engine control unit SSANGYONG KORANDO 1997 Service Owner's Manual
[x] Cancel search | Manufacturer: SSANGYONG, Model Year: 1997, Model line: KORANDO, Model: SSANGYONG KORANDO 1997Pages: 2053, PDF Size: 88.33 MB
Page 796 of 2053
OM600 ENGINE CONTROLS 1F3 -- 39
D AEW OO M Y_2000
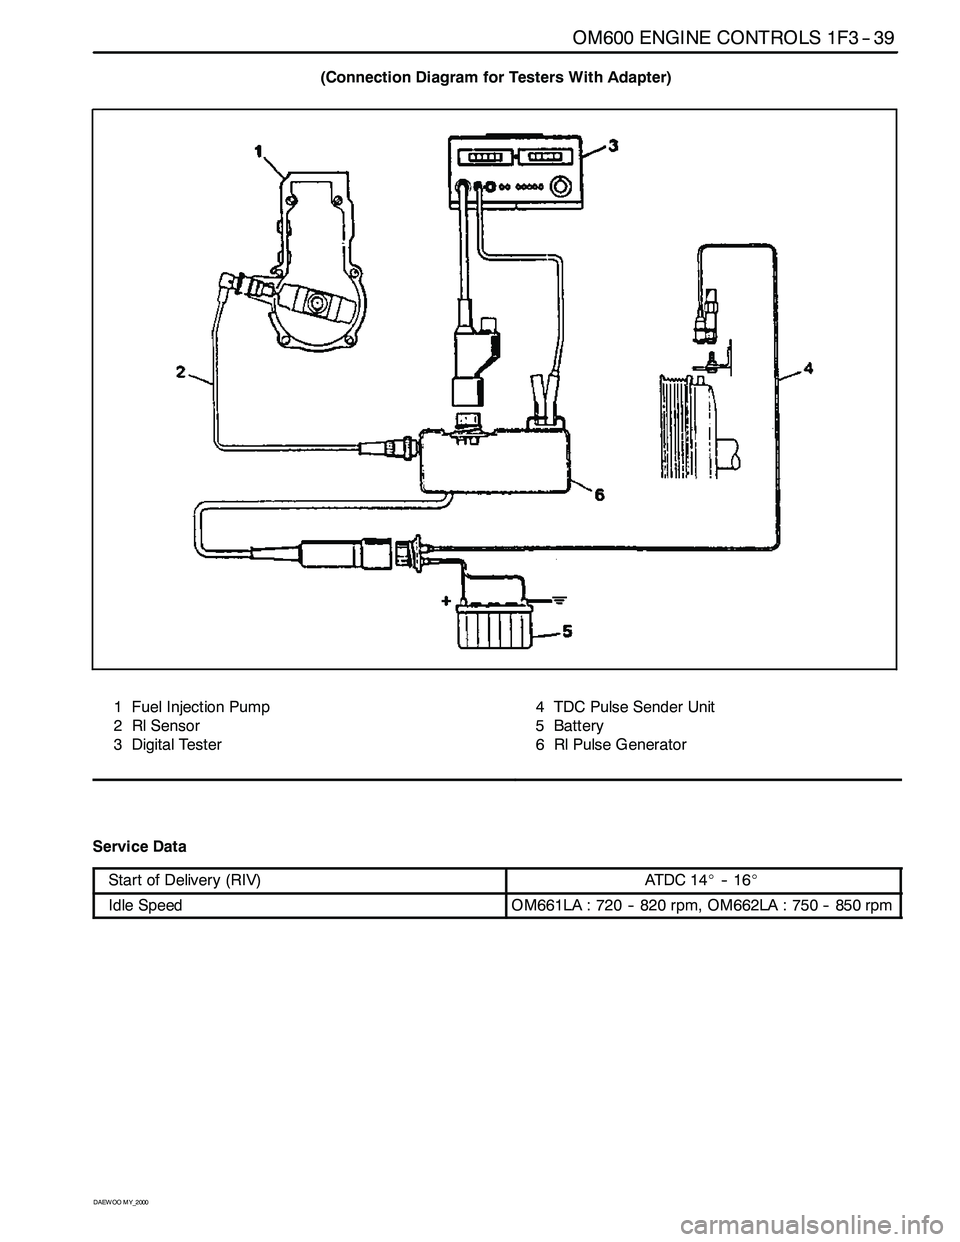
(Connection Diagram for Testers With Adapter)
1 Fuel Injection Pump
2 Rl Sensor
3 Digital Tester4 TDC Pulse Sender Unit
5 Battery
6 Rl Pulse Generator
Service Data
Start of Delivery (RIV)AT DC 1 4_-- 1 6_
Idle SpeedOM661LA : 720 -- 820 rpm, OM662LA : 750 -- 850 rpm
Page 797 of 2053
1F3 -- 40 OM600 ENGINE CONTROLS
D AEW OO M Y_2000
Tools Required
617 589 09 21 00 Rl Sensor
617589102100 TimingTester
667589002100 TDCPulseGenerator
Commercial Tools
ItemTools
Digigal TesterWith Pulse GeneratorBosch, MOT 001.03gg
Hartmann & Braun, EOMT3
Without Pulse GeneratorBosch, ETD 019.00
Sun, DIT 9000
ALV, Diesel -- Tester 875
Test Procedure
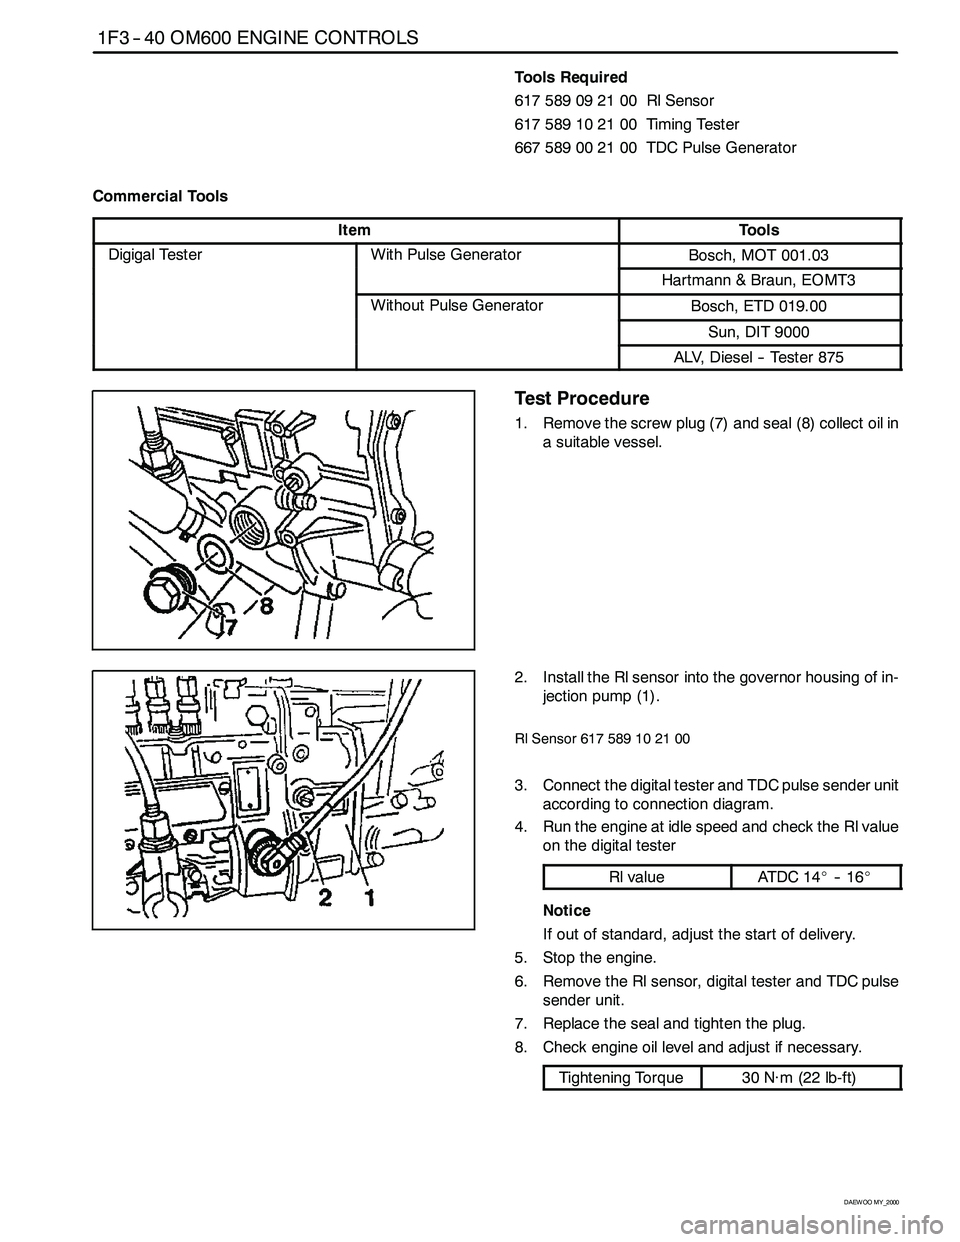
1. Remove the screw plug (7) and seal (8) collect oil in
a suitable vessel.
2. Install the Rl sensor into the governor housing of in-
jection pump (1).
Rl Sensor 617 589 10 21 00
3. Connect the digital tester and TDC pulse sender unit
according to connection diagram.
4. Run the engine at idle speed and check the Rl value
on the digital tester
Rl valueAT DC 1 4_-- 1 6_
Notice
If out of standard, adjust the start of delivery.
5. Stop the engine.
6. Remove the Rl sensor, digital tester and TDC pulse
sender unit.
7. Replace the seal and tighten the plug.
8. Check engine oil level and adjust if necessary.
Tightening Torque30 N∙m (22 lb-ft)
Page 808 of 2053
OM600 ENGINE CONTROLS 1F3 -- 5
D AEW OO M Y_2000
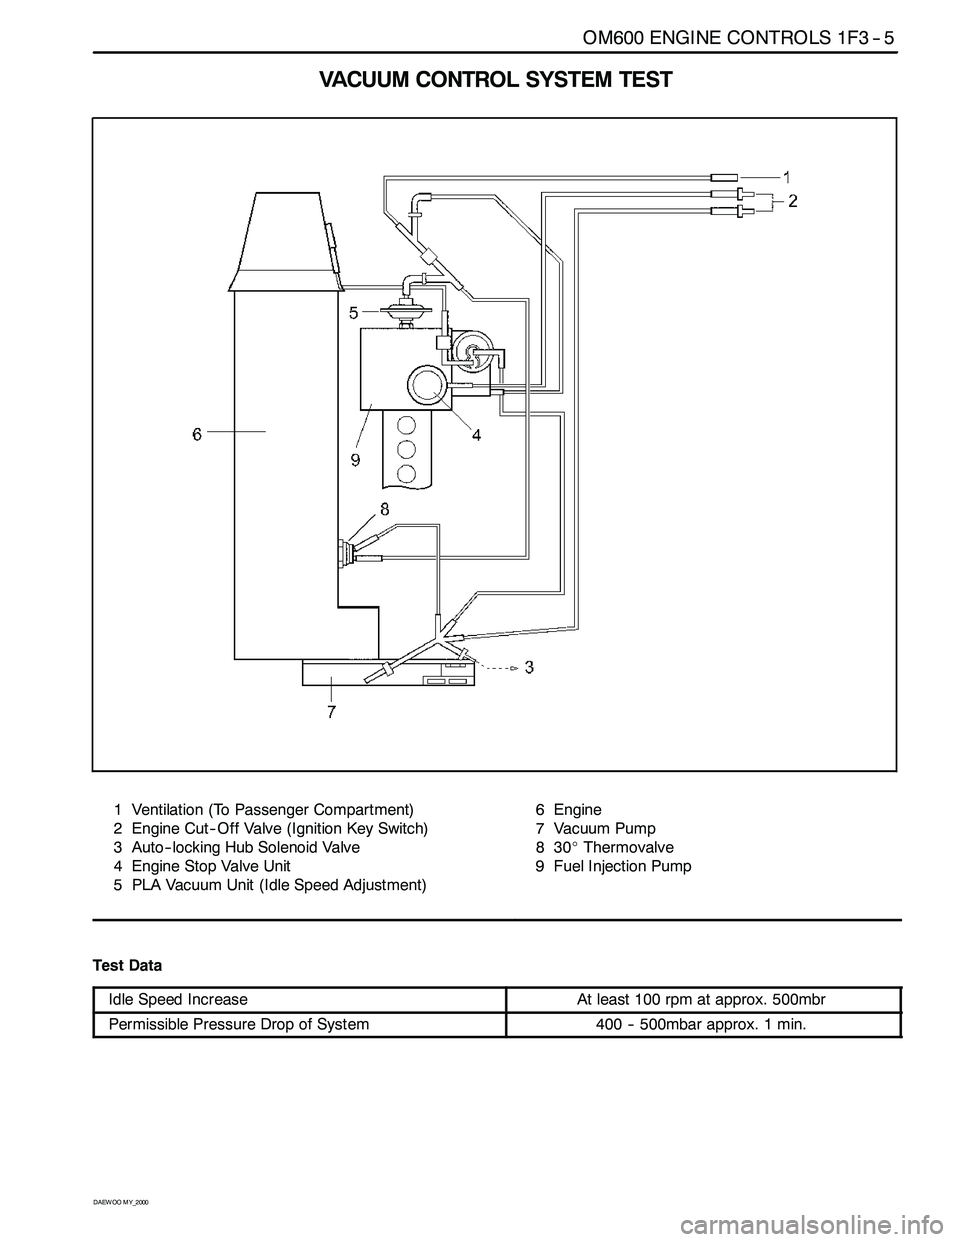
VACUUM CONTROLSYSTEM TEST
1 Ventilation (To Passenger Compartment)
2 Engine Cut -- Off Valve (Ignition Key Switch)
3 Auto-- locking Hub Solenoid Valve
4 Engine Stop Valve Unit
5 PLA Vacuum Unit (Idle Speed Adjustment)6Engine
7 Vacuum Pump
830_Thermovalve
9 Fuel Injection Pump
Test Data
Idle Speed IncreaseAt least 100 rpm at approx. 500mbr
Permissible Pressure Drop of System400 -- 500mbar approx. 1 min.
Page 809 of 2053
1F3 -- 6 OM600 ENGINE CONTROLS
D AEW OO M Y_2000
Tools Required
001 589 73 21 00 Vacuum Pump
201 589 13 21 00 Vacuum Tester
667 589 00 21 00 TDC pulse generator
Commercial Tools
Digital testere.g. Bosch MOT 001.03
Sun DIT 9000
Temperature measuring instrument with test probe
WB24e.g. Ahlborn, Therm 2263 -- 2
Eichenfeldstrabe 1 -- 3
D-- 8150 Holzkirchen
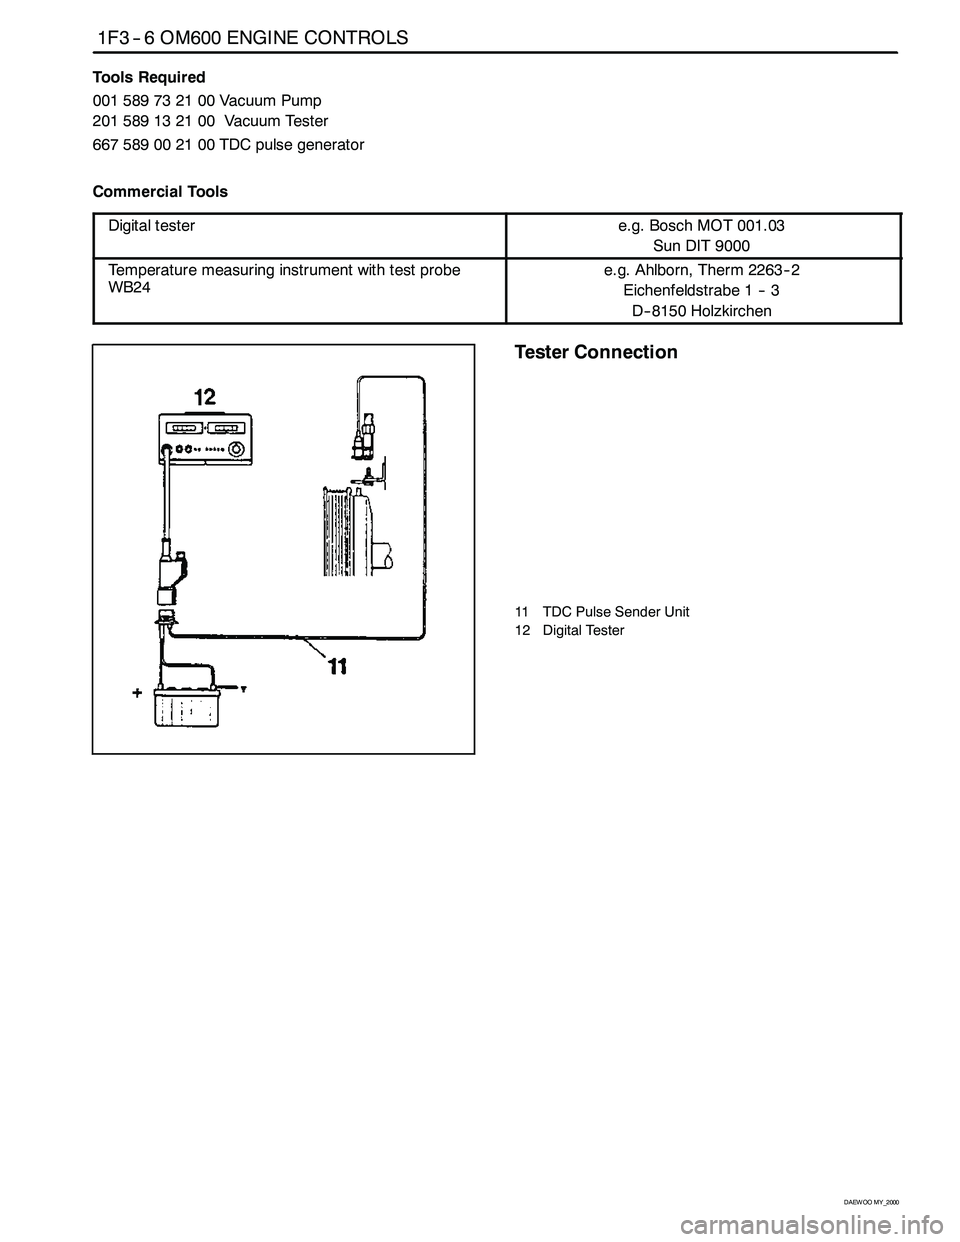
Tester Connection
11 TDC Pulse Sender Unit
12 Digital Tester
Page 810 of 2053
OM600 ENGINE CONTROLS 1F3 -- 7
D AEW OO M Y_2000
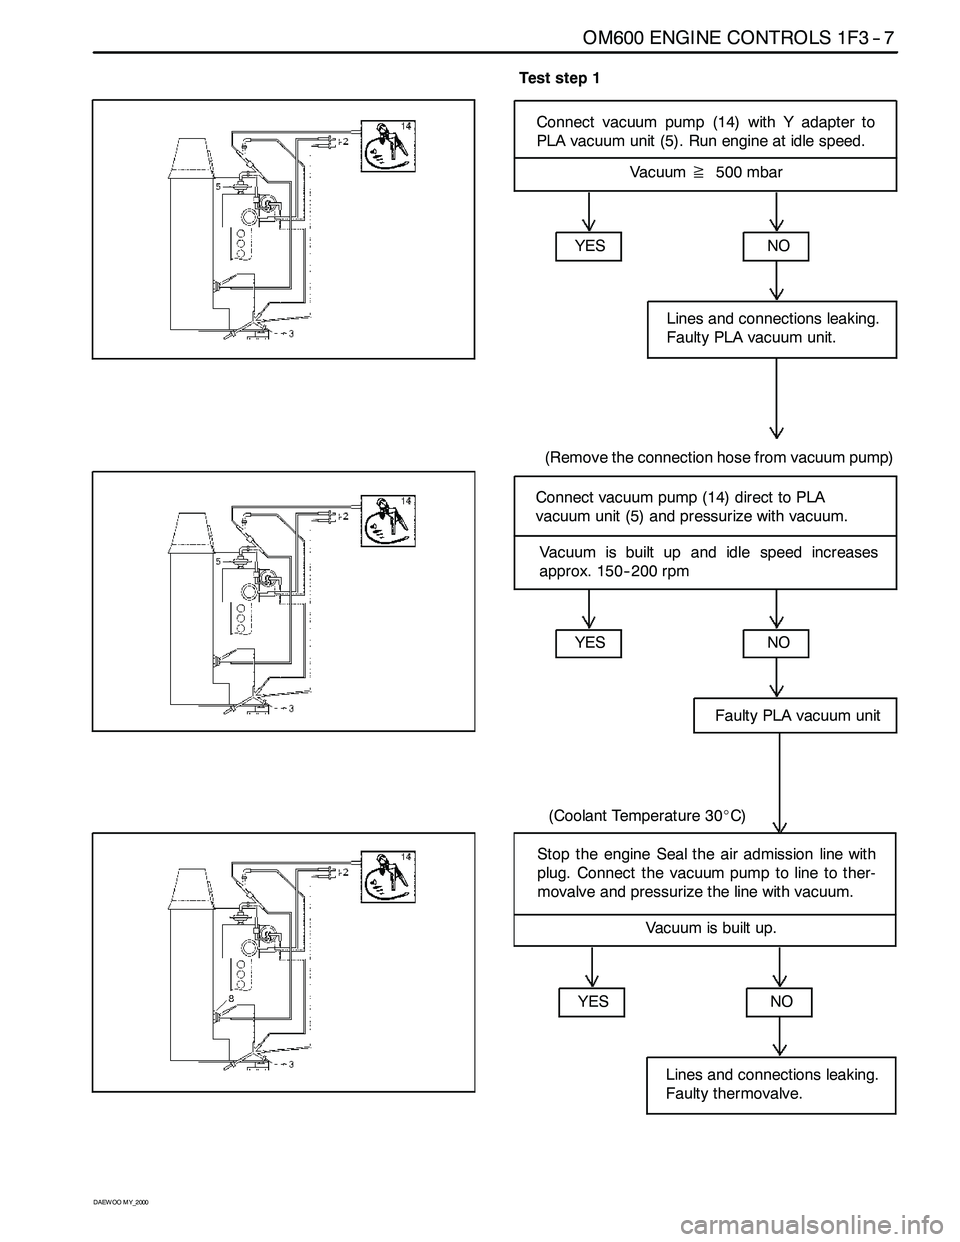
Test step 1
Connect vacuum pump (14) with Y adapter to
PLA vacuum unit (5). Run engine at idle speed.
Vacuum≧500 mbar
YES
NO
Faulty PLA vacuum unit
(Coolant Temperature 30_C)
Connect vacuum pump (14) direct to PLA
vacuum unit (5) and pressurize with vacuum.
YES
NO
Lines and connections leaking.
Faulty PLA vacuum unit.
(Remove the connection hose from vacuum pump)
Vacuum is built up and idle speed increases
approx. 150-- 200 rpm
YESNO
Lines and connections leaking.
Faulty thermovalve.
Stop the engine Seal the air admission line with
plug. Connect the vacuum pump to line to ther-
movalve and pressurize the line with vacuum.
Vacuum is built up.
Page 812 of 2053
OM600 ENGINE CONTROLS 1F3 -- 9
D AEW OO M Y_2000
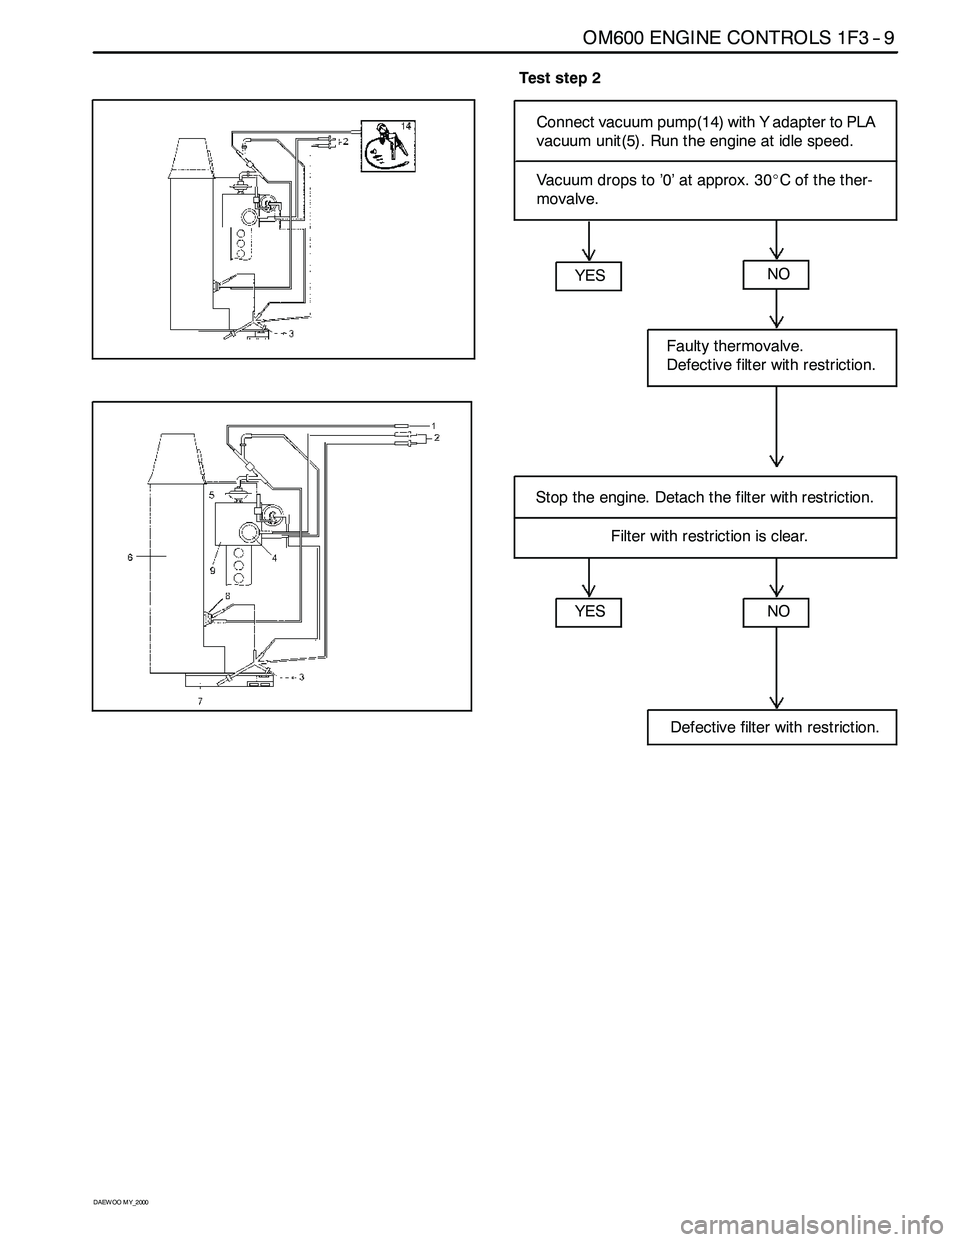
Test step 2
Connect vacuum pump(14) with Y adapter to PLA
vacuum unit(5). Run the engine at idle speed.
Vacuum drops to ’0’ at approx. 30_C of the ther-
movalve.
YES
NO
Defective filter with restriction.
Stop the engine. Detach the filter with restriction.
YES
NO
Faulty thermovalve.
Defective filter with restriction.
Filter with restriction is clear.
Page 1095 of 2053
SECTION 5A
AUTOMATIC TRANSMISSION
CAUTION: Disconnect the negative battery cable before removing or installing any electrical unit or when a
tool or equipment could easily come in contact with exposed electrical terminals. Disconnecting this cable
will help prevent personal injury and damage to the vehicle. The ignition must also be in LOCK unless
otherwise noted.
TABLE OF CONTENTS
Description and Operation . . . . . . . . . . . . . . . . . 5A-2
BTRA M74 4WD Automatic Transmission . . . . . . 5A-2
Operators Interfaces . . . . . . . . . . . . . . . . . . . . . 5A-2
Control Systems . . . . . . . . . . . . . . . . . . . . . . . . 5A-3
Electronic Control System . . . . . . . . . . . . . . . . . 5A-3
Hydraulic Control System . . . . . . . . . . . . . . . . . . 5A-9
Hydraulic Control Circuit . . . . . . . . . . . . . . . . . . 5A-10
Power Train System . . . . . . . . . . . . . . . . . . . . . 5A-14
Power Flows . . . . . . . . . . . . . . . . . . . . . . . . . . 5A-18
Park and Neutral . . . . . . . . . . . . . . . . . . . . . . . 5A-20
Reverse . . . . . . . . . . . . . . . . . . . . . . . . . . . . . . 5A-22
Manual 1 . . . . . . . . . . . . . . . . . . . . . . . . . . . . . 5A-24
Drive 1 . . . . . . . . . . . . . . . . . . . . . . . . . . . . . . 5A-26
Drive 2 and Manual 2 . . . . . . . . . . . . . . . . . . . . 5A-28
Drive 3 and Manual 3 . . . . . . . . . . . . . . . . . . . . 5A-30
Drive 3 Lock Up and Manual 3 Lock Up . . . . . . 5A-32
Drive 4 (Overdrive) . . . . . . . . . . . . . . . . . . . . . 5A-34
Drive 4 Lock Up . . . . . . . . . . . . . . . . . . . . . . . . 5A-36
Diagnostic Information and Procedures . . . . . 5A-38
Diagnosis . . . . . . . . . . . . . . . . . . . . . . . . . . . . . 5A-38
Basic Knowledge Required . . . . . . . . . . . . . . . 5A-38
Functional Check Procedure . . . . . . . . . . . . . . . 5A-38
Transmission Fluid Level Service Procedure . . . 5A-38
Fluid Leak Diagnosis and Repair . . . . . . . . . . . 5A-39
Electrical / Garage Shift Test . . . . . . . . . . . . . . 5A-40
Road Test Procedure . . . . . . . . . . . . . . . . . . . . 5A-40
Electronic Adjustments . . . . . . . . . . . . . . . . . . 5A-40
Symptom Diagnosis . . . . . . . . . . . . . . . . . . . . . 5A-41
Drive Faults . . . . . . . . . . . . . . . . . . . . . . . . . . . 5A-41
Faulty Shift Pattern . . . . . . . . . . . . . . . . . . . . . . 5A-42Shift Quality Faults . . . . . . . . . . . . . . . . . . . . . . 5A-44
After Teardown Faults . . . . . . . . . . . . . . . . . . . 5A-46
Trouble Code Diagnosis - Gasoline Vehicle . . 5A-48
TCM Diagnostic System Overview . . . . . . . . . . 5A-48
Clearing Trouble Codes . . . . . . . . . . . . . . . . . . 5A-48
Diagnostic Trouble Codes . . . . . . . . . . . . . . . . 5A-48
Trouble Code Diagnosis - Diesel Vehicle . . . . . 5A-50
TCM Diagnostic System Overview . . . . . . . . . . 5A-50
Clearing Trouble Codes . . . . . . . . . . . . . . . . . . 5A-50
Diagnostic Trouble Codes . . . . . . . . . . . . . . . . 5A-50
Repair Instructions . . . . . . . . . . . . . . . . . . . . . . 5A-157
On-Vehicle Service . . . . . . . . . . . . . . . . . . . . . . . 5A-157
Transmission . . . . . . . . . . . . . . . . . . . . . . . . . . 5A-157
Unit Repair . . . . . . . . . . . . . . . . . . . . . . . . . . . . 5A-160
Rebuild Warnings . . . . . . . . . . . . . . . . . . . . . . 5A-160
Disassembly Procedure . . . . . . . . . . . . . . . . . . 5A-161
Assembly Procedure . . . . . . . . . . . . . . . . . . . . 5A-171
Front and Rear Band Adjustment . . . . . . . . . . . 5A-199
Gear Shift Control Lever . . . . . . . . . . . . . . . . . . 5A-202
Kickdown Switch . . . . . . . . . . . . . . . . . . . . . . . 5A-202
Specifications . . . . . . . . . . . . . . . . . . . . . . . . . . 5A-203
General Specification . . . . . . . . . . . . . . . . . . . . 5A-203
Fastener Tightening Specifications . . . . . . . . . . 5A-205
Schematic and Routing Diagrams . . . . . . . . . . 5A-206
TCM Wiring Diagrams (Gasoline Engine) . . . . . 5A-206
TCM Wiring Diagrams (Diesel Engine) . . . . . . . 5A-208
Connector End View . . . . . . . . . . . . . . . . . . . . . 5A-210
Special Tools and Equipment . . . . . . . . . . . . . 5A-211
Special Tools Table . . . . . . . . . . . . . . . . . . . . . 5A-211
Page 1096 of 2053
5A-2 AUTOMATIC TRANSMISSION
SSANGYONG MY2002
OPERATORS INTERFACES
There are three operator interfaces as the following;
•Gear Shift Control Lever
Driving Mode Selector
Indicator Light
Gear Shift Control lever
The transmission uses a conventional shift control lever.
The gear shift control lever can be moved from one
position to another within the staggered configuration
of the shift control lever gate to positively indicate the
gear selection.
DESCRIPTION AND OPERATION
BTRA M74 4WD AUTOMATIC
TRANSMISSION
The BTR Automotive Model 74 Four Speed Automatic
Transmission is an electronically controlled overdrive
four speed unit with a lock-up torque converter. The
lock-up torque converter results in lower engine speeds
at cruise and eliminates unnecessary slippage. These
features benefit the customer through improved fuel
economy and noise reduction.Of primary significance is the Transmission Control Mo-
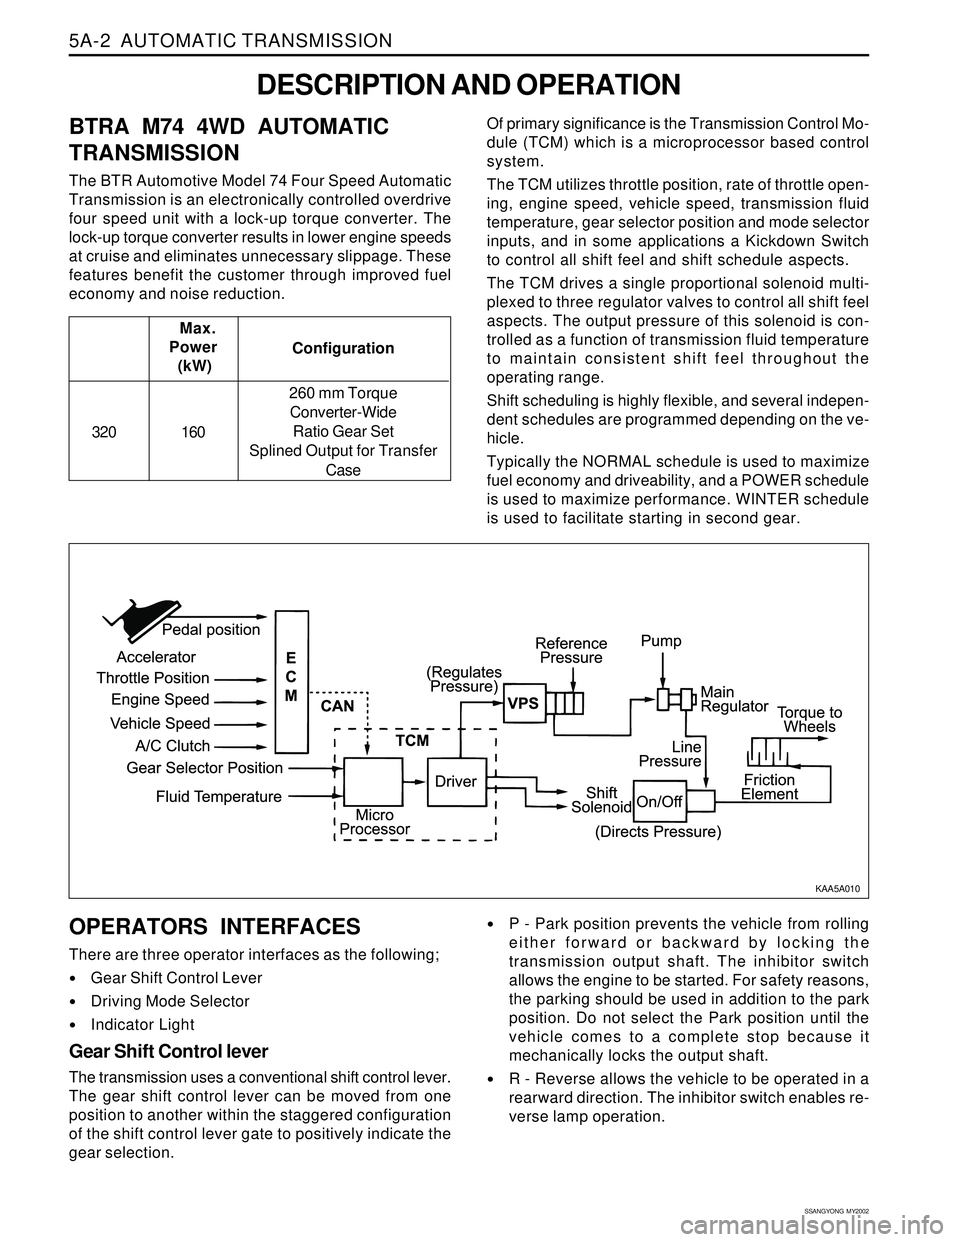
dule (TCM) which is a microprocessor based control
system.
The TCM utilizes throttle position, rate of throttle open-
ing, engine speed, vehicle speed, transmission fluid
temperature, gear selector position and mode selector
inputs, and in some applications a Kickdown Switch
to control all shift feel and shift schedule aspects.
The TCM drives a single proportional solenoid multi-
plexed to three regulator valves to control all shift feel
aspects. The output pressure of this solenoid is con-
trolled as a function of transmission fluid temperature
to maintain consistent shift feel throughout the
operating range.
Shift scheduling is highly flexible, and several indepen-
dent schedules are programmed depending on the ve-
hicle.
Typically the NORMAL schedule is used to maximize
fuel economy and driveability, and a POWER schedule
is used to maximize performance. WINTER schedule
is used to facilitate starting in second gear. Configuration Max.
Power
(kW)
320 160260 mm Torque
Converter-Wide
Ratio Gear Set
Splined Output for Transfer
Case
P - Park position prevents the vehicle from rolling
either forward or backward by locking the
transmission output shaft. The inhibitor switch
allows the engine to be started. For safety reasons,
the parking should be used in addition to the park
position. Do not select the Park position until the
vehicle comes to a complete stop because it
mechanically locks the output shaft.
R - Reverse allows the vehicle to be operated in a
rearward direction. The inhibitor switch enables re-
verse lamp operation.
KAA5A010
Page 1255 of 2053
5A-160 AUTOMATIC TRANSMISSION
SSANGYONG MY2002
UNIT REPAIR
REBUILD WARNINGS
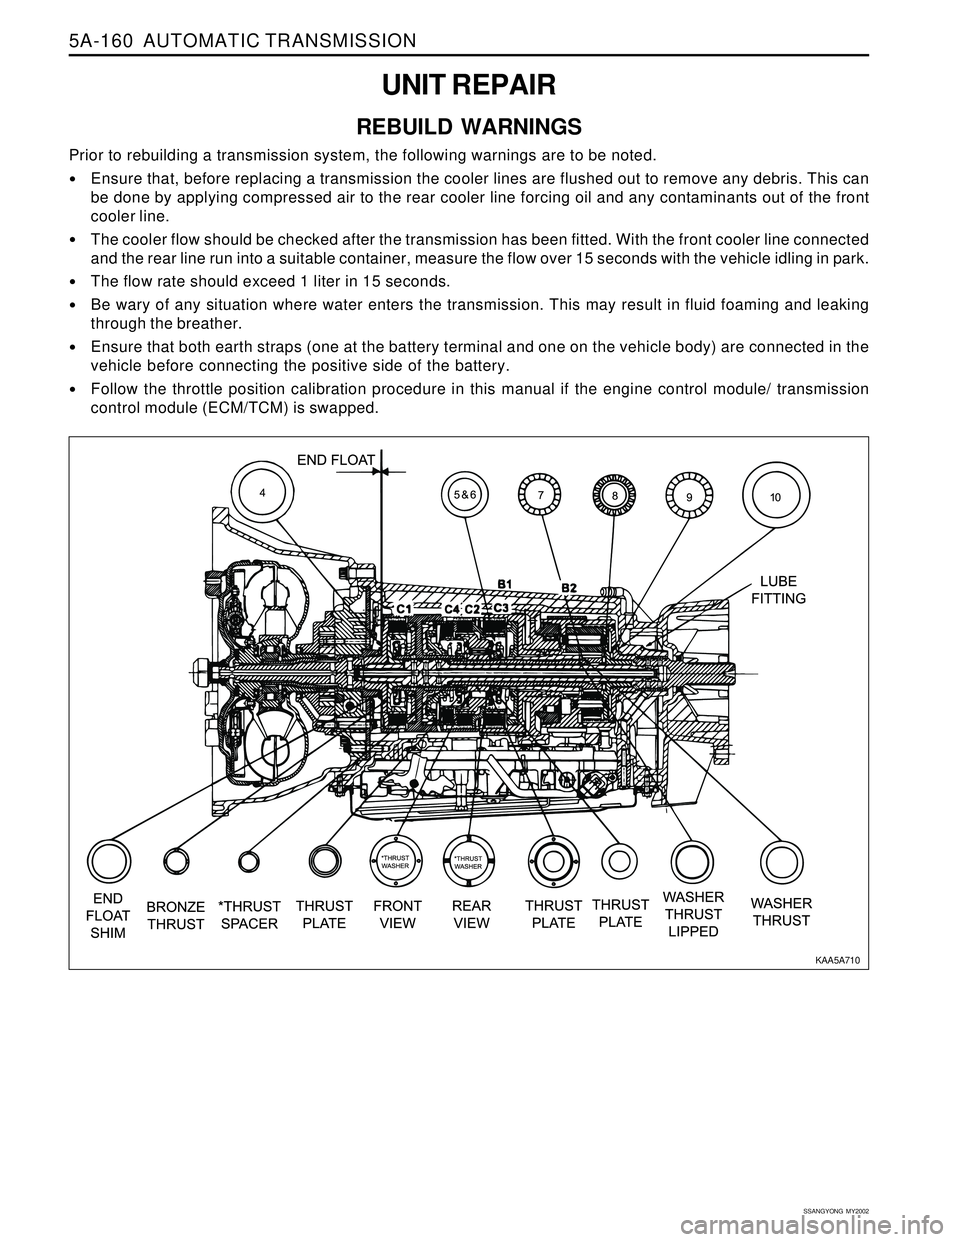
Prior to rebuilding a transmission system, the following warnings are to be noted.
Ensure that, before replacing a transmission the cooler lines are flushed out to remove any debris. This can
be done by applying compressed air to the rear cooler line forcing oil and any contaminants out of the front
cooler line.
The cooler flow should be checked after the transmission has been fitted. With the front cooler line connected
and the rear line run into a suitable container, measure the flow over 15 seconds with the vehicle idling in park.
The flow rate should exceed 1 liter in 15 seconds.
Be wary of any situation where water enters the transmission. This may result in fluid foaming and leaking
through the breather.
Ensure that both earth straps (one at the battery terminal and one on the vehicle body) are connected in the
vehicle before connecting the positive side of the battery.
Follow the throttle position calibration procedure in this manual if the engine control module/ transmission
control module (ECM/TCM) is swapped.
KAA5A710
Page 1389 of 2053
TRANSFER CASE 5D1-67
SSANGYONG MY2002
KAA5D260
KAA5D270
TRANSFER CASE CONTROL UNIT
(TCCU)
Removal and Installation Procedure
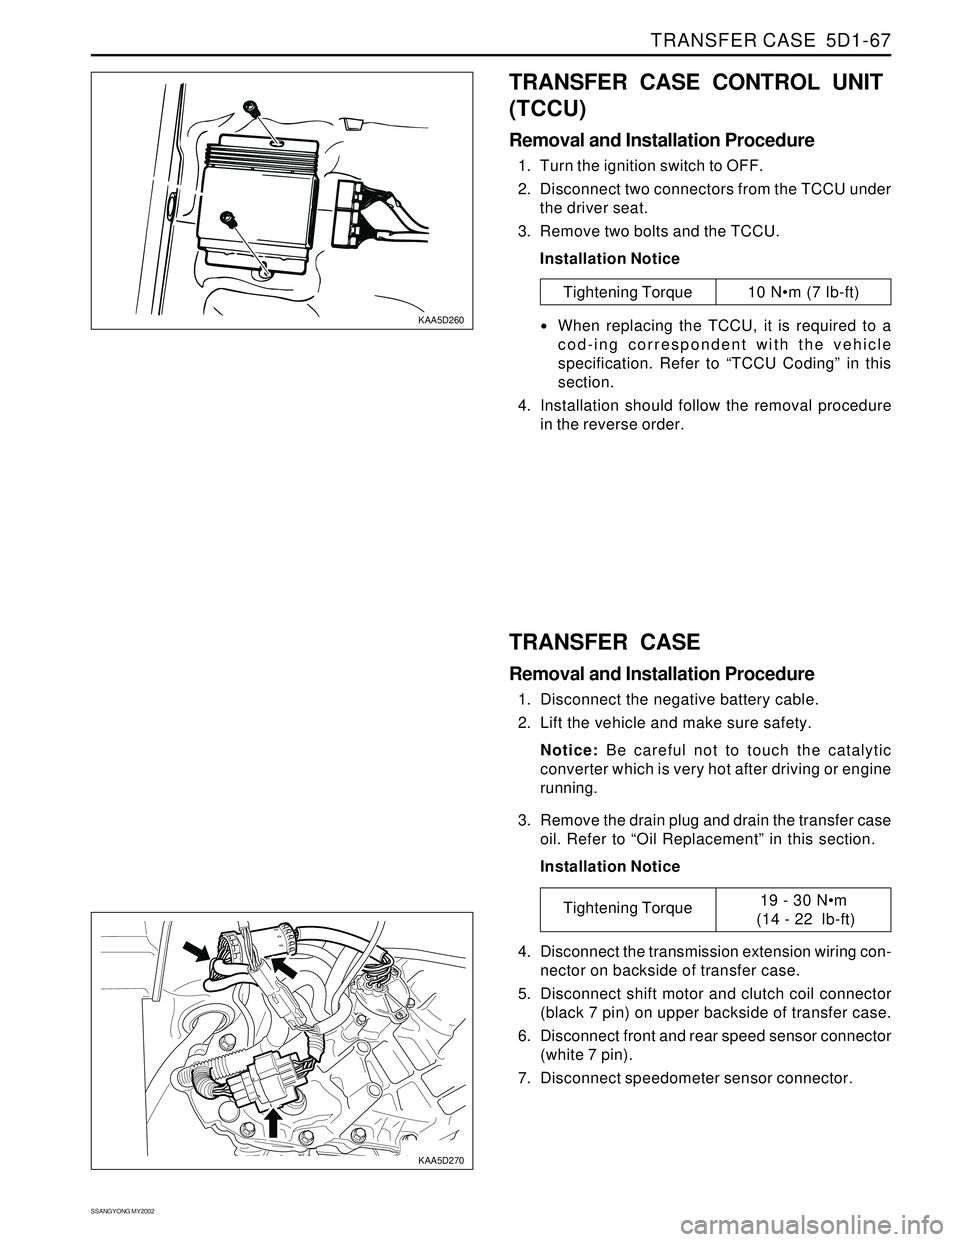
1. Turn the ignition switch to OFF.
2. Disconnect two connectors from the TCCU under
the driver seat.
3. Remove two bolts and the TCCU.
Installation Notice
Tightening Torque 10 Nm (7 lb-ft)
When replacing the TCCU, it is required to a
cod-ing correspondent with the vehicle
specification. Refer to “TCCU Coding” in this
section.
4. Installation should follow the removal procedure
in the reverse order.
TRANSFER CASE
Removal and Installation Procedure
1. Disconnect the negative battery cable.
2. Lift the vehicle and make sure safety.
Notice: Be careful not to touch the catalytic
converter which is very hot after driving or engine
running.
3. Remove the drain plug and drain the transfer case
oil. Refer to “Oil Replacement” in this section.
Installation Notice
4. Disconnect the transmission extension wiring con-
nector on backside of transfer case.
5. Disconnect shift motor and clutch coil connector
(black 7 pin) on upper backside of transfer case.
6. Disconnect front and rear speed sensor connector
(white 7 pin).
7. Disconnect speedometer sensor connector.
Tightening Torque19 - 30 Nm
(14 - 22 lb-ft)