tailgate SSANGYONG KORANDO 1997 Service Repair Manual
[x] Cancel search | Manufacturer: SSANGYONG, Model Year: 1997, Model line: KORANDO, Model: SSANGYONG KORANDO 1997Pages: 2053, PDF Size: 88.33 MB
Page 1715 of 2053

WIPER, WASHER SYSTEMS 9D-7
SSANGYONG MY2002
KAA9D120
KAA9D130
REAR WIPER MOTOR
Removal and Installation Procedure
1. Remove the tailgate trim panel. Refer to Section
9G “INTERIOR TRIM”.
2. Remove the tailgate seal trim.
3. Remove the wiper motor.
Installation Notice
Dissimilar metals in direct contact with each
other may corrode rapidly. Make sure to use
the correct fasteners to prevent premature
corrosion.
4. Installation should follow the removal procedure
in the reverse order.
Tightening Torque8 - 12 Nm
(71 - 106 lb-in)
KAA9D140
REAR WASHER RESERVOIR
Removal and Installation Procedure
1. Remove the tailgate trim panel. Refer to Section
9G “INTERIOR TRIM”.
2. Remove the tailgate seal trim.
3. Disconnect the washer hose and electrical
connector.
4. Remove the rear washer reservoir.
Installation Notice
Dissimilar metals in direct contact with each
other may corrode rapidly. Make sure to use
the correct fasteners to prevent premature
corrosion.
5. Installation should follow the removal procedure
in the reverse order.
Tightening Torque8 - 12 Nm
(71 - 106 lb-in)
Page 1788 of 2053

SSANGYONG MY2002
9L-6 GLASS AND MIRRORS
KAA9L080
KAA9L090
KAA9L100
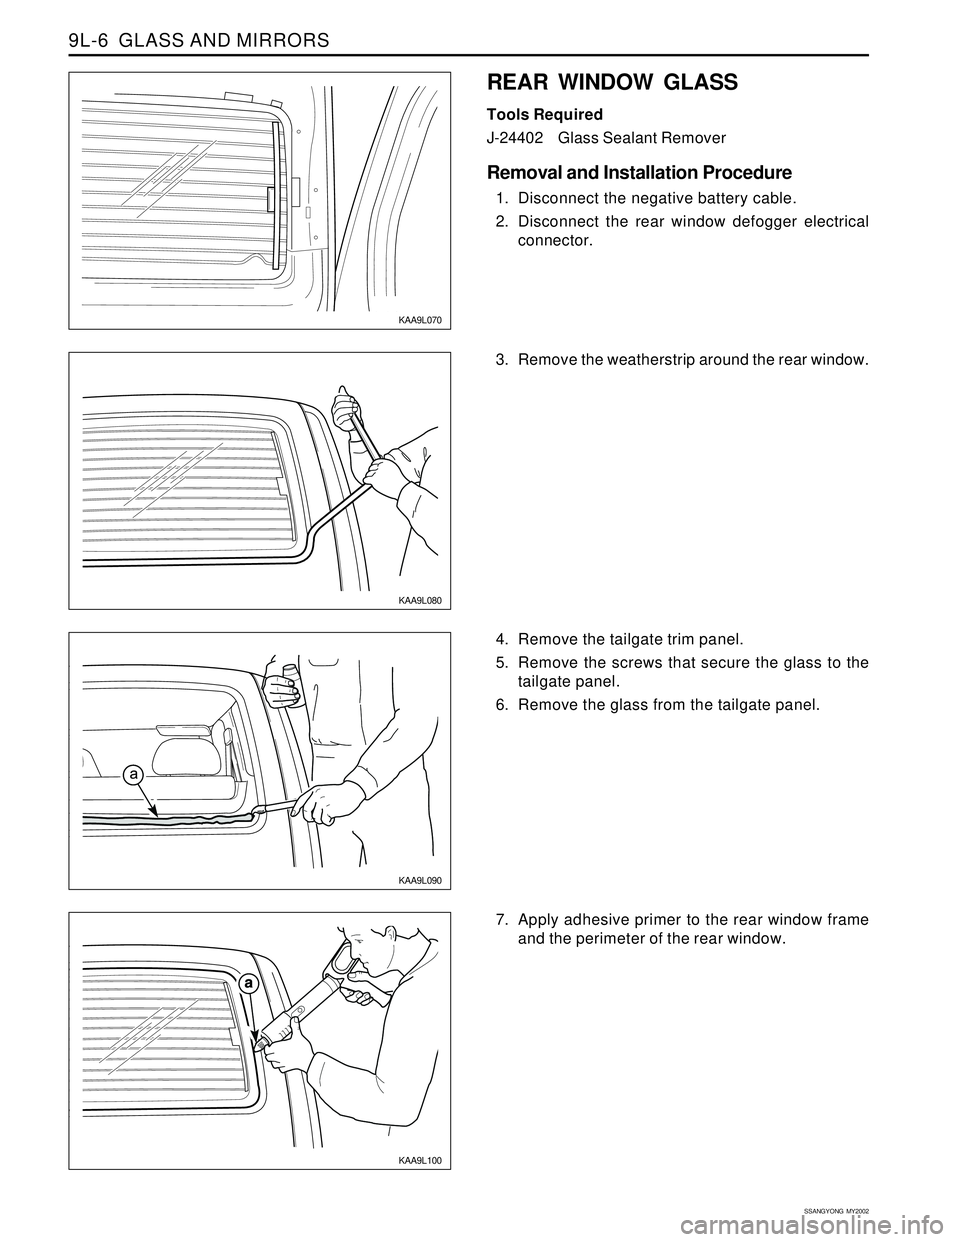
3. Remove the weatherstrip around the rear window.
7. Apply adhesive primer to the rear window frame
and the perimeter of the rear window.
KAA9L070
REAR WINDOW GLASS
Tools Required
J-24402Glass Sealant Remover
Removal and Installation Procedure
1. Disconnect the negative battery cable.
2. Disconnect the rear window defogger electrical
connector.
4. Remove the tailgate trim panel.
5. Remove the screws that secure the glass to the
tailgate panel.
6. Remove the glass from the tailgate panel.
Page 1798 of 2053

EXTERIOR TRIM 9M-3
SSANGYONG MY2002
COMPONENTS LOCATOR
EXTERIOR TRIM
1 Rivet
2 B Pillar Cover
3 Air Extractor Grill
4 Air Extractor Grill Tape
5 Door Molding
6 Front Wheel Arch Molding
7 Rear Wheel Arch Molding
8 Side Step
9 Side Step Upper Cover
10 Bolt
11 Wheel Arch Clip12 Garnish Clip
13 Garnish Clip
14 Door Molding Clip
15 Door Molding Clip
16 Clip
17 “C” Pillar Cover
18 Clip
19 Tailgate Garnish
20 Roof Molding
21 Roof Molding Endcap
22 Clip
KAA9M010
Page 1801 of 2053

SSANGYONG MY2002
9M-6 EXTERIOR TRIM
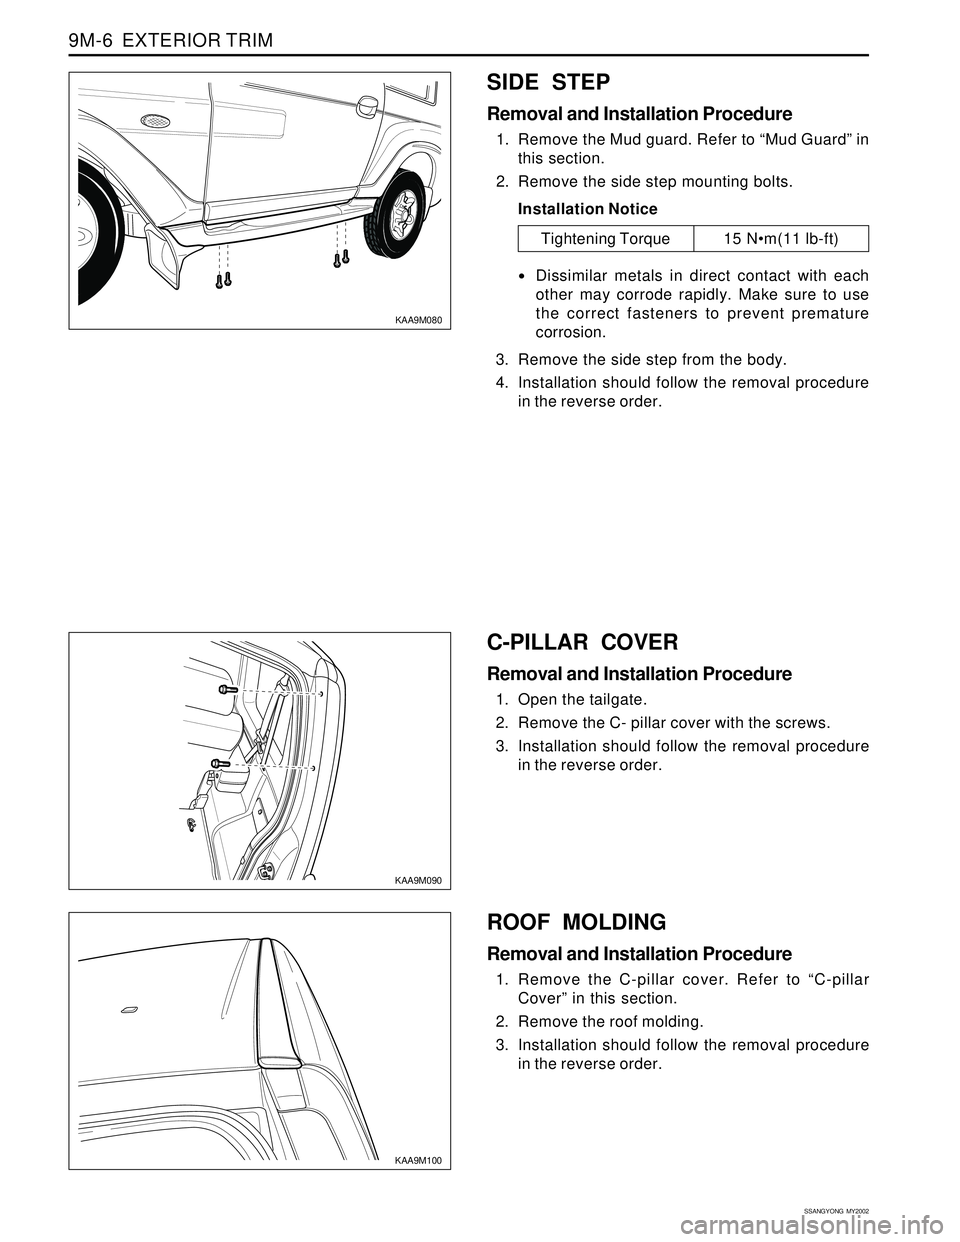
KAA9M090
KAA9M100
C-PILLAR COVER
Removal and Installation Procedure
1. Open the tailgate.
2. Remove the C- pillar cover with the screws.
3. Installation should follow the removal procedure
in the reverse order. 3. Remove the side step from the body.
4. Installation should follow the removal procedure
in the reverse order.
ROOF MOLDING
Removal and Installation Procedure
1. Remove the C-pillar cover. Refer to “C-pillar
Cover” in this section.
2. Remove the roof molding.
3. Installation should follow the removal procedure
in the reverse order.
SIDE STEP
Removal and Installation Procedure
1. Remove the Mud guard. Refer to “Mud Guard” in
this section.
2. Remove the side step mounting bolts.
Installation Notice
Dissimilar metals in direct contact with each
other may corrode rapidly. Make sure to use
the correct fasteners to prevent premature
corrosion.
KAA9M080
Tightening Torque 15 Nm(11 lb-ft)
Page 1825 of 2053

SSANGYONG MY2002
9P-8 DOORS
KAA9P100
KAA9P110
FRONT DOOR ASSEMBLY
Removal and Installation Procedure
1. Disconnect the negative battery cable.
2. Remove the door hold open link. Refer to “Door
Hold Open Link” in this section.
3. Disconnect the body to door rubber grommet and
the electrical connector.
4. With the aid of another technician, remove the bolts
and the door.
5. Installation should follow the removal procedure
in the reverse order.
TAIL GATE ASSEMBLY
Removal and Installation Procedure
1. Disconnect the negative battery cable.
2. Remove the door hold open link with the bolt.
3. Disconnect the body to tailgate rubber grommet
and the electrical connector.
4. With the aid of another technician, remove the bolts
and the door.
5. Installation should follow the removal procedure
in the reverse order.
KAA9P090
POWER WINDOW REGULATOR
Removal and Installation Procedure
1. Disconnect the battery cable.
2. Remove the door glass. Refer to Section 9L, Glass
and Mirrors.
3. Remove the nuts and the regulator.
Installation Notice
Dissimilar metals in direct contact with each
other may corrode rapidly. Make sure to use
the correct fasteners to prevent premature
corrosion.
4. Disconnect the electrical connector.
5. Installation should follow the removal procedure
in the reverse order.
Tightening Torque3.92 - 5.49 Nm
(2.92 - 4.08 lb-in)
Page 1849 of 2053

SSANGYONG MY2002
9T1-2 REMOTE KEYLESS ENTRY AND ANTI-THEFT SYSTEM
DESCRIPTION AND OPERATION
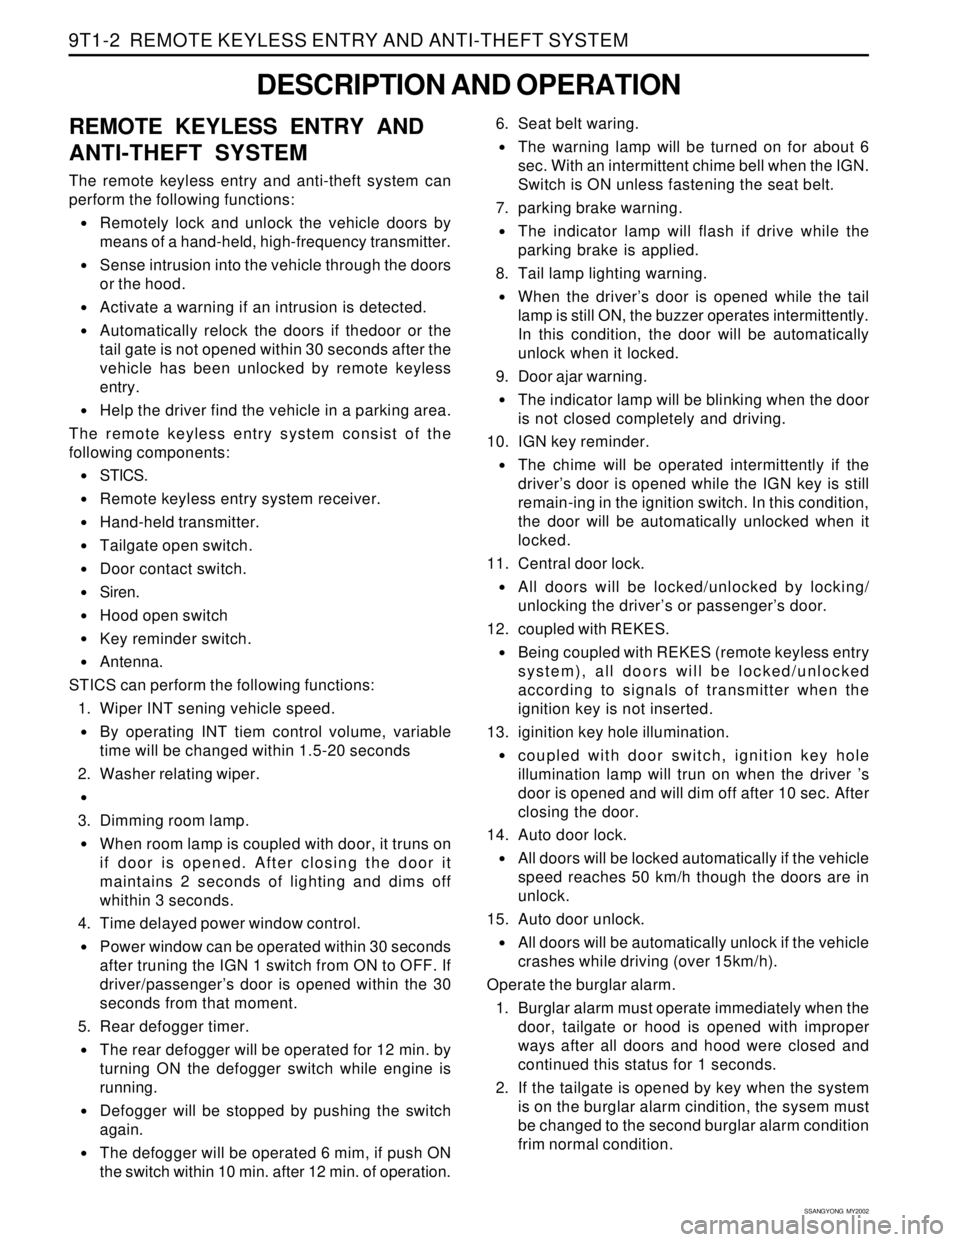
REMOTE KEYLESS ENTRY AND
ANTI-THEFT SYSTEM
The remote keyless entry and anti-theft system can
perform the following functions:
•Remotely lock and unlock the vehicle doors by
means of a hand-held, high-frequency transmitter.
Sense intrusion into the vehicle through the doors
or the hood.
Activate a warning if an intrusion is detected.
Automatically relock the doors if thedoor or the
tail gate is not opened within 30 seconds after the
vehicle has been unlocked by remote keyless
entry.
Help the driver find the vehicle in a parking area.
The remote keyless entry system consist of the
following components:
STICS.
Remote keyless entry system receiver.
Hand-held transmitter.
Tailgate open switch.
Door contact switch.
Siren.
Hood open switch
Key reminder switch.
Antenna.
STICS can perform the following functions:
1. Wiper INT sening vehicle speed.
By operating INT tiem control volume, variable
time will be changed within 1.5-20 seconds
2. Washer relating wiper.
3. Dimming room lamp.
When room lamp is coupled with door, it truns on
if door is opened. After closing the door it
maintains 2 seconds of lighting and dims off
whithin 3 seconds.
4. Time delayed power window control.
Power window can be operated within 30 seconds
after truning the IGN 1 switch from ON to OFF. If
driver/passenger’s door is opened within the 30
seconds from that moment.
5. Rear defogger timer.
The rear defogger will be operated for 12 min. by
turning ON the defogger switch while engine is
running.
Defogger will be stopped by pushing the switch
again.
The defogger will be operated 6 mim, if push ON
the switch within 10 min. after 12 min. of operation.6. Seat belt waring.
The warning lamp will be turned on for about 6
sec. With an intermittent chime bell when the IGN.
Switch is ON unless fastening the seat belt.
7. parking brake warning.
The indicator lamp will flash if drive while the
parking brake is applied.
8. Tail lamp lighting warning.
When the driver’s door is opened while the tail
lamp is still ON, the buzzer operates intermittently.
In this condition, the door will be automatically
unlock when it locked.
9. Door ajar warning.
The indicator lamp will be blinking when the door
is not closed completely and driving.
10. IGN key reminder.
The chime will be operated intermittently if the
driver’s door is opened while the IGN key is still
remain-ing in the ignition switch. In this condition,
the door will be automatically unlocked when it
locked.
11. Central door lock.
All doors will be locked/unlocked by locking/
unlocking the driver’s or passenger’s door.
12. coupled with REKES.
Being coupled with REKES (remote keyless entry
system), all doors will be locked/unlocked
according to signals of transmitter when the
ignition key is not inserted.
13. iginition key hole illumination.
coupled with door switch, ignition key hole
illumination lamp will trun on when the driver ’s
door is opened and will dim off after 10 sec. After
closing the door.
14. Auto door lock.
All doors will be locked automatically if the vehicle
speed reaches 50 km/h though the doors are in
unlock.
15. Auto door unlock.
All doors will be automatically unlock if the vehicle
crashes while driving (over 15km/h).
Operate the burglar alarm.
1. Burglar alarm must operate immediately when the
door, tailgate or hood is opened with improper
ways after all doors and hood were closed and
continued this status for 1 seconds.
2. If the tailgate is opened by key when the system
is on the burglar alarm cindition, the sysem must
be changed to the second burglar alarm condition
frim normal condition.
Page 1851 of 2053

SSANGYONG MY2002
9T1-4 REMOTE KEYLESS ENTRY AND ANTI-THEFT SYSTEM
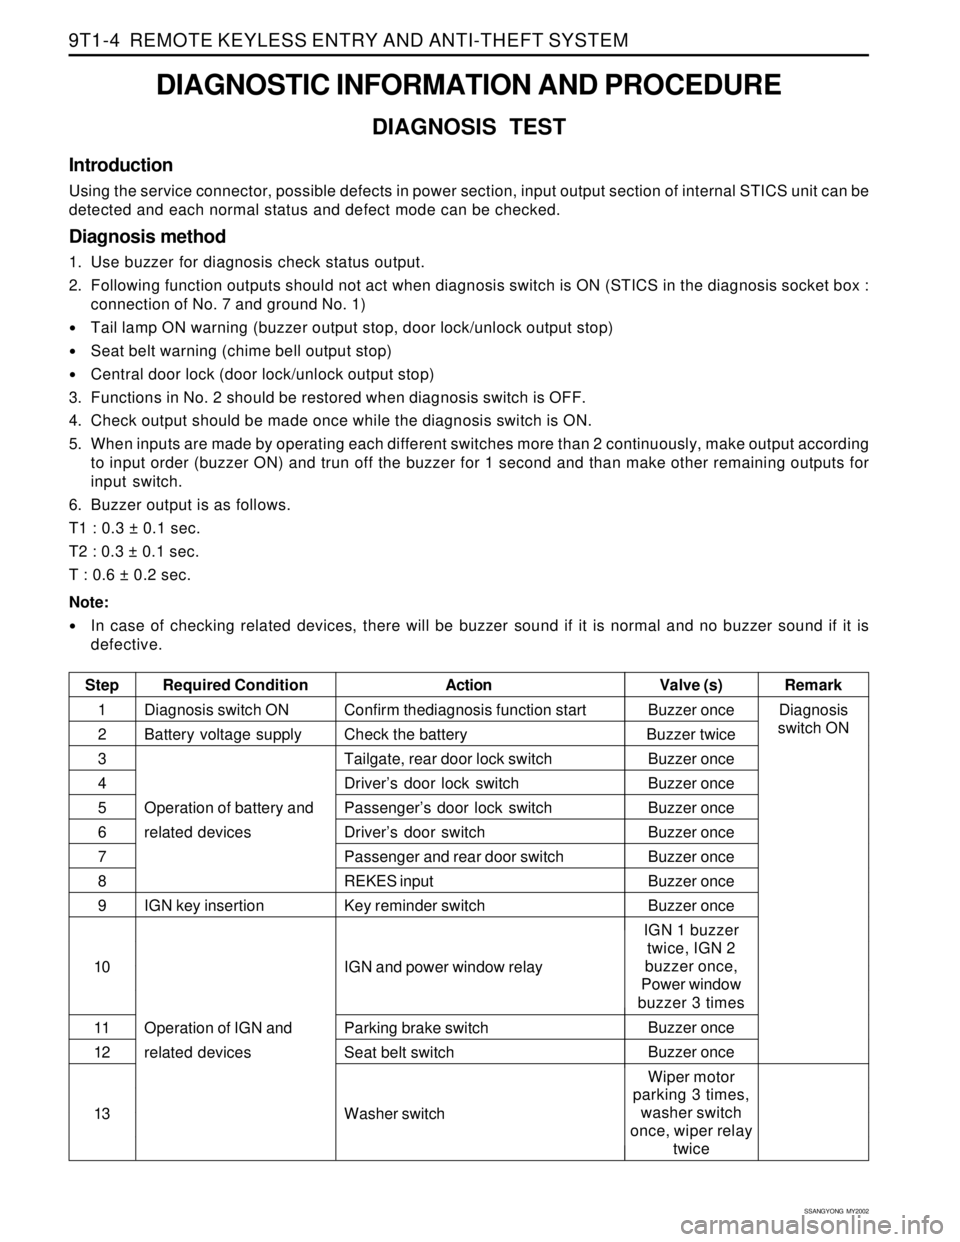
DIAGNOSTIC INFORMATION AND PROCEDURE
DIAGNOSIS TEST
Introduction
Using the service connector, possible defects in power section, input output section of internal STICS unit can be
detected and each normal status and defect mode can be checked.
Diagnosis method
1. Use buzzer for diagnosis check status output.
2. Following function outputs should not act when diagnosis switch is ON (STICS in the diagnosis socket box :
connection of No. 7 and ground No. 1)
Tail lamp ON warning (buzzer output stop, door lock/unlock output stop)
Seat belt warning (chime bell output stop)
Central door lock (door lock/unlock output stop)
3. Functions in No. 2 should be restored when diagnosis switch is OFF.
4. Check output should be made once while the diagnosis switch is ON.
5. When inputs are made by operating each different switches more than 2 continuously, make output according
to input order (buzzer ON) and trun off the buzzer for 1 second and than make other remaining outputs for
input switch.
6. Buzzer output is as follows.
T1 : 0.3 ± 0.1 sec.
T2 : 0.3 ± 0.1 sec.
T : 0.6 ± 0.2 sec.
Note:
In case of checking related devices, there will be buzzer sound if it is normal and no buzzer sound if it is
defective.
Step Required ConditionActionRemark Valve (s)
Diagnosis switch ON
Battery voltage supply
Operation of battery and
related devices
IGN key insertion
Operation of IGN and
related devicesBuzzer once
Buzzer twice
Buzzer once
Buzzer once
Buzzer once
Buzzer once
Buzzer once
Buzzer once
Buzzer once
IGN 1 buzzer
twice, IGN 2
buzzer once,
Power window
buzzer 3 times
Buzzer once
Buzzer once
Wiper motor
parking 3 times,
washer switch
once, wiper relay
twice Confirm thediagnosis function start
Check the battery
Tailgate, rear door lock switch
Driver’s door lock switch
Passenger’s door lock switch
Driver’s door switch
Passenger and rear door switch
REKES input
Key reminder switch
IGN and power window relay
Parking brake switch
Seat belt switch
Washer switch1
2
3
4
5
6
7
8
9
10
11
12
13Diagnosis
switch ON