power steering SSANGYONG MUSSO 2003 User Guide
[x] Cancel search | Manufacturer: SSANGYONG, Model Year: 2003, Model line: MUSSO, Model: SSANGYONG MUSSO 2003Pages: 1574, PDF Size: 26.41 MB
Page 56 of 1574

1B1-20 M162 ENGINE MECHANICAL Removal & Installation Procedure
1. Remove the belt pulley.Installation Notice
2. Disconnect the hydraulic pipe of the power steering pump and drain the oil.
3. Unscrew the bolts (arrows) and remove the steering pump. Installation Notice
Notice Pull the tensioning pulley clockwise as shown in the figure.
4. Remove the compressor after disconnecting the wiring connector and refrigerant pipe of A/C compressor. Notice Discharge all the refrigerant before removing the pipes.
Tightening Torque 40.5 - 49.5 Nm
Tightening Torque 22.5 - 27.5 Nm
Page 62 of 1574

1B1-26 M162 ENGINE MECHANICAL Poly V-Belt Arrangement
1 Belt Tensioning Pulley
2 Crankshaft Belt Pulley
3 A/C Compressor Pulley
4 Cooling Fan Pulley5 Alternator Pulley
6 Idler
7 Power Steering Pump Pulley
8 Cooling Fan and Water Pump Pulley
Page 153 of 1574

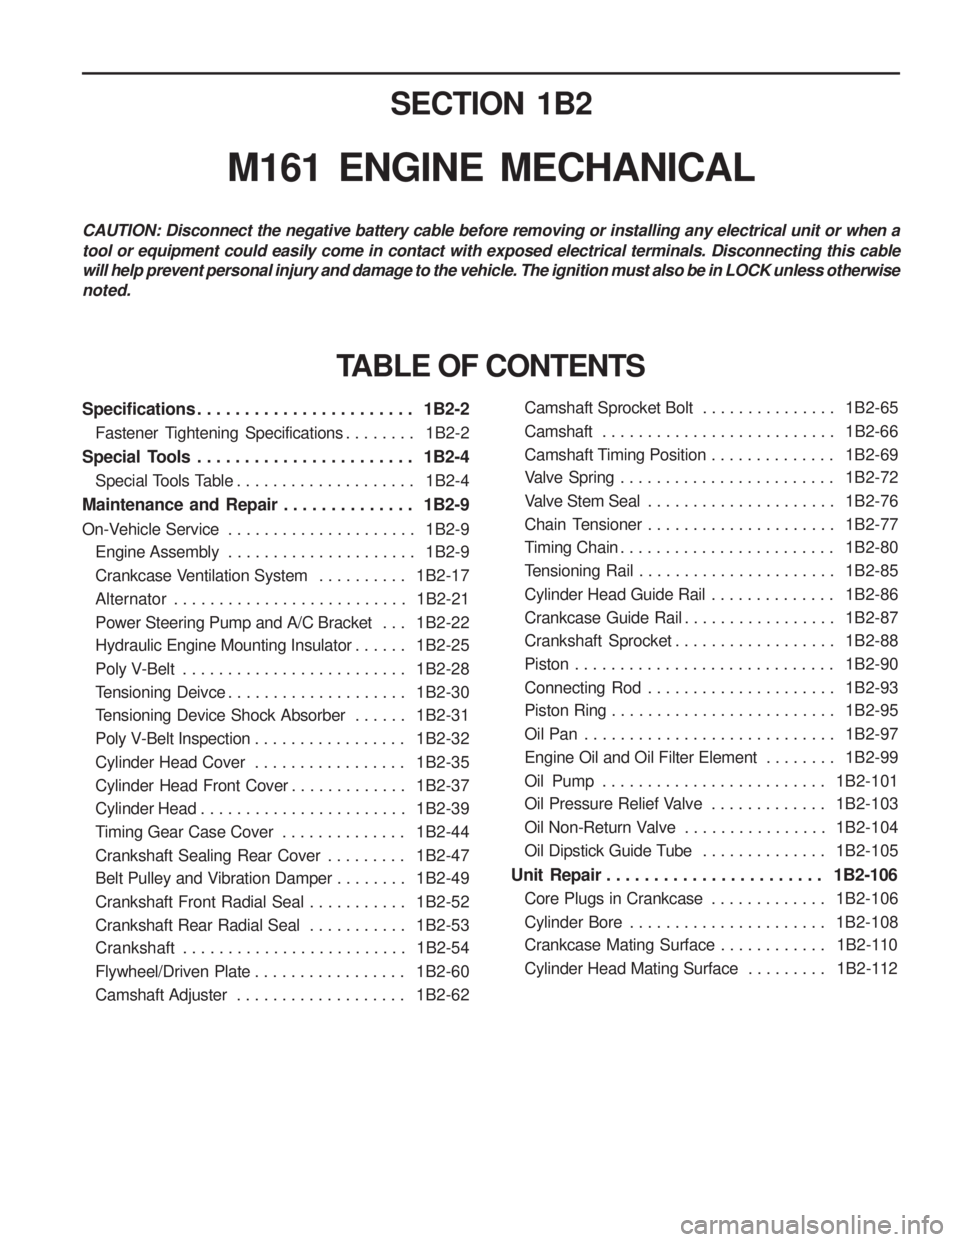
SECTION 1B2
M161 ENGINE MECHANICAL
CAUTION: Disconnect the negative battery cable before removing or installing any electrical unit or when a tool or equipment could easily come in contact with exposed electrical terminals. Disconnecting this cable will help prevent personal injury and damage to the vehicle. The ignition must also be in LOCK unless otherwisenoted.
Specifications . . . . . . . . . . . . . . . . . . . . . . . 1B2-2Fastener Tightening Specifications . . . . . . . . 1B2-2
Special Tools . . . . . . . . . . . . . . . . . . . . . . . 1B2-4 Special Tools Table . . . . . . . . . . . . . . . . . . . . 1B2-4
Maintenance and Repair . . . . . . . . . . . . . . 1B2-9
On-Vehicle Service . . . . . . . . . . . . . . . . . . . . . 1B2-9
Engine Assembly . . . . . . . . . . . . . . . . . . . . . 1B2-9
Crankcase Ventilation System . . . . . . . . . . 1B2-17
Alternator . . . . . . . . . . . . . . . . . . . . . . . . . . 1B2-21
Power Steering Pump and A/C Bracket . . . 1B2-22
Hydraulic Engine Mounting Insulator . . . . . . 1B2-25
Poly V-Belt . . . . . . . . . . . . . . . . . . . . . . . . . 1B2-28
Tensioning Deivce . . . . . . . . . . . . . . . . . . . . 1B2-30
Tensioning Device Shock Absorber . . . . . . 1B2-31
Poly V-Belt Inspection . . . . . . . . . . . . . . . . . 1B2-32
Cylinder Head Cover . . . . . . . . . . . . . . . . . 1B2-35
Cylinder Head Front Cover . . . . . . . . . . . . . 1B2-37
Cylinder Head . . . . . . . . . . . . . . . . . . . . . . . 1B2-39
Timing Gear Case Cover . . . . . . . . . . . . . . 1B2-44
Crankshaft Sealing Rear Cover . . . . . . . . . 1B2-47
Belt Pulley and Vibration Damper . . . . . . . . 1B2-49
Crankshaft Front Radial Seal . . . . . . . . . . . 1B2-52
Crankshaft Rear Radial Seal . . . . . . . . . . . 1B2-53
Crankshaft . . . . . . . . . . . . . . . . . . . . . . . . . 1B2-54
Flywheel/Driven Plate . . . . . . . . . . . . . . . . . 1B2-60
Camshaft Adjuster . . . . . . . . . . . . . . . . . . . 1B2-62
TABLE OF CONTENTS
Camshaft Sprocket Bolt . . . . . . . . . . . . . . . 1B2-65
Camshaft . . . . . . . . . . . . . . . . . . . . . . . . . . 1B2-66
Camshaft Timing Position . . . . . . . . . . . . . . 1B2-69
Valve Spring . . . . . . . . . . . . . . . . . . . . . . . . 1B2-72
Valve Stem Seal . . . . . . . . . . . . . . . . . . . . . 1B2-76
Chain Tensioner . . . . . . . . . . . . . . . . . . . . . 1B2-77
Timing Chain . . . . . . . . . . . . . . . . . . . . . . . . 1B2-80
Tensioning Rail . . . . . . . . . . . . . . . . . . . . . . 1B2-85
Cylinder Head Guide Rail . . . . . . . . . . . . . . 1B2-86
Crankcase Guide Rail . . . . . . . . . . . . . . . . . 1B2-87
Crankshaft Sprocket . . . . . . . . . . . . . . . . . . 1B2-88
Piston . . . . . . . . . . . . . . . . . . . . . . . . . . . . . 1B2-90
Connecting Rod . . . . . . . . . . . . . . . . . . . . . 1B2-93
Piston Ring . . . . . . . . . . . . . . . . . . . . . . . . . 1B2-95
Oil Pan . . . . . . . . . . . . . . . . . . . . . . . . . . . . 1B2-97
Engine Oil and Oil Filter Element . . . . . . . . 1B2-99
Oil Pump . . . . . . . . . . . . . . . . . . . . . . . . . 1B2-101
Oil Pressure Relief Valve . . . . . . . . . . . . . 1B2-103
Oil Non-Return Valve . . . . . . . . . . . . . . . . 1B2-104
Oil Dipstick Guide Tube . . . . . . . . . . . . . . 1B2-105
Unit Repair . . . . . . . . . . . . . . . . . . . . . . . 1B2-106 Core Plugs in Crankcase . . . . . . . . . . . . . 1B2-106
Cylinder Bore . . . . . . . . . . . . . . . . . . . . . . 1B2-108
Crankcase Mating Surface . . . . . . . . . . . . 1B2-110
Cylinder Head Mating Surface . . . . . . . . . 1B2-112
Page 154 of 1574

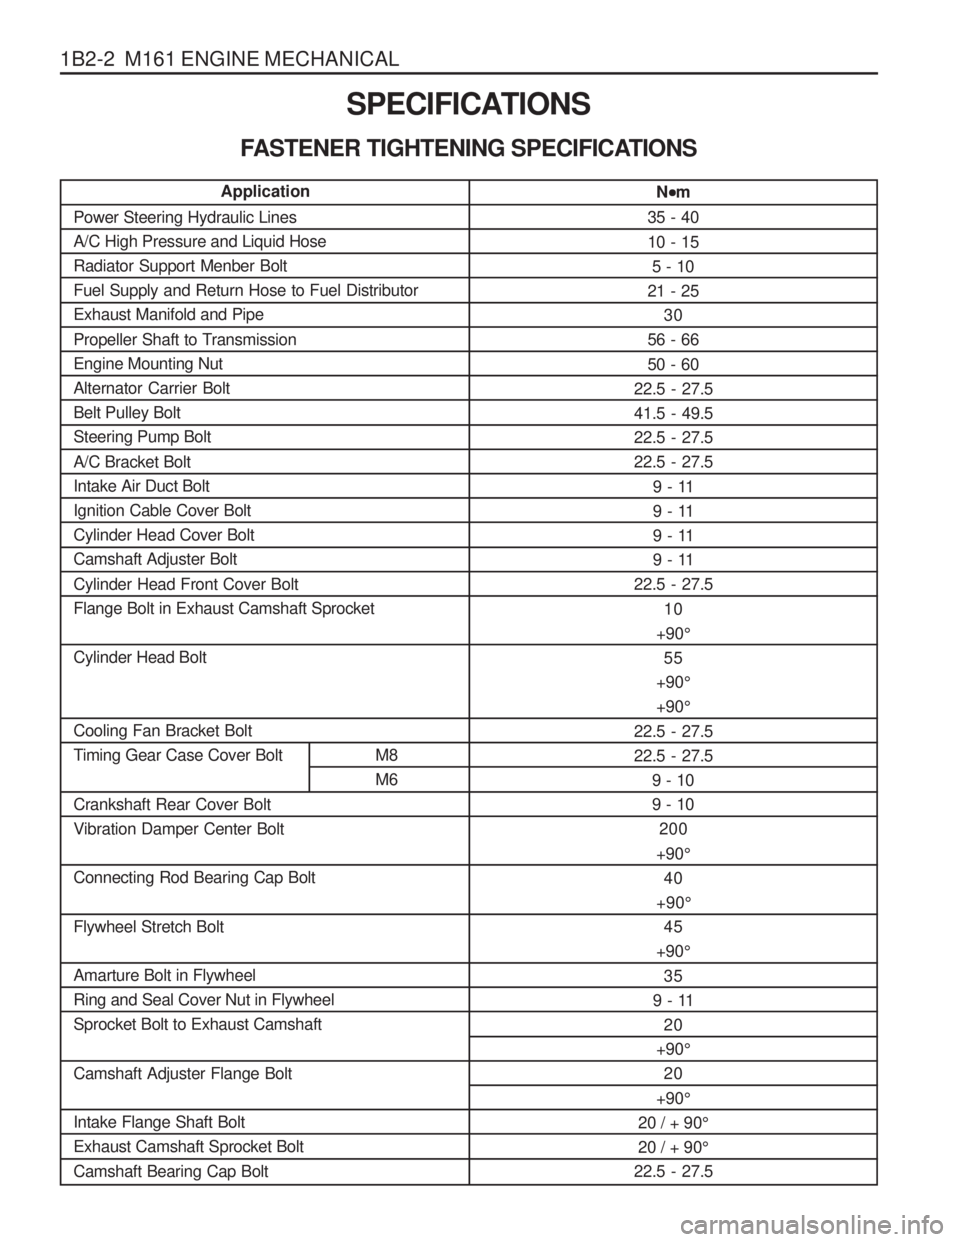
1B2-2 M161 ENGINE MECHANICALSPECIFICATIONS
FASTENER TIGHTENING SPECIFICATIONS N
m
35 - 40 10 - 15 5 - 10
21 - 25 30
56 - 6650 - 60
22.5 - 27.5 41.5 - 49.522.5 - 27.522.5 - 27.5
9 - 11
9 - 11
9 - 11
9 - 11
22.5 - 27.5
10
+90 °
55
+90 °
+90 °
22.5 - 27.522.5 - 27.5 9 - 109 - 10200
+90 °
40
+90 °
45
+90 °
35
9 - 11 20
+90 °
20
+90 °
20 / + 90 °
20 / + 90 °
22.5 - 27.5
Application
Power Steering Hydraulic Lines A/C High Pressure and Liquid HoseRadiator Support Menber BoltFuel Supply and Return Hose to Fuel DistributorExhaust Manifold and Pipe
Propeller Shaft to Transmission Engine Mounting NutAlternator Carrier BoltBelt Pulley BoltSteering Pump Bolt A/C Bracket Bolt Intake Air Duct BoltIgnition Cable Cover BoltCylinder Head Cover BoltCamshaft Adjuster Bolt Cylinder Head Front Cover Bolt Flange Bolt in Exhaust Camshaft Sprocket Cylinder Head Bolt Cooling Fan Bracket Bolt
Timing Gear Case Cover Bolt M8 M6
Crankshaft Rear Cover BoltVibration Damper Center Bolt Connecting Rod Bearing Cap Bolt Flywheel Stretch Bolt Amarture Bolt in Flywheel Ring and Seal Cover Nut in FlywheelSprocket Bolt to Exhaust Camshaft Camshaft Adjuster Flange Bolt Intake Flange Shaft Bolt Exhaust Camshaft Sprocket Bolt Camshaft Bearing Cap Bolt
Page 164 of 1574

1B2-12 M161 ENGINE MECHANICAL
12. Discharge the refrigerant from A/C system, and disconnectthe discharge pipe and suction pipe from the compressor.
14. Remove the fuel feed and return line. Notice Before removing the fuel lines, release the pressure in the fuel system. Installation Notice
13. Remove the acceleration control cable and automatic
transmission pressure cable.
11. Remove the hydraulic pipe of power steering.
NoticeCompletely drain the oil.
Tightening Torque 21 - 25 Nm
Page 174 of 1574

1B2-22 M161 ENGINE MECHANICALPOWER STEERING PUMP AND A/C BRACKET Preceding Work : Removal of cooling fan and shroud Removal of drive belt
1 Nut ................................................. 35.2-28.8 Nm
2 Washer
3 Belt Pulley
4 Bolt (M8 X 91, 2 pieces) .................22.5-27.5 Nm
5 Power Steering Pump
6 Bracket
7 Washer
8 Bolt (M8 X 20, 2 pieces) .................22.5-27.5 Nm 9 Washer
10 Bolt (M8 X 105,4 pieces) ................22.5-27.5 Nm
11 A/C Compressor
12 Bolt (M8 X 50, 5 pieces, M8 X 80,
5 pieces) ........................................ 22.5-27.5 Nm
13 A/C Bracket
14 Vent Hose
15 Bracket Gasket ...................................... Replace
Page 175 of 1574

M161 ENGINE MECHANICAL 1B2-23
Removal & Installation Procedure
1. Remove the belt pulley after removal of poly v-belt.Installation Notice
2. Disconnect the hydraulic pipe of the power steering pump and drain the oil.
3. Unscrew the bolts (arrows) and remove the steering pump. Installation Notice
Notice Pull the tensioning pulley counterclockwise as shown in the figure.
4. Remove the compressor after disconnecting the wiring connector and refrigerant pipe of A/C compressor. Notice Discharge all the refrigerant before removing the pipes.
Tightening Torque 40.5 - 49.5 Nm
Tightening Torque 22.5 - 27.5 Nm
Page 181 of 1574

M161 ENGINE MECHANICAL 1B2-29
Poly V-belt Arrangement
1 Belt Tensioning Pulley
2 Crankshaft Belt Pulley
3 A/C Compressor Pulley5 Alternator Pulley
7 Power Steering Pump Pulley
8 Water Pump Pulley
Page 197 of 1574

M161 ENGINE MECHANICAL 1B2-45
Tools Required
001 589 72 21 00 Torque Wrench
116 589 2 0 33 00 Sliding Hammer
116 589 01 34 00 Threaded Bolt Removal & Installation Procedure
1. Remove the power steering belt pulley and A/C compressorbracket.
2. Remove the oil line from power steering pump.
3. Rotate the crankshaft so that the piston of number, cylinder is at ATDC20 °
Sliding Hammer 116 589 20 33 00Threaded Pin 116 589 02 34 00
4. Put the alignment marks (arrows) on the timing chain and
camshaft sprocket.
5. Remove the chain tensioner. Installation Notice
Tightening Torque 78 - 88 Nm
6. Remove the intake and exhaust camshaft sprocket (remove the camshaft adjuster assembly in E23 engine). Installation Notice
Tightening Torque 1st step 18 - 22 Nm
2nd step 85
° - 95 °
Notice The flange bolt is designed to be used only once, so always replace with new one.
7. Remove the guide rail pin using the sliding hammer (02) and the threaded pin (03). NoticeApply the sealant on guide rail pin when installation.
Page 281 of 1574

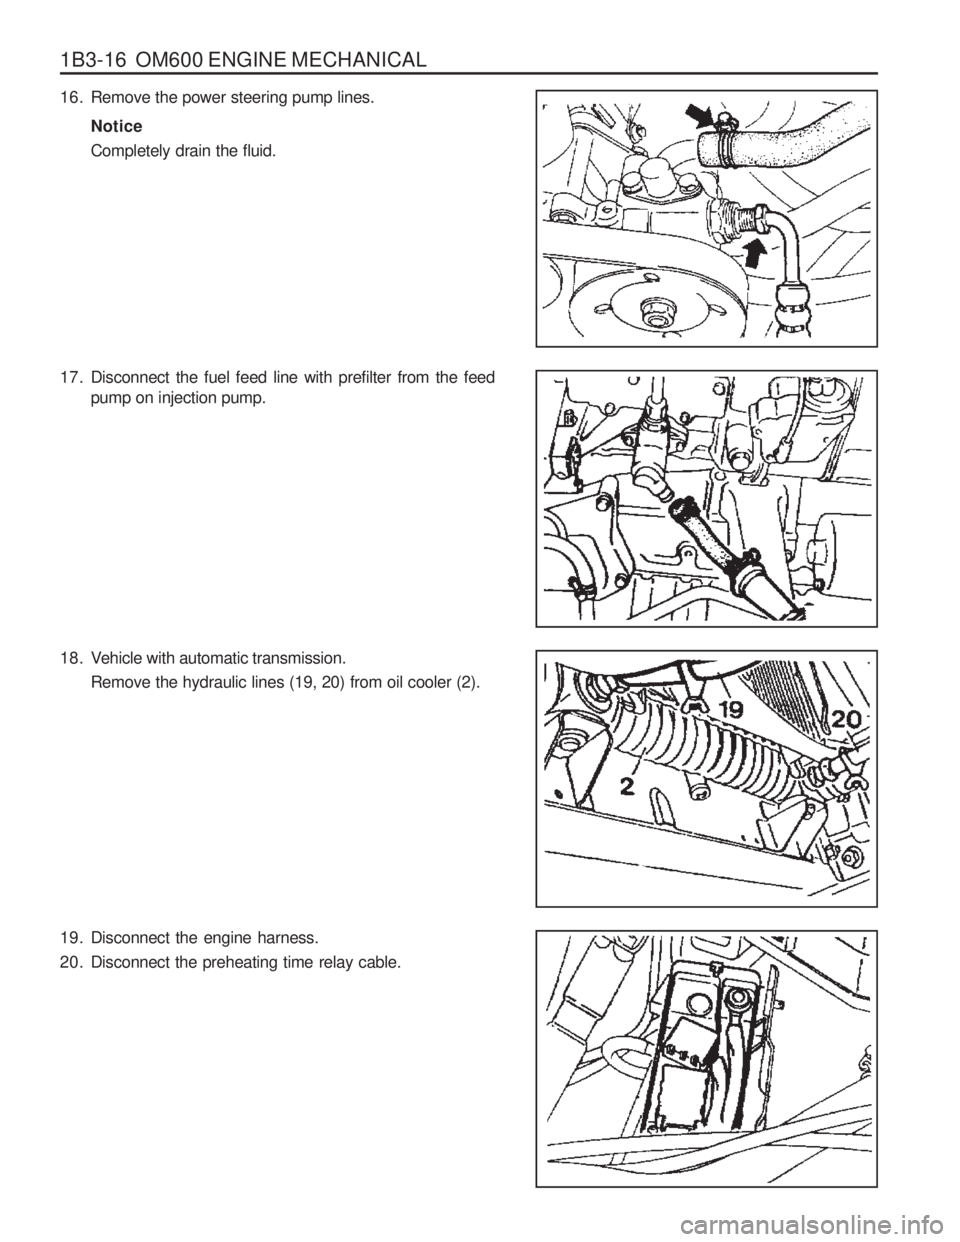
1B3-16 OM600 ENGINE MECHANICAL
16. Remove the power steering pump lines.Notice Completely drain the fluid.
17. Disconnect the fuel feed line with prefilter from the feed pump on injection pump.
18. Vehicle with automatic transmission. Remove the hydraulic lines (19, 20) from oil cooler (2).
19. Disconnect the engine harness.
20. Disconnect the preheating time relay cable.