ECU SSANGYONG MUSSO 2003 Workshop Manual
[x] Cancel search | Manufacturer: SSANGYONG, Model Year: 2003, Model line: MUSSO, Model: SSANGYONG MUSSO 2003Pages: 1574, PDF Size: 26.41 MB
Page 606 of 1574

1F1-74 M162 ENGINE CONTROLS
KNOCK SENSOR
Functions Vibration of the engine block is transmitted to the sensor and transferred to the ECU in the form of an alternating voltage signal via a shielded cable. The knock sensor is fastened to the engine block to recognize knocking in all cylinders. TheECU compares the signal and the retards firing point. Removal & Installation Procedure
1. Disconnect the knock sensor connector from the intakemanifold bracket.
2. Unscrew the mounting bolt (M8 X 28) from the knock sensor installed on the cylinder block and remove the knocking
sensor. Installation Notice
3. Installation should follow the removal procedure in the reverse order.
Tightening Torque 22.5 - 27.5 Nm
Page 608 of 1574

1F1-76 M162 ENGINE CONTROLS 2. Measure the resistance between the coolant temperaturesensor terminal No.1 and No.4 with the coolant temperature sensor disconnected.
Inspection 1. Measure the coolant sensor input voltage between the ECU
terminal No.79 and No.78 while the ignition switch in "ON" position. Notice Replace wiring and coolant temperature sensor if out of specified value. allowable error :
±5%
allowable error : ±5%
Voltage (V)
3.57 1.220.78
Temperature (
°C)
203040
Resistance (W) 2,500322 185
Temperature (
°C)
203040
Page 664 of 1574

M162 ENGINE INTAKE & EXHAUST 1G1-3
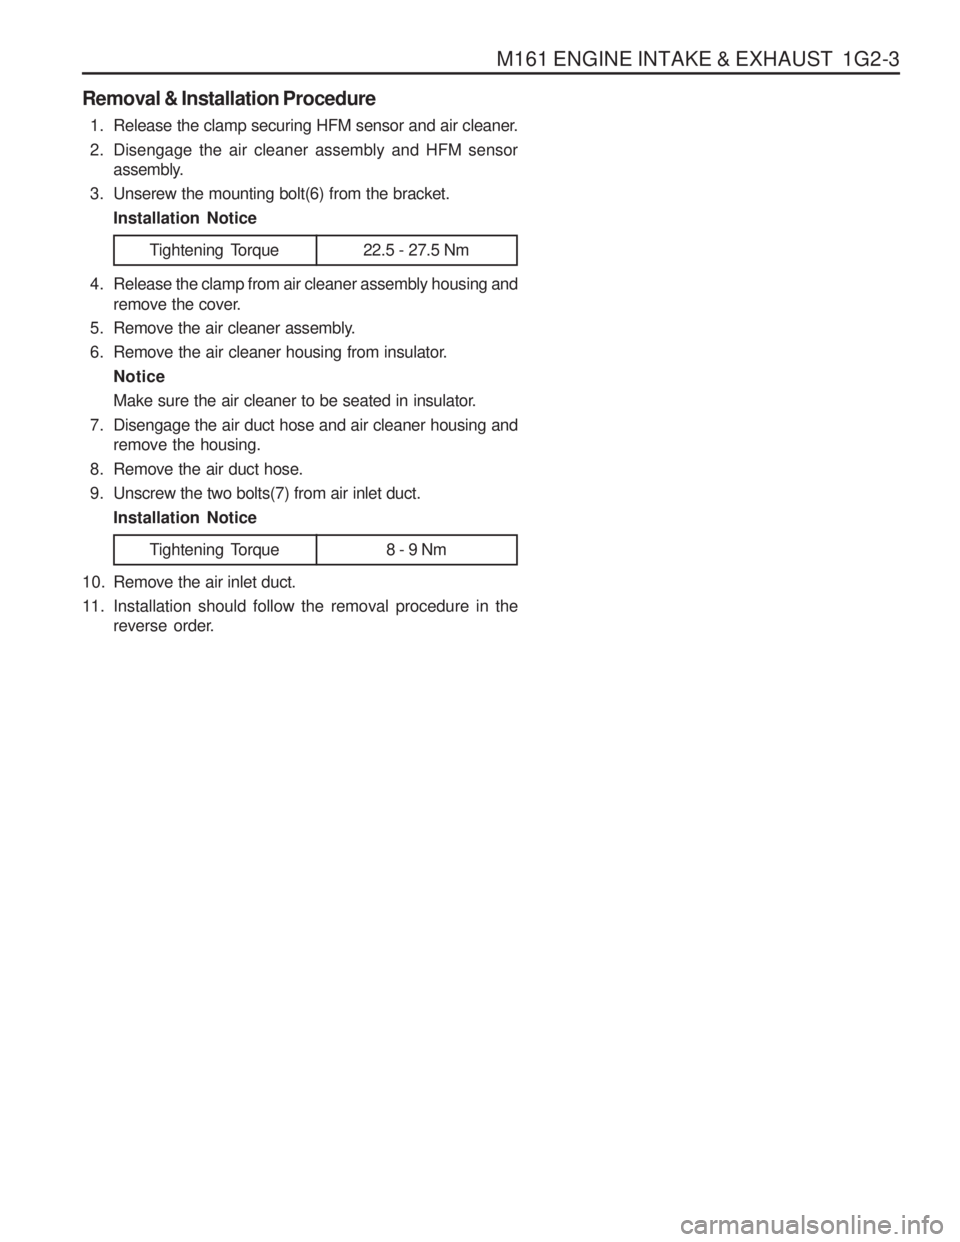
Removal & Installation Procedure1. Release the clamp securing HFM sensor and air cleaner.
2. Disengage the air cleaner assembly and HFM sensor assembly.
3. Unserew the mounting bolt(6) from the bracket.
Installation Notice
Tightening Torque 22.5 - 27.5 Nm
4. Release the clamp from air cleaner assembly housing and remove the cover.
5. Remove the air cleaner assembly.
6. Remove the air cleaner housing from insulator.
Notice
Make sure the air cleaner to be seated in insulator.
7. Disengage the air duct hose and air cleaner housing and remove the housing.
8. Remove the air duct hose.
9. Unscrew the two bolts(7) from air inlet duct. Installation Notice
10. Remove the air inlet duct.
11. Installation should follow the removal procedure in the reverse order.
Tightening Torque 8 - 9 Nm
Page 669 of 1574

1G1-8 M162 ENGINE INTAKE & EXHAUST
Function Description A pneumatically actuated resonance flap (5) is located on the intake manifold, and will be opened and closed by load, whichoperates resonance flap according to engine and controlled by ECU and rpm.
1. Resonance flap closed (at idle/partial load : less than3,800/rpm) The switch valve (7) will be adjusted by ECU and resonance falp will be colosed. By increasing air flow passage throughdividing intaking air flow toward both air collection housing(8). This leads to a signficant increase in the torque in thelower speed range.
2. Resonance flap open (at full load : over 3,800/rpm) The switch valve (7) will not be adjusted by ECU andresonance falp (5) will be open. The colllected air in the aircollection housing (8) will not be divided and intaking airpassage will be shorten.
Page 675 of 1574

M161 ENGINE INTAKE & EXHAUST 1G2-3
Removal & Installation Procedure1. Release the clamp securing HFM sensor and air cleaner.
2. Disengage the air cleaner assembly and HFM sensor assembly.
3. Unserew the mounting bolt(6) from the bracket.
Installation Notice
Tightening Torque 22.5 - 27.5 Nm
4. Release the clamp from air cleaner assembly housing and remove the cover.
5. Remove the air cleaner assembly.
6. Remove the air cleaner housing from insulator.
Notice
Make sure the air cleaner to be seated in insulator.
7. Disengage the air duct hose and air cleaner housing and remove the housing.
8. Remove the air duct hose.
9. Unscrew the two bolts(7) from air inlet duct. Installation Notice
10. Remove the air inlet duct.
11. Installation should follow the removal procedure in the reverse order.
Tightening Torque 8 - 9 Nm
Page 702 of 1574

SUSPENSION DIAGNOSIS 2A-5
INPUT & OUTPUT DEVICES AND DAMPING FORCECONTROL LOGIC
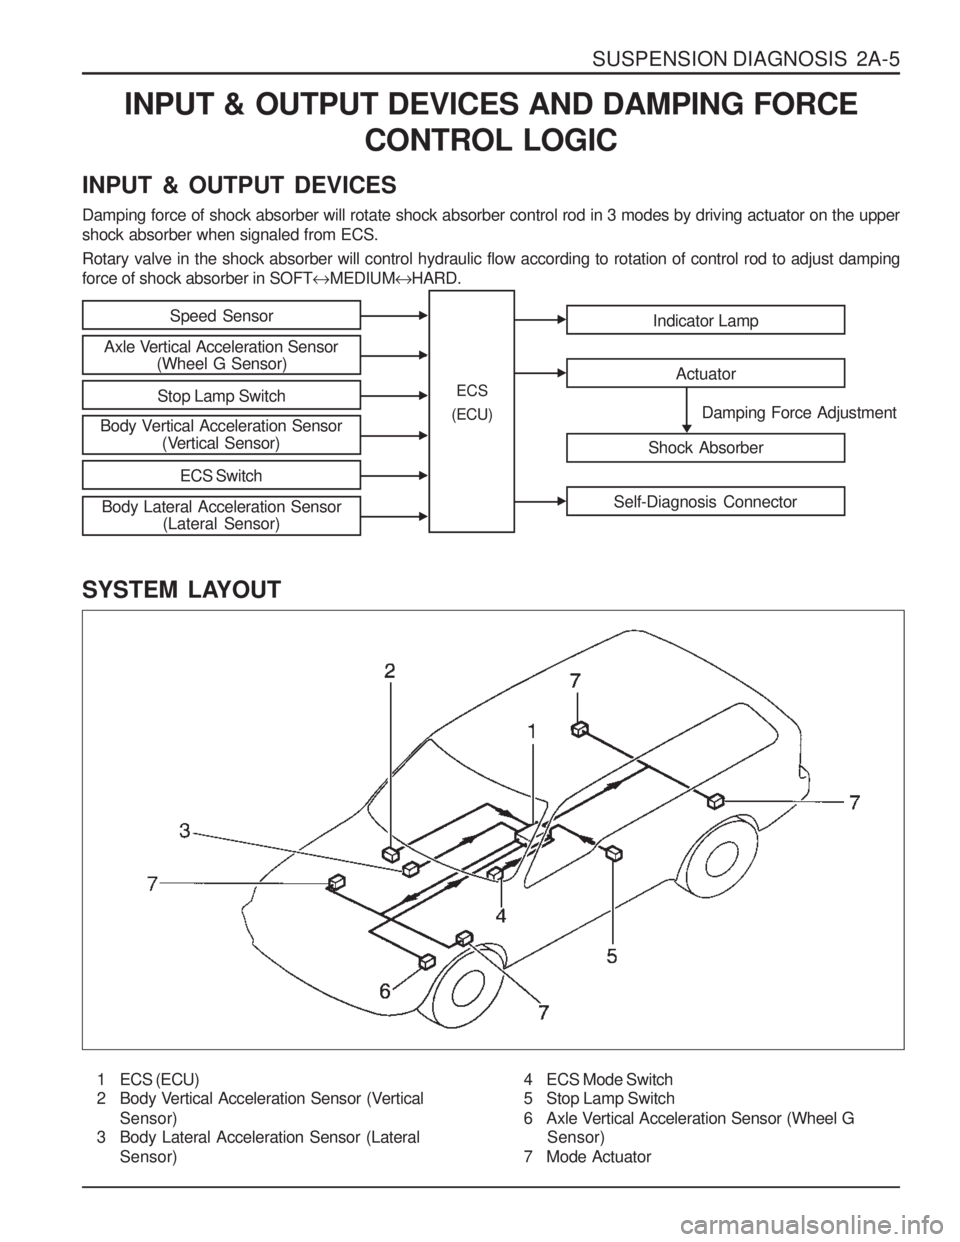
INPUT & OUTPUT DEVICES Damping force of shock absorber will rotate shock absorber control rod in 3 modes by driving actuator on the upper shock absorber when signaled from ECS. Rotary valve in the shock absorber will control hydraulic flow according to rotation of control rod to adjust damping force of shock absorber in SOFT �MEDIUM �HARD.
SYSTEM LAYOUT
1 ECS (ECU)
2 Body Vertical Acceleration Sensor (Vertical Sensor)
3 Body Lateral Acceleration Sensor (Lateral
Sensor)
Speed Sensor
Axle Vertical Acceleration Sensor (Wheel G Sensor)
Stop Lamp Switch
Body Vertical Acceleration Sensor (Vertical Sensor)
ECS Switch
Indicator Lamp
Actuator
Shock Absorber
Self-Diagnosis Connector
Damping Force Adjustment
ECS
(ECU)
Body Lateral Acceleration Sensor (Lateral Sensor)
4 ECS Mode Switch
5 Stop Lamp Switch
6 Axle Vertical Acceleration Sensor (Wheel G
Sensor)
7 Mode Actuator
Page 703 of 1574

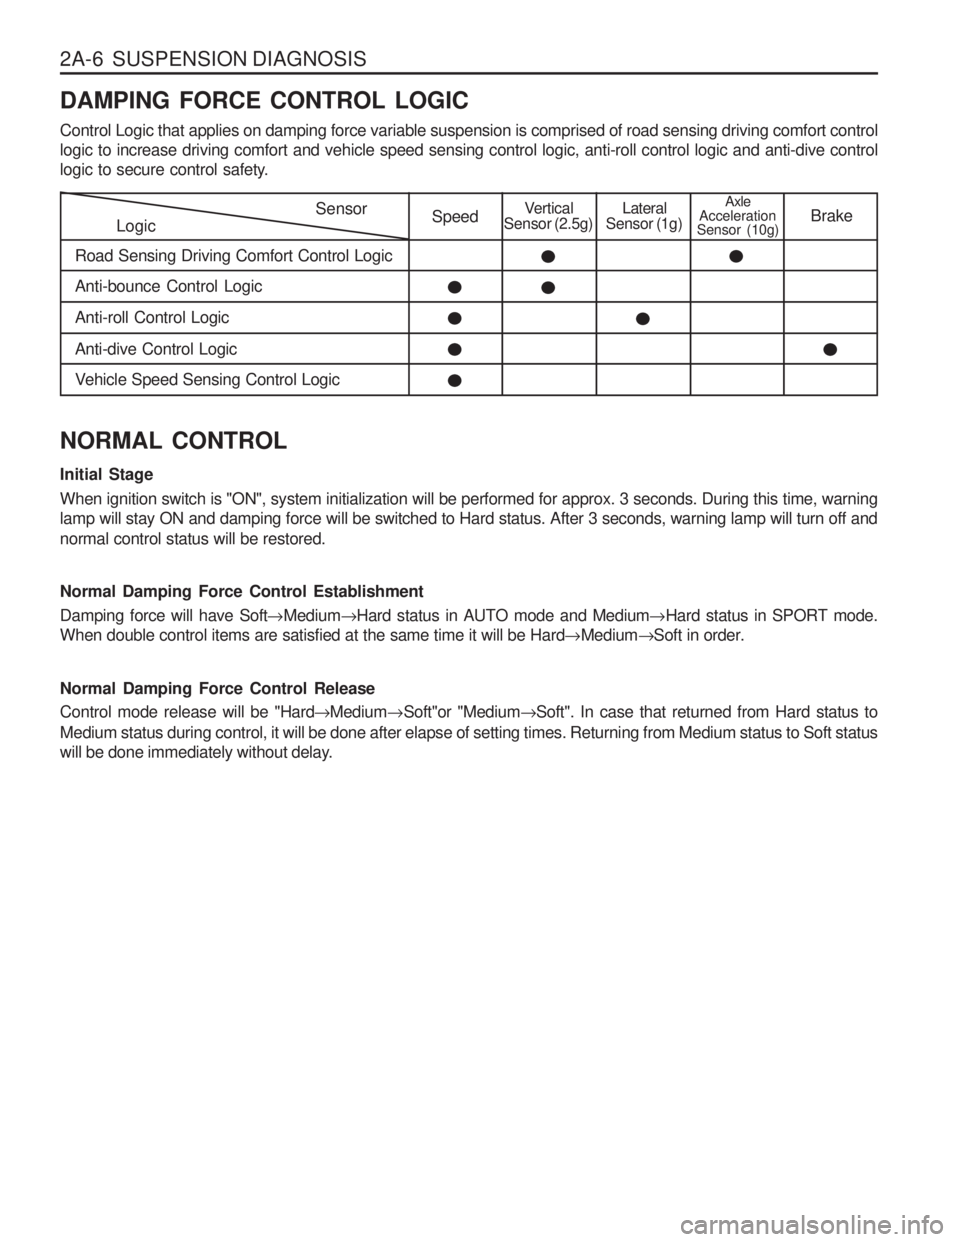
2A-6 SUSPENSION DIAGNOSIS DAMPING FORCE CONTROL LOGIC Control Logic that applies on damping force variable suspension is comprised of road sensing driving comfort control logic to increase driving comfort and vehicle speed sensing control logic, anti-roll control logic and anti-dive control
logic to secure control safety.
LogicSensor
Road Sensing Driving Comfort Control LogicSpeedVertical
Sensor (2.5g)Lateral
Sensor (1g)Axle
Acceleration
Sensor (10g) Brake
Anti-bounce Control Logic Anti-roll Control LogicAnti-dive Control Logic
Vehicle Speed Sensing Control Logic
NORMAL CONTROL Initial Stage When ignition switch is "ON", system initialization will be performed for approx. 3 seconds. During this time, warning lamp will stay ON and damping force will be switched to Hard status. After 3 seconds, warning lamp will turn off and normal control status will be restored. Normal Damping Force Control Establishment Damping force will have Soft �Medium �Hard status in AUTO mode and Medium �Hard status in SPORT mode.
When double control items are satisfied at the same time it will be Hard �Medium �Soft in order.
Normal Damping Force Control Release Control mode release will be "Hard �Medium �Soft"or "Medium �Soft". In case that returned from Hard status to
Medium status during control, it will be done after elapse of setting times. Returning from Medium status to Soft status
will be done immediately without delay.
Page 704 of 1574

SUSPENSION DIAGNOSIS 2A-7
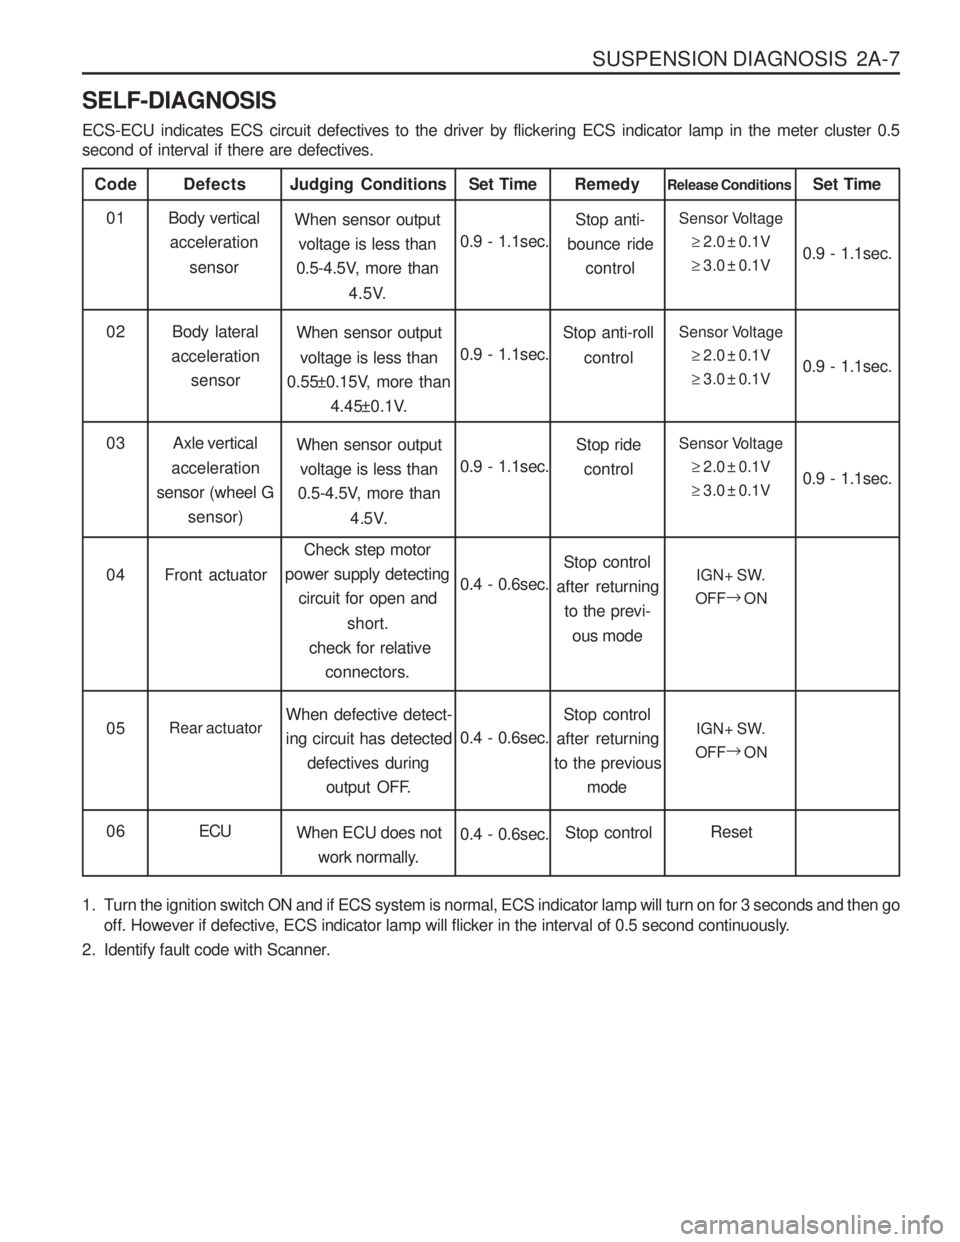
SELF-DIAGNOSIS ECS-ECU indicates ECS circuit defectives to the driver by flickering ECS indicator lamp in the meter cluster 0.5 second of interval if there are defectives.
Code
Body verticalacceleration
sensor
Defects
When sensor outputvoltage is less than
0.5-4.5V, more than
4.5V.
Judging Conditions01
0.9 - 1.1sec.Set TimeSensor Voltage
�2.0 ± 0.1V
� 3.0 ± 0.1V
Release Conditions
0.9 - 1.1sec.
Set Time
Body lateral
acceleration sensor When sensor output
voltage is less than
0.55±0.15V, more than
4.45±0.1V.
02
0.9 - 1.1sec.Sensor Voltage
�2.0 ± 0.1V
� 3.0 ± 0.1V 0.9 - 1.1sec.
Stop anti-
bounce ride
control
Remedy
Stop anti-roll control
Axle vertical
acceleration
sensor (wheel G sensor) When sensor output
voltage is less than
0.5-4.5V, more than
4.5V.
03
0.9 - 1.1sec.Sensor Voltage
�2.0 ± 0.1V
� 3.0 ± 0.1V 0.9 - 1.1sec.
Stop ride
control
Front actuator Check step motor
power supply detecting
circuit for open and
short.
check for relative connectors.
04
0.4 - 0.6sec.IGN+ SW.
OFF �
ON
Stop control
after returning to the previ-
ous mode
Rear actuator When defective detect- ing circuit has detected
defectives during
output OFF.
05
0.4 - 0.6sec.IGN+ SW.
OFF �
ON
Stop control
after returning
to the previous
mode
ECU When ECU does not
work normally.
06
0.4 - 0.6sec.Reset
Stop control
1. Turn the ignition switch ON and if ECS system is normal, ECS indicator lamp will turn on for 3 seconds and then go off. However if defective, ECS indicator lamp will flicker in the interval of 0.5 second continuously.
2. Identify fault code with Scanner.
Page 710 of 1574

SUSPENSION DIAGNOSIS 2A-13
Self - Diagnosis List
Fault
CodeDefects Service Hint
01 Vertical Acceleration Sensor
02 Lateral Acceleration Sensor
03 Wheel Acceleration Sensor
04
05 Rear Step Motor
0 6 ECU Front Step Motor 1. Check sensor supply voltage
�Condition - IGN ON
� Standard value - voltage between pin 11 and 8 of ECU : 4.5 - 5.0V
2. Check sensor output voltage �Condition - IGN ON
� Standard value - voltage between pin 20 and 11 of ECU: 0.5 - 4.5V
3. Check the sensor.
4. Check circuit for open.
5. Check connection of other connectors.
1. Check sensor supply voltage �Condition - IGN ON
� Standard value - voltage between pin 11 and 8 of ECU : 4.5 - 5.0V
2. Check sensor output voltage �Condition - IGN ON
� Standard value - voltage between pin 10 and 11 of ECU : 0.5 - 4.5V
3. Check the sensor.
4. Check circuit for open.
5. Check connection of other connectors.
1. Check step motor supply voltage.
2. Check circuit for open.
3. Check connection of other connectors.
1. Check step motor supply voltage.
2. Check circuit for open.
3. Check connection of other connectors.
1. Check connectors of ECU.
2. Replace the ECU.
1. Check sensor supply voltage
�Condition - IGN ON
� Standard value - voltage between pin 11, 8 and pin
7,11 of ECU : 4.5 - 5.0V
2. Check sensor output voltage
3. Check the sensor.
4. Check circuit for open.
5. Check connection of other connectors.
Page 720 of 1574

SECTION 2C
FRONT SUSPENSION
TABLE OF CONTENTSSPECIFICATIONS
GENERAL SPECIFICATIONS
Type
Spring Type
Torsion Bar Shock Absorber
Stabilizer Type
Double Wishbone
Torsion Bar Spring 1,040 mm
24.5 mm
Cylindrical Reciprocation Type
Torsion Bar Spring
Specifications . . . . . . . . . . . . . . . . . . . . . . . . 2C-1General Specifications . . . . . . . . . . . . . . . . . . 2C-1
Fastener Tightening Specifications . . . . . . . . . 2C-2
Component Locator . . . . . . . . . . . . . . . . . . . 2C-3
Front Suspension . . . . . . . . . . . . . . . . . . . . . . 2C-3
Maintenance and Repair . . . . . . . . . . . . . . . 2C-4
On-Vehicle Service . . . . . . . . . . . . . . . . . . . . . 2C-4
Front Stabilizer Bar . . . . . . . . . . . . . . . . . . . . . 2C-4
Application Description
Torsion Bar . . . . . . . . . . . . . . . . . . . . . . . . . . . 2C-6
Front Lower and Upper Arm . . . . . . . . . . . . . . 2C-8
Front Shock Absorber . . . . . . . . . . . . . . . . .
2C-10
Axle Vertical Acceleration Sensor (Wheel G Sensor) . . . . . . . . . . . . . . . . . . . 2C-12
Vertical and Lateral Sensor . . . . . . . . . . . . . . 2C-13
ECS (ECU) . . . . . . . . . . . . . . . . . . . . . . . . . . 2C-14
Length Outer Diameter(
�)