engine SSANGYONG MUSSO 2003 Manual Online
[x] Cancel search | Manufacturer: SSANGYONG, Model Year: 2003, Model line: MUSSO, Model: SSANGYONG MUSSO 2003Pages: 1574, PDF Size: 26.41 MB
Page 88 of 1574
1B1-52 M162 ENGINE MECHANICAL
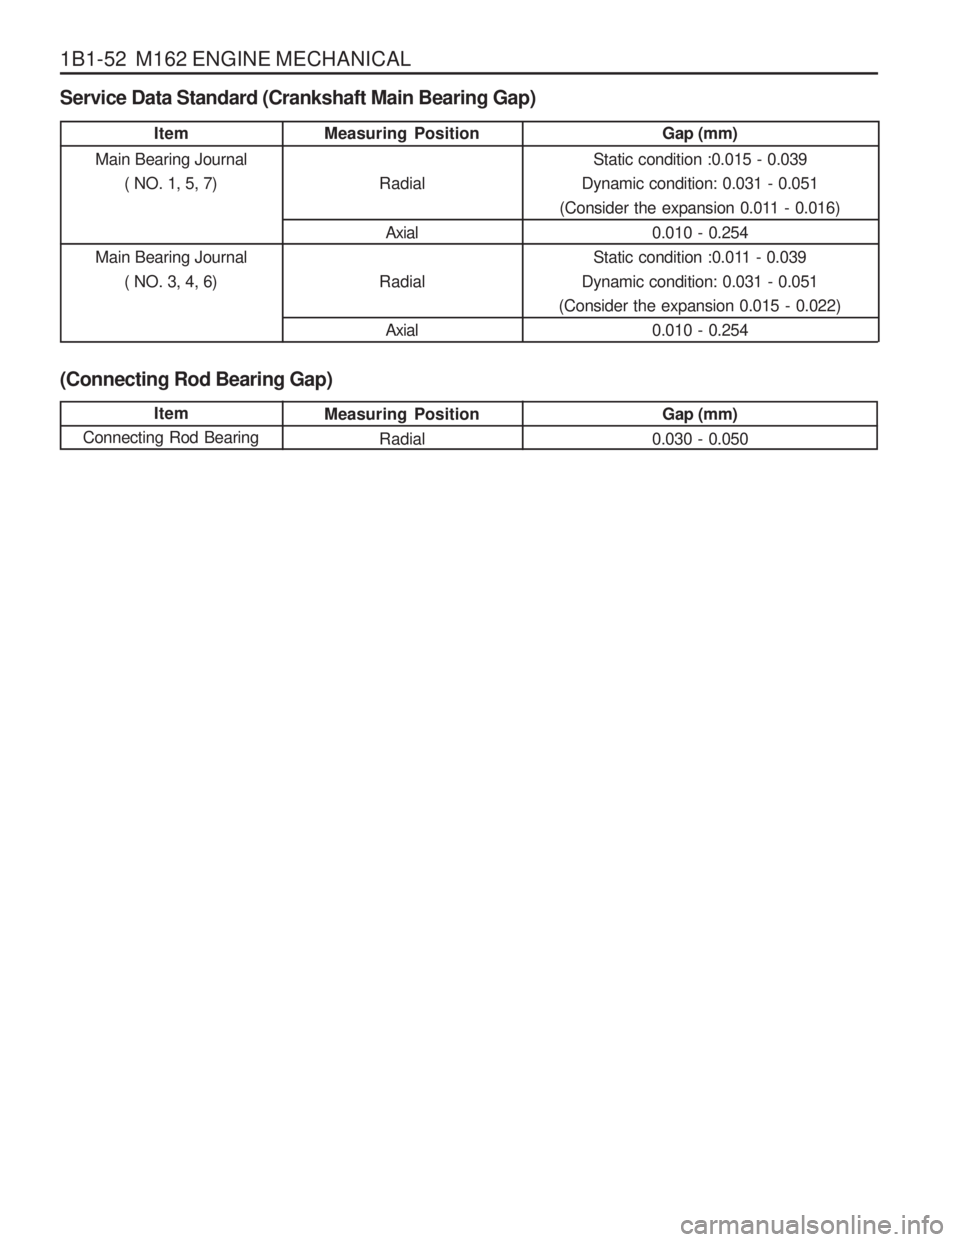
Service Data Standard (Crankshaft Main Bearing Gap) (Connecting Rod Bearing Gap)
Item
Main Bearing Journal ( NO. 1, 5, 7)
Main Bearing Journal ( NO. 3, 4, 6) Measuring Position
RadialAxial
Radial Axial Gap (mm)
Static condition :0.015 - 0.039
Dynamic condition: 0.031 - 0.051
(Consider the expansion 0.011 - 0.016)
0.010 - 0.254
Static condition :0.011 - 0.039
Dynamic condition: 0.031 - 0.051
(Consider the expansion 0.015 - 0.022) 0.010 - 0.254
Item
Connecting Rod Bearing Measuring Position
Radial Gap (mm)
0.030 - 0.050
Page 89 of 1574
M162 ENGINE MECHANICAL 1B1-53
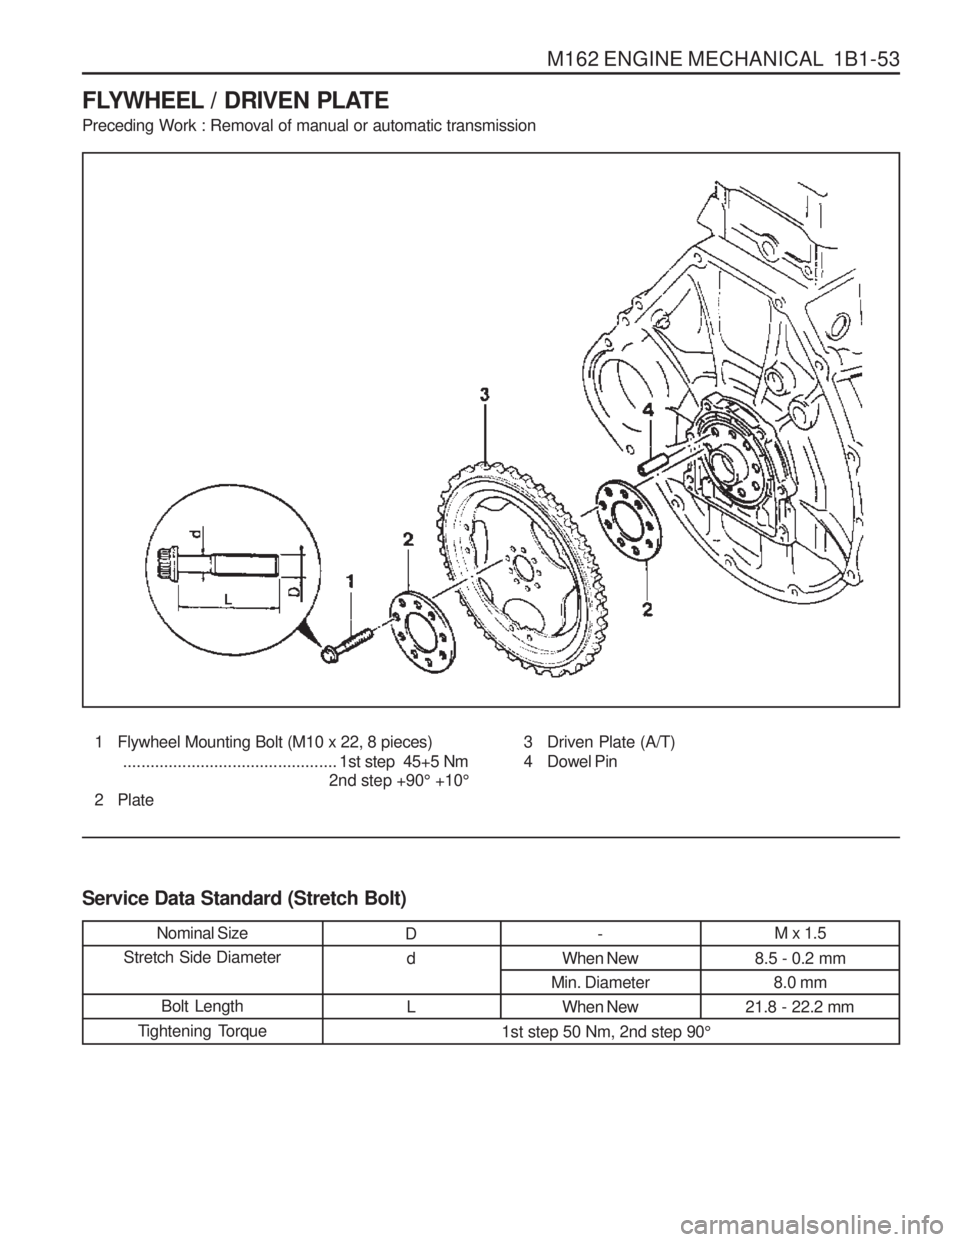
FLYWHEEL / DRIVEN PLATE Preceding Work : Removal of manual or automatic transmission
1 Flywheel Mounting Bolt (M10 x 22, 8 pieces)............................................... 1st step 45+5 Nm
2nd step +90 ° +10 °
2 Plate 3 Driven Plate (A/T)
4 Dowel Pin
Service Data Standard (Stretch Bolt)
Nominal Size
Stretch Side Diameter
Bolt Length
Tightening Torque
M x 1.5
8.5 - 0.2 mm 8.0 mm
21.8 - 22.2 mm-
When New
Min. Diameter When NewDd L
1st step 50 Nm, 2nd step 90 °
Page 90 of 1574
1B1-54 M162 ENGINE MECHANICAL Removal & Installation Procedure
1. Unscrew the stretch bolt.Installation Notice
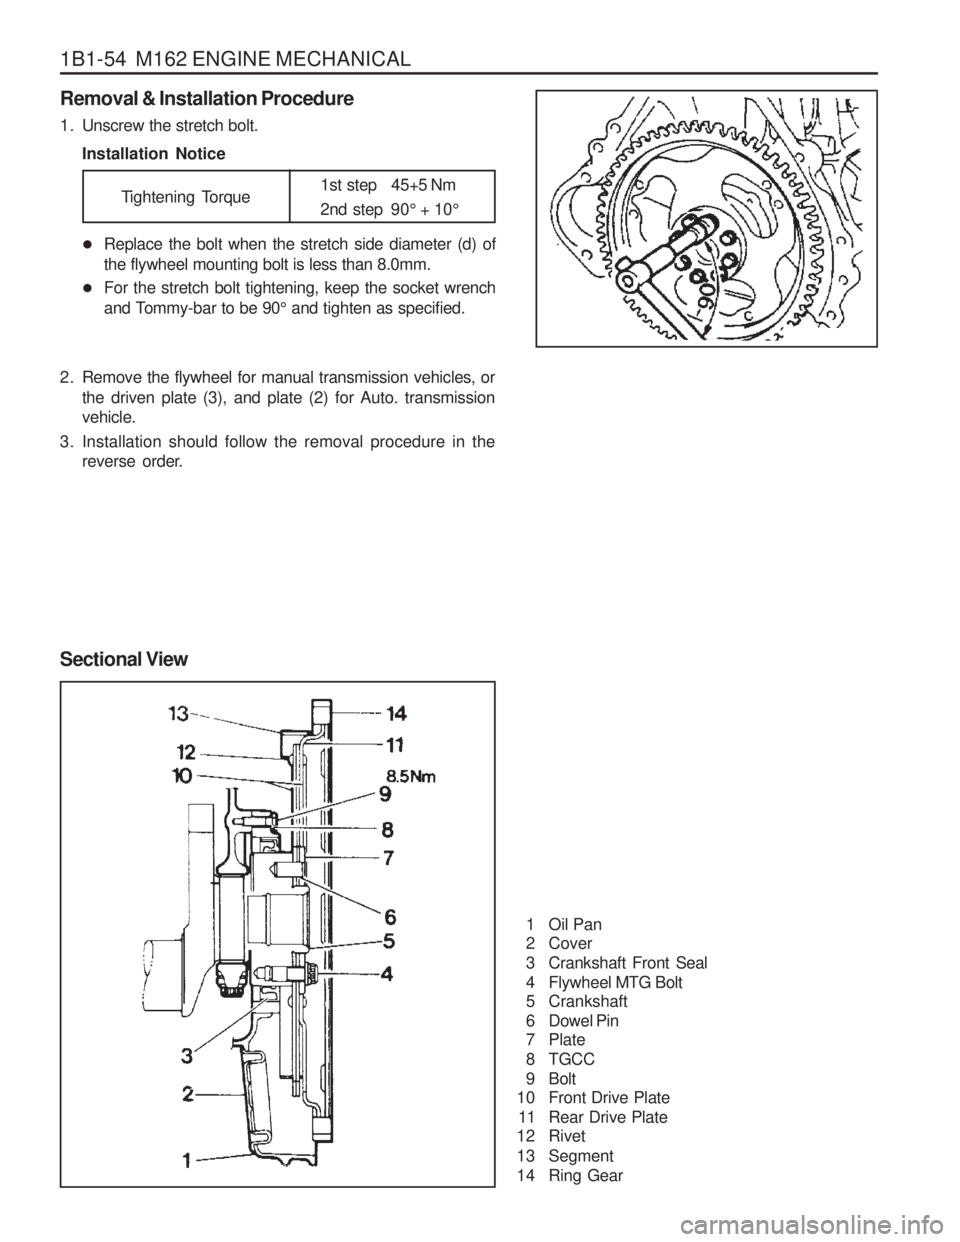
Sectional View
1 Oil Pan
2 Cover
3 Crankshaft Front Seal
4 Flywheel MTG Bolt
5 Crankshaft
6 Dowel Pin
7 Plate
8 TGCC
9 Bolt
10 Front Drive Plate
11 Rear Drive Plate
12 Rivet
13 Segment
14 Ring Gear
�
Replace the bolt when the stretch side diameter (d) of the flywheel mounting bolt is less than 8.0mm.
� For the stretch bolt tightening, keep the socket wrench
and Tommy-bar to be 90 ° and tighten as specified.
2. Remove the flywheel for manual transmission vehicles, or the driven plate (3), and plate (2) for Auto. transmission vehicle.
3. Installation should follow the removal procedure in the reverse order. Tightening Torque
1st step 45+5 Nm
2nd step 90
° + 10 °
Page 91 of 1574
M162 ENGINE MECHANICAL 1B1-55
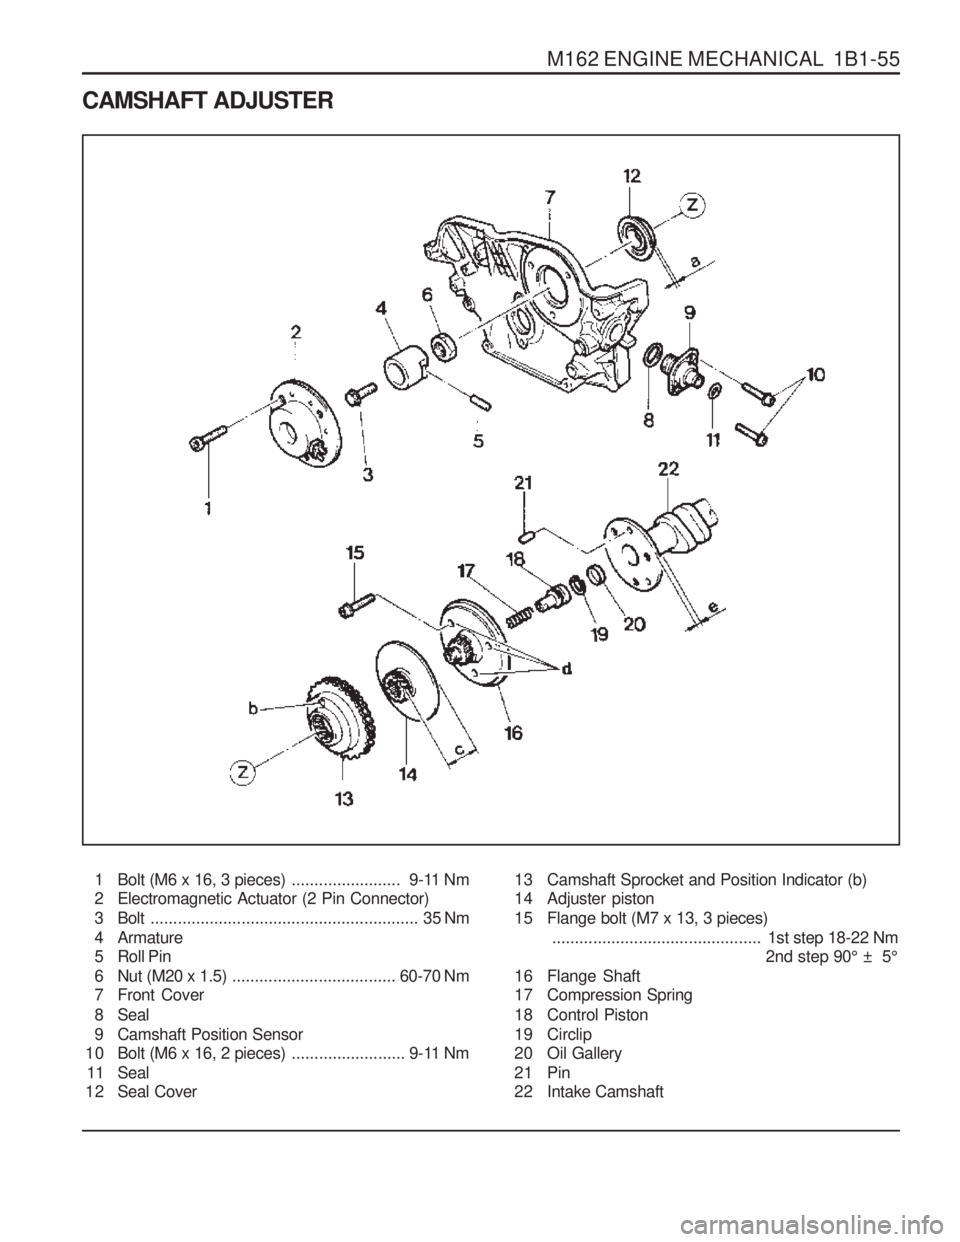
CAMSHAFT ADJUSTER
1 Bolt (M6 x 16, 3 pieces)........................ 9-11 Nm
2 Electromagnetic Actuator (2 Pin Connector)
3 Bolt ........................................................... 35 Nm
4 Armature
5 Roll Pin
6 Nut (M20 x 1.5) .................................... 60-70 Nm
7 Front Cover
8 Seal
9 Camshaft Position Sensor
10 Bolt (M6 x 16, 2 pieces) ......................... 9-11 Nm
11 Seal
12 Seal Cover 13 Camshaft Sprocket and Position Indicator (b)
14 Adjuster piston
15 Flange bolt (M7 x 13, 3 pieces)
.............................................. 1st step 18-22 Nm
2nd step 90 ° ± 5 °
16 Flange Shaft
17 Compression Spring
18 Control Piston
19 Circlip
20 Oil Gallery
21 Pin
22 Intake Camshaft
Page 92 of 1574
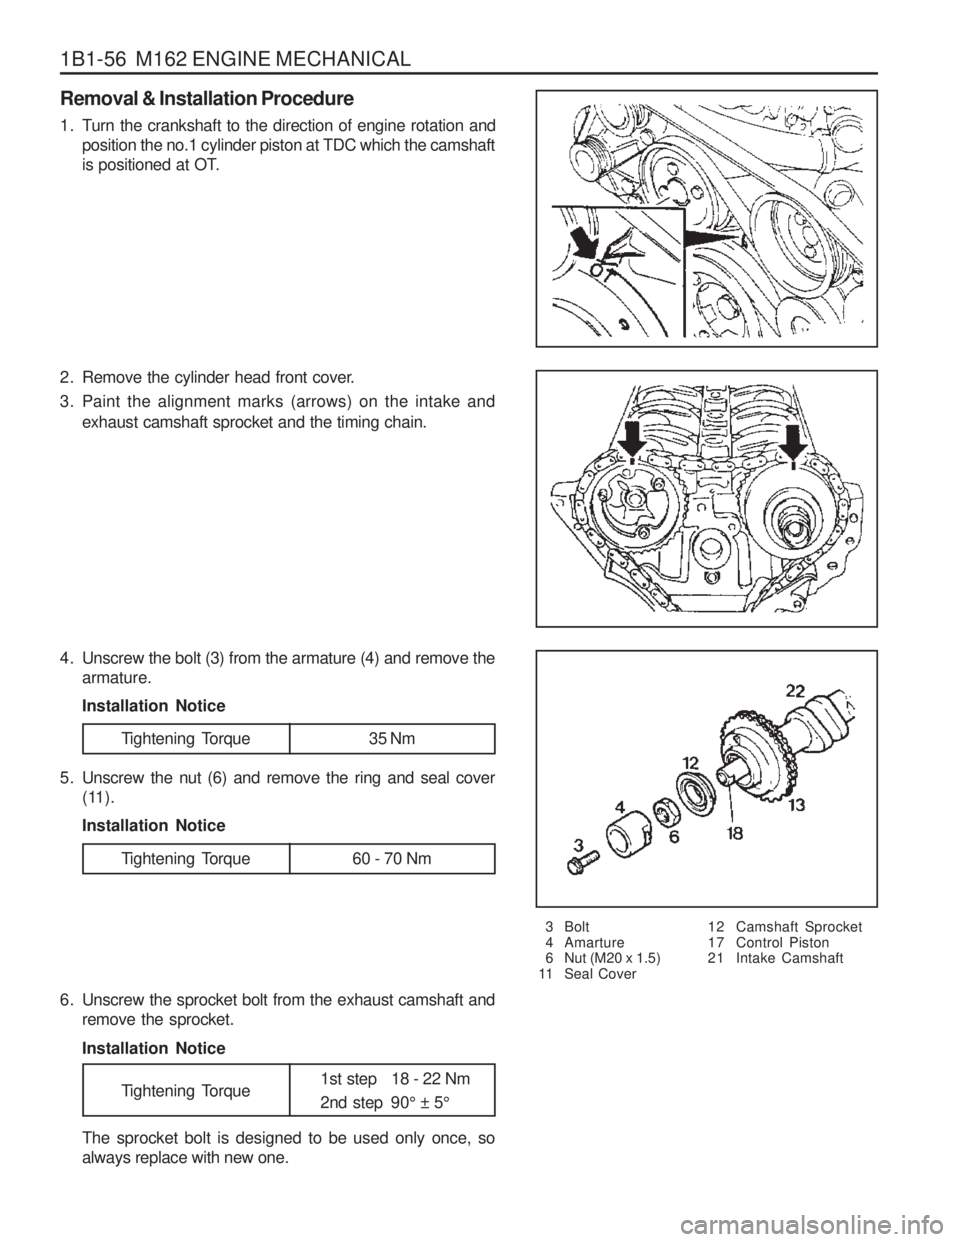
1B1-56 M162 ENGINE MECHANICAL Removal & Installation Procedure
1. Turn the crankshaft to the direction of engine rotation andposition the no.1 cylinder piston at TDC which the camshaft
is positioned at OT.
2. Remove the cylinder head front cover.
3. Paint the alignment marks (arrows) on the intake and exhaust camshaft sprocket and the timing chain.
4. Unscrew the bolt (3) from the armature (4) and remove the armature. Installation Notice
3 Bolt
4 Amarture
6 Nut (M20 x 1.5)
11 Seal Cover
5. Unscrew the nut (6) and remove the ring and seal cover
(11). Installation Notice
Tightening Torque 35 Nm
Tightening Torque 60 - 70 Nm
12 Camshaft Sprocket
17 Control Piston
21 Intake Camshaft
6. Unscrew the sprocket bolt from the exhaust camshaft and remove the sprocket. Installation Notice The sprocket bolt is designed to be used only once, so always replace with new one. Tightening Torque
1st step 18 - 22 Nm
2nd step 90
° ± 5 °
Page 93 of 1574
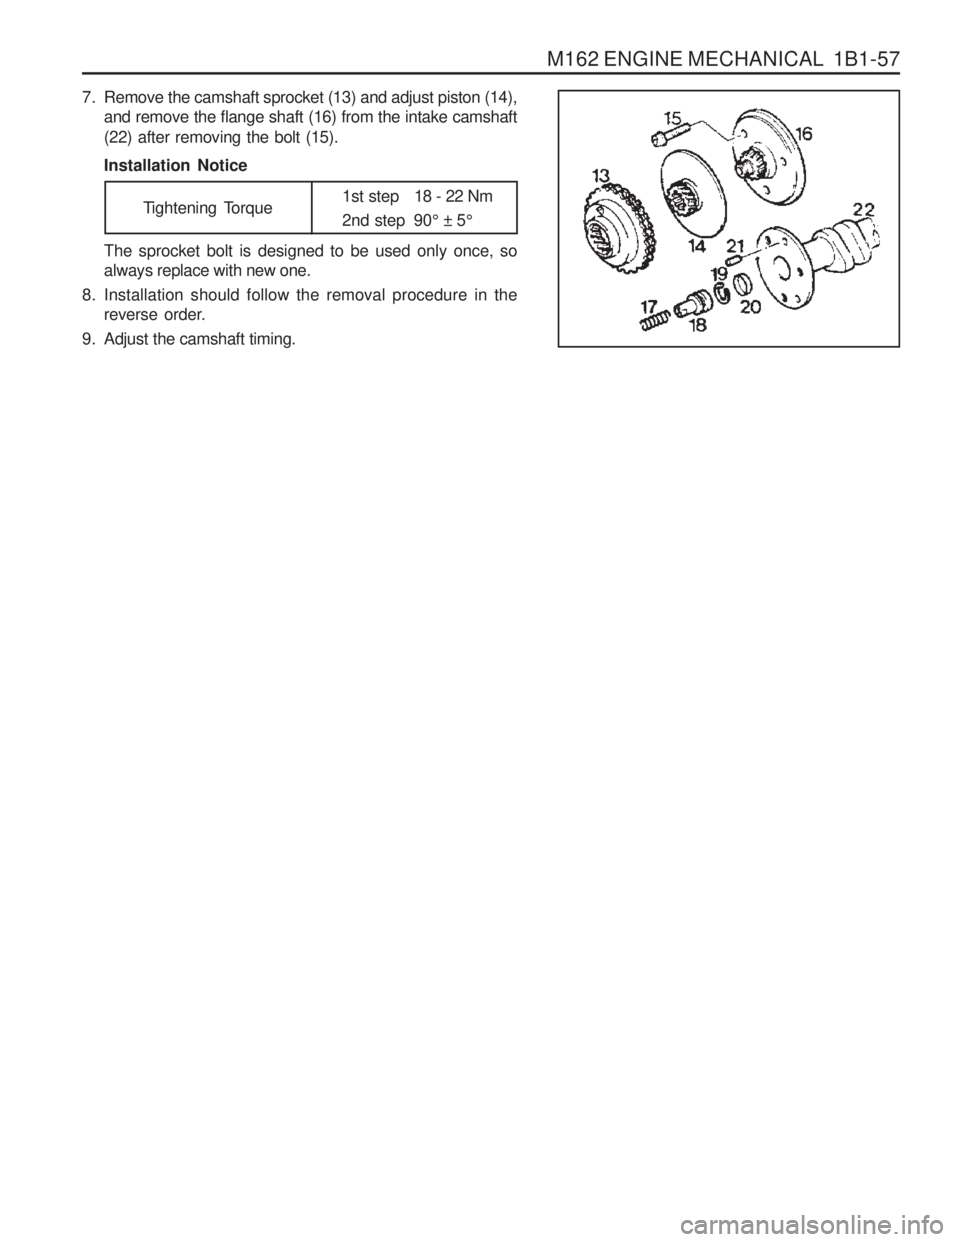
M162 ENGINE MECHANICAL 1B1-57
7. Remove the camshaft sprocket (13) and adjust piston (14),and remove the flange shaft (16) from the intake camshaft (22) after removing the bolt (15). Installation Notice The sprocket bolt is designed to be used only once, so always replace with new one.
8. Installation should follow the removal procedure in the reverse order.
9. Adjust the camshaft timing.
Tightening Torque 1st step 18 - 22 Nm
2nd step 90
° ± 5 °
Page 94 of 1574
1B1-58 M162 ENGINE MECHANICAL
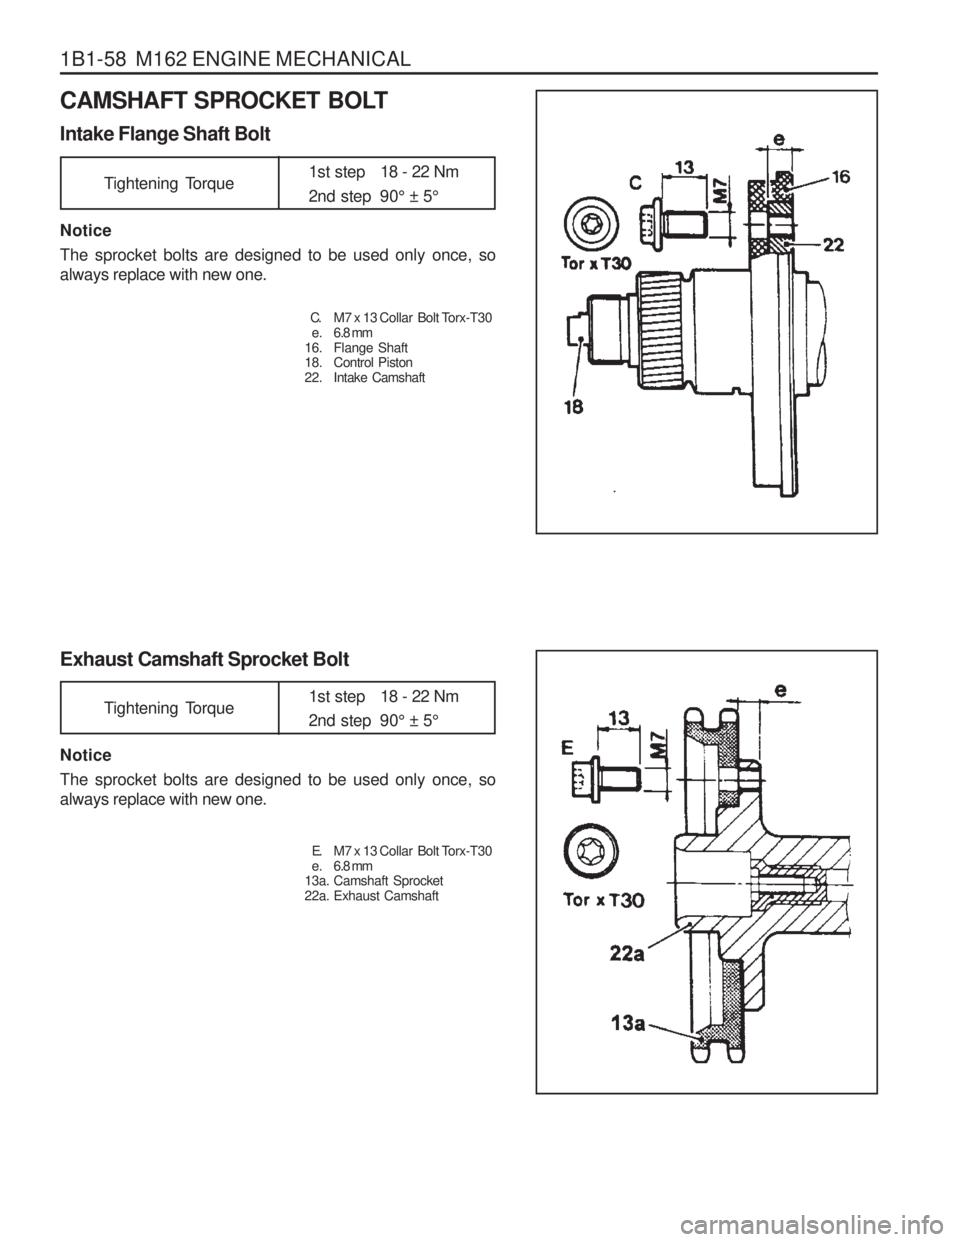
CAMSHAFT SPROCKET BOLT Intake Flange Shaft Bolt Notice The sprocket bolts are designed to be used only once, so always replace with new one. Exhaust Camshaft Sprocket Bolt Notice The sprocket bolts are designed to be used only once, so always replace with new one.
C. M7 x 13 Collar Bolt Torx-T30e . 6.8 mm
16. Flange Shaft
18. Control Piston
22. Intake Camshaft
E. M7 x 13 Collar Bolt Torx-T30
e . 6.8 mm
13a. Camshaft Sprocket
22a. Exhaust Camshaft
Tightening Torque
1st step 18 - 22 Nm
2nd step 90
° ± 5 °
Tightening Torque 1st step 18 - 22 Nm
2nd step 90
° ± 5 °
Page 95 of 1574
M162 ENGINE MECHANICAL 1B1-59
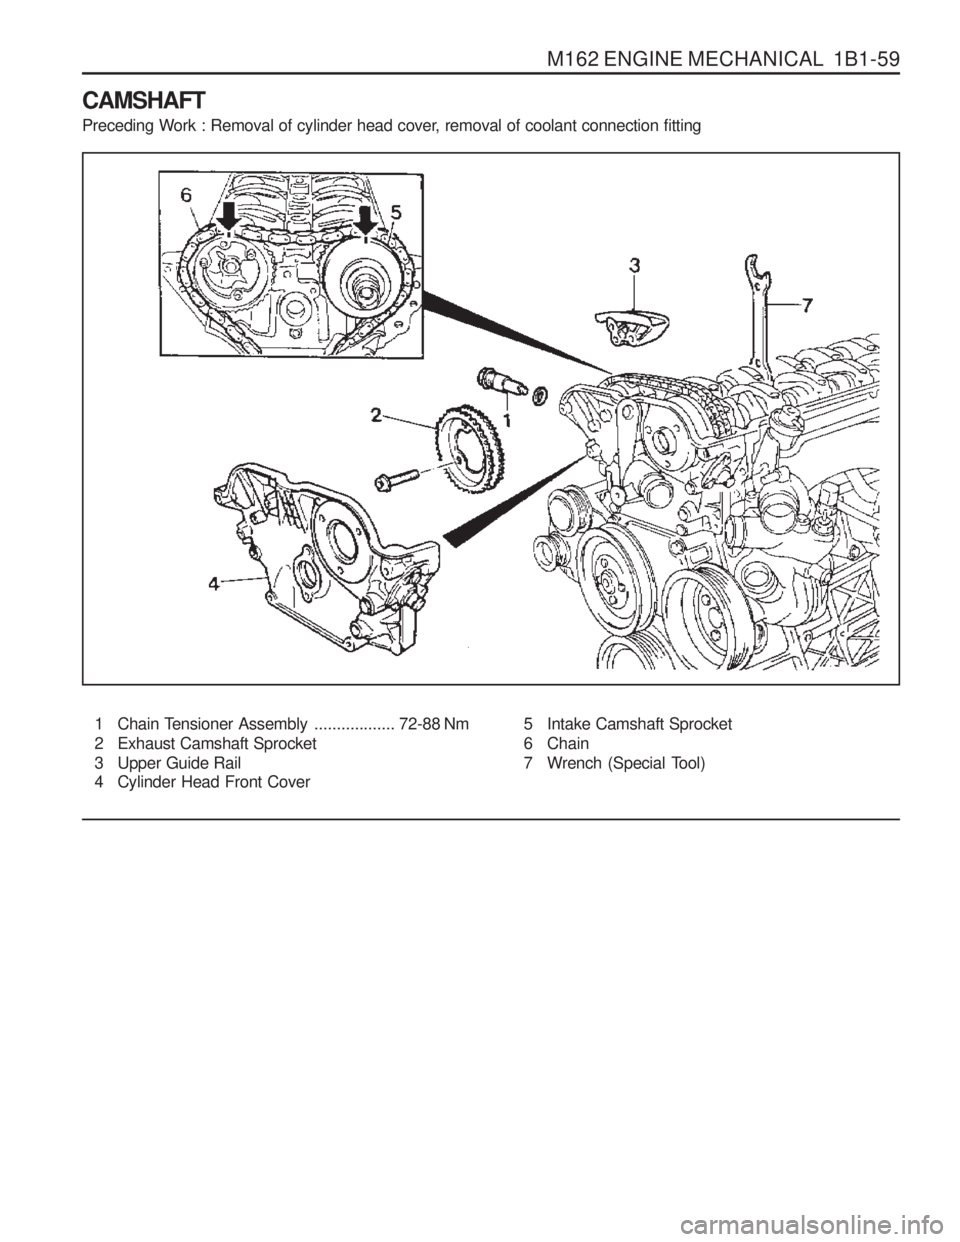
CAMSHAFT
Preceding Work : Removal of cylinder head cover, removal of coolant connection fitting
1 Chain Tensioner Assembly.................. 72-88 Nm
2 Exhaust Camshaft Sprocket
3 Upper Guide Rail
4 Cylinder Head Front Cover 5 Intake Camshaft Sprocket
6 Chain
7 Wrench (Special Tool)
Page 96 of 1574
1B1-60 M162 ENGINE MECHANICAL
Tools Required
000 589 01 10 00 Box Wrench Insert104 589 01 01 00Spanner
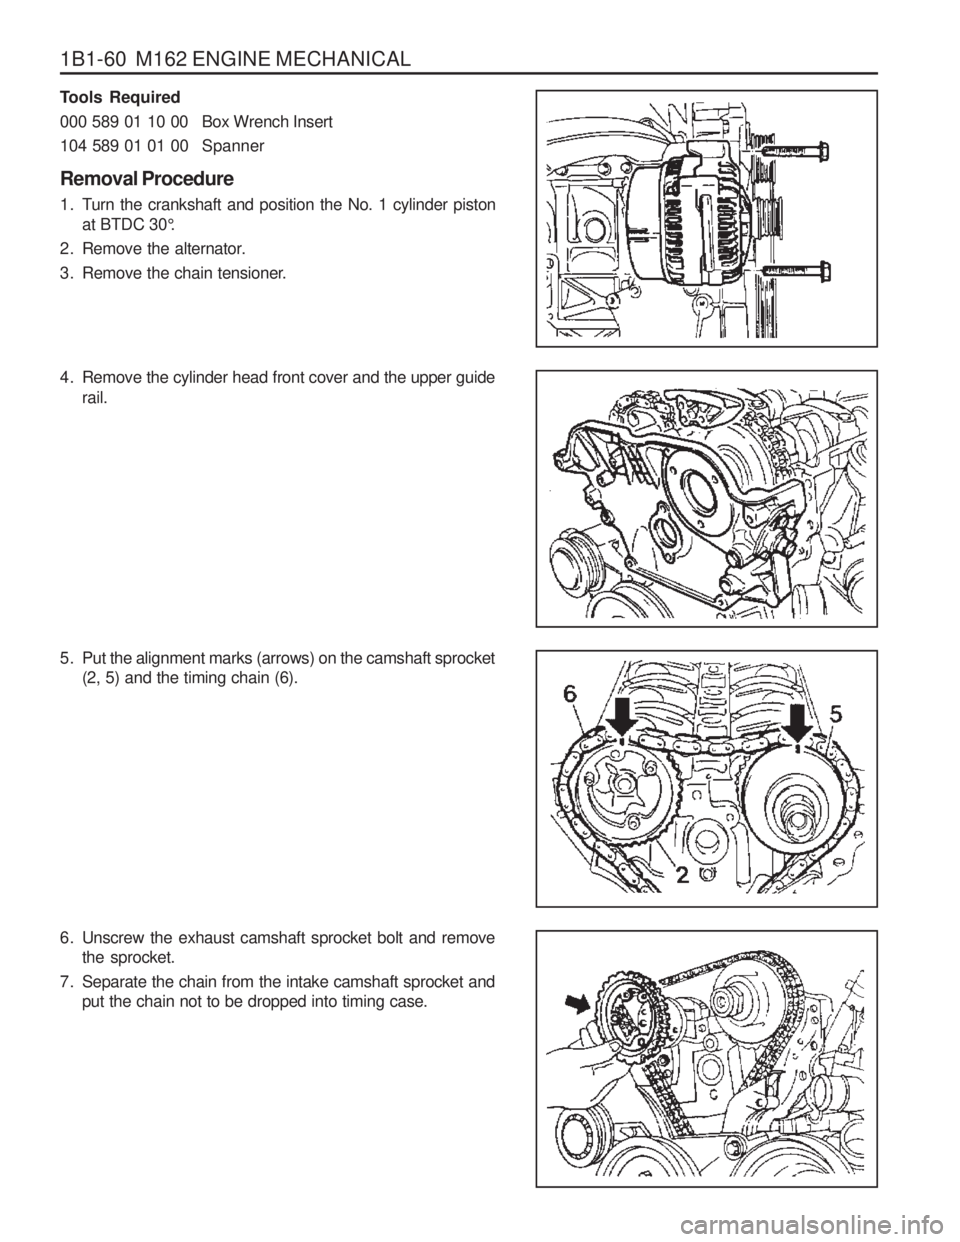
Removal Procedure
1. Turn the crankshaft and position the No. 1 cylinder piston at BTDC 30 °.
2. Remove the alternator.
3. Remove the chain tensioner.
4. Remove the cylinder head front cover and the upper guide rail.
6. Unscrew the exhaust camshaft sprocket bolt and remove the sprocket.
7. Separate the chain from the intake camshaft sprocket and put the chain not to be dropped into timing case.
5. Put the alignment marks (arrows) on the camshaft sprocket
(2, 5) and the timing chain (6).
Page 97 of 1574
M162 ENGINE MECHANICAL 1B1-61
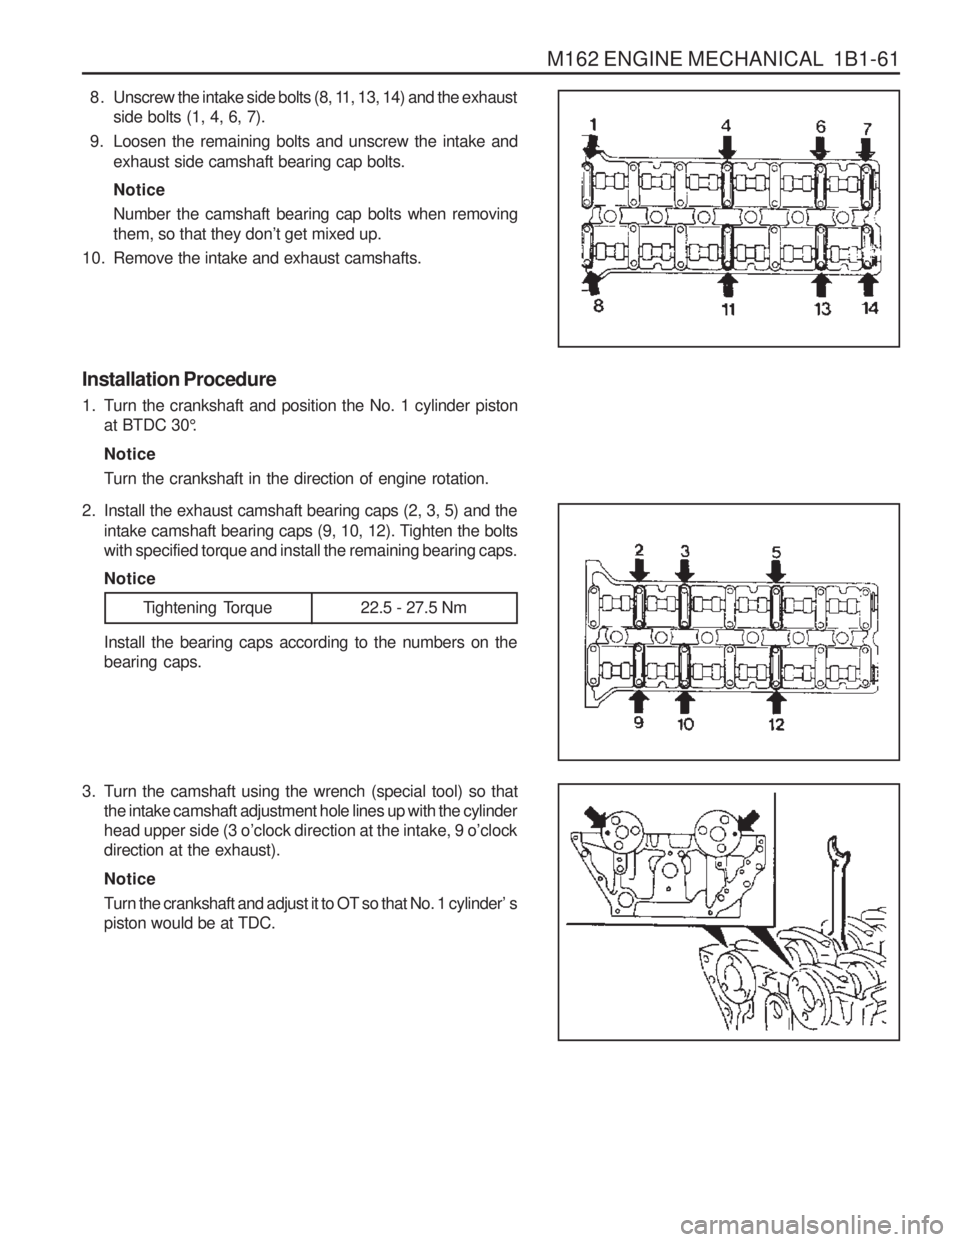
8 . Unscrew the intake side bolts (8, 11, 13, 14) and the exhaustside bolts (1, 4, 6, 7).
9. Loosen the remaining bolts and unscrew the intake and exhaust side camshaft bearing cap bolts. Notice Number the camshaft bearing cap bolts when removing them, so that they don ’t get mixed up.
10. Remove the intake and exhaust camshafts.
Installation Procedure
1. Turn the crankshaft and position the No. 1 cylinder piston at BTDC 30 °.
Notice
Turn the crankshaft in the direction of engine rotation.
3. Turn the camshaft using the wrench (special tool) so that the intake camshaft adjustment hole lines up with the cylinder head upper side (3 o ’clock direction at the intake, 9 o ’clock
direction at the exhaust). Notice
Turn the crankshaft and adjust it to OT so that No. 1 cylinder ’ s
piston would be at TDC.
Install the bearing caps according to the numbers on the bearing caps.
Tightening Torque 22.5 - 27.5 Nm
2. Install the exhaust camshaft bearing caps (2, 3, 5) and the
intake camshaft bearing caps (9, 10, 12). Tighten the bolts with specified torque and install the remaining bearing caps. Notice