headlamp SSANGYONG MUSSO 2003 Service Manual
[x] Cancel search | Manufacturer: SSANGYONG, Model Year: 2003, Model line: MUSSO, Model: SSANGYONG MUSSO 2003Pages: 1574, PDF Size: 26.41 MB
Page 1238 of 1574

9B-10 LIGHTING SYSTEM Head Lamp Focusing When using the beam setting device
1. The head lamp focus should be adjusted by using a properbeam setting device.
2. Adjust the head lamp focus by using Up/Down, Left/Right adjusting screws.
When using the screen
1. Put the vehicle on the leveling surface.
2. One person is needed to seat on the driver's seat without other loads(CVW) and check the tire pressure if it is in the specification.
3. The distance between the headlamp and the screen is 25m.
4. Draw the vertical line (crossing the center of each headlamp) on the screen.
5. Start the engine.
6. Check if the cut-off line of the headlamp on the screen is in the specification.
1 ) Left/right direction
- The degree of the cross point at the cut-off line of theheadlamp and the vertical line should be 15.
2 ) Up/down direction - The distance between the cut-off line of the headlampand the horizontal line should be 25cm.
7. Adjust the focus if the cut-off line of the headlamp is out of
the specification by using up/down, left/right adjusting screws. A : Up/down direction adjusting screwB : Left/right direction adjusting secrw
Page 1239 of 1574

LIGHTING SYSTEM 9B-11
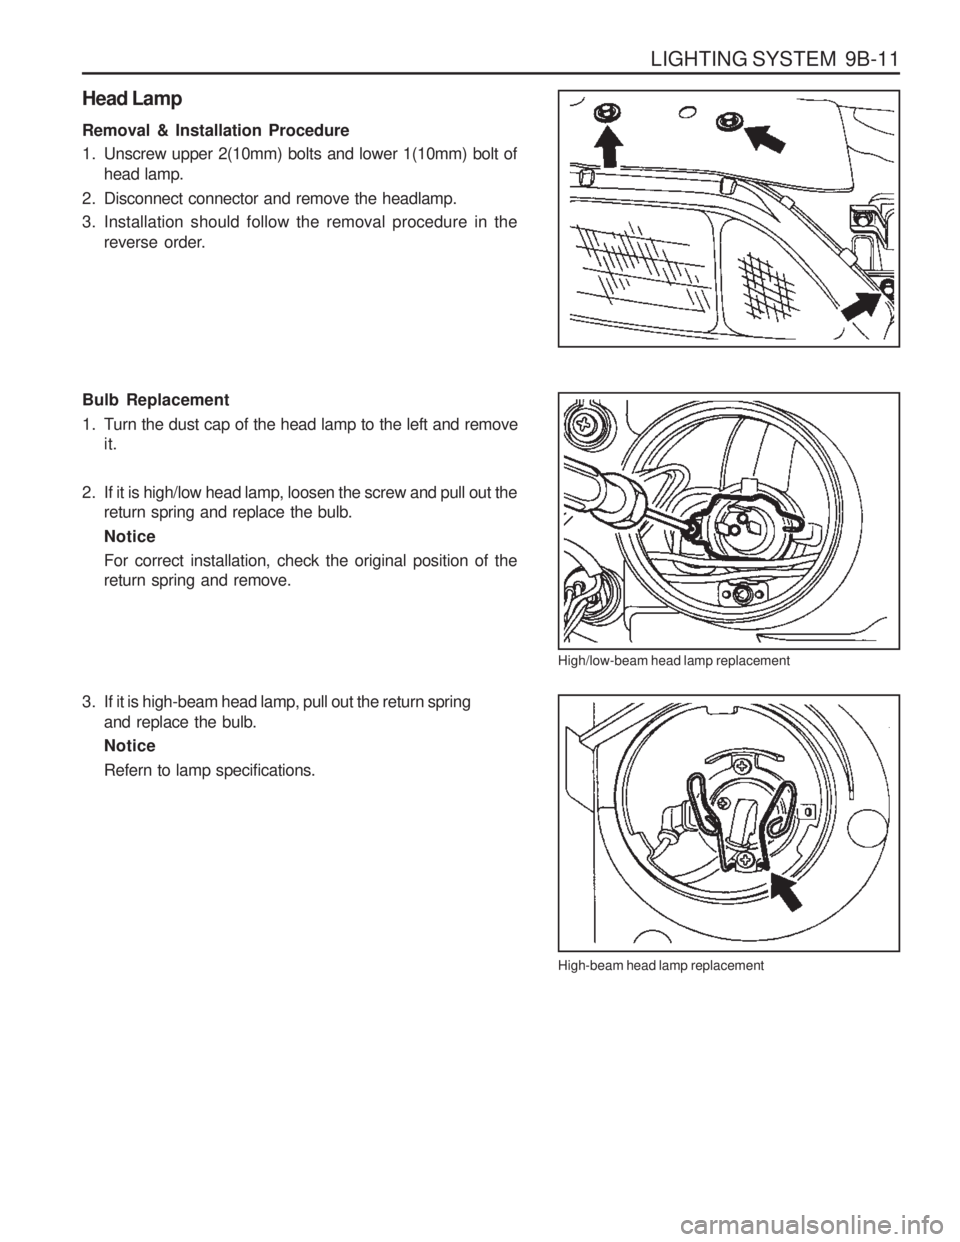
Head Lamp Removal & Installation Procedure
1. Unscrew upper 2(10mm) bolts and lower 1(10mm) bolt ofhead lamp.
2. Disconnect connector and remove the headlamp.
3. Installation should follow the removal procedure in the reverse order.
Bulb Replacement
1. Turn the dust cap of the head lamp to the left and removeit.
2. If it is high/low head lamp, loosen the screw and pull out the return spring and replace the bulb.NoticeFor correct installation, check the original position of the return spring and remove.
High/low-beam head lamp replacement High-beam head lamp replacement
3. If it is high-beam head lamp, pull out the return spring
and replace the bulb. Notice Refern to lamp specifications.
Page 1286 of 1574

BUMPERS AND FASCIAS 9O-3
Mounting Inspection
1. Clearance between the upper bumper and radiator grille.
2. Clearance between the upper bumper and headlampmoding.
Clearance 12 ± 1.0 mm
Clearance 9 mm
2. Clearance between the bumper and wheel arch.
Clearance10 mm
Page 1366 of 1574

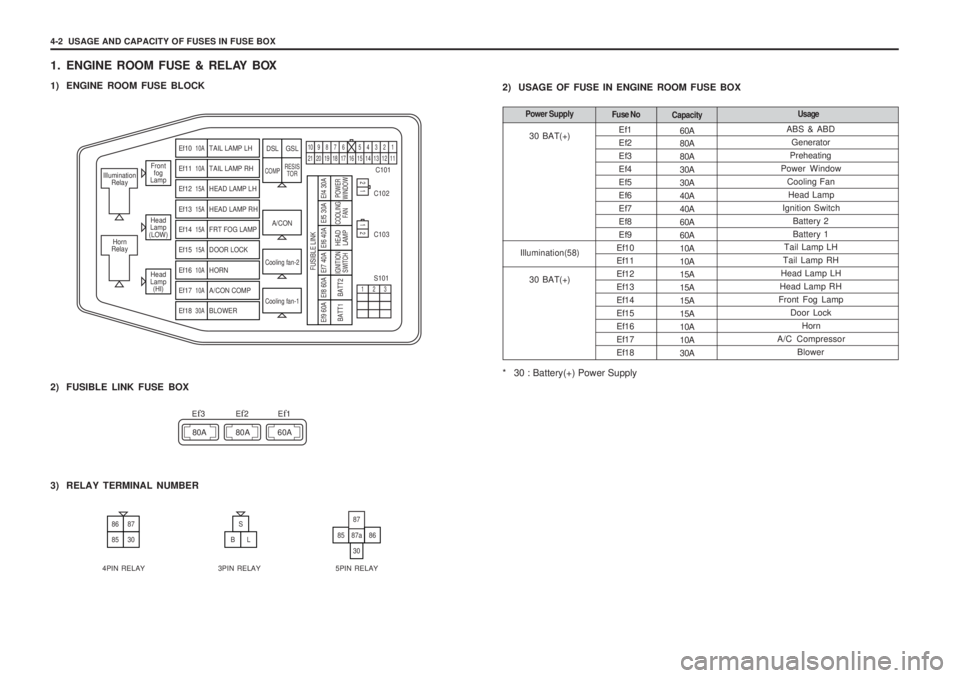
4-2 USAGE AND CAPACITY OF FUSES IN FUSE BOX
60A 80A 80A30A30A40A40A60A60A10A10A15A15A15A15A10A10A30A
Ef1Ef2Ef3Ef4Ef5Ef6Ef7Ef8Ef9
Ef10Ef11Ef12Ef13Ef14Ef15Ef16Ef17Ef18
1. ENGINE ROOM FUSE & RELAY BOX
1) ENGINE ROOM FUSE BLOCK
2) USAGE OF FUSE IN ENGINE ROOM FUSE BOX
* 30 : Battery(+) Power Supply
Front
fog
Lamp
Head
Lamp
(LOW)
Head
Lamp (HI)
Illumination
Relay
Horn
Relay
A/CON C101
C102 C103 S101
Cooling fan-2
Cooling fan-1
Ef10 10ATAIL LAMP LH
Ef11 10ATAIL LAMP RH
Ef12 15AHEAD LAMP LH
Ef13 15AHEAD LAMP RH
Ef14 15AFRT FOG LAMP
Ef15 15ADOOR LOCK
Ef16 10AHORN
Ef17 10AA/CON COMP
Ef18 30ABLOWER
DSL GSL
COMP RESIS
TOR
109876 5432121 20 19 18 17 16 15 14 13 12 11
21
123
12
Ef9 60A
BATT1
Ef8 60ABATT2
Ef7 40AIGNITION SWITCH
Ef6 40A
FUSIBLE LINK
HEADLAMP
Ef5 30ACOOLING FAN
Ef4 30APOWER
WINDOW
2) FUSIBLE LINK FUSE BOX
80A 80A 60A
E
f3Ef2Ef1
3) RELAY TERMINAL NUMBER
8687
8530
S
BL8587a
30
87
86
4PIN RELAY 3PIN RELAY 5PIN RELAY ABS & ABD
Generator
Preheating
Power Window
Cooling FanHead Lamp
Ignition Switch Battery 2 Battery 1
Tail Lamp LH
Tail Lamp RH
Head Lamp LH
Head Lamp RH
Front Fog Lamp Door LockHorn
A/C Compressor
Blower
Fuse No Capacity UsagePower Supply
30 BAT(+)
Illumination(58)
30 BAT(+)