SUBARU BRZ 2014 1.G Owners Manual
BRZ 2014 1.G
SUBARU
SUBARU
https://www.carmanualsonline.info/img/17/7179/w960_7179-0.png
SUBARU BRZ 2014 1.G Owners Manual
Trending: water pump, set clock, deactivate passenger airbag, coolant, spare tire, garage, start stop button
Page 341 of 488
341
4-3. Do-it-yourself maintenance
4
Maintenance and care
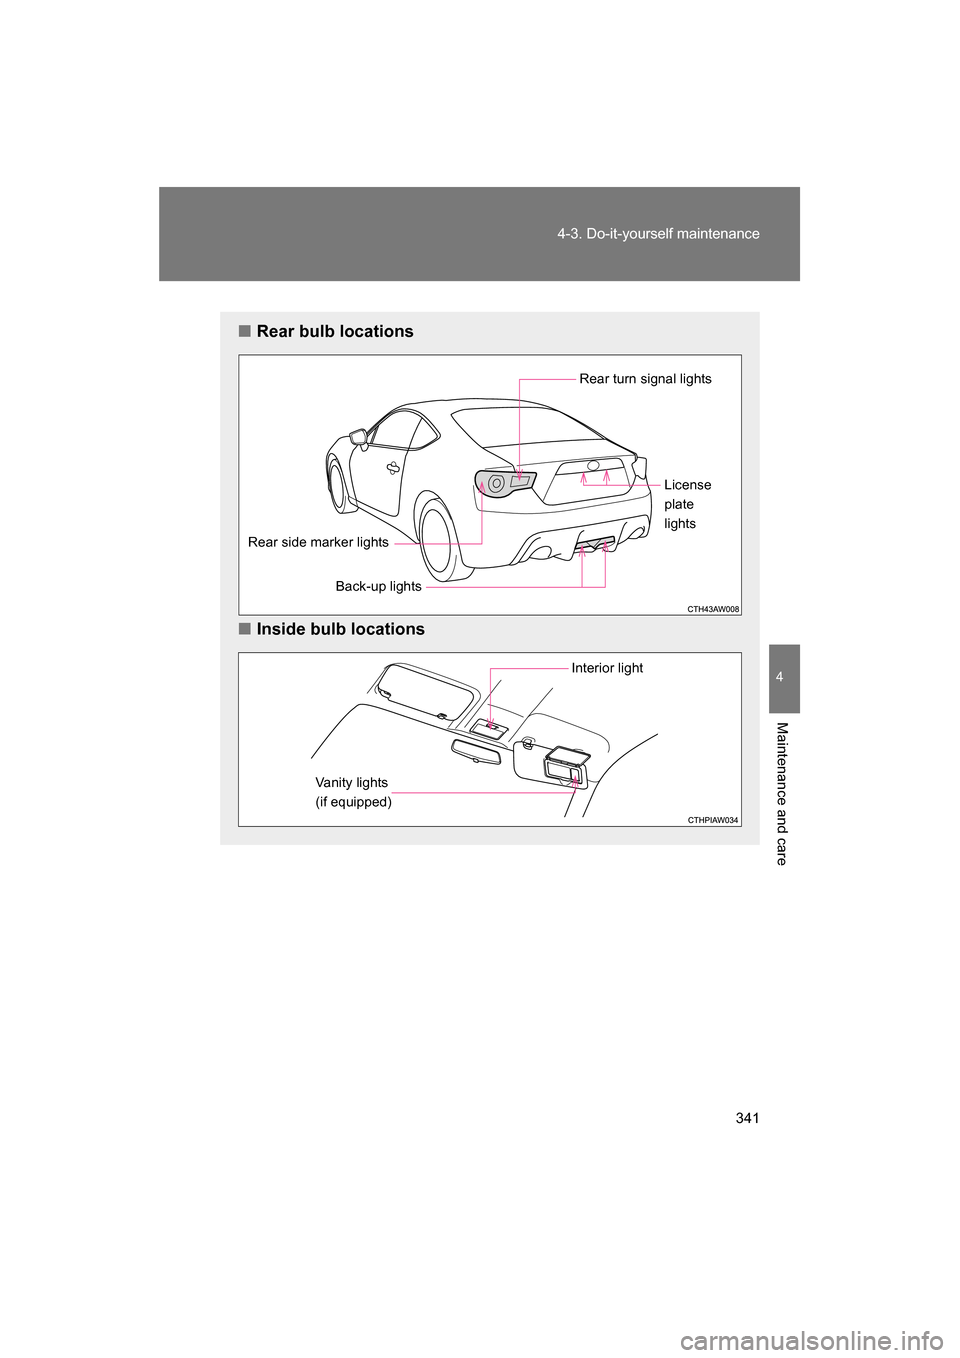
■Rear bulb locations
■Inside bulb locations
Rear turn signal lights
Rear side marker lightsBack-up lights License
plate
lights
Interior light
Vanity lights
(if equipped)
Page 342 of 488
342
4-3. Do-it-yourself maintenance
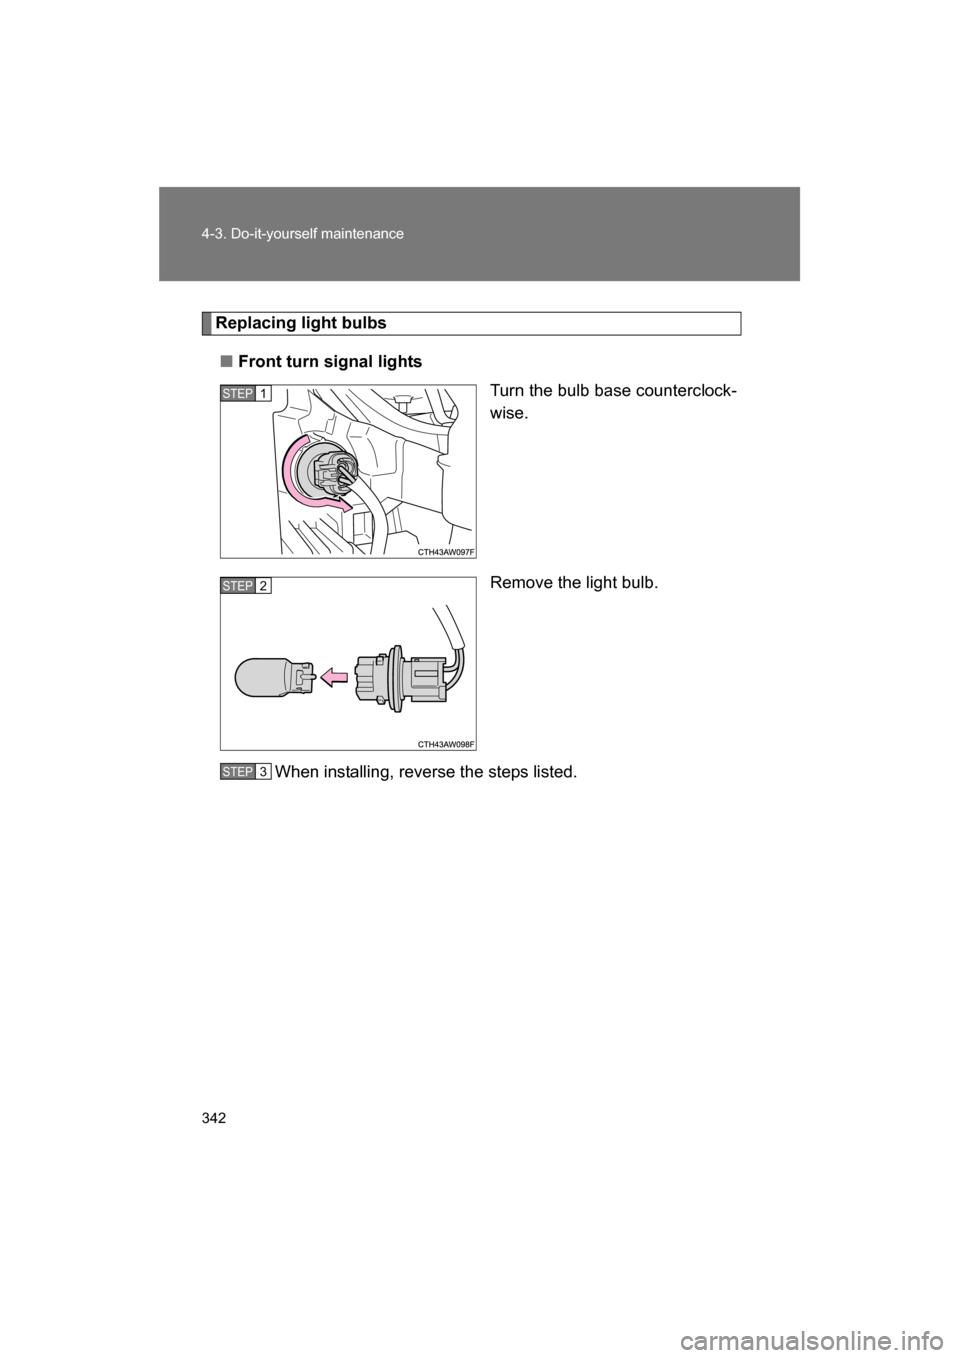
Replacing light bulbs
■Front turn signal lightsTurn the bulb base counterclock-
wise.
Remove the light bulb.
When installing, reverse the steps listed.
STEP 1
STEP 3 STEP 2
STEP 3
Page 343 of 488
343
4-3. Do-it-yourself maintenance
4
Maintenance and care
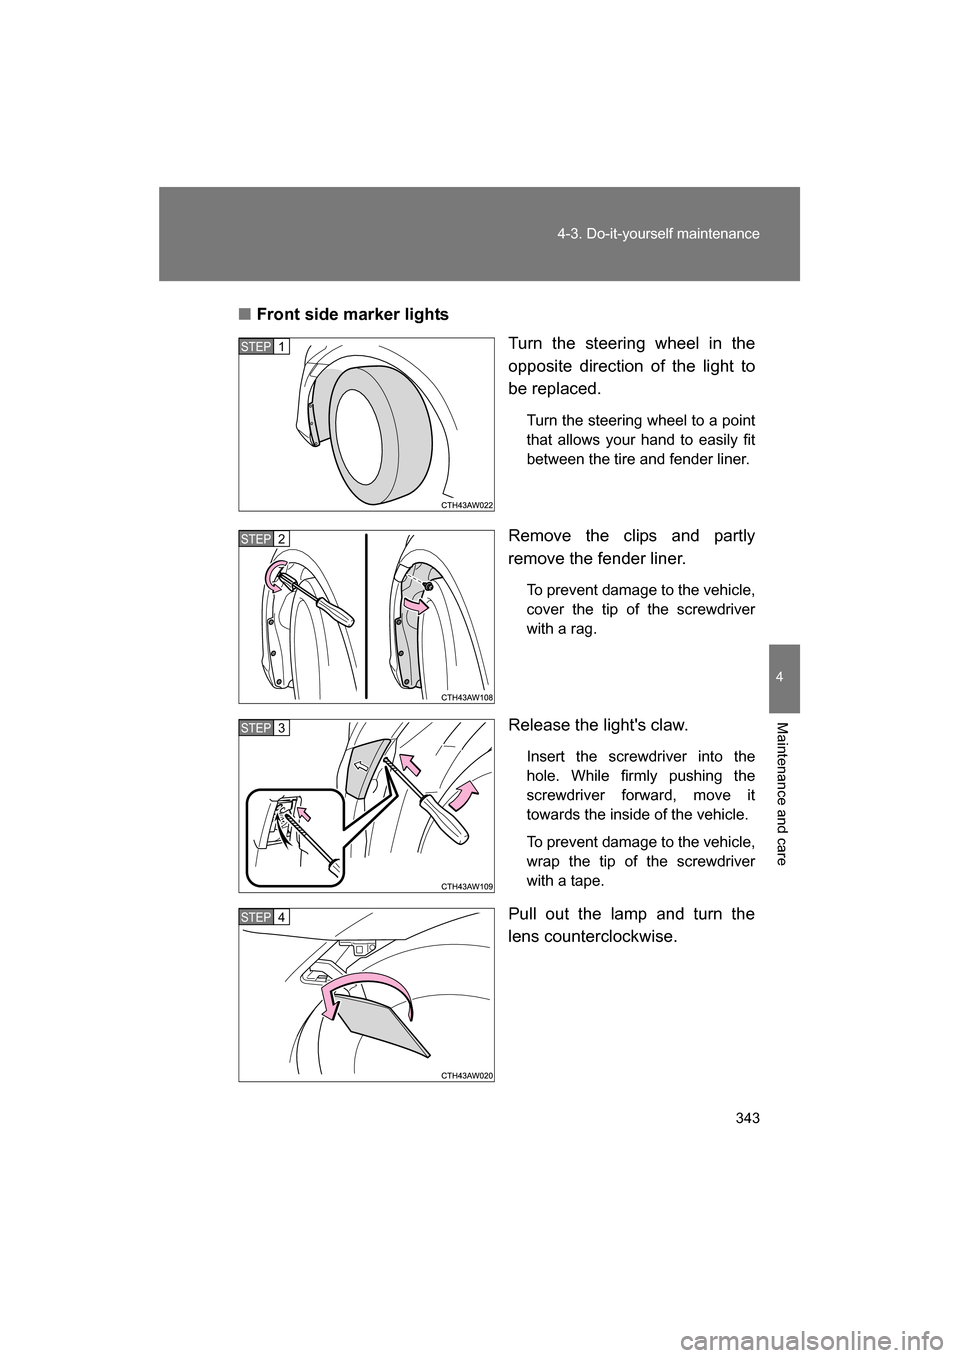
■Front side marker lightsTurn the steering wheel in the
opposite direction of the light to
be replaced.
Turn the steering wheel to a point
that allows your hand to easily fit
between the tire and fender liner.
Remove the clips and partly
remove the fender liner. To prevent damage to the vehicle,
cover the tip of the screwdriver
with a rag.
Release the light's claw. Insert the screwdriver into the
hole. While firmly pushing the
screwdriver forward, move it
towards the inside of the vehicle.
To prevent damage to the vehicle,
wrap the tip of the screwdriver
with a tape.
Pull out the lamp and turn the
lens counterclockwise.
STEP 1
STEP 2
STEP 3
STEP 4
Page 344 of 488
344
4-3. Do-it-yourself maintenance
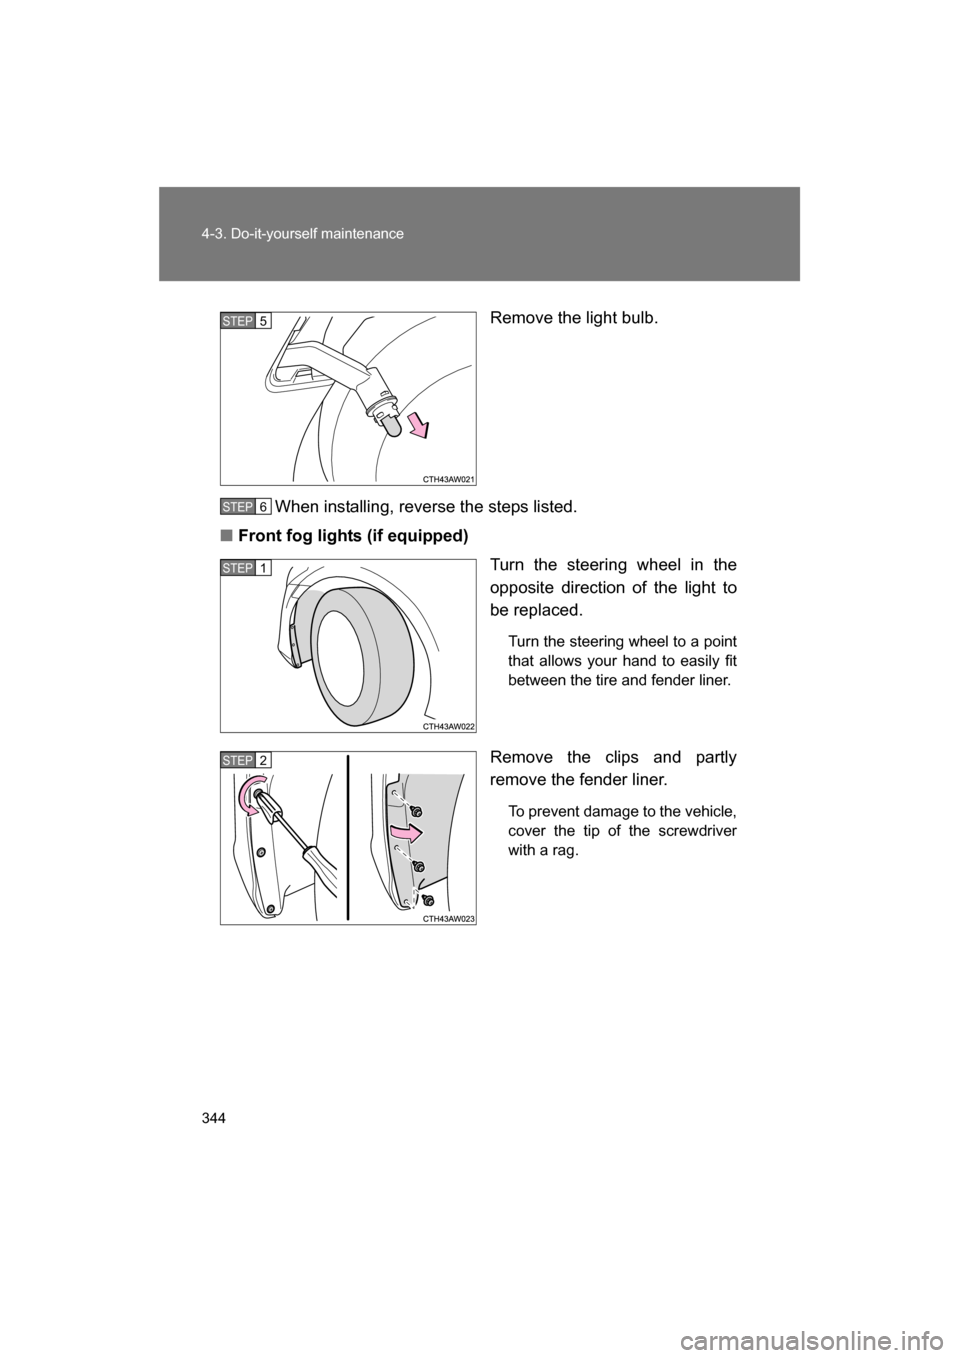
Remove the light bulb.
When installing, reverse the steps listed.
■Front fog lights (if equipped) Turn the steering wheel in the
opposite direction of the light to
be replaced.
Turn the steering wheel to a point
that allows your hand to easily fit
between the tire and fender liner.
Remove the clips and partly
remove the fender liner. To prevent damage to the vehicle,
cover the tip of the screwdriverwith a rag.
STEP 5
STEP 6
STEP 1
STEP 2
Page 345 of 488
345
4-3. Do-it-yourself maintenance
4
Maintenance and care
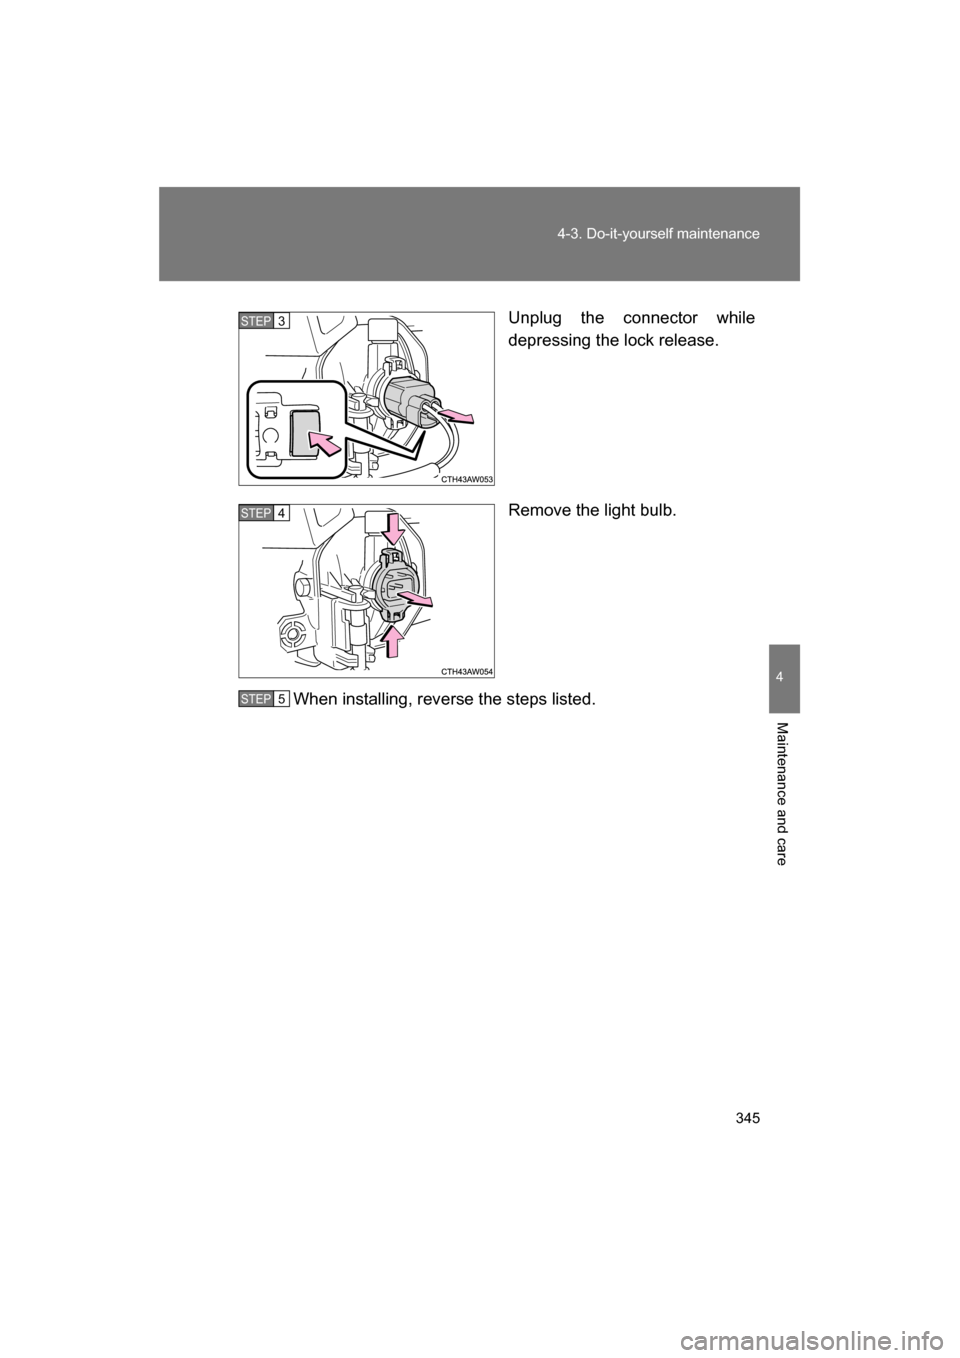
Unplug the connector while
depressing the lock release.
Remove the light bulb.
When installing, reverse the steps listed.STEP 3
STEP 4
STEP 5
Page 346 of 488
346
4-3. Do-it-yourself maintenance
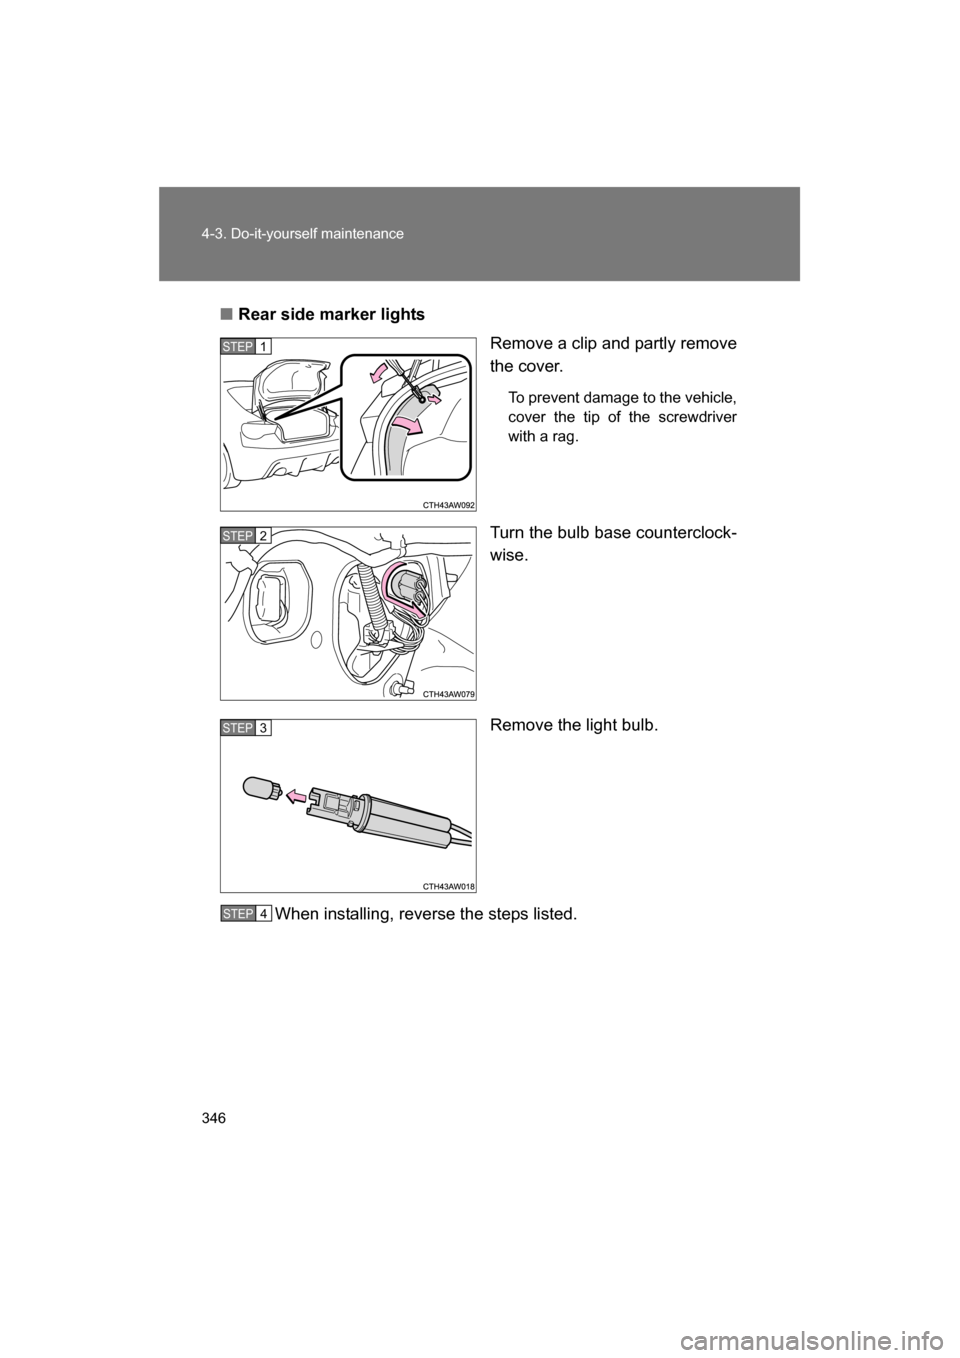
■Rear side marker lightsRemove a clip and partly remove
the cover.
To prevent damage to the vehicle,
cover the tip of the screwdriverwith a rag.
Turn the bulb base counterclock-
wise.
Remove the light bulb.
When installing, reverse the steps listed.
STEP 1
STEP 2
STEP 3
STEP 4
Page 347 of 488
347
4-3. Do-it-yourself maintenance
4
Maintenance and care
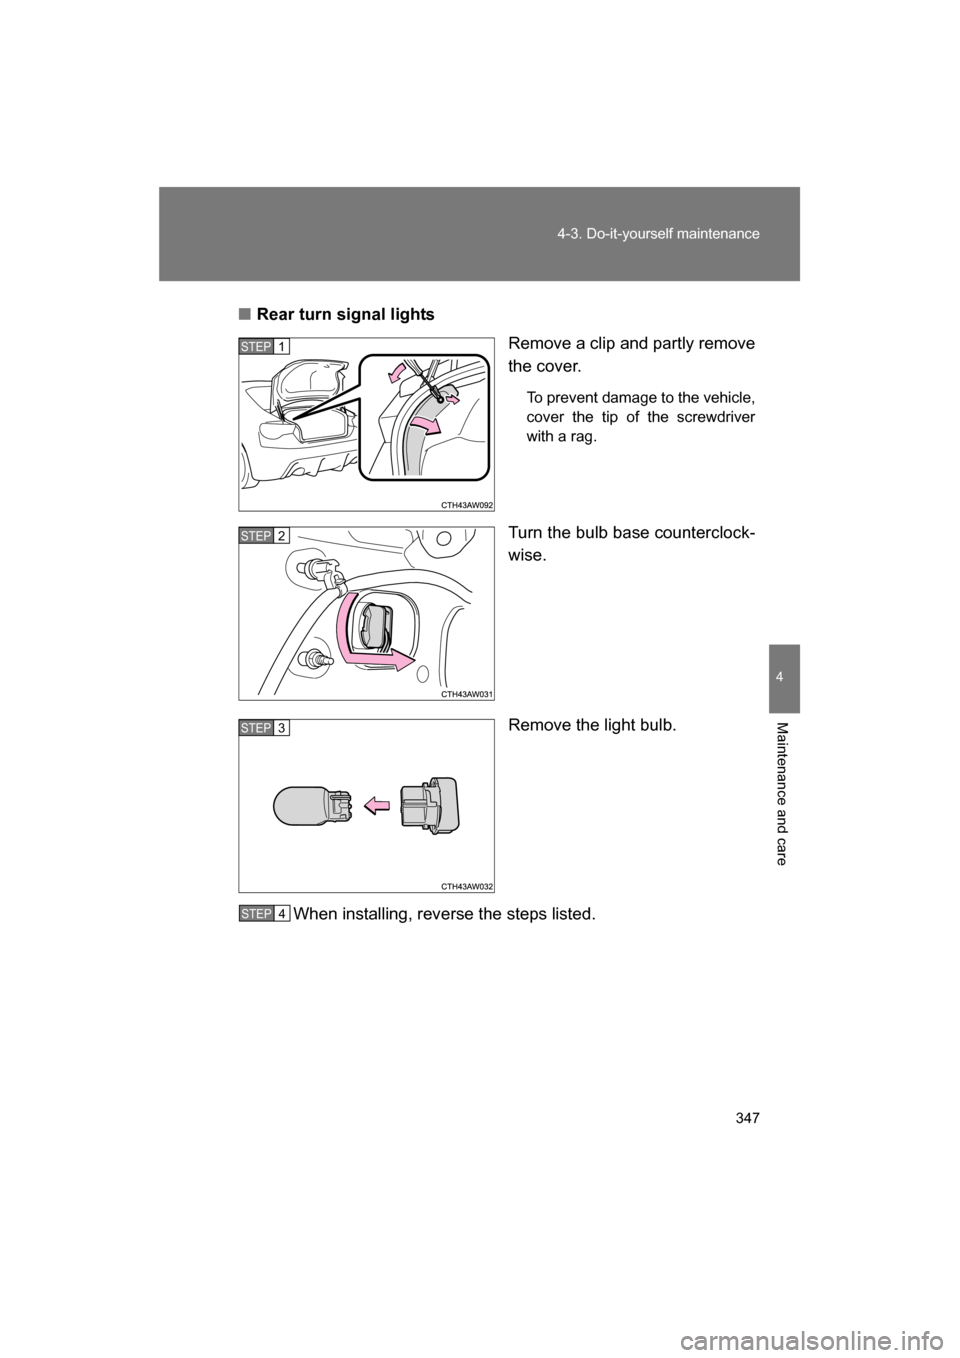
■Rear turn signal lightsRemove a clip and partly remove
the cover.
To prevent damage to the vehicle,
cover the tip of the screwdriver
with a rag.
Turn the bulb base counterclock-
wise.
Remove the light bulb.
When installing, reverse the steps listed.
STEP 1
STEP 2
STEP 3
STEP 4
Page 348 of 488
348
4-3. Do-it-yourself maintenance
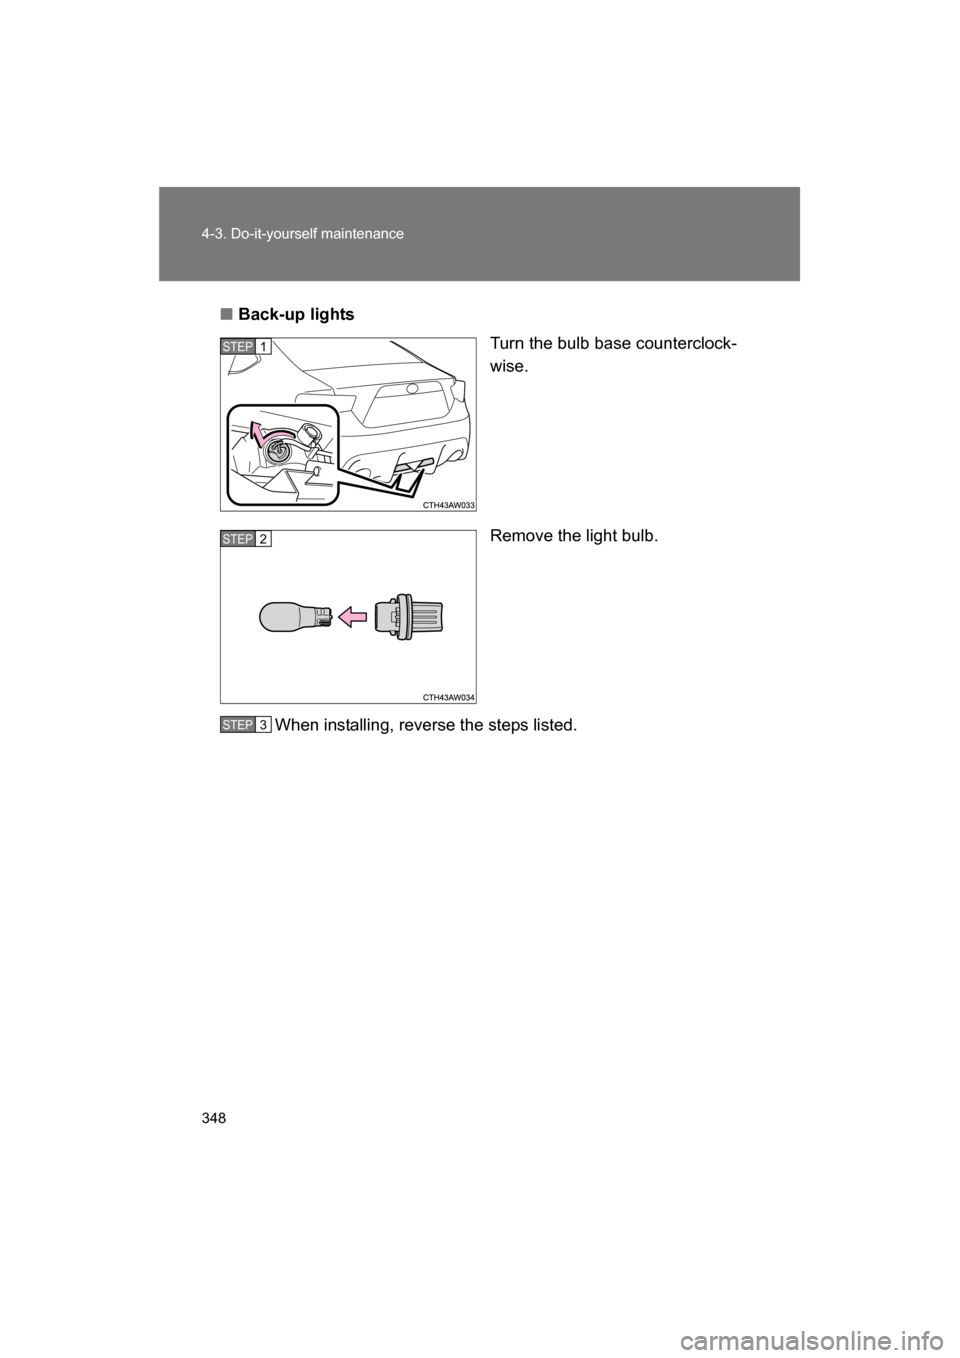
■Back-up lightsTurn the bulb base counterclock-
wise.
Remove the light bulb.
When installing, reverse the steps listed.
STEP 1
STEP 3 STEP 2
STEP 3
Page 349 of 488
349
4-3. Do-it-yourself maintenance
4
Maintenance and care
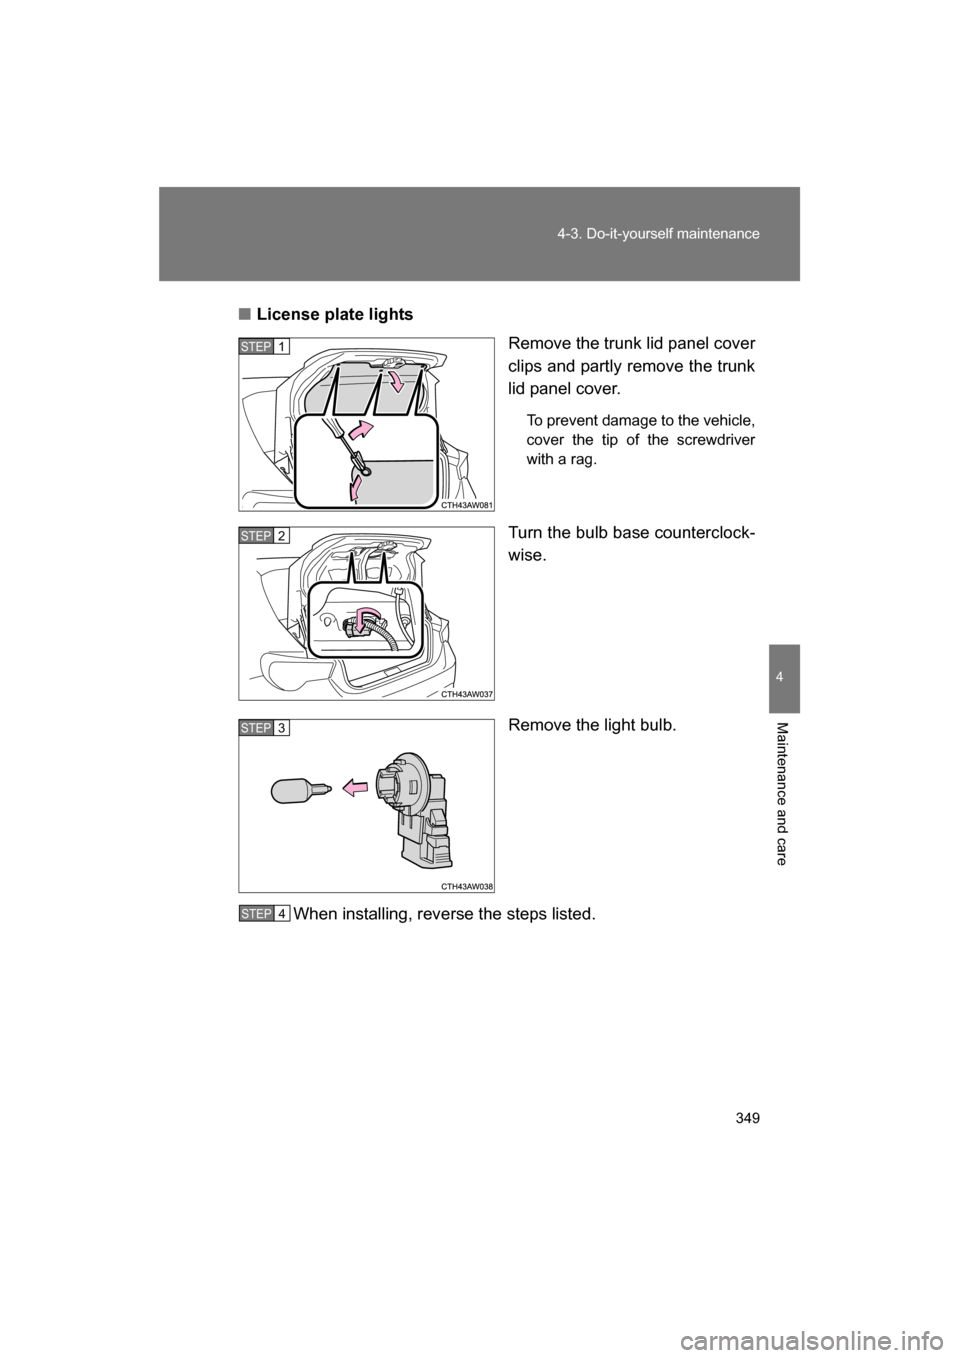
■License plate lightsRemove the trunk lid panel cover
clips and partly remove the trunk
lid panel cover.
To prevent damage to the vehicle,
cover the tip of the screwdriver
with a rag.
Turn the bulb base counterclock-
wise.
Remove the light bulb.
When installing, reverse the steps listed.
STEP 1
STEP 2
STEP 3
STEP 4
Page 350 of 488
350
4-3. Do-it-yourself maintenance
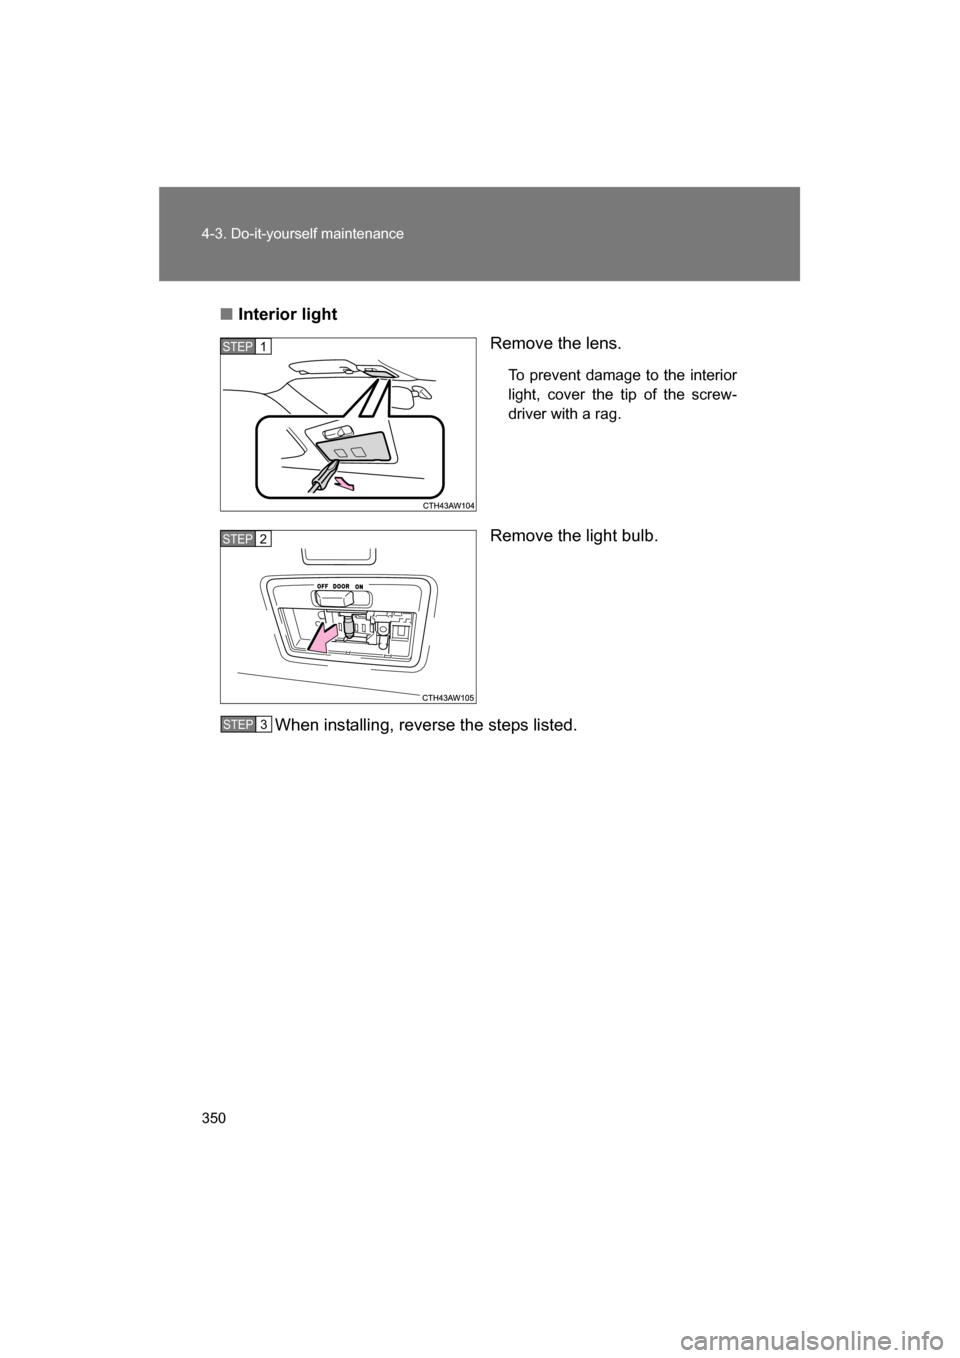
■Interior lightRemove the lens.
To prevent damage to the interior
light, cover the tip of the screw-
driver with a rag.
Remove the light bulb.
When installing, reverse the steps listed.
STEP 1
STEP 2
STEP 3
Trending: fuel reserve, engine overheat, suspension, door lock, jump start terminals, fuse, windshield wipers
