audio SUBARU BRZ 2017 1.G Navigation Manual
[x] Cancel search | Manufacturer: SUBARU, Model Year: 2017, Model line: BRZ, Model: SUBARU BRZ 2017 1.GPages: 334, PDF Size: 10.36 MB
Page 24 of 334
22 Introduction
Before Use
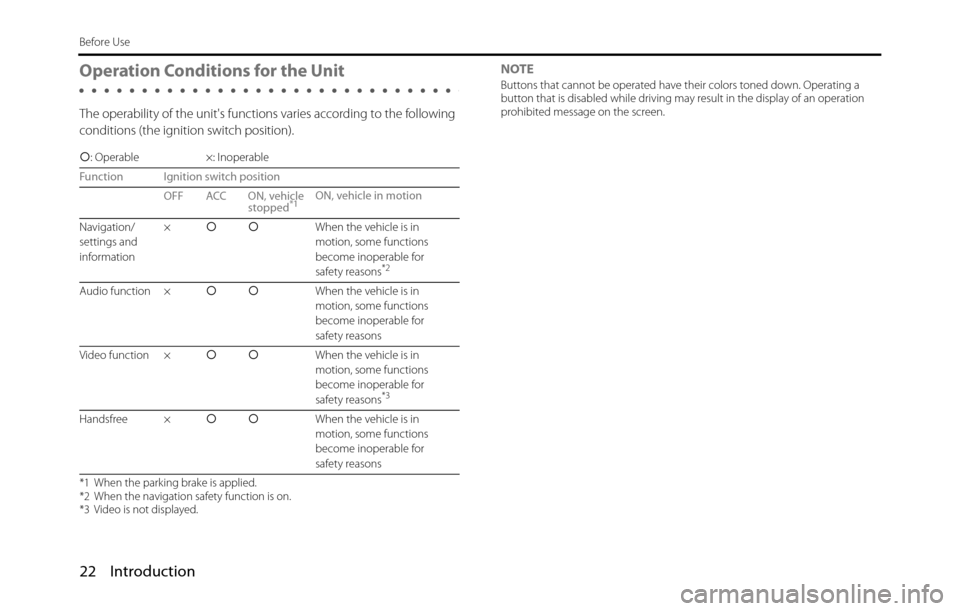
Operation Conditions for the Unit
The operability of the unit's functions varies according to the following
conditions (the ignition switch position).NOTE
Buttons that cannot be operated have their colors toned down. Operating a
button that is disabled while driving may result in the display of an operation
prohibited message on the screen.
�c: Operable ×: Inoperable
Function Ignition switch position
OFF ACC ON, vehicle
stopped
*1ON, vehicle in motion
Navigation/
settings and
information�c�cWhen the vehicle is in
motion, some functions
become inoperable for
safety reasons
*2
Audio function �c�cWhen the vehicle is in
motion, some functions
become inoperable for
safety reasons
Video function �c�cWhen the vehicle is in
motion, some functions
become inoperable for
safety reasons
*3
Handsfree �c�cWhen the vehicle is in
motion, some functions
become inoperable for
safety reasons
*1 When the parking brake is applied.
*2 When the navigation safety function is on.
*3 Video is not displayed.
Page 25 of 334
Introduction 23
Before Use
Unit Settings
In addition to settings for navigation and audio operations,
the following settings can be performed for the unit.
•Bluetooth setting (See Page 24.)
•Interface Customization (See Page 25.)
•Opening screen setting (See Page 26.)
•Time zone setting (See Page 27.)
•Link to Day/Night View setting (See Page 28.)
•Voice recognition setting (See Page 30.)
•Guide tone setting (See Page 31.)
•Aha Setting (See Page 32.)
•Deleting Personal Data (See Page 33.)
•Initializing Settings menu (See Page 34.)
•Language setting (See Page 35.)
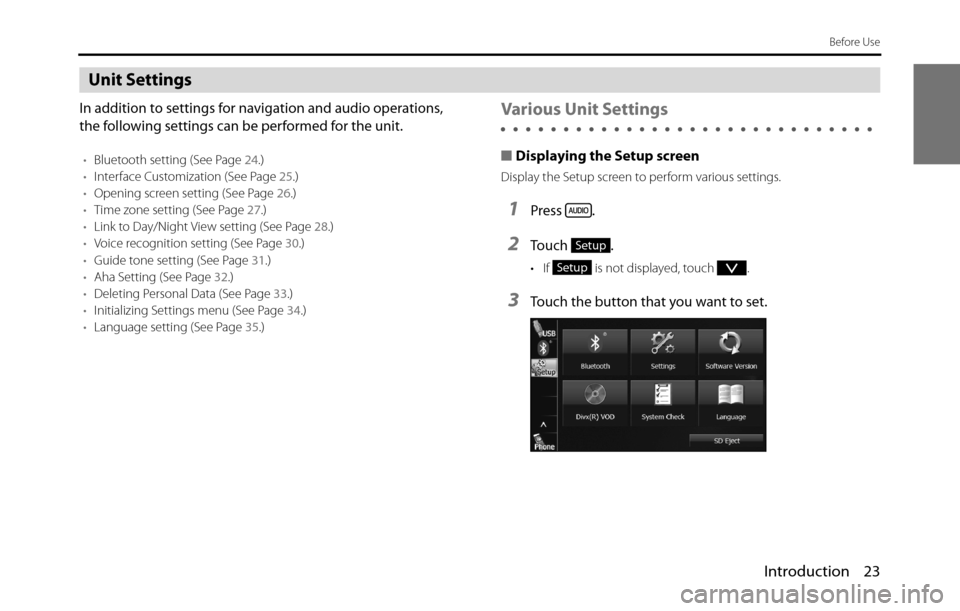
Various Unit Settings
■Displaying the Setup screen
Display the Setup screen to perform various settings.
1Press .
2Touch .
• If is not displayed, touch .
3Touch the button that you want to set.
Setup
Setup
Page 26 of 334
24 Introduction
Before Use
NOTE
:
Perform the Bluetooth settings. (See Page 24.)
(Settings):
Perform the unit settings. (See Page 25 - 34.)
(Software Version):
View information such as the map data that is stored on the unit or version
information for the audio application. (See Page 36.)
(DivX(R) VOD):
Display DivX VOD code. (See Page 244.)
(System Check):
Check the sensitivity of the GPS signal reception, or the connection of the
parking and reverse signals. (See Page 174.)
(Language):
Perform the language setting (See Page 35.)
(SD Eject):
Touch to remove the map SD card or the SD memory card that contains the
picture data. (See Page 16.)
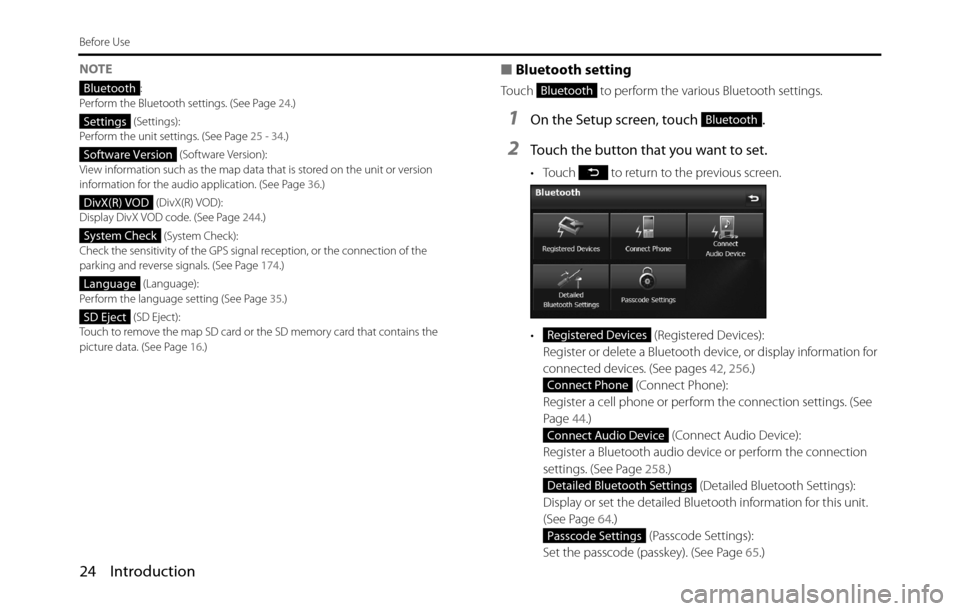
■Bluetooth setting
Touch to perform the various Bluetooth settings.
1On the Setup screen, touch .
2Touch the button that you want to set.
• Touch to return to the previous screen.
• (Registered Devices):
Register or delete a Bluetooth device, or display information for
connected devices. (See pages 42, 256.)
(Connect Phone):
Register a cell phone or perform the connection settings. (See
Page 44.)
(Connect Audio Device):
Register a Bluetooth audio device or perform the connection
settings. (See Page 258.)
(Detailed Bluetooth Settings):
Display or set the detailed Bluetooth information for this unit.
(See Page 64.)
(Passcode Settings):
Set the passcode (passkey). (See Page 65.)
Bluetooth
Settings
Software Version
DivX(R) VOD
System Check
Language
SD Eject
Bluetooth
Bluetooth
Registered Devices
Connect Phone
Connect Audio Device
Detailed Bluetooth Settings
Passcode Settings
Page 32 of 334
30 Introduction
Before Use
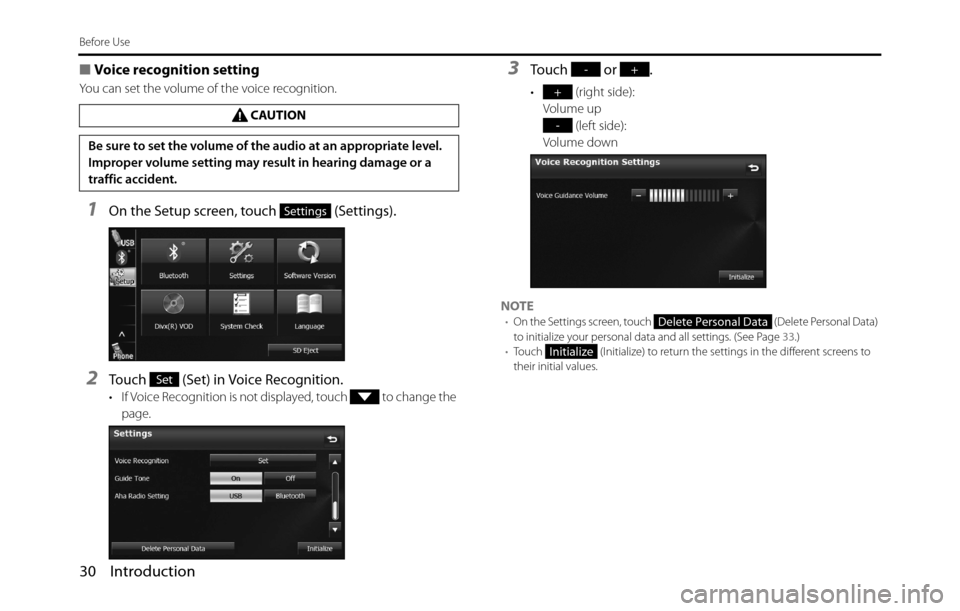
■Voice recognition setting
You can set the volume of the voice recognition.
1On the Setup screen, touch (Settings).
2Touch (Set) in Voice Recognition.
• If Voice Recognition is not displayed, touch to change the
page.
3Touch or .
• (right side):
Volume up
(left side):
Volume down
NOTE
•On the Settings screen, touch (Delete Personal Data)
to initialize your personal data and all settings. (See Page 33.)
•Touch (Initialize) to return the settings in the different screens to
their initial values.
CAUTION
Be sure to set the volume of the audio at an appropriate level.
Improper volume setting may result in hearing damage or a
traffic accident.
Settings
Set
-+
+
-
Delete Personal Data
Initialize
Page 34 of 334
32 Introduction
Before Use
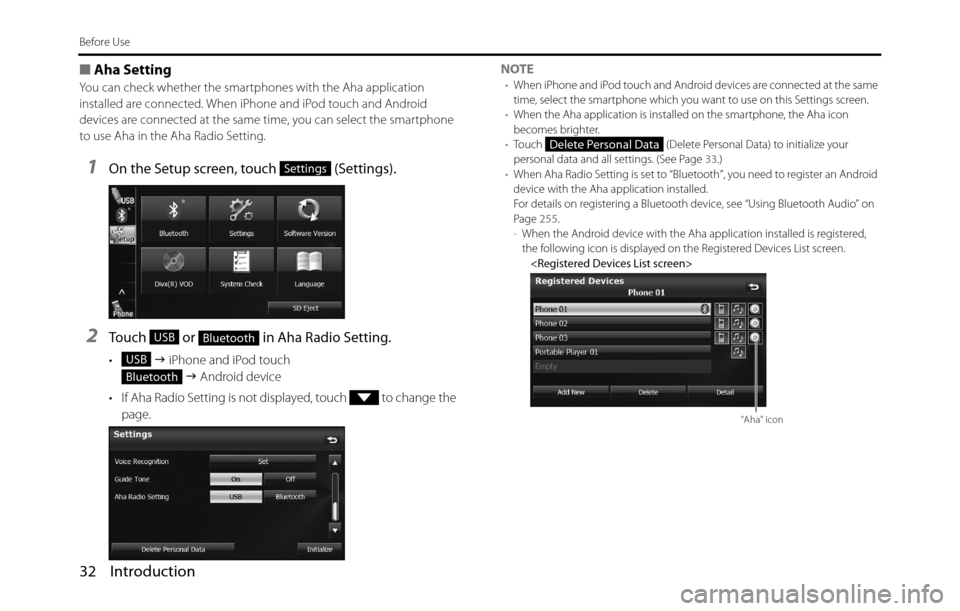
■Aha Setting
You can check whether the smartphones with the Aha application
installed are connected. When iPhone and iPod touch and Android
devices are connected at the same time, you can select the smartphone
to use Aha in the Aha Radio Setting.
1On the Setup screen, touch (Settings).
2Touch or in Aha Radio Setting.
• �J iPhone and iPod touch
�J Android device
• If Aha Radio Setting is not displayed, touch to change the
page.NOTE
•When iPhone and iPod touch and Android devices are connected at the same
time, select the smartphone which you want to use on this Settings screen.
•When the Aha application is installed on the smartphone, the Aha icon
becomes brighter.
•Touch (Delete Personal Data) to initialize your
personal data and all settings. (See Page 33.)
•When Aha Radio Setting is set to “Bluetooth”, you need to register an Android
device with the Aha application installed.
For details on registering a Bluetooth device, see “Using Bluetooth Audio” on
Page 255.
-When the Android device with the Aha application installed is registered,
the following icon is displayed on the Registered Devices List screen.
Settings
USBBluetooth
USB
Bluetooth
Delete Personal Data
“Aha” icon
Page 35 of 334
Introduction 33
Before Use
■Deleting Personal Data
You can delete the data items that you registered and return them to
their factory default values.
Deleted personal data items
Deleting personal data
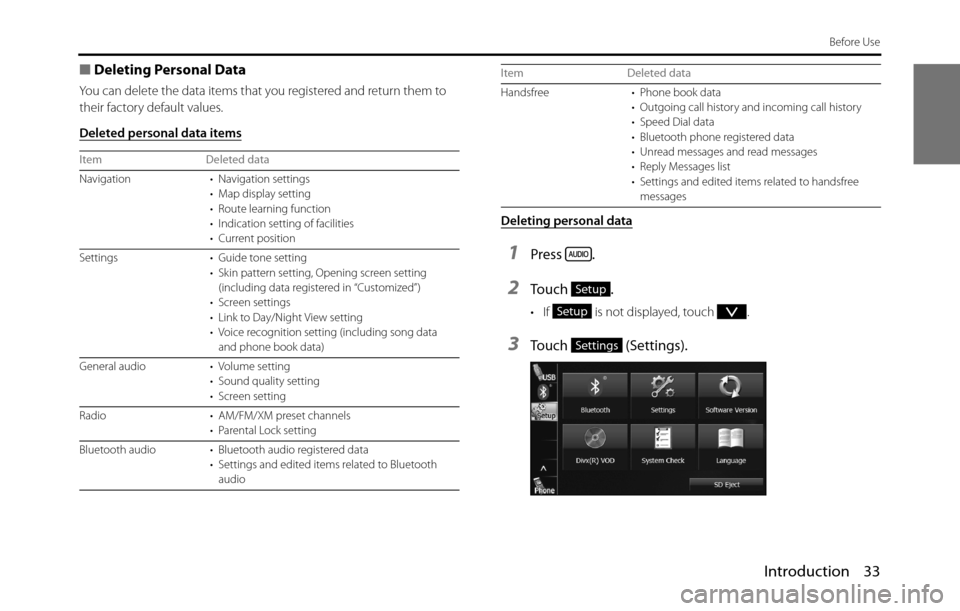
1Press .
2To u c h .
• If is not displayed, touch .
3Touch (Settings).
Item Deleted data
Navigation • Navigation settings
• Map display setting
• Route learning function
• Indication setting of facilities
• Current position
Settings • Guide tone setting
• Skin pattern setting, Opening screen setting
(including data registered in “Customized”)
• Screen settings
• Link to Day/Night View setting
• Voice recognition setting (including song data
and phone book data)
General audio • Volume setting
• Sound quality setting
• Screen setting
Radio • AM/FM/XM preset channels
• Parental Lock setting
Bluetooth audio • Bluetooth audio registered data
• Settings and edited items related to Bluetooth
audio
Handsfree • Phone book data
• Outgoing call history and incoming call history
• Speed Dial data
• Bluetooth phone registered data
• Unread messages and read messages
• Reply Messages list
• Settings and edited items related to handsfree
messages Item Deleted data
Setup
Setup
Settings
Page 37 of 334
Introduction 35
Before Use
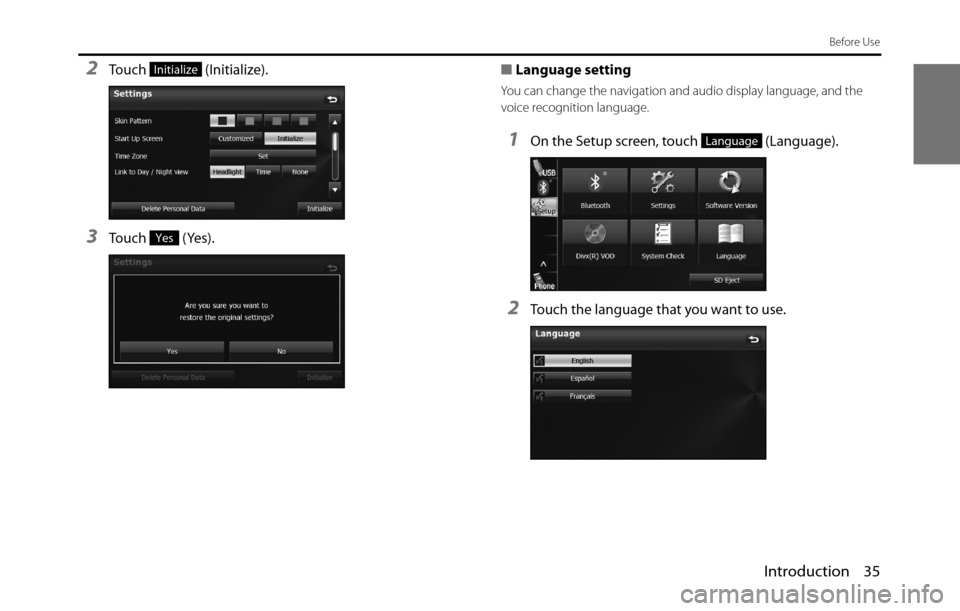
2Touch (Initialize).
3Touch (Yes).■Language setting
You can change the navigation and audio display language, and the
voice recognition language.
1On the Setup screen, touch (Language).
2Touch the language that you want to use.
Initialize
Yes
Language
Page 38 of 334
36 Introduction
Before Use
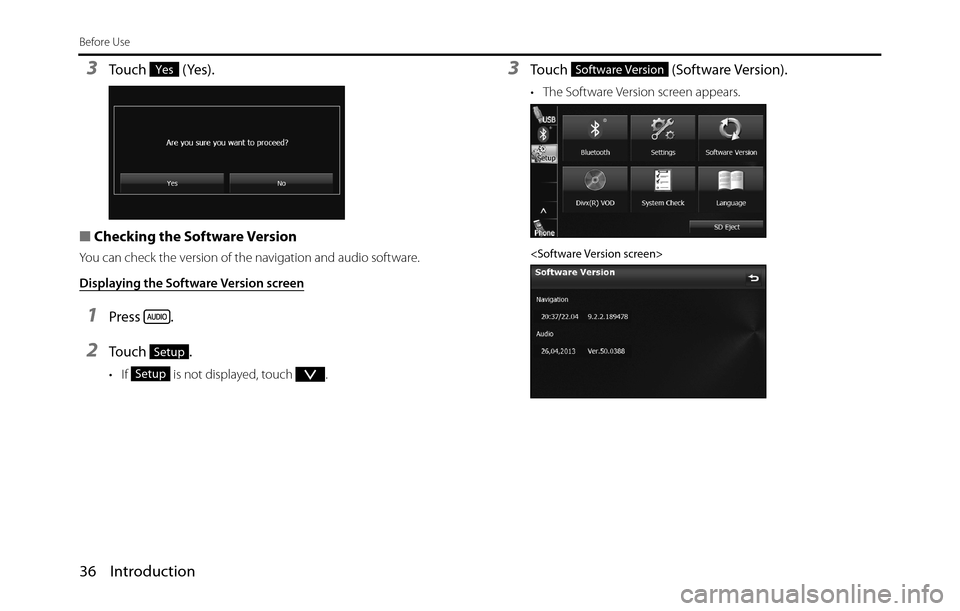
3Touch (Yes).
■Checking the Software Version
You can check the version of the navigation and audio software.
Displaying the Software Version screen
1Press .
2To u c h .
• If is not displayed, touch .
3Touch (Software Version).
• The Software Version screen appears.
Yes
Setup
Setup
Software Version
Page 39 of 334
Introduction 37
Before Use
Screen Adjustment and Setting
When Link to Day/Night View on the Settings screen is set to
“Headlight” (See Page 28.), day view or night view is selected based on
whether the lights (sidelights, tail lights, license plate light) are on or off,
to make it easier to view the screen. When “Time” is set (See Page 28.),
the view changes at the set time.
Also, when set to “None” (See Page 29.), you can manually switch to a
day view or a night view screen at any time.
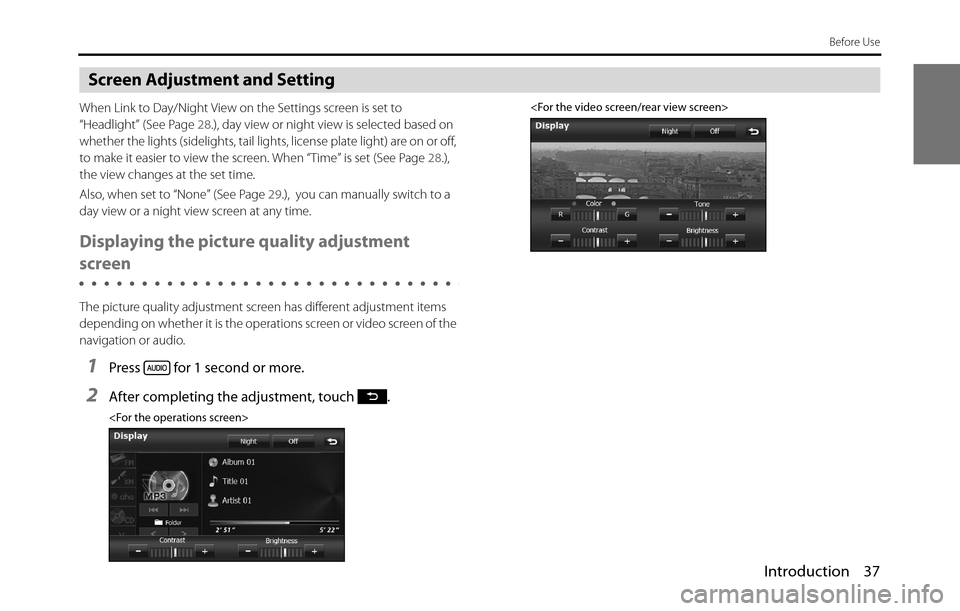
Displaying the picture quality adjustment
screen
The picture quality adjustment screen has different adjustment items
depending on whether it is the operations screen or video screen of the
navigation or audio.
1Press for 1 second or more.
2After completing the adjustment, touch .
Page 45 of 334
Introduction 43
Before Use
7When the registration is complete, “Connection
completed.” appears.
• The cell phone registration is complete.
• After the registration completed message is displayed, “Do you
want to transfer the phonebook from your mobile device?”
appears. Touch ( Yes) or (No). For the procedure
when you touch (Yes), see step 4 in “Transferring the
phone book data from a cell phone” on Page 57.
NOTE
•If the registration fails, “Connection failed.” appears on the screen. If this
happens, perform the registration operation again.
•For details of operations on the cell phone, see the cell phone's instruction
manual.
•When processing a Bluetooth connection, the Bluetooth Audio may skip.
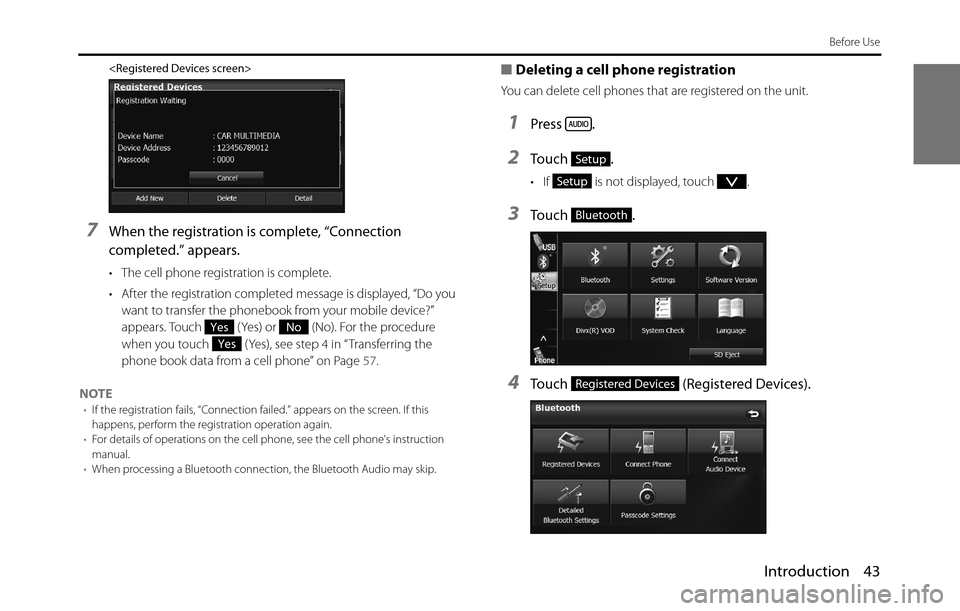
■Deleting a cell phone registration
You can delete cell phones that are registered on the unit.
1Press .
2To u c h .
• If is not displayed, touch .
3To u c h .
4Touch (Registered Devices).
YesNo
Yes
Setup
Setup
Bluetooth
Registered Devices