language SUBARU CROSSTREK 2017 1.G Owners Manual
[x] Cancel search | Manufacturer: SUBARU, Model Year: 2017, Model line: CROSSTREK, Model: SUBARU CROSSTREK 2017 1.GPages: 572, PDF Size: 41.52 MB
Page 179 of 572
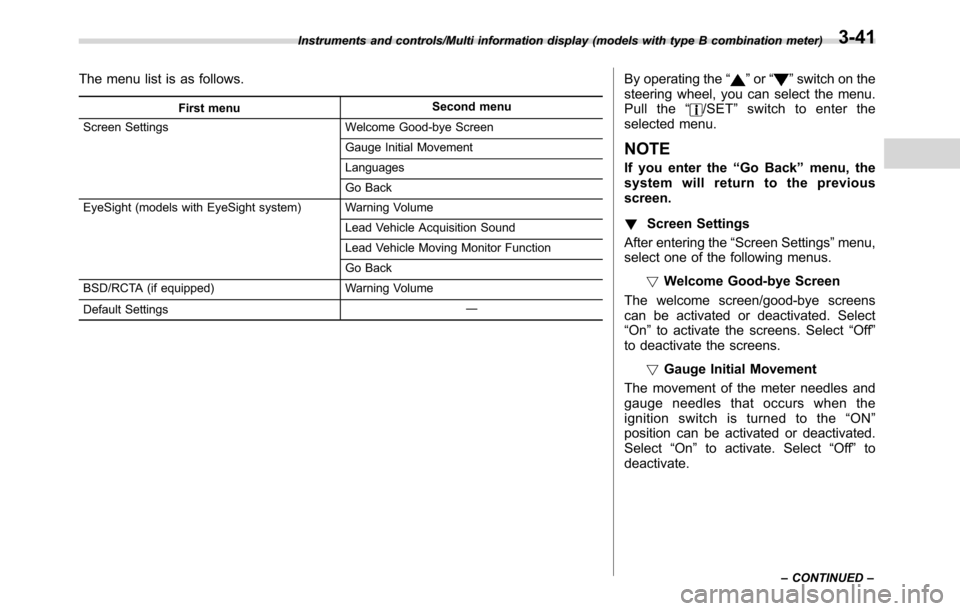
The menu list is as follows.
First menuSecond menu
Screen Settings Welcome Good-bye Screen
Gauge Initial Movement
Languages
Go Back
EyeSight (models with EyeSight system) Warning Volume
Lead Vehicle Acquisition Sound
Lead Vehicle Moving Monitor Function
Go Back
BSD/RCTA (if equipped) Warning Volume
Default Settings―
By operating the“”or“”switch on the
steering wheel, you can select the menu.
Pull the“
/SET”switch to enter the
selected menu.
NOTE
If you enter the“Go Back”menu, the
system will return to the previous
screen.
!Screen Settings
After entering the“Screen Settings”menu,
select one of the following menus.
!Welcome Good-bye Screen
The welcome screen/good-bye screens
can be activated or deactivated. Select
“On”to activate the screens. Select“Off”
to deactivate the screens.
!Gauge Initial Movement
The movement of the meter needles and
gauge needles that occurs when the
ignition switch is turned to the“ON”
position can be activated or deactivated.
Select“On”to activate. Select“Off”to
deactivate.
Instruments and controls/Multi information display (models with type B combination meter)
–CONTINUED–3-41
Page 180 of 572
Instruments and controls/Multi function display
!Languages
Operate the“
”or“”switch on the
steering wheel to display the preferred
language. Then pull the“
/SET”switch to
select the displayed language.
!EyeSight (models with EyeSight
system)
NOTE
For models with the EyeSight system,
refer to the Owner’s Manual supple-
ment for the EyeSight system.
!BSD/RCTA (if equipped)
After entering the“BSD/RCTA”menu,
select the“Warning Volume”menu. You
can set the volume of the warning buzzer
for RCTA (Rear Cross Traffic Alert). You
can select“Max”,“Mid”,“Min”or“Off”.
!Default Settings
Select“Ye s”to use the menu screen to
restore customized settings to the factory
default settings. Select“No”to return to
the previous screen without restoring the
factory default settings.
Multi function display (if
equipped)
&Models without multi func-
tion display
NOTE
For models with information display
(black and white), refer to“Information
display”F3-32.
The U.S.-spec models are not equipped
with the multi function display. The other
models may be equipped with the multi
function display or not, depending on the
model.
&Safety precautions
WARNING
Always pay adequate attention to
safe driving when operating the
multi function display while the
vehicle is in motion. When operation
of the multi function display is
disturbing your awareness and abil-
ity to concentrate on driving, stop
the vehicle in a safe place before
performing operations on the
screen. Also, do not concentrate
on the display while driving. Doing
so may cause you to look away from
the road and could result in an
accident.
3-42
Page 191 of 572
&Selection screen
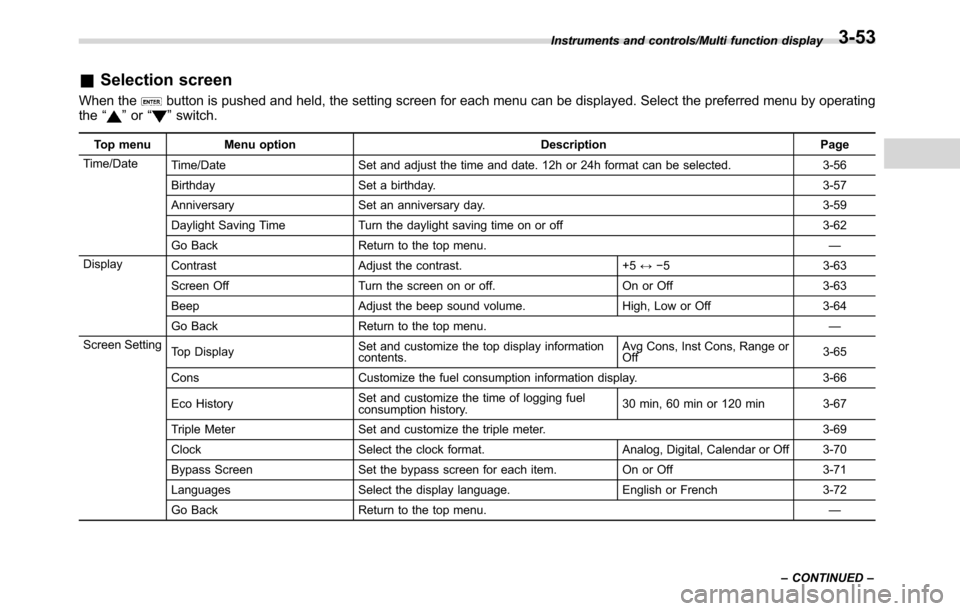
When thebutton is pushed and held, the setting screen for each menu can be displayed. Select the preferred menu by operating
the“”or“”switch.
Top menu Menu option Description Page
Time/Date
Time/Date Set and adjust the time and date. 12h or 24h format can be selected. 3-56
Birthday Set a birthday. 3-57
Anniversary Set an anniversary day. 3-59
Daylight Saving Time Turn the daylight saving time on or off 3-62
Go Back Return to the top menu.—
Display
Contrast Adjust the contrast. +5↔−53-63
Screen Off Turn the screen on or off. On or Off 3-63
Beep Adjust the beep sound volume. High, Low or Off 3-64
Go Back Return to the top menu.—
Screen Setting
Top DisplaySet and customize the top display information
contents.Avg Cons, Inst Cons, Range or
Off3-65
Cons Customize the fuel consumption information display. 3-66
Eco HistorySet and customize the time of logging fuel
consumption history.30 min, 60 min or 120 min 3-67
Triple Meter Set and customize the triple meter. 3-69
Clock Select the clock format. Analog, Digital, Calendar or Off 3-70
Bypass Screen Set the bypass screen for each item. On or Off 3-71
Languages Select the display language. English or French 3-72
Go Back Return to the top menu.— Instruments and controls/Multi function display
–CONTINUED–
3-53
Page 210 of 572
Instruments and controls/Multi function display
“”switch, and confirm the setting by
pushing thebutton.
6. The system will notify you that the
setting is complete.
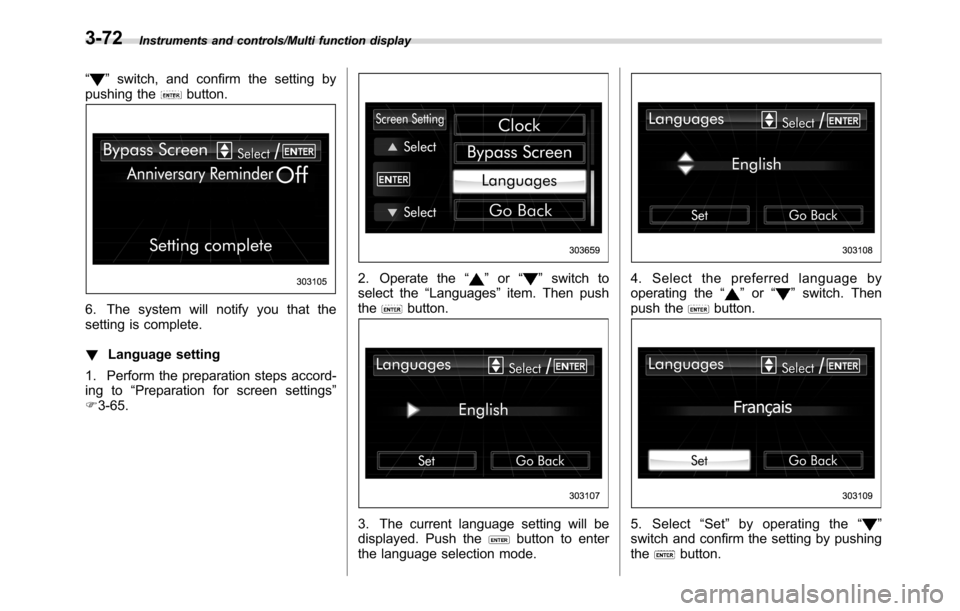
!Language setting
1. Perform the preparation steps accord-
ing to“Preparation for screen settings”
F3-65.
2. Operate the“”or“”switch to
select the“Languages”item. Then push
the
button.
3. The current language setting will be
displayed. Push thebutton to enter
the language selection mode.
4. Select the preferred language by
operating the“”or“”switch. Then
push thebutton.
5. Select“Set”by operating the“”
switch and confirm the setting by pushing
the
button.
3-72
Page 274 of 572
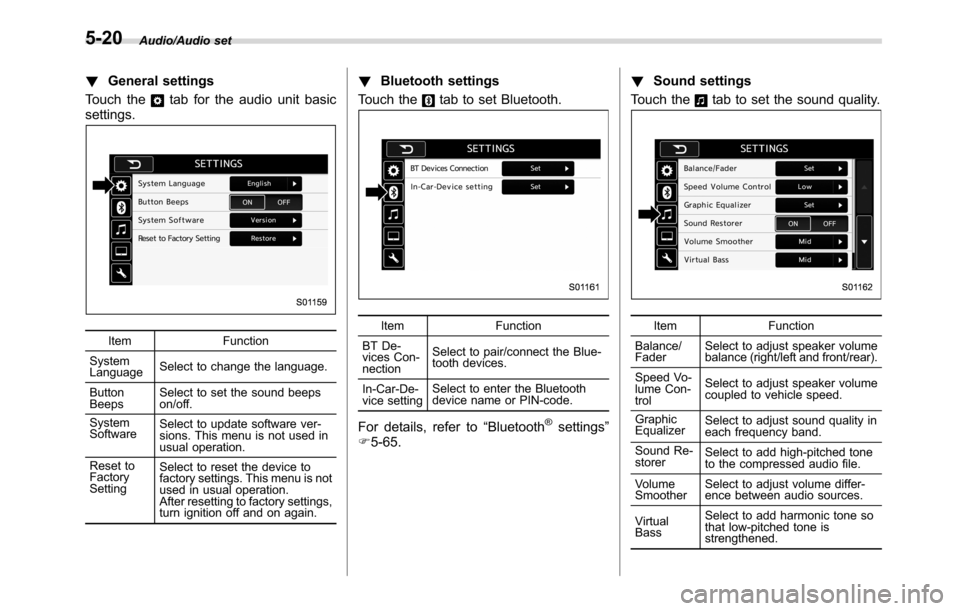
Audio/Audio set
!General settings
Touch the
tab for the audio unit basic
settings.
Item Function
System
LanguageSelect to change the language.
Button
BeepsSelect to set the sound beeps
on/off.
System
SoftwareSelect to update software ver-
sions. This menu is not used in
usual operation.
Reset to
Factory
SettingSelect to reset the device to
factory settings. This menu is not
used in usual operation.
After resetting to factory settings,
turn ignition off and on again.
!Bluetooth settings
Touch the
tab to set Bluetooth.
Item Function
BT De-
vices Con-
nectionSelect to pair/connect the Blue-
tooth devices.
In-Car-De-
vice settingSelect to enter the Bluetooth
device name or PIN-code.
For details, refer to“Bluetooth®settings”
F5-65.!Sound settings
Touch the
tab to set the sound quality.
Item Function
Balance/
FaderSelect to adjust speaker volume
balance (right/left and front/rear).
Speed Vo-
lume Con-
trolSelect to adjust speaker volume
coupled to vehicle speed.
Graphic
EqualizerSelect to adjust sound quality in
each frequency band.
Sound Re-
storerSelect to add high-pitched tone
to the compressed audio file.
Volume
SmootherSelect to adjust volume differ-
ence between audio sources.
Virtual
BassSelect to add harmonic tone so
that low-pitched tone is
strengthened.
5-20
Page 293 of 572
!How to subscribe to SiriusXM Sa-
tellite Radio
To listen to a satellite radio broadcast in
the vehicle, a subscription to the SiriusXM
Satellite Radio service is necessary.
A SiriusXM Satellite Radio is a tuner
designed exclusively to receive broad-
casts provided under a separate subscrip-
tion.
!How to subscribe
It is necessary to enter into a separate
service agreement with SiriusXM Satellite
Radio in order to receive satellite broad-
cast programming in the vehicle. Addi-
tional activation and service subscription
fees apply that are not included in the
purchase price of the vehicle and digital
satellite tuner.
For complete information on subscription
rates and terms, or to subscribe to
SiriusXM Satellite Radio:
.U.S. customers:
Refer to www.siriusxm.com or call
1-866-635-2349
.Canadian customers:
Refer to www.siriusxm.ca or call
1-877-209-0079WARNING
.SiriusXM Satellite Radio Services
—Legal Disclaimers and Warn-
ings
–Fees and Taxes—Subscrip-
tion fee, taxes, one time acti-
vation fee, and other fees may
apply. Subscription fee is con-
sumer only. All fees and pro-
gramming subject to change.
Subscriptions subject to Cus-
tomer Agreement available at
www.siriusxm.com (U.S.) or
www.siriusxm.ca (Canada).
SiriusXM U.S. satellite and
data services are available
only in the contiguous USA
and DC. SiriusXM satellite
service is also available in
Canada: see
www.siriusxm.ca.
Explicit Language Notice—
Channels with frequent expli-
cit language are indicated
with an“XL”preceding the
channel name. Channel block-
ing is available for SiriusXM
Satellite Radio receivers by
notifying SiriusXM at:.U.S. customers:
Visit www.siriusxm.com or call
1-866-635-2349
.Canadian customers:
Visit www.siriusxm.ca or call
1-877-209-0079
CAUTION
.It is prohibited to copy, decom-
pile, disassemble, reverse engi-
neer, hack, manipulate or other-
wise make available any technol-
ogy or software incorporated in
receivers compatible with the
SiriusXM Satellite Radio System
or that support the XM website,
the Online Service or any of its
content. Furthermore, the
AMBE
®voice compression soft-
ware included in this product is
protected by intellectual property
rights including patent rights,
copyrights, and trade secrets of
Digital Voice Systems, Inc.
.Note: this applies to SiriusXM
Satellite Radio receivers only
and not XM Ready devices.
Audio/Audio set
–CONTINUED–5-39
Page 334 of 572
Audio/Voice command system
!For PBAP incompatible but OPP
compatible Bluetooth phones
1. Select the“Download 1 Entry”key.
2. Transfer the contact data to the sys-
tem using a Bluetooth phone.
.This operation may be unnecessary
depending on the type of cell phone.
.To cancel this function, select the
“Cancel”key.
3. Check that a confirmation screen is
displayed when the operation is complete.
NOTE
To download all items, you may need to
change the settings in your cell phone
beforehand.
!Deleting the contact data
You can delete the phonebook data stored
in the audio set.
1. Display the“PHONE”screen. Refer to
“How to change the hands-free phone
system”F5-73.
2. Touch the“Contacts”key, and then
select the“Delete All”key.
3. Select the“OK”key when the con-
firmation screen appears.
NOTE
.Manual transfer operation cannot be
performed while driving.
.If your cell phone is neither PBAP
nor OPP compatible, the contacts can-
not be transferred.
.Depending on the type of Bluetooth
phone:
–It may be necessary to perform
additional steps on the phone when
transferring contact data.Voice command system
The voice command system enables the
audio, hands-free phone system, etc. to
be operated using voice commands.
Refer to the“Command list”F5-84 for
samples of voice commands.
Voice commands can be used even when
you set the system to another language.
For details about setting language, refer to
“General settings”F5-20.
&Using the voice command
system
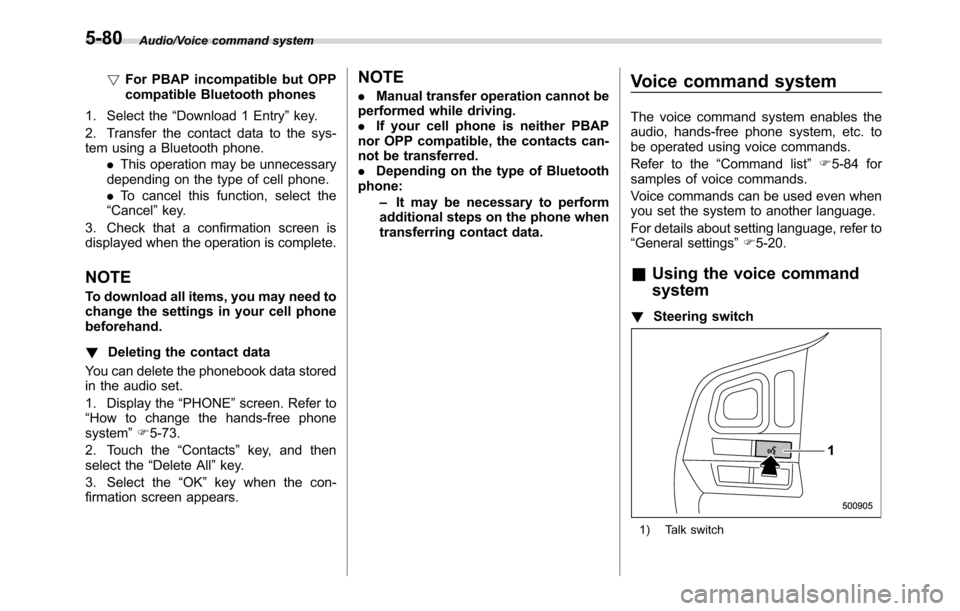
!Steering switch
1) Talk switch
5-80
Page 337 of 572
“Ye s”or“No”.
.When the system recognizes multi-
ple names from the contacts list, a
name candidate list will be displayed
on the screen. If the desired name is
not displayed on the top of the screen,
say or select the number of the name
from the candidate list (number 1,
number 2, etc.) to select a name from
the candidate list.
.When a contact has multiple phone
numbers registered in the contacts list,
a candidate list will be displayed. If the
desired phone number is not displayed
on the top of the screen, say or select
the number of the desired phone
number from the candidate list (num-
ber 1, number 2, etc.) to select a phone
number from the candidate list.
!Voice command example: Dial
number
1. Press the talk switch on the steering
wheel.
2. Say
“Dial number”.
3. Say
“Dial
For example, if the phone number is
2345678:
Say
“two three four five six seven
eight”
Do not say“twenty three forty five sixty
seven eight”
4. Say“Dial”or press the off hook switch
on the steering wheel.
NOTE
.When the system recognizes multi-
ple phone numbers, a phone number
candidate list will be displayed on the
screen. Pressing the off hook switch on
the steering wheel makes a call to the
top entry on the list. If the desired
phone number is not displayed on the
top of the screen, say the number of
the desired phone number from the
candidate list to select a phone number
from the candidate list.
.Calling to the following phone num-
bers
–3 digit numbers (911, 411, 611)
–7 digit numbers (Local phone
numbers)
–10 digit numbers (Area code +
Local phone number)
–11 digit phone numbers (1 + Area
code + Local phone number)
.As the system cannot recognize
additional numbers, say the complete
number without stopping.!Casual speech recognization
Due to natural language speech recogni-
tion technology, this system enables re-
cognition of a command when spoken
naturally. However, the system cannot
recognize every variation of each com-
mand. In some situations, it is possible to
omit the command for the procedure and
directly state the desired operation. Not all
voice commands are displayed in the
function menu.
NOTE
If the command cannot be recognized
completely, the command input screen
will be displayed. (Search results will
be shown based on the part of the
command that was recognized.)
!Expression examples for each
function
Command Expression examples
“Dial
Phone
Audio/Voice command system
–CONTINUED–5-83
Page 338 of 572
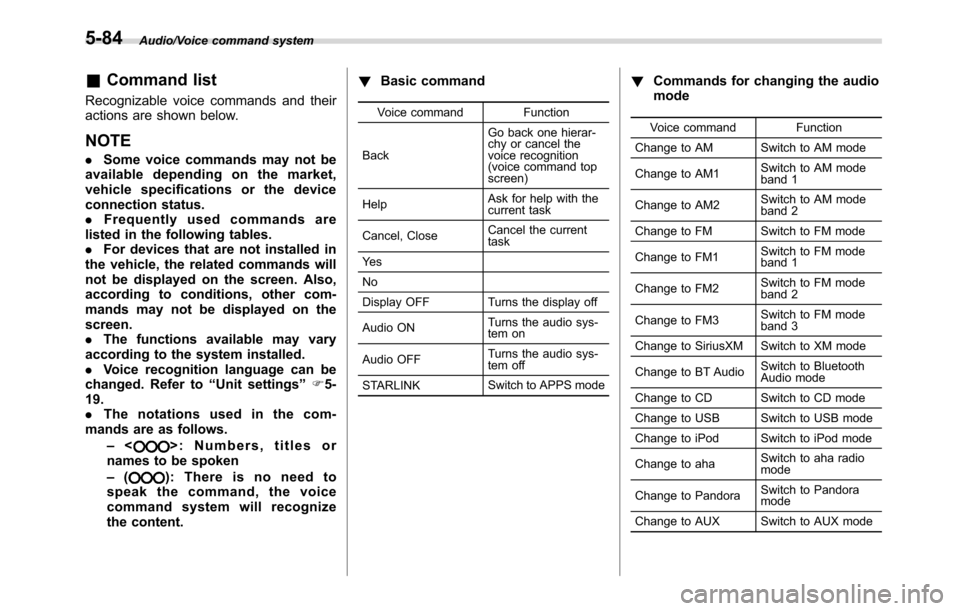
Audio/Voice command system
&Command list
Recognizable voice commands and their
actions are shown below.
NOTE
.Some voice commands may not be
available depending on the market,
vehicle specifications or the device
connection status.
.Frequently used commands are
listed in the following tables.
.For devices that are not installed in
the vehicle, the related commands will
not be displayed on the screen. Also,
according to conditions, other com-
mands may not be displayed on the
screen.
.The functions available may vary
according to the system installed.
.Voice recognition language can be
changed. Refer to“Unit settings”F5-
19.
.The notations used in the com-
mands are as follows.
–<
>: Numbers, titles or
names to be spoken
–(
): There is no need to
speak the command, the voice
command system will recognize
the content.!Basic command
Voice command Function
BackGo back one hierar-
chy or cancel the
voice recognition
(voice command top
screen)
HelpAsk for help with the
current task
Cancel, CloseCancel the current
task
Ye s
No
Display OFF Turns the display off
Audio ONTurns the audio sys-
tem on
Audio OFFTurns the audio sys-
tem off
STARLINKSwitch to APPS mode
!Commands for changing the audio
mode
Voice command Function
Change to AM Switch to AM mode
Change to AM1Switch to AM mode
band 1
Change to AM2Switch to AM mode
band 2
Change to FM Switch to FM mode
Change to FM1Switch to FM mode
band 1
Change to FM2Switch to FM mode
band 2
Change to FM3Switch to FM mode
band 3
Change to SiriusXM Switch to XM mode
Change to BT AudioSwitch to Bluetooth
Audio mode
Change to CD Switch to CD mode
Change to USB Switch to USB mode
Change to iPod Switch to iPod mode
Change to ahaSwitch to aha radio
mode
Change to PandoraSwitch to Pandora
mode
Change to AUXSwitch to AUX mode
5-84