instrument panel SUBARU CROSSTREK 2021 Getting Started Guide
[x] Cancel search | Manufacturer: SUBARU, Model Year: 2021, Model line: CROSSTREK, Model: SUBARU CROSSTREK 2021Pages: 124, PDF Size: 34.1 MB
Page 3 of 124
PURPOSE OF THIS GUIDE
WELCOME................. 4
IMPORTANT SAFETY
INFORMATION.............. 4
OWNER’S RESOURCES....... 4
IN CASE OF EMERGENCY..... 5
TOWING YOUR ALL-WHEEL
DRIVE SUBARU............. 6
ENTRY AND EXIT
KEYLESS ENTRY............ 7
KEYLESS ACCESS WITH PUSH
BUTTON START............. 8
INSTRUMENT PANEL........10
GETTING COMFORTABLE
SEATING...................12
TILT AND TELESCOPIC STEERING
COLUMN...................14
POWER EXTERIOR MIRRORS . . 14
REAR VIEW MIRROR.........15
POWER WINDOWS..........16
POWER MOONROOF........16
CLIMATE CONTROL..........17
ACCESSORY CONNECTIONS . . 20
CONTROLS
INSTRUMENT PANEL SWITCHES
(LOWER LEFT)..............21
AUDIO CONTROLS...........21CRUISE CONTROL...........22
ADVANCED ADAPTIVE CRUISE
CONTROL.................22
I/SET SWITCH...............23
INFO SWITCH...............23
LIGHT CONTROLS...........24
TURN SIGNALS.............25
WINDSHIELD WIPERS........25
REAR WINDOW WIPER.......26
OVERHEAD CONSOLE........26
GAUGES AND WARNING
LIGHTS
COMBINATION METER.......28
WARNING AND INDICATOR
LIGHTS....................29
OPERATING THE VEHICLE
IGNITION SWITCH...........30
PUSH-BUTTON IGNITION
SWITCH...................30
STARTING THE VEHICLE......30
DRIVING THE VEHICLE.......31
AUTO START–STOP.........33
X-MODE
®..................35
TURNING OFF THE VEHICLE...36
REFUELING
FUEL FILLER LID............37
FUEL......................37
FUEL CAPACITY.............37
TABLE OF CONTENTS
Page 12 of 124
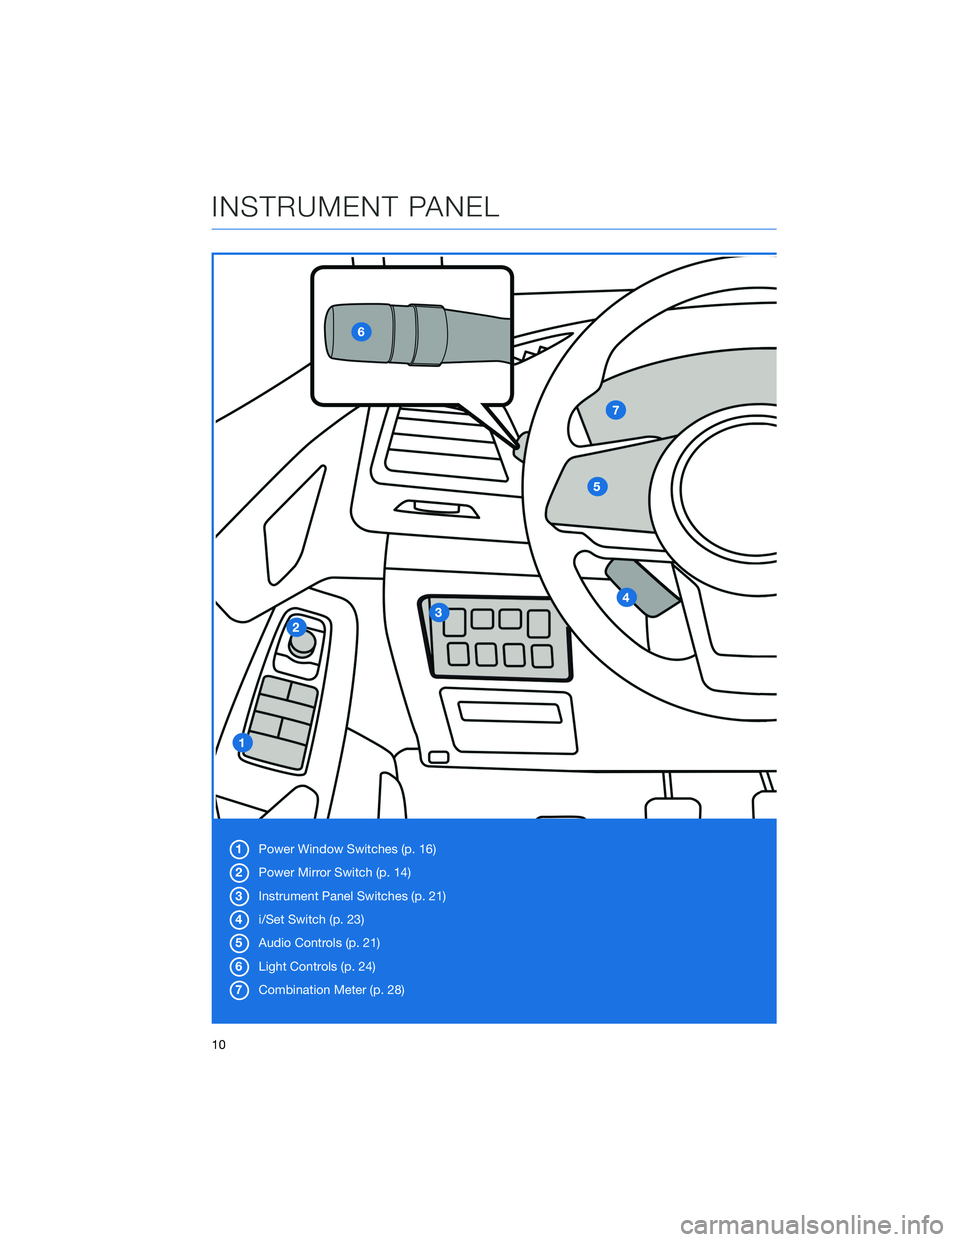
1Power Window Switches (p. 16)
2Power Mirror Switch (p. 14)
3Instrument Panel Switches (p. 21)
4i/Set Switch (p. 23)
5Audio Controls (p. 21)
6Light Controls (p. 24)
7Combination Meter (p. 28)
INSTRUMENT PANEL
10
Page 13 of 124
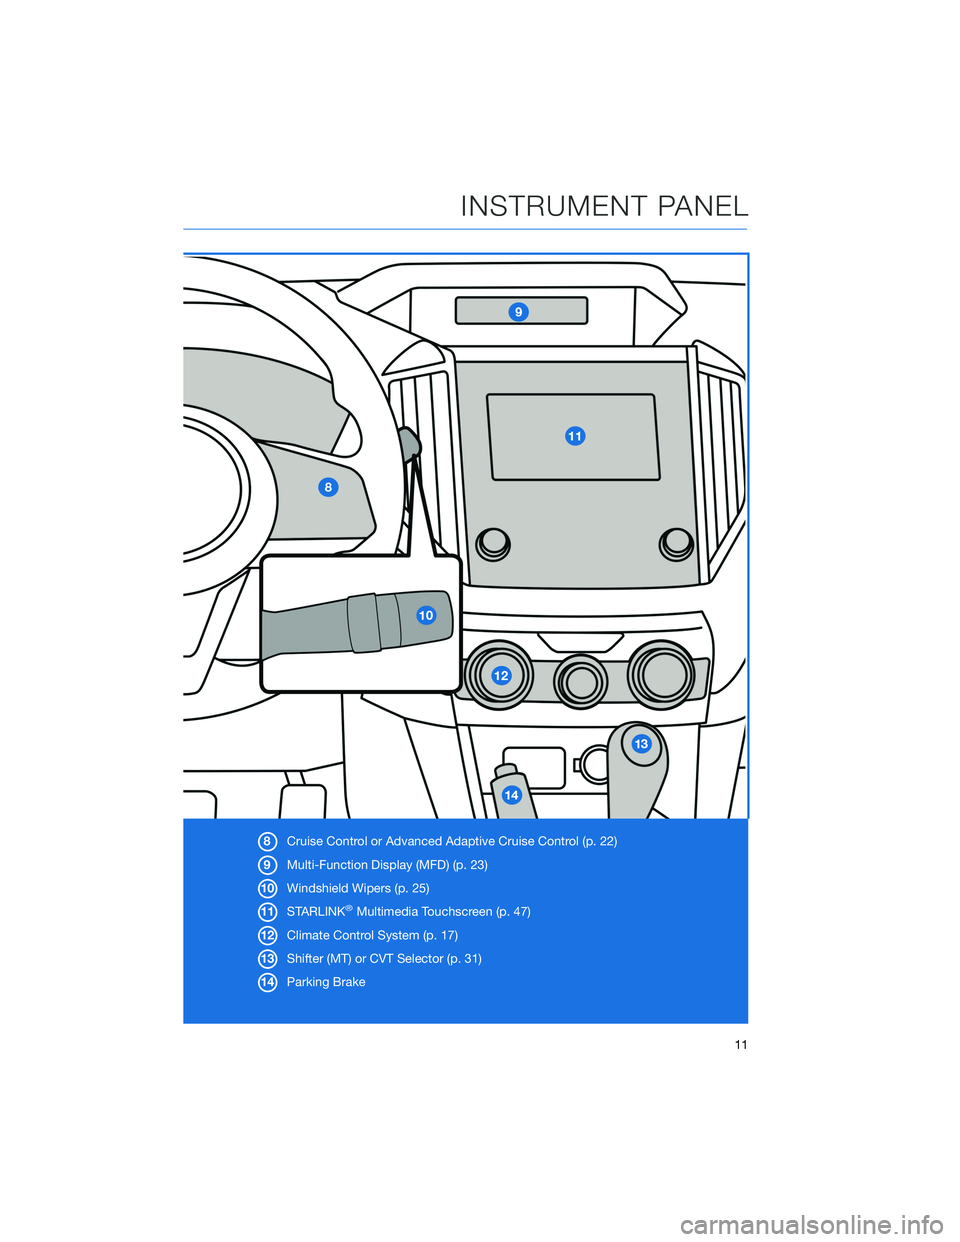
8Cruise Control or Advanced Adaptive Cruise Control (p. 22)
9Multi-Function Display (MFD) (p. 23)
10Windshield Wipers (p. 25)
11STARLINK
®Multimedia Touchscreen (p. 47)
12Climate Control System (p. 17)
13Shifter (MT) or CVT Selector (p. 31)
14Parking Brake
INSTRUMENT PANEL
11
Page 20 of 124
4MAX A/C Button:Press this button for quickest cooling.
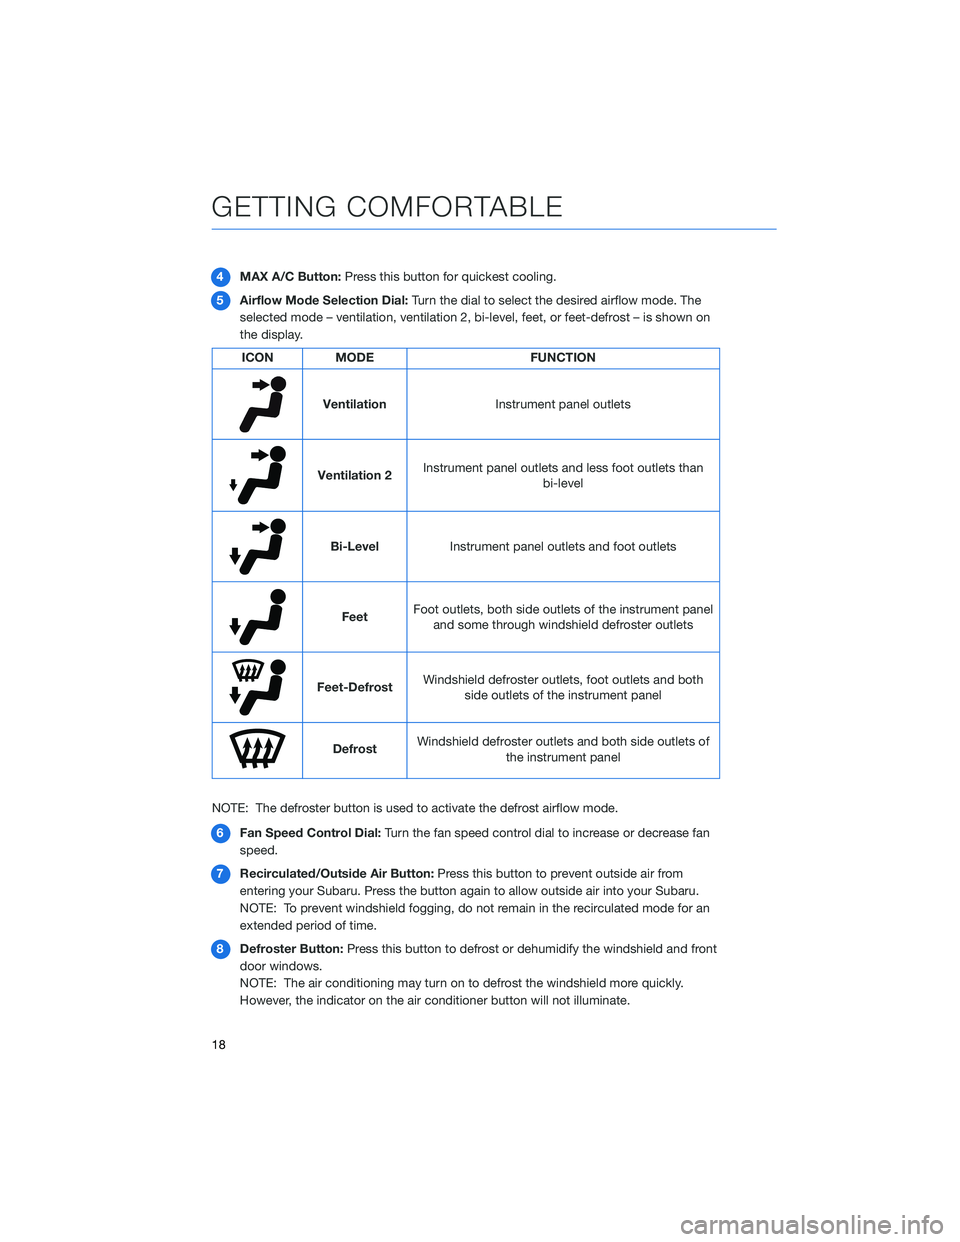
5Airflow Mode Selection Dial:Turn the dial to select the desired airflow mode. The
selected mode – ventilation, ventilation 2, bi-level, feet, or feet-defrost – is shown on
the display.
ICON MODE FUNCTION
Ventilation
Instrument panel outlets
Ventilation 2Instrument panel outlets and less foot outlets than
bi-level
Bi-Level
Instrument panel outlets and foot outlets
FeetFoot outlets, both side outlets of the instrument panel
and some through windshield defroster outlets
Feet-DefrostWindshield defroster outlets, foot outlets and both
side outlets of the instrument panel
DefrostWindshield defroster outlets and both side outlets of
the instrument panel
NOTE: The defroster button is used to activate the defrost airflow mode.
6Fan Speed Control Dial:Turn the fan speed control dial to increase or decrease fan
speed.
7Recirculated/Outside Air Button:Press this button to prevent outside air from
entering your Subaru. Press the button again to allow outside air into your Subaru.
NOTE: To prevent windshield fogging, do not remain in the recirculated mode for an
extended period of time.
8Defroster Button:Press this button to defrost or dehumidify the windshield and front
door windows.
NOTE: The air conditioning may turn on to defrost the windshield more quickly.
However, the indicator on the air conditioner button will not illuminate.
GETTING COMFORTABLE
18
Page 23 of 124
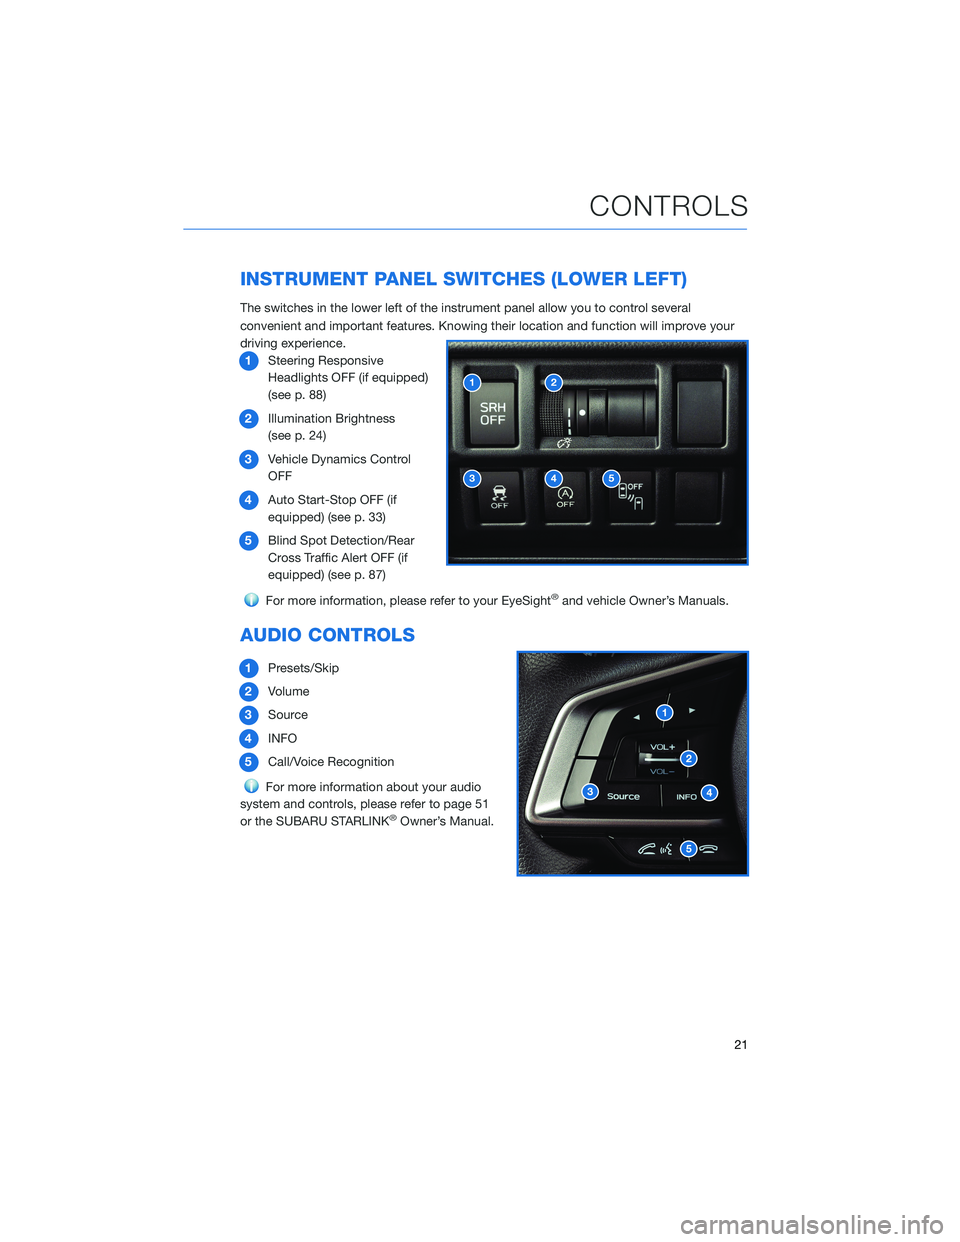
INSTRUMENT PANEL SWITCHES (LOWER LEFT)
The switches in the lower left of the instrument panel allow you to control several
convenient and important features. Knowing their location and function will improve your
driving experience.
1Steering Responsive
Headlights OFF (if equipped)
(see p. 88)
2Illumination Brightness
(see p. 24)
3Vehicle Dynamics Control
OFF
4Auto Start-Stop OFF (if
equipped) (see p. 33)
5Blind Spot Detection/Rear
Cross Traffic Alert OFF (if
equipped) (see p. 87)
For more information, please refer to your EyeSight®and vehicle Owner’s Manuals.
AUDIO CONTROLS
1Presets/Skip
2Volume
3Source
4INFO
5Call/Voice Recognition
For more information about your audio
system and controls, please refer to page 51
or the SUBARU STARLINK
®Owner’s Manual.
CONTROLS
21
Page 26 of 124
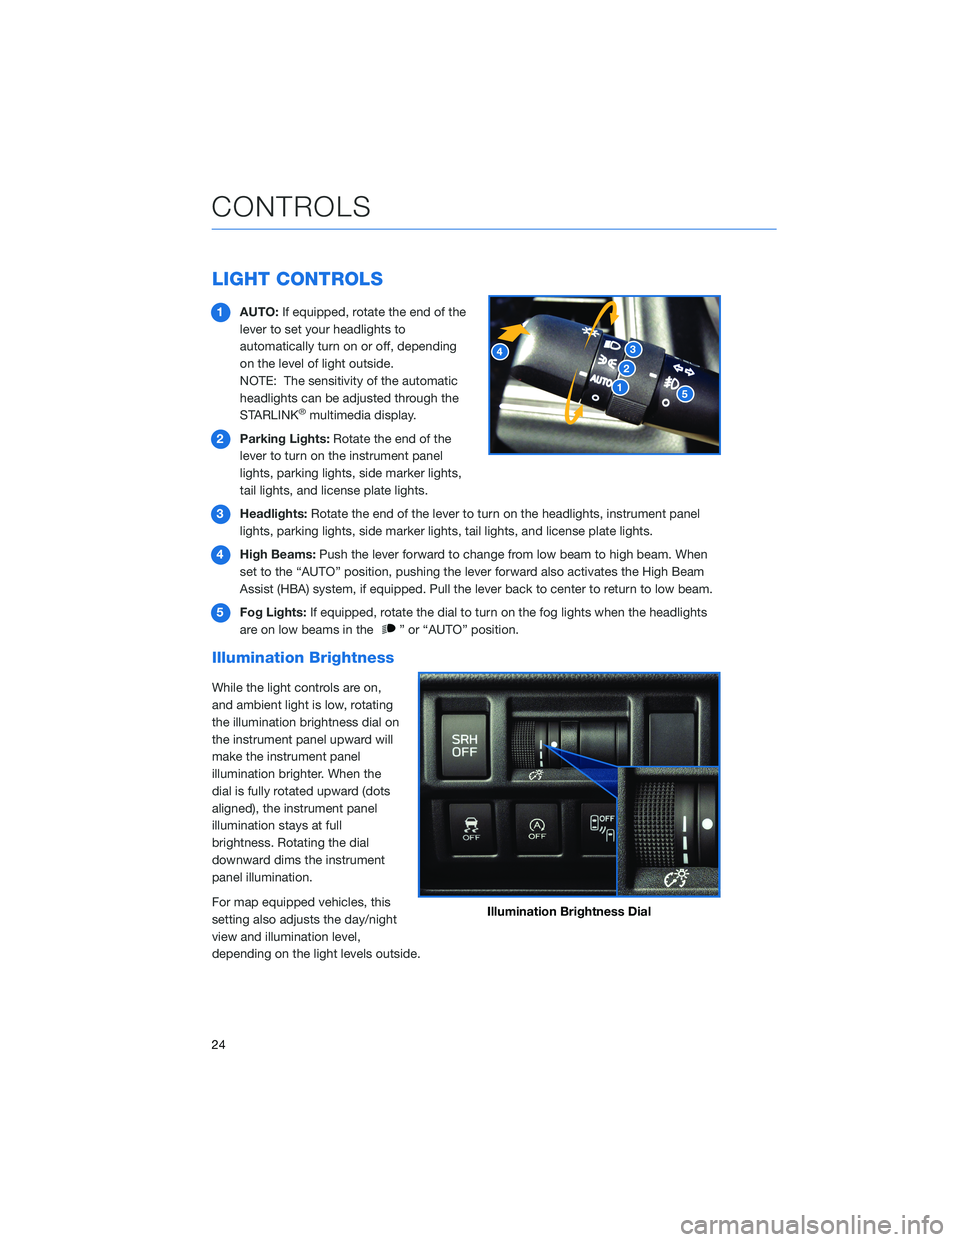
LIGHT CONTROLS
1AUTO:If equipped, rotate the end of the
lever to set your headlights to
automatically turn on or off, depending
on the level of light outside.
NOTE: The sensitivity of the automatic
headlights can be adjusted through the
STARLINK
®multimedia display.
2Parking Lights:Rotate the end of the
lever to turn on the instrument panel
lights, parking lights, side marker lights,
tail lights, and license plate lights.
3Headlights:Rotate the end of the lever to turn on the headlights, instrument panel
lights, parking lights, side marker lights, tail lights, and license plate lights.
4High Beams:Push the lever forward to change from low beam to high beam. When
set to the “AUTO” position, pushing the lever forward also activates the High Beam
Assist (HBA) system, if equipped. Pull the lever back to center to return to low beam.
5Fog Lights:If equipped, rotate the dial to turn on the fog lights when the headlights
are on low beams in the
” or “AUTO” position.
Illumination Brightness
While the light controls are on,
and ambient light is low, rotating
the illumination brightness dial on
the instrument panel upward will
make the instrument panel
illumination brighter. When the
dial is fully rotated upward (dots
aligned), the instrument panel
illumination stays at full
brightness. Rotating the dial
downward dims the instrument
panel illumination.
For map equipped vehicles, this
setting also adjusts the day/night
view and illumination level,
depending on the light levels outside.
Illumination Brightness Dial
CONTROLS
24
Page 90 of 124
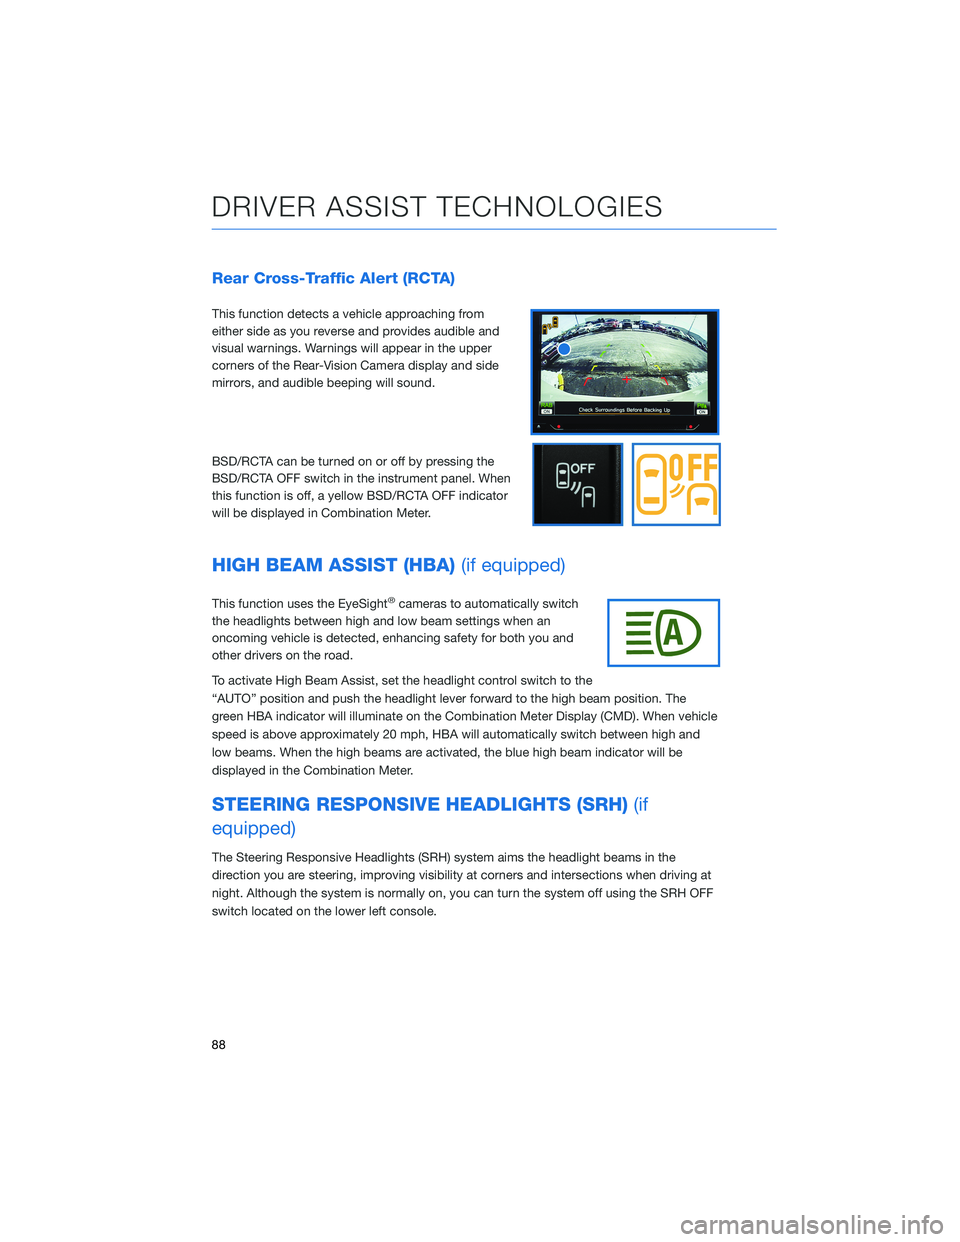
Rear Cross-Traffic Alert (RCTA)
This function detects a vehicle approaching from
either side as you reverse and provides audible and
visual warnings. Warnings will appear in the upper
corners of the Rear-Vision Camera display and side
mirrors, and audible beeping will sound.
BSD/RCTA can be turned on or off by pressing the
BSD/RCTA OFF switch in the instrument panel. When
this function is off, a yellow BSD/RCTA OFF indicator
will be displayed in Combination Meter.
HIGH BEAM ASSIST (HBA)(if equipped)
This function uses the EyeSight®cameras to automatically switch
the headlights between high and low beam settings when an
oncoming vehicle is detected, enhancing safety for both you and
other drivers on the road.
To activate High Beam Assist, set the headlight control switch to the
“AUTO” position and push the headlight lever forward to the high beam position. The
green HBA indicator will illuminate on the Combination Meter Display (CMD). When vehicle
speed is above approximately 20 mph, HBA will automatically switch between high and
low beams. When the high beams are activated, the blue high beam indicator will be
displayed in the Combination Meter.
STEERING RESPONSIVE HEADLIGHTS (SRH)(if
equipped)
The Steering Responsive Headlights (SRH) system aims the headlight beams in the
direction you are steering, improving visibility at corners and intersections when driving at
night. Although the system is normally on, you can turn the system off using the SRH OFF
switch located on the lower left console.
DRIVER ASSIST TECHNOLOGIES
88
Page 120 of 124
Lane Departure Prevention . . . . . . 81
Lane Departure Warning . . . . . . . . 80
Lane Sway Warning . . . . . . . . . . 81
Lead Vehicle Start Alert........84
Pre-Collision Brake Assist . . .....80
Pre-Collision Braking ..........79
Pre-Collision Throttle Management . . 80
H
HIGH BEAM ASSIST (HBA) . . . . . . . 88
HOME SCREEN ICONS . . . . . .....54
HOOD PROP . . . . . . . . . . . . . . . . 42
HOW TO OVERVIEW . . . . . . . . . . . 93
I
IGNITION SWITCH . . . . . . . . . . . . . 30
IMPORTANT SAFETY INFORMATION . . . 4
IN CASE OF EMERGENCY
Subaru Roadside Assistance . . . . . . 5
SUBARU STARLINK
®Safety and
Security . . . . . . . . ..........5
INFO SWITCH . . . . . . . . . . . . . . . 23
INSTRUMENT PANEL SWITCHES
(LOWER LEFT) . . . . . . . . .....21
I/SET SWITCH . . . . . . . . . . . . . . . 23
K
KEYLESS ACCESS WITH PUSH BUTTON
START
Locking Using Door Handles......8
Locking Using the Rear Gate . . . . . . 9
Unlocking Using Door Handles . . . . . 8
Unlocking Using the Rear Gate.....9
KEYLESS ENTRY
Automatic Door Locking/Unlocking . . 7L
LANE DEPARTURE WARNING AND
PRE-COLLISION BRAKING SYSTEM
OFF
Lane Departure Warning OFF Switch . 86
Pre-Collision Braking OFF Switch . . 86
LATCH/ANCHOR ..............39
LIGHT CONTROLS
Daytime Running Lights . . . . . . . . 24
Illumination Brightness . . . . . . . . . 24
M
MAKING A CALL . . . . . . . .......60
MAPS
Arrival Time/Distance . . . . . . . . . 109
Canceling Guidance..........114
Finding a Destination by Address . . 109
Finding a Destination by POI .....110
Guidance Screen Icons . . . . . . . . 112
Map Updates . . . . . . . ......114
Map View/Perspective . . . . . . . . 112
Map Zoom . . . . . . .........112
Nearest Gas Station . . . . ......113
Route Options . . . . . . .......111
Saving Destination as a Favorite . . 111
Shortest/Fastest/Economic . . . . . 111
Traffic Information . . . . . ......113
MAPS/NAVIGATION
Checking for Map Updates ......74
Updating Maps Over-the-Air . . . . . 74
Updating Maps Using Your PC/MAC . 75
MAPS OVERVIEW.............68
MEDIA
Aux Input.................59
Bluetooth
®................59
CD (if equipped) . . . . . . .......59
USB / iPod . . . . . . . .........59
MYSUBARU
Service Appointment Scheduler . . . 67
MYSUBARU INTEGRATION .......70
INDEX
118