bolt SUBARU FORESTER 1999 Service Repair Manual
[x] Cancel search | Manufacturer: SUBARU, Model Year: 1999, Model line: FORESTER, Model: SUBARU FORESTER 1999Pages: 345, PDF Size: 5.6 MB
Page 159 of 345
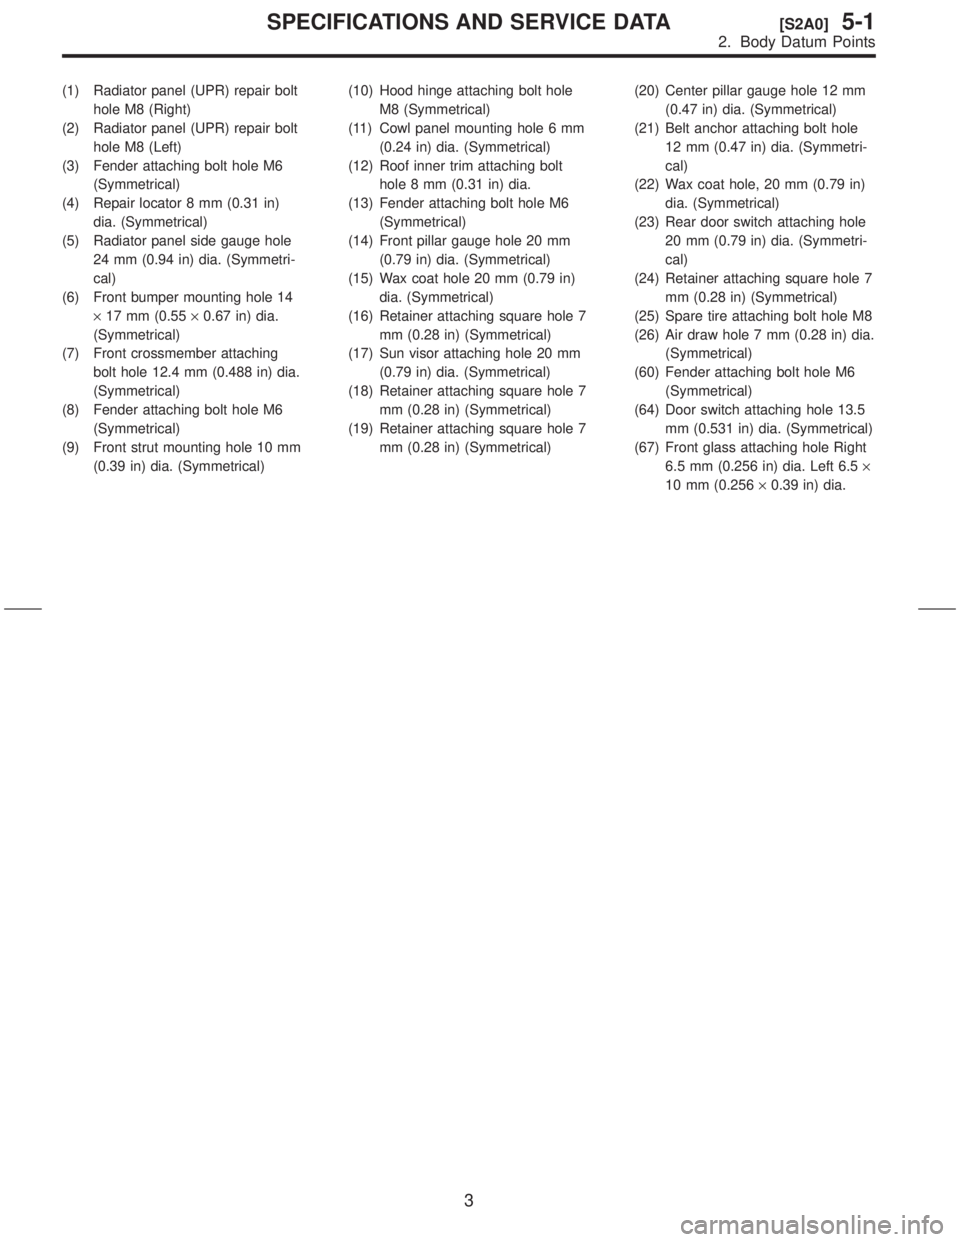
(1) Radiator panel (UPR) repair bolt
hole M8 (Right)
(2) Radiator panel (UPR) repair bolt
hole M8 (Left)
(3) Fender attaching bolt hole M6
(Symmetrical)
(4) Repair locator 8 mm (0.31 in)
dia. (Symmetrical)
(5) Radiator panel side gauge hole
24 mm (0.94 in) dia. (Symmetri-
cal)
(6) Front bumper mounting hole 14
´17 mm (0.55´0.67 in) dia.
(Symmetrical)
(7) Front crossmember attaching
bolt hole 12.4 mm (0.488 in) dia.
(Symmetrical)
(8) Fender attaching bolt hole M6
(Symmetrical)
(9) Front strut mounting hole 10 mm
(0.39 in) dia. (Symmetrical)(10) Hood hinge attaching bolt hole
M8 (Symmetrical)
(11) Cowl panel mounting hole 6 mm
(0.24 in) dia. (Symmetrical)
(12) Roof inner trim attaching bolt
hole 8 mm (0.31 in) dia.
(13) Fender attaching bolt hole M6
(Symmetrical)
(14) Front pillar gauge hole 20 mm
(0.79 in) dia. (Symmetrical)
(15) Wax coat hole 20 mm (0.79 in)
dia. (Symmetrical)
(16) Retainer attaching square hole 7
mm (0.28 in) (Symmetrical)
(17) Sun visor attaching hole 20 mm
(0.79 in) dia. (Symmetrical)
(18) Retainer attaching square hole 7
mm (0.28 in) (Symmetrical)
(19) Retainer attaching square hole 7
mm (0.28 in) (Symmetrical)(20) Center pillar gauge hole 12 mm
(0.47 in) dia. (Symmetrical)
(21) Belt anchor attaching bolt hole
12 mm (0.47 in) dia. (Symmetri-
cal)
(22) Wax coat hole, 20 mm (0.79 in)
dia. (Symmetrical)
(23) Rear door switch attaching hole
20 mm (0.79 in) dia. (Symmetri-
cal)
(24) Retainer attaching square hole 7
mm (0.28 in) (Symmetrical)
(25) Spare tire attaching bolt hole M8
(26) Air draw hole 7 mm (0.28 in) dia.
(Symmetrical)
(60) Fender attaching bolt hole M6
(Symmetrical)
(64) Door switch attaching hole 13.5
mm (0.531 in) dia. (Symmetrical)
(67) Front glass attaching hole Right
6.5 mm (0.256 in) dia. Left 6.5´
10 mm (0.256´0.39 in) dia.
3
[S2A0]5-1SPECIFICATIONS AND SERVICE DATA
2. Body Datum Points
Page 160 of 345
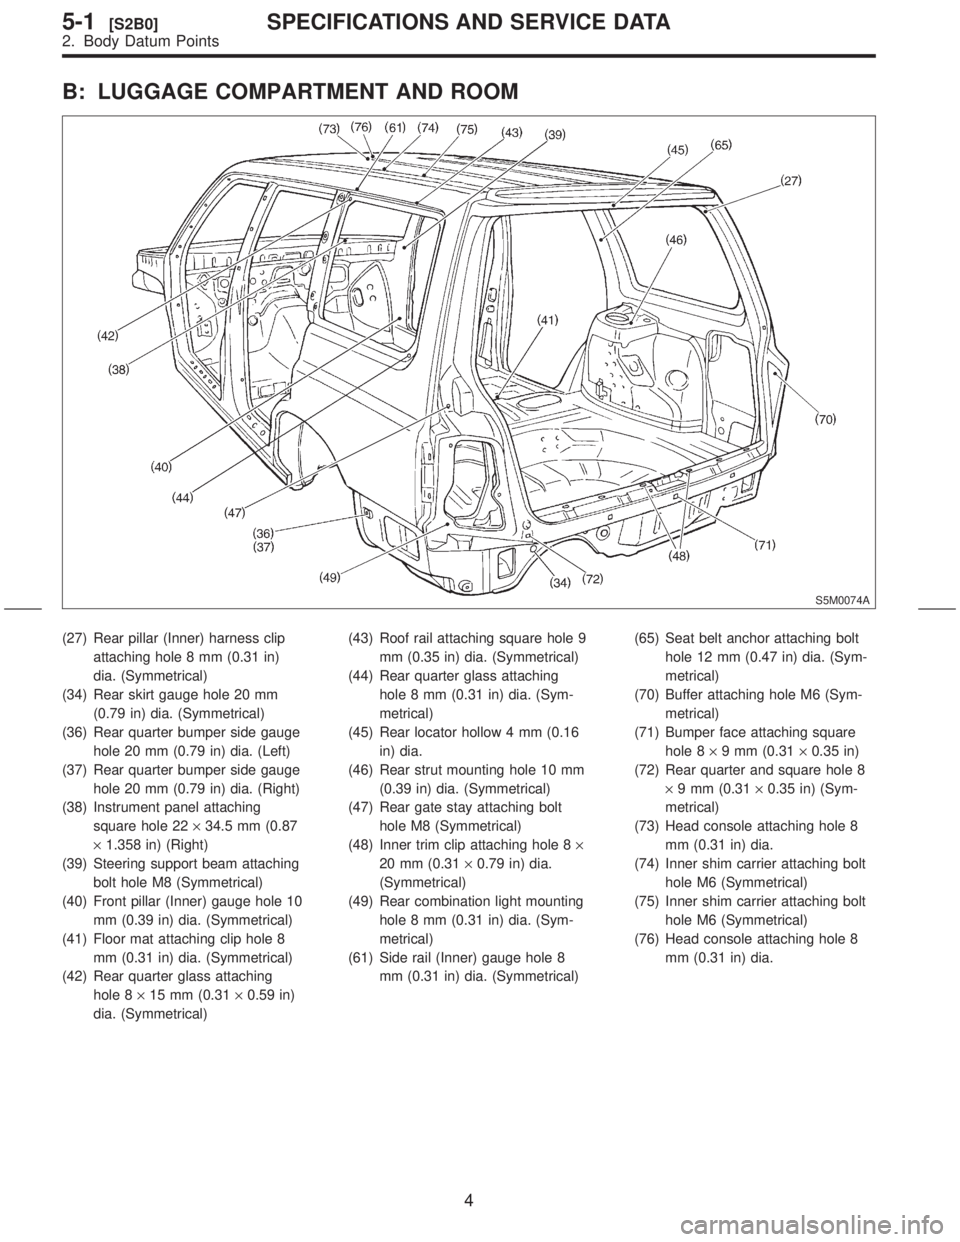
B: LUGGAGE COMPARTMENT AND ROOM
S5M0074A
(27) Rear pillar (Inner) harness clip
attaching hole 8 mm (0.31 in)
dia. (Symmetrical)
(34) Rear skirt gauge hole 20 mm
(0.79 in) dia. (Symmetrical)
(36) Rear quarter bumper side gauge
hole 20 mm (0.79 in) dia. (Left)
(37) Rear quarter bumper side gauge
hole 20 mm (0.79 in) dia. (Right)
(38) Instrument panel attaching
square hole 22´34.5 mm (0.87
´1.358 in) (Right)
(39) Steering support beam attaching
bolt hole M8 (Symmetrical)
(40) Front pillar (Inner) gauge hole 10
mm (0.39 in) dia. (Symmetrical)
(41) Floor mat attaching clip hole 8
mm (0.31 in) dia. (Symmetrical)
(42) Rear quarter glass attaching
hole 8´15 mm (0.31´0.59 in)
dia. (Symmetrical)(43) Roof rail attaching square hole 9
mm (0.35 in) dia. (Symmetrical)
(44) Rear quarter glass attaching
hole 8 mm (0.31 in) dia. (Sym-
metrical)
(45) Rear locator hollow 4 mm (0.16
in) dia.
(46) Rear strut mounting hole 10 mm
(0.39 in) dia. (Symmetrical)
(47) Rear gate stay attaching bolt
hole M8 (Symmetrical)
(48) Inner trim clip attaching hole 8´
20 mm (0.31´0.79 in) dia.
(Symmetrical)
(49) Rear combination light mounting
hole 8 mm (0.31 in) dia. (Sym-
metrical)
(61) Side rail (Inner) gauge hole 8
mm (0.31 in) dia. (Symmetrical)(65) Seat belt anchor attaching bolt
hole 12 mm (0.47 in) dia. (Sym-
metrical)
(70) Buffer attaching hole M6 (Sym-
metrical)
(71) Bumper face attaching square
hole 8´9 mm (0.31´0.35 in)
(72) Rear quarter and square hole 8
´9 mm (0.31´0.35 in) (Sym-
metrical)
(73) Head console attaching hole 8
mm (0.31 in) dia.
(74) Inner shim carrier attaching bolt
hole M6 (Symmetrical)
(75) Inner shim carrier attaching bolt
hole M6 (Symmetrical)
(76) Head console attaching hole 8
mm (0.31 in) dia.
4
5-1[S2B0]SPECIFICATIONS AND SERVICE DATA
2. Body Datum Points
Page 161 of 345
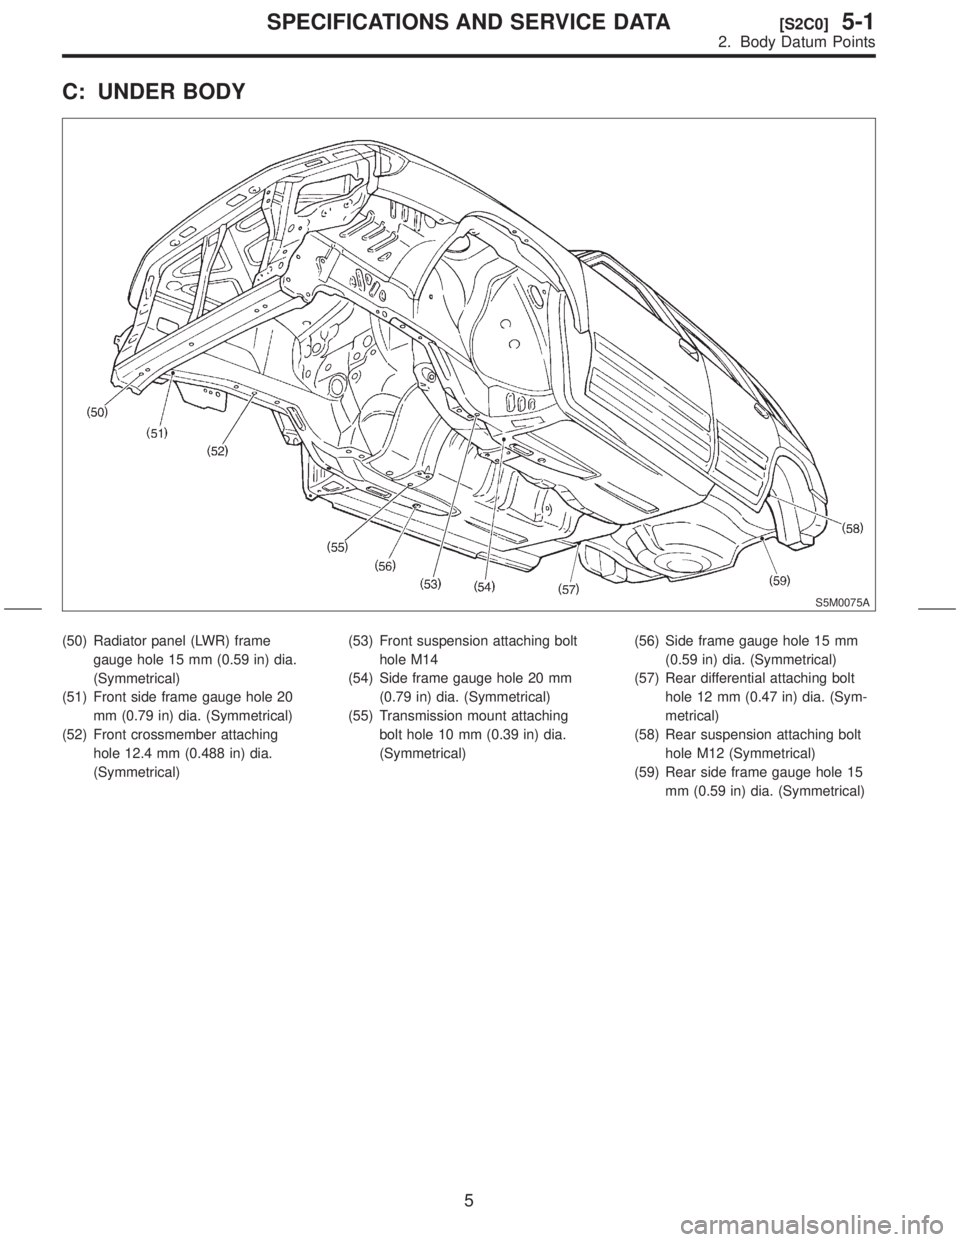
C: UNDER BODY
S5M0075A
(50) Radiator panel (LWR) frame
gauge hole 15 mm (0.59 in) dia.
(Symmetrical)
(51) Front side frame gauge hole 20
mm (0.79 in) dia. (Symmetrical)
(52) Front crossmember attaching
hole 12.4 mm (0.488 in) dia.
(Symmetrical)(53) Front suspension attaching bolt
hole M14
(54) Side frame gauge hole 20 mm
(0.79 in) dia. (Symmetrical)
(55) Transmission mount attaching
bolt hole 10 mm (0.39 in) dia.
(Symmetrical)(56) Side frame gauge hole 15 mm
(0.59 in) dia. (Symmetrical)
(57) Rear differential attaching bolt
hole 12 mm (0.47 in) dia. (Sym-
metrical)
(58) Rear suspension attaching bolt
hole M12 (Symmetrical)
(59) Rear side frame gauge hole 15
mm (0.59 in) dia. (Symmetrical)
5
[S2C0]5-1SPECIFICATIONS AND SERVICE DATA
2. Body Datum Points
Page 185 of 345
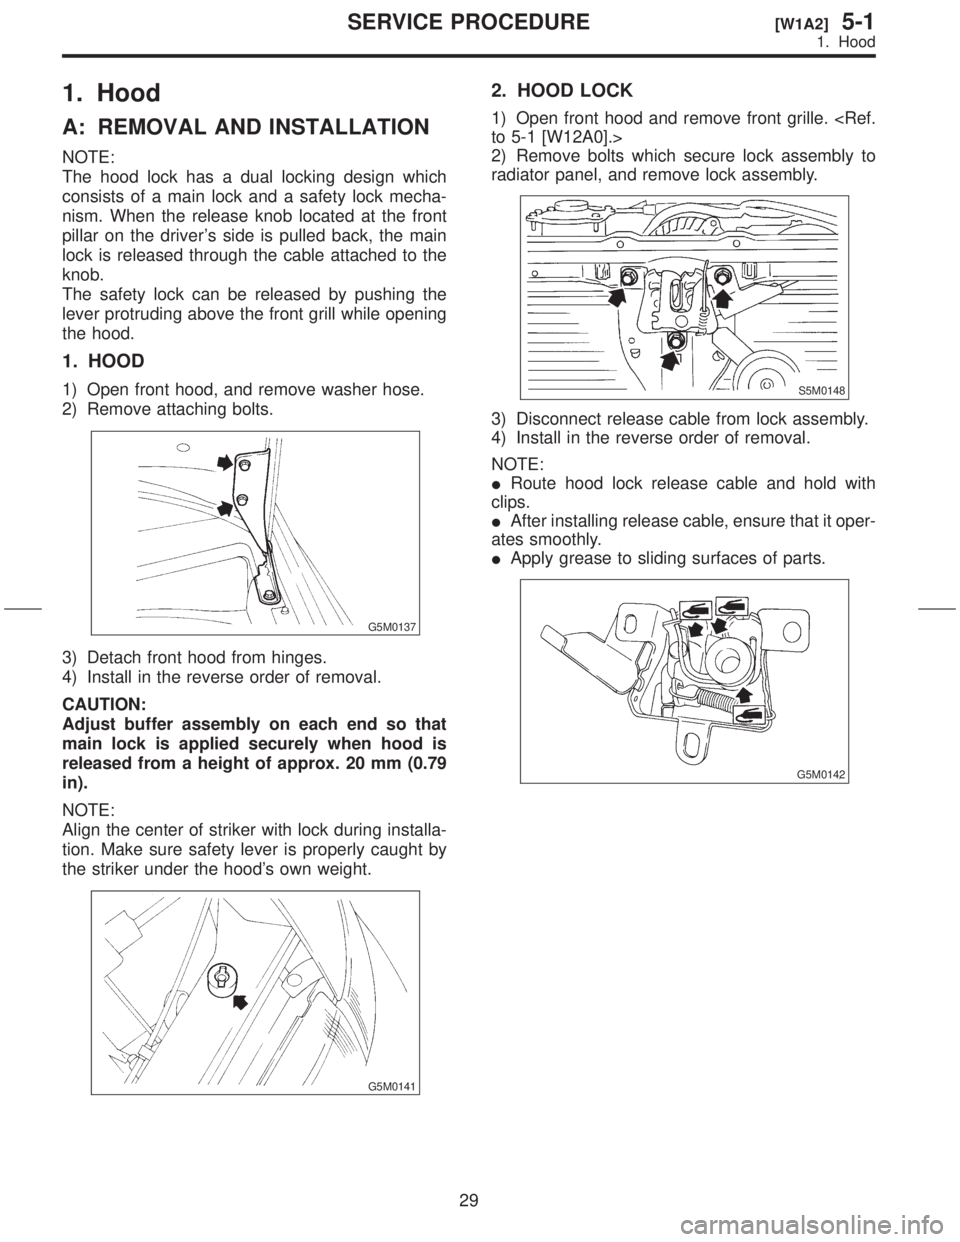
1. Hood
A: REMOVAL AND INSTALLATION
NOTE:
The hood lock has a dual locking design which
consists of a main lock and a safety lock mecha-
nism. When the release knob located at the front
pillar on the driver's side is pulled back, the main
lock is released through the cable attached to the
knob.
The safety lock can be released by pushing the
lever protruding above the front grill while opening
the hood.
1. HOOD
1) Open front hood, and remove washer hose.
2) Remove attaching bolts.
G5M0137
3) Detach front hood from hinges.
4) Install in the reverse order of removal.
CAUTION:
Adjust buffer assembly on each end so that
main lock is applied securely when hood is
released from a height of approx. 20 mm (0.79
in).
NOTE:
Align the center of striker with lock during installa-
tion. Make sure safety lever is properly caught by
the striker under the hood's own weight.
G5M0141
2. HOOD LOCK
1) Open front hood and remove front grille.
2) Remove bolts which secure lock assembly to
radiator panel, and remove lock assembly.
S5M0148
3) Disconnect release cable from lock assembly.
4) Install in the reverse order of removal.
NOTE:
IRoute hood lock release cable and hold with
clips.
IAfter installing release cable, ensure that it oper-
ates smoothly.
IApply grease to sliding surfaces of parts.
G5M0142
29
[W1A2]5-1SERVICE PROCEDURE
1. Hood
Page 186 of 345

3. RELEASE CABLE
1) Remove front grille.
2) Remove release cable from lock assembly.
3) Remove cable clip from engine compartment.
4) While disengaging cable from opener lever,
remove opener lever from front pillar.
S5M0149
5) Remove release cable.
6) Install in the reverse order of removal.
B: POINTS TO CHECK
1) Check striker for bending or abnormal wear.
2) Check safety lever for improper movement.
3) Check other levers and spring for rust formation
and rough movement.
G5M0140
C: ADJUSTMENT
1) Fore-aft and left-right adjustments
Loosen striker mounting bolts and adjust fore-and-
aft position of striker.
CAUTION:
Do not adjust striker position using the lock.
Doing so may result in a misaligned front grille.
G5M0143
2) Up-down adjustment
Make up-and-down adjustment of striker only
when hood does not properly contact buffer or
hood is not flush with fender, or when release cable
does not properly operate. Adjustment can be
made by adjusting the stroke length of the striker
after lock assembly mounting screws are removed.
30
5-1[W1A3]SERVICE PROCEDURE
1. Hood
Page 187 of 345
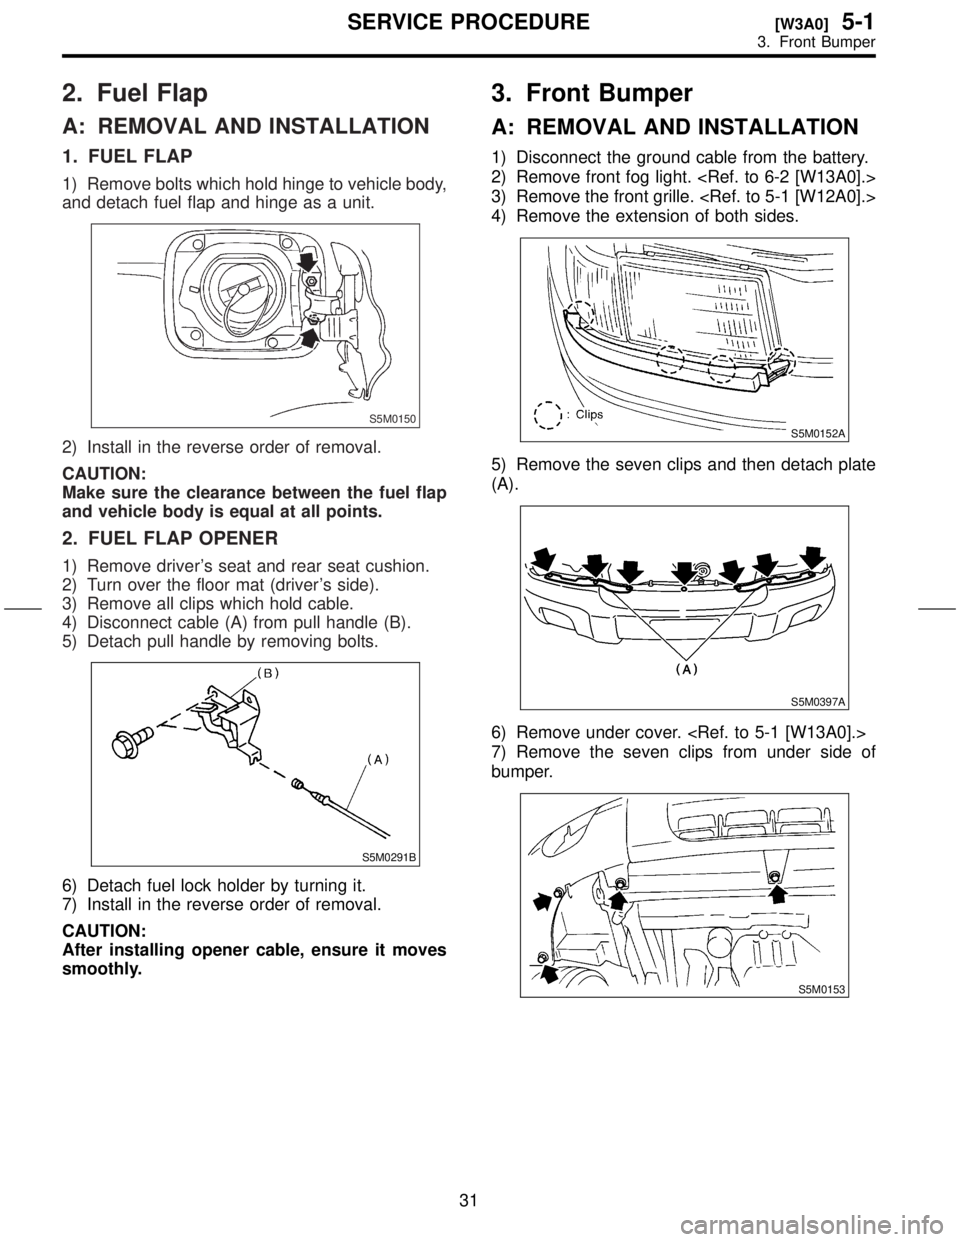
2. Fuel Flap
A: REMOVAL AND INSTALLATION
1. FUEL FLAP
1) Remove bolts which hold hinge to vehicle body,
and detach fuel flap and hinge as a unit.
S5M0150
2) Install in the reverse order of removal.
CAUTION:
Make sure the clearance between the fuel flap
and vehicle body is equal at all points.
2. FUEL FLAP OPENER
1) Remove driver's seat and rear seat cushion.
2) Turn over the floor mat (driver's side).
3) Remove all clips which hold cable.
4) Disconnect cable (A) from pull handle (B).
5) Detach pull handle by removing bolts.
S5M0291B
6) Detach fuel lock holder by turning it.
7) Install in the reverse order of removal.
CAUTION:
After installing opener cable, ensure it moves
smoothly.
3. Front Bumper
A: REMOVAL AND INSTALLATION
1) Disconnect the ground cable from the battery.
2) Remove front fog light.
3) Remove the front grille.
4) Remove the extension of both sides.
S5M0152A
5) Remove the seven clips and then detach plate
(A).
S5M0397A
6) Remove under cover.
7) Remove the seven clips from under side of
bumper.
S5M0153
31
[W3A0]5-1SERVICE PROCEDURE
3. Front Bumper
Page 188 of 345
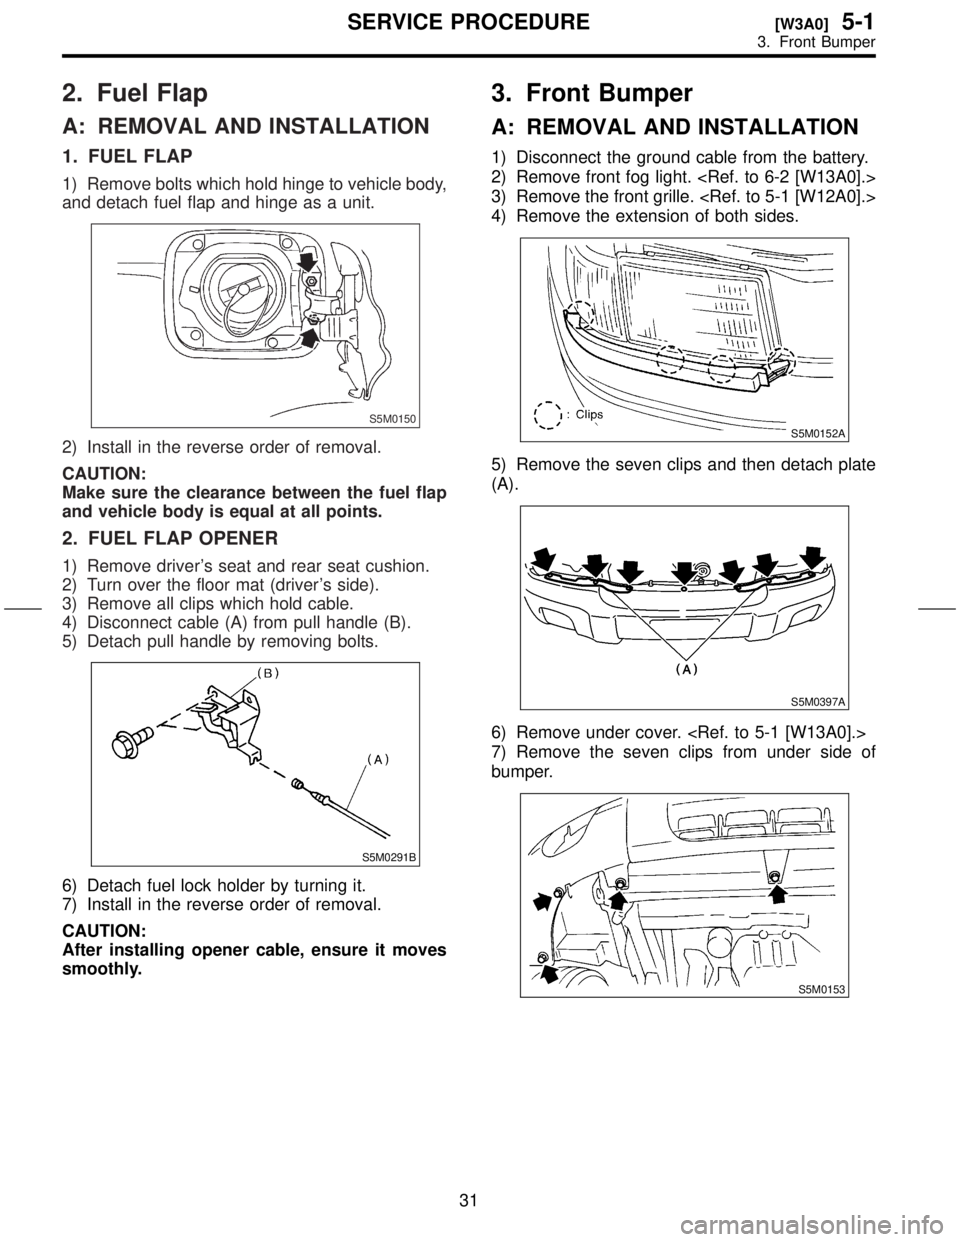
2. Fuel Flap
A: REMOVAL AND INSTALLATION
1. FUEL FLAP
1) Remove bolts which hold hinge to vehicle body,
and detach fuel flap and hinge as a unit.
S5M0150
2) Install in the reverse order of removal.
CAUTION:
Make sure the clearance between the fuel flap
and vehicle body is equal at all points.
2. FUEL FLAP OPENER
1) Remove driver's seat and rear seat cushion.
2) Turn over the floor mat (driver's side).
3) Remove all clips which hold cable.
4) Disconnect cable (A) from pull handle (B).
5) Detach pull handle by removing bolts.
S5M0291B
6) Detach fuel lock holder by turning it.
7) Install in the reverse order of removal.
CAUTION:
After installing opener cable, ensure it moves
smoothly.
3. Front Bumper
A: REMOVAL AND INSTALLATION
1) Disconnect the ground cable from the battery.
2) Remove front fog light.
3) Remove the front grille.
4) Remove the extension of both sides.
S5M0152A
5) Remove the seven clips and then detach plate
(A).
S5M0397A
6) Remove under cover.
7) Remove the seven clips from under side of
bumper.
S5M0153
31
[W3A0]5-1SERVICE PROCEDURE
3. Front Bumper
Page 189 of 345
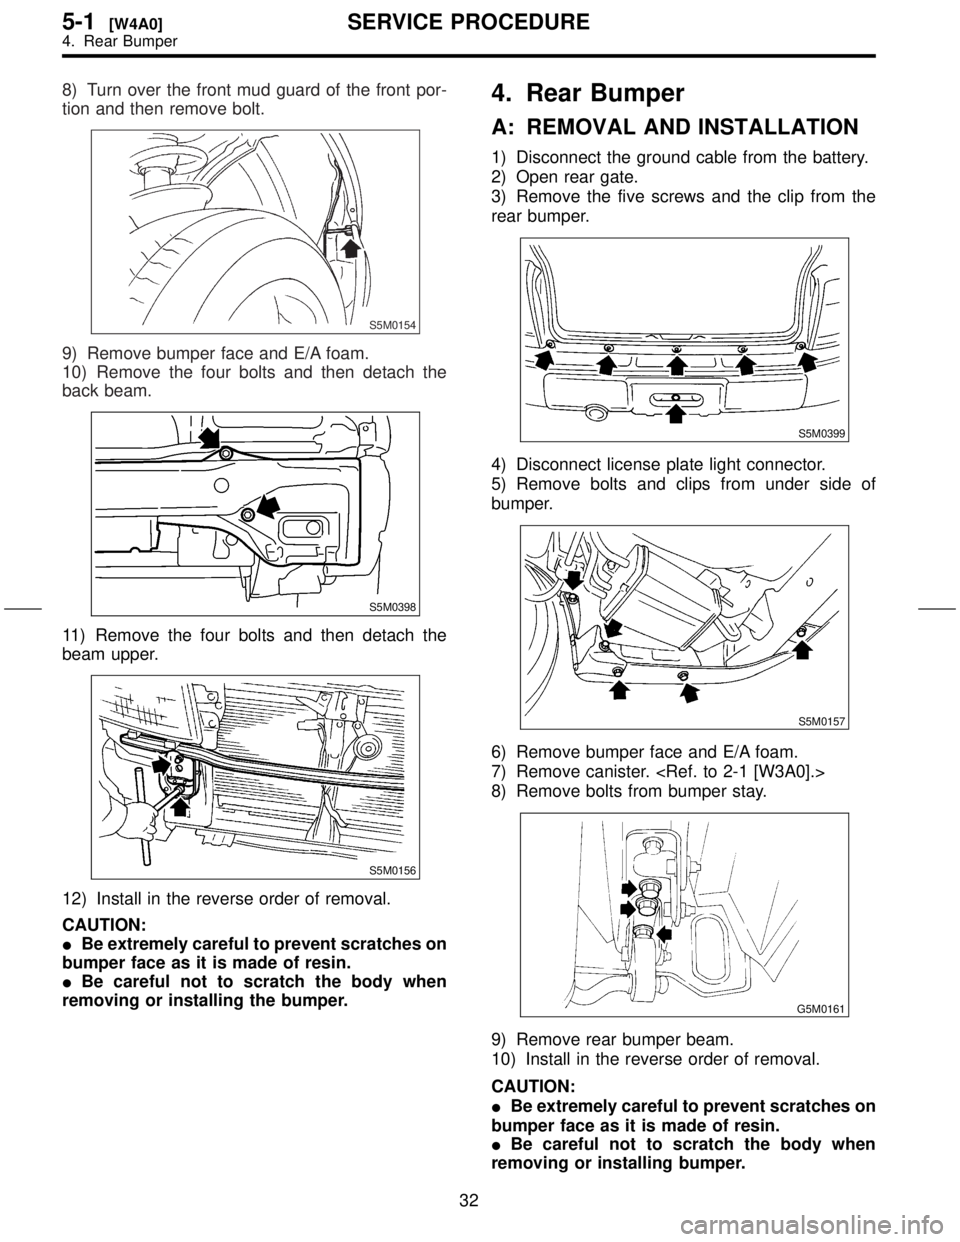
8) Turn over the front mud guard of the front por-
tion and then remove bolt.
S5M0154
9) Remove bumper face and E/A foam.
10) Remove the four bolts and then detach the
back beam.
S5M0398
11) Remove the four bolts and then detach the
beam upper.
S5M0156
12) Install in the reverse order of removal.
CAUTION:
IBe extremely careful to prevent scratches on
bumper face as it is made of resin.
IBe careful not to scratch the body when
removing or installing the bumper.
4. Rear Bumper
A: REMOVAL AND INSTALLATION
1) Disconnect the ground cable from the battery.
2) Open rear gate.
3) Remove the five screws and the clip from the
rear bumper.
S5M0399
4) Disconnect license plate light connector.
5) Remove bolts and clips from under side of
bumper.
S5M0157
6) Remove bumper face and E/A foam.
7) Remove canister.
8) Remove bolts from bumper stay.
G5M0161
9) Remove rear bumper beam.
10) Install in the reverse order of removal.
CAUTION:
IBe extremely careful to prevent scratches on
bumper face as it is made of resin.
IBe careful not to scratch the body when
removing or installing bumper.
32
5-1[W4A0]SERVICE PROCEDURE
4. Rear Bumper
Page 190 of 345
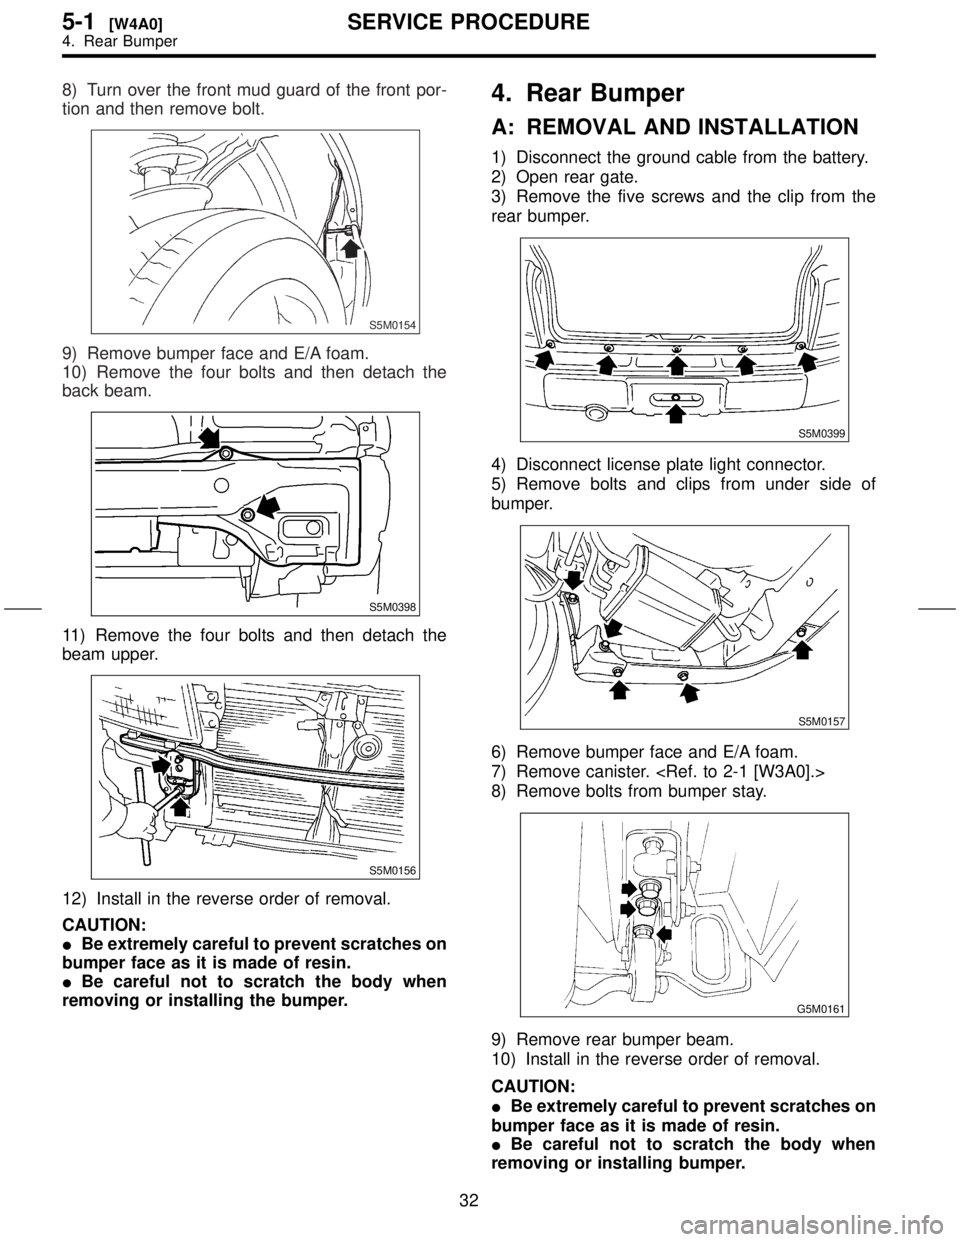
8) Turn over the front mud guard of the front por-
tion and then remove bolt.
S5M0154
9) Remove bumper face and E/A foam.
10) Remove the four bolts and then detach the
back beam.
S5M0398
11) Remove the four bolts and then detach the
beam upper.
S5M0156
12) Install in the reverse order of removal.
CAUTION:
IBe extremely careful to prevent scratches on
bumper face as it is made of resin.
IBe careful not to scratch the body when
removing or installing the bumper.
4. Rear Bumper
A: REMOVAL AND INSTALLATION
1) Disconnect the ground cable from the battery.
2) Open rear gate.
3) Remove the five screws and the clip from the
rear bumper.
S5M0399
4) Disconnect license plate light connector.
5) Remove bolts and clips from under side of
bumper.
S5M0157
6) Remove bumper face and E/A foam.
7) Remove canister.
8) Remove bolts from bumper stay.
G5M0161
9) Remove rear bumper beam.
10) Install in the reverse order of removal.
CAUTION:
IBe extremely careful to prevent scratches on
bumper face as it is made of resin.
IBe careful not to scratch the body when
removing or installing bumper.
32
5-1[W4A0]SERVICE PROCEDURE
4. Rear Bumper
Page 204 of 345
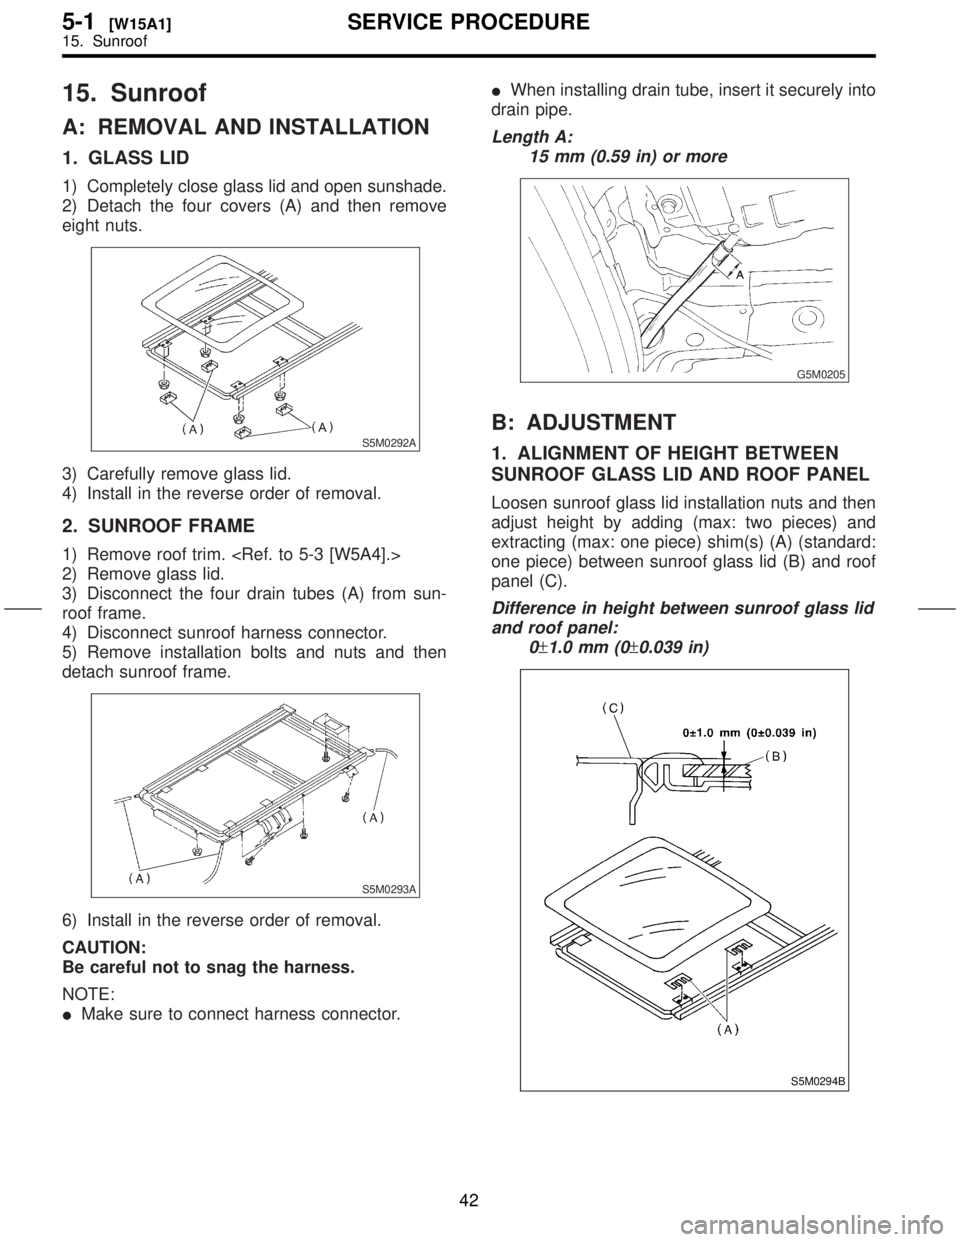
15. Sunroof
A: REMOVAL AND INSTALLATION
1. GLASS LID
1) Completely close glass lid and open sunshade.
2) Detach the four covers (A) and then remove
eight nuts.
S5M0292A
3) Carefully remove glass lid.
4) Install in the reverse order of removal.
2. SUNROOF FRAME
1) Remove roof trim.
2) Remove glass lid.
3) Disconnect the four drain tubes (A) from sun-
roof frame.
4) Disconnect sunroof harness connector.
5) Remove installation bolts and nuts and then
detach sunroof frame.
S5M0293A
6) Install in the reverse order of removal.
CAUTION:
Be careful not to snag the harness.
NOTE:
IMake sure to connect harness connector.IWhen installing drain tube, insert it securely into
drain pipe.
Length A:
15 mm (0.59 in) or more
G5M0205
B: ADJUSTMENT
1. ALIGNMENT OF HEIGHT BETWEEN
SUNROOF GLASS LID AND ROOF PANEL
Loosen sunroof glass lid installation nuts and then
adjust height by adding (max: two pieces) and
extracting (max: one piece) shim(s) (A) (standard:
one piece) between sunroof glass lid (B) and roof
panel (C).
Difference in height between sunroof glass lid
and roof panel:
0
±1.0 mm (0±0.039 in)
S5M0294B
42
5-1[W15A1]SERVICE PROCEDURE
15. Sunroof