tire pressure SUBARU FORESTER 1999 Service Repair Manual
[x] Cancel search | Manufacturer: SUBARU, Model Year: 1999, Model line: FORESTER, Model: SUBARU FORESTER 1999Pages: 345, PDF Size: 5.6 MB
Page 194 of 345

Process
No.Process name Job contents
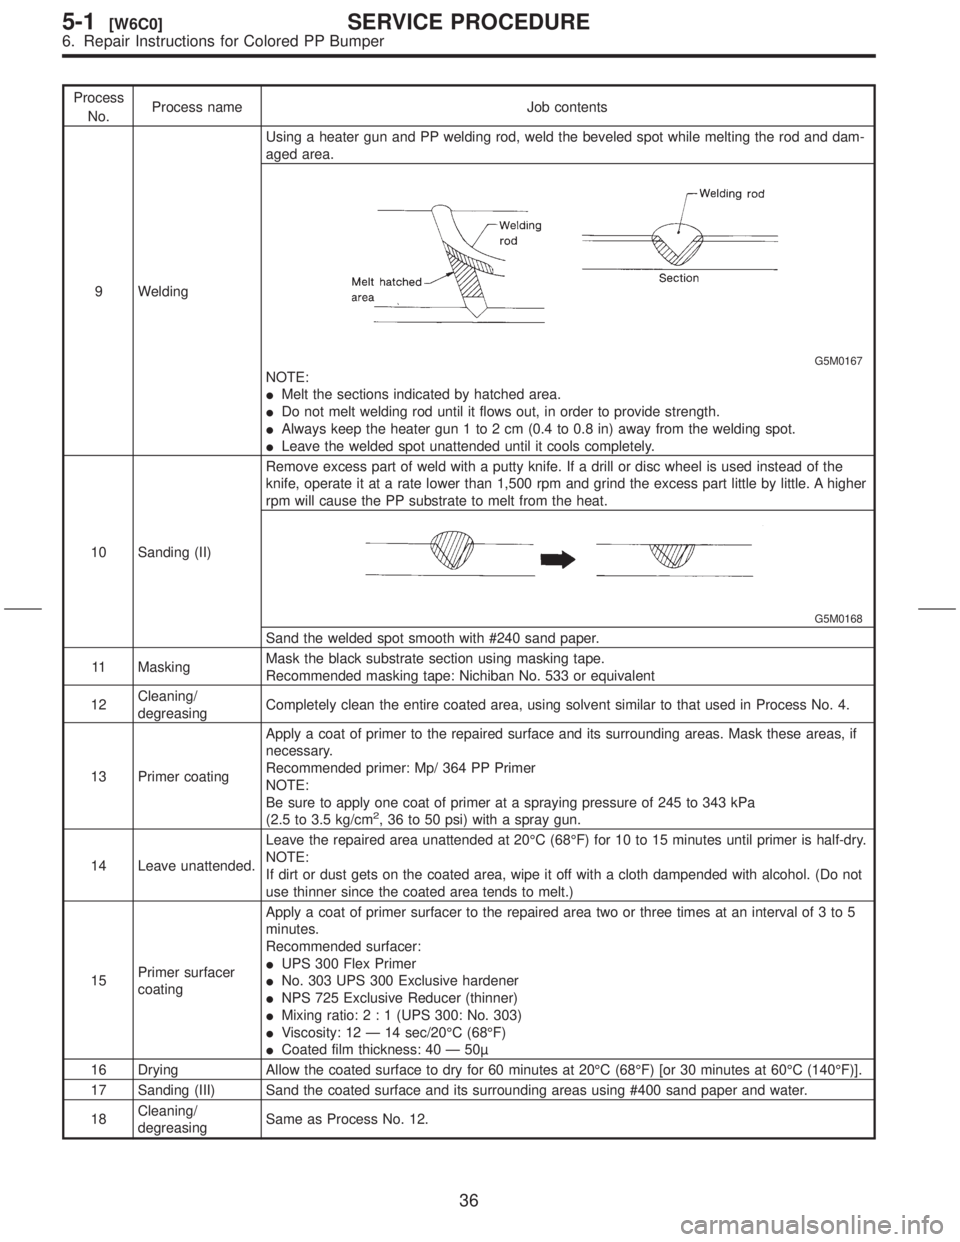
9 WeldingUsing a heater gun and PP welding rod, weld the beveled spot while melting the rod and dam-
aged area.
G5M0167
NOTE:
IMelt the sections indicated by hatched area.
IDo not melt welding rod until it flows out, in order to provide strength.
IAlways keep the heater gun 1 to 2 cm (0.4 to 0.8 in) away from the welding spot.
ILeave the welded spot unattended until it cools completely.
10 Sanding (II)Remove excess part of weld with a putty knife. If a drill or disc wheel is used instead of the
knife, operate it at a rate lower than 1,500 rpm and grind the excess part little by little. A higher
rpm will cause the PP substrate to melt from the heat.
G5M0168
Sand the welded spot smooth with #240 sand paper.
11 MaskingMask the black substrate section using masking tape.
Recommended masking tape: Nichiban No. 533 or equivalent
12Cleaning/
degreasingCompletely clean the entire coated area, using solvent similar to that used in Process No. 4.
13 Primer coatingApply a coat of primer to the repaired surface and its surrounding areas. Mask these areas, if
necessary.
Recommended primer: Mp/ 364 PP Primer
NOTE:
Be sure to apply one coat of primer at a spraying pressure of 245 to 343 kPa
(2.5 to 3.5 kg/cm
2, 36 to 50 psi) with a spray gun.
14 Leave unattended.Leave the repaired area unattended at 20ÉC (68ÉF) for 10 to 15 minutes until primer is half-dry.
NOTE:
If dirt or dust gets on the coated area, wipe it off with a cloth dampended with alcohol. (Do not
use thinner since the coated area tends to melt.)
15Primer surfacer
coatingApply a coat of primer surfacer to the repaired area two or three times at an interval of 3 to 5
minutes.
Recommended surfacer:
IUPS 300 Flex Primer
INo. 303 UPS 300 Exclusive hardener
INPS 725 Exclusive Reducer (thinner)
IMixing ratio:2:1(UPS 300: No. 303)
IViscosity: 12 Ð 14 sec/20ÉC (68ÉF)
ICoated film thickness: 40 Ð 50
16 Drying Allow the coated surface to dry for 60 minutes at 20ÉC (68ÉF) [or 30 minutes at 60ÉC (140ÉF)].
17 Sanding (III) Sand the coated surface and its surrounding areas using #400 sand paper and water.
18Cleaning/
degreasingSame as Process No. 12.
36
5-1[W6C0]SERVICE PROCEDURE
6. Repair Instructions for Colored PP Bumper
Page 322 of 345
![SUBARU FORESTER 1999 Service Repair Manual 3. Ignition Switch
A: REMOVAL AND INSTALLATION
1) Disconnect ground cable from battery.
2) Remove instrument panel lower cover. <Ref. to
5-4 [W1A0].>
3) Remove screws, separate upper column cover
and SUBARU FORESTER 1999 Service Repair Manual 3. Ignition Switch
A: REMOVAL AND INSTALLATION
1) Disconnect ground cable from battery.
2) Remove instrument panel lower cover. <Ref. to
5-4 [W1A0].>
3) Remove screws, separate upper column cover
and](/img/17/57427/w960_57427-321.png)
3. Ignition Switch
A: REMOVAL AND INSTALLATION
1) Disconnect ground cable from battery.
2) Remove instrument panel lower cover.
3) Remove screws, separate upper column cover
and lower column cover.
S6M0042
4) Remove knee protector.
5) Remove meter visor.
6) Disconnect ignition switch connector from body
harness.
7) Using a drift and hammer, hit the torn bolt head
to loosen and remove the ignition switch.
G6M0020
8) Install in the reverse order of removal.
NOTE:
When installing, tighten the connecting bolt (A)
until its head twists off.
S6M0162B
4. Lighting
A: ADJUSTMENT
1. HEADLIGHT AIMING
NOTE:
As this headlight is the ªVISUAL AIMING TYPEº, it
is possible to adjust aiming only in the vertical
direction. It cannot be adjusted in the horizontal
direction.
CAUTION:
Turn off the light before adjusting headlight
aiming. If the light is necessary to check
aiming, do not turn on for more than two min-
utes.
NOTE:
Before checking the headlight aiming, be sure of
the following:
IThe area around the headlight has not sustained
any accident, damage or other type of deformation.
IVehicle is parked on level ground.
IThe inflation pressure of tires is correct.
IVehicle's gas tank is fully charged.
IBounce the vehicle several times to normalize
the suspension.
IMake certain that someone is seated in the driv-
er's seat.
1) Place a cloth over the headlight that does not
require aiming adjustment.
5
[W4A1]6-2SERVICE PROCEDURE
4. Lighting