rear SUBARU FORESTER 2004 Service User Guide
[x] Cancel search | Manufacturer: SUBARU, Model Year: 2004, Model line: FORESTER, Model: SUBARU FORESTER 2004Pages: 2870, PDF Size: 38.67 MB
Page 123 of 2870
AB-23
AIRBAG SYSTEM
Airbag Module Disposal (Deployment Processing On Vehicle)
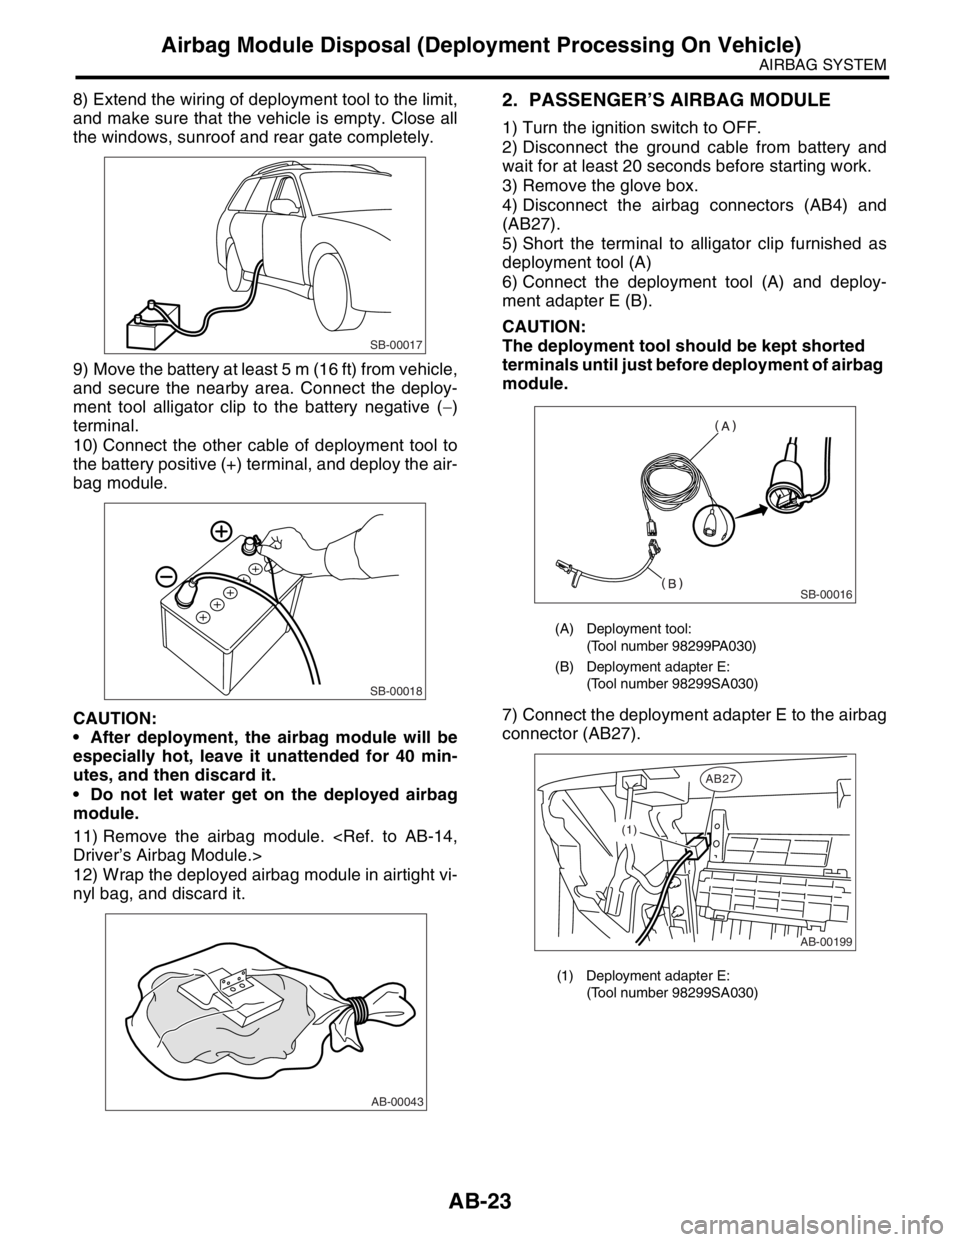
8) Extend the wiring of deployment tool to the limit,
and make sure that the vehicle is empty. Close all
the windows, sunroof and rear gate completely.
9) Move the battery at least 5 m (16 ft) from vehicle,
and secure the nearby area. Connect the deploy-
ment tool alligator clip to the battery negative (−)
terminal.
10) Connect the other cable of deployment tool to
the battery positive (+) terminal, and deploy the air-
bag module.
CAUTION:
After deployment, the airbag module will be
especially hot, leave it unattended for 40 min-
utes, and then discard it.
Do not let water get on the deployed airbag
module.
11) Remove the airbag module.
12) Wrap the deployed airbag module in airtight vi-
nyl bag, and discard it.2. PASSENGER’S AIRBAG MODULE
1) Turn the ignition switch to OFF.
2) Disconnect the ground cable from battery and
wait for at least 20 seconds before starting work.
3) Remove the glove box.
4) Disconnect the airbag connectors (AB4) and
(AB27).
5) Short the terminal to alligator clip furnished as
deployment tool (A)
6) Connect the deployment tool (A) and deploy-
ment adapter E (B).
CAUTION:
The deployment tool should be kept shorted
terminals until just before deployment of airbag
module.
7) Connect the deployment adapter E to the airbag
connector (AB27).
SB-00017
SB-00018
AB-00043
(A) Deployment tool:
(Tool number 98299PA030)
(B) Deployment adapter E:
(Tool number 98299SA030)
(1) Deployment adapter E:
(Tool number 98299SA030)
SB-00016
AB-00199
AB27
(1)
Page 124 of 2870

AB-24
AIRBAG SYSTEM
Airbag Module Disposal (Deployment Processing On Vehicle)
8) Extend the wiring of deployment tool to the limit,
and make sure that the vehicle is empty. Close all
the windows, sunroof and rear gate completely.
9) Move the battery at least 5 m (16 ft) from vehicle,
and secure the nearby area. Connect the deploy-
ment tool alligator clip to the battery negative (−)
terminal.
10) Connect the other cable of deployment tool to
the battery positive (+) terminal, and deploy the air-
bag module.
CAUTION:
After deployment, the airbag module will be
especially hot, leave it unattended for 40 min-
utes, and then discard it.
Do not let water get on the deployed airbag
module.
11) Remove the airbag module.
12) Wrap the airbag module in an airtight vinyl bag,
and discard it.3. SIDE AIRBAG MODULE
1) Turn the ignition switch to OFF.
2) Disconnect the ground cable from battery and
wait for at least 20 seconds before starting work.
3) Disconnect the side airbag module connector
(yellow) under the front seat cushion.
4) Set the backrest at most standing position, and
then set the seat position at center of slide rail.
5) Short the terminal to alligator clip furnished as
deployment tool (A)
6) Connect the deployment tool and deployment
adapter A (B).
CAUTION:
The deployment tool should be kept shorted
terminals until just before deployment of airbag
module.
7) Connect the deployment adapter A (1) to the
side airbag module connector (yellow).
CAUTION:
Do not place any object on front seat.
Deploy the side airbag one by one to discard
it.
SB-00017
SB-00018
AB-00043
(A) Deployment tool:
(Tool number 98299PA030)
(B) Deployment adapter A:
(Tool number 98299FC030)
SB-00016
(1)
AB-00652
Page 125 of 2870

AB-25
AIRBAG SYSTEM
Airbag Module Disposal (Deployment Processing On Vehicle)
8) Extend the wiring of deployment tool to the limit,
and make sure that the vehicle is empty. Close all
the windows, sunroof and rear gate completely.
9) Move the battery at least 5 m (16 ft) from vehicle,
and secure the nearby area. Connect the deploy-
ment tool alligator clip to the battery negative (−)
terminal.
10) Connect the other cable of deployment tool to
the battery positive (+) terminal, and deploy the air-
bag module.
CAUTION:
After deployment, the airbag module will be
especially hot, leave it unattended for 40 min-
utes, and then discard it.
Do not let water get on the deployed airbag
module.
11) Remove the side airbag module.
12) Wrap the deployed airbag module in airtight vi-
nyl bag, and discard it.
SB-00017
SB-00018
AB-00043
Page 138 of 2870
AB-6
AIRBAG SYSTEM (DIAGNOSTIC)
General Description
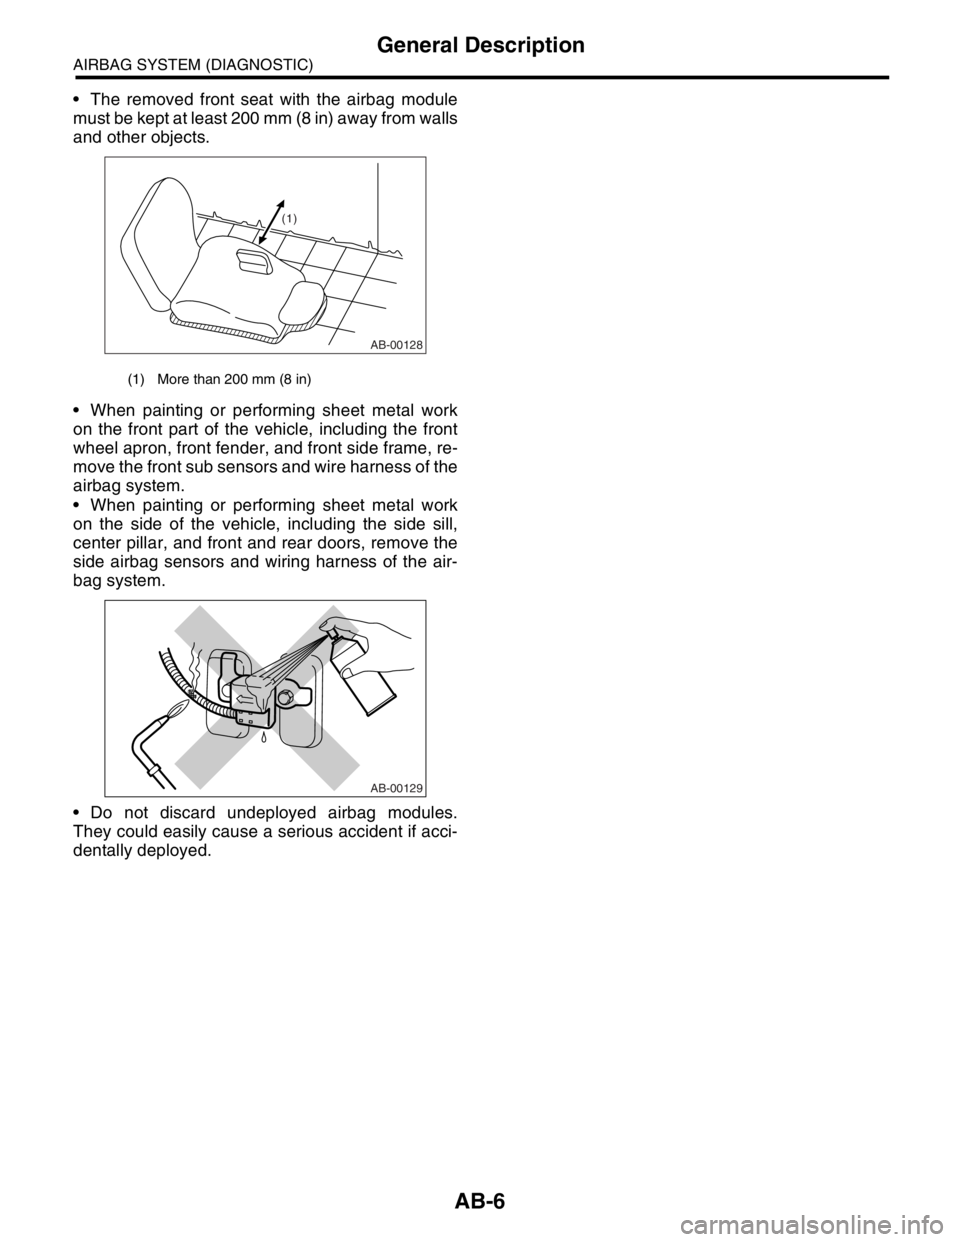
The removed front seat with the airbag module
must be kept at least 200 mm (8 in) away from walls
and other objects.
When painting or performing sheet metal work
on the front part of the vehicle, including the front
wheel apron, front fender, and front side frame, re-
move the front sub sensors and wire harness of the
airbag system.
When painting or performing sheet metal work
on the side of the vehicle, including the side sill,
center pillar, and front and rear doors, remove the
side airbag sensors and wiring harness of the air-
bag system.
Do not discard undeployed airbag modules.
They could easily cause a serious accident if acci-
dentally deployed.
(1) More than 200 mm (8 in)
AB-00128
(1)
AB-00129
Page 235 of 2870
SEAT BELT SYSTEM
SB
Page
1. General Description ....................................................................................2
2. Inspection Locations After a Collision .........................................................6
3. Seat Belt Warning System ..........................................................................7
4. Front Seat Belt ..........................................................................................10
5. Rear Seat Belt ...........................................................................................12
6. Disposal of Pretensioner ...........................................................................14
Page 237 of 2870
SB-3
SEAT BELT SYSTEM
General Description
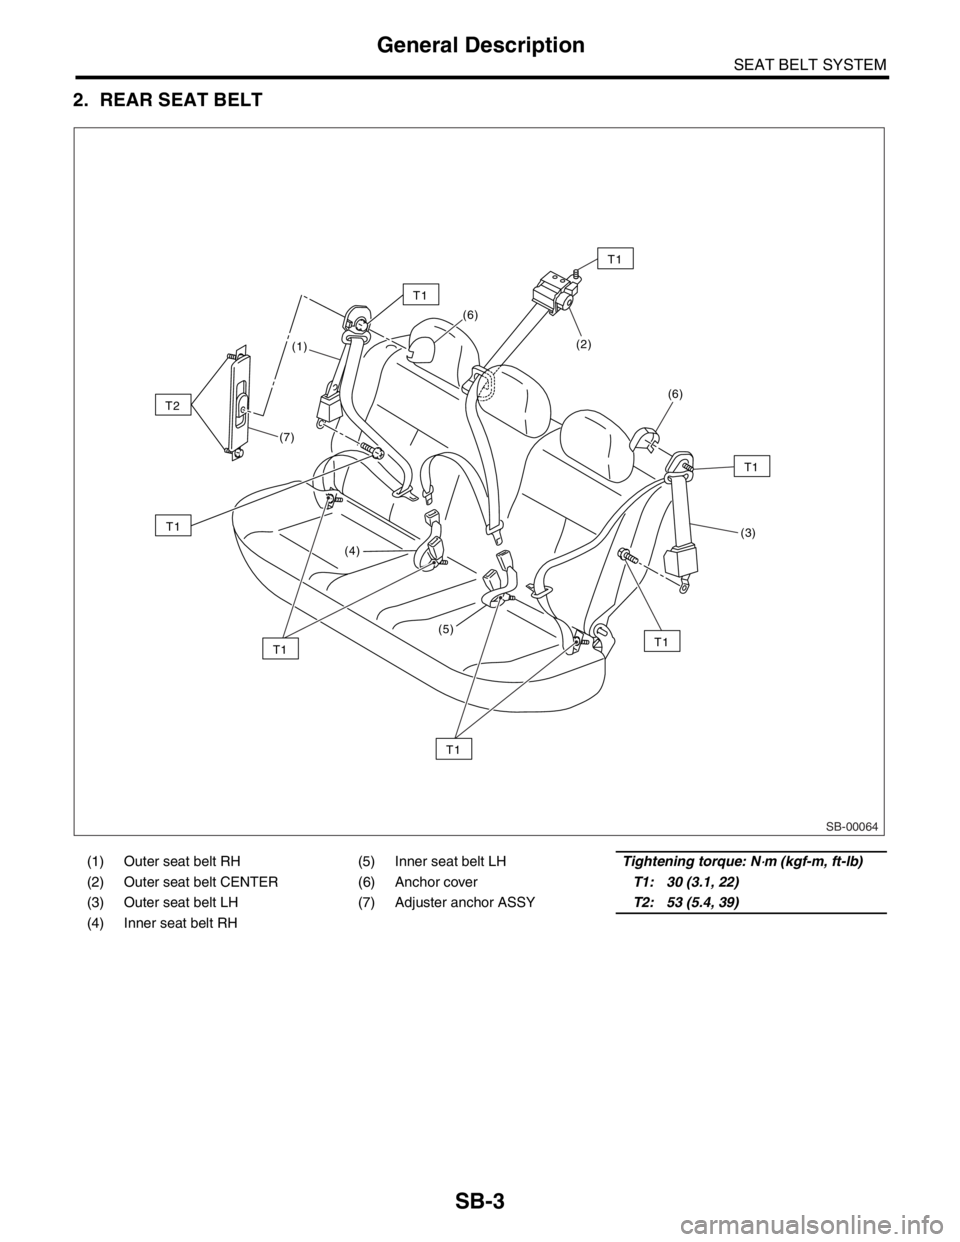
2. REAR SEAT BELT
(1) Outer seat belt RH (5) Inner seat belt LHTightening torque: N⋅m (kgf-m, ft-lb)
(2) Outer seat belt CENTER (6) Anchor coverT1: 30 (3.1, 22)
(3) Outer seat belt LH (7) Adjuster anchor ASSYT2: 53 (5.4, 39)
(4) Inner seat belt RH
SB-00064
T1
T1
T1
T1
T2
T1
T1
(1)
(7)
(4)
(5)(6)
(2)
(6)
(3)
T1
Page 243 of 2870
SB-9
SEAT BELT SYSTEM
Seat Belt Warning System
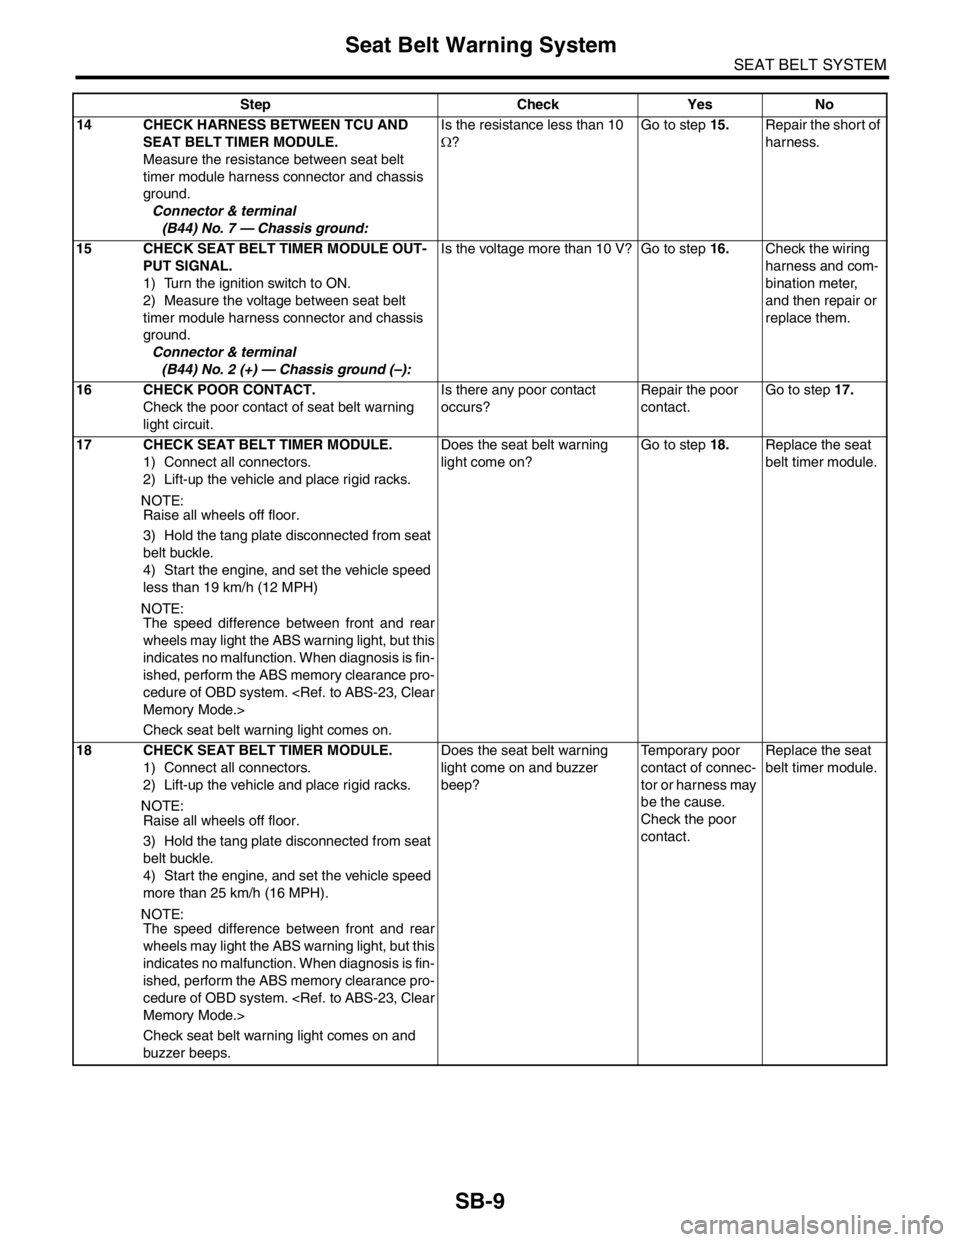
14 CHECK HARNESS BETWEEN TCU AND
SEAT BELT TIMER MODULE.
Measure the resistance between seat belt
timer module harness connector and chassis
ground.
Connector & terminal
(B44) No. 7 — Chassis ground:Is the resistance less than 10
Ω?Go to step 15.Repair the short of
harness.
15 CHECK SEAT BELT TIMER MODULE OUT-
PUT SIGNAL.
1) Turn the ignition switch to ON.
2) Measure the voltage between seat belt
timer module harness connector and chassis
ground.
Connector & terminal
(B44) No. 2 (+) — Chassis ground (–):Is the voltage more than 10 V? Go to step 16.Check the wiring
harness and com-
bination meter,
and then repair or
replace them.
16 CHECK POOR CONTACT.
Check the poor contact of seat belt warning
light circuit.Is there any poor contact
occurs?Repair the poor
contact.Go to step 17.
17 CHECK SEAT BELT TIMER MODULE.
1) Connect all connectors.
2) Lift-up the vehicle and place rigid racks.
NOTE:
Raise all wheels off floor.
3) Hold the tang plate disconnected from seat
belt buckle.
4) Start the engine, and set the vehicle speed
less than 19 km/h (12 MPH)
N
OTE:
The speed difference between front and rear
wheels may light the ABS warning light, but this
indicates no malfunction. When diagnosis is fin-
ished, perform the ABS memory clearance pro-
cedure of OBD system.
Check seat belt warning light comes on.Does the seat belt warning
light come on?Go to step 18.Replace the seat
belt timer module.
18 CHECK SEAT BELT TIMER MODULE.
1) Connect all connectors.
2) Lift-up the vehicle and place rigid racks.
N
OTE:
Raise all wheels off floor.
3) Hold the tang plate disconnected from seat
belt buckle.
4) Start the engine, and set the vehicle speed
more than 25 km/h (16 MPH).
NOTE:
The speed difference between front and rear
wheels may light the ABS warning light, but this
indicates no malfunction. When diagnosis is fin-
ished, perform the ABS memory clearance pro-
cedure of OBD system.
Check seat belt warning light comes on and
buzzer beeps.Does the seat belt warning
light come on and buzzer
beep?Temporary poor
contact of connec-
tor or harness may
be the cause.
Check the poor
contact.Replace the seat
belt timer module. Step Check Yes No
Page 246 of 2870
SB-12
SEAT BELT SYSTEM
Rear Seat Belt
5. Rear Seat Belt
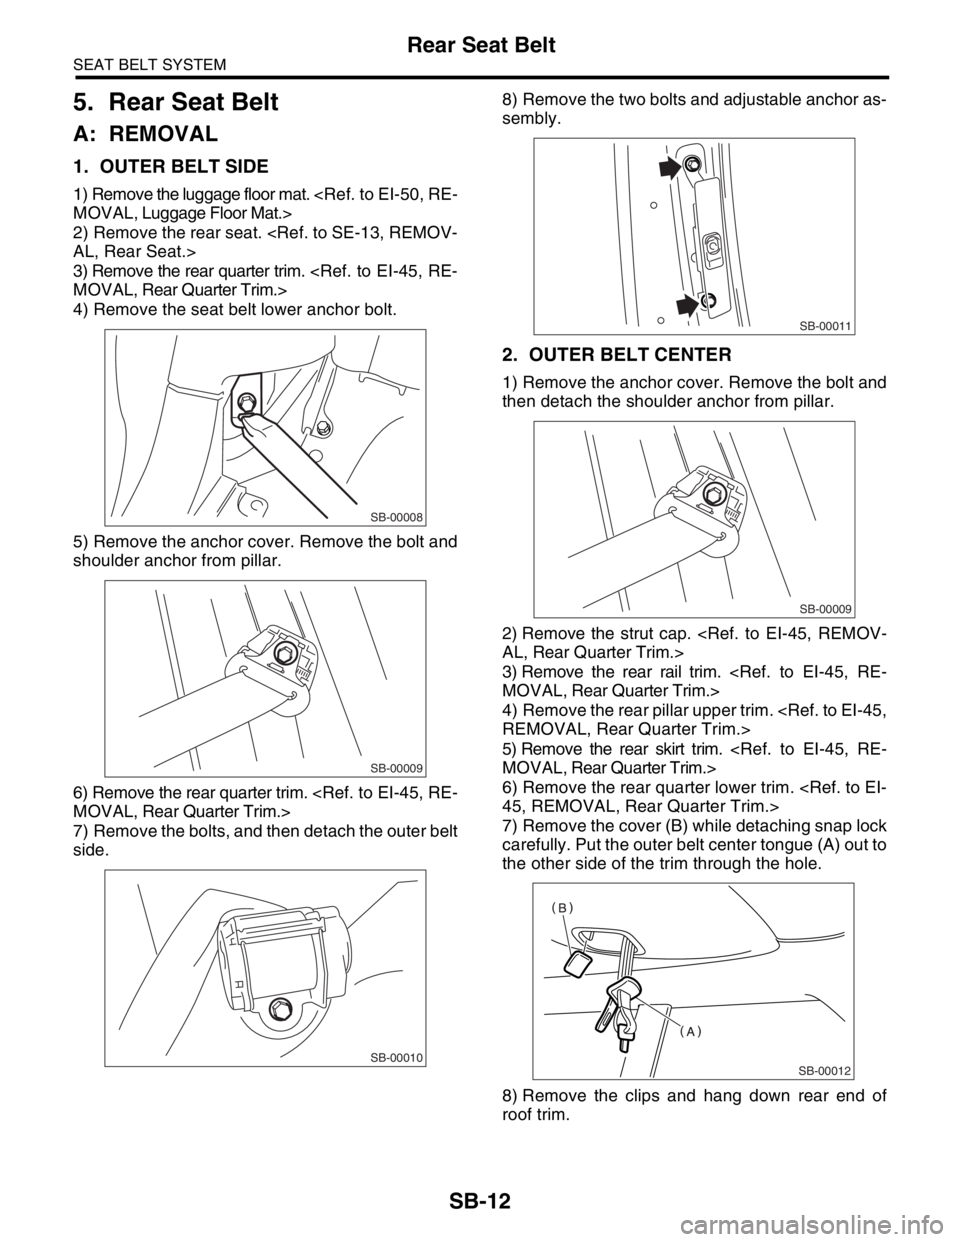
A: REMOVAL
1. OUTER BELT SIDE
1) Remove the luggage floor mat.
2) Remove the rear seat.
3) Remove the rear quarter trim.
4) Remove the seat belt lower anchor bolt.
5) Remove the anchor cover. Remove the bolt and
shoulder anchor from pillar.
6) Remove the rear quarter trim.
7) Remove the bolts, and then detach the outer belt
side.8) Remove the two bolts and adjustable anchor as-
sembly.
2. OUTER BELT CENTER
1) Remove the anchor cover. Remove the bolt and
then detach the shoulder anchor from pillar.
2) Remove the strut cap.
3) Remove the rear rail trim.
4) Remove the rear pillar upper trim.
5) Remove the rear skirt trim.
6) Remove the rear quarter lower trim.
7) Remove the cover (B) while detaching snap lock
carefully. Put the outer belt center tongue (A) out to
the other side of the trim through the hole.
8) Remove the clips and hang down rear end of
roof trim.
SB-00008
SB-00009
SB-00010
SB-00011
SB-00009
SB-00012
Page 247 of 2870
SB-13
SEAT BELT SYSTEM
Rear Seat Belt
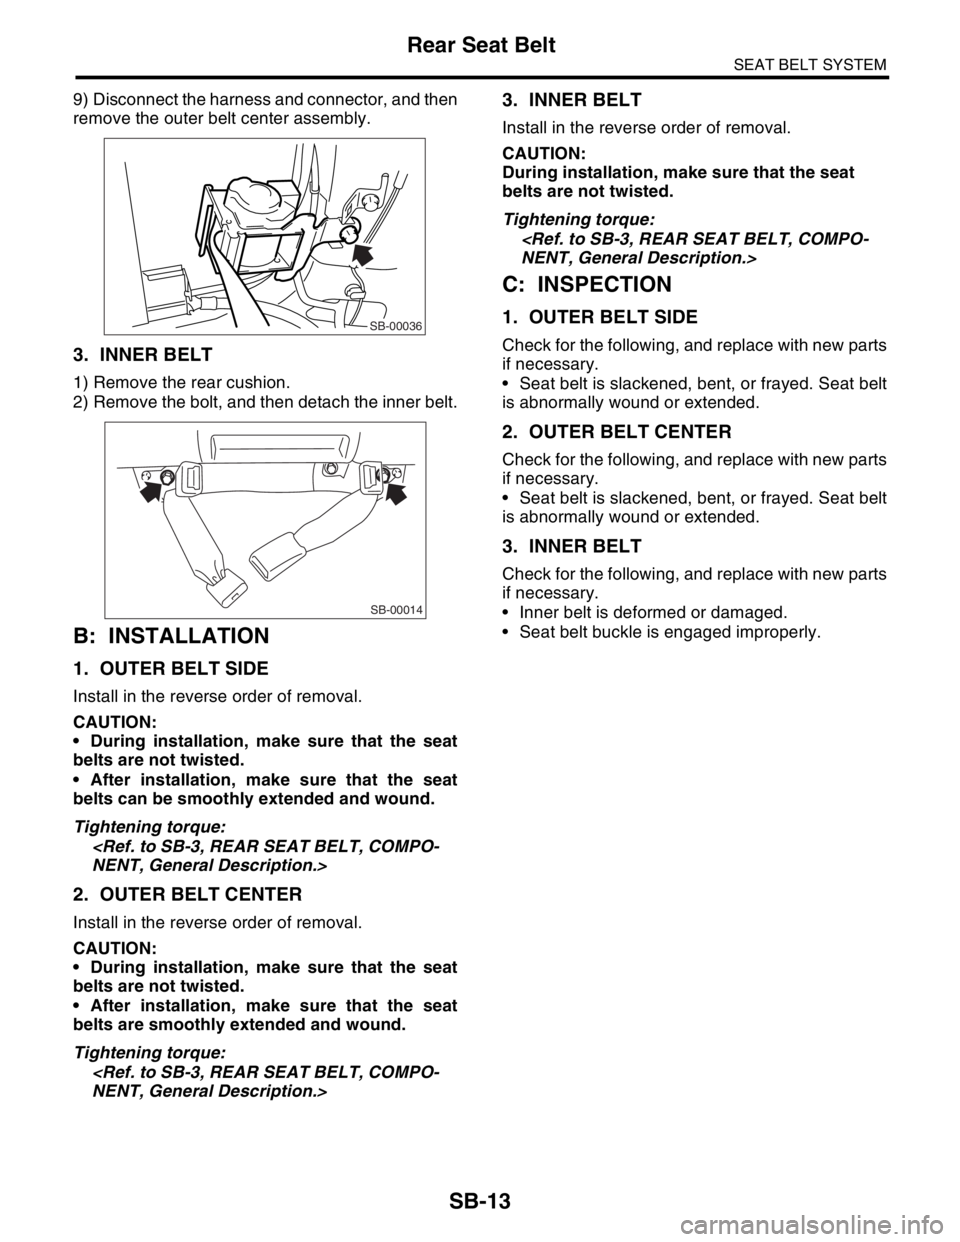
9) Disconnect the harness and connector, and then
remove the outer belt center assembly.
3. INNER BELT
1) Remove the rear cushion.
2) Remove the bolt, and then detach the inner belt.
B: INSTALLATION
1. OUTER BELT SIDE
Install in the reverse order of removal.
CAUTION:
During installation, make sure that the seat
belts are not twisted.
After installation, make sure that the seat
belts can be smoothly extended and wound.
Tightening torque:
2. OUTER BELT CENTER
Install in the reverse order of removal.
CAUTION:
During installation, make sure that the seat
belts are not twisted.
After installation, make sure that the seat
belts are smoothly extended and wound.
Tightening torque:
3. INNER BELT
Install in the reverse order of removal.
CAUTION:
During installation, make sure that the seat
belts are not twisted.
Tightening torque:
C: INSPECTION
1. OUTER BELT SIDE
Check for the following, and replace with new parts
if necessary.
Seat belt is slackened, bent, or frayed. Seat belt
is abnormally wound or extended.
2. OUTER BELT CENTER
Check for the following, and replace with new parts
if necessary.
Seat belt is slackened, bent, or frayed. Seat belt
is abnormally wound or extended.
3. INNER BELT
Check for the following, and replace with new parts
if necessary.
Inner belt is deformed or damaged.
Seat belt buckle is engaged improperly.
SB-00036
SB-00014
Page 248 of 2870
SB-14
SEAT BELT SYSTEM
Disposal of Pretensioner
6. Disposal of Pretensioner
A: CAUTION
Do not discard undeployed pretensioners, because
they may cause serious personal injury when acci-
dentally deployed.
Deployment of the pretensioners should be done
on a flat place free from any possible danger. Avoid
deploying outdoors during heavy rainy or strong
windy weather.
Do not drop or damage the pretensioner.
Because deploying the pretensioners causes a
high-explosive noise, be sure to warn people in the
area, and do not allow anyone within a 5 m (16 ft)
radius of the disposal site.
Some smoke will be emitted after deployment of
the pretensioners. Therefore, it must be deployed
in a well-ventilated area with no smoke alarms
nearby.
Wear gloves, goggles, and earplugs during this
operation. Wash your hands afterwards.
After deployment, the pretensioner is especially
hot. Leave it unattended for 40 minutes or longer,
and then discard it.
Do not let water get on the deployed pretension-
er.
Wrap the deployed pretensioner in an airtight vi-
nyl bag, and then discard it.
If circumstances do not permit pretensioner de-
ployment, contact a SUBARU dealer.
B: OPERATION
1. DEPLOYING OF PRETENSIONER WHILE
INSTALLED IN VEHICLE
1) Fold backrest all the way forward, and then
move front seat all the way forward.
2) Turn the ignition switch to OFF, disconnect the
ground cable from battery, and wait for more than
20 seconds before starting work.
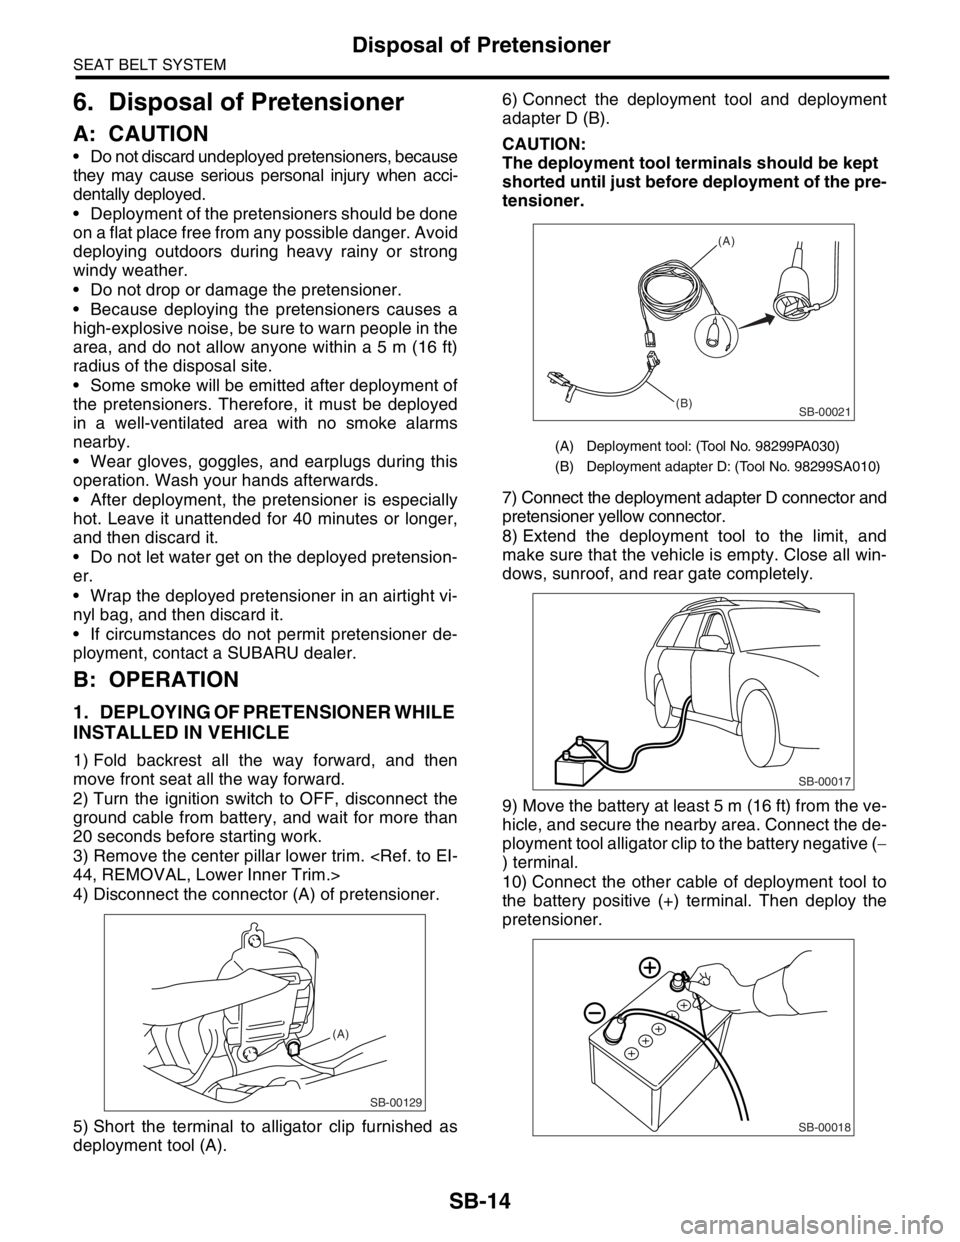
3) Remove the center pillar lower trim.
4) Disconnect the connector (A) of pretensioner.
5) Short the terminal to alligator clip furnished as
deployment tool (A).6) Connect the deployment tool and deployment
adapter D (B).
CAUTION:
The deployment tool terminals should be kept
shorted until just before deployment of the pre-
tensioner.
7) Connect the deployment adapter D connector and
pretensioner yellow connector.
8) Extend the deployment tool to the limit, and
make sure that the vehicle is empty. Close all win-
dows, sunroof, and rear gate completely.
9) Move the battery at least 5 m (16 ft) from the ve-
hicle, and secure the nearby area. Connect the de-
ployment tool alligator clip to the battery negative (−
) terminal.
10) Connect the other cable of deployment tool to
the battery positive (+) terminal. Then deploy the
pretensioner.
SB-00129
(A)
(A) Deployment tool: (Tool No. 98299PA030)
(B) Deployment adapter D: (Tool No. 98299SA010)
SB-00021
(A)
(B)
SB-00017
SB-00018