display SUBARU FORESTER 2010 SH / 3.G User Guide
[x] Cancel search | Manufacturer: SUBARU, Model Year: 2010, Model line: FORESTER, Model: SUBARU FORESTER 2010 SH / 3.GPages: 402, PDF Size: 14.36 MB
Page 144 of 402
button, the compass display is toggled on
or off. When the compass is on, an
illuminated compass reading will appear
in the upper right corner of the mirror.
Even with the mirror in anti-glare mode,
the mirror surface turns bright if the
transmission is shifted into reverse. This
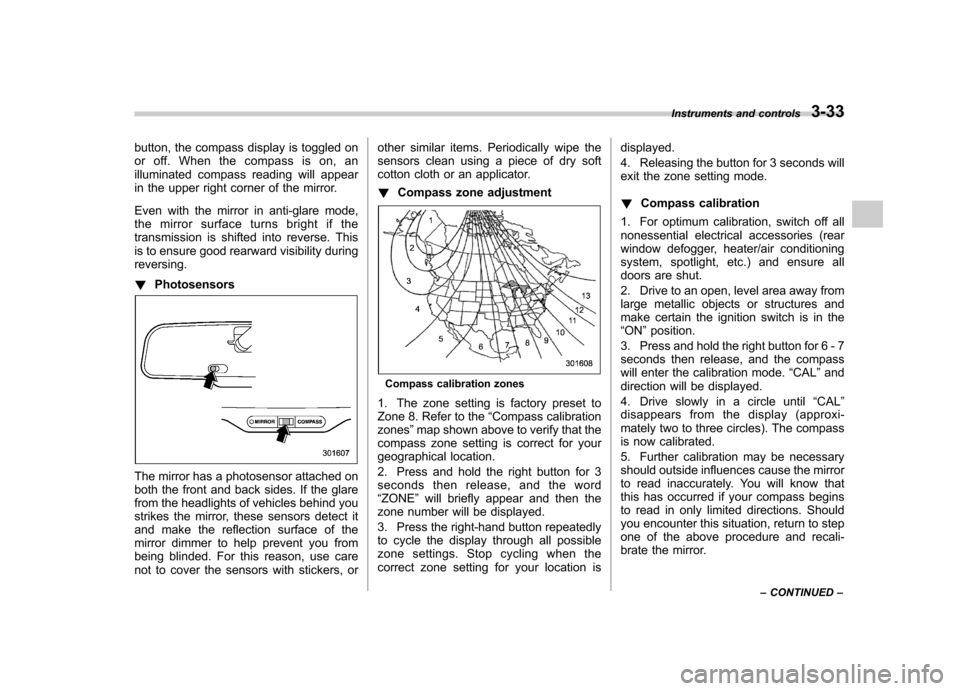
is to ensure good rearward visibility duringreversing. !Photosensors
The mirror has a photosensor attached on
both the front and back sides. If the glare
from the headlights of vehicles behind you
strikes the mirror, these sensors detect it
and make the reflection surface of the
mirror dimmer to help prevent you from
being blinded. For this reason, use care
not to cover the sensors with stickers, or other similar items. Periodically wipe the
sensors clean using a piece of dry soft
cotton cloth or an applicator. !
Compass zone adjustment
Compass calibration zones
1. The zone setting is factory preset to
Zone 8. Refer to the “Compass calibration
zones ”map shown above to verify that the
compass zone setting is correct for your
geographical location.
2. Press and hold the right button for 3
seconds then release, and the word“ ZONE ”will briefly appear and then the
zone number will be displayed.
3. Press the right-hand button repeatedly
to cycle the display through all possible
zone settings. Stop cycling when the
correct zone setting for your location is displayed.
4. Releasing the button for 3 seconds will
exit the zone setting mode. !
Compass calibration
1. For optimum calibration, switch off all
nonessential electrical accessories (rear
window defogger, heater/air conditioning
system, spotlight, etc.) and ensure all
doors are shut.
2. Drive to an open, level area away from
large metallic objects or structures and
make certain the ignition switch is in the“ ON ”position.
3. Press and hold the right button for 6 - 7
seconds then release, and the compass
will enter the calibration mode. “CAL ”and
direction will be displayed.
4. Drive slowly in a circle until “CAL ”
disappears from the display (approxi-
mately two to three circles). The compass
is now calibrated.
5. Further calibration may be necessary
should outside influences cause the mirror
to read inaccurately. You will know that
this has occurred if your compass begins
to read in only limited directions. Should
you encounter this situation, return to step
one of the above procedure and recali-
brate the mirror. Instruments and controls
3-33
– CONTINUED –
Page 145 of 402
3-34Instruments and controls
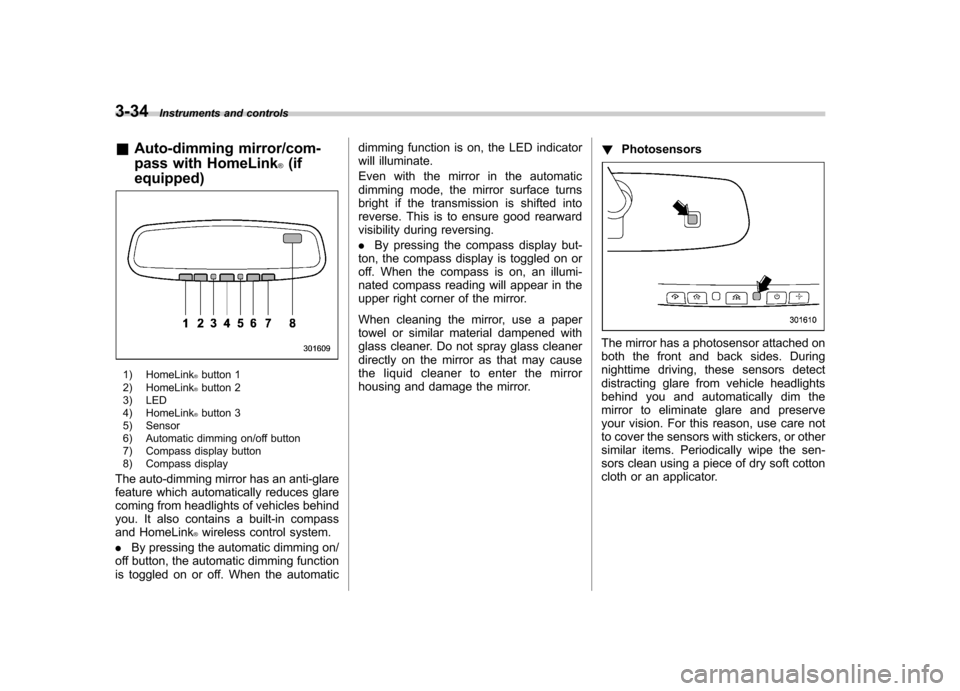
& Auto-dimming mirror/com-
pass with HomeLink
®(if
equipped)
1) HomeLink®button 1
2) HomeLink®button 2
3) LED
4) HomeLink
®button 3
5) Sensor
6) Automatic dimming on/off button
7) Compass display button
8) Compass display
The auto-dimming mirror has an anti-glare
feature which automatically reduces glare
coming from headlights of vehicles behind
you. It also contains a built-in compass
and HomeLink
®wireless control system.
. By pressing the automatic dimming on/
off button, the automatic dimming function
is toggled on or off. When the automatic dimming function is on, the LED indicator
will illuminate.
Even with the mirror in the automatic
dimming mode, the mirror surface turns
bright if the transmission is shifted into
reverse. This is to ensure good rearward
visibility during reversing. .
By pressing the compass display but-
ton, the compass display is toggled on or
off. When the compass is on, an illumi-
nated compass reading will appear in the
upper right corner of the mirror.
When cleaning the mirror, use a paper
towel or similar material dampened with
glass cleaner. Do not spray glass cleaner
directly on the mirror as that may cause
the liquid cleaner to enter the mirror
housing and damage the mirror. !
Photosensors
The mirror has a photosensor attached on
both the front and back sides. During
nighttime driving, these sensors detect
distracting glare from vehicle headlights
behind you and automatically dim the
mirror to eliminate glare and preserve
your vision. For this reason, use care not
to cover the sensors with stickers, or other
similar items. Periodically wipe the sen-
sors clean using a piece of dry soft cotton
cloth or an applicator.
Page 146 of 402
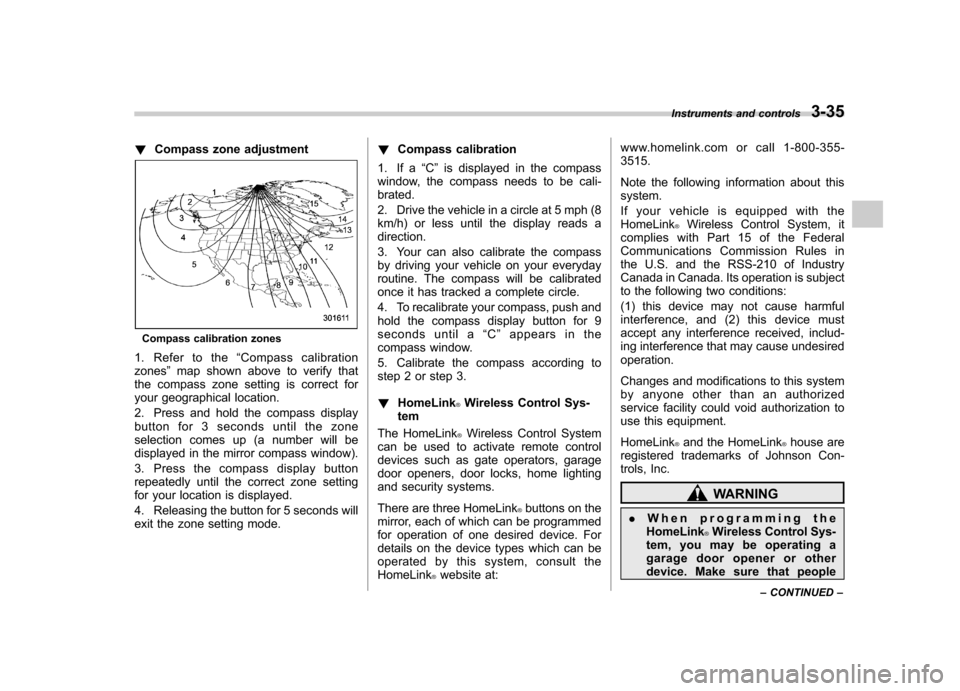
!Compass zone adjustment
Compass calibration zones
1. Refer to the “Compass calibration
zones ”map shown above to verify that
the compass zone setting is correct for
your geographical location.
2. Press and hold the compass display
button for 3 seconds until the zone
selection comes up (a number will be
displayed in the mirror compass window).
3. Press the compass display button
repeatedly until the correct zone setting
for your location is displayed.
4. Releasing the button for 5 seconds will
exit the zone setting mode. !
Compass calibration
1. If a “C ” is displayed in the compass
window, the compass needs to be cali-brated.
2. Drive the vehicle in a circle at 5 mph (8
km/h) or less until the display reads a direction.
3. Your can also calibrate the compass
by driving your vehicle on your everyday
routine. The compass will be calibrated
once it has tracked a complete circle.
4. To recalibrate your compass, push and
hold the compass display button for 9
seconds until a “C ” appears in the
compass window.
5. Calibrate the compass according to
step 2 or step 3. ! HomeLink
®Wireless Control Sys-
tem
The HomeLink
®Wireless Control System
can be used to activate remote control
devices such as gate operators, garage
door openers, door locks, home lighting
and security systems.
There are three HomeLink
®buttons on the
mirror, each of which can be programmed
for operation of one desired device. For
details on the device types which can be
operated by this system, consult the HomeLink
®website at: www.homelink.com or call 1-800-355-3515.
Note the following information about this system.
If your vehicle is equipped with the HomeLink
®Wireless Control System, it
complies with Part 15 of the Federal
Communications Commission Rules in
the U.S. and the RSS-210 of Industry
Canada in Canada. Its operation is subject
to the following two conditions:
(1) this device may not cause harmful
interference, and (2) this device must
accept any interference received, includ-
ing interference that may cause undesiredoperation.
Changes and modifications to this system
by anyone other than an authorized
service facility could void authorization to
use this equipment. HomeLink
®and the HomeLink®house are
registered trademarks of Johnson Con-
trols, Inc.
WARNING
. When programming the
HomeLink
®Wireless Control Sys-
tem, you may be operating a
garage door opener or other
device. Make sure that people Instruments and controls
3-35
– CONTINUED –
Page 172 of 402
Antenna system.................................................. 5-2
Roof antenna ...................................................... 5-2
FM reception ....................................................... 5-2
XM
TMsatellite radio reception (if equipped) ...... 5-2
Installation of accessories .................................. 5-4
Audio set ............................................................. 5-4
Type A audio set (if equipped) ............................. 5-5
Type B audio set (if equipped) ............................. 5-6
Power and sound controls ................................. 5-7
Power switch and volume control ........................ 5-7
Sound control ..................................................... 5-7
Adjustable level of each mode ............................. 5-9
FM/AM radio operation ...................................... 5-10
FM/AM selection ................................................. 5-10
Tuning ............................................................... 5-10
Displaying radio PS (Program Service Name) and RT (Radio Text) ................................................ 5-12
Station preset .................................................... 5-12
Satellite radio operation (if equipped) .............. 5-13
XM
TMsatellite radio ............................................ 5-13
Sirius satellite radio ........................................... 5-13
Satellite radio reception ...................................... 5-13
Displaying satellite radio ID of tuner ................... 5-13Band selection
................................................... 5-14
Channel and category selection ......................... 5-14
Channel preset .................................................. 5-16
Display selection ............................................... 5-16
CD player operation .......................................... 5-17
How to insert a CD (type A) ................................ 5-17
How to insert a CD(s) (type B) .. .......................... 5-17
How to play back a CD ...................................... 5-19
To select a track from its beginning. ................... 5-19
Fast-forwarding and fast-reversing ..................... 5-20
Repeating .......................................................... 5-21
Random playback .............................................. 5-21
Scan ................................................................. 5-22
Display selection ............................................... 5-22
Folder selection ................................................. 5-23
How to eject a CD from the player (type A) .... ..... 5-23
How to eject CDs from the player (type B) ..... ..... 5-24
When the following messages are displayed. . ..... 5-25
Auxiliary input jack (if equipped). ..................... 5-25
Precautions to observe when handling a compact disc ................................................... 5-26
Audio control buttons (if equipped) ................. 5-28
MODE button ..................................................... 5-28 Audio
5
Page 179 of 402

5-8Audio
mately 5 seconds. ! SVC setting
SVC (Speed Volume Control) is a function
that automatically adjusts the volume
according to the vehicle speed. As the
vehicle speed increases, the audio vo-
lume automatically increases to match the
vehicle speed, in order to create a
pleasant listening environment even as
the driving noise increases. The amount of
this automatic volume change can be set
in the range from OFF to 2. The initial
setting is OFF. ! BEEP setting
A beep sound (operation sound) that
occurs when the audio system is operated
can be set ON/OFF. The initial setting is ON. ! SRS CS Auto setting (type B audio)
SRS CS Auto can be set ON/OFF. When
this setting is ON, “
”is displayed on the
screen.
NOTE
SRS CS Auto creates a 5.1ch equiva-
lent surround field using 10 speakers
that are installed in the vehicle.
SRS CS Auto features:
1) Sound originating from door mount
speakers can be heard at ear level (built in SRS FOCUS effect).
2) Ultra rich bass sound can be ob-
tained from standard door mount
speakers (built in SRS TruBass effect).
3) Surround sound can be obtained
from 2-channel stereo sources such as
CD, MP3 and FM (built in SRS Circle
Surround II effect).
4) SRS CS Auto can position the
center channel image in the center of
the vehicle
’s windshield. This elimi-
nates the need for a center speaker
(built in SRS Circle Surround II phan-
tom center and SRS FOCUS effects).
CS Auto, TruBass, FOCUS, Circle Sur-
round-II, SRS and “
”symbol are
trademarks of SRS Labs, Inc.
CS Auto technology is incorporated
under license from SRS Labs, inc.
Page 180 of 402

&Adjustable level of each mode
Mode Range of levels (displayed)Initial setting Turn counterclockwise Turn clockwise
Volume Volume control 0 to 40 15 For less volume For more volume AUX volume control* 0 to 40 15 For less volume For more volume
Tone and balance Bass control �8 to +8 0 For less bass sound For more bass sound
Midrange control �8 to +8 0 For less midrange sound For more midrange sound
Treble control �8 to +8 0 For less treble sound For more treble sound
Balance L9 to R9 0 Right channel attenuated Left channel attenuated
Fader R9 to F9 0 Front attenuated Rear attenuated
Other settings SPEED VOLUME OFF to 2 OFF For less auto volume change For more auto volume change
BEEP OFF to ON ON OFF ON
CS Auto (type B audio) OFF to ON OFF OFF ON
*: Only when an AUX audio product is connected. Audio
5-9
Page 182 of 402
!Scan tuning (SCAN)
If you press the “SCAN ”button, the radio
will switch to the scan mode. In this mode,
the radio scans through the radio band
until a station is found. The radio will stop
at the station for 5 seconds while display-
ing the frequency, after which scanning
will continue until the entire band has beenscanned.
Press the “SCAN ”button again to cancel
the SCAN mode and to stop at any
displayed channel.
Automatic tuning may not function prop-
erly if the station reception is weakened by
distance from the station or proximity to
tall buildings and hills. !
PTY (Program type) group tuning
(only FM reception)
Press the “PTY/CAT ”button to change to
the PTY selection mode. At this time, the
PTY group that you are currently listening
to will be displayed for 10 seconds. In the
PTY selection mode, “PTY ”is displayed
on the screen. !
PTY (Program type) group selectionIn the PTY selection mode, press the “PTY ”button “”or “”to change the
PTY group by one step at a time. Pressing “
”changes the PTY group up
by one step. Pressing “”changes the
PTY group down by one step.
This operation only changes the display. It
does not change the station that is
currently being received. Audio
5-11
– CONTINUED –
Page 183 of 402
5-12Audio
! Seek in PTY (Program type) group
In the PTY selection mode, when the
desired PTY group has been selected,
pressing the “SEEK ”button “
”or “”
seeks within that PTY group. Pressing “
”seeks up. Pressing “”
seeks down.
The control function returns to the normal
mode after approximately 10 seconds. &
Displaying radio PS (Pro-
gram Service Name) and RT
(Radio Text)
If the PS (Program Service Name) and/or
RT (Radio Text) are available, pressingthe “TEXT ”button changes the display
among PS, RT and frequency. The initial
setting is “PS ”.
NOTE . The maximum number of characters
that can be displayed for PS is 8. . The maximum number of characters
that can be displayed for RT is 64.. If RT is 13 characters or longer,
press and hold the “TEXT ”button for
0.5 second or longer in order to change
the page. &
Station preset
! How to preset stations
1. Press the “FM AM ”button to select
FM1, FM2, FM3 or AM reception.
2. Press the “
”or “”side of the
SEEK button or tune the radio manually
until the desired station frequency isdisplayed.
3. Press one of the preset buttons for
more than 1.5 seconds to store the
frequency. If the button is pressed for less
than 1.5 seconds, the preceding selection
will remain in memory. NOTE . If the connection between the radio
and battery is broken for any reason
such as vehicle maintenance or radio
removal, all stations stored in the
preset buttons are cleared. If this
occurs, it is necessary to reset the
preset buttons.. If a cell phone is placed near the
radio, it may cause the radio to emit
noise when it receives calls. This noise
does not indicate a radio fault.
Page 184 of 402

!Selecting preset stations
Presetting a station with a preset button
allows you to select that station in a single
operation. Up to six AM, FM1, FM2 and
FM3 stations each may be preset. Satellite radio operation (if equipped)
To receive satellite radio, it is necessary to
install the SUBARU genuine satellite
receiver (optional equipment) and to enter
into a contract. For details, please contact
your SUBARU dealer. &
XM
TMsatellite radio
XMTMis a continental U.S. based satellite
radio service, including music, news,
sports, talk and children ’s programming.
XM
TMprovides digital quality audio and
text information, including song title and
artist name. A service fee is required to
receive the XM
TMservice. For more
information, contact XMTMatwww.xmradio.com or call 1-800-XM-
RADIO (1-800-967-2346) for U.S.,
www.xmradio.ca or 1-877-GET-XMSR (1-
877-438-9677) for Canada. & Sirius satellite radio
Sirius satellite radio is a recent innovation
that allows the listener to experience
digital sound quality and to have a greater
variety of channels.
Use of satellite radio (Sirius) requires a
tuner, antenna and a service contract. For
details, please contact your SUBARU dealer or visit Sirius Satellite Radio at
www.sirius.com or call 1-888-539-SIRIUS
(7474) for more information. Sirius, the
Sirius dog logo, channel names and logos
are trademarks of SIRIUS Satellite RadioInc. &
Satellite radio reception
Satellite radio signals are best received in
areas with a clear view of the open sky. In
areas where there are tall buildings, trees,
tunnels or other structures that may
obstruct the signal of the satellites, there
may be signal interruptions. Other circum-
stances that may result in signal loss
include driving near a wall, steep cliff, hill
or driving on the lower level of a multi-
tiered road or inside of a parking garage.
To help reduce this condition, satellite
radio providers have installed ground-
based repeaters in heavily populated
areas. However, you may still experience
reception problems in some areas. & Displaying satellite radio ID
of tuner
When you activate satellite radio, you
should have your satellite radio tuner ID
ready because each tuner is identified by
its unique satellite radio tuner ID.
The satellite radio ID will be needed when Audio
5-13
– CONTINUED –
Page 185 of 402
5-14Audio
you activate satellite radio and receive
satellite radio customer support.
The satellite radio ID can be found on the
audio display by tuning the channel to “0 ”.
Turn the “CH ”dial to select the satellite
radio channel.
NOTE
For Sirius, change the display to an
indication mode other than the channel
number after performing the aboveoperation. & Band selection
Push the “SAT ”button when the radio is
off to turn on the radio.
Push the “SAT ”button when the radio is
on to select SAT1, SAT2 or SAT3 recep- tion.
& Channel and category selec- tion
! Channel selection (type A)
Turn the “CH ”dial clockwise to select the
next channel and turn the “CH ”dial
counterclockwise to select the previous channel. !
Channel selection (type B)
When in the SAT mode, briefly press the “SEEK ”button “”or “”to select the
channel.