Control unit SUBARU FORESTER 2017 SJ / 4.G User Guide
[x] Cancel search | Manufacturer: SUBARU, Model Year: 2017, Model line: FORESTER, Model: SUBARU FORESTER 2017 SJ / 4.GPages: 634, PDF Size: 11.77 MB
Page 305 of 634
Audio/Audio set
NOTE
.If the audio control screen appears,
select the “Source ”key on the audio
screen or press the AUDIO/TUNE knob
again.
. When you push the AUDIO/TUNE
knob while any screen other than the
audio control screen is displayed, the
display will return to the audio control
screen.
. When the AUDIO/TUNE knob is
pushed and held, the graphic equalizer
screen will be displayed. Refer to
““Graphic Equalizer ””F5-22.
! Selecting a function menu
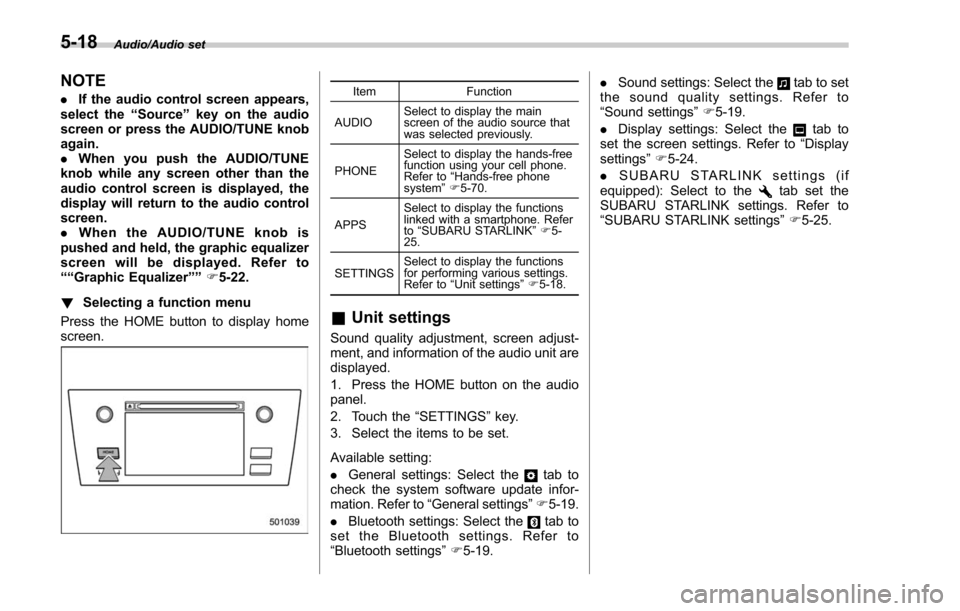
Press the HOME button to display home
screen.Item Function
AUDIO Select to display the main
screen of the audio source that
was selected previously.
PHONE Select to display the hands-free
function using your cell phone.
Refer to
“Hands-free phone
system ”F 5-70.
APPS Select to display the functions
linked with a smartphone. Refer
to
“SUBARU STARLINK ”F 5-
25.
SETTINGS Select to display the functions
for performing various settings.
Refer to
“Unit settings ”F 5-18.
& Unit settings
Sound quality adjustment, screen adjust-
ment, and information of the audio unit are
displayed.
1. Press the HOME button on the audio
panel.
2. Touch the “SETTINGS”key.
3. Select the items to be set.
Available setting:
. General settings: Select the
tab to
check the system software update infor-
mation. Refer to “General settings” F5-19.
. Bluetooth settings: Select the
tab to
set the Bluetooth settings. Refer to
“Bluetooth settings” F5-19. .
Sound settings: Select the
tab to set
the sound quality settings. Refer to
“Sound settings” F5-19.
. Display settings: Select the
tab to
set the screen settings. Refer to “Display
settings ”F 5-24.
. SUBARU STARLINK settings (if
equipped): Select to the
tab set the
SUBARU STARLINK settings. Refer to
“ SUBARU STARLINK settings” F5-25.
5-18
Page 314 of 634
&AM/FM radio
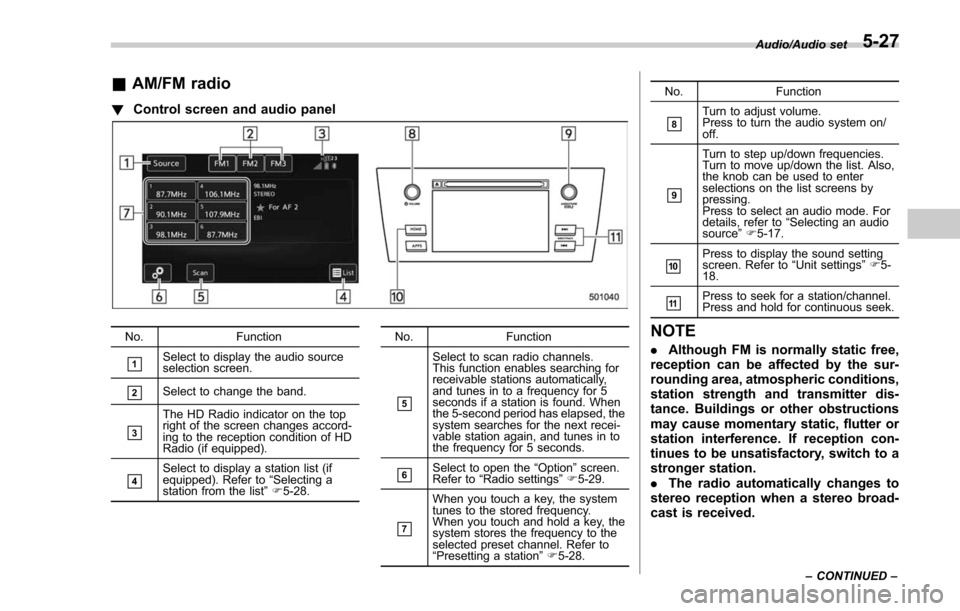
! Control screen and audio panel
No. Function
&1Select to display the audio source
selection screen.
&2Select to change the band.
&3
The HD Radio indicator on the top
right of the screen changes accord-
ing to the reception condition of HD
Radio (if equipped).
&4Select to display a station list (if
equipped). Refer to“Selecting a
station from the list ”F 5-28. No. Function
&5
Select to scan radio channels.
This function enables searching for
receivable stations automatically,
and tunes in to a frequency for 5
seconds if a station is found. When
the 5-second period has elapsed, the
system searches for the next recei-
vable station again, and tunes in to
the frequency for 5 seconds.
&6Select to open the
“Option ”screen.
Refer to “Radio settings ”F 5-29.
&7
When you touch a key, the system
tunes to the stored frequency.
When you touch and hold a key, the
system stores the frequency to the
selected preset channel. Refer to
“Presetting a station ”F 5-28. No. Function
&8Turn to adjust volume.
Press to turn the audio system on/
off.
&9
Turn to step up/down frequencies.
Turn to move up/down the list. Also,
the knob can be used to enter
selections on the list screens by
pressing.
Press to select an audio mode. For
details, refer to
“Selecting an audio
source ”F 5-17.
&10Press to display the sound setting
screen. Refer to “Unit settings ”F 5-
18.
&11Press to seek for a station/channel.
Press and hold for continuous seek.
NOTE
. Although FM is normally static free,
reception can be affected by the sur-
rounding area, atmospheric conditions,
station strength and transmitter dis-
tance. Buildings or other obstructions
may cause momentary static, flutter or
station interference. If reception con-
tinues to be unsatisfactory, switch to a
stronger station.
. The radio automatically changes to
stereo reception when a stereo broad-
cast is received.
Audio/Audio set
–CONTINUED –5-27
Page 337 of 634
Audio/Audio set
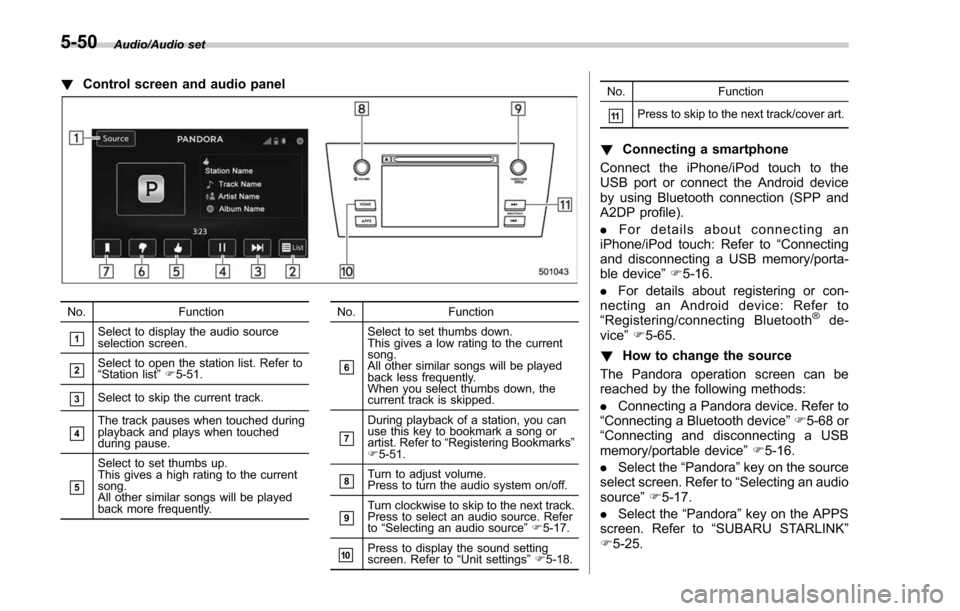
!Control screen and audio panel
No. Function
&1Select to display the audio source
selection screen.
&2Select to open the station list. Refer to
“Station list ”F 5-51.
&3Select to skip the current track.
&4The track pauses when touched during
playback and plays when touched
during pause.
&5
Select to set thumbs up.
This gives a high rating to the current
song.
All other similar songs will be played
back more frequently. No. Function
&6
Select to set thumbs down.
This gives a low rating to the current
song.
All other similar songs will be played
back less frequently.
When you select thumbs down, the
current track is skipped.
&7
During playback of a station, you can
use this key to bookmark a song or
artist. Refer to
“Registering Bookmarks ”
F 5-51.
&8Turn to adjust volume.
Press to turn the audio system on/off.
&9Turn clockwise to skip to the next track.
Press to select an audio source. Refer
to “Selecting an audio source ”F 5-17.
&10Press to display the sound setting
screen. Refer to “Unit settings ”F 5-18. No. Function
&11Press to skip to the next track/cover art.
!
Connecting a smartphone
Connect the iPhone/iPod touch to the
USB port or connect the Android device
by using Bluetooth connection (SPP and
A2DP profile).
. For details about connecting an
iPhone/iPod touch: Refer to “Connecting
and disconnecting a USB memory/porta-
ble device ”F 5-16.
. For details about registering or con-
necting an Android device: Refer to
“ Registering/connecting Bluetooth
®de-
vice” F5-65.
! How to change the source
The Pandora operation screen can be
reached by the following methods:
. Connecting a Pandora device. Refer to
“ Connecting a Bluetooth device ”F 5-68 or
“ Connecting and disconnecting a USB
memory/portable device ”F 5-16.
. Select the “Pandora”key on the source
select screen. Refer to “Selecting an audio
source” F5-17.
. Select the “Pandora”key on the APPS
screen. Refer to “SUBARU STARLINK ”
F 5-25.
5-50
Page 339 of 634
Audio/Audio set
&CD
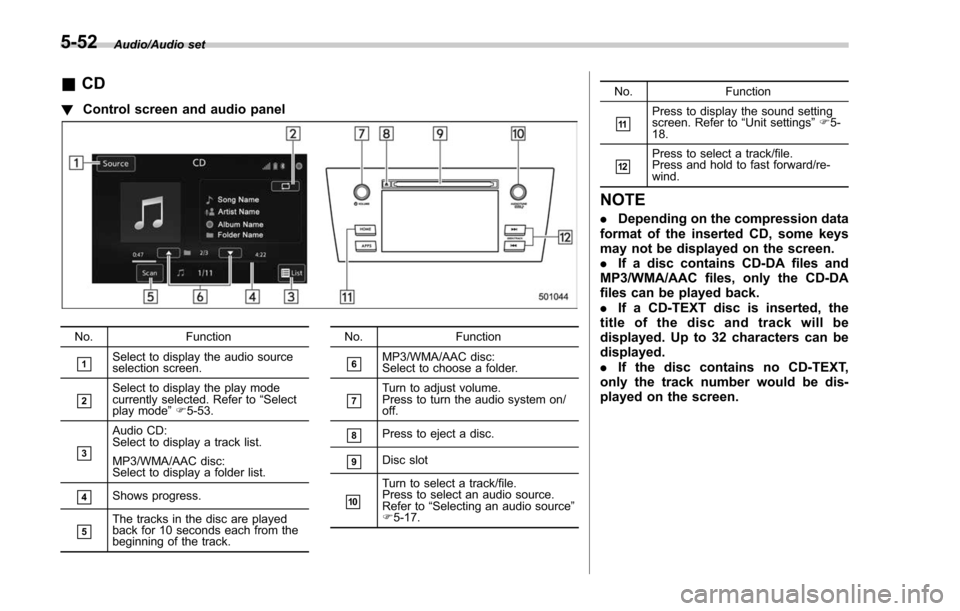
! Control screen and audio panel
No. Function
&1Select to display the audio source
selection screen.
&2Select to display the play mode
currently selected. Refer to “Select
play mode ”F 5-53.
&3
Audio CD:
Select to display a track list.
MP3/WMA/AAC disc:
Select to display a folder list.
&4Shows progress.
&5The tracks in the disc are played
back for 10 seconds each from the
beginning of the track. No. Function
&6MP3/WMA/AAC disc:
Select to choose a folder.
&7Turn to adjust volume.
Press to turn the audio system on/
off.
&8Press to eject a disc.
&9Disc slot
&10
Turn to select a track/file.
Press to select an audio source.
Refer to
“Selecting an audio source ”
F 5-17. No. Function
&11Press to display the sound setting
screen. Refer to
“Unit settings ”F 5-
18.
&12Press to select a track/file.
Press and hold to fast forward/re-
wind.
NOTE
. Depending on the compression data
format of the inserted CD, some keys
may not be displayed on the screen.
. If a disc contains CD-DA files and
MP3/WMA/AAC files, only the CD-DA
files can be played back.
. If a CD-TEXT disc is inserted, the
title of the disc and track will be
displayed. Up to 32 characters can be
displayed.
. If the disc contains no CD-TEXT,
only the track number would be dis-
played on the screen.
5-52
Page 341 of 634
Audio/Audio set
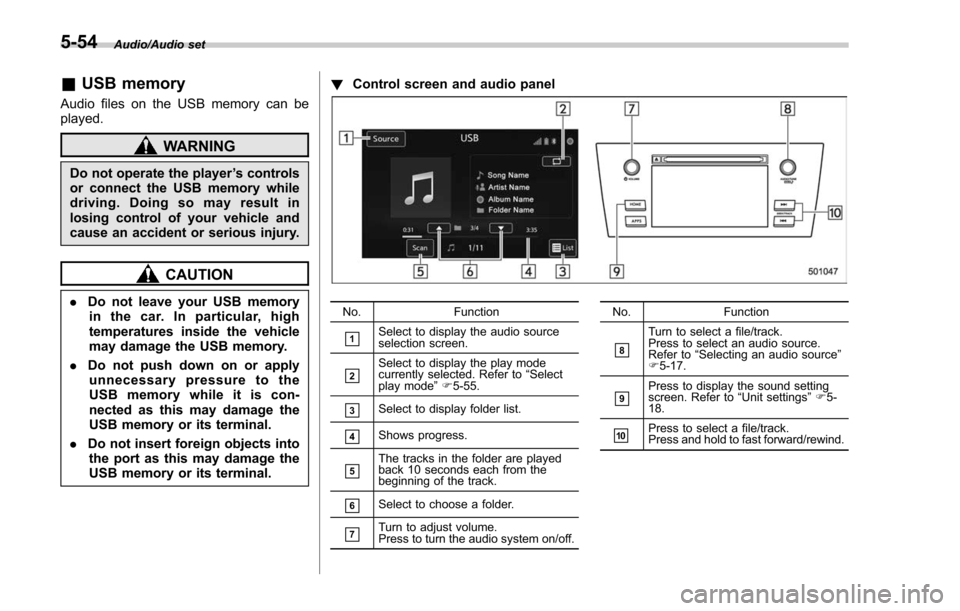
&USB memory
Audio files on the USB memory can be
played.
WARNING
Do not operate the player ’s controls
or connect the USB memory while
driving. Doing so may result in
losing control of your vehicle and
cause an accident or serious injury.
CAUTION
. Do not leave your USB memory
in the car. In particular, high
temperatures inside the vehicle
may damage the USB memory.
. Do not push down on or apply
unnecessary pressure to the
USB memory while it is con-
nected as this may damage the
USB memory or its terminal.
. Do not insert foreign objects into
the port as this may damage the
USB memory or its terminal. !
Control screen and audio panelNo. Function
&1Select to display the audio source
selection screen.
&2Select to display the play mode
currently selected. Refer to “Select
play mode ”F 5-55.
&3Select to display folder list.
&4Shows progress.
&5The tracks in the folder are played
back 10 seconds each from the
beginning of the track.
&6Select to choose a folder.
&7Turn to adjust volume.
Press to turn the audio system on/off. No.
Function
&8
Turn to select a file/track.
Press to select an audio source.
Refer to“Selecting an audio source ”
F 5-17.
&9Press to display the sound setting
screen. Refer to “Unit settings ”F 5-
18.
&10Press to select a file/track.
Press and hold to fast forward/rewind.
5-54
Page 343 of 634
Audio/Audio set
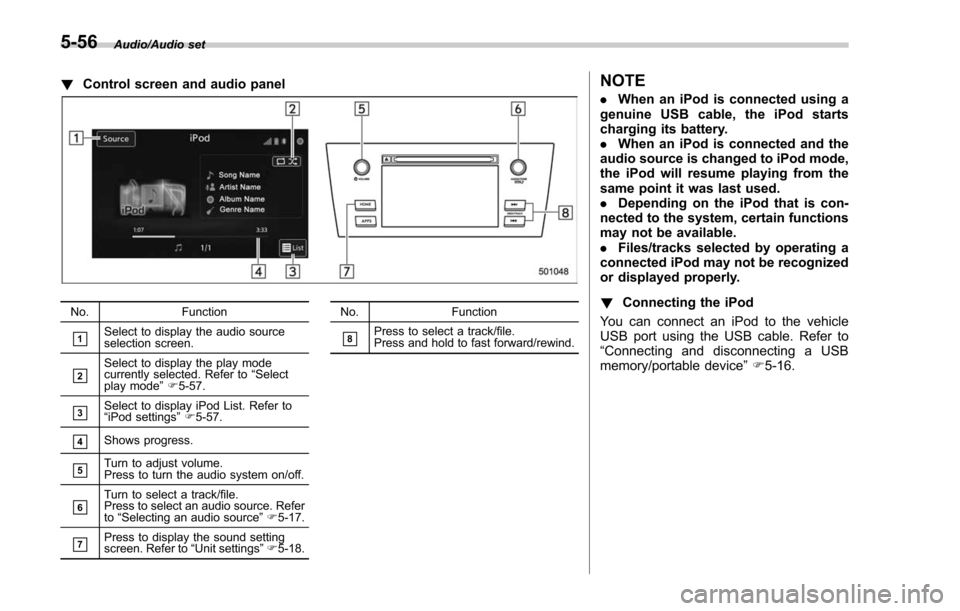
!Control screen and audio panel
No. Function
&1Select to display the audio source
selection screen.
&2Select to display the play mode
currently selected. Refer to “Select
play mode ”F 5-57.
&3Select to display iPod List. Refer to
“iPod settings ”F 5-57.
&4Shows progress.
&5Turn to adjust volume.
Press to turn the audio system on/off.
&6Turn to select a track/file.
Press to select an audio source. Refer
to “Selecting an audio source ”F 5-17.
&7Press to display the sound setting
screen. Refer to “Unit settings ”F 5-18. No. Function
&8Press to select a track/file.
Press and hold to fast forward/rewind.
NOTE
.
When an iPod is connected using a
genuine USB cable, the iPod starts
charging its battery.
. When an iPod is connected and the
audio source is changed to iPod mode,
the iPod will resume playing from the
same point it was last used.
. Depending on the iPod that is con-
nected to the system, certain functions
may not be available.
. Files/tracks selected by operating a
connected iPod may not be recognized
or displayed properly.
! Connecting the iPod
You can connect an iPod to the vehicle
USB port using the USB cable. Refer to
“ Connecting and disconnecting a USB
memory/portable device ”F 5-16.
5-56
Page 344 of 634
!How to change the source
TheiPodoperationscreencanbe
reached by the following methods:
. Connect an iPod. Refer to “Connecting
and disconnecting a USB memory/porta-
ble device ”F 5-16.
. Select the “USB/iPod ”key on the
source select screen. Refer to “Selecting
an audio source” F5-17.
! Select play mode
The play mode settings display will appear
when play mode key is touched. Select
the preferred play mode from the following
items.
Icon Function
Touch to start 1 track repeat.
Touch to start repeat all.
Touch to start shuffle all.
Touch to turn off shuffle.
Touch to start shuffle album.
Return to the control screen.
!iPod settings
You can choose the following items from
the list screen after touching the
tab
on the screen.
Icon Function
Select to display the play list.
Select to display tracks list.
Select to display artists list.
Select to display albums list.
Select to open other list ( “Gen-
res ”, “Composers ”, “Audiobooks ”
and “Podcast ”).
Select to open “Genres ”list.
Select to open “Composers ”list.
Select to open “Audiobooks ”list.
Select to open “Podcasts ”list.
& Bluetooth audio
The Bluetooth audio system enables
users to enjoy listening to music that is
played on a portable player on the vehicle
speakers via wireless communication.
This audio system supports Bluetooth, a
wireless data system capable of playing
portable audio music without cables. If
your device does not support Bluetooth,
the Bluetooth audio system will not func-
tion.
WARNING
. Do not operate the player ’s con-
trols or connect to the Bluetooth
audio system while driving.
Doing so may result in loss of
control of your vehicle and cause
an accident or serious injury.
. Your audio unit is fitted with
Bluetooth antennas. People with
implantable cardiac pacemakers,
cardiac resynchronization ther-
apy-pacemakers or implantable
cardioverter defibrillators should
maintain a reasonable distance
between themselves and the
Bluetooth antennas. The radio
waves may affect the operation
of such devices.
Audio/Audio set
–CONTINUED –5-57
Page 345 of 634
Audio/Audio set
.Before using Bluetooth devices,
users of any electrical medical
device other than implantable
cardiac pacemakers, cardiac re-
synchronization thera py-pace-
makers or implantable cardiover-
ter defibrillators should consult
the manufacturer of the device
for information about its opera-
tion under the influence of radio
waves. Radio waves could have
unexpected effects on the opera-
tion of such medical devices.
CAUTION
Do not leave your portable player in
the vehicle. In particular, high tem-
peratures inside the vehicle may
damage the portable player. !
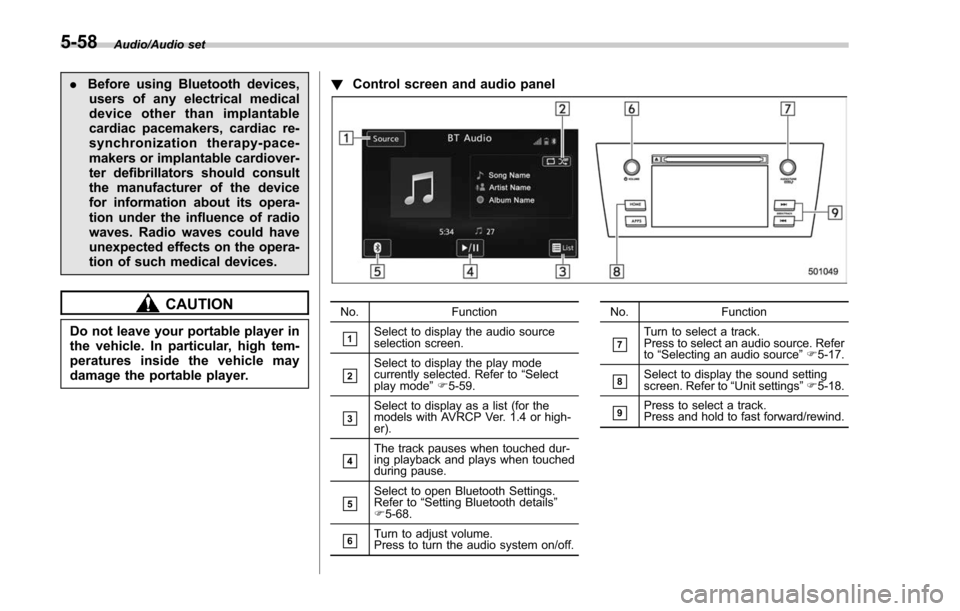
Control screen and audio panel
No. Function
&1Select to display the audio source
selection screen.
&2Select to display the play mode
currently selected. Refer to “Select
play mode ”F 5-59.
&3Select to display as a list (for the
models with AVRCP Ver. 1.4 or high-
er).
&4The track pauses when touched dur-
ing playback and plays when touched
during pause.
&5Select to open Bluetooth Settings.
Refer to “Setting Bluetooth details ”
F 5-68.
&6Turn to adjust volume.
Press to turn the audio system on/off. No. Function
&7Turn to select a track.
Press to select an audio source. Refer
to
“Selecting an audio source ”F 5-17.
&8Select to display the sound setting
screen. Refer to “Unit settings ”F 5-18.
&9Press to select a track.
Press and hold to fast forward/rewind.
5-58
Page 348 of 634
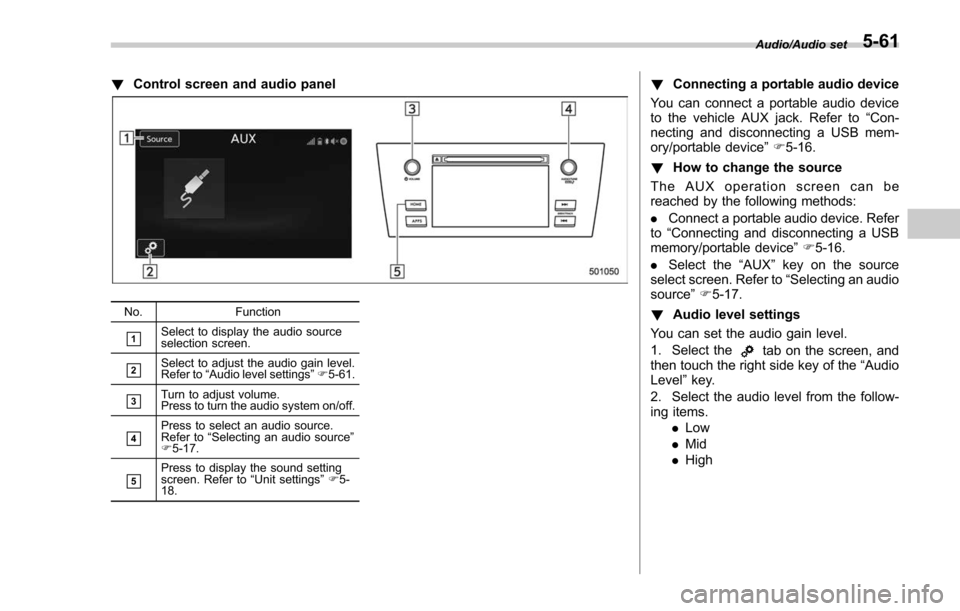
!Control screen and audio panel
No. Function
&1Select to display the audio source
selection screen.
&2Select to adjust the audio gain level.
Refer to“Audio level settings ”F 5-61.
&3Turn to adjust volume.
Press to turn the audio system on/off.
&4Press to select an audio source.
Refer to “Selecting an audio source ”
F 5-17.
&5Press to display the sound setting
screen. Refer to “Unit settings ”F 5-
18.
! Connecting a portable audio device
You can connect a portable audio device
to the vehicle AUX jack. Refer to “Con-
necting and disconnecting a USB mem-
ory/portable device ”F 5-16.
! How to change the source
The AUX operation screen can be
reached by the following methods:
. Connect a portable audio device. Refer
to “Connecting and disconnecting a USB
memory/portable device ”F 5-16.
. Select the “AUX”key on the source
select screen. Refer to “Selecting an audio
source” F5-17.
! Audio level settings
You can set the audio gain level.
1. Select the
tab on the screen, and
then touch the right side key of the “Audio
Level ”key.
2. Select the audio level from the follow-
ing items. .Low
. Mid
. High
Audio/Audio set5-61
Page 357 of 634
Audio/Hands–free phone system
Hands-free phone system
The hands-free system enables calls to be
made and received without having to take
your hands off the steering wheel.
This system supports Bluetooth. Bluetooth
is a wireless data system that enables cell
phones to be used without being con-
nected by a cable or placed in a cradle.
The operating procedure of the phone is
explained here.
WARNING
. While driving, do not use a cell
phone or connect the Bluetooth
phone. Doing so may result in
loss of control of your vehicle
and cause an accident or serious
injury.
. Your audio unit is fitted with
Bluetooth antennas. People with
implantable cardiac pacemakers,
cardiac resynchronization ther-
apy-pacemakers or implantable
cardioverter defibrillators should
maintain a reasonable distance
between themselves and the
Bluetooth antennas. The radio
waves may affect the operation
of such devices. .
Before using Bluetooth devices,
users of any electrical medical
device other than implantable
cardiac pacemakers, cardiac re-
synchronization therapy-pace-
makers or implantable cardiover-
ter defibrillators should consult
the manufacturer of the device
for information about its opera-
tion under the influence of radio
waves. Radio waves could have
unexpected effects on the opera-
tion of such medical devices.CAUTION
Do not leave your cell phone in the
vehicle. The temperature inside may
rise to a level that could damage the
phone.
NOTE
. If your cell phone does not support
Bluetooth, this system cannot function.
. In the following conditions, the sys-
tem may not function:
–The cell phone is turned off.
– The current position is outside
the communication area.
– The cell phone is not connected.
– The cell phone has a low battery. .
When using the hands free function
and other Bluetooth functions at the
same time, the following problems may
occur:
–The Bluetooth connection may
be cut.
– Noise may be heard when play-
ing back voice with the Bluetooth
function.
. The other party’ s voice will be heard
from the front speakers. The audio/
visual system will be muted during
phone calls or when hands-free voice
commands are used.
. Talk alternately with the other party
on the phone. If both parties speak at
the same time, the other party may not
hear what has been said. (This is not a
malfunction.)
. Keep call volume down. Otherwise,
the other party’ s voice may be audible
outside the vehicle and voice echo may
increase. When talking on the phone,
speak clearly towards the microphone.
. The other party may not hear you
clearly when:
–Drivingonanunpavedroad.
(Making excessive traffic noise.)
– Driving at high speeds.
– The moonroof or windows are
open.
– The air conditioning vents are
5-70