SUBARU FORESTER 2022 Getting Started Guide
Manufacturer: SUBARU, Model Year: 2022, Model line: FORESTER, Model: SUBARU FORESTER 2022Pages: 156, PDF Size: 45.35 MB
Page 131 of 156
Compatible Models
Android Auto is available on Android phones. To see if your phone is
compatible, please refer to the Android Auto website:
https://www.android.com/phones/
HOW TO APPENDIX
129
Page 132 of 156
APPLE CARPLAY®
Cables
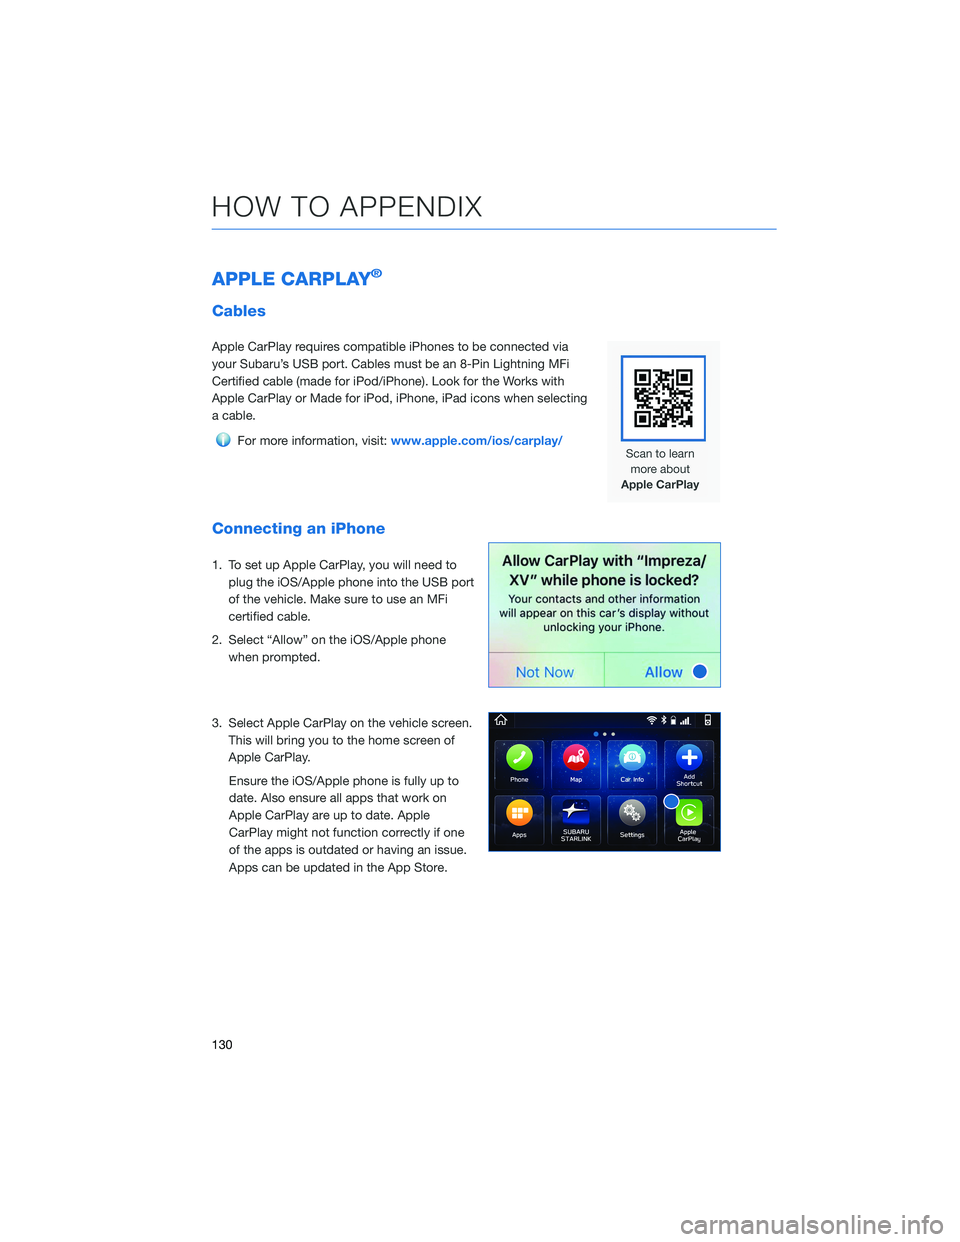
Apple CarPlay requires compatible iPhones to be connected via
your Subaru’s USB port. Cables must be an 8-Pin Lightning MFi
Certified cable (made for iPod/iPhone). Look for the Works with
Apple CarPlay or Made for iPod, iPhone, iPad icons when selecting
a cable.
For more information, visit:www.apple.com/ios/carplay/
Connecting an iPhone
1. To set up Apple CarPlay, you will need to
plug the iOS/Apple phone into the USB port
of the vehicle. Make sure to use an MFi
certified cable.
2. Select “Allow” on the iOS/Apple phone when prompted.
3. Select Apple CarPlay on the vehicle screen. This will bring you to the home screen of
Apple CarPlay.
Ensure the iOS/Apple phone is fully up to
date. Also ensure all apps that work on
Apple CarPlay are up to date. Apple
CarPlay might not function correctly if one
of the apps is outdated or having an issue.
Apps can be updated in the App Store.
HOW TO APPENDIX
130
Page 133 of 156
Compatible Models
For a list of all the Apple phones that are compatible with Apple
CarPlay, visit:www.apple.com/ios/carplay/
WI-FI
Connecting to a Wi-Fi Network
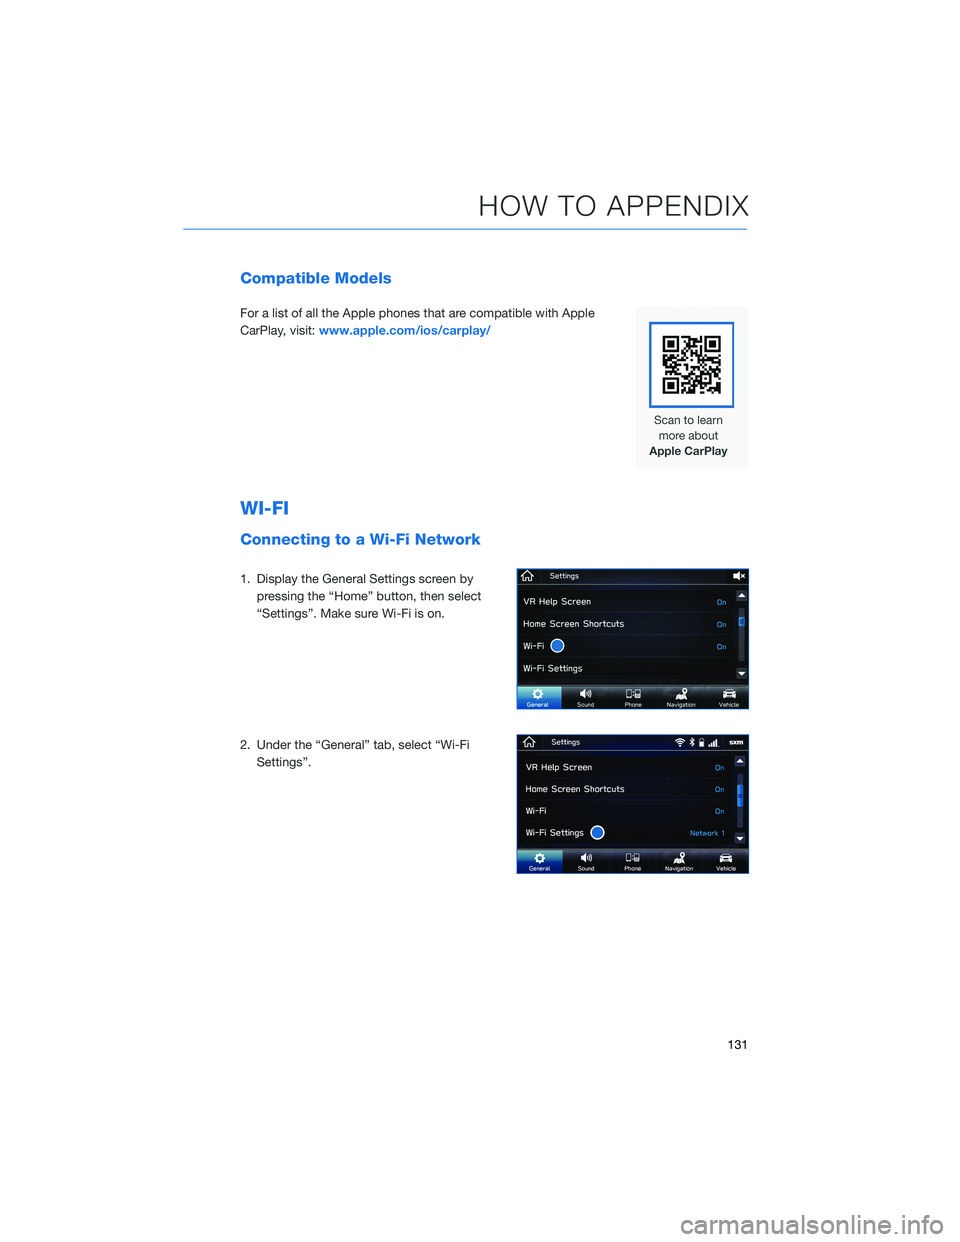
1. Display the General Settings screen by
pressing the “Home” button, then select
“Settings”. Make sure Wi-Fi is on.
2. Under the “General” tab, select “Wi-Fi Settings”.
HOW TO APPENDIX
131
Page 134 of 156
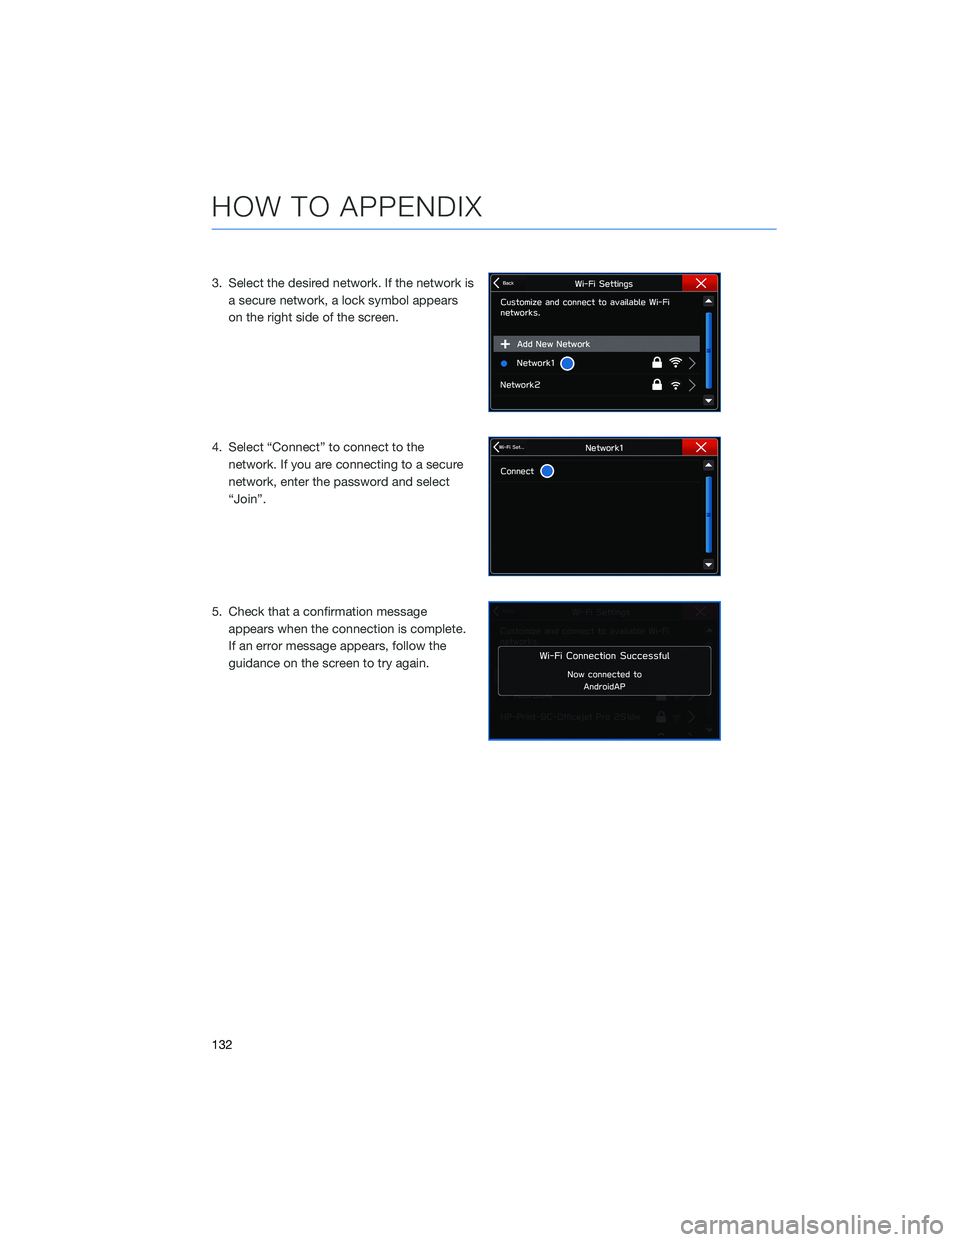
3. Select the desired network. If the network isa secure network, a lock symbol appears
on the right side of the screen.
4. Select “Connect” to connect to the network. If you are connecting to a secure
network, enter the password and select
“Join”.
5. Check that a confirmation message appears when the connection is complete.
If an error message appears, follow the
guidance on the screen to try again.
HOW TO APPENDIX
132
Page 135 of 156
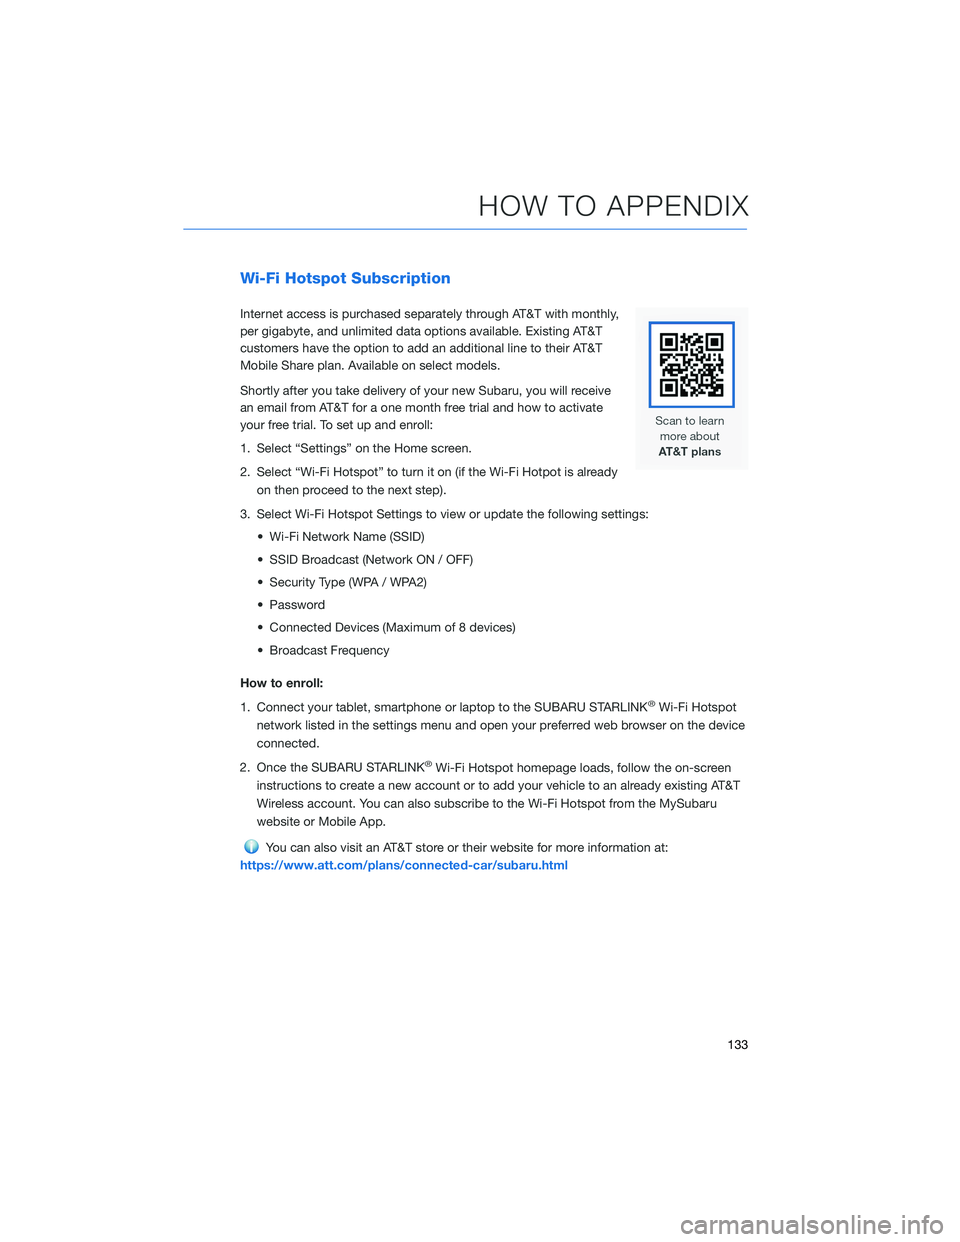
Wi-Fi Hotspot Subscription
Internet access is purchased separately through AT&T with monthly,
per gigabyte, and unlimited data options available. Existing AT&T
customers have the option to add an additional line to their AT&T
Mobile Share plan. Available on select models.
Shortly after you take delivery of your new Subaru, you will receive
an email from AT&T for a one month free trial and how to activate
your free trial. To set up and enroll:
1. Select “Settings” on the Home screen.
2. Select “Wi-Fi Hotspot” to turn it on (if the Wi-Fi Hotpot is alreadyon then proceed to the next step).
3. Select Wi-Fi Hotspot Settings to view or update the following settings: • Wi-Fi Network Name (SSID)
• SSID Broadcast (Network ON / OFF)
• Security Type (WPA / WPA2)
• Password
• Connected Devices (Maximum of 8 devices)
• Broadcast Frequency
How to enroll:
1. Connect your tablet, smartphone or laptop to the SUBARU STARLINK
®Wi-Fi Hotspot
network listed in the settings menu and open your preferred web browser on the device
connected.
2. Once the SUBARU STARLINK
®Wi-Fi Hotspot homepage loads, follow the on-screen
instructions to create a new account or to add your vehicle to an already existing AT&T
Wireless account. You can also subscribe to the Wi-Fi Hotspot from the MySubaru
website or Mobile App.
You can also visit an AT&T store or their website for more information at:
https://www.att.com/plans/connected-car/subaru.html
HOW TO APPENDIX
133
Page 136 of 156
MAPS(if equipped)
Finding a Destination by Address
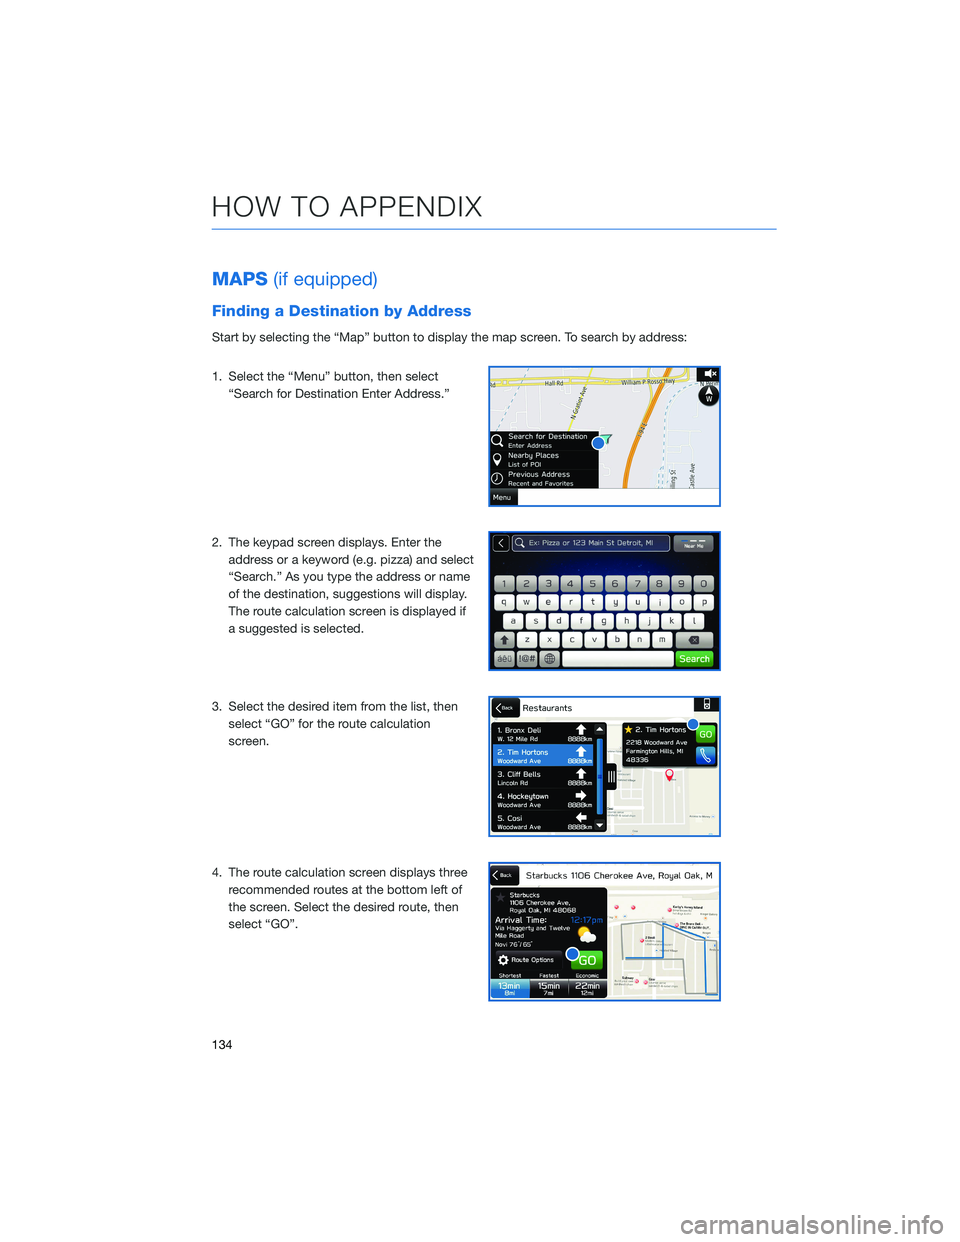
Start by selecting the “Map” button to display the map screen. To search by address:
1. Select the “Menu” button, then select
“Search for Destination Enter Address.”
2. The keypad screen displays. Enter the address or a keyword (e.g. pizza) and select
“Search.” As you type the address or name
of the destination, suggestions will display.
The route calculation screen is displayed if
a suggested is selected.
3. Select the desired item from the list, then select “GO” for the route calculation
screen.
4. The route calculation screen displays three recommended routes at the bottom left of
the screen. Select the desired route, then
select “GO”.
HOW TO APPENDIX
134
Page 137 of 156
Finding a Destination by POI
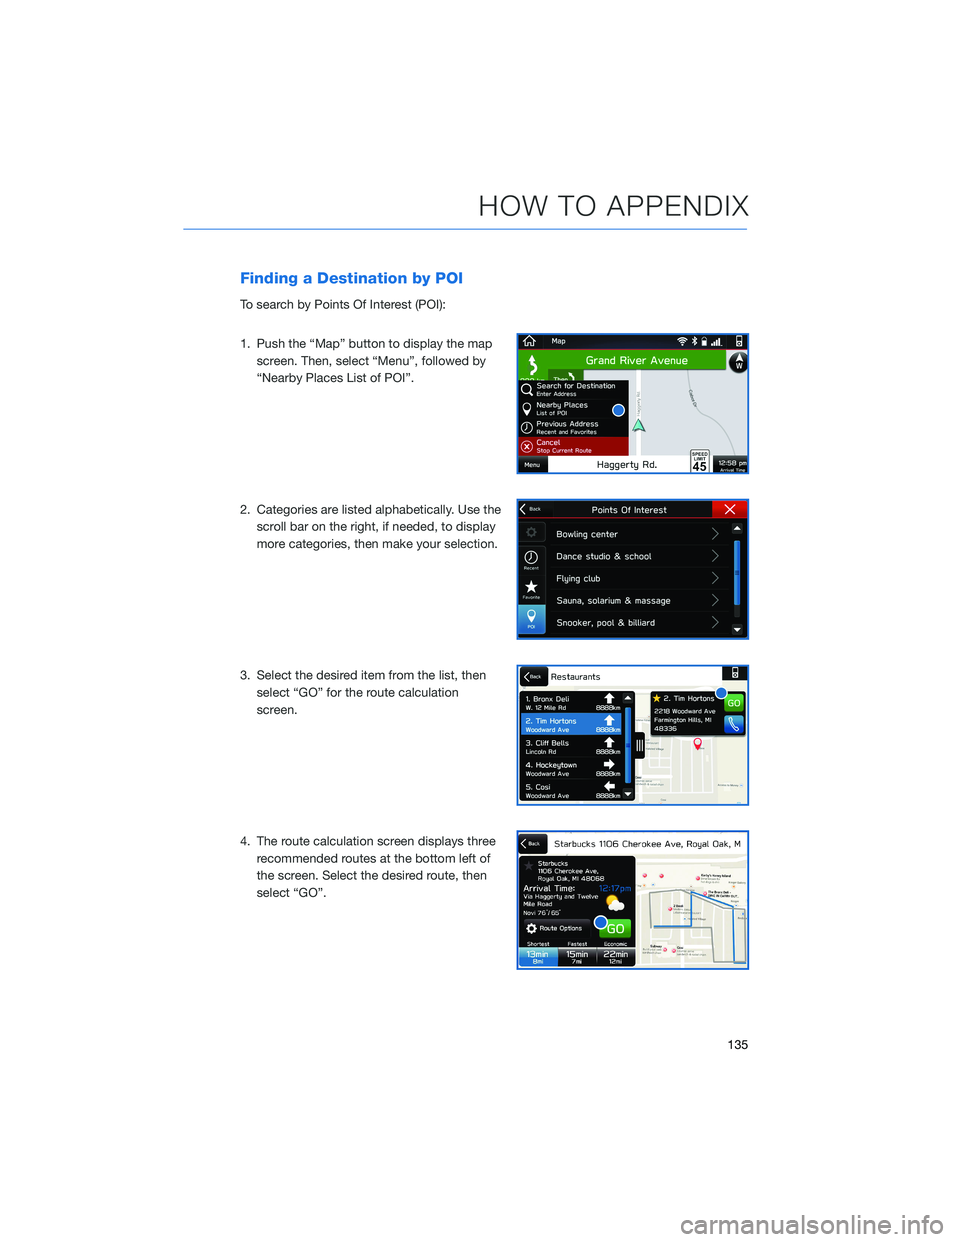
To search by Points Of Interest (POI):
1. Push the “Map” button to display the mapscreen. Then, select “Menu”, followed by
“Nearby Places List of POI”.
2. Categories are listed alphabetically. Use the scroll bar on the right, if needed, to display
more categories, then make your selection.
3. Select the desired item from the list, then select “GO” for the route calculation
screen.
4. The route calculation screen displays three recommended routes at the bottom left of
the screen. Select the desired route, then
select “GO”.
HOW TO APPENDIX
135
Page 138 of 156
Route Options
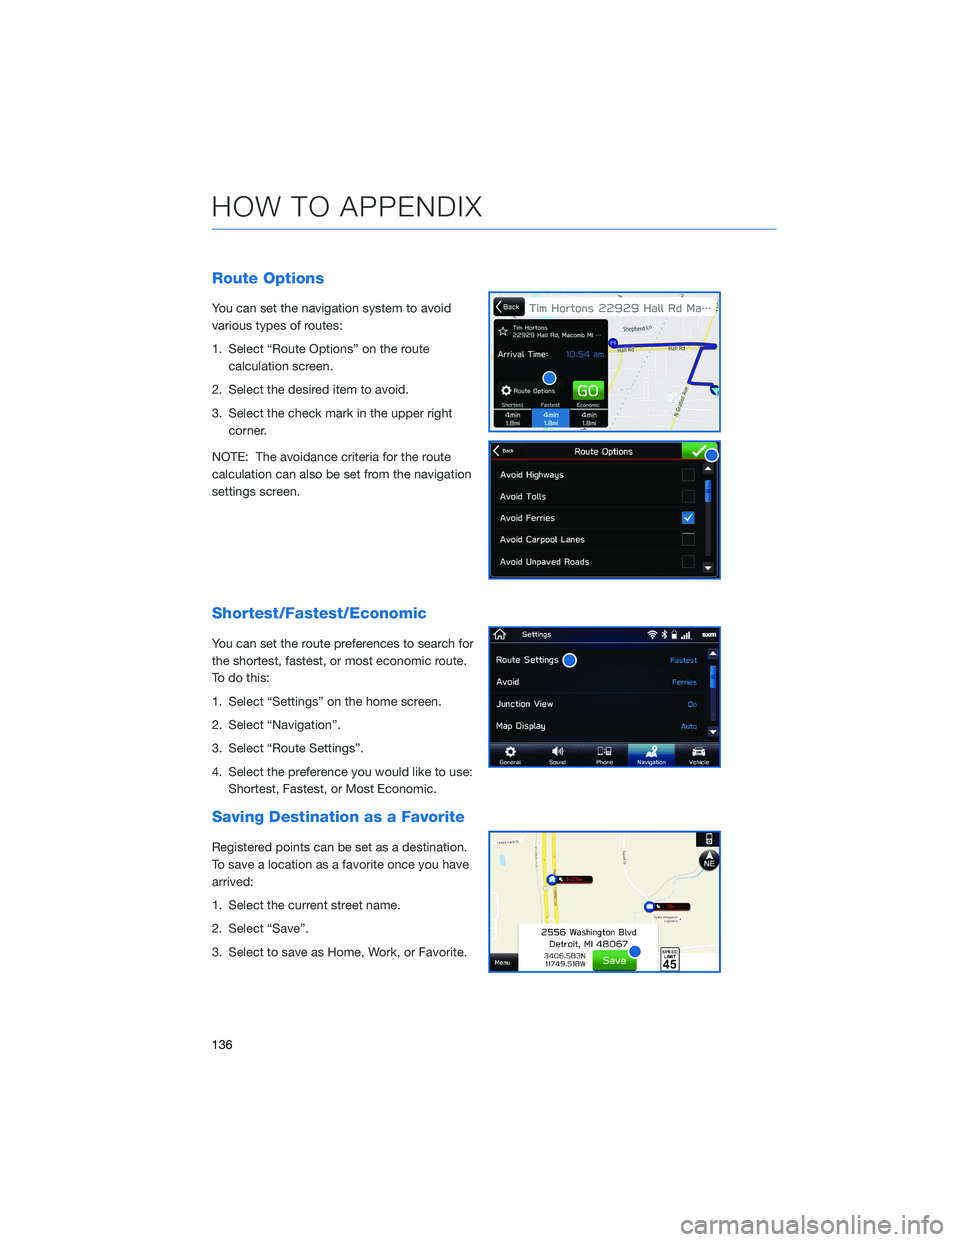
You can set the navigation system to avoid
various types of routes:
1. Select “Route Options” on the routecalculation screen.
2. Select the desired item to avoid.
3. Select the check mark in the upper right corner.
NOTE: The avoidance criteria for the route
calculation can also be set from the navigation
settings screen.
Shortest/Fastest/Economic
You can set the route preferences to search for
the shortest, fastest, or most economic route.
To do this:
1. Select “Settings” on the home screen.
2. Select “Navigation”.
3. Select “Route Settings”.
4. Select the preference you would like to use: Shortest, Fastest, or Most Economic.
Saving Destination as a Favorite
Registered points can be set as a destination.
To save a location as a favorite once you have
arrived:
1. Select the current street name.
2. Select “Save”.
3. Select to save as Home, Work, or Favorite.
HOW TO APPENDIX
136
Page 139 of 156
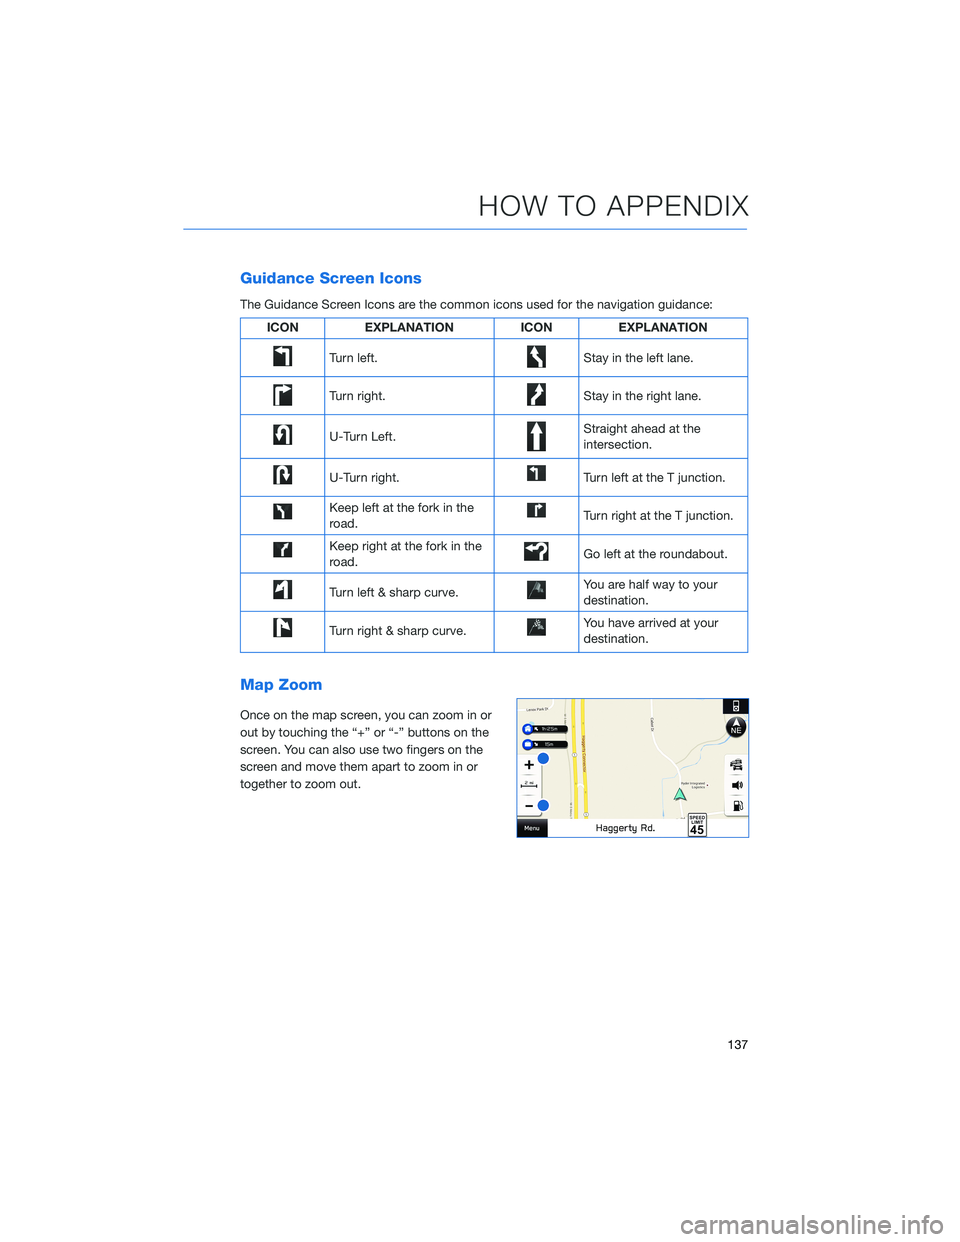
Guidance Screen Icons
The Guidance Screen Icons are the common icons used for the navigation guidance:
ICONEXPLANATION ICONEXPLANATION
Turn left.Stay in the left lane.
Turn right.Stay in the right lane.
U-Turn Left.Straight ahead at the
intersection.
U-Turn right.Turn left at the T junction.
Keep left at the fork in the
road.Turn right at the T junction.
Keep right at the fork in the
road.Go left at the roundabout.
Turn left & sharp curve.You are half way to your
destination.
Turn right & sharp curve.You have arrived at your
destination.
Map Zoom
Once on the map screen, you can zoom in or
out by touching the “+” or “-” buttons on the
screen. You can also use two fingers on the
screen and move them apart to zoom in or
together to zoom out.
HOW TO APPENDIX
137
Page 140 of 156
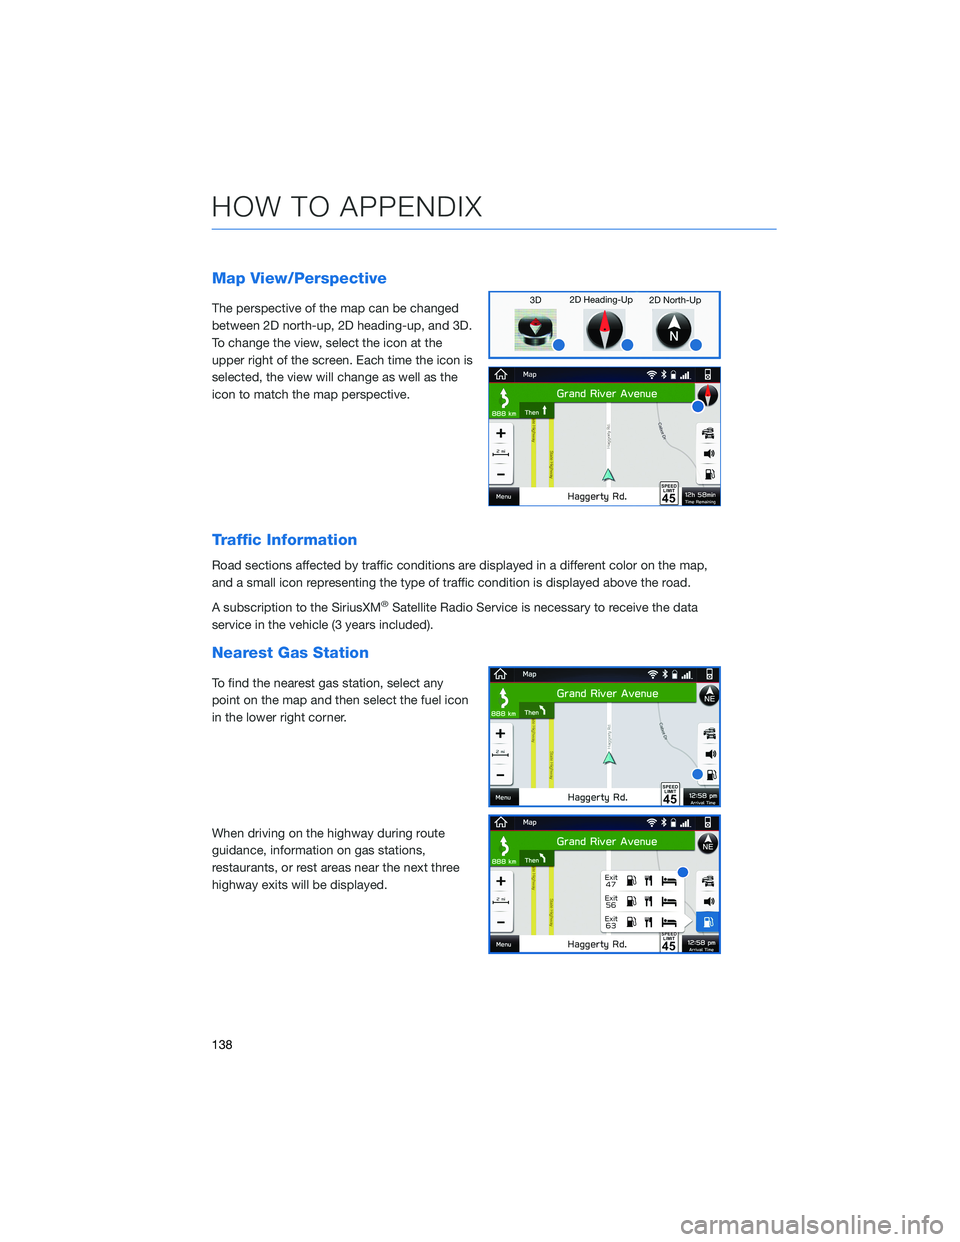
Map View/Perspective
The perspective of the map can be changed
between 2D north-up, 2D heading-up, and 3D.
To change the view, select the icon at the
upper right of the screen. Each time the icon is
selected, the view will change as well as the
icon to match the map perspective.
Traffic Information
Road sections affected by traffic conditions are displayed in a different color on the map,
and a small icon representing the type of traffic condition is displayed above the road.
A subscription to the SiriusXM
®Satellite Radio Service is necessary to receive the data
service in the vehicle (3 years included).
Nearest Gas Station
To find the nearest gas station, select any
point on the map and then select the fuel icon
in the lower right corner.
When driving on the highway during route
guidance, information on gas stations,
restaurants, or rest areas near the next three
highway exits will be displayed.
HOW TO APPENDIX
138