key SUBARU LEGACY 2010 5.G Navigation Manual
[x] Cancel search | Manufacturer: SUBARU, Model Year: 2010, Model line: LEGACY, Model: SUBARU LEGACY 2010 5.GPages: 90, PDF Size: 28.14 MB
Page 56 of 90
70 NavigationNavigation Setup
Distance:
Units of distance can be selected from (km)
and (mile).
Road Restriction Warnings:
You can select or deselect display of traffic restriction warnings
during route guidance.
Keyboard layout:
The layout of input keys can be selected from ("ABC" lay-
out) or ("QWERTY" layout).
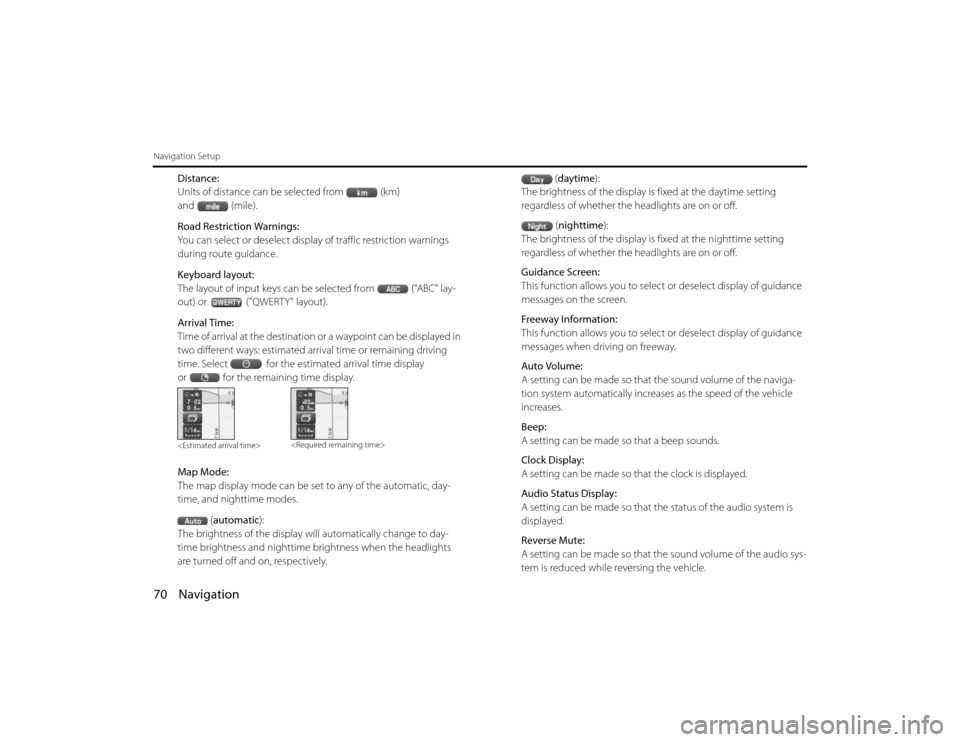
Arrival Time:
Time of arrival at the destination or a waypoint can be displayed in
two different ways: estimated arrival time or remaining driving
time. Select for the estimated arrival time display
or for the remaining time display.
Map Mode:
The map display mode can be set to any of the automatic, day-
time, and nighttime modes.(automatic ):
The brightness of the display will automatically change to day-
time brightness and nighttime brightness when the headlights
are turned off and on, respectively. (
daytime ):
The brightness of the display is fixed at the daytime setting
regardless of whether the headlights are on or off.
(nighttime ):
The brightness of the display is fixed at the nighttime setting
regardless of whether the headlights are on or off.
Guidance Screen:
This function allows you to select or deselect display of guidance
messages on the screen.
Freeway Information:
This function allows you to select or deselect display of guidance
messages when driving on freeway.
Auto Volume:
A setting can be made so that the sound volume of the naviga-
tion system automatically increases as the speed of the vehicle
increases.
Beep:
A setting can be made so that a beep sounds.
Clock Display:
A setting can be made so th at the clock is displayed.
Audio Status Display:
A setting can be made so that th e status of the audio system is
displayed.
Reverse Mute:
A setting can be made so that th e sound volume of the audio sys-
tem is reduced while reversing the vehicle.
Legacy_B2462BE-A.book Page 70
Wednesday, April 22, 2009 5:32 PM
Page 57 of 90
Navigation 71
Navigation Setup
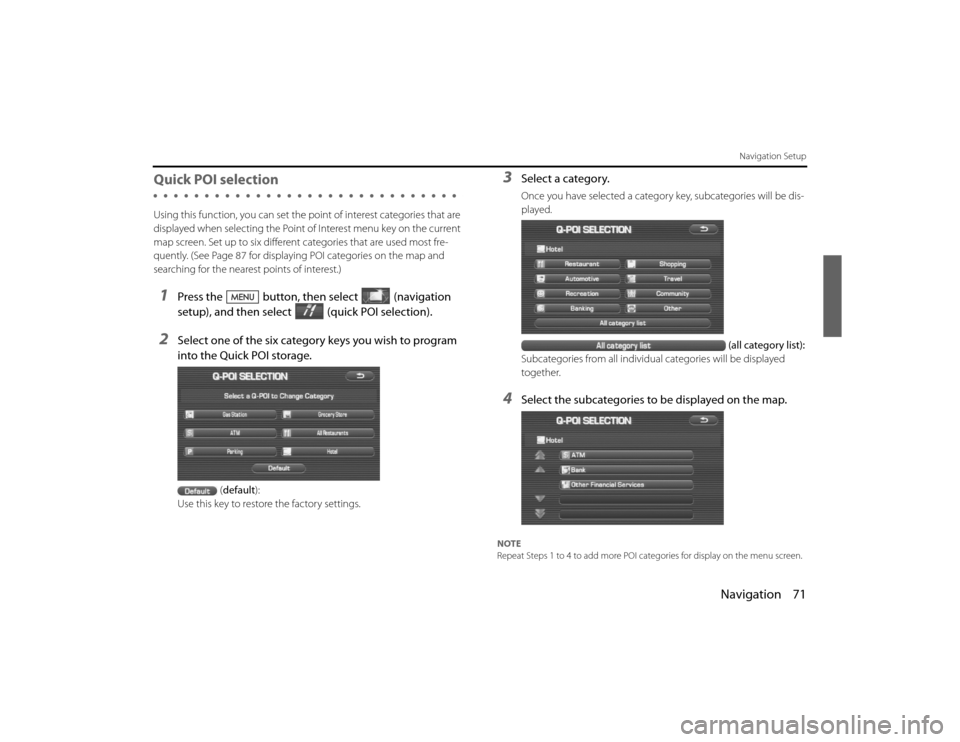
Quick POI selectionUsing this function, you can set the point of interest categories that are
displayed when selecting the Point of Interest menu key on the current
map screen. Set up to six different categories that are used most fre-
quently. (See Page 87 for displaying POI categories on the map and
searching for the nearest points of interest.)1
Press the button, then select (navigation
setup), and then select (quick POI selection).
2
Select one of the six category keys you wish to program
into the Quick POI storage.
(default ):
Use this key to restore the factory settings.
3
Select a category.Once you have selected a category key, subcategories will be dis-
played.
(all category list):
Subcategories from all individual categories will be displayed
together.
4
Select the subcategories to be displayed on the map.
NOTE
Repeat Steps 1 to 4 to add more POI categories for display on the menu screen.
Legacy_B2462BE-A.book Page 71 Wednesday, April 22, 2009 5:32 PM
Page 62 of 90
![SUBARU LEGACY 2010 5.G Navigation Manual
76 NavigationNavigation Setup
[Default List]ItemInitial condition
Map display
Search Area
Display Guidance Language
Voice Recognition Language
Map Orientation (1 and 2 screen)
Map Display Mode
Map Di SUBARU LEGACY 2010 5.G Navigation Manual
76 NavigationNavigation Setup
[Default List]ItemInitial condition
Map display
Search Area
Display Guidance Language
Voice Recognition Language
Map Orientation (1 and 2 screen)
Map Display Mode
Map Di](/img/17/7276/w960_7276-61.png)
76 NavigationNavigation Setup
[Default List]ItemInitial condition
Map display
Search Area
Display Guidance Language
Voice Recognition Language
Map Orientation (1 and 2 screen)
Map Display Mode
Map Display Scale
Map Configuration
Q-POI Map Display
Show POI Icon Display
Right Screen Setting, POI
Passage Point Display/Current Location, Map Screen ( Time
Requirement, Time, Direction / Distance)Passage Point Display/ Full Route, Map Screen ( Time Require-
ment, Time, Direction / Distance)
Restricted Road
Freeway Information Disc A ( WEST ): CA
Disc B (MID): IL
Disc C (EAST ): DC
US English, female
US English
North up
Single-screen display
Single-screen:
10,000 map (1/16 mi) (100 m)
Dual-screen:
40,000 map (1/4 mi) (500 m)
Arrow Mode
Off
Off
On
Next passage point
Destination
On
Off
Volume Control
Volume Preset
4
Navigation Setup Menu
Distance
Road Restriction Warnings
Reverse Mute
Keyboard Layout
Arrival Timemile
On
Off
ABC
Required remaining time
Item Initial condition
Map Mode
Guidance Screen
Q-POI Selection
Language Selection Auto
On
A: Gas station
B: ATM
C: Parking
D: Grocery store
E: All Restaurants
F: Hotel
US English, female, male,
French, Espanõl
Route Options
Search Condition
Route Preferences Quick
Allow Toll Road: Off
Allow Ferry: Off
Allow Major Roads: On
Allow Time Restricted Road:
Off
Item
Initial condition
Legacy_B2462BE-A.book Page 76 Wednesday, April 22, 2009 5:32 PM
Page 63 of 90
Navigation 77
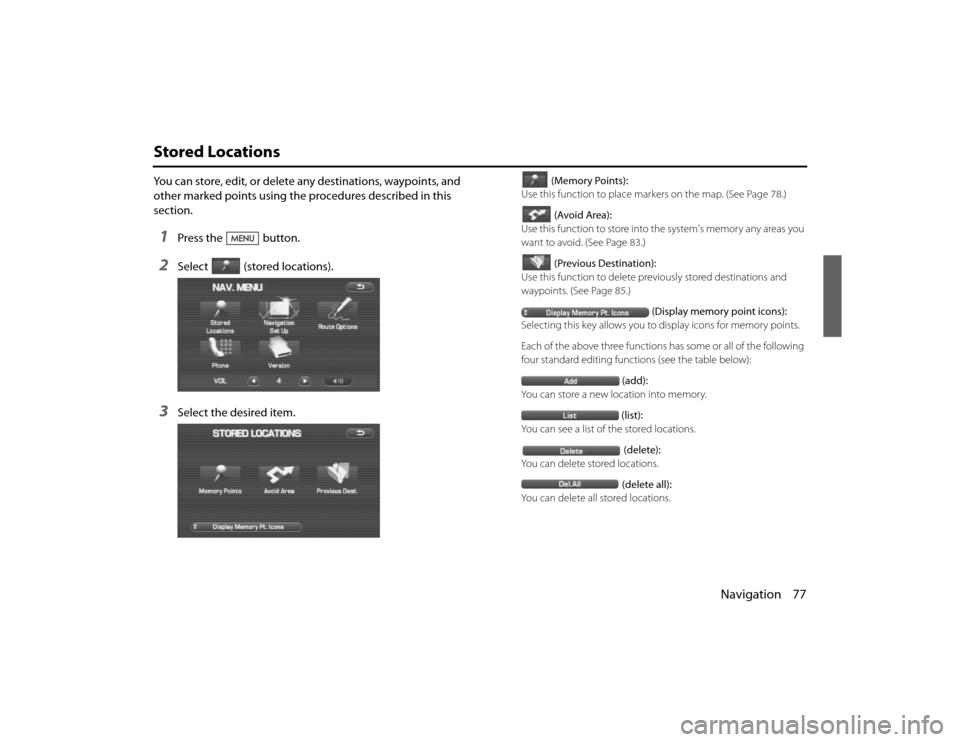
Stored LocationsYou can store, edit, or delete any destinations, waypoints, and
other marked points using the procedures described in this
section.1
Press the button.
2
Select (stored locations).
3
Select the desired item.
(Memory Points):
Use this function to place markers on the map. (See Page 78.)
(Avoid Area):
Use this function to store into the system's memory any areas you
want to avoid. (See Page 83.)
(Previous Destination):
Use this function to delete prev iously stored destinations and
waypoints. (See Page 85.)
(Display memory point icons):
Selecting this key allows you to display icons for memory points.
Each of the above three functions has some or all of the following
four standard editing functions (see the table below): (add):
You can store a new location into memory.
(list):
You can see a list of the stored locations.
(delete):
You can delete stored locations.
(delete all):
You can delete all stored locations.
Legacy_B2462BE-A.book Page 77 Wednesday, April 22, 2009 5:32 PM
Page 64 of 90
78 NavigationStored Locations
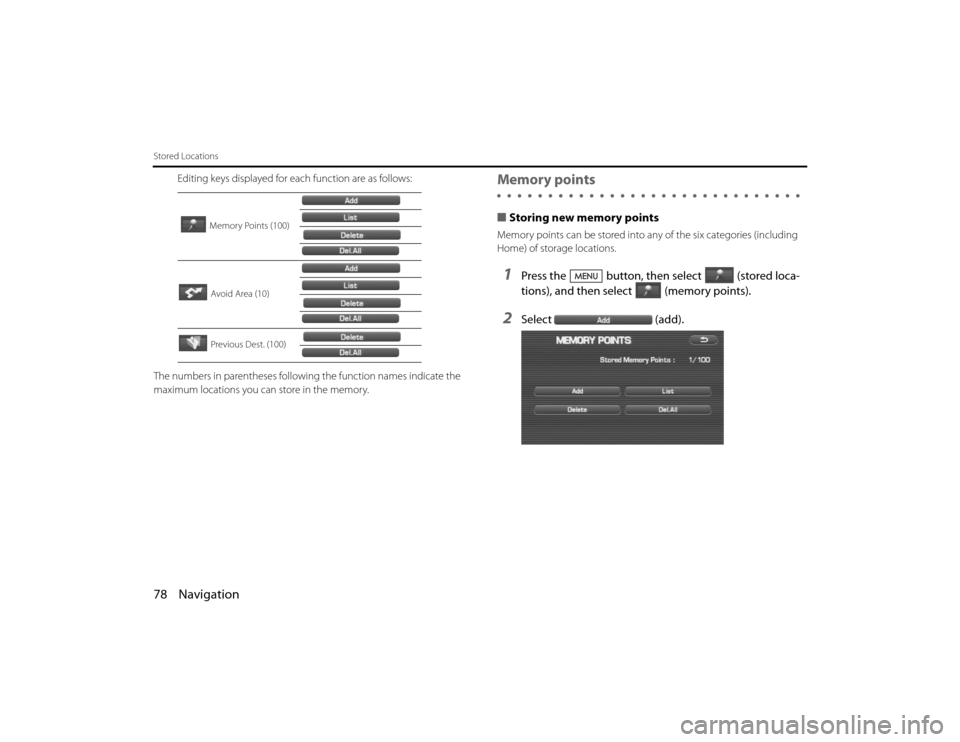
Editing keys displayed for each function are as follows:
The numbers in parentheses following the function names indicate the
maximum locations you can store in the memory.
Memory points■ Storing new memory pointsMemory points can be stored into any of the six categories (including
Home) of storage locations.1
Press the button, then select (stored loca-
tions), and then select (memory points).
2
Select (add).
Memory Points (100)
Avoid Area (10)
Previous Dest. (100)
Legacy_B2462BE-A.book Page 78 Wednesday, April 22, 2009 5:32 PM
Page 66 of 90
80 NavigationStored Locations3
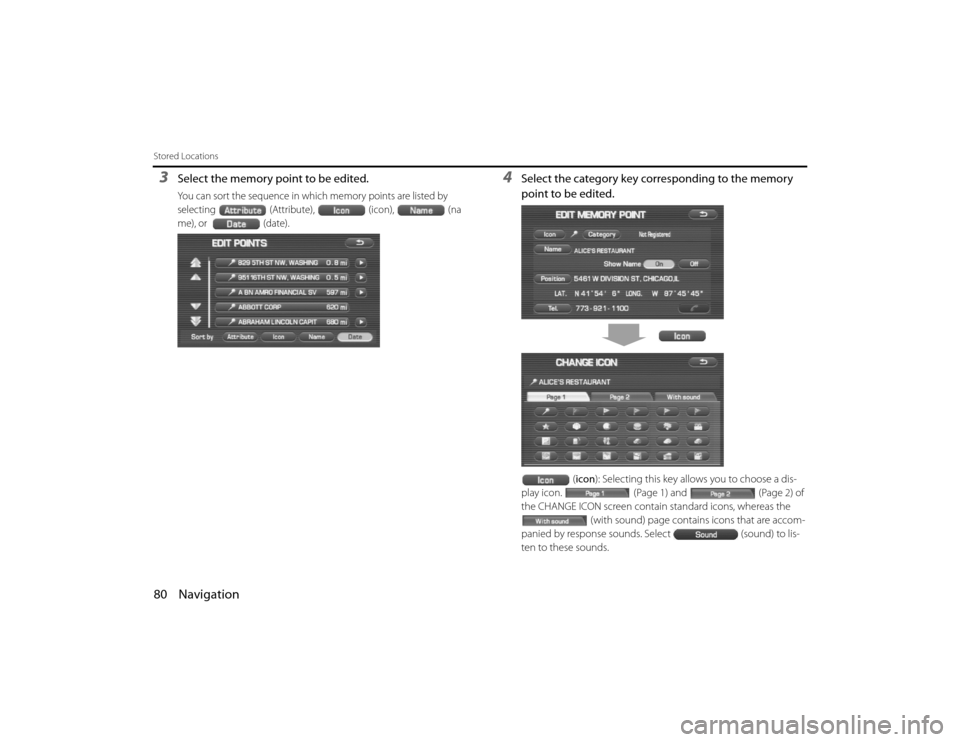
Select the memory point to be edited.You can sort the sequence in which memory points are listed by
selecting(Attribute), (icon),(na
me), or (date)
.
4
Select the category key corresponding to the memory
point to be edited.
(icon ): Selecting this key allows you to choose a dis-
play icon. (Page 1) and (Page 2) of
the CHANGE ICON screen contain standard icons, whereas the
(with sound) page contai ns icons that are accom-
panied by response sounds. Select (sound) to lis-
ten to these sounds.
Legacy_B2462BE-A.book Page 80 Wednesday, April 22, 2009 5:32 PM
Page 67 of 90
Navigation 81
Stored Locations
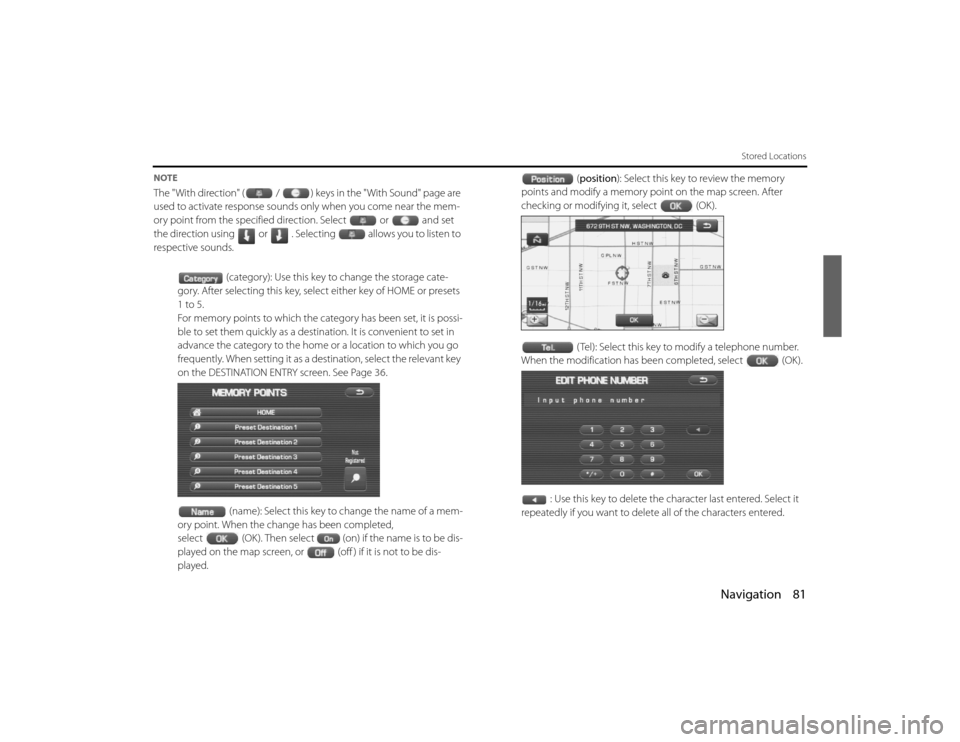
NOTEThe "With direction" ( / ) keys in the "With Sound" page are
used to activate response sounds only when you come near the me m-
ory point from the specified direction. Select or and s et
the direction using or . Selecting allows you to listen to
respective sounds.
(category): Use this key to change the storage cate-
gory. After selecting this key, select either key of HOME or presets
1 to 5.
For memory points to which the ca tegory has been set, it is possi-
ble to set them quickly as a destinat ion. It is convenient to set in
advance the category to the home or a location to which you go
frequently. When setting it as a de stination, select the relevant key
on the DESTINATION ENTRY screen. See Page 36.
(name): Select this key to change the name of a mem-
ory point. When the change has been completed,
select (OK). Then select (on) if the name is to be dis-
played on the map screen, or (off ) if it is not to be dis-
played. (
position ): Select this key to review the memory
points and modify a memory point on the map screen. After
checking or modifying it, select (OK).
( Tel): Select this key to modify a telephone number.
When the modification has been completed, select (OK).
: Use this key to delete the character last entered. Select it
repeatedly if you want to delete all of the characters entered.Legacy_B2462BE-A.book Page 81 Wednesday, April 22, 2009 5:32 PM
Page 70 of 90
84 NavigationStored Locations4
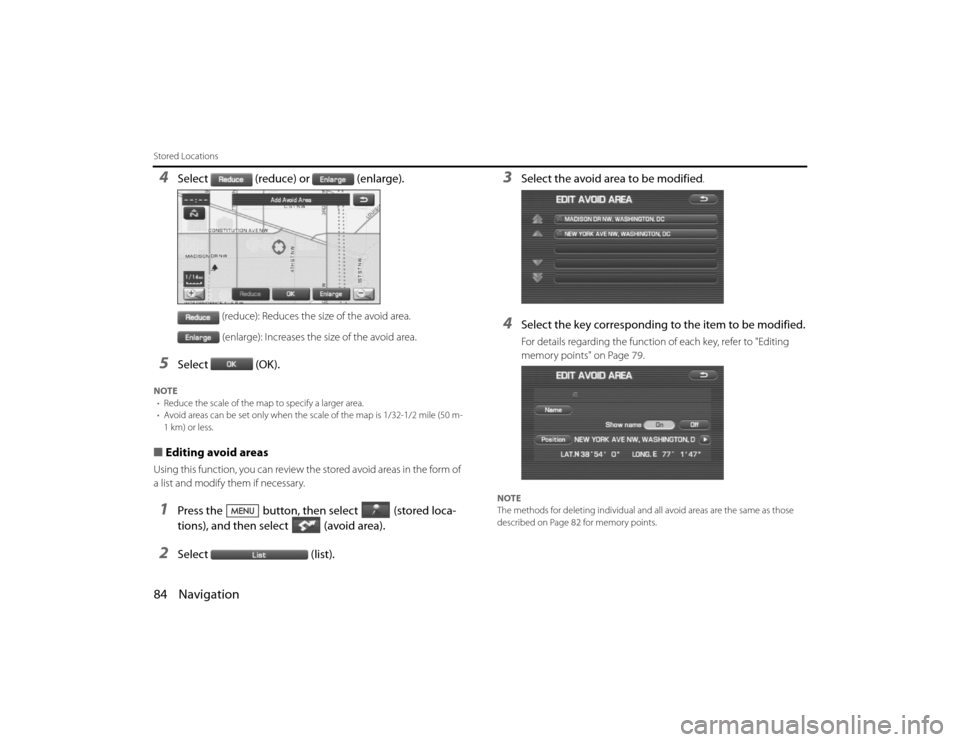
Select (reduce) or (enlarge).
(reduce): Reduces the size of the avoid area.(enlarge): Increases the size of the avoid area.
5
Select (OK).
NOTE • Reduce the scale of the map to specify a larger area.
• Avoid areas can be set only when the sc ale of the map is 1/32-1/2 mile (50 m-
1 km) or less.■ Editing avoid areasUsing this function, you can review the stored avoid areas in the form of
a list and modify them if necessary.1
Press the button, then select (stored loca-
tions), and then select (avoid area).
2
Select (list).
3
Select the avoid area to be modified
.
4
Select the key corresponding to the item to be modified.For details regarding the function of each key, refer to "Editing
memory points" on Page 79.
NOTE
The methods for deleting individual and all avoid areas are th e same as those
described on Page 82 for memory points.
Legacy_B2462BE-A.book Page 84 Wednesday, April 22, 2009 5:32 PM
Page 71 of 90
Navigation 85
Stored Locations
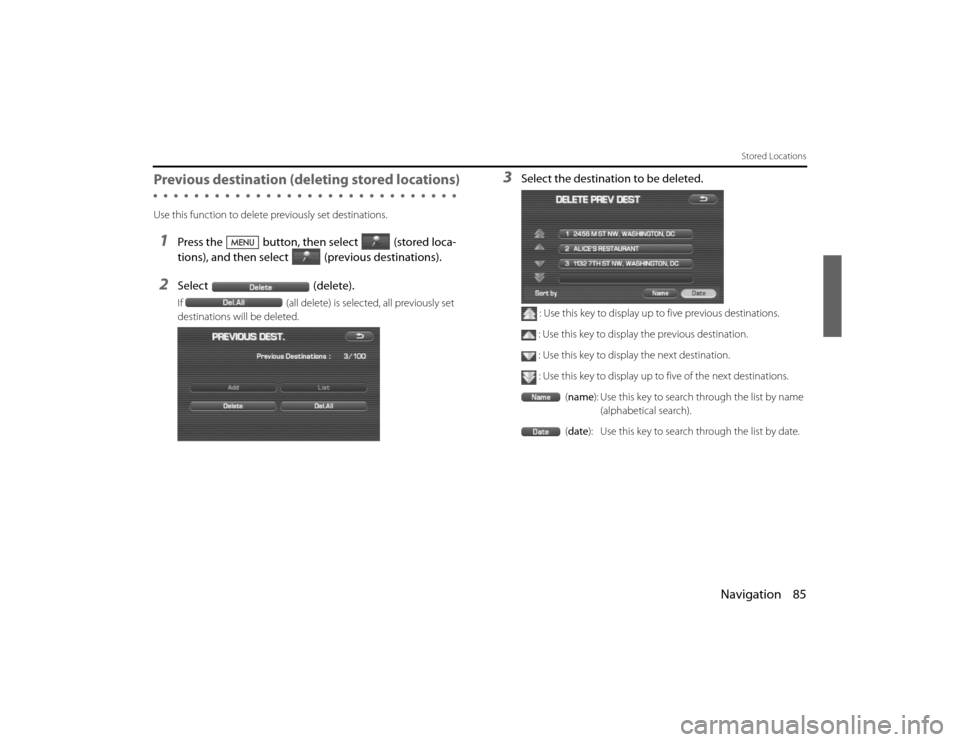
Previous destination (deleting stored locations) Use this function to delete previously set destinations.1
Press the button, then select (stored loca-
tions), and then select (previous destinations).
2
Select(delete).If(all delete) is selected, all previously set
destinations will be deleted.
3
Select the destination to be deleted.
: Use this key to display up to five previous destinations.
: Use this key to display the previous destination. : Use this key to display the next destination.
: Use this key to display up to five of the next destinations. (name): Use this key to search through the list by name
(alphabetical search).
( date ): Use this key to search through the list by date.
Legacy_B2462BE-A.book Page 85 Wednesday, April 22, 2009 5:32 PM
Page 73 of 90
Navigation 87
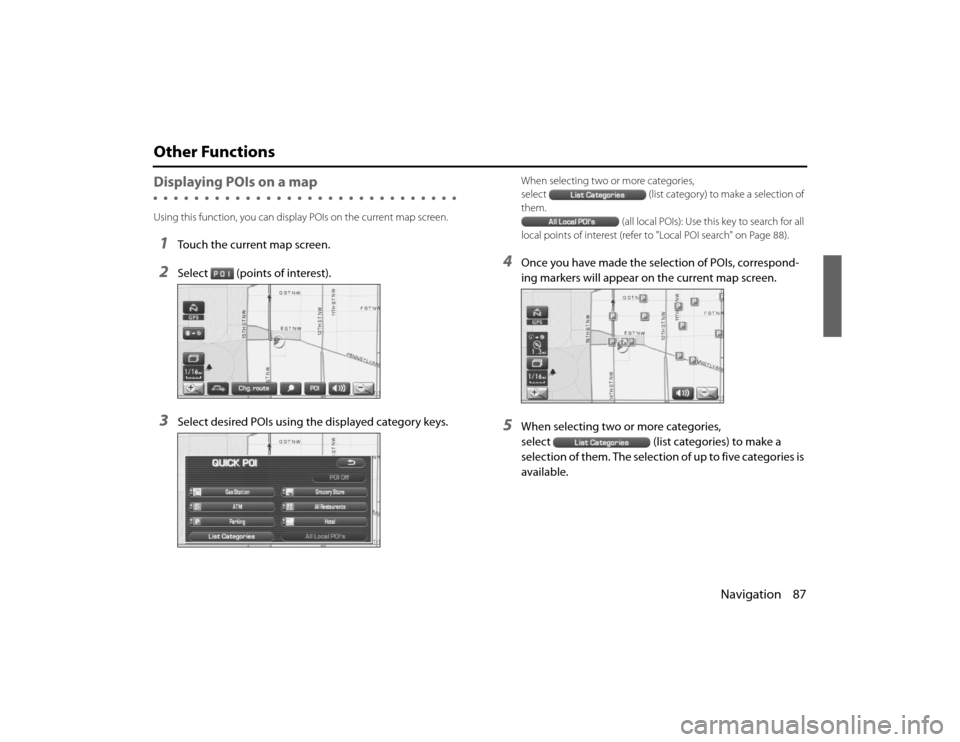
Other FunctionsDisplaying POIs on a mapUsing this function, you can display POIs on the current map screen.1
Touch the current map screen.
2
Select (points of interest).
3
Select desired POIs using the displayed category keys.
When selecting two or more categories,
select(list category) to make a selection of
them.
(all local POIs): Use this key to search for all
local points of interest (refer to "Local POI search" on Page 88).
4
Once you have made the selection of POIs, correspond-
ing markers will appear on the current map screen.
5
When selecting two or more categories,
select (list categories) to make a
selec tion of them. The selection of up to five categories is
available.
Legacy_B2462BE-A.book Page 87 Wednesday, April 22, 2009 5:32 PM