parking brake SUBARU LEGACY 2012 5.G User Guide
[x] Cancel search | Manufacturer: SUBARU, Model Year: 2012, Model line: LEGACY, Model: SUBARU LEGACY 2012 5.GPages: 474, PDF Size: 17.45 MB
Page 296 of 474
In this position, the transmission is me-
chanically locked to prevent the vehicle
from rolling freely.
When you park the vehicle, first apply the
parking brake, then shift into the“P ”
position. Do not hold the vehicle with only
the transmission.
To shift the select lever from the “P ”to any
other position, you should depress the
brake pedal fully then move the select
lever. This prevents the vehicle from
lurching when it is started. NOTE
To protect the engine while the “P ”
position is selected, the engine is
controlled such that the engine speed
may not become too high even if the
accelerator pedal is depressed hard. ! R (Reverse)
This position is for backing the vehicle.
To shift from the “N ” to “R ”position, stop
the vehicle completely then move the
lever to the “R ”position.
! N (Neutral)
This position is for restarting a stalledengine.
In this position the wheels and transmis-
sion are not locked. In this position, the transmission is neutral; the vehicle will roll
freely, even on the slightest incline unless
the parking brake or foot brake is applied.
Avoid coasting with the transmission neutral.
During coasting, there is no engine brak-
ing effect.
NOTE . To protect the engine while the “N ”
position is selected, the engine is
controlled such that the engine speed
may not become too high even if the
accelerator pedal is depressed hard.. If the select lever is in the “N ”
position when you stop the engine for
parking, you may not subsequently be
able to move it to the “R ” and “P ”
positions. If this happens, turn the
ignition switch to the “ON ”position.
You will then be able to move the select
lever to the “P ” position.
WARNING
Do not drive the vehicle with the
select lever in the “N ” (neutral)
position. Engine braking has no
effect in this condition and the risk
of an accident is consequently in-creased. !
D (Drive)
This position is for normal driving. The
transmission automatically shifts into a
suitable gear according to the vehicle
speed and the acceleration you require.
When more acceleration is required in this
position, depress the accelerator pedal
fully to the floor and hold that position. The
transmission will automatically downshift.
When you release the pedal, the transmis-
sion will return to the original gear posi-tion.
To use the manual mode, move the lever
from this position into the manual gate.
NOTE (AT models only)
Automatic downshifts to 4th or 3rd may
occur even when driving on a level
road depending on conditions, such as
how hard you depress the brake pedal. ! While climbing a grade
When driving up a hill, undesired upshift is
prevented from taking place when the
accelerator is released. This minimizes
the chance of subsequent downshifting to
a lower gear when accelerating again.
This prevents repeated upshifting and
downshifting resulting in a smoother op-
eration of the vehicle. Starting and operating
7-19
– CONTINUED –
Page 297 of 474
7-20Starting and operating
NOTE
The transmission may downshift, de-
pending on the way the accelerator
pedal is depressed to accelerate the
vehicle again. & Shift lock function
The shift lock function helps prevent the
improper operation of the select lever. . The select lever cannot be operated
unless the ignition switch is turned to the “ ON ”position and the brake pedal is
depressed. . The select lever cannot be moved from
the “P ” position to any other position
before the brake pedal is depressed.
Depress the brake pedal first, and then
operate the select lever. . Only the “P ”position allows you to turn
the key from the “Acc ”position to the
“ LOCK ”position and remove the key from
the ignition key cylinder.. If the ignition switch is turned to the
“ LOCK ”position while the select lever is in
the “N ”position, the select lever may not
be moved to the “P ”position after a period
of time. Therefore, move the select lever
to the “P ” position with the brake pedal
depressed soon after the ignition switch is
turned to the “LOCK ”position. !
Shift lock release
If the select lever cannot be operated, turn
theignitionswitchbacktothe “ON ”
position then move the select lever to the“ P ” position with the select lever button
pressed and brake pedal depressed.
If the select lever does not move after
performing the above procedure, perform
the following steps. . When the select lever cannot be
shifted from “P ” to “N ”:
Refer to “Shift lock release using the shift
lock release button ”F 7-20.
. When the select lever cannot be
shifted from “N ” to “R ”, “P ”:
Within 60 seconds after placing the igni-
tion switch in the “Acc ”position, move the
select lever to the “P ” position with the
select lever button pressed and brake
pedal depressed.
If you must perform the above procedure,
the shift lock system (or the vehicle control
system) may be malfunctioning. Contact a
SUBARU dealer for an inspection as soon
as possible.
If the select lever does not move after
performing the above procedure, refer to“ Shift lock release using the shift lock
release button ”F 7-20. !
Shift lock release using the shift
lock release button
Perform the following procedure to release
the shift lock.
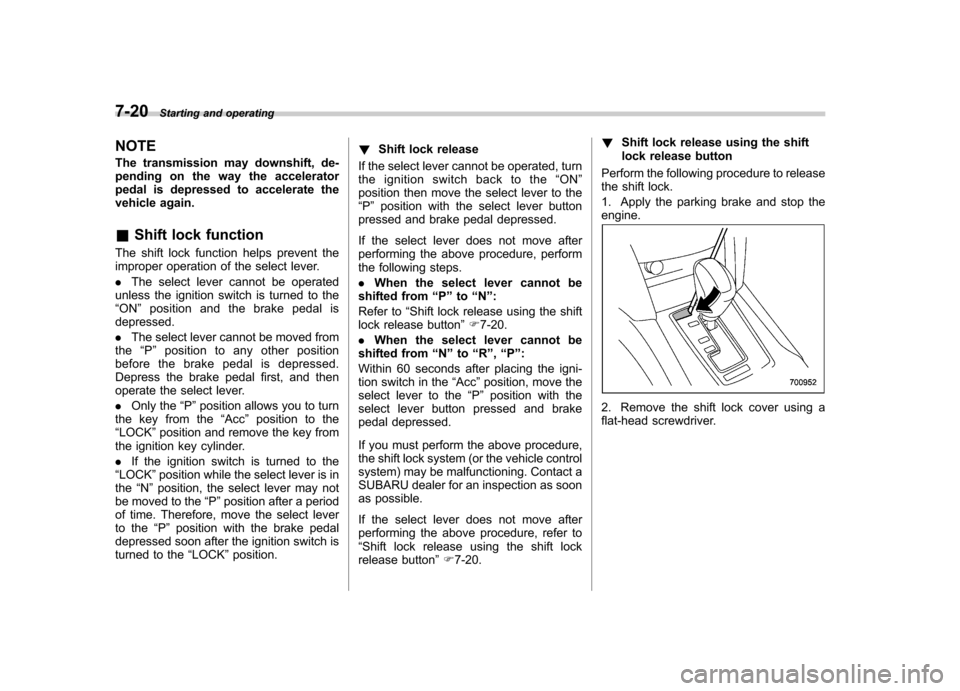
1. Apply the parking brake and stop the engine.
2. Remove the shift lock cover using a
flat-head screwdriver.
Page 298 of 474
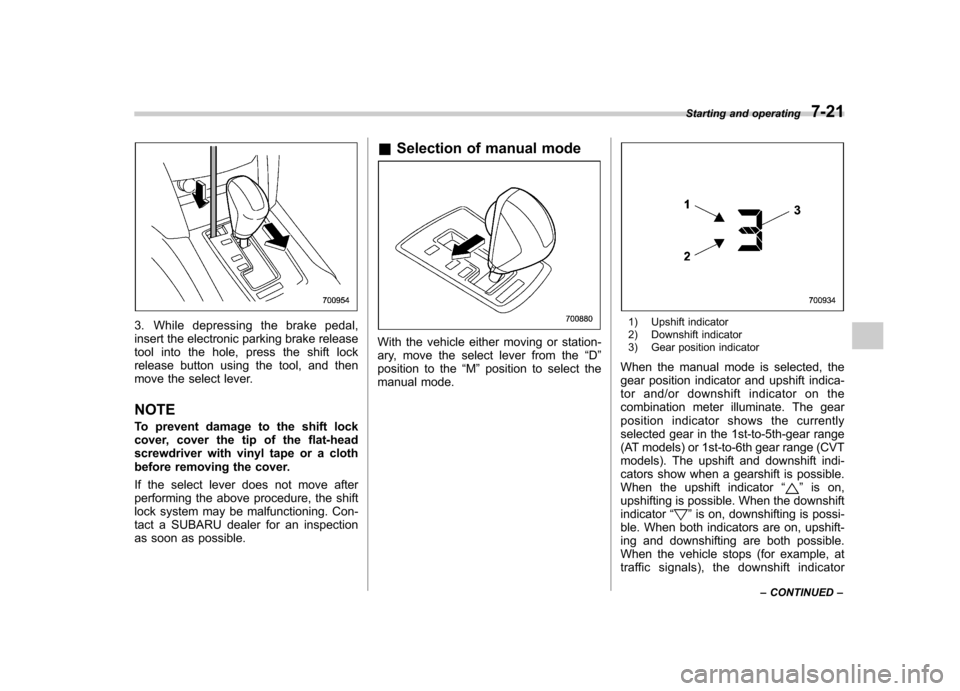
3. While depressing the brake pedal,
insert the electronic parking brake release
tool into the hole, press the shift lock
release button using the tool, and then
move the select lever. NOTE
To prevent damage to the shift lock
cover, cover the tip of the flat-head
screwdriver with vinyl tape or a cloth
before removing the cover.
If the select lever does not move after
performing the above procedure, the shift
lock system may be malfunctioning. Con-
tact a SUBARU dealer for an inspection
as soon as possible.&
Selection of manual mode
With the vehicle either moving or station-
ary, move the select lever from the “D ”
position to the “M ”position to select the
manual mode.
1) Upshift indicator
2) Downshift indicator
3) Gear position indicator
When the manual mode is selected, the
gear position indicator and upshift indica-
tor and/or downshift indicator on the
combination meter illuminate. The gear
position indicator shows the currently
selected gear in the 1st-to-5th-gear range
(AT models) or 1st-to-6th gear range (CVT
models). The upshift and downshift indi-
cators show when a gearshift is possible.
When the upshift indicator “
”is on,
upshifting is possible. When the downshift indicator “
”is on, downshifting is possi-
ble. When both indicators are on, upshift-
ing and downshifting are both possible.
When the vehicle stops (for example, at
traffic signals), the downshift indicator Starting and operating
7-21
– CONTINUED –
Page 299 of 474
7-22Starting and operating
turns off.
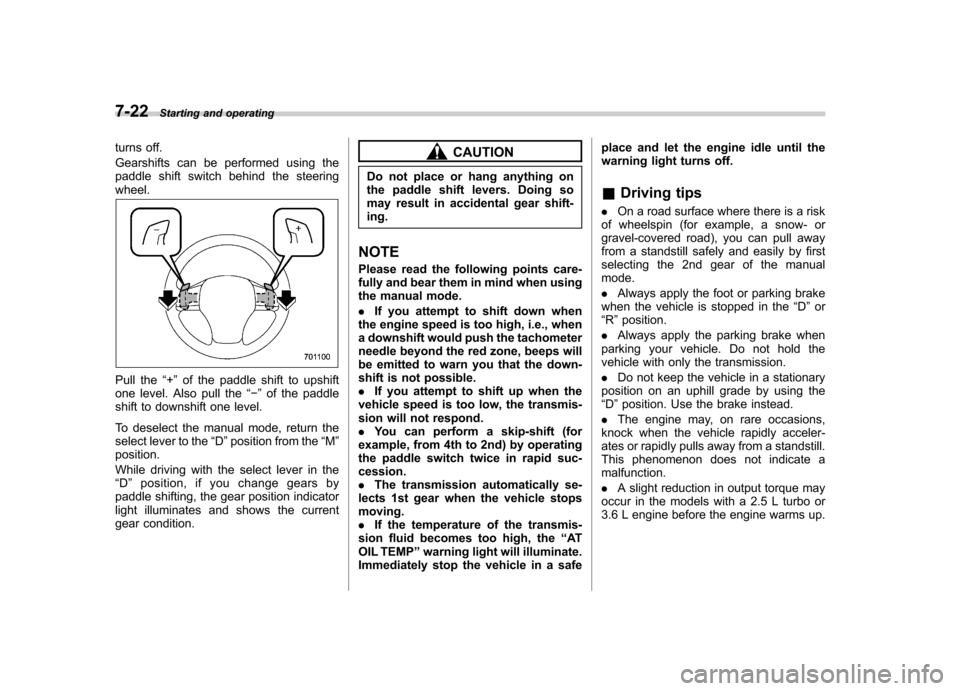
Gearshifts can be performed using the
paddle shift switch behind the steeringwheel.
Pull the “+ ” of the paddle shift to upshift
one level. Also pull the “ ” of the paddle
shift to downshift one level.
To deselect the manual mode, return the
select lever to the “D ”position from the “M ”
position.
While driving with the select lever in the “ D ” position, if you change gears by
paddle shifting, the gear position indicator
light illuminates and shows the current
gear condition.
CAUTION
Do not place or hang anything on
the paddle shift levers. Doing so
may result in accidental gear shift-ing.
NOTE
Please read the following points care-
fully and bear them in mind when using
the manual mode. . If you attempt to shift down when
the engine speed is too high, i.e., when
a downshift would push the tachometer
needle beyond the red zone, beeps will
be emitted to warn you that the down-
shift is not possible.. If you attempt to shift up when the
vehicle speed is too low, the transmis-
sion will not respond.. You can perform a skip-shift (for
example, from 4th to 2nd) by operating
the paddle switch twice in rapid suc-cession.. The transmission automatically se-
lects 1st gear when the vehicle stopsmoving.. If the temperature of the transmis-
sion fluid becomes too high, the “AT
OIL TEMP ”warning light will illuminate.
Immediately stop the vehicle in a safe place and let the engine idle until the
warning light turns off. &
Driving tips
. On a road surface where there is a risk
of wheelspin (for example, a snow- or
gravel-covered road), you can pull away
from a standstill safely and easily by first
selecting the 2nd gear of the manualmode. . Always apply the foot or parking brake
when the vehicle is stopped in the “D ”or
“ R ”position.
. Always apply the parking brake when
parking your vehicle. Do not hold the
vehicle with only the transmission. . Do not keep the vehicle in a stationary
position on an uphill grade by using the “ D ”position. Use the brake instead.
. The engine may, on rare occasions,
knock when the vehicle rapidly acceler-
ates or rapidly pulls away from a standstill.
This phenomenon does not indicate amalfunction. . A slight reduction in output torque may
occur in the models with a 2.5 L turbo or
3.6 L engine before the engine warms up.
Page 303 of 474
7-26Starting and operating
warning light illuminate simultaneously,
take the following steps.
1. Stop the vehicle in the nearest safe,
flat place.
2. Shut down the engine, then restart it.
3. Release the parking brake. If both
warning lights turn off, the EBD system
may be malfunctioning.
Drive carefully to the nearest SUBARU
dealer and have the system inspected.
4. If both warning lights illuminate again
and remain illuminated after the engine
has been restarted, shut down the engine
again, apply the parking brake, and check
the brake fluid level. Refer to “Brake fluid ”
F 11-25.
5. If the brake fluid level is not below the“ MIN ”mark, the EBD system may be
malfunctioning. Drive carefully to the
nearest SUBARU dealer and have the
system inspected.
6. If the brake fluid level is below the “ MIN ”mark, DO NOT drive the vehicle.
Instead, have the vehicle towed to the
nearest SUBARU dealer for repair.
WARNING
. Driving with the brake system
warning light on is dangerous.
This indicates your brake system may not be working properly. If
the light remains on, have the
brakes inspected by a SUBARU
dealer immediately.
. If at all in doubt about whether
the brakes are operating prop-
erly, do not drive the vehicle.
Have your vehicle towed to the
nearest SUBARU dealer for re-
pair. Vehicle Dynamics Control system
WARNING
Always use the utmost care in driving –overconfidence because
you are driving with a Vehicle Dy-
namics Control system equipped
vehicle could easily lead to a ser-
ious accident.
CAUTION
. Even if your vehicle is equipped
with Vehicle Dynamics Control
system, winter tires should be
used when driving on snow-cov-
ered or icy roads; in addition,
vehicle speed should be reduced
considerably. Simply having a
Vehicle Dynamics Control sys-
tem does not guarantee that the
vehicle will be able to avoid
accidents in any situation.
. Activation of the Vehicle Dy-
namics Control system is an
indication that the road being
travelled on has a slippery sur-
face; since having Vehicle Dy-
namics Control is no guarantee
Page 308 of 474
&Electronic parking brake
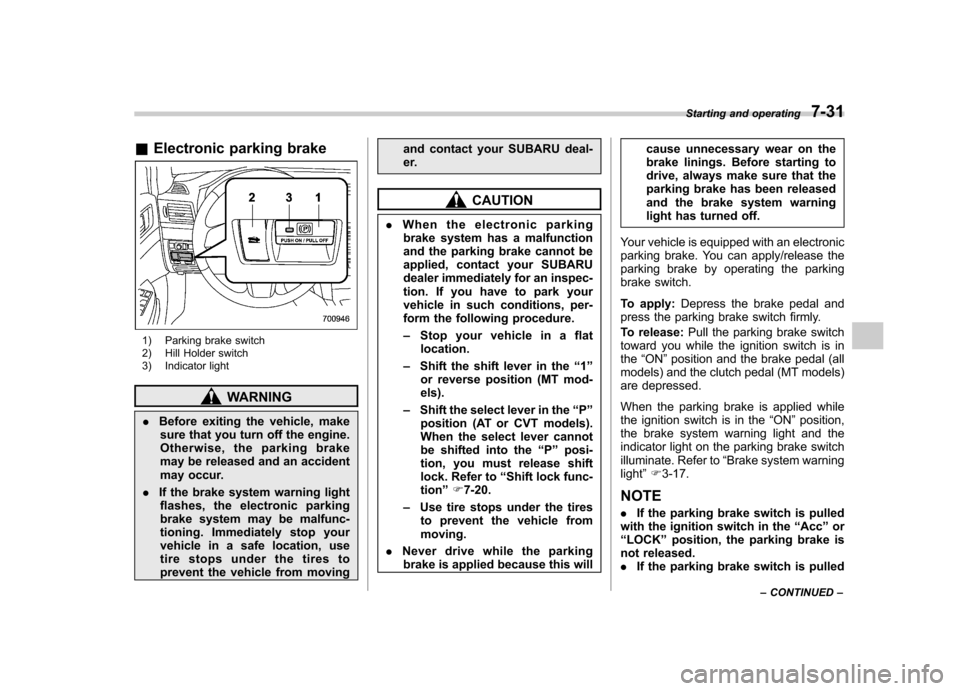
1) Parking brake switch
2) Hill Holder switch
3) Indicator light
WARNING
. Before exiting the vehicle, make
sure that you turn off the engine.
Otherwise, the parking brake
may be released and an accident
may occur.
. If the brake system warning light
flashes, the electronic parking
brake system may be malfunc-
tioning. Immediately stop your
vehicle in a safe location, use
tire stops under the tires to
prevent the vehicle from moving and contact your SUBARU deal-
er.
CAUTION
. When the electronic parking
brake system has a malfunction
and the parking brake cannot be
applied, contact your SUBARU
dealer immediately for an inspec-
tion. If you have to park your
vehicle in such conditions, per-
form the following procedure. – Stop your vehicle in a flat
location.
– Shift the shift lever in the “1 ”
or reverse position (MT mod- els).
– Shift the select lever in the “P ”
position (AT or CVT models).
When the select lever cannot
be shifted into the “P ” posi-
tion, you must release shift
lock. Refer to “Shift lock func-
tion ”F 7-20.
– Use tire stops under the tires
to prevent the vehicle frommoving.
. Never drive while the parking
brake is applied because this will cause unnecessary wear on the
brake linings. Before starting to
drive, always make sure that the
parking brake has been released
and the brake system warning
light has turned off.
Your vehicle is equipped with an electronic
parking brake. You can apply/release the
parking brake by operating the parking
brake switch.
To apply: Depress the brake pedal and
press the parking brake switch firmly.
To release: Pull the parking brake switch
toward you while the ignition switch is in the “ON ”position and the brake pedal (all
models) and the clutch pedal (MT models)
are depressed.
When the parking brake is applied while
the ignition switch is in the “ON ”position,
the brake system warning light and the
indicator light on the parking brake switch
illuminate. Refer to “Brake system warning
light ”F 3-17.
NOTE . If the parking brake switch is pulled
with the ignition switch in the “Acc ”or
“ LOCK ”position, the parking brake is
not released. . If the parking brake switch is pulled Starting and operating
7-31
– CONTINUED –
Page 309 of 474
7-32Starting and operating
without depressing the brake pedal or
the clutch pedal, the parking brake is
not released..When the parking brake is being
applied or released, noise may be
noticed. However, this is not a malfunc-tion.. When the electronic parking brake
system has a malfunction or the elec-
tronic parking brake operation is pro-
hibited temporarily, if the parking brake
switch is operated, a chirp sound is
heard and the brake system warning
light flashes.. When you cannot release the park-
ing brake due to, for example, a system
malfunction, you can release it by
using the parking brake release tool.
Refer to “Electronic parking brake –if
the electronic parking brake cannot bereleased ”F 9-17.
! Automatic release function by ac-
celerator pedal
The electronic parking brake system has
an automatic release function. The park-
ing brake will be automatically released by
depressing the accelerator pedal. How-
ever, the automatic release function does
not operate under the following conditions. . Any door (other than the trunk lid or
rear gate) is open. .
The driver ’s seatbelt is not fastened.
If the parking brake is automatically
released, the brake system warning light
and the indicator light on the parking brake
switch turn off.
NOTE
Even if you have applied the parking
brake by pressing the parking brake
switch, the parking brake will be auto-
matically released when the accelera-
tor pedal is depressed. ! Hill Holder function
The electronic parking brake system has a
Hill Holder function. If the Hill Holder
function is activated, the parking brake
will be automatically applied when stop-
ping on an uphill slope with the brake
pedal depressed. In this case, the brake
system warning light and the indicator light
on the parking brake switch illuminate. NOTE . The Hill Holder function may not
activate on a gentle uphill slope. In this
case, manually apply the electronic
parking brake.. If you do not depress the brake
pedal sufficiently, the Hill Holder func-
tion may not operate properly. How-
ever, this is not a malfunction. When stopping on an uphill slope, depress
the brake pedal firmly and release it
after the brake system warning lightilluminates..
Depending on the condition of the
road surface and braking force, the
brakes operate temporarily and feel
different than usual.. When the electronic parking brake
system has a malfunction while the Hill
Holder function is activated, a chirp
sound is heard, the Hill Holder indica-
tor light turns off and the brake system
warning light flashes.. The Hill Holder function does not
reactivate when parking with the elec-
tronic parking brake released after the
Hill Holder function is activated. If
necessary, manually apply the electro-
nic parking brake.. If the seatbelt is not fastened when
the Hill Holder function is activated, the
vehicle may not start moving smoothly
from a stop, or a noise may be heard
from the brake components. ! Hill Holder switch
WARNING
When stopping on an uphill slope
with the Hill Holder function acti-
vated, release the brake pedal after
Page 310 of 474
the brake system warning light has
illuminated. Otherwise, the Hill
Holder function may not operate
properly and an accident may occur.
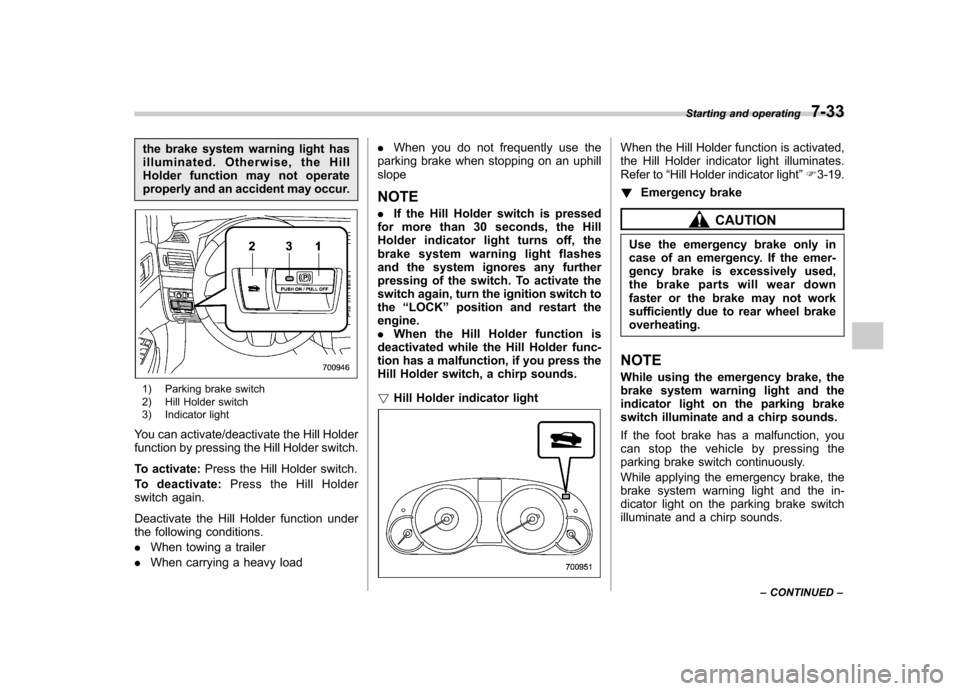
1) Parking brake switch
2) Hill Holder switch
3) Indicator light
You can activate/deactivate the Hill Holder
function by pressing the Hill Holder switch.
To activate: Press the Hill Holder switch.
To deactivate: Press the Hill Holder
switch again.
Deactivate the Hill Holder function under
the following conditions. . When towing a trailer
. When carrying a heavy load .
When you do not frequently use the
parking brake when stopping on an uphill slope NOTE . If the Hill Holder switch is pressed
for more than 30 seconds, the Hill
Holder indicator light turns off, the
brake system warning light flashes
and the system ignores any further
pressing of the switch. To activate the
switch again, turn the ignition switch tothe “LOCK ”position and restart the
engine.. When the Hill Holder function is
deactivated while the Hill Holder func-
tion has a malfunction, if you press the
Hill Holder switch, a chirp sounds. ! Hill Holder indicator light
When the Hill Holder function is activated,
the Hill Holder indicator light illuminates.
Refer to “Hill Holder indicator light ”F 3-19.
! Emergency brake
CAUTION
Use the emergency brake only in
case of an emergency. If the emer-
gency brake is excessively used,
the brake parts will wear down
faster or the brake may not work
sufficiently due to rear wheel brakeoverheating.
NOTE
While using the emergency brake, the
brake system warning light and the
indicator light on the parking brake
switch illuminate and a chirp sounds.
If the foot brake has a malfunction, you
canstopthevehiclebypressingthe
parking brake switch continuously.
While applying the emergency brake, the
brake system warning light and the in-
dicator light on the parking brake switch
illuminate and a chirp sounds. Starting and operating
7-33
– CONTINUED –
Page 311 of 474
7-34Starting and operating
!Electronic parking brake system warning
CAUTION
If the brake system warning light
flashes, the electronic parking brake
system may be malfunctioning. Im-
mediately stop your vehicle in the
nearest safe location and contact
your SUBARU dealer.
If a malfunction occurs in the electronic
parking brake system, the brake system
warning light flashes. Refer to “Electronic
parking brake system warning ”F 3-18. &
Parking tips
When parking your vehicle, always per-
form the following items. . Apply the parking brake.
. For MT models, put the shift lever in the
“ 1 ” (1st) for upgrade or “R ”(Reverse) for a
downgrade.. For AT and CVT models, put the select
lever in the “P ”(Park) position.
Never rely on the transmission alone to
hold the vehicle.
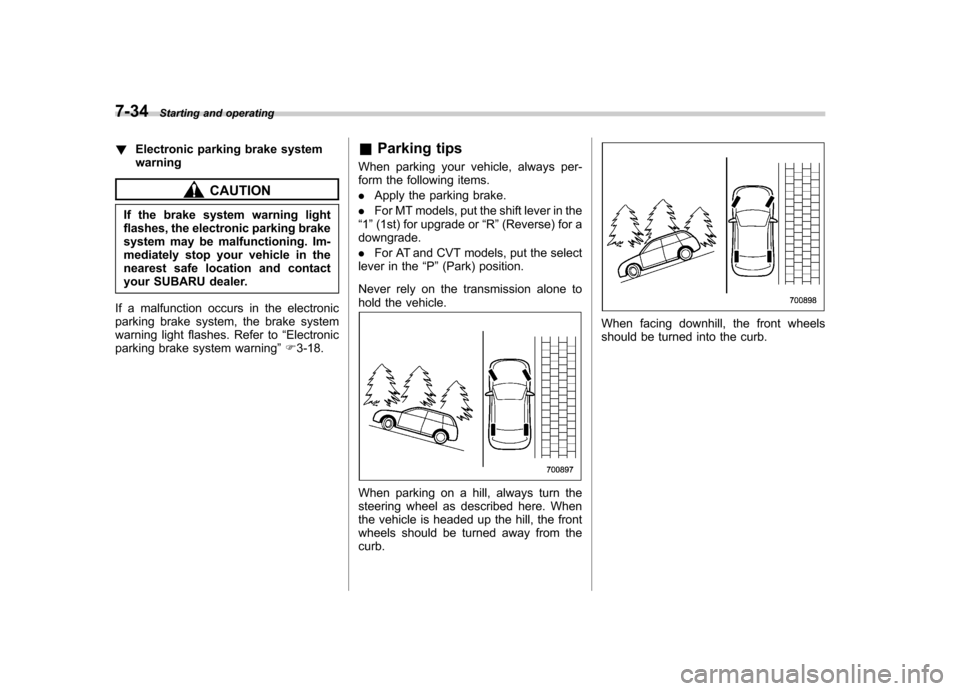
When parking on a hill, always turn the
steering wheel as described here. When
the vehicle is headed up the hill, the front
wheels should be turned away from the curb.
When facing downhill, the front wheels
should be turned into the curb.
Page 324 of 474
a different concentration from the one
used previously, purge the old fluid from
the piping between the reservoir tank and
washer nozzles by operating the washer
for a certain period of time. Otherwise, if
the concentration of the fluid remaining in
thepipingistoolowfortheoutside
temperature, it may freeze and block thenozzles.
CAUTION
. Adjust the washer fluid concen-
tration appropriately for the out-
side temperature. If the concen-
tration is inappropriate, sprayed
washer fluid may freeze on the
windshield and obstruct your
view, and the fluid may freeze in
the reservoir tank.
. State or local regulations on
volatile organic compounds may
restrict the use of methanol, a
common windshield washer anti-
freeze additive. Washer fluids
containing non-methanol anti-
freeze agents should be used
only if they provide cold weather
protection without damaging
your vehicle ’s paint, wiper blades
or washer system. !
Before driving your vehicle
Before entering the vehicle, remove any
snow or ice from your shoes because that
could make the pedals slippery and
driving dangerous.
While warming up the vehicle before
driving, check that the accelerator pedal,
brake pedal, and all other controls operate
smoothly.
Clear away ice and snow that has
accumulated under the fenders to avoid
making steering difficult. During severe
winter driving, stop when and where it is
safe to do so and check under the fenders
periodically. ! Parking in cold weather
WARNING
Snow can trap dangerous exhaust
gases under your vehicle. Keep
snow clear of the exhaust pipe and
from around your vehicle if you park
the vehicle in snow with the enginerunning.
Do not use the parking brake when
parking for long periods in cold weather
since it could freeze in that position.
Instead, you should observe the followingtips. 1. Place the shift lever in
“1 ” or “R ”for MT
models, or the select lever in “P ” for AT
models and CVT models.
2. Use tire stops under the tires to
prevent the vehicle from moving.
When the vehicle is parked in snow or
when it snows, raise the wiper blades off
the glass to prevent damage to them.
When the vehicle has been left parked
after use on roads heavily covered with
snow, or has been left parked during a
snowstorm, icing may develop on the
brake system, which could cause poor
braking action. Check for snow or ice
buildup on the suspension, disc brakes
and brake hoses underneath the vehicle.
If there is caked snow or ice, remove it,
being careful not to damage the disc
brakes and brake hoses and ABS har-ness. ! Refueling in cold weather
To help prevent moisture from forming in
the fuel system and the risk of its freezing,
use of an antifreeze additive in the fuel
tank is recommended during cold weather.
Use only additives that are specifically
designed for this purpose. When an
antifreeze additive is used, its effect lasts
longer if the tank is refilled whenever the
fuel level reaches half empty. Driving tips
8-9
– CONTINUED –