SUBARU LEGACY 2020 Getting Started Guide
Manufacturer: SUBARU, Model Year: 2020, Model line: LEGACY, Model: SUBARU LEGACY 2020Pages: 124, PDF Size: 5.53 MB
Page 1 of 124
SUBARU of America, Inc.
One Subaru Drive
Camden, NJ 08103-9800
MSA5B2003A
Issued July 2019
Printed in USA 07/19
Love. It’s what makes a Subaru, a Subaru.
Getting Started Guide
Legacy
2020
Page 2 of 124
© 2019 Subaru of America, Inc. All rights reserved.
Contents may not be reproduced in whole or in part without prior written permission of
publisher. Specifications in this Guide are based on the latest product information available
at the time of publication. Some images shown are for illustration purposes only. Some
equipment shown in photography within this Guide is optional at extra co\
st. Specific
options may be available only in combination with other options. Specifi\
c combinations
of equipment or features may vary from time to time, and by geographic area. Subaru
of America, Inc. reserves the right to change or discontinue at any time, without notice: \
Prices, colors, materials, equipment, accessories, specifications, mod\
els and packages,
without incurring any obligation to make the same or similar changes on \
vehicles
previously sold. Colors shown may vary due to reproduction and printing processes.
Subaru of America, Inc. is not responsible for typographical errors.
Aha
™ is a trademark of Harman International Industries, Inc. Alcantara® is a registered
trademark of Alcantara S.p.A., and Alcantara is produced by the Toray Group. App Store®
is a registered trademark of Apple, Inc. Apple® is a registered trademark of Apple, Inc.
BBS® is a registered trademark of BBS Kraftahrzeugtechnik, AG. Bluetooth® is a registered
trademark of Bluetooth SIG, Inc. Brembo® is a registered trademark of Freni Brembo, S.p.A.
GreenEdge® is a registered trademark of Harman International Industries, Inc. Harman
Kardon® is a registered trademark of Harman International Industries, Inc. HD Radio® is a
registered trademark of iBiquity Digital Corporation. HomeLink® is a registered trademark
of Prince Corporation, a wholly owned subsidiary of Johnson Controls. iHeart® Radio
is a registered trademark of iHeartMedia, Inc. iPod® is a registered trademark of Apple,
Inc. iTunes® is a registered trademark of Apple, Inc. Metal-Matrix Diaphragm (MMD®) is a
registered trademark of Harman International Industries, Inc. MirrorLink™ is a trademark of
Car Connectivity Consortium, LLC. Pandora® is a registered trademark of Pandora Media,
Inc. Siri® is a registered trademark of Apple, Inc. Smart Way® is a registered trademark
of the U.S. Environmental Protection Agency. Stitcher™ is a trademark of Stitcher™, Inc.
TORSEN LSD® is a registered trademark of JTEKT TORSEN North America, Inc. SiriusXM®
All Access Radio is a registered trademark of SiriusXM Radio, Inc. SiriusXM Traffic® and
SiriusXM Travel Link® are registered trademarks of SiriusXM Radio, Inc. Added Security,
Crosstrek, Forester and Outback are registered trademarks of Subaru of America, Inc. BRZ,
EyeSight, Impreza, Lineartronic, Legacy, Subaru, SUBARU BOXER, WRX, STI and X-MODE
are registered trademarks of Subaru Corporation. Confidence in Motion and SUBARU
STARLINK
™ are trademarks of Subaru Corporation.
Page 3 of 124
2PURPOSE OF THIS GUIDE
4 ENTRY AND EXIT
6 INSTRUMENT PANEL
8 GETTING COMFORTABLE
21 CONTROLS
25 GAUGES AND WARNING LIGHTS
26 OPERATING THE VEHICLE
32 REFUELING
33 PASSENGER/CARGO AREAS
37 ENGINE COMPARTMENT
40 ADDITIONAL SPECIFICATIONS
43 STARLINK OVERVIEW
48 STARLINK HOME
52 CREATING A DRIVER PROFILE
56 MULTIMEDIA
59 PHONE
63 APPS
67 SUBARU STARLINK™ SAFETY AND SECURITY
70 MAPS(IF EQUIPPED)
88 SETTINGS AND UPDATES
98 APPENDIX: HOW TO
112 INDEX
TABLE OF CONTENTS
Page 4 of 124
FORWARD
Congratulations on choosing a Subaru vehicle! This Getting Started Guide is designed to
provide information on the basic operation and key features of your Subaru and STARLINK
Systems on your Subaru vehicle.
IMPORTANT SAFETY INFORMATION
The Getting Started Guide is not intended as a substitute for the Owner’s Manual. We
strongly encourage you to review the entire Owner’s Manual to ensure complete
understanding.
ADDITIONAL RESOURCES
If you’re having difficulty using any of the functions outlined in this guide, you can get more
information from the following sources:
Your Subaru Owner’s Manual:
Located in the glovebox
Online Subaru Owner’s Resources:
www.subaru.com/owners
Subaru Customer Support:
www.subaru.com/customer-support
1-800-SUBARU3 (1-800-782-2783)
PURPOSE OF THIS GUIDE
2
Page 5 of 124
IN CASE OF EMERGENCY
SUBARU STARLINK™ Safety and Security(subscription required)
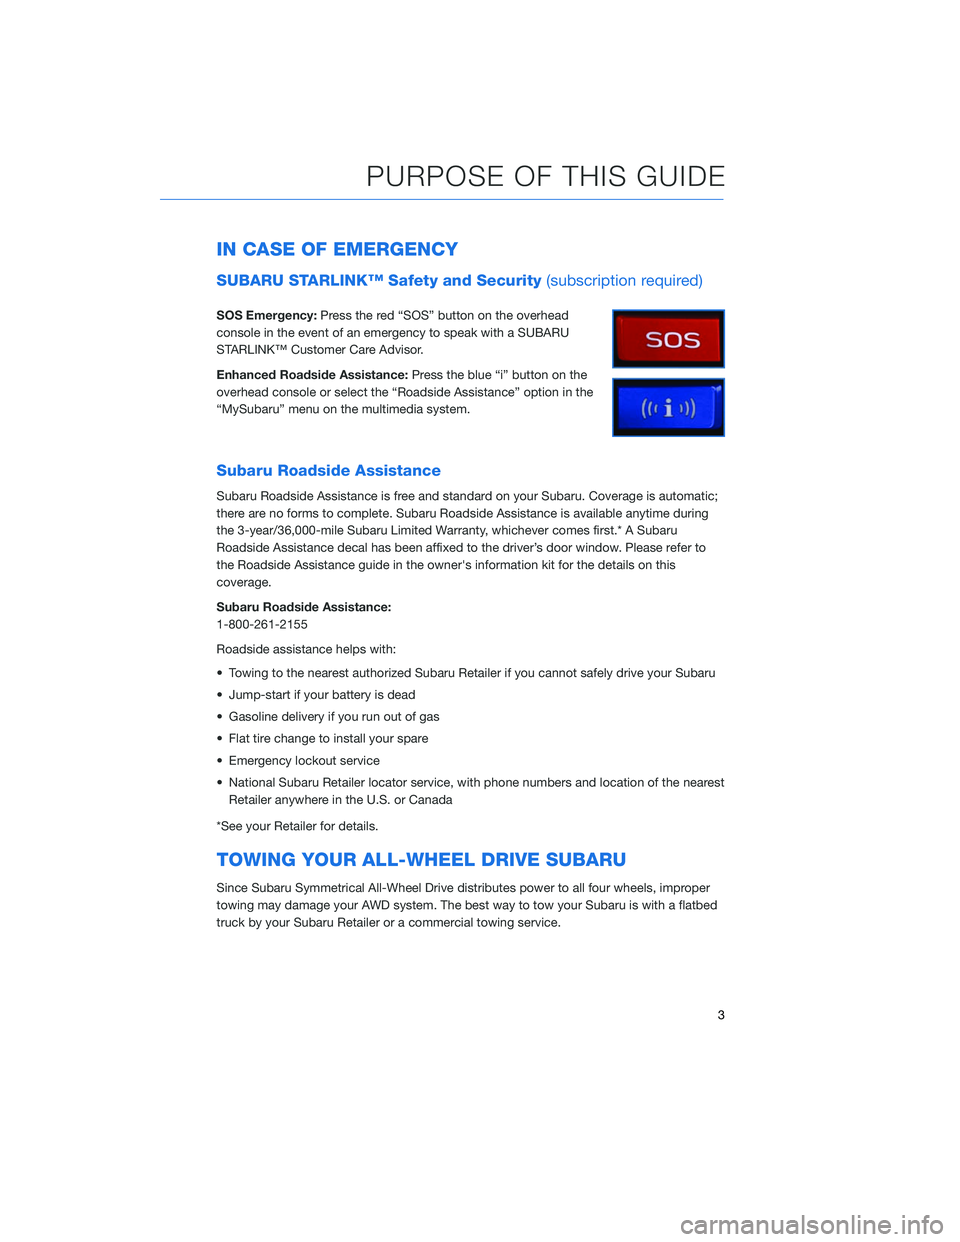
SOS Emergency:Press the red “SOS” button on the overhead
console in the event of an emergency to speak with a SUBARU
STARLINK™ Customer Care Advisor.
Enhanced Roadside Assistance: Press the blue “i” button on the
overhead console or select the “Roadside Assistance” option in the
“MySubaru” menu on the multimedia system.
Subaru Roadside Assistance
Subaru Roadside Assistance is free and standard on your Subaru. Coverage is automatic;
there are no forms to complete. Subaru Roadside Assistance is available anytime during
the 3-year/36,000-mile Subaru Limited Warranty, whichever comes first.* A Subaru
Roadside Assistance decal has been affixed to the driver’s door window. Please refer to
the Roadside Assistance guide in the owner's information kit for the details on this
coverage.
Subaru Roadside Assistance:
1-800-261-2155
Roadside assistance helps with:
• Towing to the nearest authorized Subaru Retailer if you cannot safely drive your Subaru
• Jump-start if your battery is dead
• Gasoline delivery if you run out of gas
• Flat tire change to install your spare
• Emergency lockout service
• National Subaru Retailer locator service, with phone numbers and location of the nearest Retailer anywhere in the U.S. or Canada
*See your Retailer for details.
TOWING YOUR ALL-WHEEL DRIVE SUBARU
Since Subaru Symmetrical All-Wheel Drive distributes power to all four wheels, improper
towing may damage your AWD system. The best way to tow your Subaru is with a flatbed
truck by your Subaru Retailer or a commercial towing service.
PURPOSE OF THIS GUIDE
3
Page 6 of 124
KEYLESS ENTRY
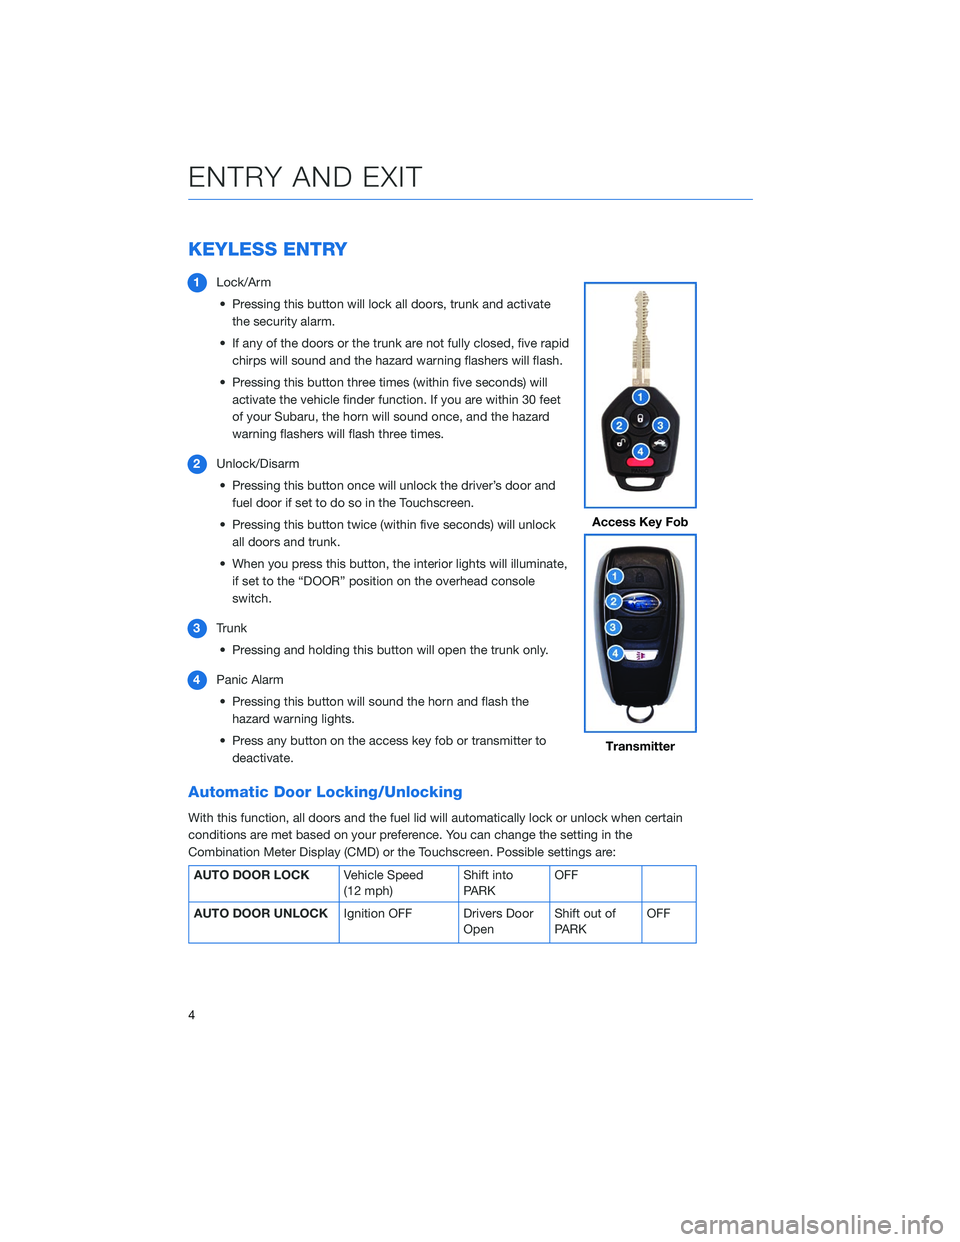
1Lock/Arm
• Pressing this button will lock all doors, trunk and activate the security alarm.
• If any of the doors or the trunk are not fully closed, five rapid chirps will sound and the hazard warning flashers will flash.
• Pressing this button three times (within five seconds) will activate the vehicle finder function. If you are within 30 feet
of your Subaru, the horn will sound once, and the hazard
warning flashers will flash three times.
2 Unlock/Disarm
• Pressing this button once will unlock the driver’s door and fuel door if set to do so in the Touchscreen.
• Pressing this button twice (within five seconds) will unlock all doors and trunk.
• When you press this button, the interior lights will illuminate, if set to the “DOOR” position on the overhead console
switch.
3 Trunk
• Pressing and holding this button will open the trunk only.
4 Panic Alarm
• Pressing this button will sound the horn and flash the hazard warning lights.
• Press any button on the access key fob or transmitter to deactivate.
Automatic Door Locking/Unlocking
With this function, all doors and the fuel lid will automatically lock or unlock when certain
conditions are met based on your preference. You can change the setting in the
Combination Meter Display (CMD) or the Touchscreen. Possible settings are:
AUTO DOOR LOCK Vehicle Speed
(12 mph)Shift into
PARKOFF
AUTO DOOR UNLOCK Ignition OFF Drivers Door
OpenShift out of
PARK OFF
Access Key Fob
Transmitter
ENTRY AND EXIT
4
Page 7 of 124
KEYLESS ACCESS WITH PUSH BUTTON START(if
equipped)
Your Subaru allows for customizing of the door unlock settings. The default setting is when
you unlock the vehicle, only the driver’s door unlocks. If preferred, you can set the vehicle
to unlock all doors and the trunk. This adjustment can be performed through the
Touchscreen under "Setting", “Car” then "Drivers Door Unlock".
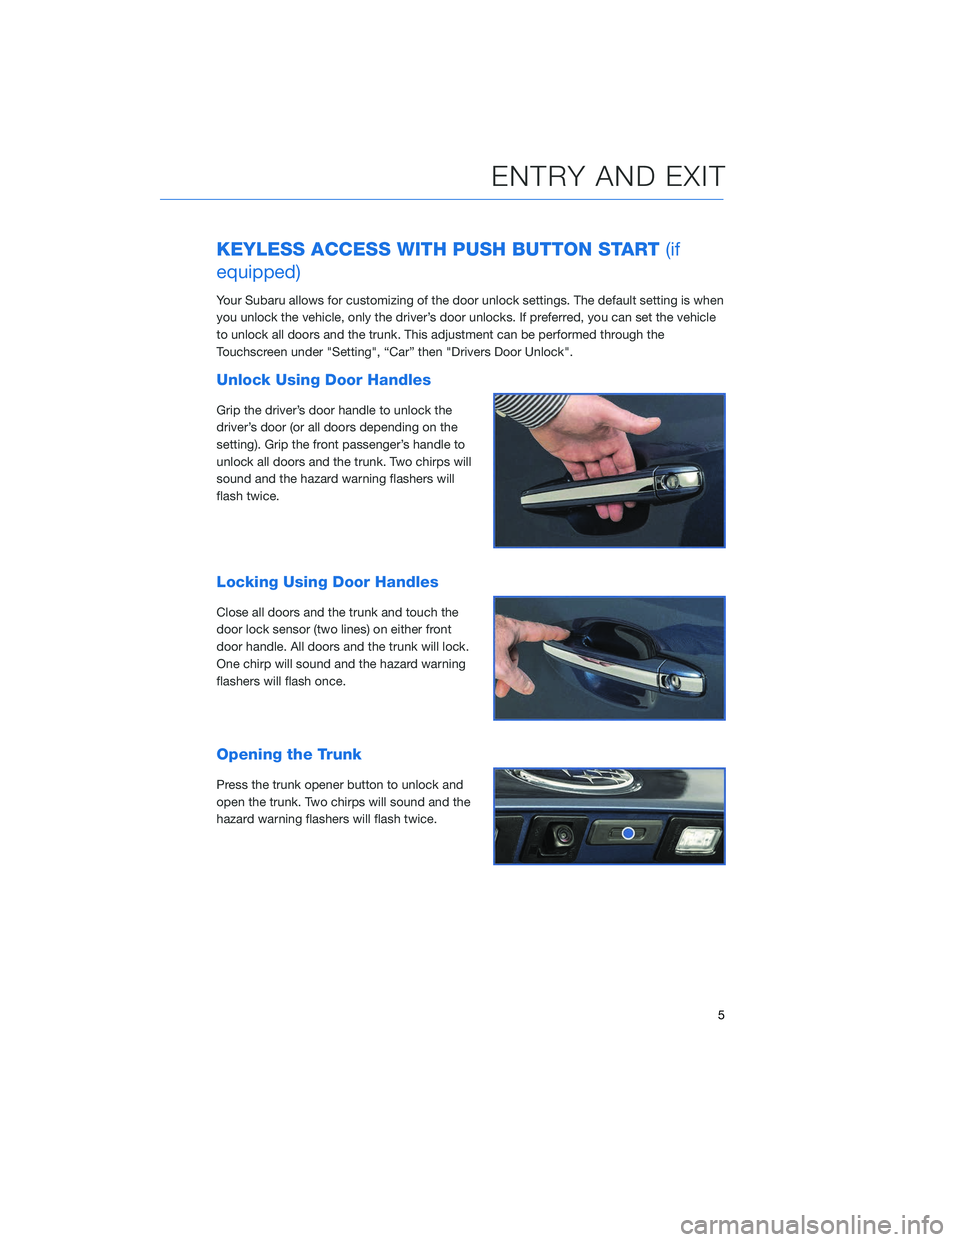
Unlock Using Door Handles
Grip the driver’s door handle to unlock the
driver’s door (or all doors depending on the
setting). Grip the front passenger’s handle to
unlock all doors and the trunk. Two chirps will
sound and the hazard warning flashers will
flash twice.
Locking Using Door Handles
Close all doors and the trunk and touch the
door lock sensor (two lines) on either front
door handle. All doors and the trunk will lock.
One chirp will sound and the hazard warning
flashers will flash once.
Opening the Trunk
Press the trunk opener button to unlock and
open the trunk. Two chirps will sound and the
hazard warning flashers will flash twice.
ENTRY AND EXIT
5
Page 8 of 124
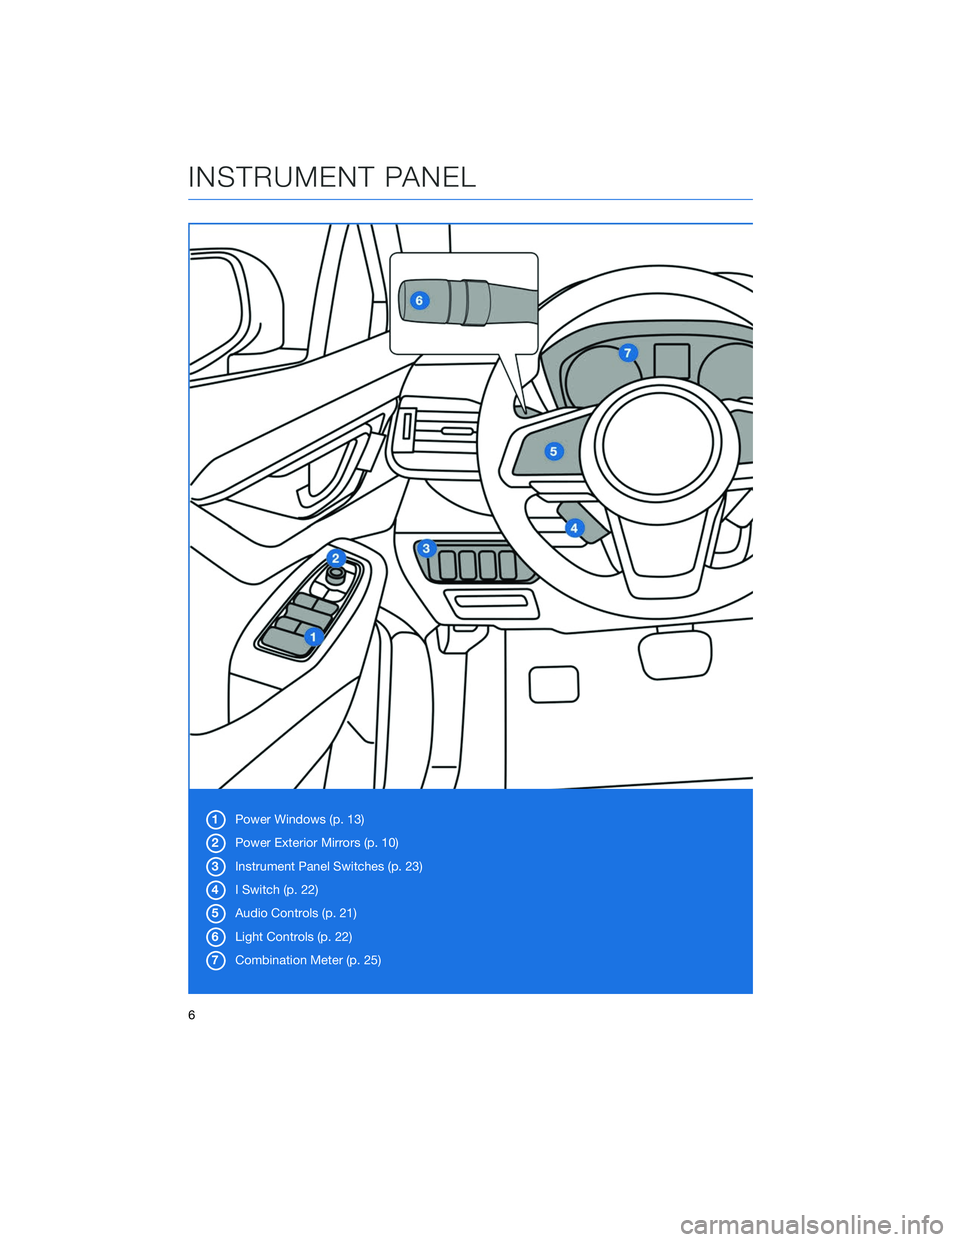
1Power Windows (p. 13)
2 Power Exterior Mirrors (p. 10)
3 Instrument Panel Switches (p. 23)
4 I Switch (p. 22)
5 Audio Controls (p. 21)
6 Light Controls (p. 22)
7 Combination Meter (p. 25)
INSTRUMENT PANEL
6
Page 9 of 124
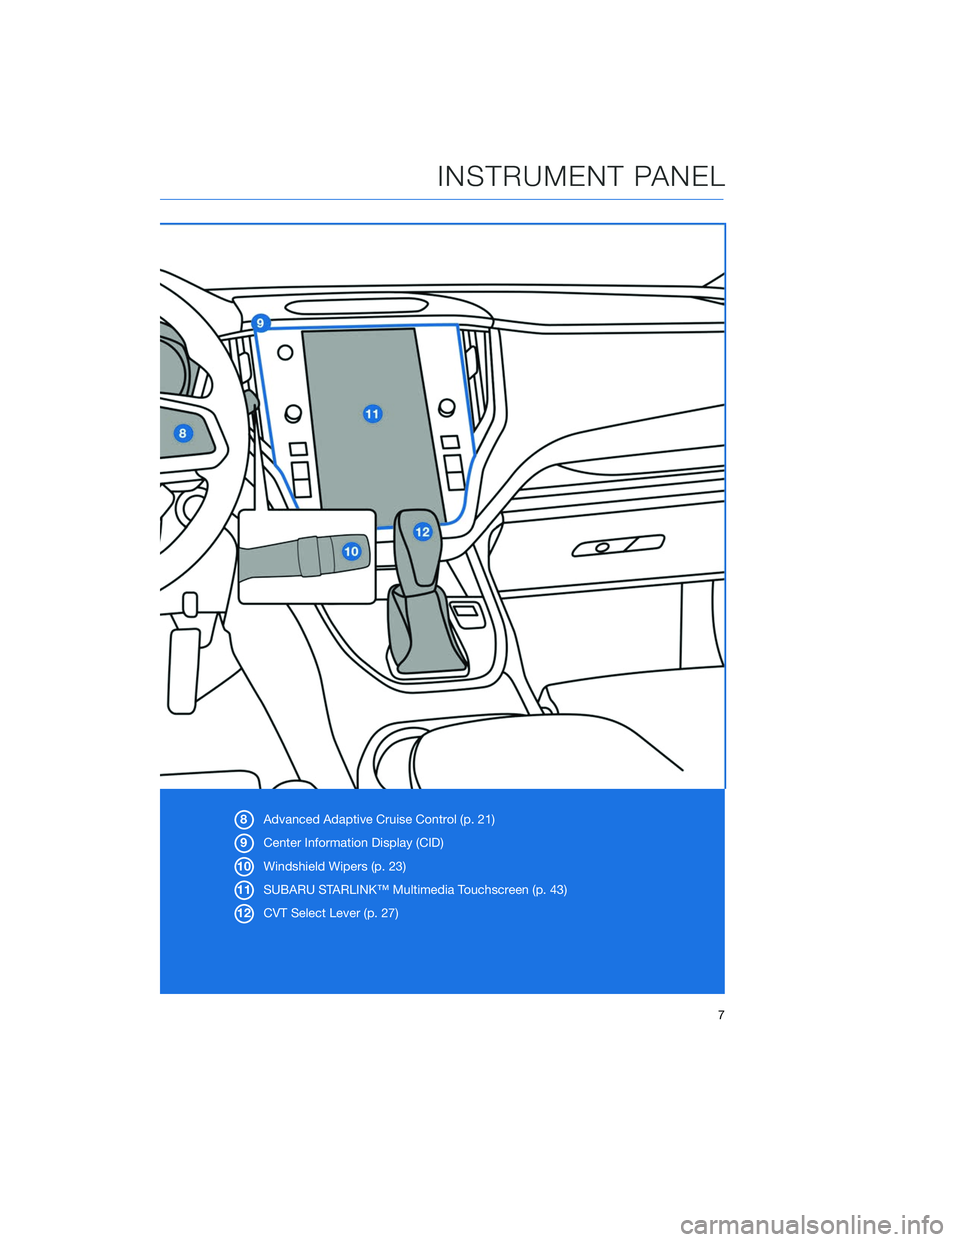
8Advanced Adaptive Cruise Control (p. 21)
9 Center Information Display (CID)
10 Windshield Wipers (p. 23)
11 SUBARU STARLINK™ Multimedia Touchscreen (p. 43)
12 CVT Select Lever (p. 27)
INSTRUMENT PANEL
7
Page 10 of 124
SEATING
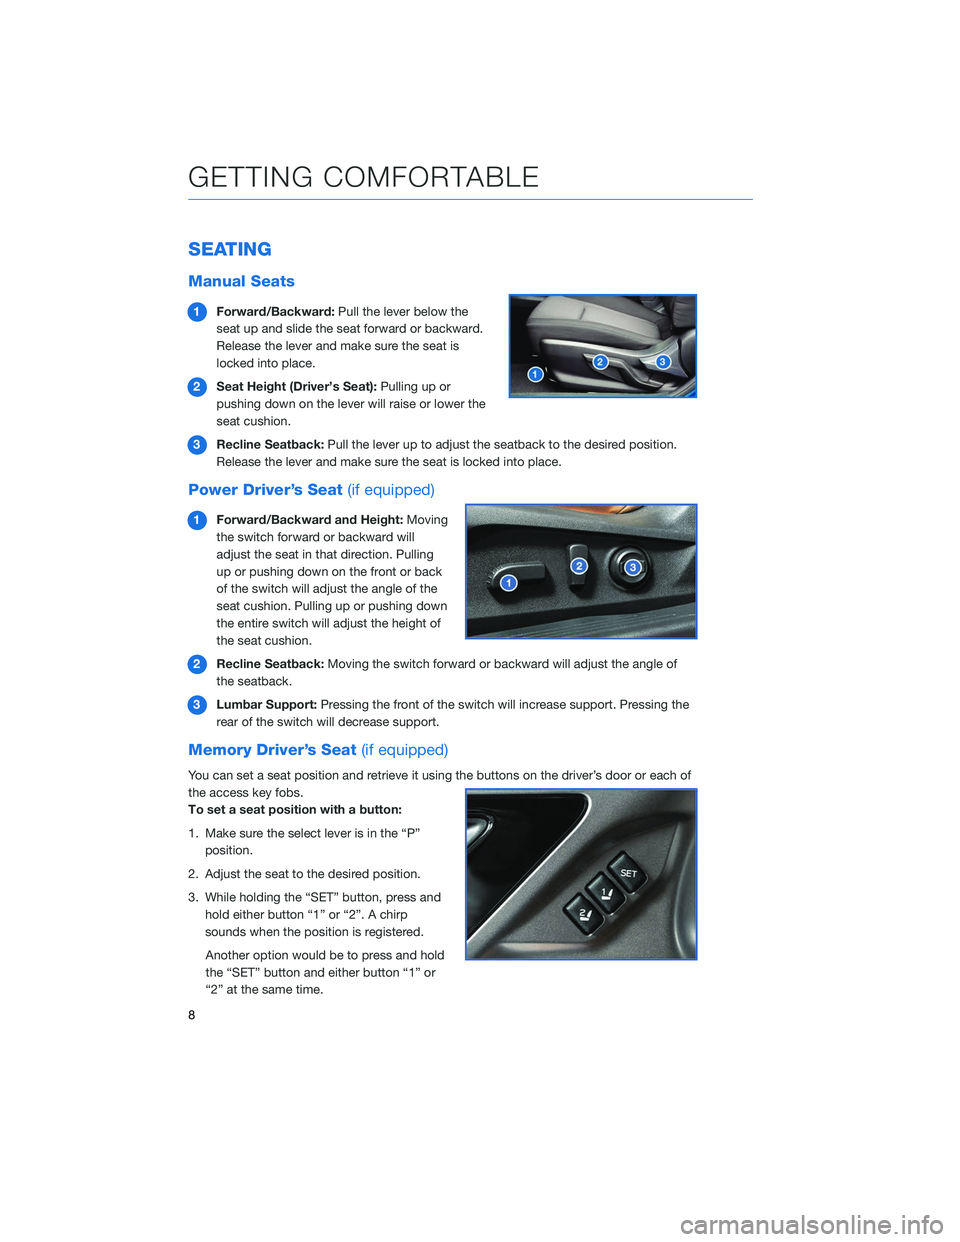
Manual Seats
1Forward/Backward: Pull the lever below the
seat up and slide the seat forward or backward.
Release the lever and make sure the seat is
locked into place.
2 Seat Height (Driver’s Seat): Pulling up or
pushing down on the lever will raise or lower the
seat cushion.
3 Recline Seatback: Pull the lever up to adjust the seatback to the desired position.
Release the lever and make sure the seat is locked into place.
Power Driver’s Seat (if equipped)
1Forward/Backward and Height: Moving
the switch forward or backward will
adjust the seat in that direction. Pulling
up or pushing down on the front or back
of the switch will adjust the angle of the
seat cushion. Pulling up or pushing down
the entire switch will adjust the height of
the seat cushion.
2 Recline Seatback: Moving the switch forward or backward will adjust the angle of
the seatback.
3 Lumbar Support: Pressing the front of the switch will increase support. Pressing the
rear of the switch will decrease support.
Memory Driver’s Seat (if equipped)
You can set a seat position and retrieve it using the buttons on the driver’s door or each of
the access key fobs.
To set a seat position with a button:
1. Make sure the select lever is in the “P”
position.
2. Adjust the seat to the desired position.
3. While holding the “SET” button, press and hold either button “1” or “2”. A chirp
sounds when the position is registered.
Another option would be to press and hold
the “SET” button and either button “1” or
“2” at the same time.
GETTING COMFORTABLE
8