brake light SUBARU OUTBACK 2005 4.G User Guide
[x] Cancel search | Manufacturer: SUBARU, Model Year: 2005, Model line: OUTBACK, Model: SUBARU OUTBACK 2005 4.GPages: 627, PDF Size: 6.42 MB
Page 335 of 627
6-18
Interior equipment
To use the cigarette lighter, push in the knob and wait
a few moments. It will automatically spring up when
ready for use.
To avoid being burned, never grasp the lighter
by the end with the heating element. Doing so
could result in injury and could also damage
the heating element.
Do not hold the lighter pushed in, because it
will overheat.
! Using as an accessory power outlet
Electrical power (12V DC) from the battery is available
at the socket when the ignition switch is either in the
“ACC” or “ON” position.
If you use the socket as an accessory power outlet,
take the following precautions.
When the socket is not in use, always put the cap on
the socket to prevent any foreign object from enteringit.
" Use only in-car use electrical appliances
which are designed for 12V DC and which con-
sume less than 120W. Overloading the socket
can cause a short circuit. Do not use double
adapters or more than one electrical appliance. " If the plug on your electric appliance is either
too loose or too tight for the socket, this can re-
sult in a poor contact or cause the plug to get
stuck. Only use plugs that fit properly. " Use of an electric appliance in the socket for
a long period of time while the engine is not
running can cause battery discharge. " Before driving your vehicle, make sure that
the plug and the cord on your electrical appli-
ance will not interfere with your shifting gears
and operating the accelerator and brake pedals.
If they do, do not use the electrical appliance
while driving.
If the socket has been used for electrical appliances,
damage may have been done to the internal mecha-
nism that causes a cigarette lighter to “pop out” after
its element has been heated. For that reason, a ciga-
rette lighter, even if it is a genuine part, should not be
Page 356 of 627
7-1
7
Starting and operating
Fuel ................................................................ 7-2 Fuel requirements ............................................. 7-2
Fuel filler lid and cap ........................................ 7-4
State emission testing (U.S. only) ............... 7-8
Preparing to drive ......................................... 7-10
Starting the engine ....................................... 7-10 Manual transmission vehicle ........................... 7-10
Automatic transmission vehicle ...................... 7-11
Stopping the engine ..................................... 7-12
Manual transmission .................................... 7-13 Shifting speeds ................................................. 7-14
Driving tips ........................................................ 7-15
Automatic transmission – 4 speed ............. 7-16 Selector lever .................................................... 7-17
Selector lever reverse inhibiting function ...... 7-19
Selection of manual mode ............................... 7-20
Maximum speeds .............................................. 7-21
Driving tips ........................................................ 7-23
SPORT mode ..................................................... 7-23
Shift lock release .............................................. 7-24
Automatic transmission – 5 speed ............. 7-25 Selector lever .................................................... 7-26
Selector lever reverse inhibiting function ...... 7-28
Selection of manual mode ............................... 7-30
Maximum speeds .............................................. 7-32
Driving tips ........................................................ 7-33
SPORT mode ..................................................... 7-34
Shift lock release .............................................. 7-35
Rear viscous limited slip differential (LSD) (if equipped) .............................................. 7-36 Power steering .............................................. 7-36
Braking ........................................................... 7-37
Braking tips ....................................................... 7-37
Brake system .................................................... 7-37
Disc brake pad wear warning indicators ........ 7-38
ABS (Anti-lock Brake System) ..................... 7-38 ABS system self-check .................................... 7-39
ABS warning light ............................................. 7-39
Electronic Brake Force Distribution (EBD) system ........................................................ 7-41Steps to take if EBD system fails .................... 7-41
Vehicle Dynamics Control system (if equipped) ............................................... 7-43Vehicle Dynamics Control system monitor .... 7-45
Vehicle Dynamics Control OFF switch ........... 7-48
Tire pressure monitoring system (TPMS) (if equipped) ............................................... 7-49
Parking your vehicle ..................................... 7-51
Cruise control ................................................ 7-53 To set cruise control ........................................ 7-53
To temporarily cancel the cruise control ....... 7-55
To turn off the cruise control ........................... 7-56
To change the cruising speed ......................... 7-56
Cruise control indicator light ........................... 7-57
Cruise control set indicator light .................... 7-58
Page 365 of 627
7-10
Starting and operating
Preparing to drive
You should perform the following checks and adjust-
ments every day before you start driving.
1. Check that all windows, mirrors, and lights are
clean and unobstructed.
2. Check the appearance and condition of the tires.
Also check tires for proper inflation.
3. Look under the vehicle for any sign of leaks.
4. Check that the hood, trunk and rear gate are fullyclosed.
5. Check the adjustment of the seat.
6. Check the adjustment of the inside and outside mir-rors.
7. Fasten your seatbelt. Check that your passengers
have fastened their seatbelts.
8. Check the operation of the warning and indicator
lights when the ignition switch is turned to the “ON” po- sition.
9. Check the gauges, indicator and warning lights af-
ter starting the engine.
NOTE
Engine oil, engine coolant, brake fluid, washer flu-
id and other fluid levels should be checked daily,
weekly or at fuel stops.
Starting the engine
Do not operate the starter motor continuously
for more than ten seconds. If the engine fails to
start after operating the starter for five to ten
seconds, wait for ten seconds or more before
trying again.
! Manual transmission vehicle
1. Apply the parking brake.
2. Turn off unnecessary lights and accessories.
3. Press the clutch pedal to the floor and shift the shift
lever into neutral.
Hold the clutch pedal to the floor while starting the en-
gine. The starter motor will only operate when the
clutch pedal is pressed fully to the floor.
4. Turn the ignition switch to the “ON” position and
check the operation of the warning and indicator lights.
Refer to the “Warning and indicator lights” section
(chapter 3).
5. Turn the ignition switch to the “START” position
without depressing the accelerator pedal. Release
the key immediately after the engine has started.
Page 366 of 627
7-11
Starting and operating
– CONTINUED –
If the engine does not start, try the following:
1) Turn the ignition switch to the “OFF” position and
wait for at least 10 seconds. After checking that the
parking brake is firmly set, turn the ignition switch to
the “START” position while depressing the acceler-
ator pedal slightly (about a quarter of the full stroke).
Release the accelerator pedal as soon as the en-
gine starts.
2) If this fails to start the engine, turn the ignition
switch back to the “OFF” position and wait for at
least 10 seconds. Then fully depress the accelerator
pedal and turn the ignition switch to the “START”
position. If the engine starts, quickly release the ac-
celerator pedal.
3) If this fails to start the engine, turn the ignition
switch again to the “OFF” position. After waiting for
10 seconds or longer, turn the ignition switch to the
“START” position without depressing the accelera-
tor pedal.
4) If the engine still refuses to start, contact your
nearest SUBARU dealer for assistance.
6. Confirm that all warning and indicator lights have
gone off after the engine has started. The fuel injection
system automatically lowers the idle speed as the en-
gine warms up. !
Automatic transmission vehicle
If you restart the engine while the vehicle is
moving, shift the selector lever into the “N” po-
sition. Do not attempt to place the selector lever
of a moving vehicle into the “P” position.
1. Apply the parking brake.
2. Turn off unnecessary lights and accessories.
3. Shift the selector lever to the “P” or “N” position
(preferably “P” position). The starter will only operate
when the select lever is at the “P” or “N” position.
4. Turn the ignition switch to the “ON” position and
check the operation of the warning and indicator lights.
Refer to the “Warning and indicator lights” section (chapter 3).
5. Turn the ignition switch to the “START” position
without depressing the accelerator pedal. Release
the key immediately after the engine has started.
If the engine does not start, try the following: 1) Turn the ignition switch to the “OFF” position and
wait for at least 10 seconds. After checking that the
parking brake is firmly set, turn the ignition switch to
the “START” position while depressing the acceler-
ator pedal slightly (about a quarter of the full stroke).
Page 367 of 627
7-12
Starting and operating
Release the accelerator pedal as soon as the en-
gine starts.
2) If this fails to start the engine, turn the ignition
switch back to the “OFF” position and wait for at
least 10 seconds. Then fully depress the accelerator
pedal and turn the ignition switch to the “START”
position. If the engine starts, quickly release the ac-
celerator pedal.
3) If this fails to start the engine, turn the ignition
switch again to the “OFF” position. After waiting for
10 seconds or longer, turn the ignition switch to the
“START” position without depressing the accelera-
tor pedal.
4) If the engine still refuses to start, contact your
nearest SUBARU dealer for assistance.
6. Confirm that all warning and indicator lights have
gone out after the engine has started. The fuel injec-
tion system automatically lowers the idle speed as the
engine warms up.
While the engine is warming up, make sure that the
selector lever is at the “P” or “N” position and that the
parking brake is applied.Stopping the engine
Do not stop the engine when the vehicle is mov-
ing. This will cause loss of power to the power
steering and the brake booster, making steer-
ing and braking more difficult. It could also re-
sult in accidental activation of the “LOCK” po-
sition on the ignition switch, causing the steer-
ing wheel to lock.
The ignition switch should be turned off only when the
engine is idling.
Page 370 of 627
7-15
Starting and operating
– CONTINUED –
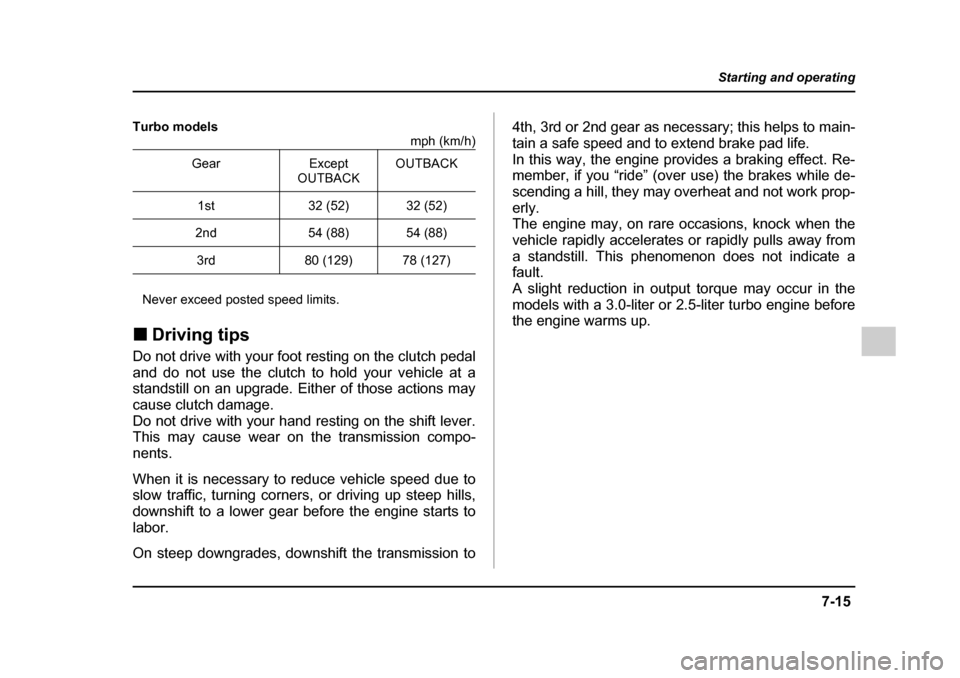
Turbo models
mph (km/h)
Never exceed posted speed limits.
! Driving tips
Do not drive with your foot resting on the clutch pedal
and do not use the clutch to hold your vehicle at a
standstill on an upgrade. Either of those actions may
cause clutch damage.
Do not drive with your hand resting on the shift lever.
This may cause wear on the transmission compo-
nents.
When it is necessary to reduce vehicle speed due to
slow traffic, turning corners, or driving up steep hills,
downshift to a lower gear before the engine starts to
labor.
On steep downgrades, downshift the transmission to 4th, 3rd or 2nd gear as necessary; this helps to main-
tain a safe speed and to extend brake pad life.
In this way, the engine provides a braking effect. Re-
member, if you “ride” (over use) the brakes while de-
scending a hill, they may overheat and not work prop-erly.
The engine may, on rare occasions, knock when the
vehicle rapidly accelerates or rapidly pulls away from
a standstill. This phenomenon does not indicate a
fault.
A slight reduction in output torque may occur in the
models with a 3.0-liter or 2.5-liter turbo engine before
the engine warms up.
Gear Except
OUTBACKOUTBACK
1st 32 (52) 32 (52)
2nd 54 (88) 54 (88)
3rd 80 (129) 78 (127)
Page 372 of 627
7-17
Starting and operating
– CONTINUED –
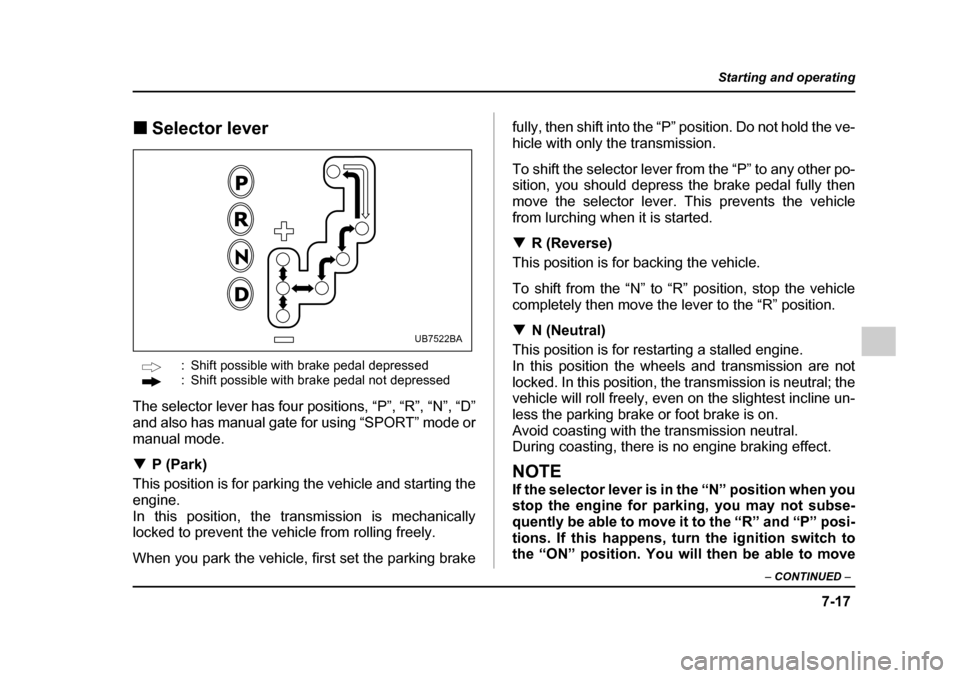
!Selector lever
: Shift possible with brake pedal depressed
: Shift possible with brake pedal not depressed
The selector lever has four positions, “P”, “R”, “N”, “D”
and also has manual gate for using “SPORT” mode or
manual mode. ! P (Park)
This position is for parking the vehicle and starting the
engine.
In this position, the transmission is mechanically
locked to prevent the vehicle from rolling freely.
When you park the vehicle, first set the parking brake fully, then shift into the “P” position. Do not hold the ve-
hicle with only the transmission.
To shift the selector lever from the “P” to any other po-
sition, you should depress the brake pedal fully then
move the selector lever. This prevents the vehicle
from lurching when it is started. !
R (Reverse)
This position is for backing the vehicle.
To shift from the “N” to “R” position, stop the vehicle
completely then move the lever to the “R” position. ! N (Neutral)
This position is for restarting a stalled engine.
In this position the wheels and transmission are not
locked. In this position, the transmission is neutral; the
vehicle will roll freely, even on the slightest incline un-
less the parking brake or foot brake is on.
Avoid coasting with the transmission neutral.
During coasting, there is no engine braking effect.
NOTE
If the selector lever is in the “N” position when you
stop the engine for parking, you may not subse-
quently be able to move it to the “R” and “P” posi-tions. If this happens, turn the ignition switch to
the “ON” position. You will then be able to move
UB7522BA
Page 379 of 627
7-24
Starting and operating
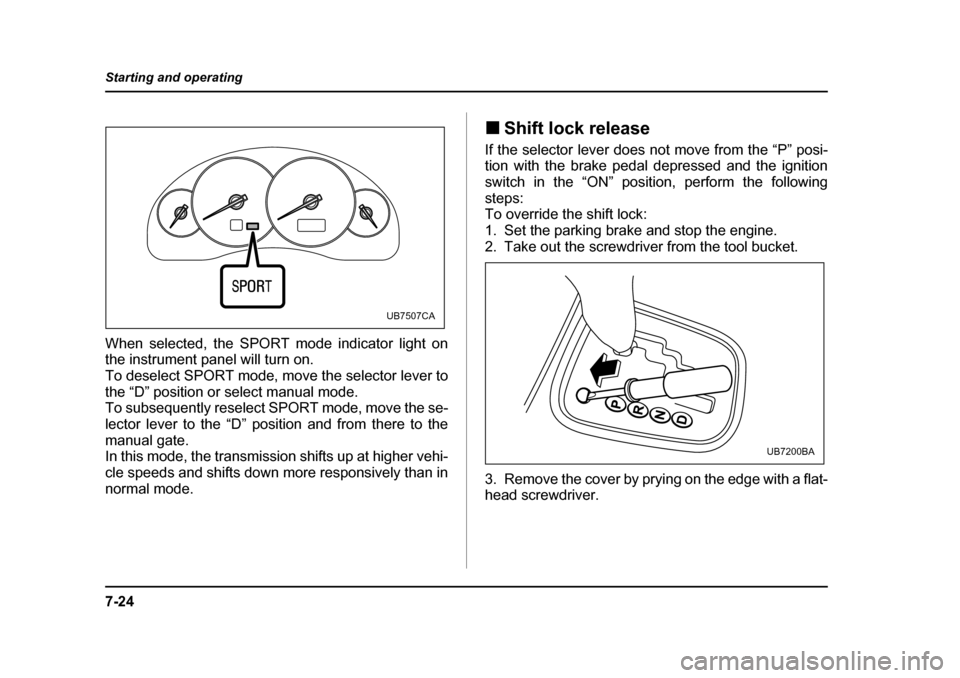
When selected, the SPORT mode indicator light on
the instrument panel will turn on.
To deselect SPORT mode, move the selector lever to
the “D” position or select manual mode.
To subsequently reselect SPORT mode, move the se-
lector lever to the “D” position and from there to the
manual gate.
In this mode, the transmission shifts up at higher vehi-
cle speeds and shifts down more responsively than in
normal mode.
!
Shift lock release
If the selector lever does not move from the “P” posi-
tion with the brake pedal depressed and the ignition
switch in the “ON” position, perform the followingsteps:
To override the shift lock:
1. Set the parking brake and stop the engine.
2. Take out the screwdriver from the tool bucket.
3. Remove the cover by prying on the edge with a flat-
head screwdriver.
UB7507CA
UB7200BA
Page 382 of 627
7-27
Starting and operating
– CONTINUED –
fully, then shift into the “P” position. Do not hold the ve-
hicle with only the transmission.
To shift the selector lever from the “P” to any other po-
sition, you should depress the brake pedal fully then
move the selector lever. This prevents the vehicle
from lurching when it is started.
NOTE (3.0-liter models only)
To protect the engine while the “P” position is se-
lected, the engine is controlled such that the en-
gine speed does not become too high even if the
accelerator pedal is pressed hard. !R (Reverse)
This position is for backing the vehicle.
To shift from the “N” to “R” position, stop the vehicle
completely then move the lever to the “R” position. ! N (Neutral)
This position is for restarting a stalled engine.
In this position the wheels and transmission are not
locked. In this position, the transmission is neutral; the
vehicle will roll freely, even on the slightest incline un-
less the parking brake or foot brake is on.
Avoid coasting with the transmission neutral.
During coasting, there is no engine braking effect.
NOTE (3.0-liter models only)
To protect the engine while the “N” position is se-
lected, the engine is controlled such that the en-
gine speed does not become too high even if the
accelerator pedal is pressed hard.
NOTE
If the selector lever is in the “N” position when you
stop the engine for parking, you may not subse-
quently be able to move it to the “R” and “P” posi-tions. If this happens, turn the ignition switch to
the “ON” position. You will then be able to move
the selector lever to the “P” position.
Do not drive the vehicle with the selector lever
in the “N” (neutral) position. Engine braking
has no effect in this condition and the risk of an
accident is consequently increased.
! D (Drive)
This position is for normal driving.
The transmission automatically shifts into a suitable
gear from 1st to 5th according to the vehicle speed
and the acceleration you require.
Page 392 of 627

7-37
Starting and operating
– CONTINUED –
Braking !Braking tips
Never rest your foot on the brake pedal while
driving. This can cause dangerous overheating
of the brakes and needless wear on the brake
pads and linings.
! When the brakes get wet
When driving in rain or after washing the vehicle, the
brakes may get wet. As a result, brake stopping dis-
tance will be longer. To dry the brakes, drive the vehi-
cle at a safe speed while lightly depressing the brake
pedal to heat up the brakes. ! Use of engine braking
Remember to make use of engine braking in addition
to foot braking. When descending a grade, if only the
foot brake is used, the brakes may start working im-
properly because of brake fluid overheating, caused
by overheated brake pads. To help prevent this, shift
into a lower gear to get stronger engine braking. !
Braking when a tire is punctured
Do not depress the brake pedal suddenly when a tire
is punctured. This could cause a loss of control of the
vehicle. Keep driving straight ahead while gradually
reducing speed. Then slowly pull off the road to a safe
place. ! Brake system
! Two separate circuits
Your vehicle has a dual circuit brake system. Each cir-
cuit works diagonally across the vehicle. If one circuit
of the brake system should fail, the other half of the
system still works. If one circuit fails, the brake pedal
will go down much closer to the floor than usual and
you will need to press it down much harder. And a
much longer distance will be needed to stop the vehi- cle. ! Brake booster
The brake booster uses engine manifold vacuum to
assist braking force. Do not turn off the engine while
driving because that will turn off the brake booster, re-
sulting in poor braking power.
The brakes will continue to work even when the brake
booster completely stops functioning. If this happens,
however, you will have to push the pedal much harder