SUBARU OUTBACK 2005 4.G Owners Manual
Manufacturer: SUBARU, Model Year: 2005, Model line: OUTBACK, Model: SUBARU OUTBACK 2005 4.GPages: 627, PDF Size: 6.42 MB
Page 551 of 627
11 - 5 2
Maintenance and service
it difficult to steer the vehicle in a straight line, one
of the tires and/or wheels may be damaged. Drive
slowly to the nearest authorized SUBARU dealer
and have the vehicle inspected. !
Tire pressures and wear
Maintaining the correct tire pressures helps to maxi-
mize the tires’ service lives and is essential for good
running performance. Check and, if necessary, adjust
the pressure of each tire (including the spare) at least
once a month (for example, during a fuel stop) and be-
fore any long journey.
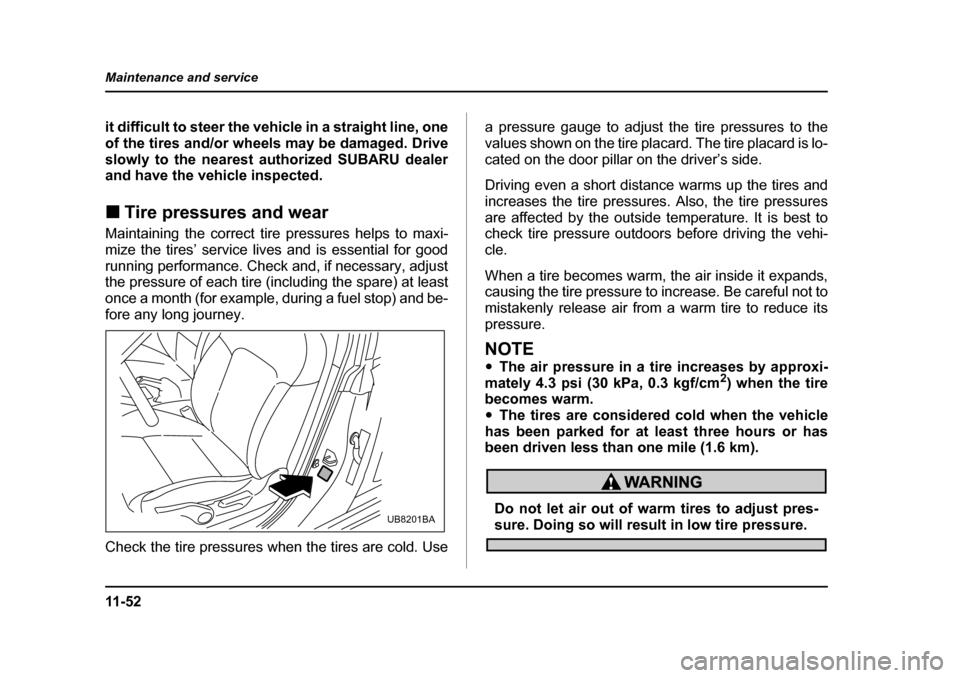
Check the tire pressures when the tires are cold. Use a pressure gauge to adjust the tire pressures to the
values shown on the tire placard. The tire placard is lo-
cated on the door pillar on the driver’s side.
Driving even a short distance warms up the tires and
increases the tire pressures. Also, the tire pressures
are affected by the outside temperature. It is best to
check tire pressure outdoors before driving the vehi- cle.
When a tire becomes warm, the air inside it expands,
causing the tire pressure to increase. Be careful not to
mistakenly release air from a warm tire to reduce itspressure.
NOTE "
The air pressure in a tire increases by approxi-
mately 4.3 psi (30 kPa, 0.3 kgf/cm 2
) when the tire
becomes warm. " The tires are considered cold when the vehicle
has been parked for at least three hours or has
been driven less than one mile (1.6 km).
Do not let air out of warm tires to adjust pres-sure. Doing so will result in low tire pressure.UB8201BA
Page 552 of 627
11 -5 3
Maintenance and service
– CONTINUED –
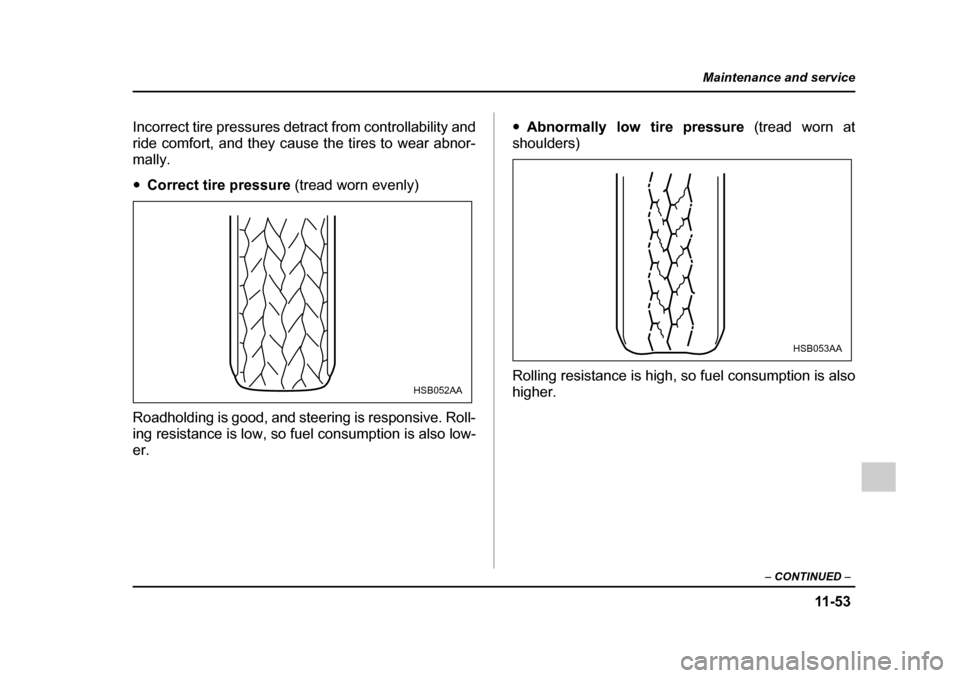
Incorrect tire pressures detract from controllability and
ride comfort, and they cause the tires to wear abnor-
mally. "Correct tire pressure (tread worn evenly)
Roadholding is good, and steering is responsive. Roll-
ing resistance is low, so fuel consumption is also low-er. "
Abnormally low tire pressure (tread worn at
shoulders)
Rolling resistance is high, so fuel consumption is also
higher.
HSB052AA
HSB053AA
Page 553 of 627
11 - 5 4
Maintenance and service
"
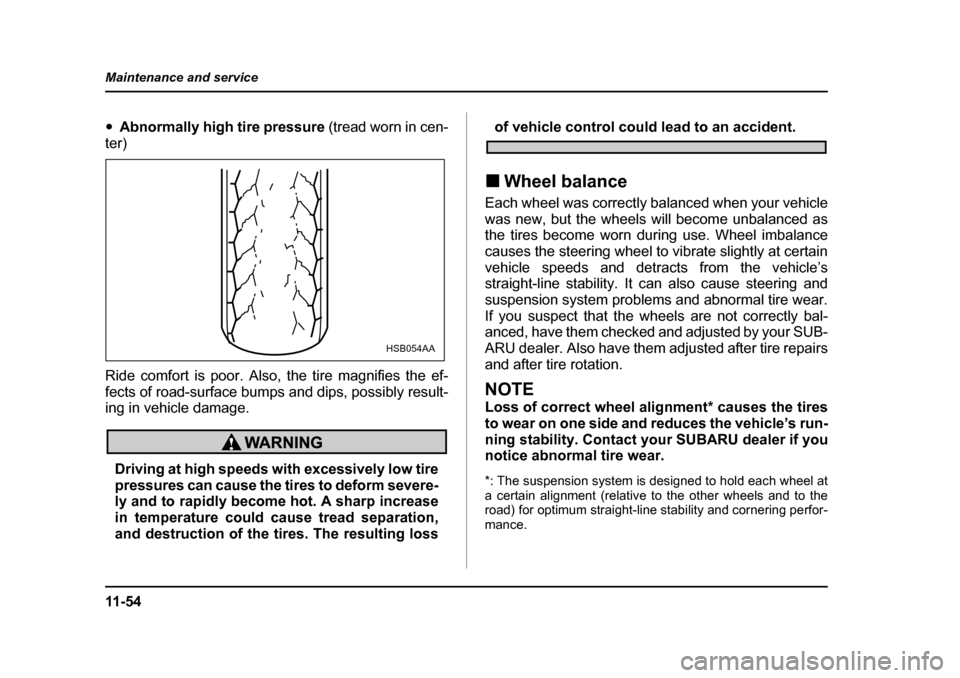
Abnormally high tire pressure (tread worn in cen-
ter)
Ride comfort is poor. Also, the tire magnifies the ef-
fects of road-surface bumps and dips, possibly result-
ing in vehicle damage.
Driving at high speeds with excessively low tire
pressures can cause the tires to deform severe-
ly and to rapidly become hot. A sharp increase
in temperature could cause tread separation,
and destruction of the tires. The resulting loss
of vehicle control could lead to an accident.
! Wheel balance
Each wheel was correctly balanced when your vehicle
was new, but the wheels will become unbalanced as
the tires become worn during use. Wheel imbalance
causes the steering wheel to vibrate slightly at certain
vehicle speeds and detracts from the vehicle’s
straight-line stability. It can also cause steering and
suspension system problems and abnormal tire wear.
If you suspect that the wheels are not correctly bal-
anced, have them checked and adjusted by your SUB-
ARU dealer. Also have them adjusted after tire repairs
and after tire rotation.
NOTE
Loss of correct wheel alignment* causes the tires
to wear on one side and reduces the vehicle’s run-
ning stability. Contact your SUBARU dealer if you
notice abnormal tire wear.
*: The suspension system is designed to hold each wheel at
a certain alignment (relative to the other wheels and to the
road) for optimum straight-line stability and cornering perfor-
mance.
HSB054AA
Page 554 of 627
11 -5 5
Maintenance and service
– CONTINUED –
!Wear indicators
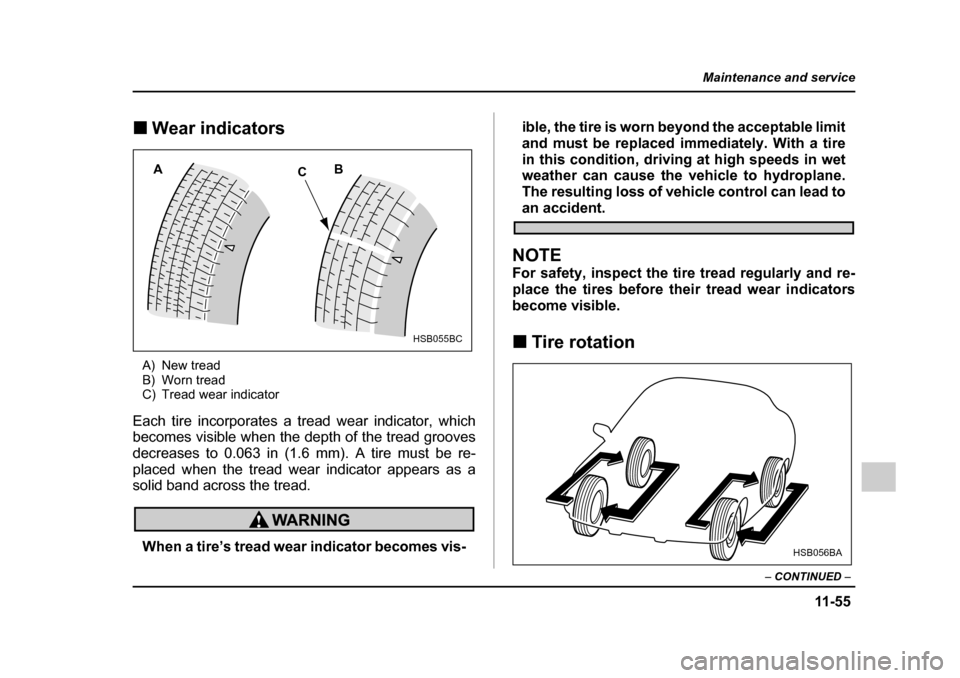
A) New tread
B) Worn tread
C) Tread wear indicator
Each tire incorporates a tread wear indicator, which
becomes visible when the depth of the tread grooves
decreases to 0.063 in (1.6 mm). A tire must be re-
placed when the tread wear indicator appears as a
solid band across the tread.
When a tire’s tread wear indicator becomes vis- ible, the tire is worn beyond the acceptable limit
and must be replaced immediately. With a tire
in this condition, driving at high speeds in wet
weather can cause the vehicle to hydroplane.
The resulting loss of vehicle control can lead to
an accident.
NOTE
For safety, inspect the tire tread regularly and re-
place the tires before their tread wear indicators
become visible. !
Tire rotation
A
CB
HSB055BC
HSB056BA
Page 555 of 627
11 - 5 6
Maintenance and service
Tire wear varies from wheel to wheel. To maximize the
life of each tire and ensure that the tires wear uniform-
ly, it is best to rotate the tires every 7,500 miles
(12,500 km). Rotating the tires involves switching the
front and rear tires on the right hand side of the vehicle
and similarly switching the front and rear tires on the
left hand side of the vehicle. (Each tire must be kept on
its original side of the vehicle.)
Replace any damaged or unevenly worn tire at the
time of rotation. After tire rotation, adjust the tire pres-
sures and make sure the wheel nuts are correctly
tightened.
After driving approximately 600 miles (1,000 km),
check the wheel nuts again and retighten any nut that
has become loose. !
Tire replacement
The wheels and tires are important and integral parts
of your vehicle’s design; they cannot be changed arbi-
trarily. The tires fitted as standard equipment are opti-
mally matched to the characteristics of the vehicle and
were selected to give the best possible combination of
running performance, ride comfort, and service life. It
is essential for every tire to have a size and construc-
tion matching those shown on the tire placard and to
have a speed symbol and load index matching those shown on the tire placard.
Using tires of a non-specified size detracts from con-
trollability, ride comfort, braking performance, speed-
ometer accuracy and odometer accuracy. It also cre-
ates incorrect body-to-tire clearances and inappropri-
ately changes the vehicle’s ground clearance.
All four tires must be the same in terms of manufactur-
er, brand (tread pattern), construction, and size. You
are advised to replace the tires with new ones that are
identical to those fitted as standard equipment.
For safe vehicle operation, SUBARU recommends re-
placing all four tires at the same time.
"
All four tires must be the same in terms of
manufacturer, brand (tread pattern), construc-
tion, degree of wear, speed symbol, load index
and size. Mixing tires of different types, sizes or
degrees of wear can result in damage to the ve-
hicle’s power train. Use of different types or siz-
es of tires can also dangerously reduce control-
lability and braking performance and can lead
to an accident. " Use only radial tires. Do not use radial tires
together with belted bias tires and/or bias-ply
Page 556 of 627
11 -5 7
Maintenance and service
– CONTINUED –
tires. Doing so can dangerously reduce control-
lability, resulting in an accident.
! Wheel replacement
When replacing wheels due, for example, to damage,
make sure the replacement wheels match the specifi-
cations of the wheels that are fitted as standard equip-
ment. Replacement wheels are available from SUBA-
RU dealers.
Use only those wheels that are specified for
your vehicle. Wheels not meeting specifica-
tions could interfere with brake caliper opera-
tion and may cause the tires to rub against the
wheel well housing during turns. The resulting
loss of vehicle control could lead to an acci-
dent.
Aluminum wheels
Aluminum wheels can be scratched and damaged
easily. Handle them carefully to maintain their appear-
ance, performance, and safety. " When any of the wheels is removed and replaced
for tire rotation or to change a flat, always check the
tightness of the wheel nuts after driving approximately
600 miles (1,000 km). If any nut is loose, tighten it to
the specified torque." Never apply oil to the threaded parts, wheel nuts, or
tapered surface of the wheel." Never let the wheel rub against sharp protrusions or
curbs. " Be sure to fit tire chains on uniformly and completely
around the tire, otherwise the chains may scratch the
wheel." When wheel nuts, balance weights, or the center
cap is replaced, be sure to replace them with genuine
SUBARU parts designed for aluminum wheels.
Page 557 of 627
11 - 5 8
Maintenance and service
Windshield washer fluid
Never use engine coolant as washer fluid be-
cause it could cause paint damage.
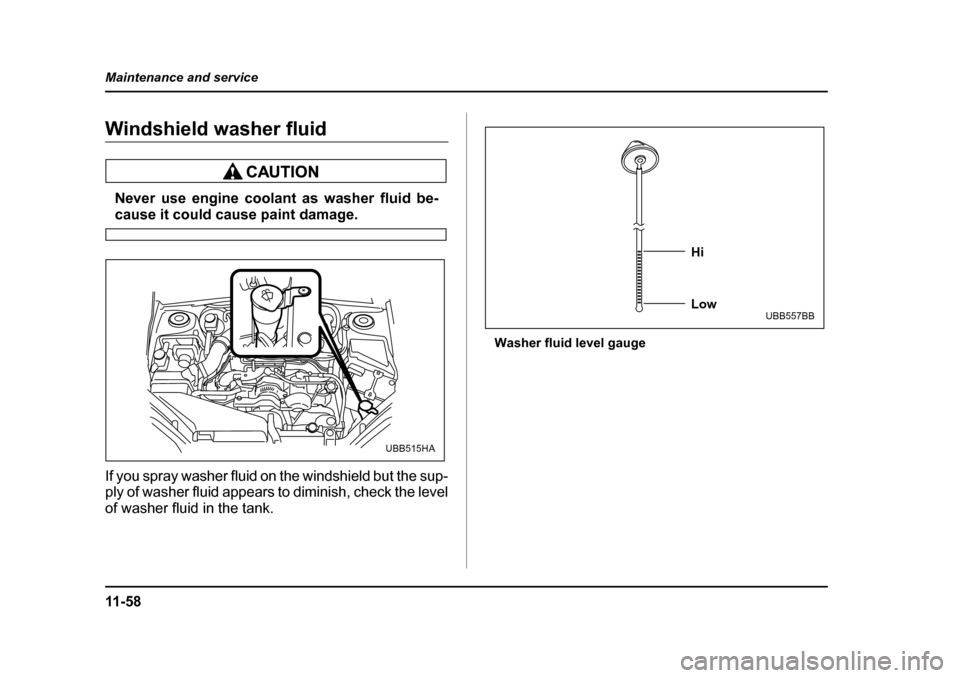
If you spray washer fluid on the windshield but the sup-
ply of washer fluid appears to diminish, check the level
of washer fluid in the tank. Washer fluid level gauge
UBB515HA
Hi Low
UBB557BB
Page 558 of 627
11 -5 9
Maintenance and service
– CONTINUED –
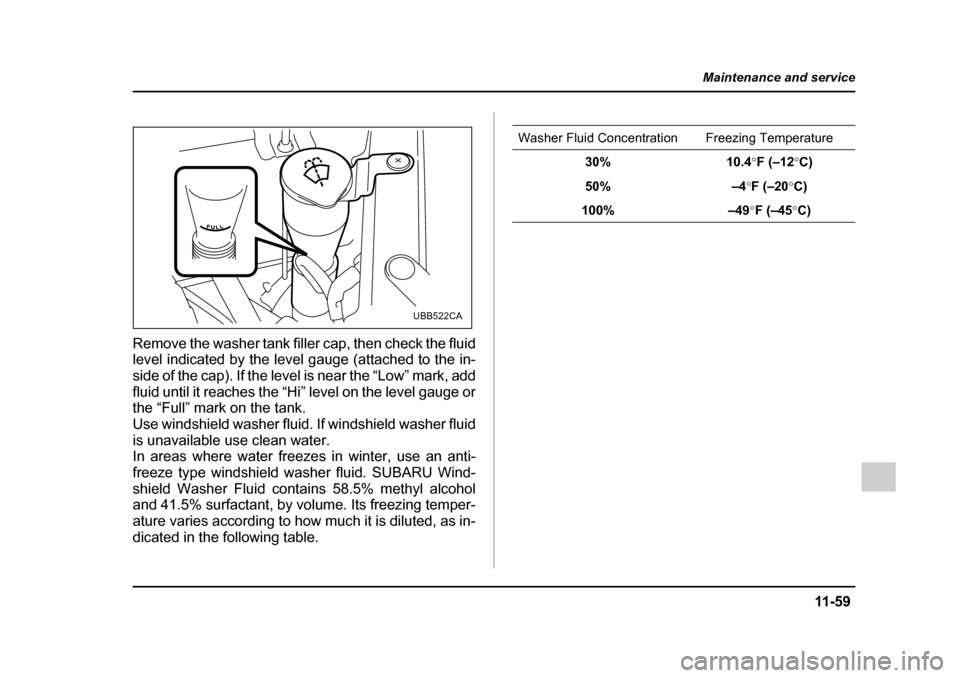
Remove the washer tank filler cap, then check the fluid
level indicated by the level gauge (attached to the in-
side of the cap). If the level is near the “Low” mark, add
fluid until it reaches the “Hi” level on the level gauge or
the “Full” mark on the tank.
Use windshield washer fluid. If windshield washer fluid
is unavailable use clean water.
In areas where water freezes in winter, use an anti-
freeze type windshield washer fluid. SUBARU Wind-
shield Washer Fluid contains 58.5% methyl alcohol
and 41.5% surfactant, by volume. Its freezing temper-
ature varies according to how much it is diluted, as in-
dicated in the following table.
UBB522CA
Washer Fluid Concentration Freezing Temperature
30% 10.4 °F (–12 °C)
50% –4 °F (–20 °C)
100% –49 °F (–45 °C)
Page 559 of 627
11 - 6 0
Maintenance and service
Replacement of wiper blades
Grease, wax, insects, or other materials on the wind-
shield or the wiper blade results in jerky wiper opera-
tion and streaking on the glass. If you cannot remove
the streaks after operating the windshield washer or if
the wiper operation is jerky, clean the outer surface of
the windshield (or rear window) and the wiper blades
using a sponge or soft cloth with a neutral detergent or
mild-abrasive cleaner. After cleaning, rinse the wind-
shield and wiper blades with clean water. The wind-
shield is clean if beads do not form when you rinse the
windshield with water.
"
Do not clean the wiper blades with gasoline
or a solvent, such as paint thinner or benzene.
This will cause deterioration of the wiper
blades. " When you wish to raise the passenger-side
wiper arm, first raise the driver-side wiper arm.
Otherwise, the passenger-side wiper assembly
and driver-side wiper assembly will touch each
other, possibly resulting in scratches." Return the passenger-side wiper arm to its
original position before returning the driver- side wiper arm to its original position. Other-
wise, the passenger-side wiper assembly and
driver-side wiper assembly will touch each oth-
er, possibly resulting in scratches.
If you cannot eliminate the streaking even after follow-
ing this method, replace the wiper blades using the fol-
lowing procedures: ! Windshield wiper blades assembly
1. Raise the windshield wiper arm on the driver’s side.
2. Next, raise the windshield wiper arm on the pas-
senger’s side.
Page 560 of 627
11 -6 1
Maintenance and service
– CONTINUED –
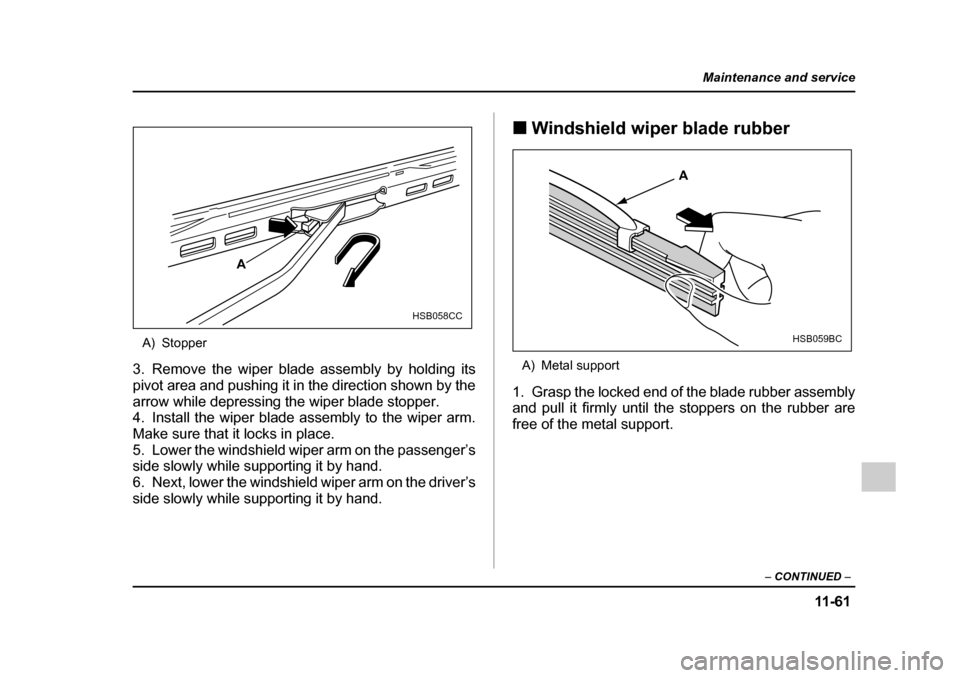
A) Stopper
3. Remove the wiper blade assembly by holding its
pivot area and pushing it in the direction shown by the
arrow while depressing the wiper blade stopper.
4. Install the wiper blade assembly to the wiper arm.
Make sure that it locks in place.
5. Lower the windshield wiper arm on the passenger’s
side slowly while supporting it by hand.
6. Next, lower the windshield wiper arm on the driver’s
side slowly while supporting it by hand. !
Windshield wiper blade rubber
A) Metal support
1. Grasp the locked end of the blade rubber assembly
and pull it firmly until the stoppers on the rubber are
free of the metal support.
A
HSB058CC
A
HSB059BC