SUBARU OUTBACK 2005 4.G Workshop Manual
Manufacturer: SUBARU, Model Year: 2005, Model line: OUTBACK, Model: SUBARU OUTBACK 2005 4.GPages: 627, PDF Size: 6.42 MB
Page 51 of 627
1-20
Seat, seatbelt and SRS airbags
seconds later (21 seconds after turning ON the ignition
switch), the warning lights will alternate between flash-
ing and steady illumination at 15-second intervals, and
the chime will sound while the warning light(s) is/are
flashing.
Alternate flashing and steady illumination of the warn-
ing lights and sounding of the chime will continue until
both driver and front passenger fasten their seatbelts.
NOTE "
If the driver and/or front passenger unfasten(s)
the seatbelt(s) after fastening, the seatbelt warn-
ing device operates as follows according to the
vehicle speed. "At speeds lower than approximately 9 mph (15
km/h)The warning light(s) for unfastened seatbelt(s)
will alternate between flashing and steady illu-
mination at 15-second intervals. The chime will
not sound. " At approximately 9 mph (15 km/h) or higher
speeds The warning light(s) for unfastened seatbelt(s)
will alternate between flashing and steady illu-
mination at 15-second intervals and the chime
will sound while the warning light(s) is/are flash-
ing.
" It is possible to cancel the warning operation that follows the 6-second warning after turning ON
the ignition switch by unfastening and refastening
the driver’s seatbelt. When the ignition switch is
turned ON next time, however, the complete se-
quence of warning operation resumes. For further
details about canceling the warning operation,
please contact your SUBARU dealer.
If there is no passenger on the front passenger’s seat,
the seatbelt warning device for front passenger’s seat
will be deactivated. The front passenger’s occupant
detection system monitors whether or not there is a
passenger on the front passenger’s seat.
Observe the following precautions. Failure to do so
may prevent the device from functioning correctly or
cause the device to fail. "
Do not install any accessory such as a table or TV
onto the seatback. " Do not store a heavy load in the seatback pocket.
" Do not allow the rear seat occupant to place his/her
hands or legs on the front passenger’s seatback, or al-
low him/her to pull the seatback. " Do not use front seats with their backward-forward
position and seatback not being locked into place se-
curely. If any of them are not locked securely, adjust
them again. For adjusting procedure, refer to the
“Manual seat” in the front seats section in Chapter 1 in
this owner’s manual. (Models equipped with manual
Page 52 of 627
1-21
Seat, seatbelt and SRS airbags
– CONTINUED –
seats only)
If the seatbelt warning device for front passenger’s
seat does not function correctly (e.g., it is activated
even when the front passenger’s seat is empty or it is
deactivated even when the front passenger has not
fastened his/her seatbelt), take the following actions. "Ensure that no article is placed on the seat other
than the child restraint system and the child occupant. " Ensure that there is no article left in the seatback
pocket." Ensure that the backward-forward position and
seatback of front passenger’s seat are locked into
place securely by moving the seat back and forth.
(Models equipped with manual seats only)
If still the seatbelt warning device for front passenger’s
seat does not function correctly after taking relevant
corrective actions described above, immediately con-
tact your SUBARU dealer for an inspection. ! Fastening the seatbelt
"Never use a belt that is twisted or reversed. In
an accident, this can increase the risk or sever-
ity of injury. "
Keep the lap belt as low as possible on your
hips. In a collision, this spreads the force of the
lap belt over stronger hip bones instead of
across the weaker abdomen. " Seatbelts provide maximum restraint when
the occupant sits well back and upright in the
seat. To reduce the risk of sliding under the
seatbelt in a collision, the front seatbacks
should be always used in the upright position
while the vehicle is running. If the front seat-
backs are not used in the upright position in a
collision, the risk of sliding under the lap belt
and of the lap belt sliding up over the abdomen
will increase, and both can result in serious in-
ternal injury or death. " Do not put cushions or any other materials
between occupants and seatbacks or seat
cushions. If you do so, the risk of sliding under
the lap belt and of the lap belt sliding up over
the abdomen will increase, and both can result
in serious internal injury or death.
Page 53 of 627
1-22
Seat, seatbelt and SRS airbags
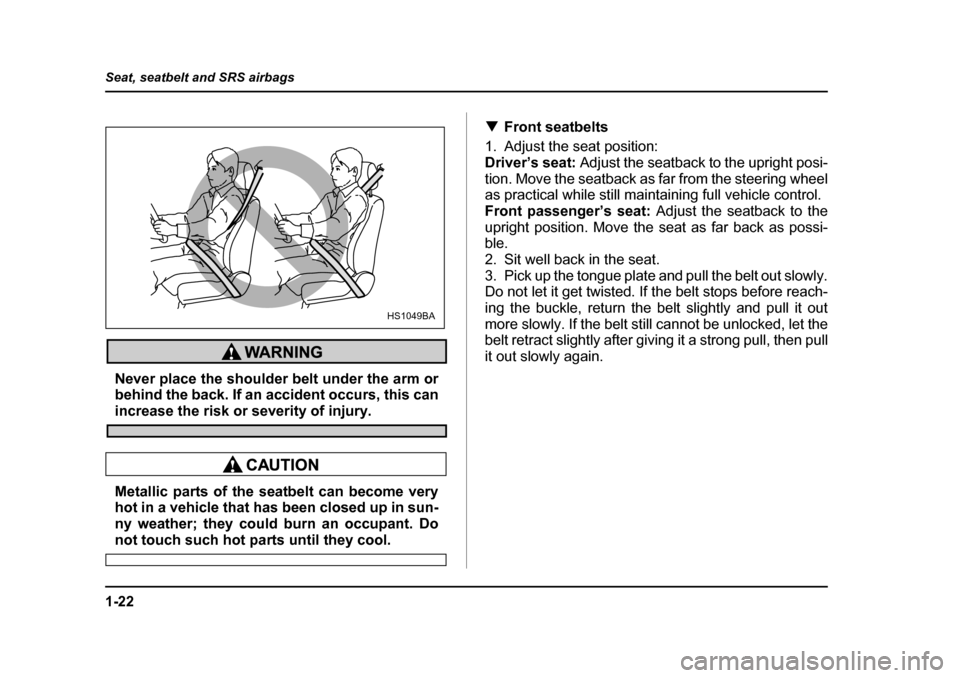
Never place the shoulder belt under the arm or
behind the back. If an accident occurs, this can
increase the risk or severity of injury.
Metallic parts of the seatbelt can become very
hot in a vehicle that has been closed up in sun-
ny weather; they could burn an occupant. Do
not touch such hot parts until they cool.
!
Front seatbelts
1. Adjust the seat position:
Driver’s seat: Adjust the seatback to the upright posi-
tion. Move the seatback as far from the steering wheel
as practical while still maintaining full vehicle control.
Front passenger’s seat: Adjust the seatback to the
upright position. Move the seat as far back as possi-
ble.
2. Sit well back in the seat.
3. Pick up the tongue plate and pull the belt out slowly.
Do not let it get twisted. If the belt stops before reach-
ing the buckle, return the belt slightly and pull it out
more slowly. If the belt still cannot be unlocked, let the
belt retract slightly after giving it a strong pull, then pull
it out slowly again.
HS1049BA
Page 54 of 627
1-23
Seat, seatbelt and SRS airbags
– CONTINUED –
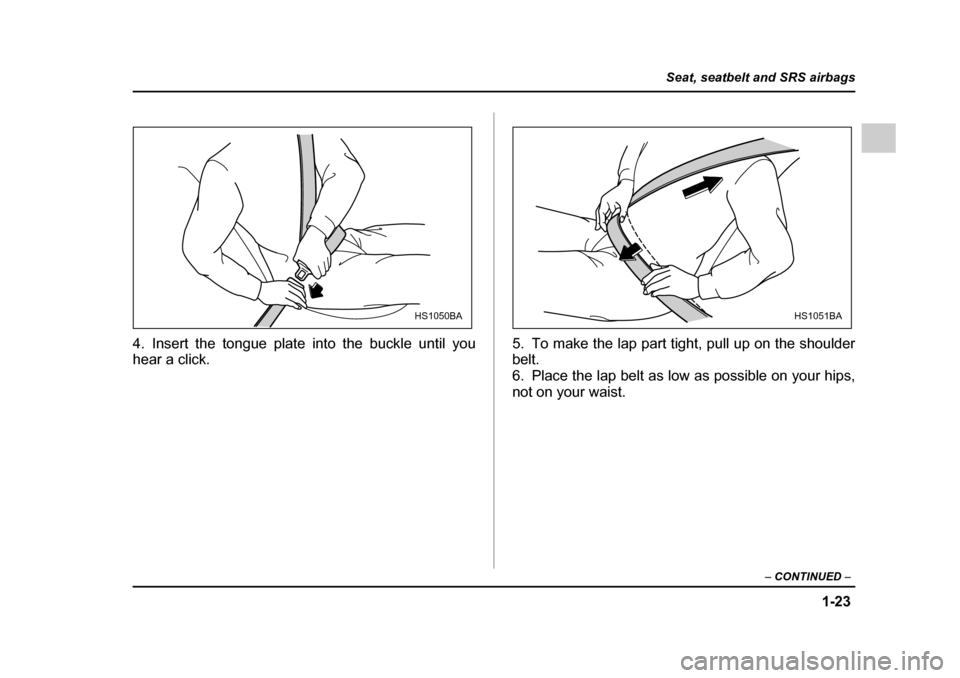
4. Insert the tongue plate into the buckle until you
hear a click. 5. To make the lap part tight, pull up on the shoulder
belt.
6. Place the lap belt as low as possible on your hips,
not on your waist.
HS1050BAHS1051BA
Page 55 of 627
1-24
Seat, seatbelt and SRS airbags
"
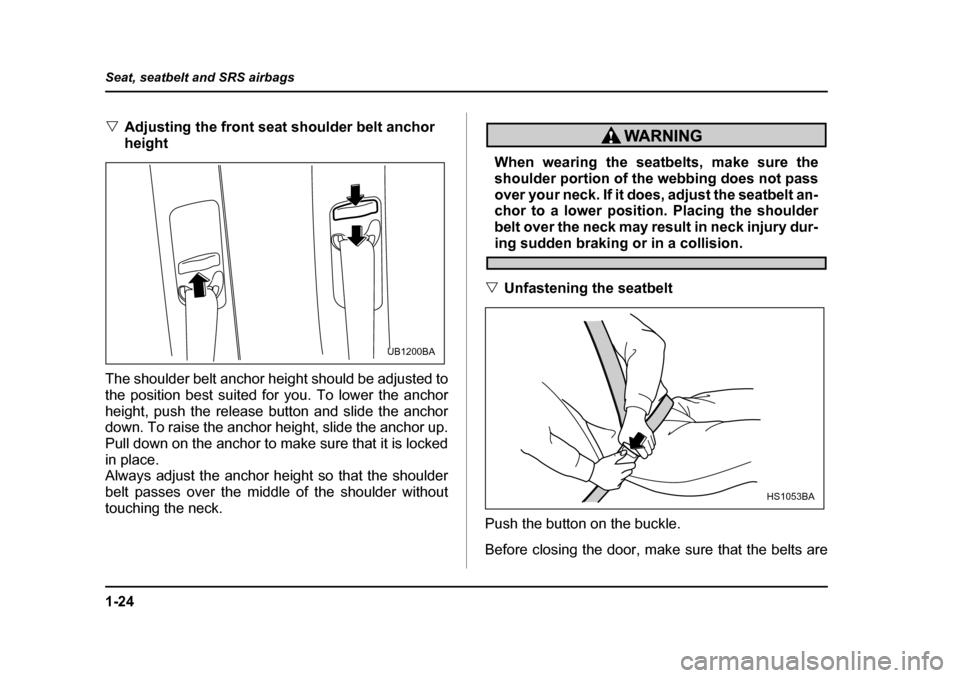
Adjusting the front seat shoulder belt anchor
height
The shoulder belt anchor height should be adjusted to
the position best suited for you. To lower the anchor
height, push the release button and slide the anchor
down. To raise the anchor height, slide the anchor up.
Pull down on the anchor to make sure that it is locked
in place.
Always adjust the anchor height so that the shoulder
belt passes over the middle of the shoulder without
touching the neck.
When wearing the seatbelts, make sure the
shoulder portion of the webbing does not pass
over your neck. If it does, adjust the seatbelt an-
chor to a lower position. Placing the shoulder
belt over the neck may result in neck injury dur-
ing sudden braking or in a collision.
" Unfastening the seatbelt
Push the button on the buckle.
Before closing the door, make sure that the belts are
UB1200BA
HS1053BA
Page 56 of 627
1-25
Seat, seatbelt and SRS airbags
– CONTINUED –
retracted properly to avoid catching the belt webbing
in the door. !Rear seatbelts (except rear center seatbelt on
Station wagon)
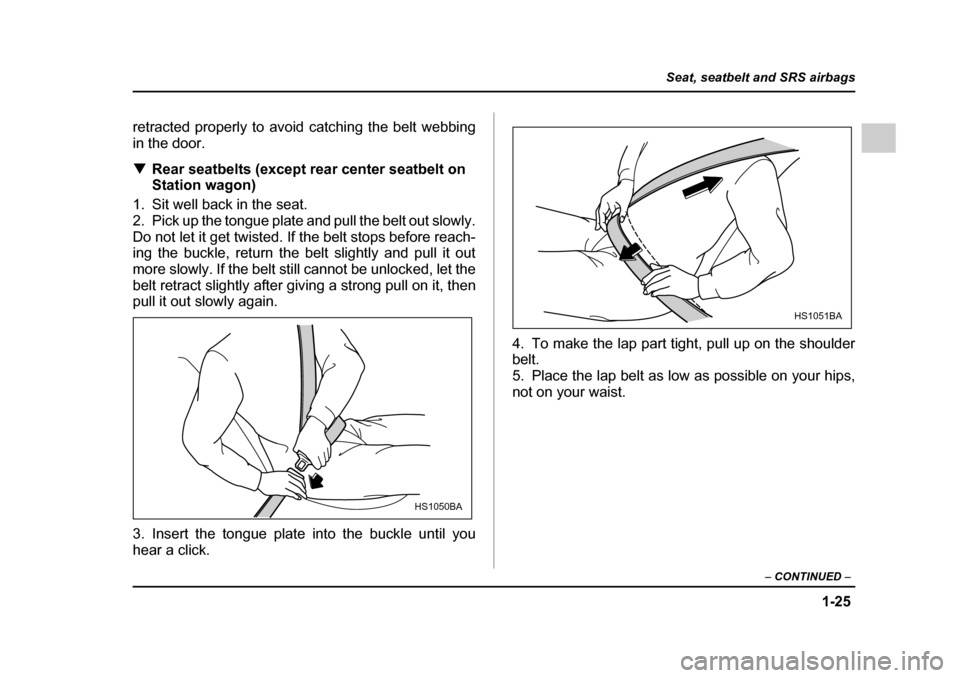
1. Sit well back in the seat.
2. Pick up the tongue plate and pull the belt out slowly.
Do not let it get twisted. If the belt stops before reach-
ing the buckle, return the belt slightly and pull it out
more slowly. If the belt still cannot be unlocked, let the
belt retract slightly after giving a strong pull on it, then
pull it out slowly again.
3. Insert the tongue plate into the buckle until you
hear a click. 4. To make the lap part tight, pull up on the shoulder
belt.
5. Place the lap belt as low as possible on your hips,
not on your waist.
HS1050BA
HS1051BA
Page 57 of 627
1-26
Seat, seatbelt and SRS airbags
"
Unfastening the seatbelt
Push the button on the buckle.
Before closing the door, make sure that the belts are
retracted properly to avoid catching the belt webbing
in the door. !
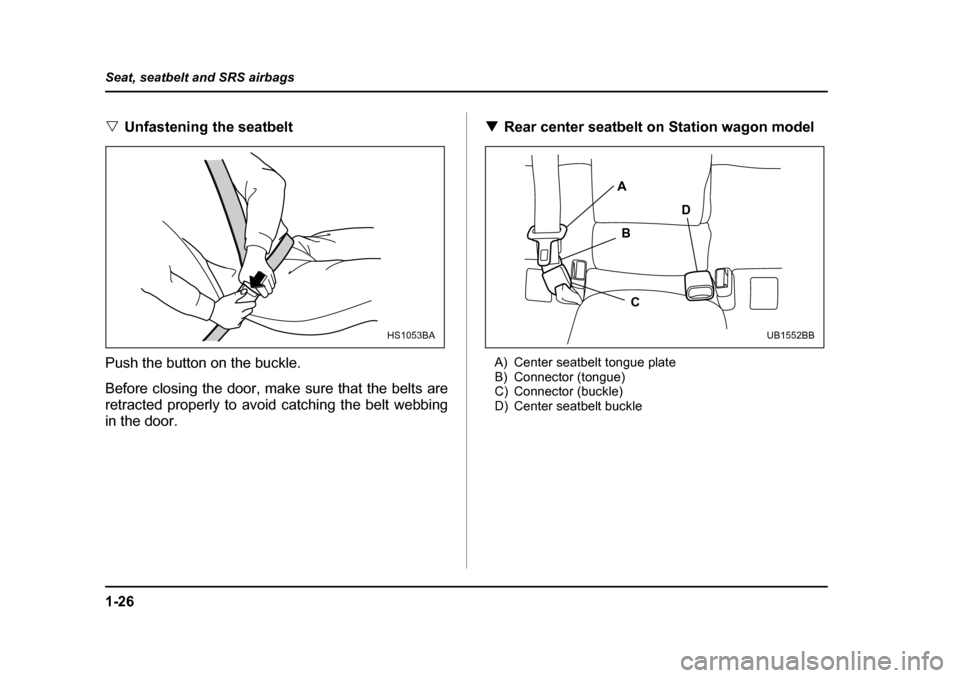
Rear center seatbelt on Station wagon model
A) Center seatbelt tongue plate
B) Connector (tongue)
C) Connector (buckle)
D) Center seatbelt buckle
HS1053BA
A B
C D
UB1552BB
Page 58 of 627
1-27
Seat, seatbelt and SRS airbags
– CONTINUED –
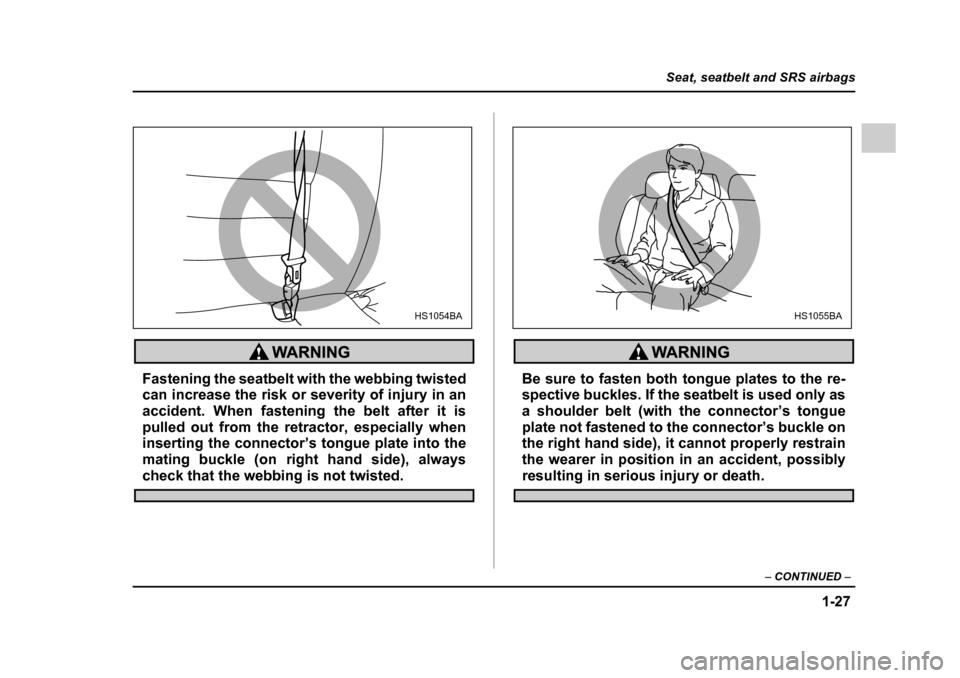
Fastening the seatbelt with the webbing twisted
can increase the risk or severity of injury in an
accident. When fastening the belt after it is
pulled out from the retractor, especially when
inserting the connector’s tongue plate into the
mating buckle (on right hand side), always
check that the webbing is not twisted.
Be sure to fasten both tongue plates to the re-
spective buckles. If the seatbelt is used only as
a shoulder belt (with the connector’s tongue
plate not fastened to the connector’s buckle on
the right hand side), it cannot properly restrain
the wearer in position in an accident, possibly
resulting in serious injury or death.
HS1054BAHS1055BA
Page 59 of 627
1-28
Seat, seatbelt and SRS airbags
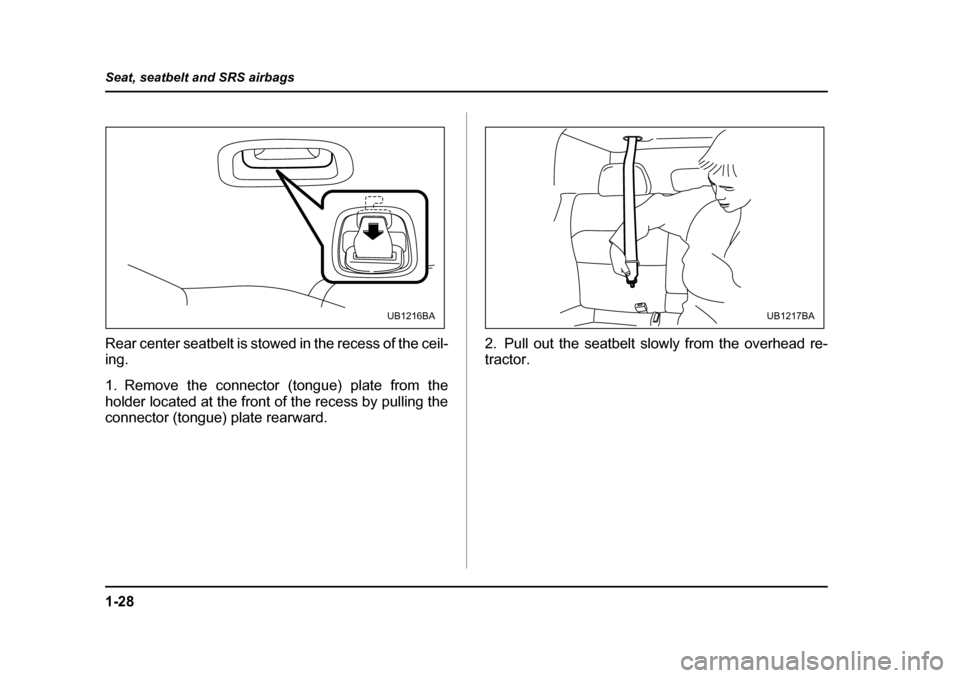
Rear center seatbelt is stowed in the recess of the ceil-
ing.
1. Remove the connector (tongue) plate from the
holder located at the front of the recess by pulling the
connector (tongue) plate rearward.
2. Pull out the seatbelt slowly from the overhead re-tractor.
UB1216BAUB1217BA
Page 60 of 627
1-29
Seat, seatbelt and SRS airbags
– CONTINUED –
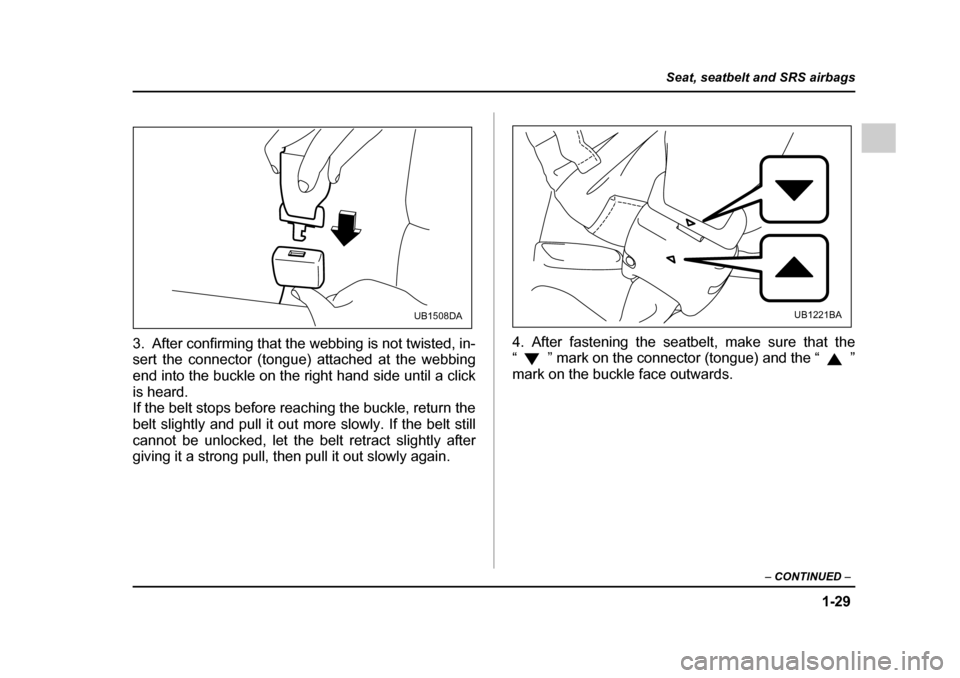
3. After confirming that the webbing is not twisted, in-
sert the connector (tongue) attached at the webbing
end into the buckle on the right hand side until a click
is heard.
If the belt stops before reaching the buckle, return the
belt slightly and pull it out more slowly. If the belt still
cannot be unlocked, let the belt retract slightly after
giving it a strong pull, then pull it out slowly again. 4. After fastening the seatbelt, make sure that the
“ ” mark on the connector (tongue) and the “ ”
mark on the buckle face outwards.
UB1508DAUB1221BA