bulb SUBARU OUTBACK 2012 5.G Owners Manual
[x] Cancel search | Manufacturer: SUBARU, Model Year: 2012, Model line: OUTBACK, Model: SUBARU OUTBACK 2012 5.GPages: 474, PDF Size: 17.45 MB
Page 13 of 474
10
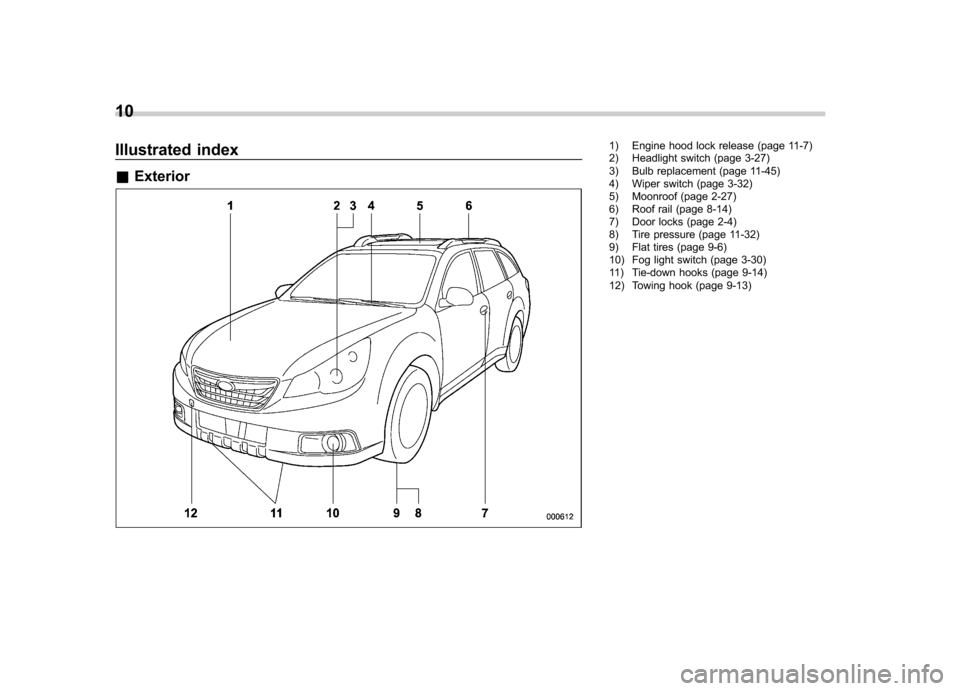
Illustrated index &Exterior1) Engine hood lock release (page 11-7)
2) Headlight switch (page 3-27)
3) Bulb replacement (page 11-45)
4) Wiper switch (page 3-32)
5) Moonroof (page 2-27)
6) Roof rail (page 8-14)
7) Door locks (page 2-4)
8) Tire pressure (page 11-32)
9) Flat tires (page 9-6)
10) Fog light switch (page 3-30)
11) Tie-down hooks (page 9-14)
12) Towing hook (page 9-13)
Page 14 of 474
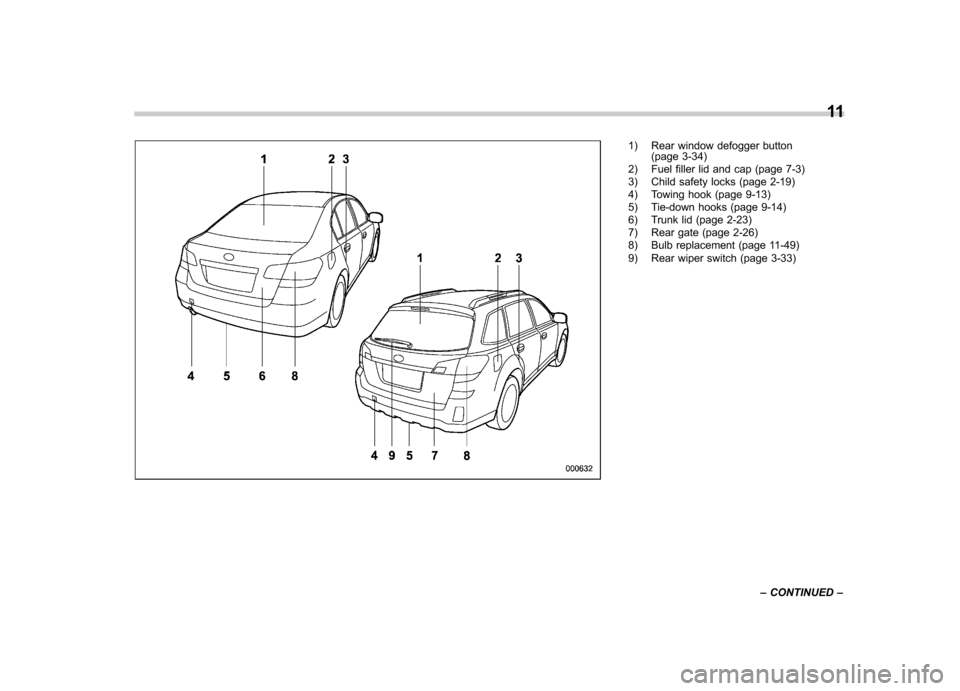
1) Rear window defogger button(page 3-34)
2) Fuel filler lid and cap (page 7-3)
3) Child safety locks (page 2-19)
4) Towing hook (page 9-13)
5) Tie-down hooks (page 9-14)
6) Trunk lid (page 2-23)
7) Rear gate (page 2-26)
8) Bulb replacement (page 11-49)
9) Rear wiper switch (page 3-33) 11
– CONTINUED –
Page 128 of 474
Warning and indicator lights
Several of the warning and indicator lights
illuminate momentarily and then go out
when the ignition switch is initially turned
to the“ON ”position. This permits check-
ing the operation of the bulbs.
Apply the parking brake and turn the
ignition switch to the “ON ”position. For
the system check, the following lights
illuminate and turn off after several sec-
onds or after the engine has started:
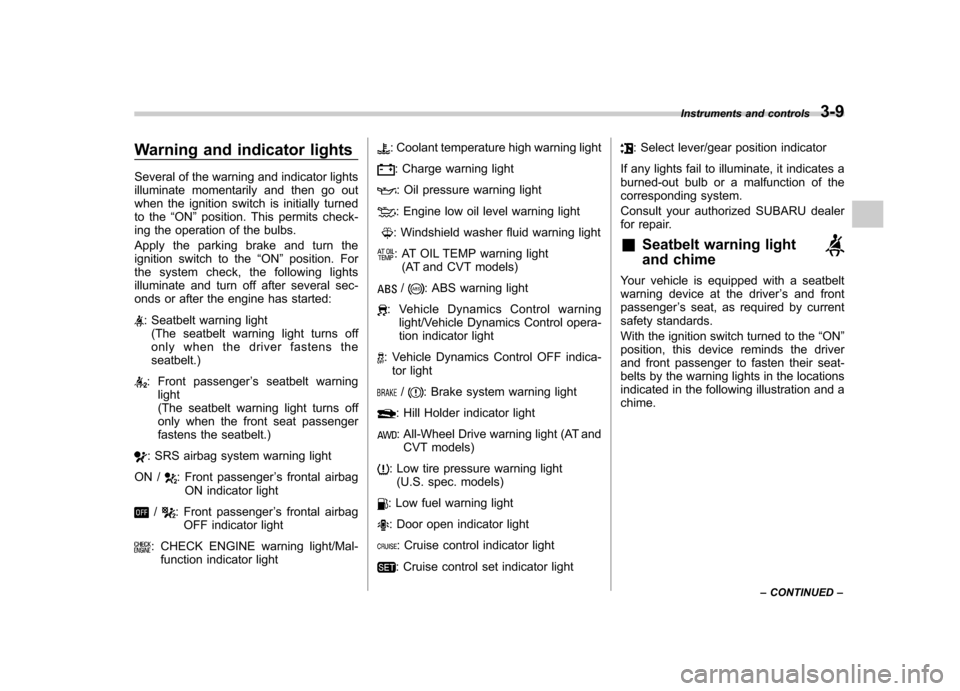
: Seatbelt warning light (The seatbelt warning light turns off
only when the driver fastens the seatbelt.)
: Front passenger ’s seatbelt warning
light
(The seatbelt warning light turns off
only when the front seat passenger
fastens the seatbelt.)
: SRS airbag system warning light
ON /
: Front passenger ’s frontal airbag
ON indicator light
/: Front passenger ’s frontal airbag
OFF indicator light
: CHECK ENGINE warning light/Mal- function indicator light
: Coolant temperature high warning light
: Charge warning light
: Oil pressure warning light
: Engine low oil level warning light
: Windshield washer fluid warning light
: AT OIL TEMP warning light(AT and CVT models)
/: ABS warning light
: Vehicle Dynamics Control warning light/Vehicle Dynamics Control opera-
tion indicator light
: Vehicle Dynamics Control OFF indica-
tor light
/: Brake system warning light
: Hill Holder indicator light
: All-Wheel Drive warning light (AT andCVT models)
: Low tire pressure warning light (U.S. spec. models)
: Low fuel warning light
: Door open indicator light
: Cruise control indicator light
: Cruise control set indicator light
: Select lever/gear position indicator
If any lights fail to illuminate, it indicates a
burned-out bulb or a malfunction of the
corresponding system.
Consult your authorized SUBARU dealer
for repair. & Seatbelt warning light
and chime
Your vehicle is equipped with a seatbelt
warning device at the driver ’s and front
passenger ’s seat, as required by current
safety standards.
With the ignition switch turned to the “ON ”
position, this device reminds the driver
and front passenger to fasten their seat-
belts by the warning lights in the locations
indicated in the following illustration and achime. Instruments and controls
3-9
– CONTINUED –
Page 141 of 474
3-22Instruments and controls
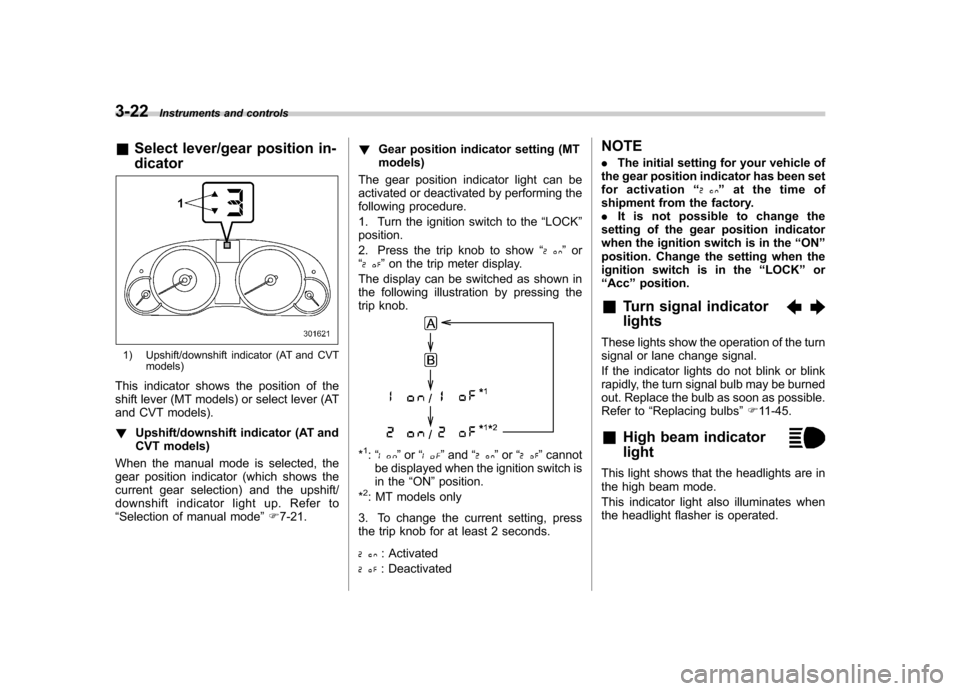
& Select lever/gear position in- dicator
1) Upshift/downshift indicator (AT and CVT
models)
This indicator shows the position of the
shift lever (MT models) or select lever (AT
and CVT models). ! Upshift/downshift indicator (AT and
CVT models)
When the manual mode is selected, the
gear position indicator (which shows the
current gear selection) and the upshift/
downshift indicator light up. Refer to“ Selection of manual mode ”F 7-21. !
Gear position indicator setting (MTmodels)
The gear position indicator light can be
activated or deactivated by performing the
following procedure.
1. Turn the ignition switch to the “LOCK ”
position.
2. Press the trip knob to show “
”or
“” on the trip meter display.
The display can be switched as shown in
the following illustration by pressing the
trip knob.
*1: “” or “”and “”or “”cannot
be displayed when the ignition switch is
in the “ON ”position.
*
2: MT models only
3. To change the current setting, press
the trip knob for at least 2 seconds.
: Activated
: Deactivated NOTE .
The initial setting for your vehicle of
the gear position indicator has been set
for activation “
”at the time of
shipment from the factory. . It is not possible to change the
setting of the gear position indicator
when the ignition switch is in the “ON ”
position. Change the setting when the
ignition switch is in the “LOCK ”or
“ Acc ”position.
& Turn signal indicator lights
These lights show the operation of the turn
signal or lane change signal.
If the indicator lights do not blink or blink
rapidly, the turn signal bulb may be burned
out. Replace the bulb as soon as possible.
Refer to “Replacing bulbs ”F 11-45.
& High beam indicator light
This light shows that the headlights are in
the high beam mode.
This indicator light also illuminates when
the headlight flasher is operated.
Page 284 of 474
.A vehiclefails the OBDII inspection if
the “CHECK ENGINE ”warning light is not
properly operating (light is illuminated or is
not working due to a burned out bulb) or
there is one or more diagnostic trouble
codes stored in the vehicle ’s computer.
. A state emission inspection may reject
(not pass or fail) a vehicle if the number of
OBDII system readiness monitors “NOT
READY ”is greater than one. If the
vehicle ’s battery has been recently re-
placed or disconnected, the OBDII system
inspection may indicate that the vehicle is
not ready for the emission test. Under this
condition, the vehicle driver should be
instructed to drive his/her vehicle for a few
days to reset the readiness monitors and
return for an emission re-inspection. . Owners of rejected or failing vehicles
should contact their SUBARU Dealer for service.
Some states still use dynamometers in
their emission inspection program. A
dynamometer is a treadmill or roller-like
testing device that allows your vehicle ’s
wheels to turn while the vehicle remains in
one place. Prior to your vehicle being put
on a dynamometer, tell your emission
inspector
not to place your SUBARU
AWD vehicle on a two-wheel dynam-
ometer. Otherwise, serious transmis-
sion damage will result. The U.S. Environmental Protection
Agency (EPA) and states using two-wheel
dynamometers in their emission testing
program have EXEMPTED SUBARU
AWD vehicles from the portion of the
testing program that involves a two-wheel
dynamometer. There are some states that
use four-wheel dynamometers in their
testing program. When properly used, this
equipment should not damage a SUBARU
AWD vehicle.
Under no circumstances should the rear
wheels be jacked off the ground, nor
should the driveshaft be disconnected for
state emission testing.
Preparing to drive
You should perform the following checks
and adjustments every day before you
start driving.
1. Check that all windows, mirrors, and
lights are clean and unobstructed.
2. Check the appearance and condition
of the tires. Also check tires for properinflation.
3. Look under the vehicle for any sign of leaks.
4. Check that the hood, trunk (Legacy)
and rear gate (Outback) are fully closed.
5. Check the adjustment of the seat.
6. Check the adjustment of the inside
and outside mirrors.
7. Fasten your seatbelt. Check that your
passengers have fastened their seatbelts.
8. Check the operation of the warning
and indicator lights when the ignition
switch is turned to the
“ON ”position.
9. Check the gauges, indicator and warn-
ing lights after starting the engine. Starting and operating
7-7
– CONTINUED –
Page 367 of 474
10-2Appearance care
Exterior care &Washing
CAUTION
. When washing the vehicle, the
brakes may get wet. As a result,
the brake stopping distance will
be longer. To dry the brakes,
drive the vehicle at a safe speed
while lightly pressing the brake
pedal to heat up the brakes.
. Do not wash the engine compart-
ment and areas adjacent to it. If
water enters the engine air in-
take, electrical parts or the power
steering fluid reservoir, it will
cause engine trouble or a mal-
function of the power steering.
. Do not use any organic solvents
when washing the surface of the
bulb assembly cover. However, if
a detergent with organic solvents
is used to wash the cover sur-
face, completely rinse off the
detergent with water. Otherwise,
the cover surface may be da-maged.
. Outback: Since your vehicle is
equipped with a rear wiper, auto-
matic car-wash brushes could become tangled around it, dama-
ging the wiper arm and other
components. Ask the automatic
car-wash operator not to let the
brushes touch the wiper arm or
to fix the wiper arm on the rear
window glass with adhesive tape
before operating the machine.
NOTE
When having your vehicle washed in
an automatic car wash, make sure
beforehand that the car wash is of
suitable type.
The best way to preserve your vehicle ’s
beauty is frequent washing. Wash the
vehicle at least once a month to avoid
contamination by road grime.
Wash dirt off with a wet sponge and plenty
of lukewarm or cold water. Do not wash
the vehicle with hot water and in directsunlight.
Salt, chemicals, insects, tar, soot, tree
sap, and bird droppings should be washed
off by using a light detergent, as required.
If you use a light detergent, make certain
that it is a neutral detergent. Do not use
strong soap or chemical detergents. All
cleaning agents should be promptly
flushed from the surface and not allowed to dry there. Rinse the vehicle thoroughly
with plenty of lukewarm water. Wipe the
remaining water off with a chamois or softcloth. !
Washing the underbody
Chemicals, salts and gravel used for
deicing road surfaces are extremely cor-
rosive, accelerating the corrosion of un-
derbody components, such as the exhaust
system, fuel and brake lines, brake
cables, floor pan and fenders, and sus-pension.
Thoroughly flush the underbody and in-
side of the fenders with lukewarm or cold
water at frequent intervals to reduce the
harmful effects of such agents.
Mud and sand adhering to the underbody
components may accelerate their corro-sion.
After driving off-road or on muddy or
sandy roads, wash the mud and sand off
the underbody.
Carefully flush the suspension and axle
parts, as they are particularly prone to
mud and sand buildup. Do not use a
sharp-edged tool to remove caked mud.
CAUTION
. Be careful not to damage brake
hoses, sensor harnesses, and
Page 368 of 474
other parts when washing sus-
pension components.
. Be careful not to flush the engine
bottom for a long time. It may
cause damage of some electricalparts.
! Using a warm water washer
. Keep a good distance of 12 in (30 cm)
or more between the washer nozzle and
the vehicle. . Do not wash the same area continu-
ously.. If a stain will not come out easily, wash
by hand. Some warm water washers are
of the high temperature, high pressure
type, and they can damage or deform the
resin parts such as mouldings, or cause
water to leak into the vehicle.
& Waxing and polishing
Always wash and dry the vehicle before
waxing and polishing.
Use a good quality polish and wax and
apply them according to the manufac-turer ’s instructions. Wax or polish when
the painted surface is cool.
Be sure to polish and wax the chrome trim,
as well as the painted surfaces. Loss of
wax on a painted surface leads to loss of
the original luster and also quickens the deterioration of the surface. It is recom-
mended that a coat of wax be applied at
least once a month, or whenever the
surface no longer repels water.
If the appearance of the paint has dimin-
ished to the point where the luster or tone
cannot be restored, lightly polish the
surface with a fine-grained compound.
Never polish just the affected area, but
include the surrounding area as well.
Always polish in only one direction. A
No. 2000 grain compound is recom-
mended. Never use a coarse-grained
compound. Coarser grained compounds
have a smaller grain-size number and
could damage the paint. After polishing
with a compound, coat with wax to restore
the original luster. Frequent polishing with
acompoundoranincorrectpolishing
technique will result in removing the paint
layer and exposing the undercoat. When
in doubt, it is always best to contact your
SUBARU dealer or an auto paint specia-list.
CAUTION
Do not use any agents with organic
solvents on the surface of the bulb
assembly cover. However, if a polish
or wax with organic solvents is
applied to the cover surface, com- pletely wipe off the polish or wax.
Otherwise, the cover surface may bedamaged.
NOTE
Be careful not to block the windshield
washer nozzles with wax when waxing
the vehicle. & Cleaning aluminum wheels
. Promptly wipe the aluminum wheels
clean of any kind of grime or agent. If dirt
is left on too long, it may be difficult to
clean off. . Do not use soap containing grit to
clean the wheels. Be sure to use a neutral
cleaning agent, and later rinse thoroughly
with water. Do not clean the wheels with a
stiff brush or expose them to a high-speed
washing device. . Clean the vehicle (including the alumi-
num wheels) with water as soon as
possible when it has been splashed with
sea water, exposed to sea breezes, or
driven on roads treated with salt or otheragents. Appearance care
10-3
Page 373 of 474
Maintenance and serviceTires and wheels .............................................. 11-30
Types of tires ................................................... 11-30
Tire pressure monitoring system (TPMS) (if equipped) ................................................... 11-30
Tire inspection ................................................. 11-32
Tire pressures and wear ................................... 11-32
Wheel balance .................................................. 11-34
Wear indicators ................................................ 11-35
Tire rotation direction mark .............................. 11-35
Tire rotation ..................................................... 11-35
Tire replacement .............................................. 11-36
Wheel replacement ........................................... 11-37
Aluminum wheels ............................................. 11-37
Windshield washer fluid .................................. 11-37
Replacement of wiper blades .......................... 11-39
Windshield wiper blade assembly ..................... 11-39
Windshield wiper blade rubber ......................... 11-40
Rear window wiper blade assembly (Outback) ....................................................... 11-41
Rear window wiper blade rubber (Outback) ... .... 11-41Battery
.............................................................. 11-43
Fuses ................................................................ 11-44
Installation of accessories .............................. 11-45
Replacing bulbs ............................................... 11-45
Headlight ......................................................... 11-45
Front turn signal light ...................................... 11-48
Front position light .......................................... 11-48
Front fog light (if equipped) .............................. 11-48
Rear combination lights ................................... 11-49
Tail/Back-up light (Outback) ............................. 11-51
License plate light ........................................... 11-52
Dome light ....................................................... 11-53
Map light ......................................................... 11-54
Vanity mirror light ............................................ 11-54
Door step light ................................................. 11-55
Cargo area light (Outback) ............................... 11-55
Trunk light (Legacy) ......................................... 11-55
Other bulbs ..................................................... 11-55
Page 376 of 474
&When checking or servicing
in the engine compartment
while the engine is running
WARNING
A running engine can be dangerous.
Keep your fingers, hands, clothing,
hair and tools away from the cooling
fan, belts and any other moving
engine parts. Removing rings,
watches and ties is advisable. Maintenance tips
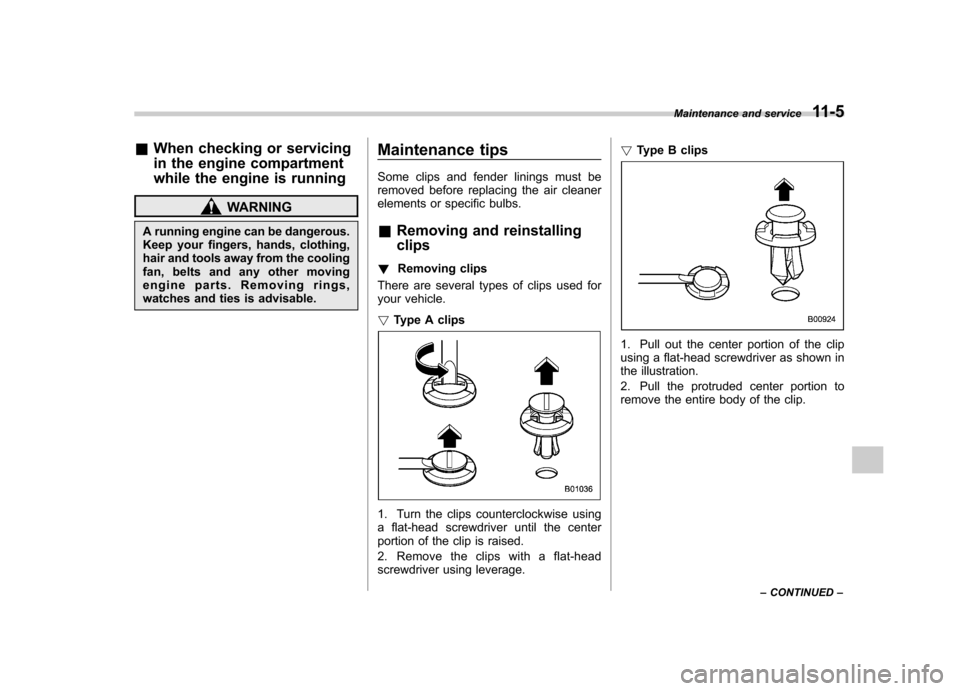
Some clips and fender linings must be
removed before replacing the air cleaner
elements or specific bulbs. &
Removing and reinstalling clips
! Removing clips
There are several types of clips used for
your vehicle. ! Type A clips
1. Turn the clips counterclockwise using
a flat-head screwdriver until the center
portion of the clip is raised.
2. Remove the clips with a flat-head
screwdriver using leverage. !
Type B clips
1. Pull out the center portion of the clip
using a flat-head screwdriver as shown in
the illustration.
2. Pull the protruded center portion to
remove the entire body of the clip. Maintenance and service
11-5
– CONTINUED –
Page 378 of 474
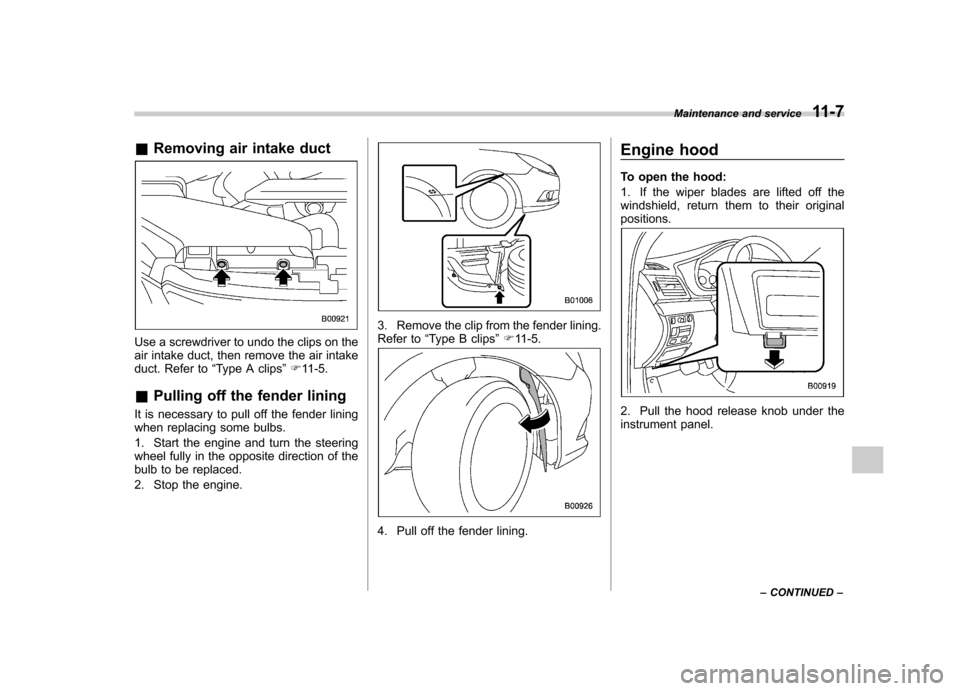
&Removing air intake duct
Use a screwdriver to undo the clips on the
air intake duct, then remove the air intake
duct. Refer to “Type A clips ”F 11-5.
& Pulling off the fender lining
It is necessary to pull off the fender lining
when replacing some bulbs.
1. Start the engine and turn the steering
wheel fully in the opposite direction of the
bulb to be replaced.
2. Stop the engine.
3. Remove the clip from the fender lining.
Refer to “Type B clips ”F 11-5.
4. Pull off the fender lining. Engine hood
To open the hood:
1. If the wiper blades are lifted off the
windshield, return them to their originalpositions.
2. Pull the hood release knob under the
instrument panel.
Maintenance and service
11-7
– CONTINUED –