service reset SUBARU OUTBACK 2012 5.G Owners Manual
[x] Cancel search | Manufacturer: SUBARU, Model Year: 2012, Model line: OUTBACK, Model: SUBARU OUTBACK 2012 5.GPages: 474, PDF Size: 17.45 MB
Page 199 of 474

5-16Audio
cast. Every radio station is independently
owned and operated. These stations are
responsible for ensuring all audio streams
and data fields are accurate. The form can
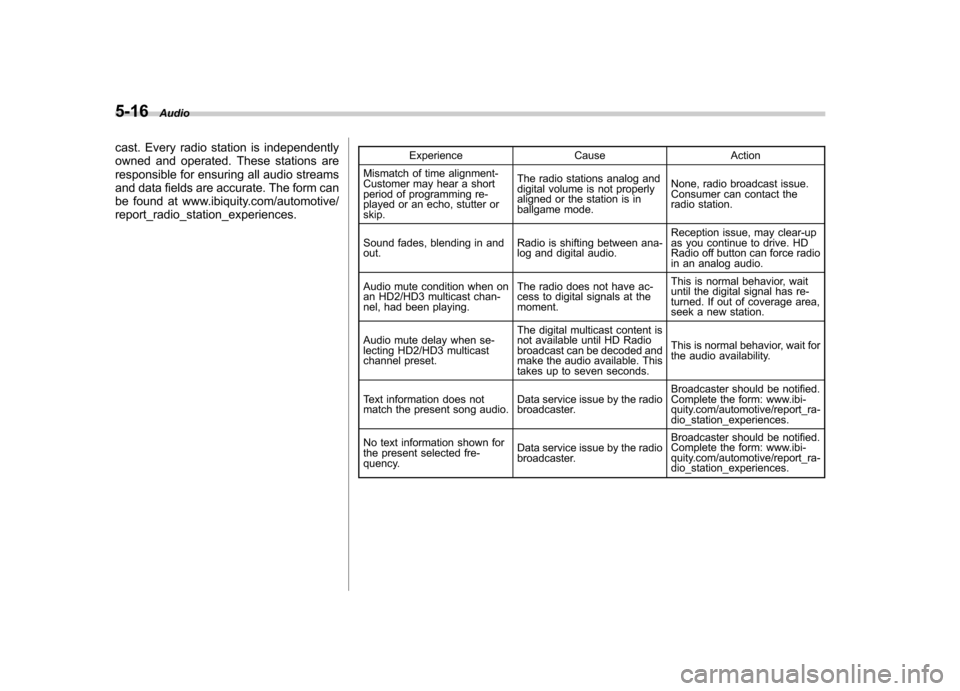
be found at www.ibiquity.com/automotive/report_radio_station_experiences. Experience Cause Action
Mismatch of time alignment-
Customer may hear a short
period of programming re-
played or an echo, stutter or skip. The radio stations analog and
digital volume is not properly
aligned or the station is in
ballgame mode.
None, radio broadcast issue.
Consumer can contact the
radio station.
Sound fades, blending in andout. Radio is shifting between ana-
log and digital audio.Reception issue, may clear-up
as you continue to drive. HD
Radio off button can force radio
in an analog audio.
Audio mute condition when on
an HD2/HD3 multicast chan-
nel, had been playing. The radio does not have ac-
cess to digital signals at the moment.This is normal behavior, wait
until the digital signal has re-
turned. If out of coverage area,
seek a new station.
Audio mute delay when se-
lecting HD2/HD3 multicast
channel preset. The digital multicast content is
not available until HD Radio
broadcast can be decoded and
make the audio available. This
takes up to seven seconds.
This is normal behavior, wait for
the audio availability.
Text information does not
match the present song audio. Data service issue by the radio
broadcaster.Broadcaster should be notified.
Complete the form: www.ibi-
quity.com/automotive/report_ra-
dio_station_experiences.
No text information shown for
the present selected fre-
quency. Data service issue by the radio
broadcaster.Broadcaster should be notified.
Complete the form: www.ibi-
quity.com/automotive/report_ra-
dio_station_experiences.
Page 201 of 474

5-18Audio
&Station preset
! How to preset stations
1. Select the preferred reception mode.
2. Select the preferred station.
3. Press and hold one of the preset
buttons (from
to) to store the
frequency. If the button is pressed briefly,
the preceding selection will remain in the
memory.
NOTE . Up to six stations for each reception
mode may be preset. . If the connection between the radio
and battery is broken for any reason
such as vehicle maintenance or radio
removal, all stations stored in the
preset buttons are cleared. If this
occurs, it is necessary to reset the
preset buttons.. If a cell phone is placed near the
radio, it may cause the radio to emit
noise when a phone call is received.
This noise does not indicate a radiomalfunction.. For type C audio, if you press and
hold a preset button while receiving a
broadcasting station with SPS (Supple-
mental Program Service), the station
will be stored in the memory for that preset button. !
Selecting preset stations
1. Select the preferred reception mode.
2. Press the preferred preset button (from
to) briefly.
NOTE
For type C audio, if the preset button
which stores a broadcasting station
with SPS (Supplemental Program Ser-
vice) while the HD Radio OFF mode isselected, “No digital data available ”will
be displayed and the volume will be
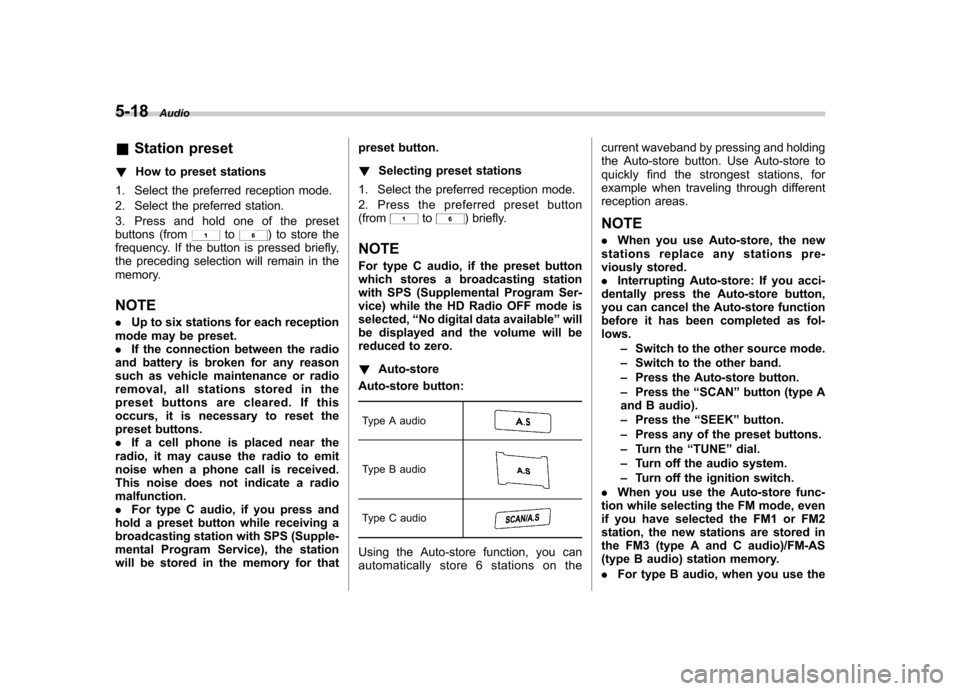
reduced to zero. ! Auto-store
Auto-store button:
Type A audio
Type B audio
Type C audio
Using the Auto-store function, you can
automatically store 6 stations on the current waveband by pressing and holding
the Auto-store button. Use Auto-store to
quickly find the strongest stations, for
example when traveling through different
reception areas. NOTE .
When you use Auto-store, the new
stations replace any stations pre-
viously stored.. Interrupting Auto-store: If you acci-
dentally press the Auto-store button,
you can cancel the Auto-store function
before it has been completed as fol-lows.
–Switch to the other source mode.
– Switch to the other band.
– Press the Auto-store button.
– Press the “SCAN ”button (type A
and B audio). – Press the “SEEK ”button.
– Press any of the preset buttons.
– Turn the “TUNE ”dial.
– Turn off the audio system.
– Turn off the ignition switch.
. When you use the Auto-store func-
tion while selecting the FM mode, even
if you have selected the FM1 or FM2
station, the new stations are stored in
the FM3 (type A and C audio)/FM-AS
(type B audio) station memory. . For type B audio, when you use the
Page 202 of 474

Auto-store function while selecting the
AM mode, even if you have selected the“AM ”station, the new stations are
stored in the AM-AS station memory. . If it is only possible to receive less
than 6 stations, the available stations
are stored from preset 1 in order by
frequency and the unused preset but-
tons are not registered to a station. . For type A and C audio, the pre-
viously registered station memories of
the unused preset buttons are cleared. . For type B audio, the previously
registered station memories of the
unused preset buttons are not cleared. . If no stations can be received, the
previously stored stations are not re- placed. . After pressing the Auto-store but-
ton, if more than 1 station is stored, the
radio receives the station stored in
preset 1. . After pressing the Auto-store but-
ton, if no stations are stored, the radio
receives the band and station that the
radio received before pressing thebutton. Satellite radio operation (if equipped)
To receive satellite radio, it is necessary to
install the SUBARU genuine satellite
receiver for some models, and to enter
into a contract with a satellite radio
network service such as
“Sirius XM
TM
satellite radio ”(for U.S.A. only). For de-
tails, please contact your SUBARU dealer. & Sirius XM
TMSatellite Radio
Activation (for U.S.A. only)
Models with Sirius XM
TMare eligible for a
3-month complimentary subscription to
the Sirius XM
TMSatellite Radio service.
! Activation process
If you would like to activate your Satellite
Radio online, please visit
http://www.sir-iusxm.com/activationhelp and follow the
step-by-step instructions for easy activa- tion. & Satellite radio reception
Satellite radio signals are best received in
areas with a clear view of the open sky. In
areas where there are tall buildings, trees,
tunnels or other structures that may
obstruct the signal of the satellites, there
may be signal interruptions. Other circum- stances that may result in signal loss
include driving near a wall, steep cliff, hill
or driving on the lower level of a multi-
tiered road or inside of a parking garage.
To help reduce this condition, satellite
radio providers have installed ground-
based repeaters in heavily populated
areas. However, you may still experience
reception problems in some areas. !
Sirius XM
TMsatellite radio reception
tips (for U.S.A. only —if equipped)
The Sirius XM
TMsatellite radio receiver
that is fitted to your vehicle receives the
necessary signals from two specially
designated satellites that are in a geosta-
tionary orbit over the equator. One satellite
covers the east coast and the other covers
the west coast. Both of them direct their
signals north. These signals are then
relayed throughout the radio reception
area by a network of ground repeater
stations. The satellite radio signals are
transmitted as “line of sight ”signals. The
line of sight signals can be blocked by
objects such as buildings, but the network
of repeater stations allows signal cover-
age within urban areas such as cities.
You may experience problems in receiving
Sirius XM
TMsatellite radio signals in the
following situations. Audio
5-19
– CONTINUED –
Page 284 of 474

.A vehiclefails the OBDII inspection if
the “CHECK ENGINE ”warning light is not
properly operating (light is illuminated or is
not working due to a burned out bulb) or
there is one or more diagnostic trouble
codes stored in the vehicle ’s computer.
. A state emission inspection may reject
(not pass or fail) a vehicle if the number of
OBDII system readiness monitors “NOT
READY ”is greater than one. If the
vehicle ’s battery has been recently re-
placed or disconnected, the OBDII system
inspection may indicate that the vehicle is
not ready for the emission test. Under this
condition, the vehicle driver should be
instructed to drive his/her vehicle for a few
days to reset the readiness monitors and
return for an emission re-inspection. . Owners of rejected or failing vehicles
should contact their SUBARU Dealer for service.
Some states still use dynamometers in
their emission inspection program. A
dynamometer is a treadmill or roller-like
testing device that allows your vehicle ’s
wheels to turn while the vehicle remains in
one place. Prior to your vehicle being put
on a dynamometer, tell your emission
inspector
not to place your SUBARU
AWD vehicle on a two-wheel dynam-
ometer. Otherwise, serious transmis-
sion damage will result. The U.S. Environmental Protection
Agency (EPA) and states using two-wheel
dynamometers in their emission testing
program have EXEMPTED SUBARU
AWD vehicles from the portion of the
testing program that involves a two-wheel
dynamometer. There are some states that
use four-wheel dynamometers in their
testing program. When properly used, this
equipment should not damage a SUBARU
AWD vehicle.
Under no circumstances should the rear
wheels be jacked off the ground, nor
should the driveshaft be disconnected for
state emission testing.
Preparing to drive
You should perform the following checks
and adjustments every day before you
start driving.
1. Check that all windows, mirrors, and
lights are clean and unobstructed.
2. Check the appearance and condition
of the tires. Also check tires for properinflation.
3. Look under the vehicle for any sign of leaks.
4. Check that the hood, trunk (Legacy)
and rear gate (Outback) are fully closed.
5. Check the adjustment of the seat.
6. Check the adjustment of the inside
and outside mirrors.
7. Fasten your seatbelt. Check that your
passengers have fastened their seatbelts.
8. Check the operation of the warning
and indicator lights when the ignition
switch is turned to the
“ON ”position.
9. Check the gauges, indicator and warn-
ing lights after starting the engine. Starting and operating
7-7
– CONTINUED –
Page 402 of 474

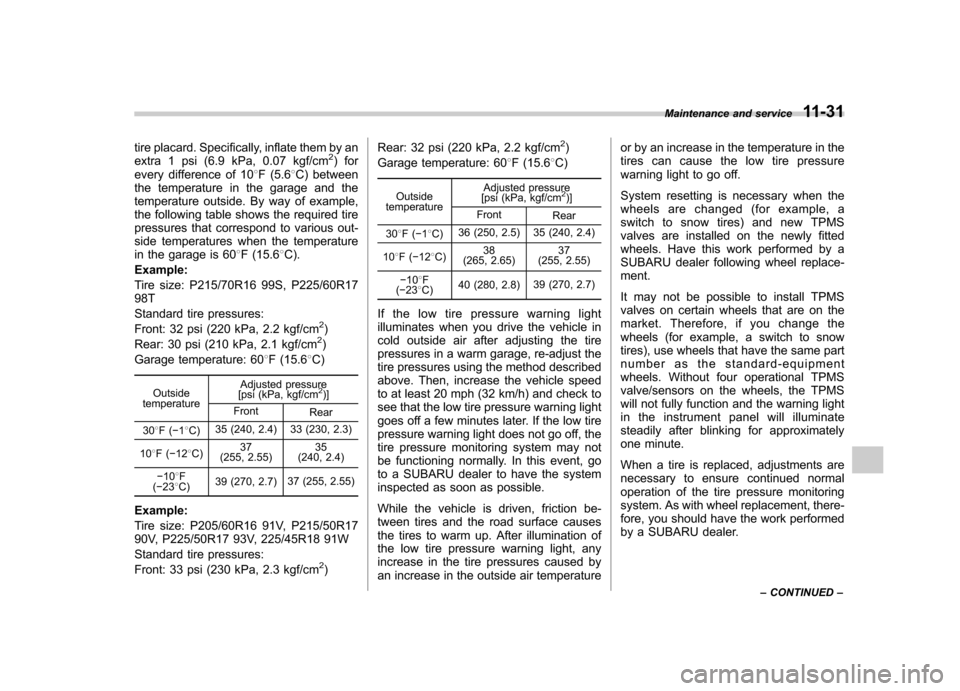
tire placard. Specifically, inflate them by an
extra 1 psi (6.9 kPa, 0.07 kgf/cm2) for
every difference of 10 8F (5.6 8C) between
the temperature in the garage and the
temperature outside. By way of example,
the following table shows the required tire
pressures that correspond to various out-
side temperatures when the temperature
in the garage is 60 8F (15.6 8C).
Example:
Tire size: P215/70R16 99S, P225/60R17 98T
Standard tire pressures:
Front: 32 psi (220 kPa, 2.2 kgf/cm
2)
Rear: 30 psi (210 kPa, 2.1 kgf/cm2)
Garage temperature: 60 8F (15.6 8C)
Outside
temperature Adjusted pressure
[psi (kPa, kgf/cm
2)]
Front Rear
30 8F( �18C) 35 (240, 2.4) 33 (230, 2.3)
10 8F( �12 8C) 37
(255, 2.55) 35
(240, 2.4)
� 10 8F
( � 23 8C) 39 (270, 2.7)
37 (255, 2.55)
Example:
Tire size: P205/60R16 91V, P215/50R17
90V, P225/50R17 93V, 225/45R18 91W
Standard tire pressures:
Front: 33 psi (230 kPa, 2.3 kgf/cm
2) Rear: 32 psi (220 kPa, 2.2 kgf/cm
2)
Garage temperature: 60 8F (15.6 8C)
Outside
temperature Adjusted pressure
[psi (kPa, kgf/cm
2)]
Front Rear
30 8F( �18C) 36 (250, 2.5) 35 (240, 2.4)
10 8F( �12 8C) 38
(265, 2.65) 37
(255, 2.55)
� 10 8F
( � 23 8C) 40 (280, 2.8)
39 (270, 2.7)
If the low tire pressure warning light
illuminates when you drive the vehicle in
cold outside air after adjusting the tire
pressures in a warm garage, re-adjust the
tire pressures using the method described
above. Then, increase the vehicle speed
to at least 20 mph (32 km/h) and check to
see that the low tire pressure warning light
goes off a few minutes later. If the low tire
pressure warning light does not go off, the
tire pressure monitoring system may not
be functioning normally. In this event, go
to a SUBARU dealer to have the system
inspected as soon as possible.
While the vehicle is driven, friction be-
tween tires and the road surface causes
the tires to warm up. After illumination of
the low tire pressure warning light, any
increase in the tire pressures caused by
an increase in the outside air temperature or by an increase in the temperature in the
tires can cause the low tire pressure
warning light to go off.
System resetting is necessary when the
wheels are changed (for example, a
switch to snow tires) and new TPMS
valves are installed on the newly fitted
wheels. Have this work performed by a
SUBARU dealer following wheel replace-ment.
It may not be possible to install TPMS
valves on certain wheels that are on the
market. Therefore, if you change the
wheels (for example, a switch to snow
tires), use wheels that have the same part
number as the standard-equipment
wheels. Without four operational TPMS
valve/sensors on the wheels, the TPMS
will not fully function and the warning light
in the instrument panel will illuminate
steadily after blinking for approximately
one minute.
When a tire is replaced, adjustments are
necessary to ensure continued normal
operation of the tire pressure monitoring
system. As with wheel replacement, there-
fore, you should have the work performed
by a SUBARU dealer.
Maintenance and service
11-31
– CONTINUED –
Page 403 of 474

11-32Maintenance and service
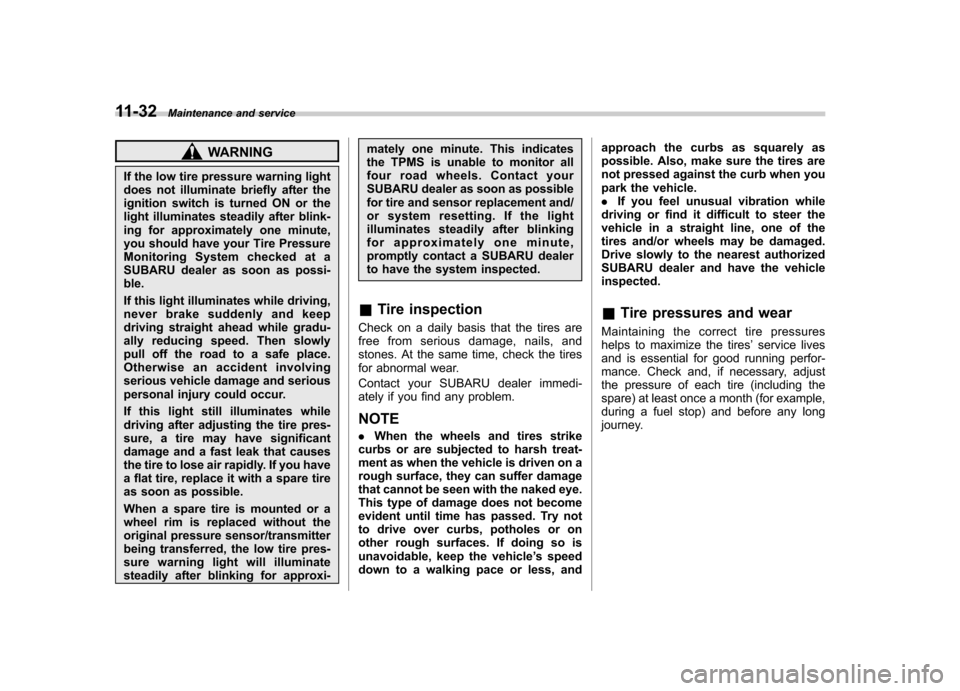
WARNING
If the low tire pressure warning light
does not illuminate briefly after the
ignition switch is turned ON or the
light illuminates steadily after blink-
ing for approximately one minute,
you should have your Tire Pressure
Monitoring System checked at a
SUBARU dealer as soon as possi-ble.
If this light illuminates while driving,
never brake suddenly and keep
driving straight ahead while gradu-
ally reducing speed. Then slowly
pull off the road to a safe place.
Otherwise an accident involving
serious vehicle damage and serious
personal injury could occur.
If this light still illuminates while
driving after adjusting the tire pres-
sure, a tire may have significant
damage and a fast leak that causes
the tire to lose air rapidly. If you have
a flat tire, replace it with a spare tire
as soon as possible.
When a spare tire is mounted or a
wheel rim is replaced without the
original pressure sensor/transmitter
being transferred, the low tire pres-
sure warning light will illuminate
steadily after blinking for approxi- mately one minute. This indicates
the TPMS is unable to monitor all
four road wheels. Contact your
SUBARU dealer as soon as possible
for tire and sensor replacement and/
or system resetting. If the light
illuminates steadily after blinking
for approximately one minute,
promptly contact a SUBARU dealer
to have the system inspected.
& Tire inspection
Check on a daily basis that the tires are
free from serious damage, nails, and
stones. At the same time, check the tires
for abnormal wear.
Contact your SUBARU dealer immedi-
ately if you find any problem. NOTE . When the wheels and tires strike
curbs or are subjected to harsh treat-
ment as when the vehicle is driven on a
rough surface, they can suffer damage
that cannot be seen with the naked eye.
This type of damage does not become
evident until time has passed. Try not
to drive over curbs, potholes or on
other rough surfaces. If doing so is
unavoidable, keep the vehicle ’s speed
down to a walking pace or less, and approach the curbs as squarely as
possible. Also, make sure the tires are
not pressed against the curb when you
park the vehicle..
If you feel unusual vibration while
driving or find it difficult to steer the
vehicle in a straight line, one of the
tires and/or wheels may be damaged.
Drive slowly to the nearest authorized
SUBARU dealer and have the vehicleinspected.
& Tire pressures and wear
Maintaining the correct tire pressures
helps to maximize the tires ’service lives
and is essential for good running perfor-
mance. Check and, if necessary, adjust
the pressure of each tire (including the
spare) at least once a month (for example,
during a fuel stop) and before any long
journey.