Jack SUBARU OUTBACK 2017 6.G Owners Manual
[x] Cancel search | Manufacturer: SUBARU, Model Year: 2017, Model line: OUTBACK, Model: SUBARU OUTBACK 2017 6.GPages: 610, PDF Size: 10.28 MB
Page 255 of 610
Audio/Audio set
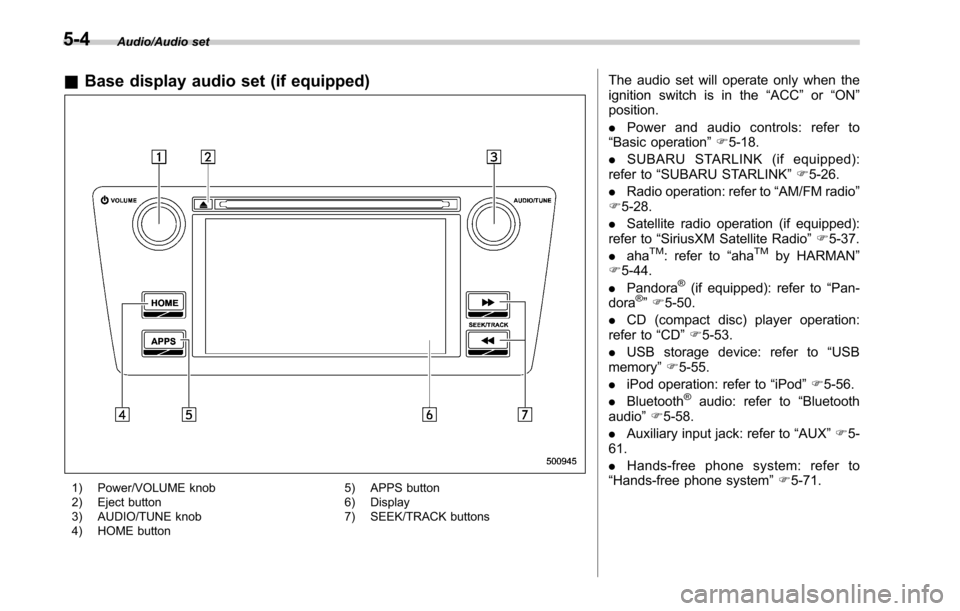
&Base display audio set (if equipped)
1) Power/VOLUME knob
2) Eject button
3) AUDIO/TUNE knob
4) HOME button 5) APPS button
6) Display
7) SEEK/TRACK buttons
The audio set will operate only when the
ignition switch is in the
“ACC”or “ON ”
position.
. Power and audio controls: refer to
“Basic operation” F5-18.
. SUBARU STARLINK (if equipped):
refer to “SUBARU STARLINK ”F 5-26.
. Radio operation: refer to “AM/FM radio”
F 5-28.
. Satellite radio operation (if equipped):
refer to “SiriusXM Satellite Radio” F5-37.
. aha
TM: refer to “ahaTMby HARMAN ”
F 5-44.
. Pandora
®(if equipped): refer to “Pan-
dora®” F 5-50.
. CD (compact disc) player operation:
refer to “CD”F 5-53.
. USB storage device: refer to “USB
memory ”F 5-55.
. iPod operation: refer to “iPod”F 5-56.
. Bluetooth
®audio: refer to “Bluetooth
audio ”F 5-58.
. Auxiliary input jack: refer to “AUX”F 5-
61.
. Hands-free phone system: refer to
“Hands-free phone system ”F 5-71.
5-4
Page 268 of 610
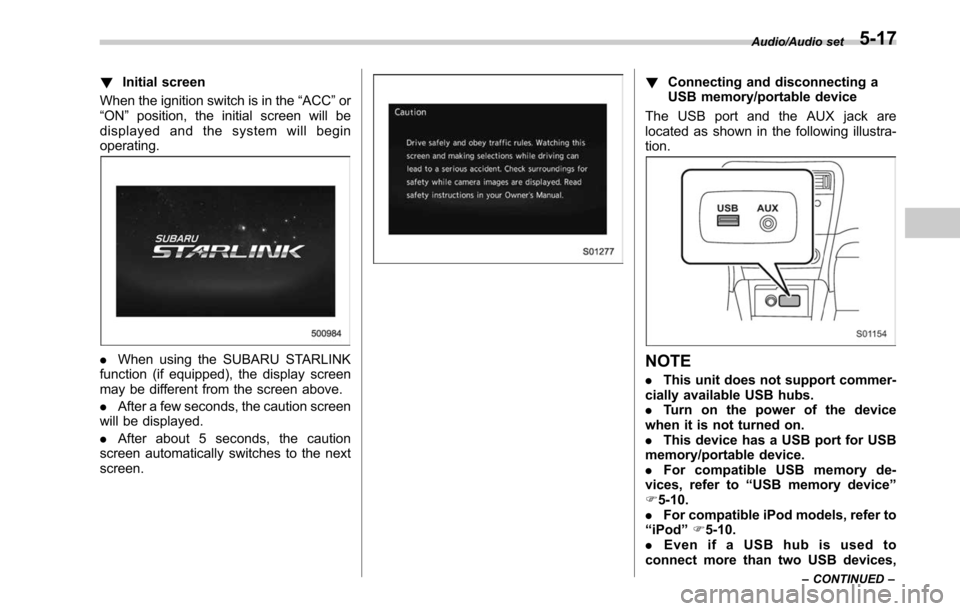
!Initial screen
When the ignition switch is in the “ACC”or
“ON ”position, the initial screen will be
displayed and the system will begin
operating.
. When using the SUBARU STARLINK
function (if equipped), the display screen
may be different from the screen above.
. After a few seconds, the caution screen
will be displayed.
. After about 5 seconds, the caution
screen automatically switches to the next
screen.
! Connecting and disconnecting a
USB memory/portable device
The USB port and the AUX jack are
located as shown in the following illustra-
tion.
NOTE
. This unit does not support commer-
cially available USB hubs.
. Turn on the power of the device
when it is not turned on.
. This device has a USB port for USB
memory/portable device.
. For compatible USB memory de-
vices, refer to “USB memory device ”
F 5-10.
. For compatible iPod models, refer to
“ iPod ”F 5-10.
. Even if a USB hub is used to
connect more than two USB devices,
Audio/Audio set
–CONTINUED –5-17
Page 313 of 610
Audio/Audio set
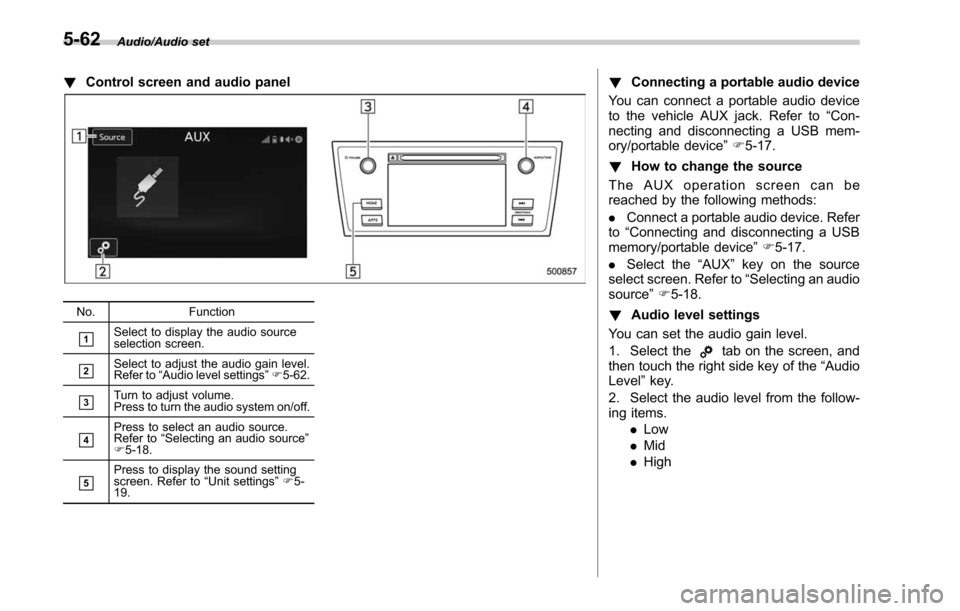
!Control screen and audio panel
No. Function
&1Select to display the audio source
selection screen.
&2Select to adjust the audio gain level.
Refer to“Audio level settings ”F 5-62.
&3Turn to adjust volume.
Press to turn the audio system on/off.
&4Press to select an audio source.
Refer to “Selecting an audio source ”
F 5-18.
&5Press to display the sound setting
screen. Refer to “Unit settings ”F 5-
19.
! Connecting a portable audio device
You can connect a portable audio device
to the vehicle AUX jack. Refer to “Con-
necting and disconnecting a USB mem-
ory/portable device ”F 5-17.
! How to change the source
The AUX operation screen can be
reached by the following methods:
. Connect a portable audio device. Refer
to “Connecting and disconnecting a USB
memory/portable device ”F 5-17.
. Select the “AUX”key on the source
select screen. Refer to “Selecting an audio
source” F5-18.
! Audio level settings
You can set the audio gain level.
1. Select the
tab on the screen, and
then touch the right side key of the “Audio
Level ”key.
2. Select the audio level from the follow-
ing items. .Low
. Mid
. High
5-62
Page 379 of 610
Starting and operating/Preparing to drive
.A vehiclefails the OBDII inspection if
the “CHECK ENGINE ”warning light is not
properly operating (light is illuminated or is
not working due to a burned out bulb) or
there is one or more diagnostic trouble
codes stored in the vehicle’ s computer.
. A state emission inspection may reject
(not pass or fail) a vehicle if the number of
OBDII system readiness monitors “NOT
READY ”is greater than one. If the
vehicle’ s battery has been recently re-
placed or disconnected, the OBDII system
inspection may indicate that the vehicle is
not ready for the emission test. Under this
condition, the vehicle driver should be
instructed to drive his/her vehicle for a few
days to reset the readiness monitors and
return for an emission re-inspection.
. Owners of rejected or failing vehicles
should contact their SUBARU Dealer for
service.
Some states still use dynamometers in
their emission inspection program. A
dynamometer is a treadmill or roller-like
testing device that allows your vehicle ’s
wheels to turn while the vehicle remains in
one place. Prior to your vehicle being put
on a dynamometer, tell your emission
inspector
not to place your SUBARU
AWD vehicle on a two-wheel dynam-
ometer. Otherwise, serious transmis-
sion damage will result. The U.S. Environmental Protection
Agency (EPA) and states using two-wheel
dynamometers in their emission testing
program have EXEMPTED SUBARU
AWD vehicles from the portion of the
testing program that involves a two-wheel
dynamometer. There are some states that
use four-wheel dynamometers in their
testing program. When properly used, this
equipment should not damage a SUBARU
AWD vehicle.
Under no circumstances should the rear
wheels be jacked off the ground, nor
should the driveshaft be disconnected for
state emission testing.
Preparing to drive
You should perform the following checks
and adjustments every day before you
start driving.
1. Check that all windows, mirrors, and
lights are clean and unobstructed.
2. Check the appearance and condition
of the tires. Also check tires for proper
inflation.
3. Look under the vehicle for any sign of
leaks.
4. Check that the hood, trunk (Legacy)
and rear gate (Outback) are fully closed.
5. Check the adjustment of the seat.
6. Check the adjustment of the inside
and outside mirrors.
7. Fasten your seatbelt. Check that your
passengers have fastened their seatbelts.
8. Check the operation of the warning
and indicator lights when the ignition
switch is turned to the
“ON”position.
9. Check the gauges, indicator and warn-
ing lights after starting the engine.
10. Check that no small animals enter the
engine compartment.
7-8
Page 468 of 610
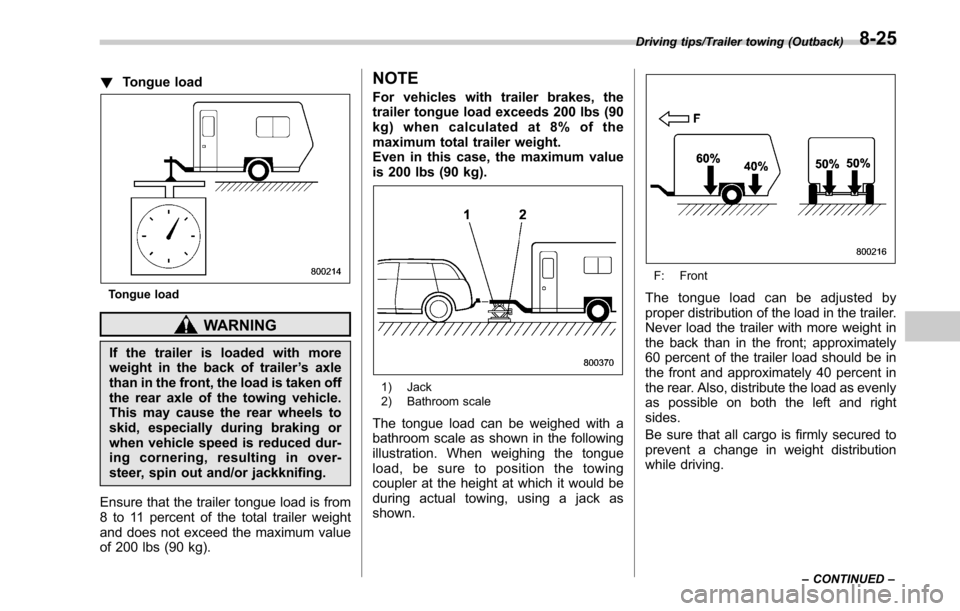
!Tongue load
Tongue load
WARNING
If the trailer is loaded with more
weight in the back of trailer ’s axle
than in the front, the load is taken off
the rear axle of the towing vehicle.
This may cause the rear wheels to
skid, especially during braking or
when vehicle speed is reduced dur-
ing cornering, resulting in over-
steer, spin out and/or jackknifing.
Ensure that the trailer tongue load is from
8 to 11 percent of the total trailer weight
and does not exceed the maximum value
of 200 lbs (90 kg).
NOTE
For vehicles with trailer brakes, the
trailer tongue load exceeds 200 lbs (90
kg) when calculated at 8% of the
maximum total trailer weight.
Even in this case, the maximum value
is 200 lbs (90 kg).
1) Jack
2) Bathroom scale
The tongue load can be weighed with a
bathroom scale as shown in the following
illustration. When weighing the tongue
load, be sure to position the towing
coupler at the height at which it would be
during actual towing, using a jack as
shown.
F: Front
The tongue load can be adjusted by
proper distribution of the load in the trailer.
Never load the trailer with more weight in
the back than in the front; approximately
60 percent of the trailer load should be in
the front and approximately 40 percent in
the rear. Also, distribute the load as evenly
as possible on both the left and right
sides.
Be sure that all cargo is firmly secured to
prevent a change in weight distribution
while driving.
Driving tips/Trailer towing (Outback)
–CONTINUED –8-25
Page 471 of 610
Driving tips/Trailer towing (Outback)
country on hot days.
. When towing a trailer, steering,
stability, stopping distance and
braking performance will be dif-
ferent when compared to normal
operation. You should never
drive at excessive speeds but
always employ extra caution
when towing a trailer. You should
also keep the following tips in
mind.
. When parking on a steep slope
with a trailer attached to your
vehicle, the braking power of the
electronic parking brake may not
be sufficient since strong brak-
ing power is needed.
! Before starting out on a trip
. Check the towing regulations for trailer
or caravan vehicles that vary by state/
region. Failure to comply with the proce-
dures set forth will not only compromise
your safety, but will also negate your
insurance coverage and/or may violate
the state road and traffic acts and regula-
tions.
. Check that the vehicle and vehicle-to-
hitch mounting are in good condition. If
any problems are apparent, do not tow the
trailer. .
Check that the vehicle rests horizon-
tally with the trailer attached. If the vehicle
is tipped sharply up at the front and down
at the rear, check the total trailer weight,
GVW, GAWs and tongue load again, then
confirm that the load and its distribution
are acceptable.
. Check that the tire pressures are
correct.
. Check that the vehicle and trailer are
connected properly. Confirm that
–the trailer tongue is connected
properly to the hitch ball.
– the trailer lights connector is con-
nected properly and trailer ’s stop lights
illuminate when the vehicle’ s brake
pedal is pressed, and that the trailer ’s
turn signal lights flash when the
vehicle’ s turn signal lever is operated.
– the safety chains are connected
properly.
– all cargo in the trailer is secured
safely in position.
– the side mirrors provide a good
rearward field of view without a sig-
nificant blind spot.
. Sufficient time should be taken to learn
the “feel ”of the vehicle/trailer combination
before starting out on a trip. In an area free
of traffic, practice turning, stopping and
backing up. !
Driving with a trailer
. You should allow for considerably more
stopping distance when towing a trailer.
Avoid sudden braking because it may
result in skidding or jackknifing and loss of
control.
. Avoid abrupt starts and sudden accel-
erations. For MT models, always start out
in first gear and release the clutch pedal at
moderate engine revolution.
. Avoid uneven steering, sharp turns and
rapid lane changes.
. Slow down before turning. Make a
longer than normal turning radius because
the trailer wheels will be closer than the
vehicle wheels to the inside of the turn. In
a tight turn, the trailer could hit your
vehicle.
. Crosswinds will adversely affect the
handling of your vehicle and trailer, caus-
ing sway. Crosswinds can be due to
weather conditions or the passing of large
trucks or buses. If swaying occurs, firmly
grip the steering wheel and promptly begin
decelerating your vehicle at a gradual
pace.
. When passing other vehicles, consid-
erable distance is required because of the
added weight and length caused by
attaching the trailer to your vehicle.
8-28
Page 476 of 610
CAUTION
Never use any temporary spare tire
other than the original. Using other
sizes may result in severe mechan-
ical damage to the drive train of your
vehicle.
The temporary spare tire is stored under
the under-floor storage compartment.
The temporary spare tire is smaller and
lighter than a conventional tire and is
designed for emergency use only. Re-
move the temporary spare tire and re-
install the conventional tire as soon as
possible because the spare tire is de-
signed only for temporary use.
Check the inflation pressure of the tem-
porary spare tire periodically to keep the
tire ready for use. The correct pressure is
60 psi (420 kPa, 4.2 kgf/cm
2).
When using the temporary spare tire, note
the following precautions.
. Do not exceed 50 mph (80 km/h).
. Do not put a tire chain on the temporary
spare tire. Because of the smaller tire size,
a tire chain will not fit properly.
. Do not use two or more temporary
spare tires at the same time.
. Do not drive over obstacles. This tire has a smaller diameter, so road clearance
is reduced.
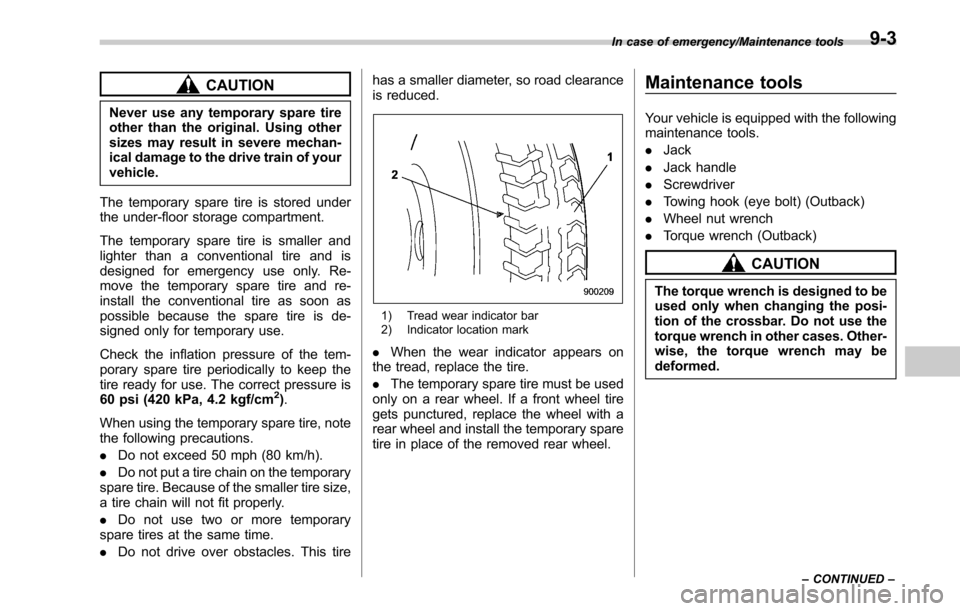
1) Tread wear indicator bar
2) Indicator location mark
.
When the wear indicator appears on
the tread, replace the tire.
. The temporary spare tire must be used
only on a rear wheel. If a front wheel tire
gets punctured, replace the wheel with a
rear wheel and install the temporary spare
tire in place of the removed rear wheel.
Maintenance tools
Your vehicle is equipped with the following
maintenance tools.
. Jack
. Jack handle
. Screwdriver
. Towing hook (eye bolt) (Outback)
. Wheel nut wrench
. Torque wrench (Outback)
CAUTION
The torque wrench is designed to be
used only when changing the posi-
tion of the crossbar. Do not use the
torque wrench in other cases. Other-
wise, the torque wrench may be
deformed.
In case of emergency/Maintenance tools
–CONTINUED –9-3
Page 477 of 610
In case of emergency/Maintenance tools
NOTE
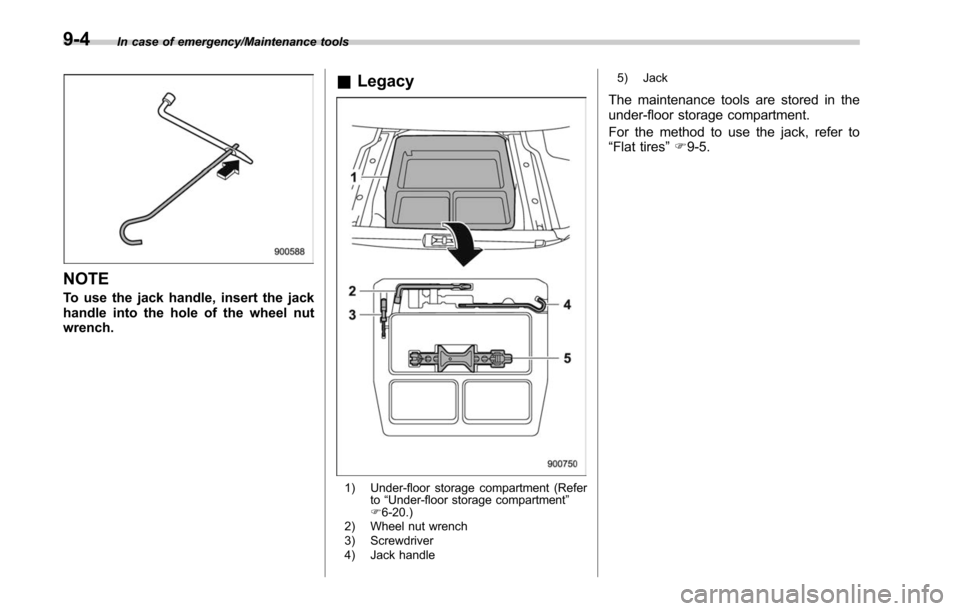
To use the jack handle, insert the jack
handle into the hole of the wheel nut
wrench.
&Legacy
1) Under-floor storage compartment (Refer
to“Under-floor storage compartment ”
F 6-20.)
2) Wheel nut wrench
3) Screwdriver
4) Jack handle 5) Jack
The maintenance tools are stored in the
under-floor storage compartment.
For the method to use the jack, refer to
“Flat tires
”F 9-5.
9-4
Page 478 of 610
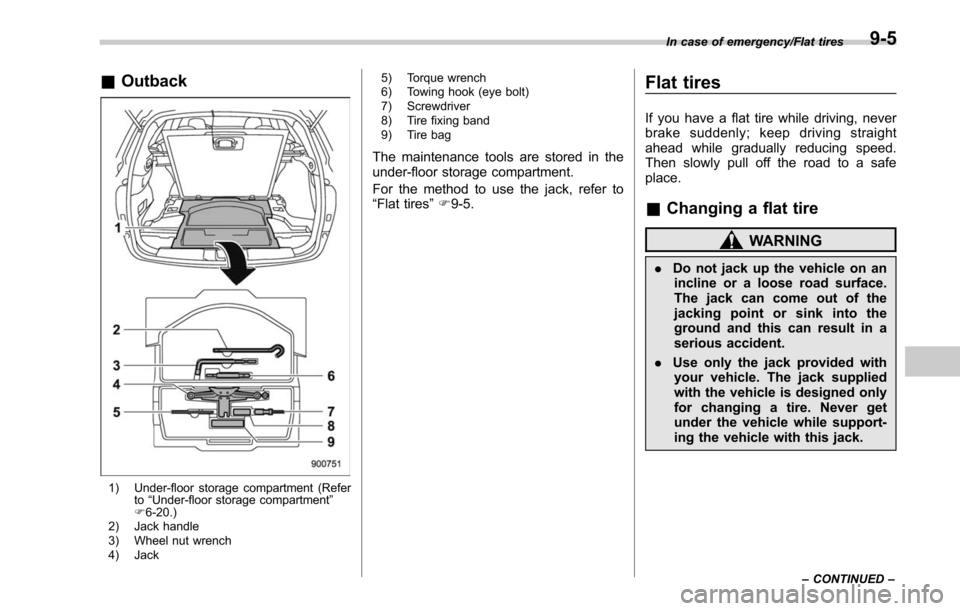
&Outback
1) Under-floor storage compartment (Refer
to“Under-floor storage compartment”
F 6-20.)
2) Jack handle
3) Wheel nut wrench
4) Jack 5) Torque wrench
6) Towing hook (eye bolt)
7) Screwdriver
8) Tire fixing band
9) Tire bag
The maintenance tools are stored in the
under-floor storage compartment.
For the method to use the jack, refer to
“
Flat tires ”F 9-5.
Flat tires
If you have a flat tire while driving, never
brake suddenly; keep driving straight
ahead while gradually reducing speed.
Then slowly pull off the road to a safe
place.
& Changing a flat tire
WARNING
. Do not jack up the vehicle on an
incline or a loose road surface.
The jack can come out of the
jacking point or sink into the
ground and this can result in a
serious accident.
. Use only the jack provided with
your vehicle. The jack supplied
with the vehicle is designed only
for changing a tire. Never get
under the vehicle while support-
ing the vehicle with this jack.
In case of emergency/Flat tires
–CONTINUED –9-5
Page 479 of 610
In case of emergency/Flat tires
.Always turn off the engine before
raising the flat tire off the ground
using the jack. Never swing or
push the vehicle supported with
the jack. The jack can come out
of the jacking point due to a jolt
and this can result in a serious
accident.
1. Park on a hard, level surface, when-
ever possible, then stop the engine.
2. Apply the parking brake and shift the
shift lever in reverse (MT models) or the
select lever in the “P”(Park) position (CVT
models).
3. Turn on the hazard warning flasher
and unload all occupants and luggage
from the vehicle.
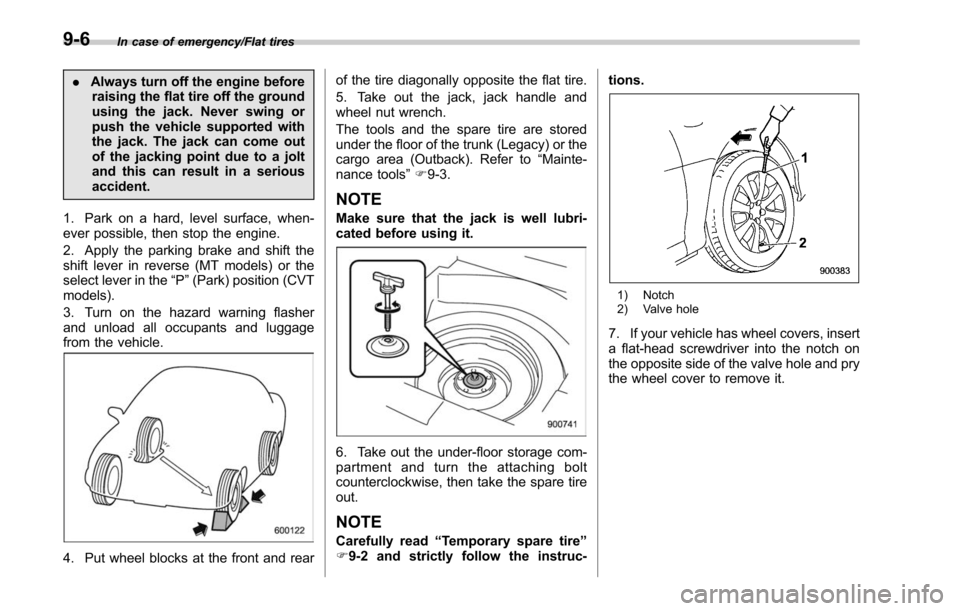
4. Put wheel blocks at the front and rear of the tire diagonally opposite the flat tire.
5. Take out the jack, jack handle and
wheel nut wrench.
The tools and the spare tire are stored
under the floor of the trunk (Legacy) or the
cargo area (Outback). Refer to
“Mainte-
nance tools ”F 9-3.
NOTE
Make sure that the jack is well lubri-
cated before using it.
6. Take out the under-floor storage com-
partment and turn the attaching bolt
counterclockwise, then take the spare tire
out.
NOTE
Carefully read “Temporary spare tire ”
F 9-2 and strictly follow the instruc- tions.
1) Notch
2) Valve hole
7. If your vehicle has wheel covers, insert
a flat-head screwdriver into the notch on
the opposite side of the valve hole and pry
the wheel cover to remove it.
9-6