display SUBARU OUTBACK 2020 Getting Started Guide
[x] Cancel search | Manufacturer: SUBARU, Model Year: 2020, Model line: OUTBACK, Model: SUBARU OUTBACK 2020Pages: 132, PDF Size: 5.99 MB
Page 103 of 132
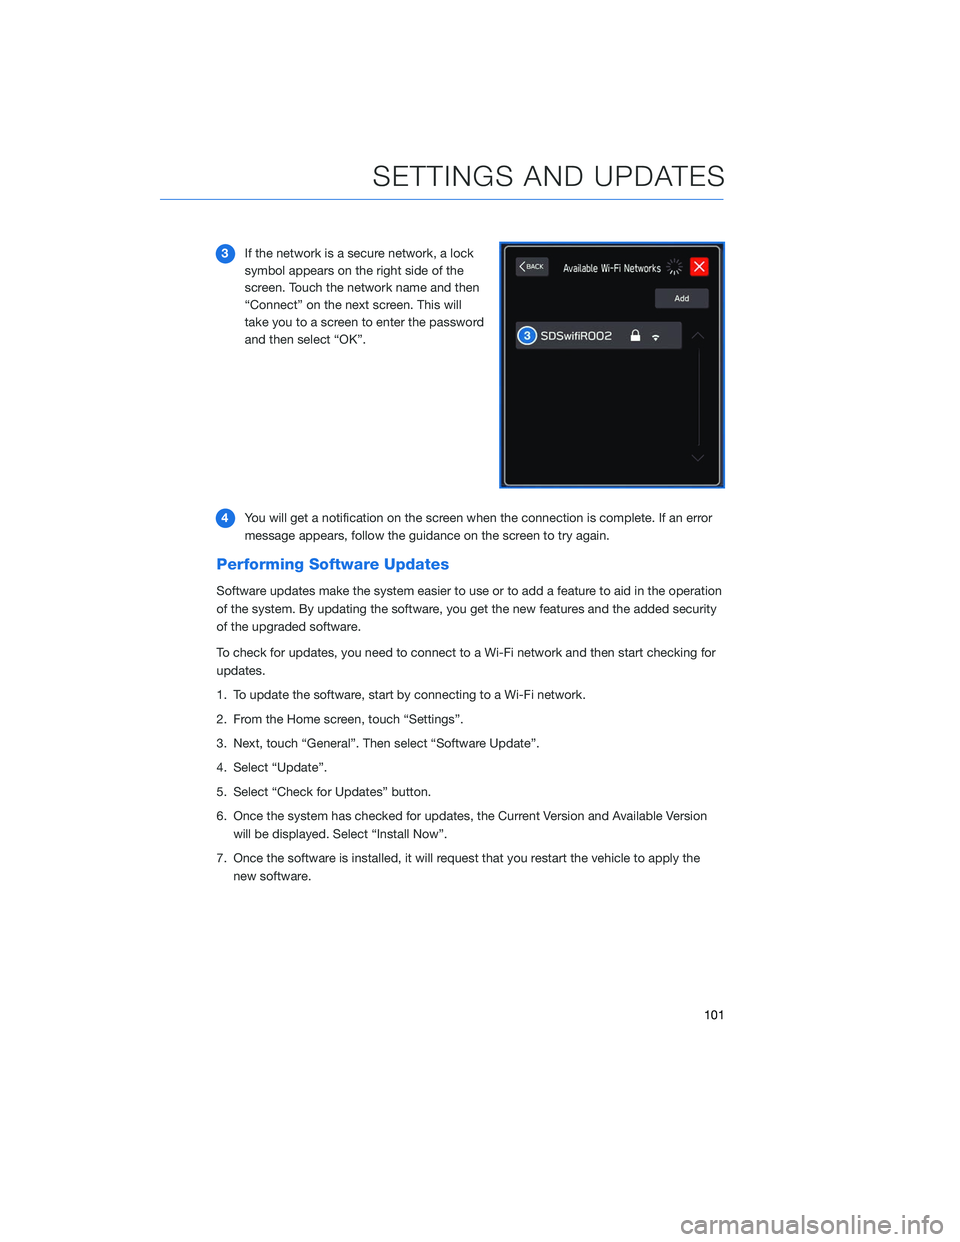
3If the network is a secure network, a lock
symbol appears on the right side of the
screen. Touch the network name and then
“Connect” on the next screen. This will
take you to a screen to enter the password
and then select “OK”.
4 You will get a notification on the screen when the connection is complete. If an error
message appears, follow the guidance on the screen to try again.
Performing Software Updates
Software updates make the system easier to use or to add a feature to aid in the operation
of the system. By updating the software, you get the new features and the added security
of the upgraded software.
To check for updates, you need to connect to a Wi-Fi network and then start checking for
updates.
1. To update the software, start by connecting to a Wi-Fi network.
2. From the Home screen, touch “Settings”.
3. Next, touch “General”. Then select “Software Update”.
4. Select “Update”.
5. Select “Check for Updates” button.
6. Once the system has checked for updates, the Current Version and Available Version
will be displayed. Select “Install Now”.
7. Once the software is installed, it will request that you restart the vehicle to apply the new software.
SETTINGS AND UPDATES
101
Page 106 of 132
MAPS/NAVIGATION
There are many settings that can be customized to your preference. These settings are
under the “Setting” menu and then “Navigation”. Below are some of the common settings
you may want to change:
SETTINGFUNCTION
Show Along Route Turn the display for parking lots, gas
stations and rest areas on or off for the
route being traveled during route guidance.
Arrival Distance/Time Sets the display for the estimated
remaining distance and estimated
remaining time to the destination.
Freeway Exit Preview Sets the freeway exit preview to on or off.
Automatic Zoom Sets whether to automatically enlarge the
map when approaching intersections or
turning points during route guidance on or
off.
Auto-Hide Route Bar Sets the route bar auto-hide function to on
or off.
Route Preference Sets the preferred route type when
searching for a new route.
Avoid Sets avoidance criteria for the route
calculation.
Traffic Warning Tone Sets the traffic alert sound to on or off.
Map Update Sets the updating of the map data.
Checking for Updates
You can update the maps to the latest information. For the best possible navigation
experience, regularly update maps for all frequented regions, including nearby states.
The maps can be updated over the air or with a USB memory device. When updating over
the air, you are limited to updating eight regions (states) at a time. This allows you to
update your home state without having to download the entire map program for the United
States. This option is great if you normally stay in your home state and/or surrounding
states.
SETTINGS AND UPDATES
104
Page 113 of 132
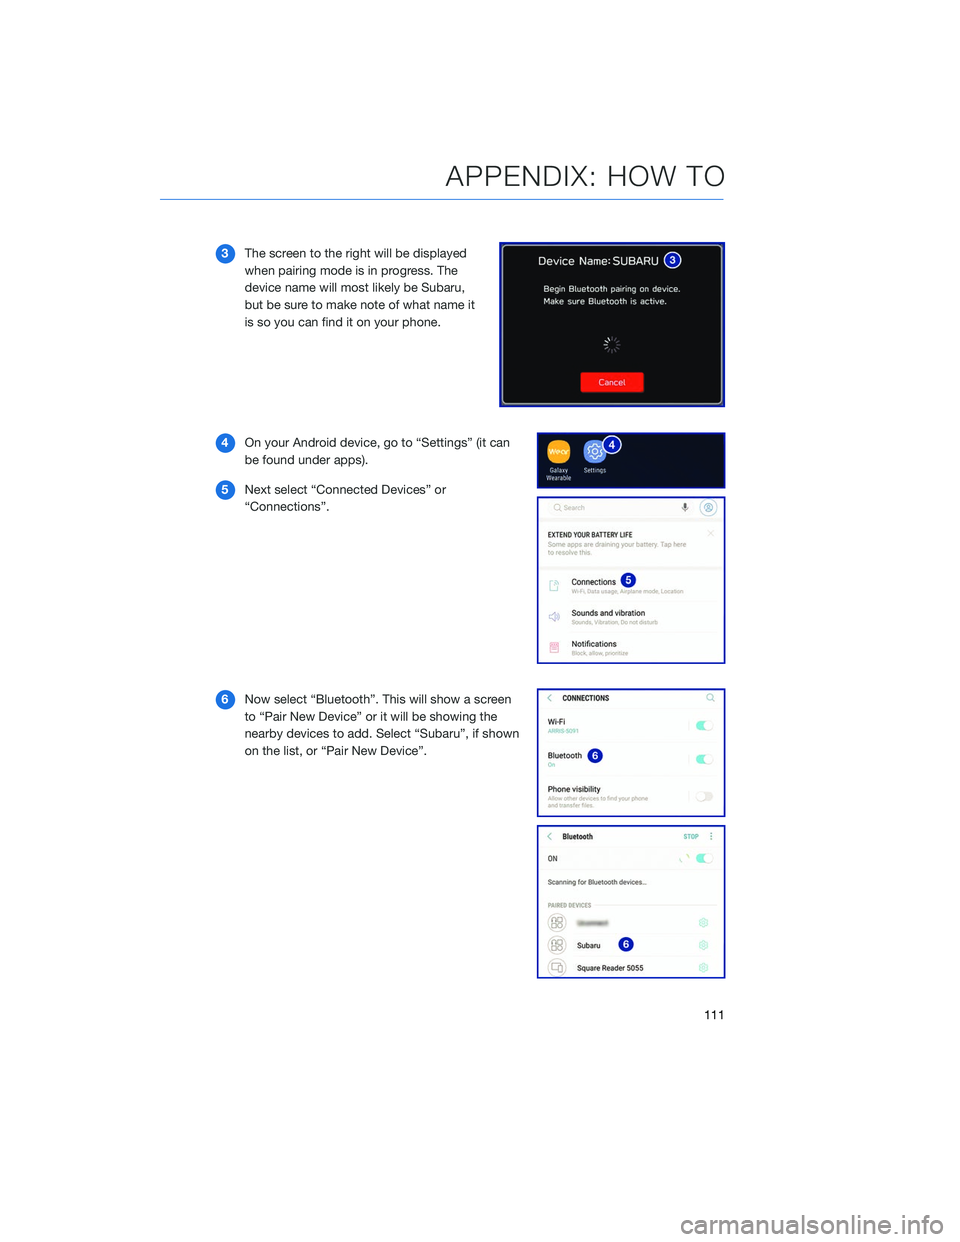
3The screen to the right will be displayed
when pairing mode is in progress. The
device name will most likely be Subaru,
but be sure to make note of what name it
is so you can find it on your phone.
4 On your Android device, go to “Settings” (it can
be found under apps).
5 Next select “Connected Devices” or
“Connections”.
6 Now select “Bluetooth”. This will show a screen
to “Pair New Device” or it will be showing the
nearby devices to add. Select “Subaru”, if shown
on the list, or “Pair New Device”.
APPENDIX: HOW TO
111
Page 115 of 132
Pairing an iOS/Apple Device
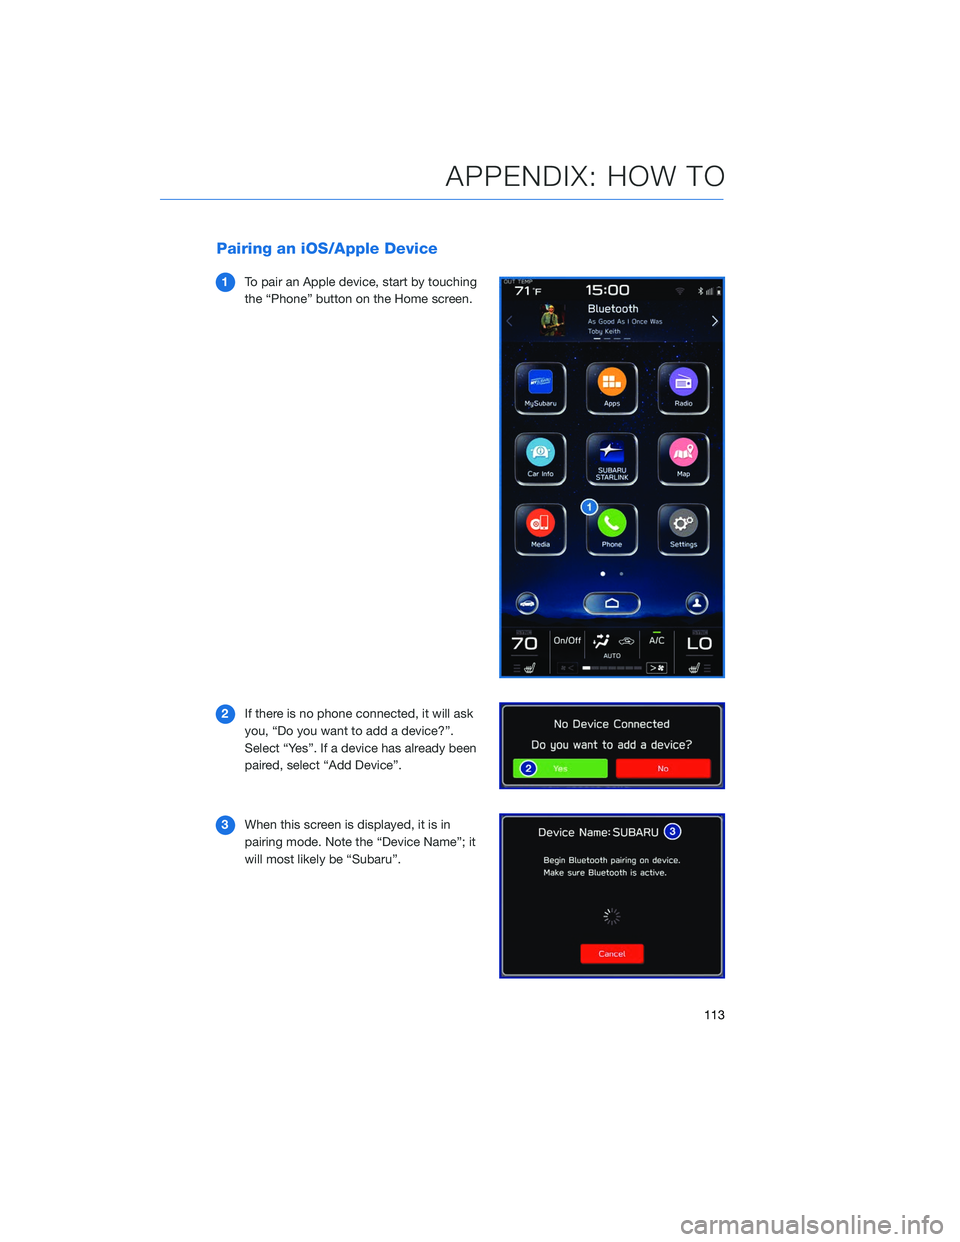
1To pair an Apple device, start by touching
the “Phone” button on the Home screen.
2 If there is no phone connected, it will ask
you, “Do you want to add a device?”.
Select “Yes”. If a device has already been
paired, select “Add Device”.
3 When this screen is displayed, it is in
pairing mode. Note the “Device Name”; it
will most likely be “Subaru”.
APPENDIX: HOW TO
113
Page 119 of 132
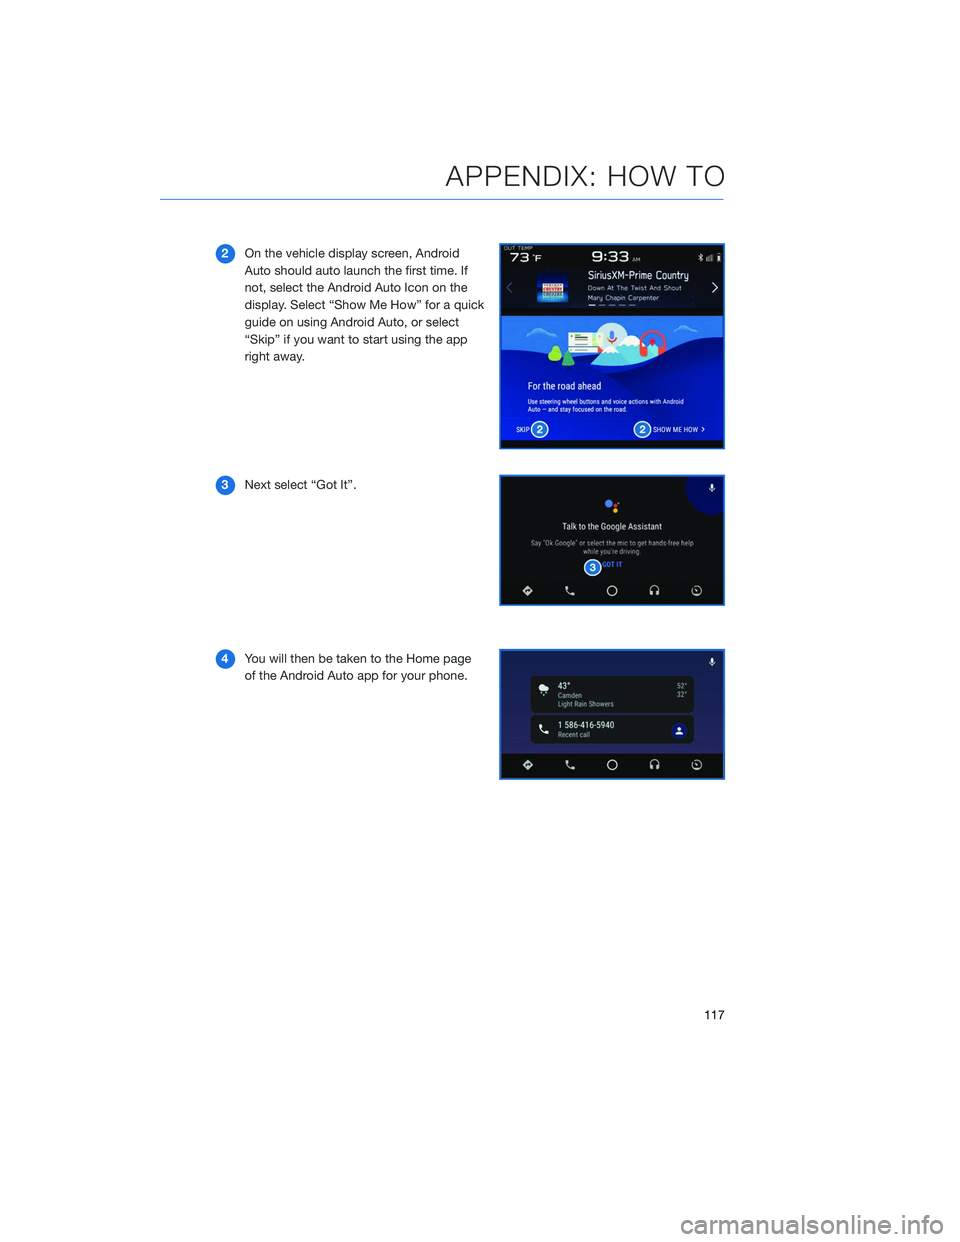
2On the vehicle display screen, Android
Auto should auto launch the first time. If
not, select the Android Auto Icon on the
display. Select “Show Me How” for a quick
guide on using Android Auto, or select
“Skip” if you want to start using the app
right away.
3 Next select “Got It”.
4 You will then be taken to the Home page
of the Android Auto app for your phone.
APPENDIX: HOW TO
117
Page 122 of 132
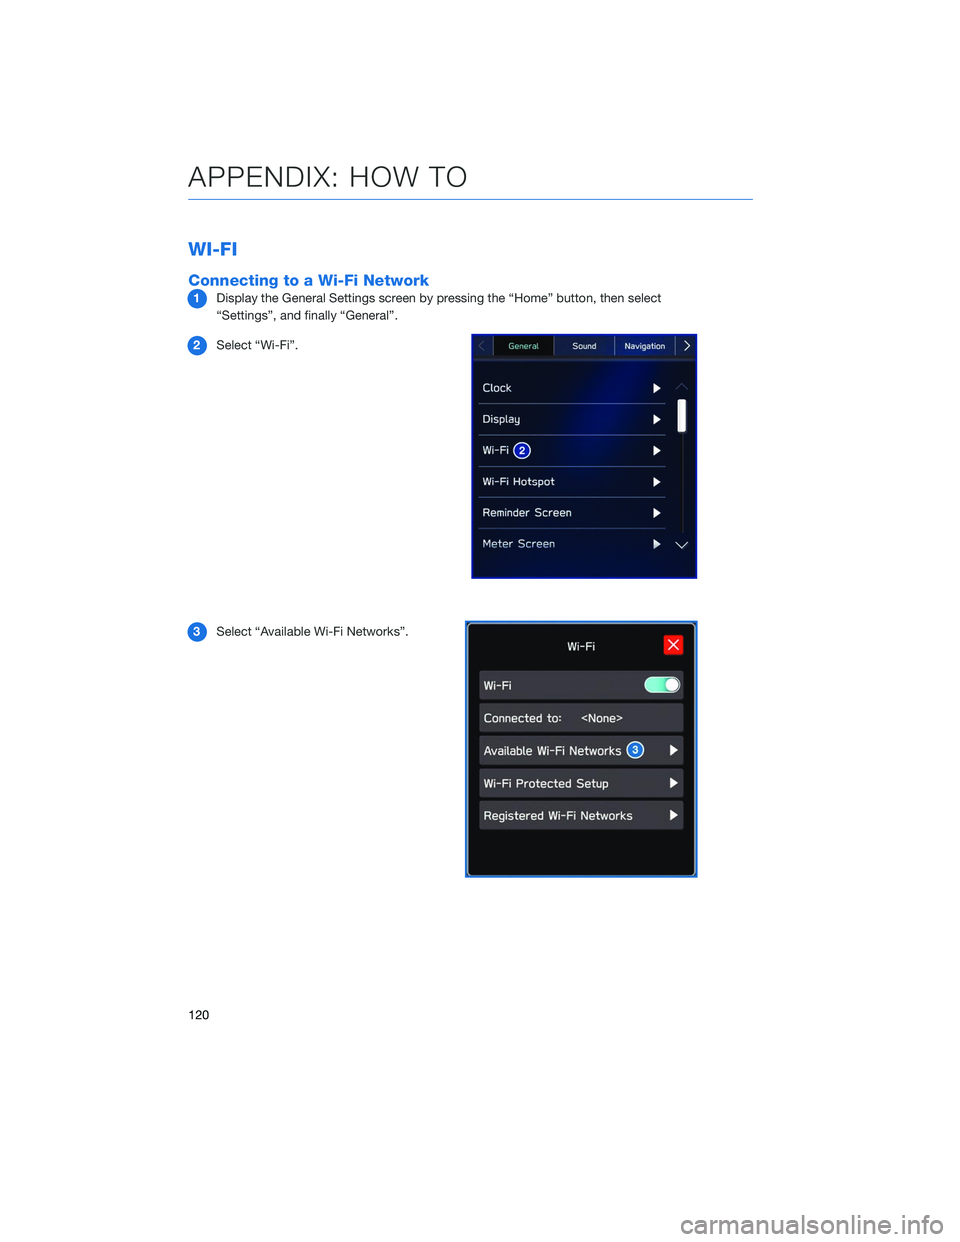
WI-FI
Connecting to a Wi-Fi Network
1Display the General Settings screen by pressing the “Home” button, then select
“Settings”, and finally “General”.
2 Select “Wi-Fi”.
3 Select “Available Wi-Fi Networks”.
APPENDIX: HOW TO
120
Page 124 of 132
FIRMWARE SOFTWARE UPDATES
For 11.6-inch Multimedia Plus and the 11.6-inch Multimedia Navigation systems only, the
system software may also be updated by you via a Wi-Fi connection or using the aha
application on your smartphone (depending on your smartphone communication and
transfer speed). The update process involves downloading and installing the software
update. Note that system functionality will be restricted during installation.
1. Connect to a Wi-Fi network or start the aha application on your smartphone.
2. Display the general setting screen by pressing the “Home” button, then select“Settings”, and finally “General”.
3. Select “Software Update”. If “Automatically Check for Updates” is turned on at the general settings screen, an update check will be performed automatically before
proceeding to the next step. If “Automatically Download Updates” is turned on at the
general settings screen, the software update will be downloaded automatically before
proceeding to “Update Installation”.
4. If the system is not set to “Automatically Check for Updates”, select “Download Now” to begin the download. The download status progress is displayed in the upper right of
the screen. If you need to stop the download and restart at a later time, select “Later” to
stop the process.
5. Select “Install Now” to start the installation process. The installation process will take several minutes to complete. If you need to stop the installation process, press
“Cancel”.
6. When the installation is complete, select “I Agree” on the confirmation message to complete the update process. By selecting “I Agree”, the system will restart
automatically.
APPENDIX: HOW TO
122