display SUBARU OUTBACK 2021 Getting Started Guide
[x] Cancel search | Manufacturer: SUBARU, Model Year: 2021, Model line: OUTBACK, Model: SUBARU OUTBACK 2021Pages: 172, PDF Size: 53.92 MB
Page 43 of 172
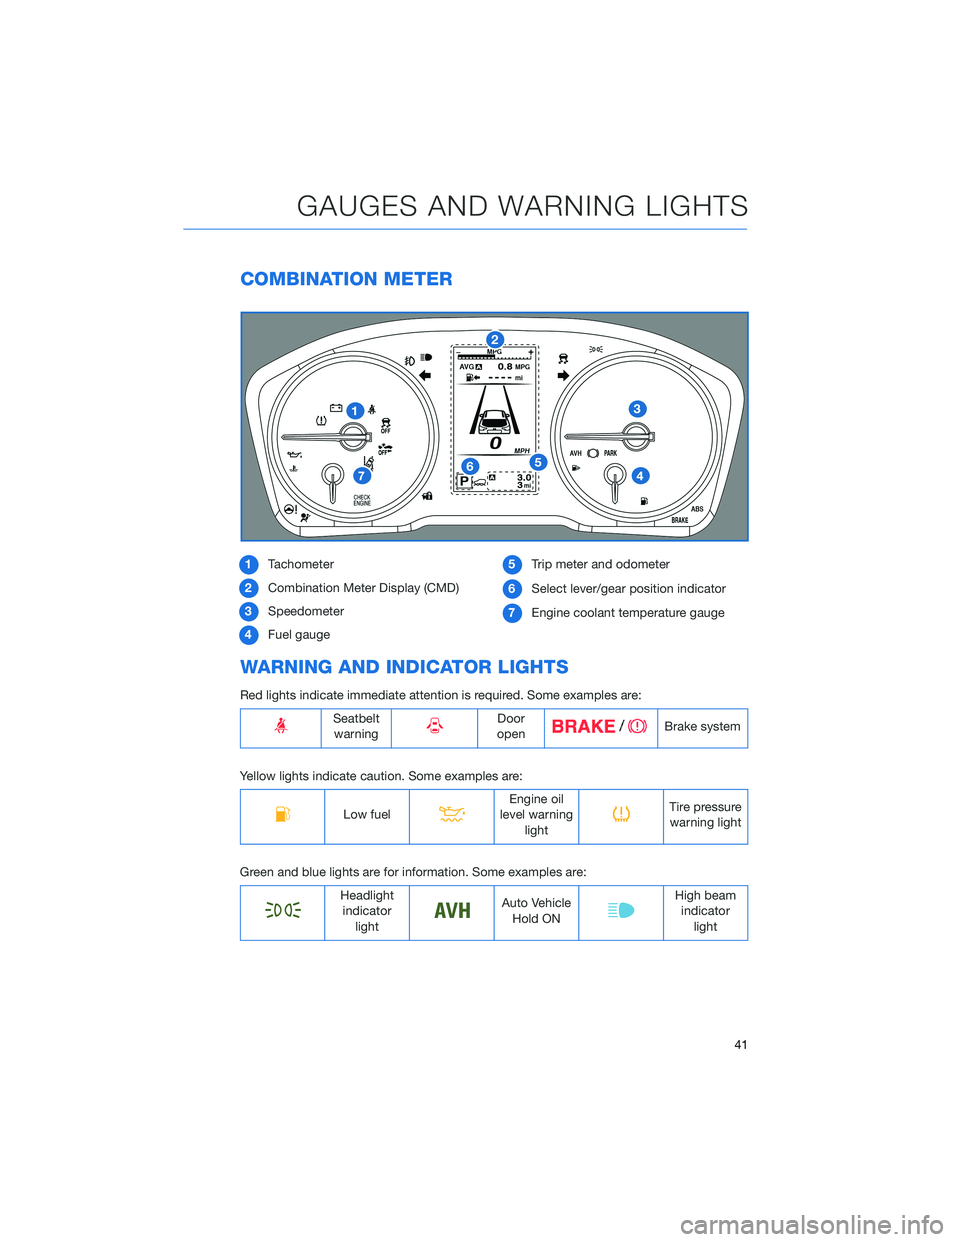
COMBINATION METER
1Tachometer
2Combination Meter Display (CMD)
3Speedometer
4Fuel gauge5Trip meter and odometer
6Select lever/gear position indicator
7Engine coolant temperature gauge
WARNING AND INDICATOR LIGHTS
Red lights indicate immediate attention is required. Some examples are:
Seatbelt
warningDoor
openBrake system
Yellow lights indicate caution. Some examples are:
Low fuelEngine oil
level warning
lightTire pressure
warning light
Green and blue lights are for information. Some examples are:
Headlight
indicator
lightAuto Vehicle
Hold ONHigh beam
indicator
light
GAUGES AND WARNING LIGHTS
41
Page 45 of 172
DRIVING THE VEHICLE
Automatic Transmission Shift Mode
The Continuously Variable Transmission (CVT)
is electronically controlled and provides two
different driving modes: normal and manual.
Normal Mode
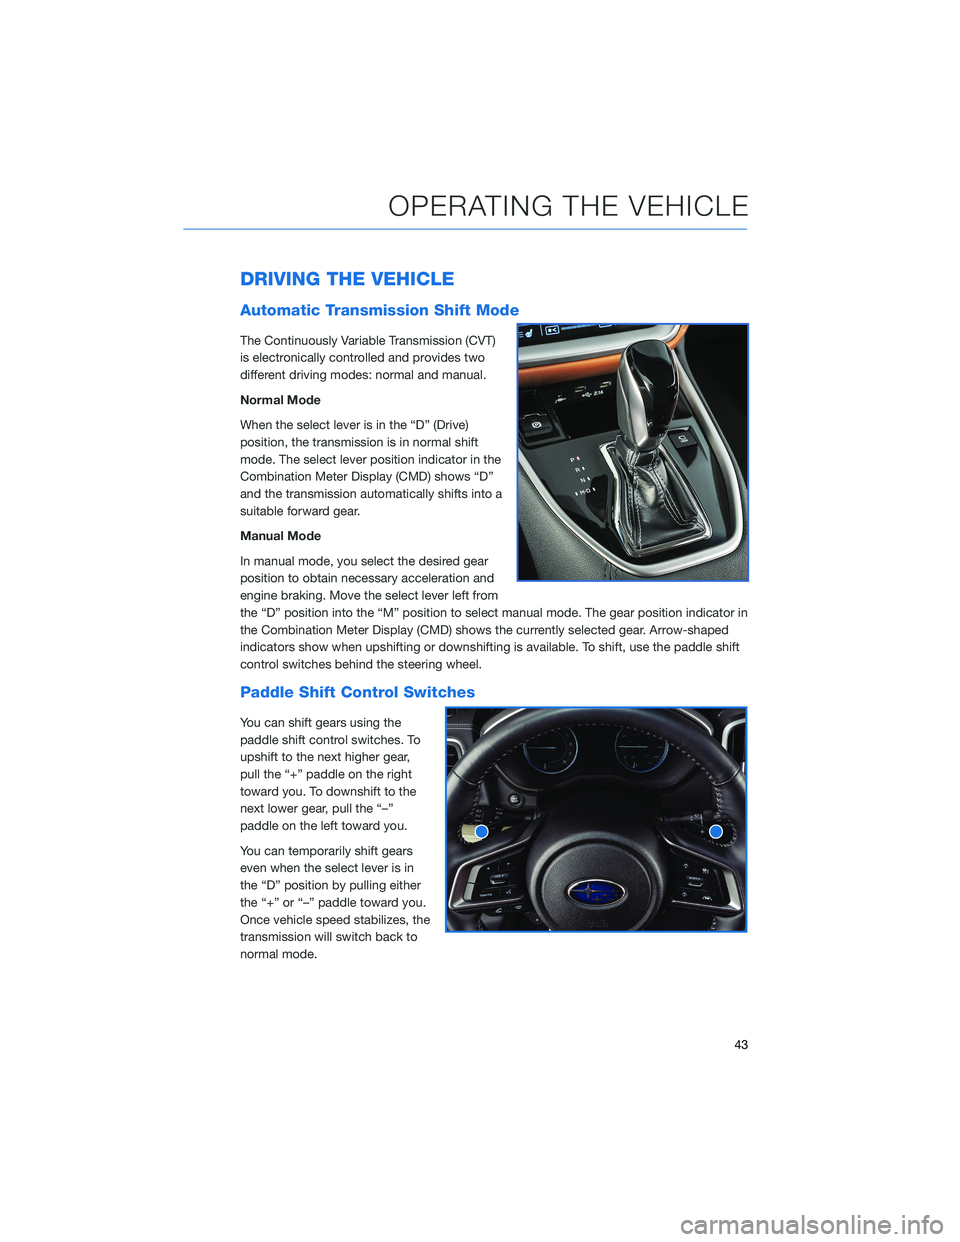
When the select lever is in the “D” (Drive)
position, the transmission is in normal shift
mode. The select lever position indicator in the
Combination Meter Display (CMD) shows “D”
and the transmission automatically shifts into a
suitable forward gear.
Manual Mode
In manual mode, you select the desired gear
position to obtain necessary acceleration and
engine braking. Move the select lever left from
the “D” position into the “M” position to select manual mode. The gear position indicator in
the Combination Meter Display (CMD) shows the currently selected gear. Arrow-shaped
indicators show when upshifting or downshifting is available. To shift, use the paddle shift
control switches behind the steering wheel.
Paddle Shift Control Switches
You can shift gears using the
paddle shift control switches. To
upshift to the next higher gear,
pull the “+” paddle on the right
toward you. To downshift to the
next lower gear, pull the “–”
paddle on the left toward you.
You can temporarily shift gears
even when the select lever is in
the “D” position by pulling either
the “+” or “–” paddle toward you.
Once vehicle speed stabilizes, the
transmission will switch back to
normal mode.
OPERATING THE VEHICLE
43
Page 46 of 172
AUTO START–STOP
The Auto Start-Stop system is designed to automatically stop and restart the engine when
the vehicle is stationary for a short period of time (while waiting for a traffic light or in a
traffic jam) after the engine has warmed up. The system operates in order to reduce fuel
consumption, exhaust emissions and undesired idling noise.
Auto Start-Stop System ON/OFF
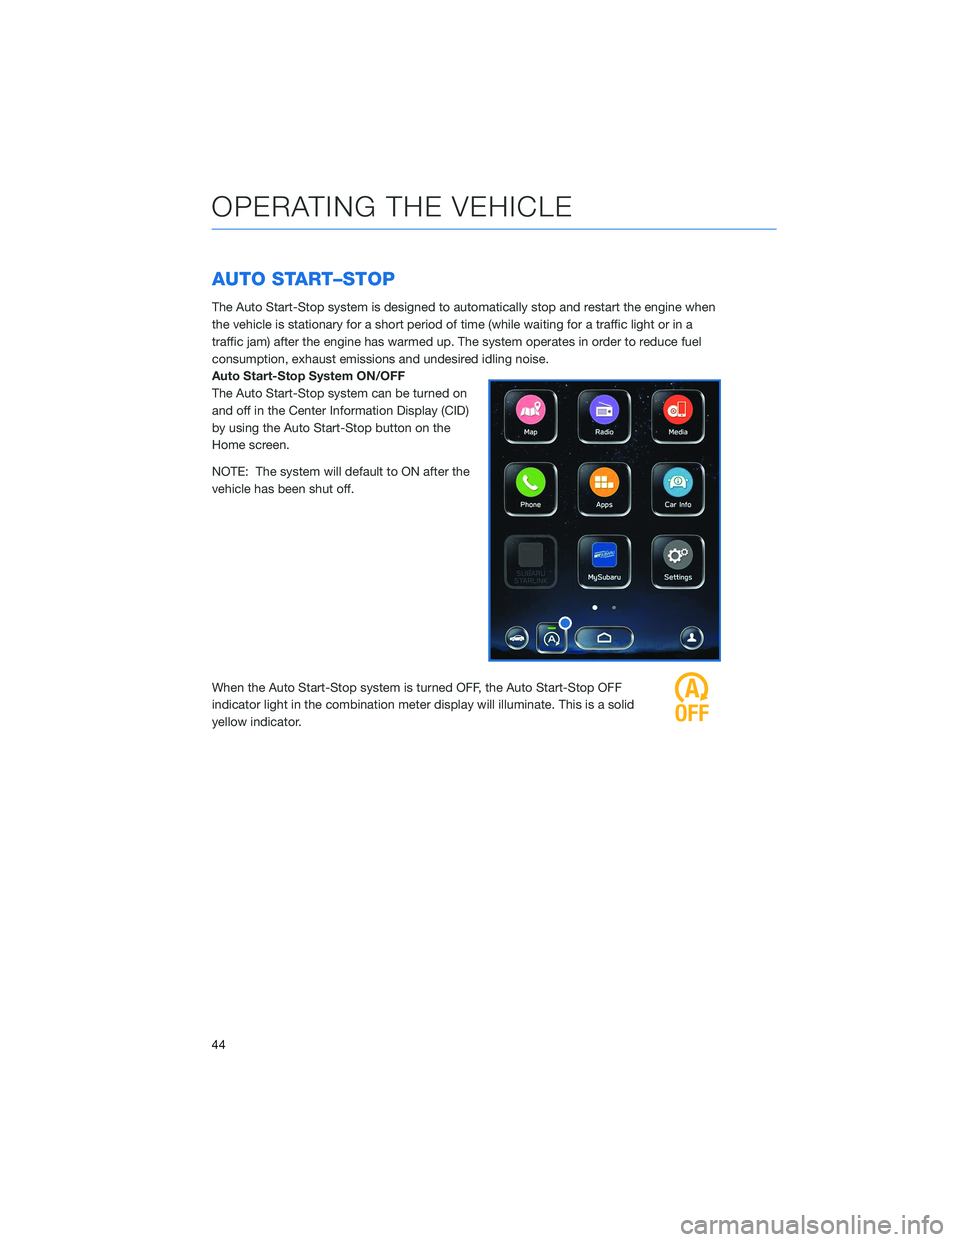
The Auto Start-Stop system can be turned on
and off in the Center Information Display (CID)
by using the Auto Start-Stop button on the
Home screen.
NOTE: The system will default to ON after the
vehicle has been shut off.
When the Auto Start-Stop system is turned OFF, the Auto Start-Stop OFF
indicator light in the combination meter display will illuminate. This is a solid
yellow indicator.
OPERATING THE VEHICLE
44
Page 47 of 172
System Operation
So that it can be used safely and comfortably, in addition to driver operations, the Auto
Start-Stop system is designed to constantly monitor the vehicle conditions as well as the
environment inside and outside the vehicle, in order to control stopping and restarting of
the engine.
After the vehicle has been completely stopped by depressing the brake pedal
with the select lever in the “D” position, the engine will be automatically
stopped.
If you release the brake pedal with the select lever kept in the “D” position, the
engine will be automatically restarted.
Auto Vehicle Hold (AVH) also integrates seamlessly with Auto Start-Stop functions. With
AVH, the parking brake automatically applies, so you can sit without your foot on the brake
pedal. To restart the engine, just gently press down on the accelerator pedal.
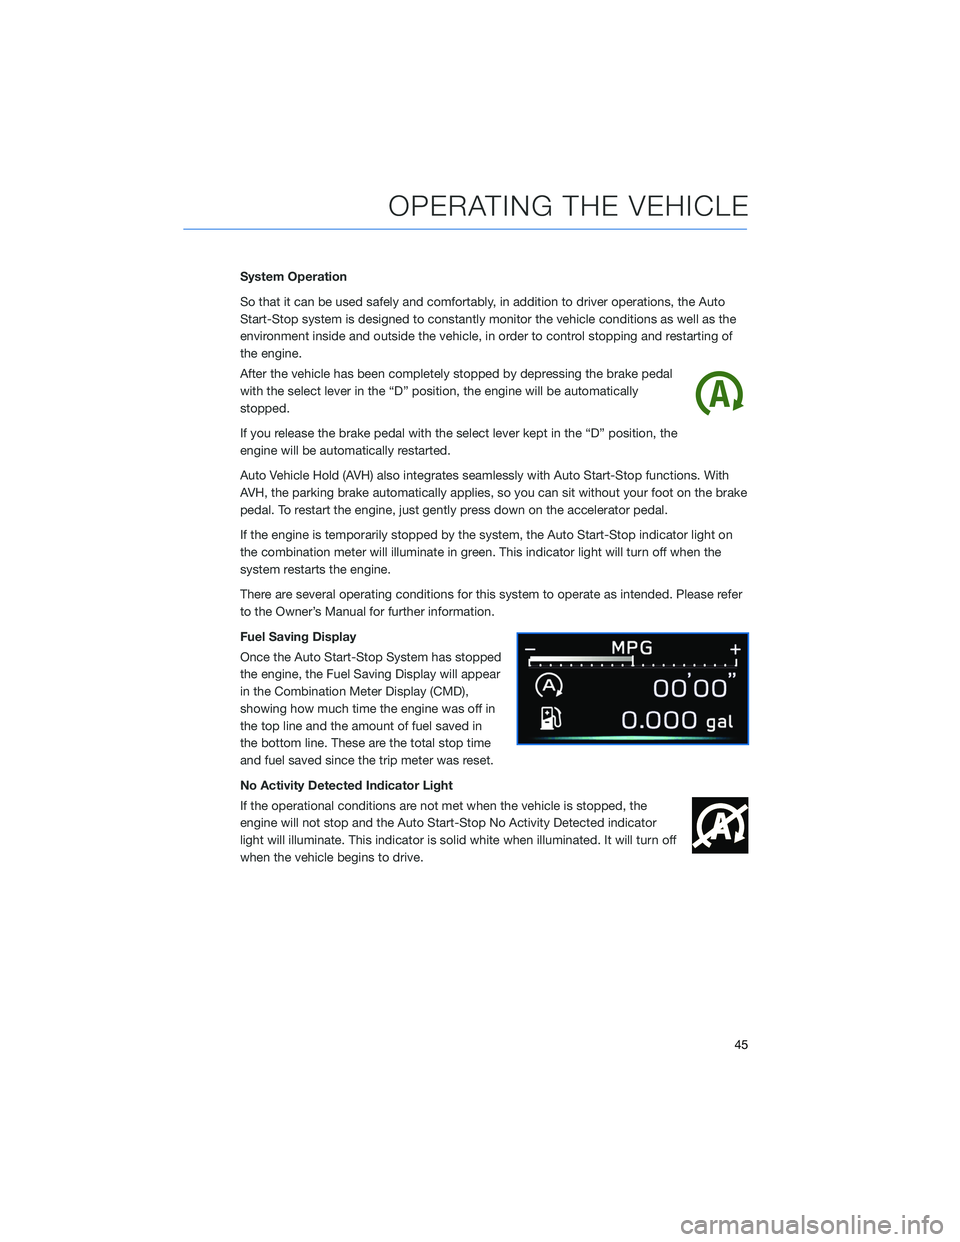
If the engine is temporarily stopped by the system, the Auto Start-Stop indicator light on
the combination meter will illuminate in green. This indicator light will turn off when the
system restarts the engine.
There are several operating conditions for this system to operate as intended. Please refer
to the Owner’s Manual for further information.
Fuel Saving Display
Once the Auto Start-Stop System has stopped
the engine, the Fuel Saving Display will appear
in the Combination Meter Display (CMD),
showing how much time the engine was off in
the top line and the amount of fuel saved in
the bottom line. These are the total stop time
and fuel saved since the trip meter was reset.
No Activity Detected Indicator Light
If the operational conditions are not met when the vehicle is stopped, the
engine will not stop and the Auto Start-Stop No Activity Detected indicator
light will illuminate. This indicator is solid white when illuminated. It will turn off
when the vehicle begins to drive.
OPERATING THE VEHICLE
45
Page 56 of 172
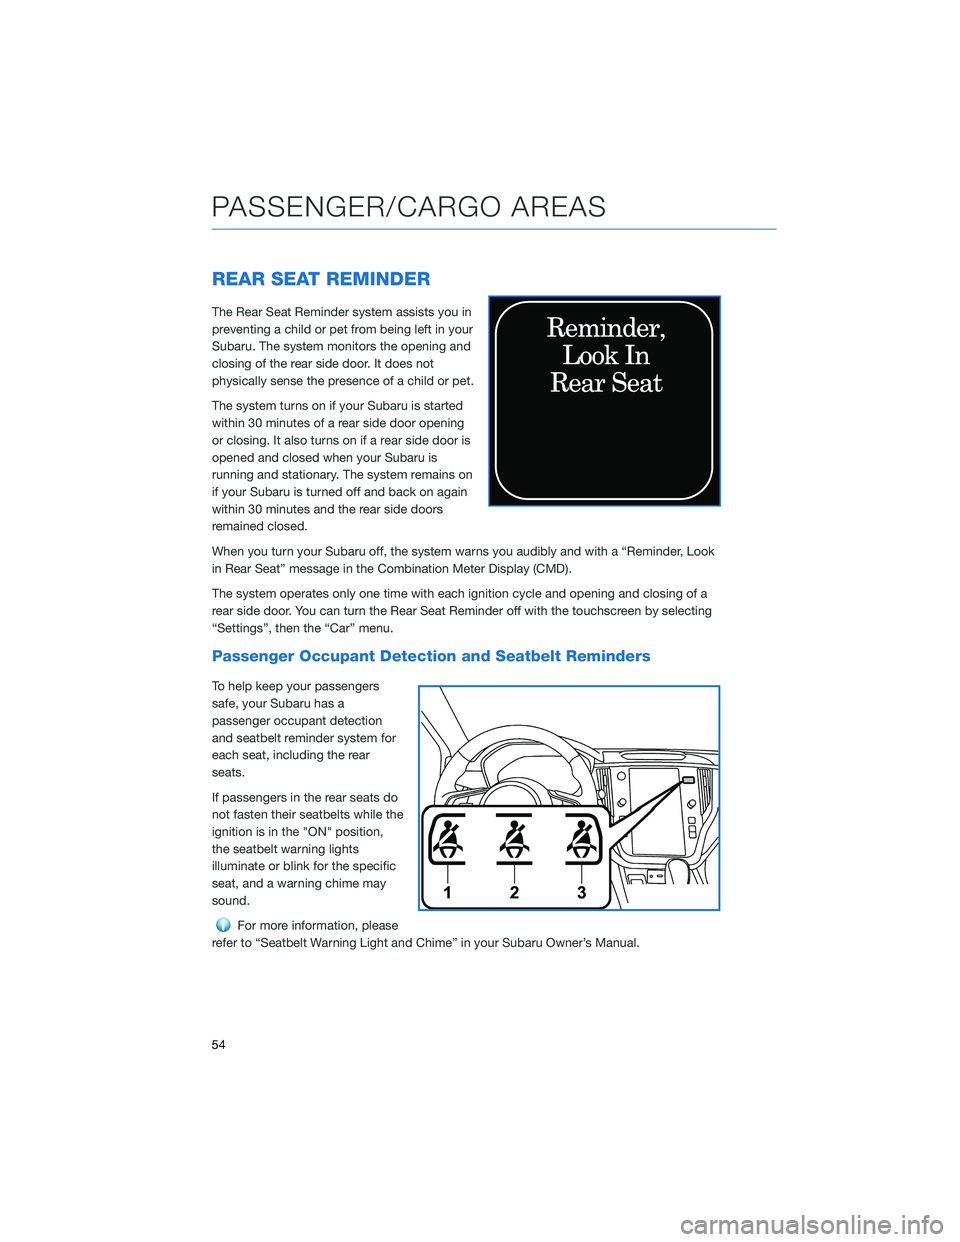
REAR SEAT REMINDER
The Rear Seat Reminder system assists you in
preventing a child or pet from being left in your
Subaru. The system monitors the opening and
closing of the rear side door. It does not
physically sense the presence of a child or pet.
The system turns on if your Subaru is started
within 30 minutes of a rear side door opening
or closing. It also turns on if a rear side door is
opened and closed when your Subaru is
running and stationary. The system remains on
if your Subaru is turned off and back on again
within 30 minutes and the rear side doors
remained closed.
When you turn your Subaru off, the system warns you audibly and with a “Reminder, Look
in Rear Seat” message in the Combination Meter Display (CMD).
The system operates only one time with each ignition cycle and opening and closing of a
rear side door. You can turn the Rear Seat Reminder off with the touchscreen by selecting
“Settings”, then the “Car” menu.
Passenger Occupant Detection and Seatbelt Reminders
To help keep your passengers
safe, your Subaru has a
passenger occupant detection
and seatbelt reminder system for
each seat, including the rear
seats.
If passengers in the rear seats do
not fasten their seatbelts while the
ignition is in the "ON" position,
the seatbelt warning lights
illuminate or blink for the specific
seat, and a warning chime may
sound.
For more information, please
refer to “Seatbelt Warning Light and Chime” in your Subaru Owner’s Manual.
PASSENGER/CARGO AREAS
54
Page 64 of 172
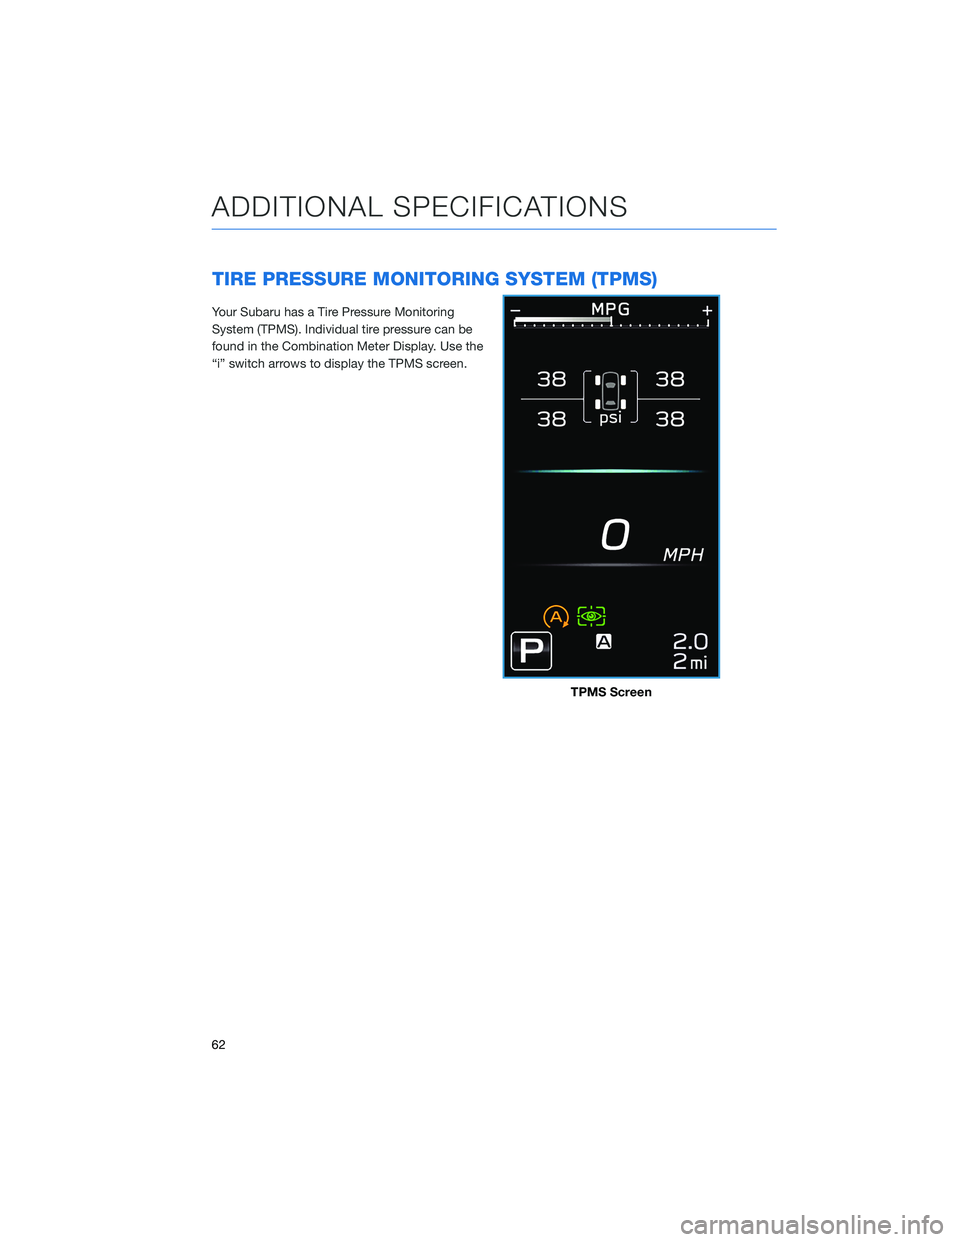
TIRE PRESSURE MONITORING SYSTEM (TPMS)
Your Subaru has a Tire Pressure Monitoring
System (TPMS). Individual tire pressure can be
found in the Combination Meter Display. Use the
“i” switch arrows to display the TPMS screen.
TPMS Screen
ADDITIONAL SPECIFICATIONS
62
Page 67 of 172
OVERVIEW OF YOUR MULTIMEDIA SYSTEM
SUBARU STARLINK®Multimedia combines the radio along with the ability to connect your
phone* through Bluetooth®to the multimedia system for making calls, sending text
messages and listening to your favorite songs on your phone.
As part of routine maintenance and continuous improvement, Subaru releases updates to
the firmware and software in your vehicle. Following the installation of these updates, the
screens and menus in your vehicle may differ from what appears in this guide.
For the most current information, please visitwww.subaru.com/owners,
www.subaru.com/customer-support, or contact your Subaru Retailer. Refer to page 5
for details on these resources.
* Compatible smartphone and application required. For applications to operate, latest version of each
application required. Data provided by smartphone is displayed on the Touchscreen. Some state laws
prohibit the operation of handheld electronic devices while operating a vehicle. Smartphone apps
should only be launched when vehicle is safely parked. Your wireless carrier’s rates may apply.
Various Systems
Depending on your model and trim level there are several types of SUBARU STARLINK®
Multimedia systems. Some of the functions described in this guide will vary by system.
• Dual 7.0-inch Multimedia
• 11.6-inch Multimedia Plus
• 11.6-inch Multimedia Navigation
STARLINK OVERVIEW
65
Page 68 of 172
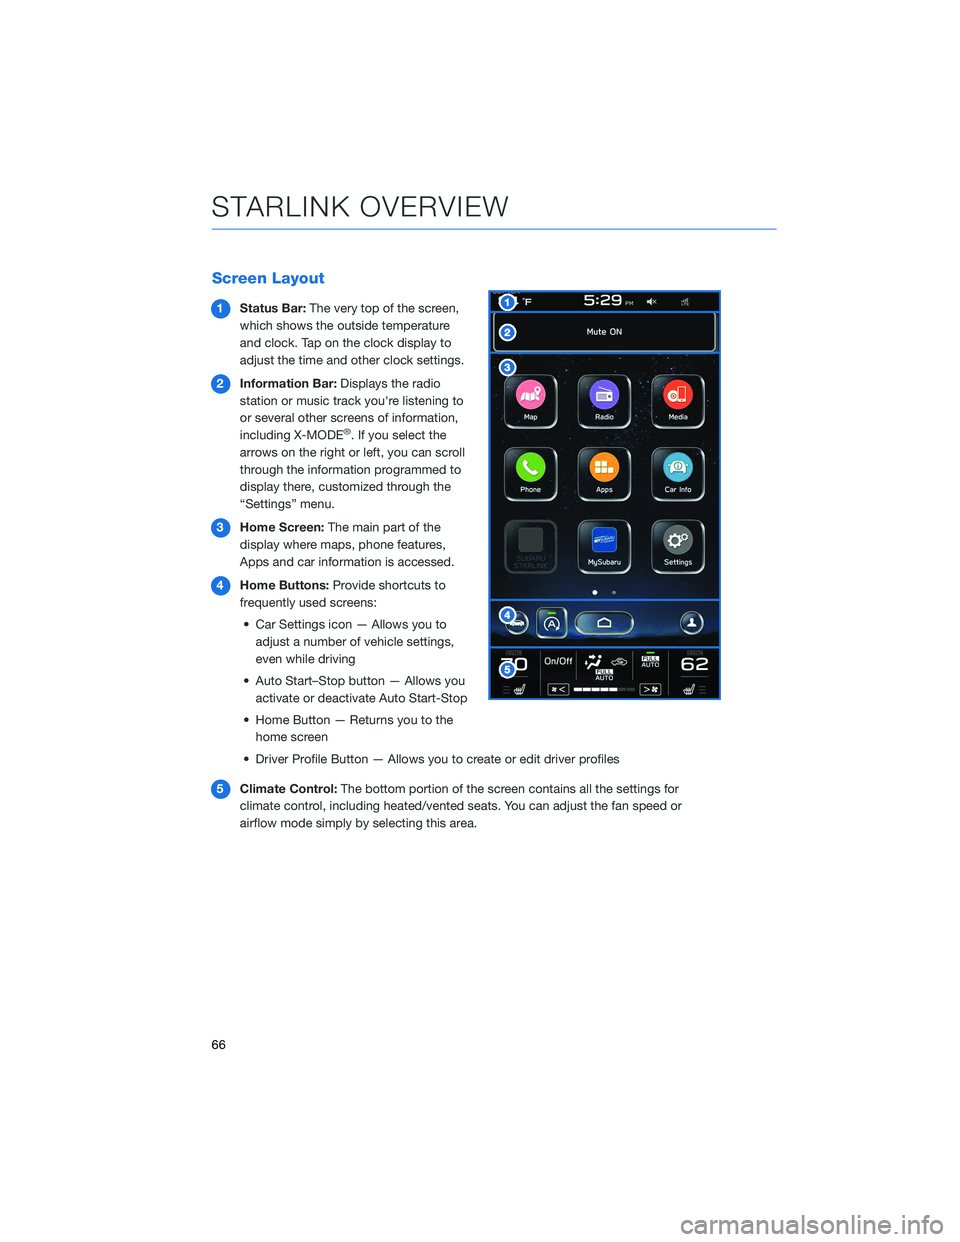
Screen Layout
1Status Bar:The very top of the screen,
which shows the outside temperature
and clock. Tap on the clock display to
adjust the time and other clock settings.
2Information Bar:Displays the radio
station or music track you're listening to
or several other screens of information,
including X-MODE
®. If you select the
arrows on the right or left, you can scroll
through the information programmed to
display there, customized through the
“Settings” menu.
3Home Screen:The main part of the
display where maps, phone features,
Apps and car information is accessed.
4Home Buttons:Provide shortcuts to
frequently used screens:
• Car Settings icon — Allows you to
adjust a number of vehicle settings,
even while driving
• Auto Start–Stop button — Allows you
activate or deactivate Auto Start-Stop
• Home Button — Returns you to the
home screen
• Driver Profile Button — Allows you to create or edit driver profiles
5Climate Control:The bottom portion of the screen contains all the settings for
climate control, including heated/vented seats. You can adjust the fan speed or
airflow mode simply by selecting this area.
STARLINK OVERVIEW
66
Page 69 of 172
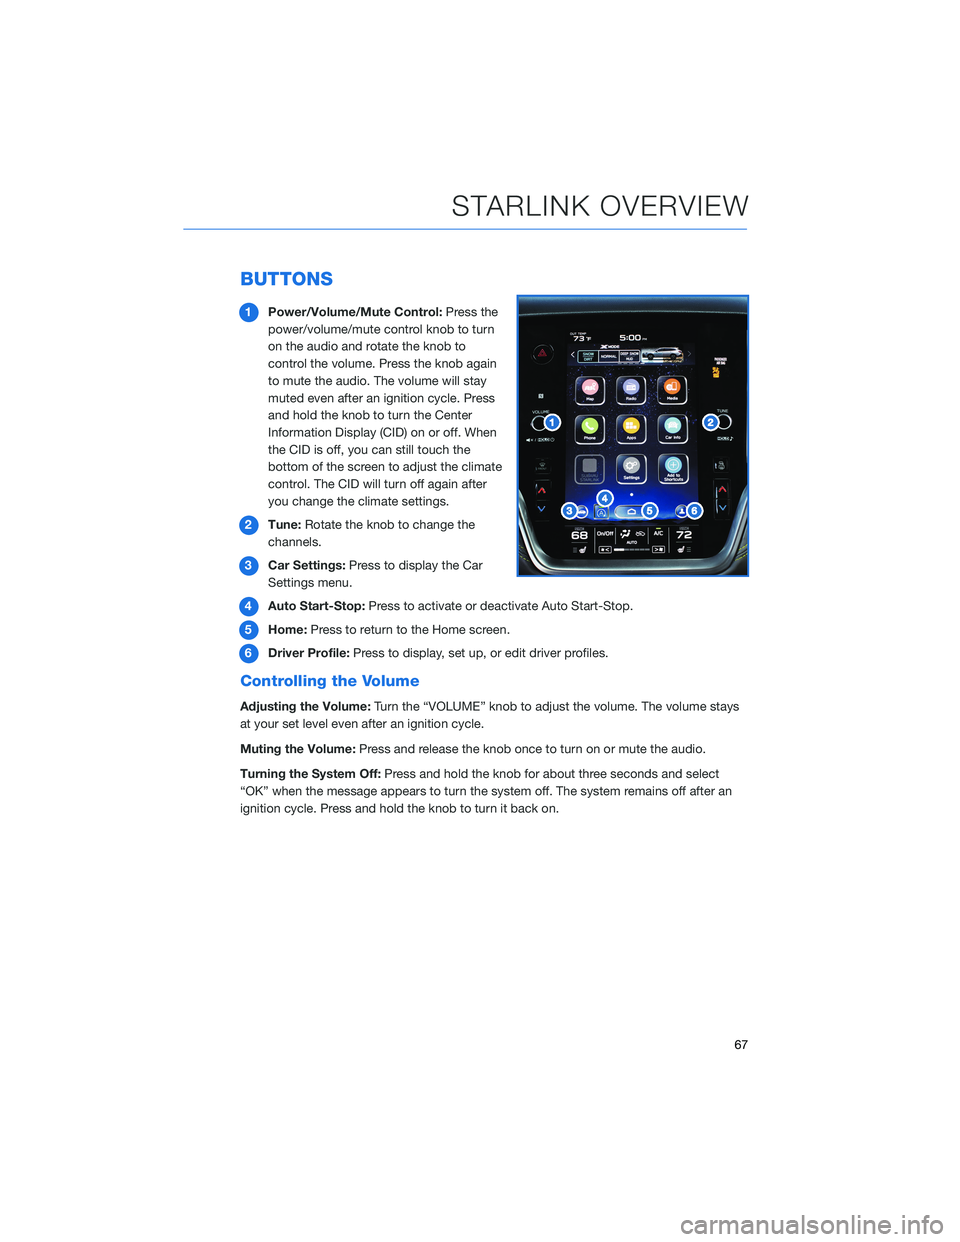
BUTTONS
1Power/Volume/Mute Control:Press the
power/volume/mute control knob to turn
on the audio and rotate the knob to
control the volume. Press the knob again
to mute the audio. The volume will stay
muted even after an ignition cycle. Press
and hold the knob to turn the Center
Information Display (CID) on or off. When
the CID is off, you can still touch the
bottom of the screen to adjust the climate
control. The CID will turn off again after
you change the climate settings.
2Tune:Rotate the knob to change the
channels.
3Car Settings:Press to display the Car
Settings menu.
4Auto Start-Stop:Press to activate or deactivate Auto Start-Stop.
5Home:Press to return to the Home screen.
6Driver Profile:Press to display, set up, or edit driver profiles.
Controlling the Volume
Adjusting the Volume:Turn the “VOLUME” knob to adjust the volume. The volume stays
at your set level even after an ignition cycle.
Muting the Volume:Press and release the knob once to turn on or mute the audio.
Turning the System Off:Press and hold the knob for about three seconds and select
“OK” when the message appears to turn the system off. The system remains off after an
ignition cycle. Press and hold the knob to turn it back on.
STARLINK OVERVIEW
67
Page 73 of 172
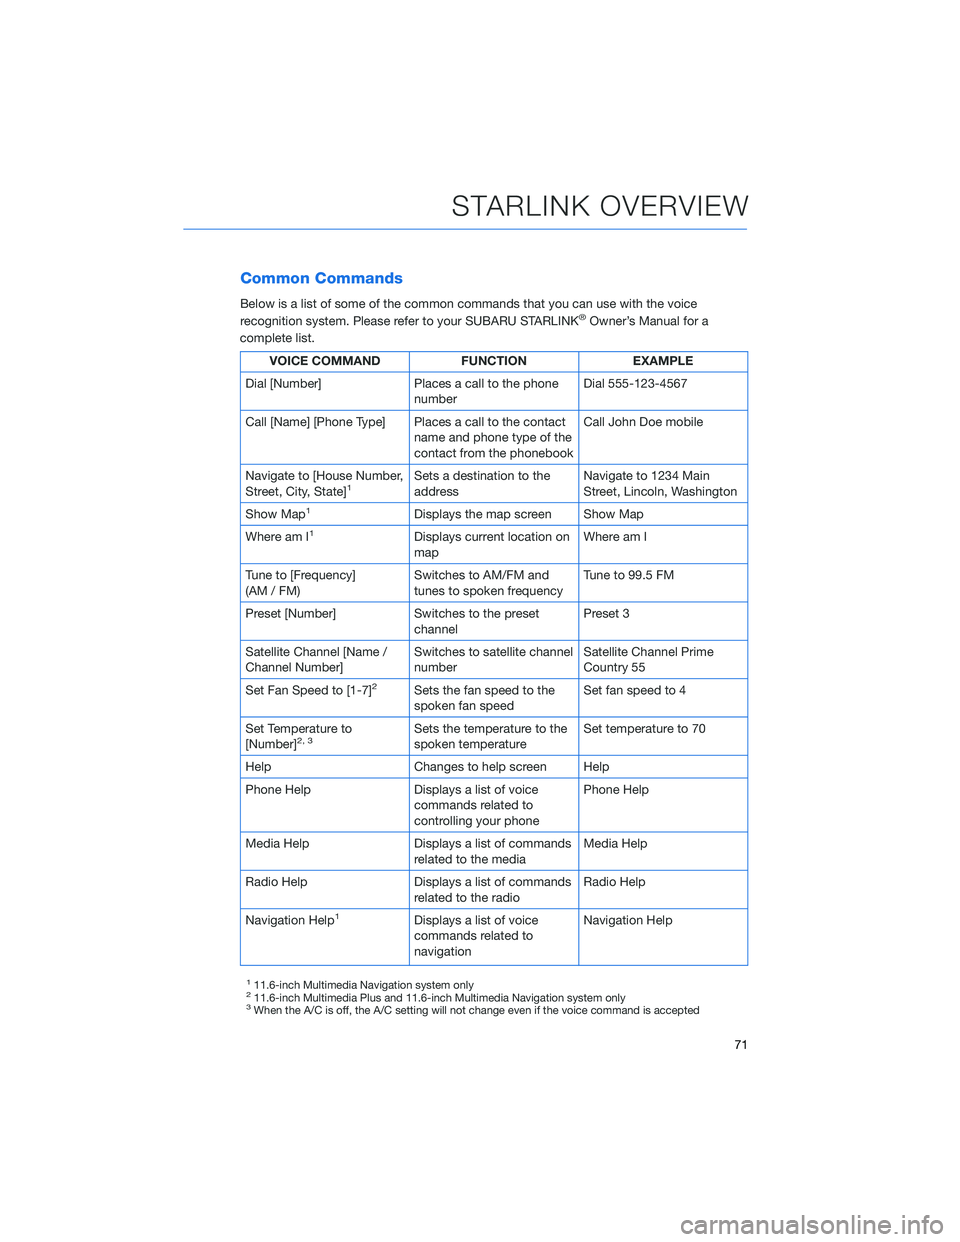
Common Commands
Below is a list of some of the common commands that you can use with the voice
recognition system. Please refer to your SUBARU STARLINK®Owner’s Manual for a
complete list.
VOICE COMMAND FUNCTION EXAMPLE
Dial [Number] Places a call to the phone
numberDial 555-123-4567
Call [Name] [Phone Type] Places a call to the contact
name and phone type of the
contact from the phonebookCall John Doe mobile
Navigate to [House Number,
Street, City, State]
1Sets a destination to the
addressNavigate to 1234 Main
Street, Lincoln, Washington
Show Map
1Displays the map screen Show Map
Where am I
1Displays current location on
mapWhere am I
Tune to [Frequency]
(AM / FM)Switches to AM/FM and
tunes to spoken frequencyTune to 99.5 FM
Preset [Number] Switches to the preset
channelPreset 3
Satellite Channel [Name /
Channel Number]Switches to satellite channel
numberSatellite Channel Prime
Country 55
Set Fan Speed to [1-7]
2Sets the fan speed to the
spoken fan speedSet fan speed to 4
Set Temperature to
[Number]
2, 3Sets the temperature to the
spoken temperatureSet temperature to 70
Help Changes to help screen Help
Phone Help Displays a list of voice
commands related to
controlling your phonePhone Help
Media Help Displays a list of commands
related to the mediaMedia Help
Radio Help Displays a list of commands
related to the radioRadio Help
Navigation Help
1Displays a list of voice
commands related to
navigationNavigation Help
111.6-inch Multimedia Navigation system only211.6-inch Multimedia Plus and 11.6-inch Multimedia Navigation system only3When the A/C is off, the A/C setting will not change even if the voice command is accepted
STARLINK OVERVIEW
71