SUBARU OUTBACK 2022 Getting Started Guide
Manufacturer: SUBARU, Model Year: 2022, Model line: OUTBACK, Model: SUBARU OUTBACK 2022Pages: 172, PDF Size: 58.6 MB
Page 21 of 172
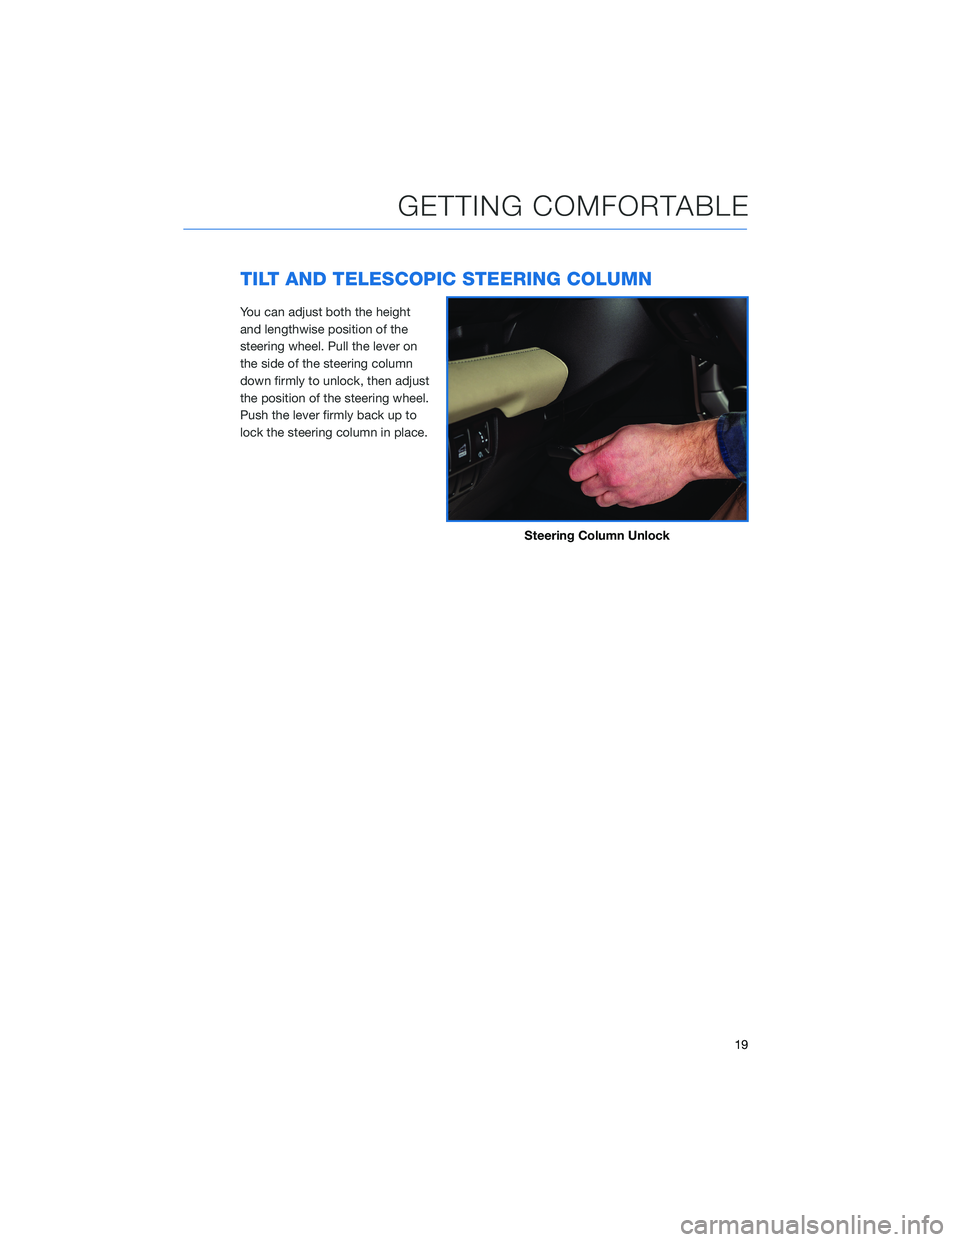
TILT AND TELESCOPIC STEERING COLUMN
You can adjust both the height
and lengthwise position of the
steering wheel. Pull the lever on
the side of the steering column
down firmly to unlock, then adjust
the position of the steering wheel.
Push the lever firmly back up to
lock the steering column in place.
Steering Column Unlock
GETTING COMFORTABLE
19
Page 22 of 172
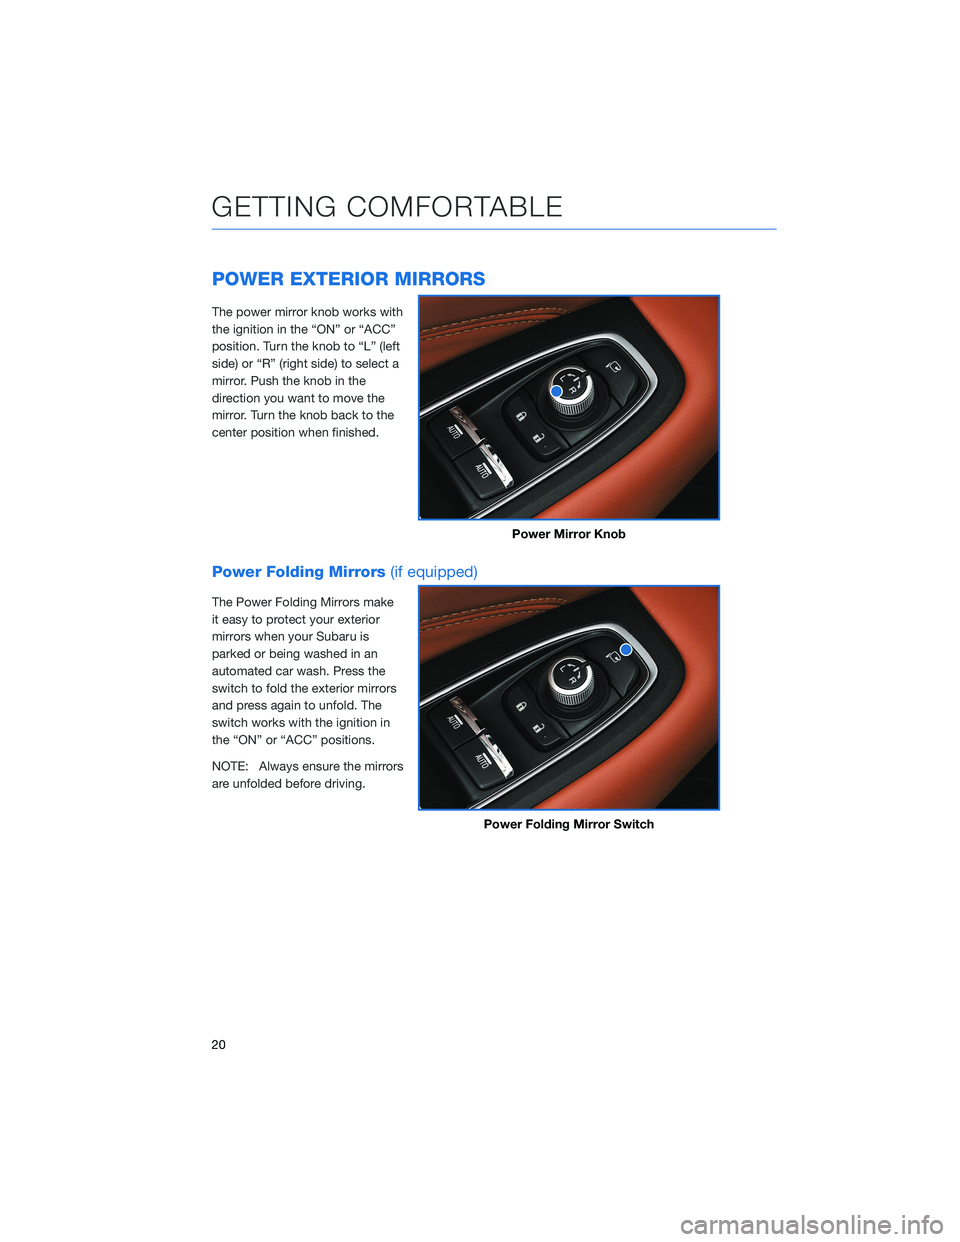
POWER EXTERIOR MIRRORS
The power mirror knob works with
the ignition in the “ON” or “ACC”
position. Turn the knob to “L” (left
side) or “R” (right side) to select a
mirror. Push the knob in the
direction you want to move the
mirror. Turn the knob back to the
center position when finished.
Power Folding Mirrors(if equipped)
The Power Folding Mirrors make
it easy to protect your exterior
mirrors when your Subaru is
parked or being washed in an
automated car wash. Press the
switch to fold the exterior mirrors
and press again to unfold. The
switch works with the ignition in
the “ON” or “ACC” positions.
NOTE: Always ensure the mirrors
are unfolded before driving.
Power Mirror Knob
Power Folding Mirror Switch
GETTING COMFORTABLE
20
Page 23 of 172
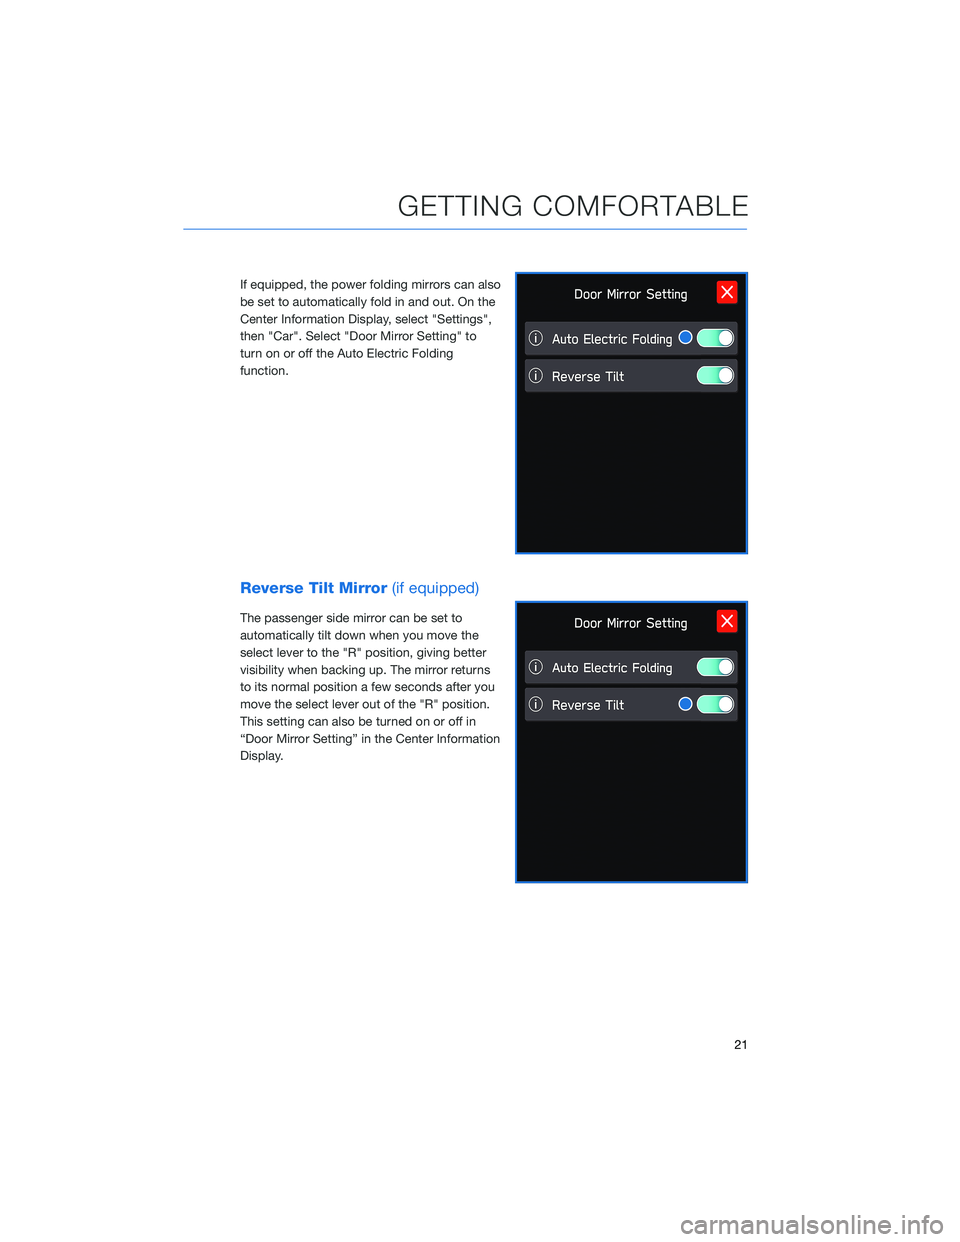
If equipped, the power folding mirrors can also
be set to automatically fold in and out. On the
Center Information Display, select "Settings",
then "Car". Select "Door Mirror Setting" to
turn on or off the Auto Electric Folding
function.
Reverse Tilt Mirror(if equipped)
The passenger side mirror can be set to
automatically tilt down when you move the
select lever to the "R" position, giving better
visibility when backing up. The mirror returns
to its normal position a few seconds after you
move the select lever out of the "R" position.
This setting can also be turned on or off in
“Door Mirror Setting” in the Center Information
Display.
GETTING COMFORTABLE
21
Page 24 of 172
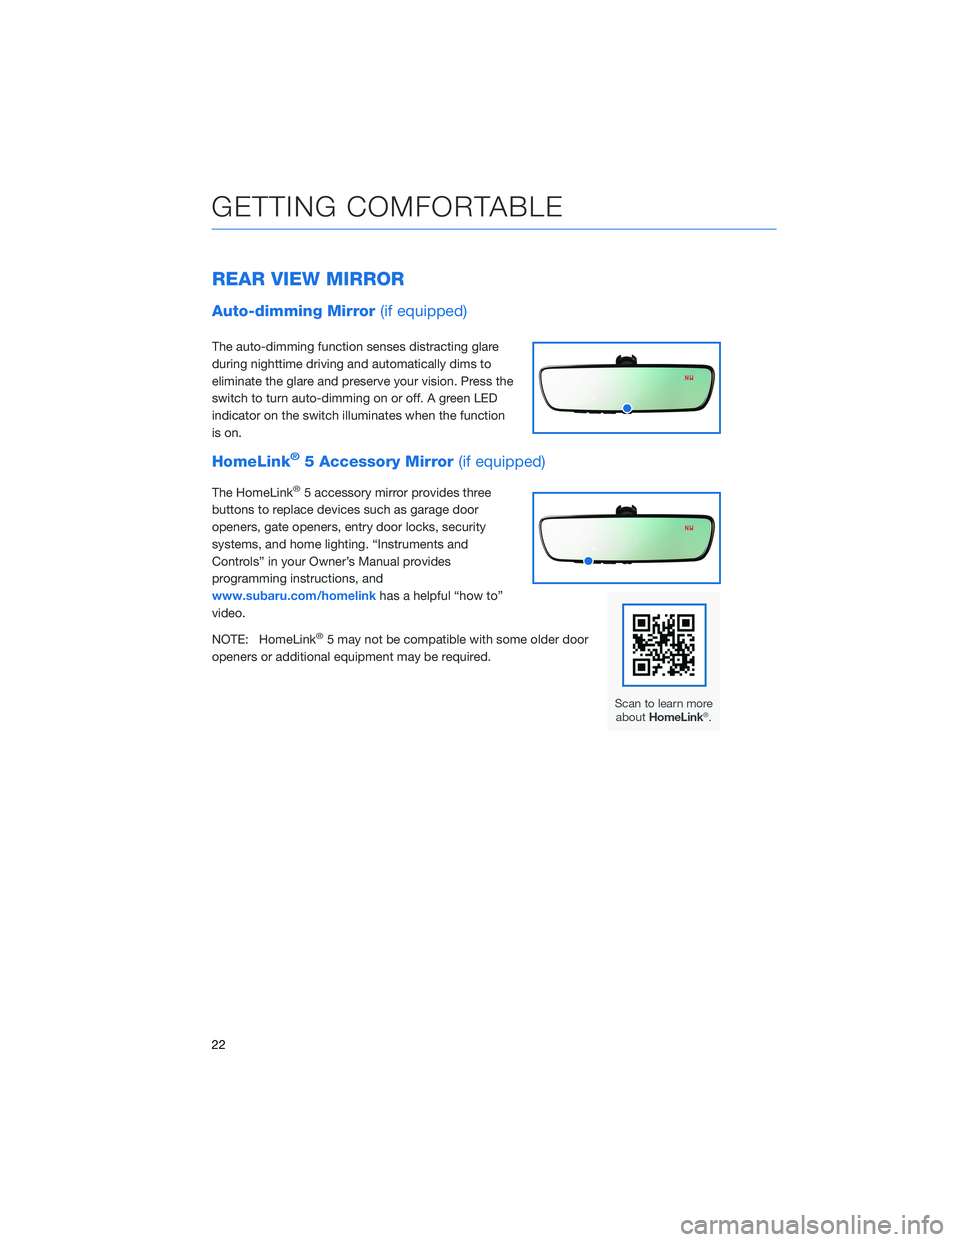
REAR VIEW MIRROR
Auto-dimming Mirror(if equipped)
The auto-dimming function senses distracting glare
during nighttime driving and automatically dims to
eliminate the glare and preserve your vision. Press the
switch to turn auto-dimming on or off. A green LED
indicator on the switch illuminates when the function
is on.
HomeLink®5 Accessory Mirror(if equipped)
The HomeLink®5 accessory mirror provides three
buttons to replace devices such as garage door
openers, gate openers, entry door locks, security
systems, and home lighting. “Instruments and
Controls” in your Owner’s Manual provides
programming instructions, and
www.subaru.com/homelinkhas a helpful “how to”
video.
NOTE: HomeLink
®5 may not be compatible with some older door
openers or additional equipment may be required.
GETTING COMFORTABLE
22
Page 25 of 172
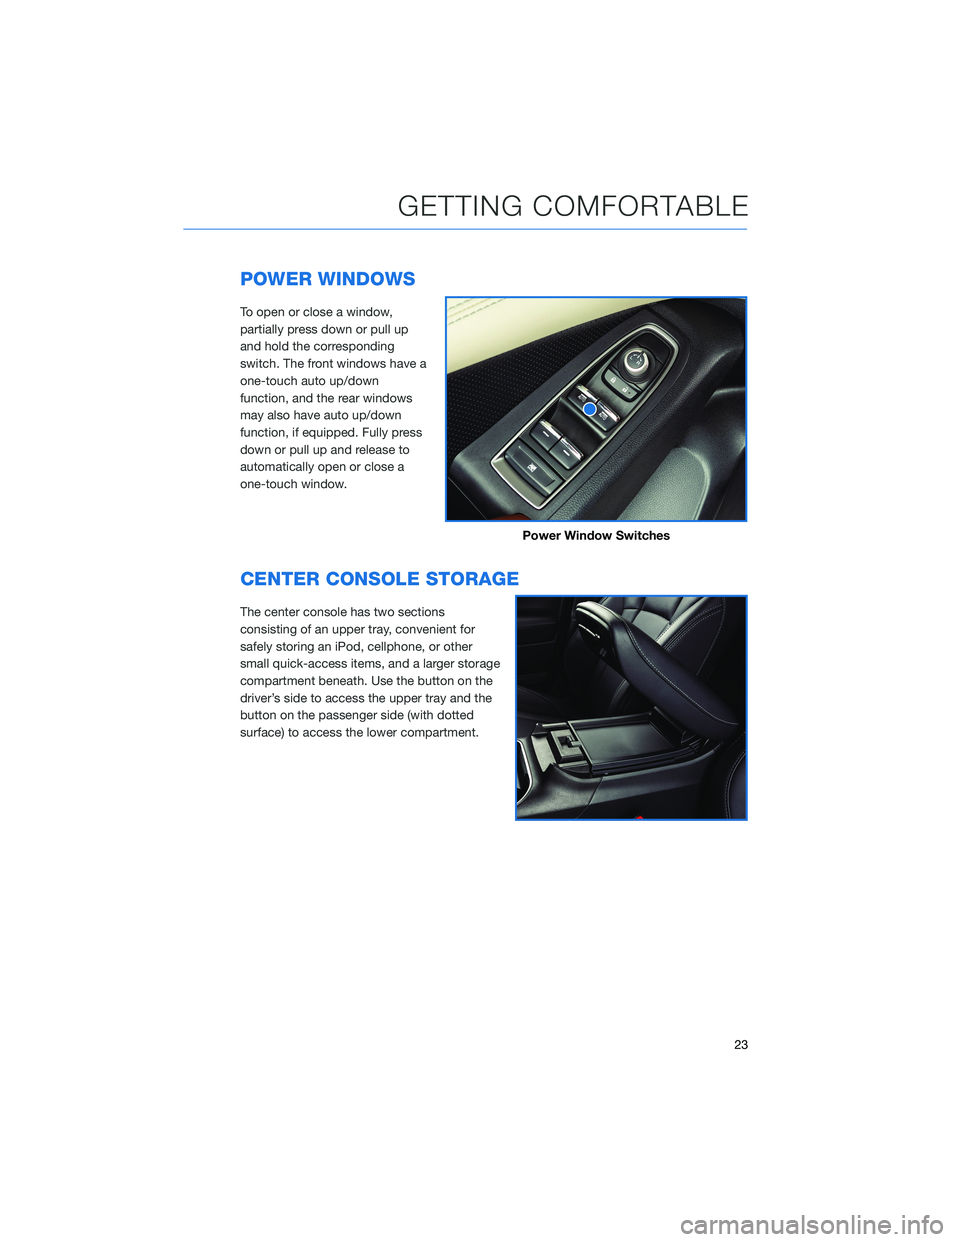
POWER WINDOWS
To open or close a window,
partially press down or pull up
and hold the corresponding
switch. The front windows have a
one-touch auto up/down
function, and the rear windows
may also have auto up/down
function, if equipped. Fully press
down or pull up and release to
automatically open or close a
one-touch window.
CENTER CONSOLE STORAGE
The center console has two sections
consisting of an upper tray, convenient for
safely storing an iPod, cellphone, or other
small quick-access items, and a larger storage
compartment beneath. Use the button on the
driver’s side to access the upper tray and the
button on the passenger side (with dotted
surface) to access the lower compartment.
Power Window Switches
GETTING COMFORTABLE
23
Page 26 of 172
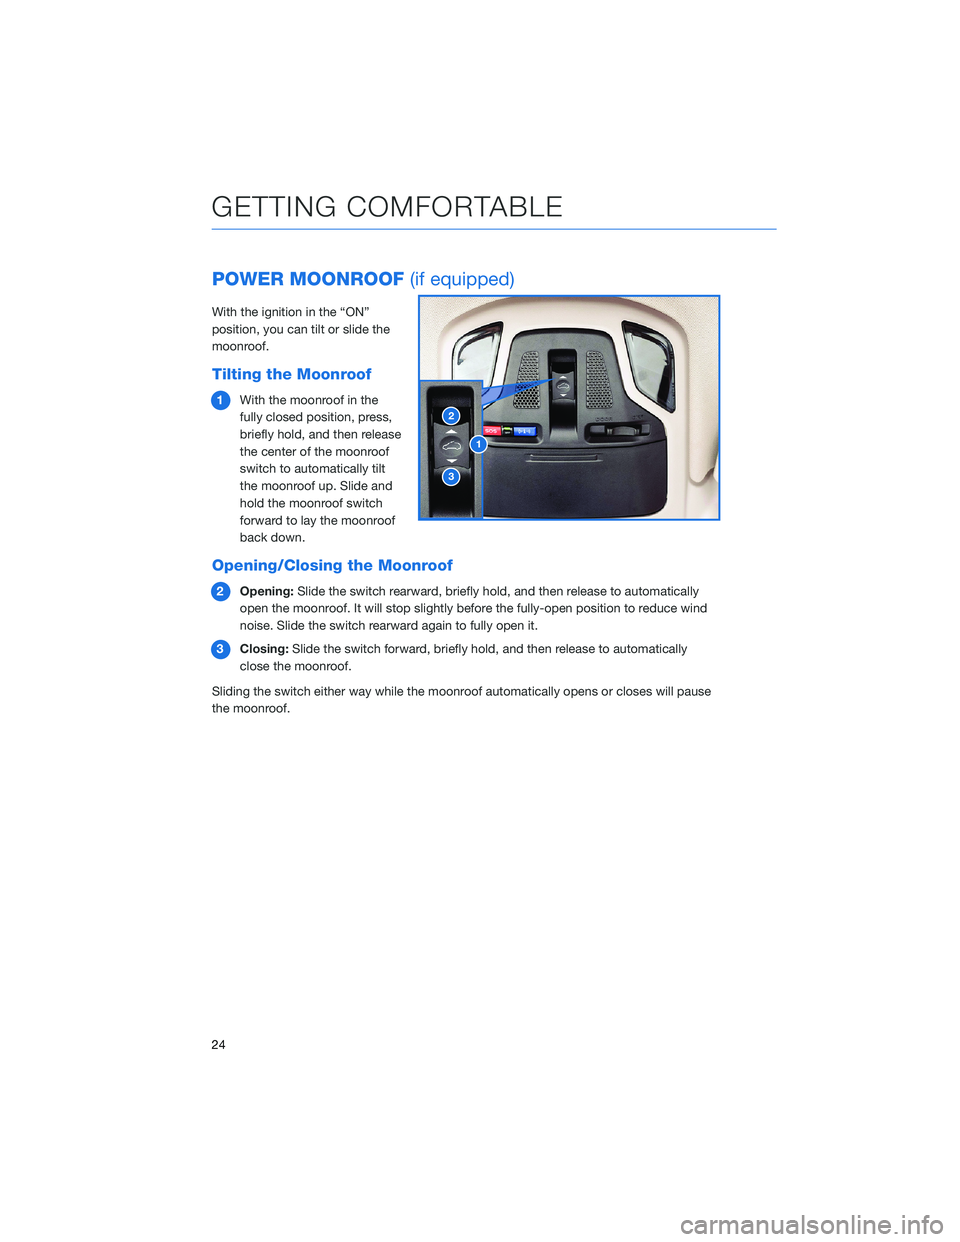
POWER MOONROOF(if equipped)
With the ignition in the “ON”
position, you can tilt or slide the
moonroof.
Tilting the Moonroof
1With the moonroof in the
fully closed position, press,
briefly hold, and then release
the center of the moonroof
switch to automatically tilt
the moonroof up. Slide and
hold the moonroof switch
forward to lay the moonroof
back down.
Opening/Closing the Moonroof
2Opening:Slide the switch rearward, briefly hold, and then release to automatically
open the moonroof. It will stop slightly before the fully-open position to reduce wind
noise. Slide the switch rearward again to fully open it.
3Closing:Slide the switch forward, briefly hold, and then release to automatically
close the moonroof.
Sliding the switch either way while the moonroof automatically opens or closes will pause
the moonroof.
1
2
3
GETTING COMFORTABLE
24
Page 27 of 172
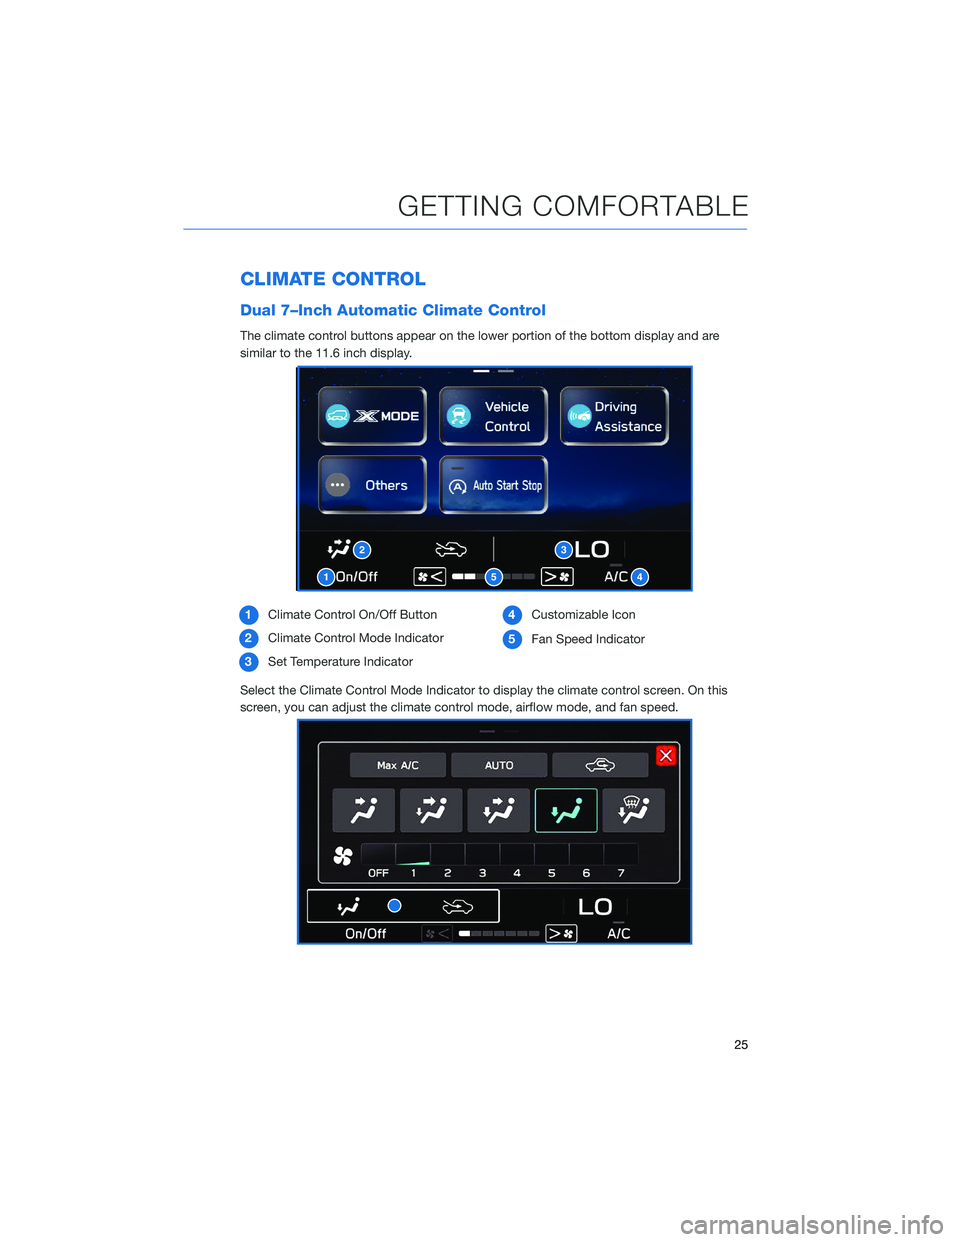
CLIMATE CONTROL
Dual 7–Inch Automatic Climate Control
The climate control buttons appear on the lower portion of the bottom display and are
similar to the 11.6 inch display.
1Climate Control On/Off Button
2Climate Control Mode Indicator
3Set Temperature Indicator4Customizable Icon
5Fan Speed Indicator
Select the Climate Control Mode Indicator to display the climate control screen. On this
screen, you can adjust the climate control mode, airflow mode, and fan speed.
1
23
54
GETTING COMFORTABLE
25
Page 28 of 172
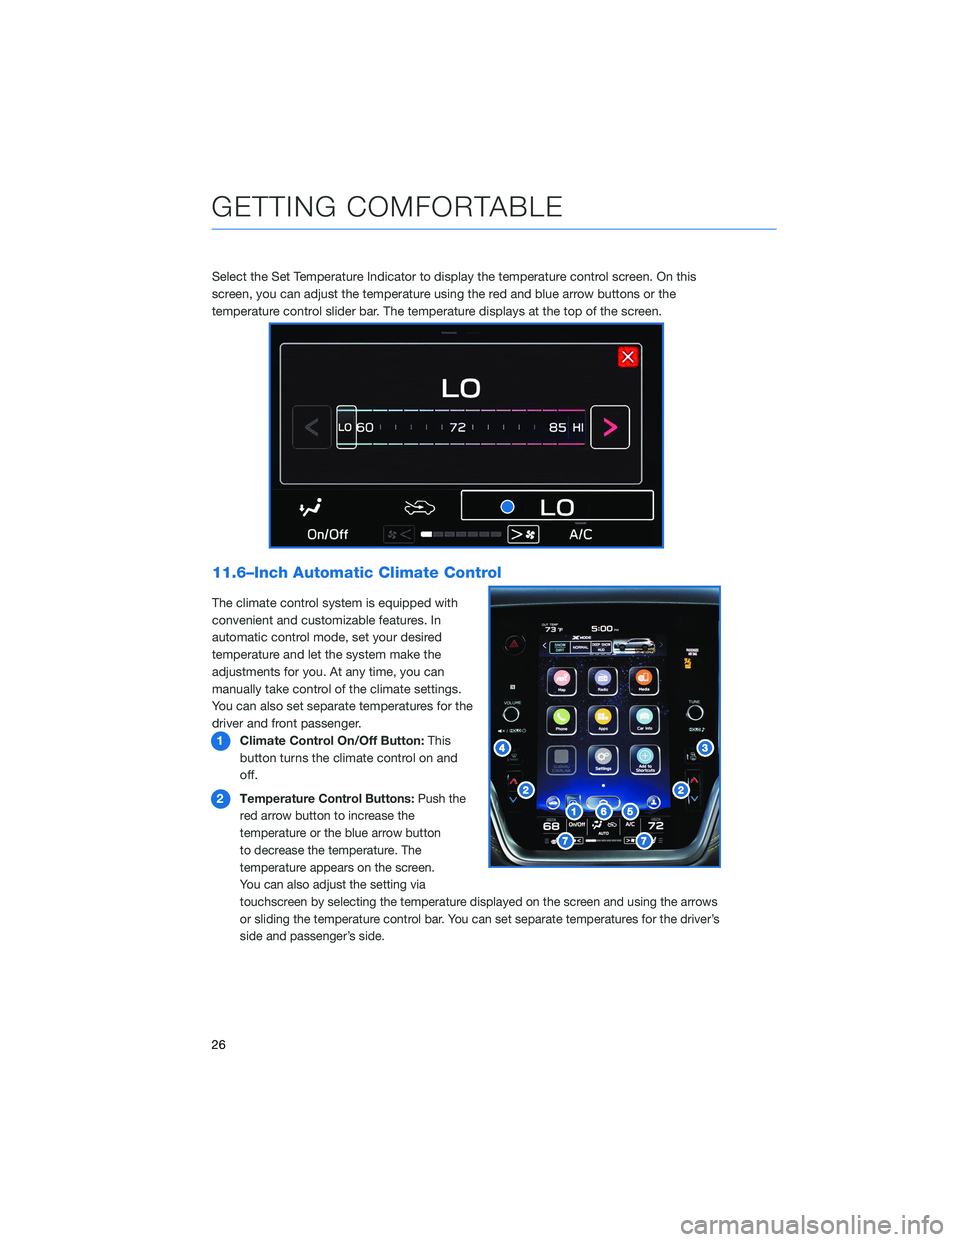
Select the Set Temperature Indicator to display the temperature control screen. On this
screen, you can adjust the temperature using the red and blue arrow buttons or the
temperature control slider bar. The temperature displays at the top of the screen.
11.6–Inch Automatic Climate Control
The climate control system is equipped with
convenient and customizable features. In
automatic control mode, set your desired
temperature and let the system make the
adjustments for you. At any time, you can
manually take control of the climate settings.
You can also set separate temperatures for the
driver and front passenger.
1Climate Control On/Off Button:This
button turns the climate control on and
off.
2
Temperature Control Buttons:Push the
red arrow button to increase the
temperature or the blue arrow button
to decrease the temperature. The
temperature appears on the screen.
You can also adjust the setting via
touchscreen by selecting the temperature displayed on the screen and using the arrows
or sliding the temperature control bar. You can set separate temperatures for the driver’s
side and passenger’s side.
GETTING COMFORTABLE
26
Page 29 of 172
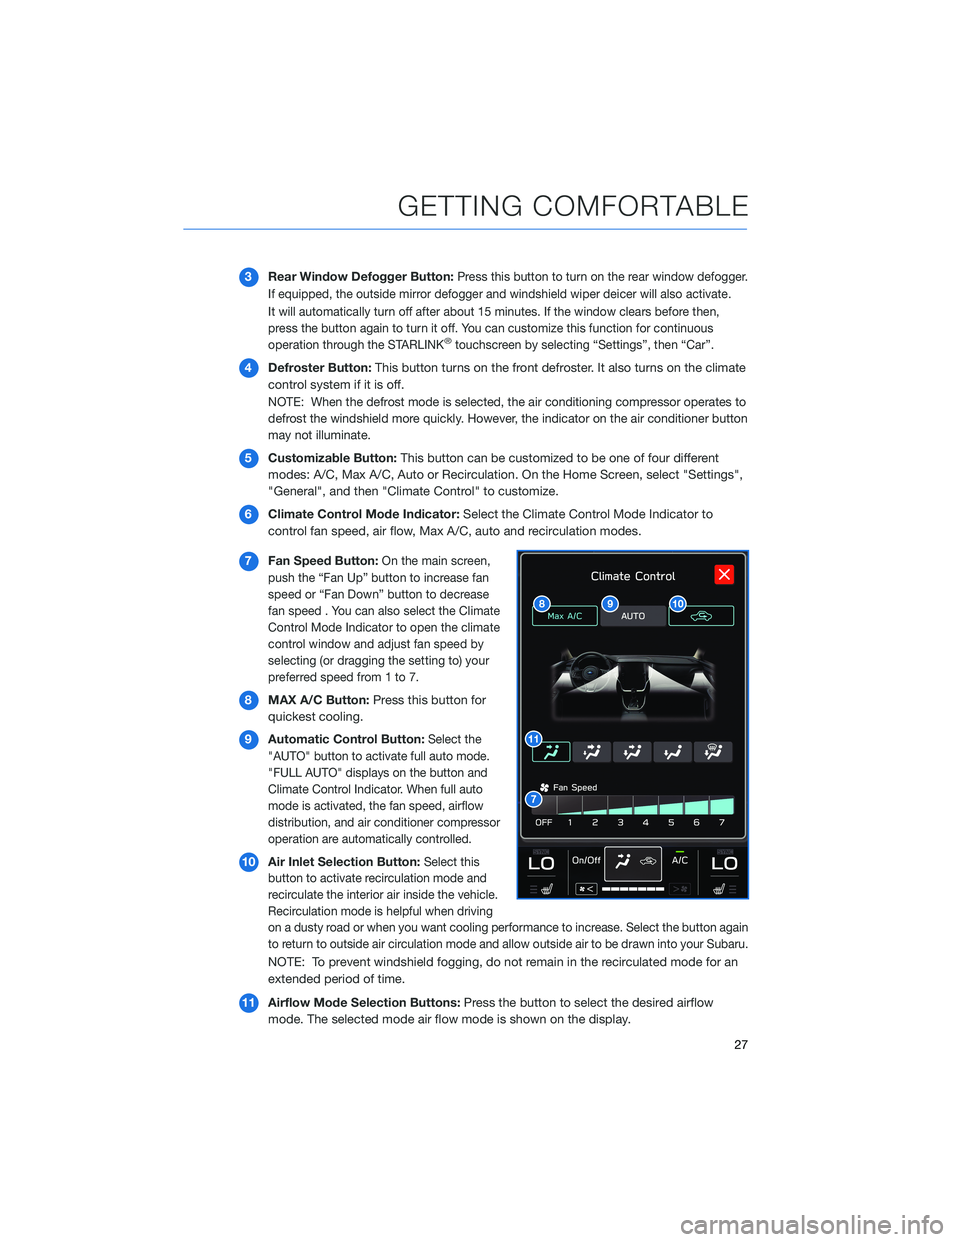
3Rear Window Defogger Button:Press this button to turn on the rear window defogger.
If equipped, the outside mirror defogger and windshield wiper deicer will also activate.
It will automatically turn off after about 15 minutes. If the window clears before then,
press the button again to turn it off. You can customize this function for continuous
operation through the STARLINK
®touchscreen by selecting “Settings”, then “Car”.
4Defroster Button:This button turns on the front defroster. It also turns on the climate
control system if it is off.
NOTE: When the defrost mode is selected, the air conditioning compressor operates to
defrost the windshield more quickly. However, the indicator on the air conditioner button
may not illuminate.
5Customizable Button:This button can be customized to be one of four different
modes: A/C, Max A/C, Auto or Recirculation. On the Home Screen, select "Settings",
"General", and then "Climate Control" to customize.
6Climate Control Mode Indicator:Select the Climate Control Mode Indicator to
control fan speed, air flow, Max A/C, auto and recirculation modes.
7Fan Speed Button:
On the main screen,
push the “Fan Up” button to increase fan
speed or “Fan Down” button to decrease
fan speed . You can also select the Climate
Control Mode Indicator to open the climate
control window and adjust fan speed by
selecting (or dragging the setting to) your
preferred speed from 1 to 7.
8MAX A/C Button:Press this button for
quickest cooling.
9Automatic Control Button:
Select the
"AUTO" button to activate full auto mode.
"FULL AUTO" displays on the button and
Climate Control Indicator. When full auto
mode is activated, the fan speed, airflow
distribution, and air conditioner compressor
operation are automatically controlled.
10Air Inlet Selection Button:Select this
button to activate recirculation mode and
recirculate the interior air inside the vehicle.
Recirculation mode is helpful when driving
on a dusty road or when you want cooling performance to increase. Select the button again
to return to outside air circulation mode and allow outside air to be drawn into your Subaru.
NOTE: To prevent windshield fogging, do not remain in the recirculated mode for an
extended period of time.
11Airflow Mode Selection Buttons:Press the button to select the desired airflow
mode. The selected mode air flow mode is shown on the display.
GETTING COMFORTABLE
27
Page 30 of 172
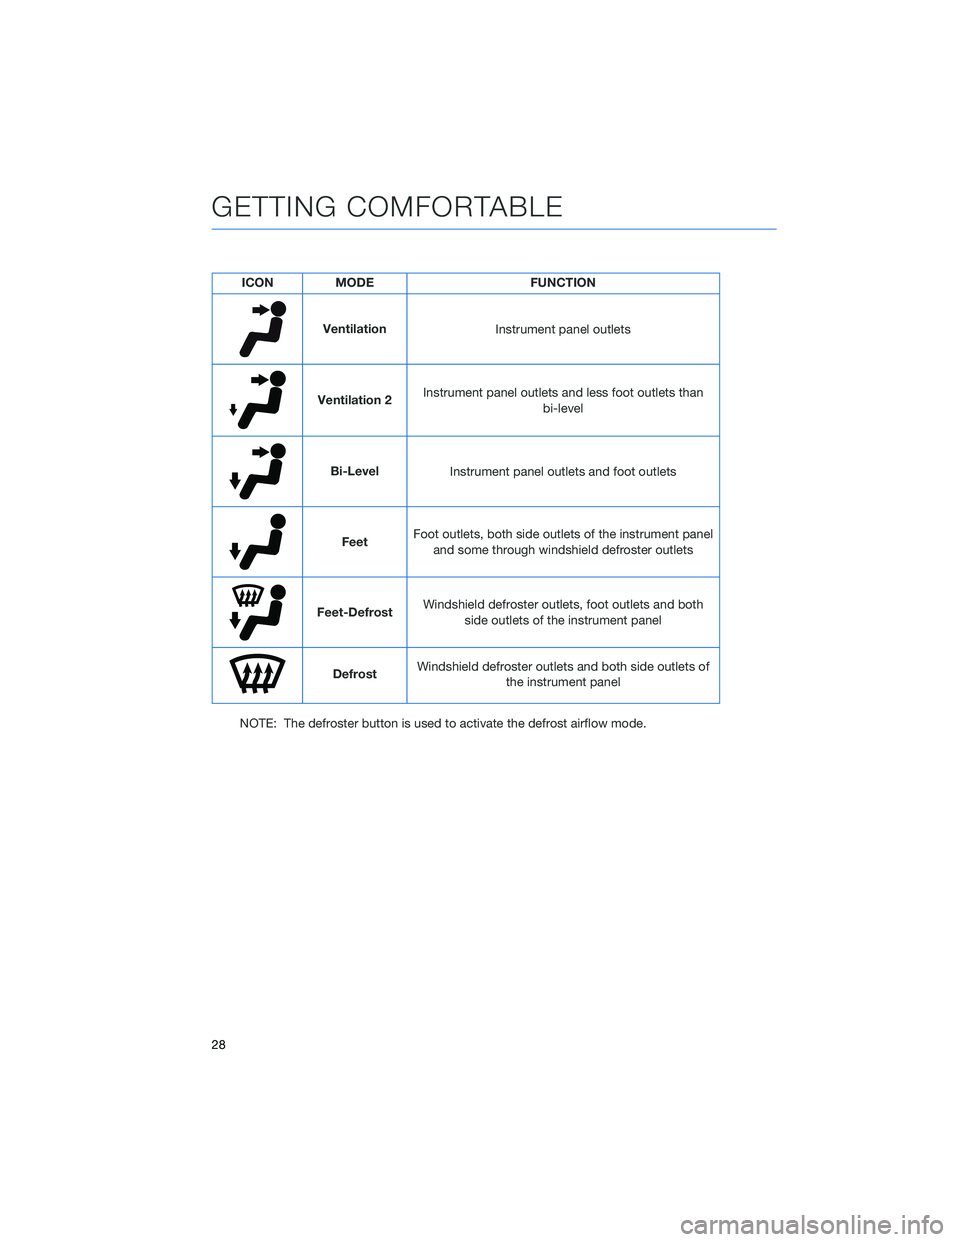
ICON MODE FUNCTION
Ventilation
Instrument panel outlets
Ventilation 2Instrument panel outlets and less foot outlets than
bi-level
Bi-Level
Instrument panel outlets and foot outlets
FeetFoot outlets, both side outlets of the instrument panel
and some through windshield defroster outlets
Feet-DefrostWindshield defroster outlets, foot outlets and both
side outlets of the instrument panel
DefrostWindshield defroster outlets and both side outlets of
the instrument panel
NOTE: The defroster button is used to activate the defrost airflow mode.
GETTING COMFORTABLE
28