air SUBARU OUTBACK 2022 Getting Started Guide
[x] Cancel search | Manufacturer: SUBARU, Model Year: 2022, Model line: OUTBACK, Model: SUBARU OUTBACK 2022Pages: 172, PDF Size: 58.6 MB
Page 4 of 172
REFUELING
FUEL FILLER LID............51
FUEL SPECIFICATIONS AND
CAPACITY..................51
PASSENGER/CARGO AREAS
FOLDING THE REAR SEATS...52
CHILD SAFETY LOCKS.......53
LATCH/ANCHOR............54
REAR SEAT REMINDER.......55
CARGO COVER.............56
SPARE TIRE................57
ENGINE COMPARTMENT
HOOD PROP................58
2.5L ENGINE................59
2.4L TURBO ENGINE.........60
ADDITIONAL SPECIFICATIONS
NEW VEHICLE BREAK-IN......61
ENGINE OIL................61
ENGINE OIL CAPACITY.......61
ROOF RAIL CAPACITY.......62
TRAILER TOWING CAPACITY . . 62
TIRE PRESSURE MONITORING
SYSTEM (TPMS).............63
STARLINK OVERVIEW
OVERVIEW OF YOUR
MULTIMEDIA SYSTEM........66
BUTTONS..................68
TOUCHSCREEN.............69
STEERING WHEEL
CONTROLS.................70
VOICE RECOGNITION........71
STARLINK HOME
HOME SCREEN ICONS.......73
REARRANGING ICONS.......74
ADDING SHORTCUTS........75
DRIVER PROFILE
CREATING A DRIVER PROFILE . . 77
MULTIMEDIA
RADIO.....................81
MEDIA.....................83
PHONE
PAIRING A PHONE...........84
MAKING A CALL.............85
RECEIVING A CALL..........86
TEXT MESSAGES............87
APPS
SUBARU STARLINK®IN-VEHICLE
APPS......................88
SUBARU STARLINK
®MOBILE
APP.......................89
MYSUBARU................90
MAPS
MAPS OVERVIEW............91
STARLINK SAFETY AND
SECURITY
SAFETY AND SECURITY
OVERVIEW.................92
ENROLLMENT..............93
MYSUBARU INTEGRATION....93
SUBARU STARLINK
®WI-FI
HOTSPOT..................94
SETTINGS AND UPDATES
SETTINGS AND UPDATES
OVERVIEW.................95
SOUND....................96
PHONE....................97
MAPS/NAVIGATION..........97
CLOCK....................99
EYESIGHT
EYESIGHT®OVERVIEW......100
OPERATION...............101
FUNCTIONS...............101
STEERING WHEEL
CONTROLS................107
EYESIGHT
®ASSIST MONITOR
(EAM)....................109
LANE DEPARTURE WARNING
AND PRE-COLLISION BRAKING
SYSTEM OFF..............110
TABLE OF CONTENTS
2
Page 5 of 172
DRIVER ASSIST
TECHNOLOGIES
REAR-VISION CAMERA......111
FRONT VIEW MONITOR.....112
BLIND SPOT DETECTION (BSD) /
REAR CROSS TRAFFIC ALERT
(RCTA)...................113
HIGH BEAM ASSIST (HBA)...114
STEERING RESPONSIVE
HEADLIGHTS (SRH).........115
REVERSE AUTOMATIC BRAKING
(RAB)....................115
DRIVERFOCUS DISTRACTION
MITIGATION SYSTEM
DRIVERFOCUS®OVERVIEW . . . 116
DRIVERFOCUS®
COMPONENTS.............116
DROWSY/INATTENTIVE
WARNINGS................118
DRIVER PROFILE/CONVENIENCE
SETTINGS.................118
DRIVER MONITORING
SYSTEM OFF..............120
CARE AND LIMITATIONS
STEREO CAMERA
PRECAUTIONS.............121
WINDSHIELD GLASS AND
DASHBOARD..............121
FRONT VIEW
OUTBACK.................122
EYESIGHT DISCLAIMER
EYESIGHT®DISCLAIMER....123
HOW TO APPENDIX
HOW TO OVERVIEW.........124
SETTING THE CLOCK.......124
MEMORY HEIGHT..........128
MEMORY DRIVER’S SEAT....130
BLUETOOTH
®PAIRING......131
ANDROID AUTO™..........137
APPLE CARPLAY
®..........139
WI-FI.....................141
MAPS....................144
FIRMWARE AND SOFTWARE
UPDATES.................164
INDEX.....................165
TABLE OF CONTENTS
3
Page 27 of 172
CLIMATE CONTROL
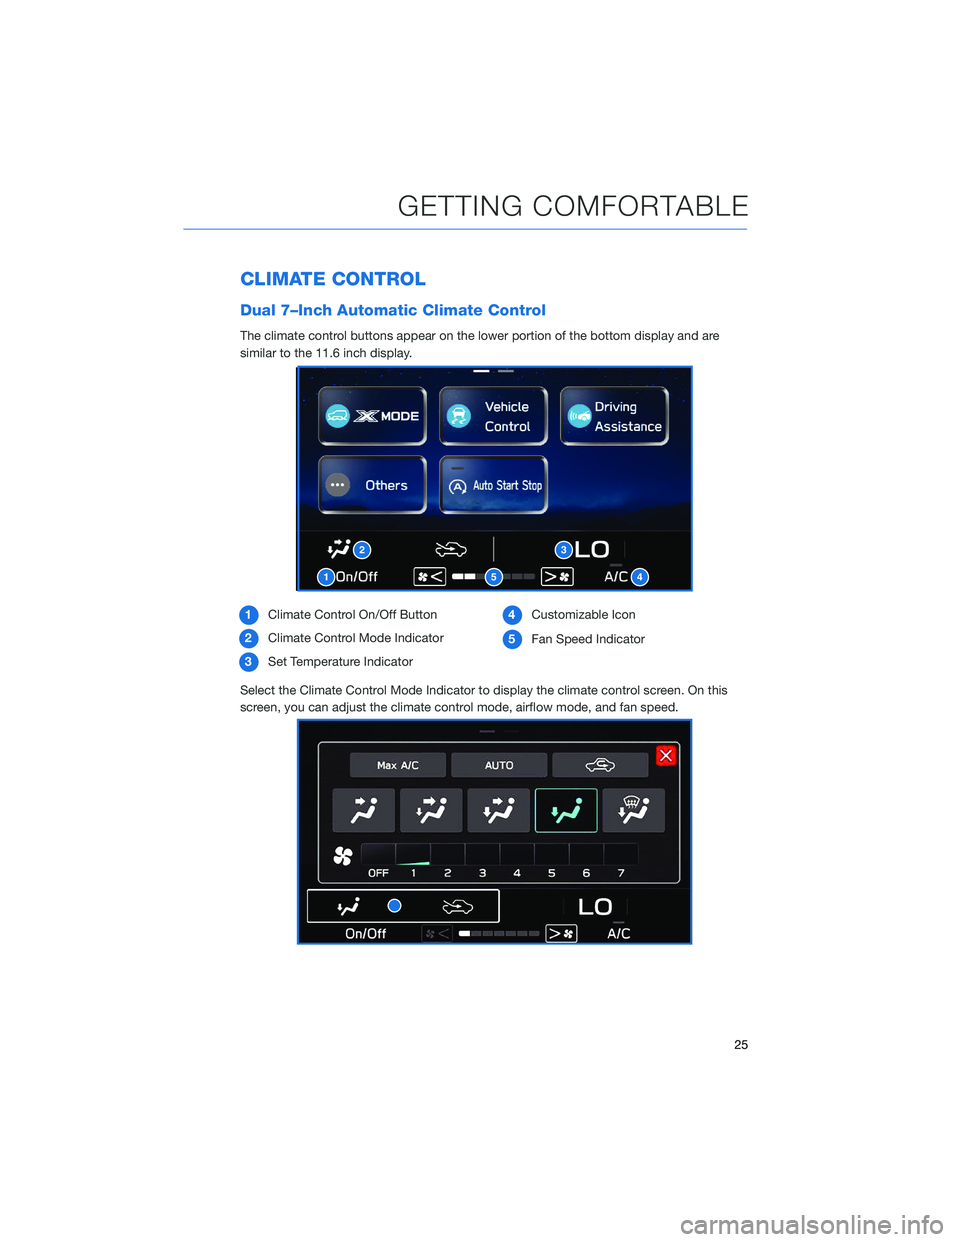
Dual 7–Inch Automatic Climate Control
The climate control buttons appear on the lower portion of the bottom display and are
similar to the 11.6 inch display.
1Climate Control On/Off Button
2Climate Control Mode Indicator
3Set Temperature Indicator4Customizable Icon
5Fan Speed Indicator
Select the Climate Control Mode Indicator to display the climate control screen. On this
screen, you can adjust the climate control mode, airflow mode, and fan speed.
1
23
54
GETTING COMFORTABLE
25
Page 29 of 172
3Rear Window Defogger Button:Press this button to turn on the rear window defogger.
If equipped, the outside mirror defogger and windshield wiper deicer will also activate.
It will automatically turn off after about 15 minutes. If the window clears before then,
press the button again to turn it off. You can customize this function for continuous
operation through the STARLINK
®touchscreen by selecting “Settings”, then “Car”.
4Defroster Button:This button turns on the front defroster. It also turns on the climate
control system if it is off.
NOTE: When the defrost mode is selected, the air conditioning compressor operates to
defrost the windshield more quickly. However, the indicator on the air conditioner button
may not illuminate.
5Customizable Button:This button can be customized to be one of four different
modes: A/C, Max A/C, Auto or Recirculation. On the Home Screen, select "Settings",
"General", and then "Climate Control" to customize.
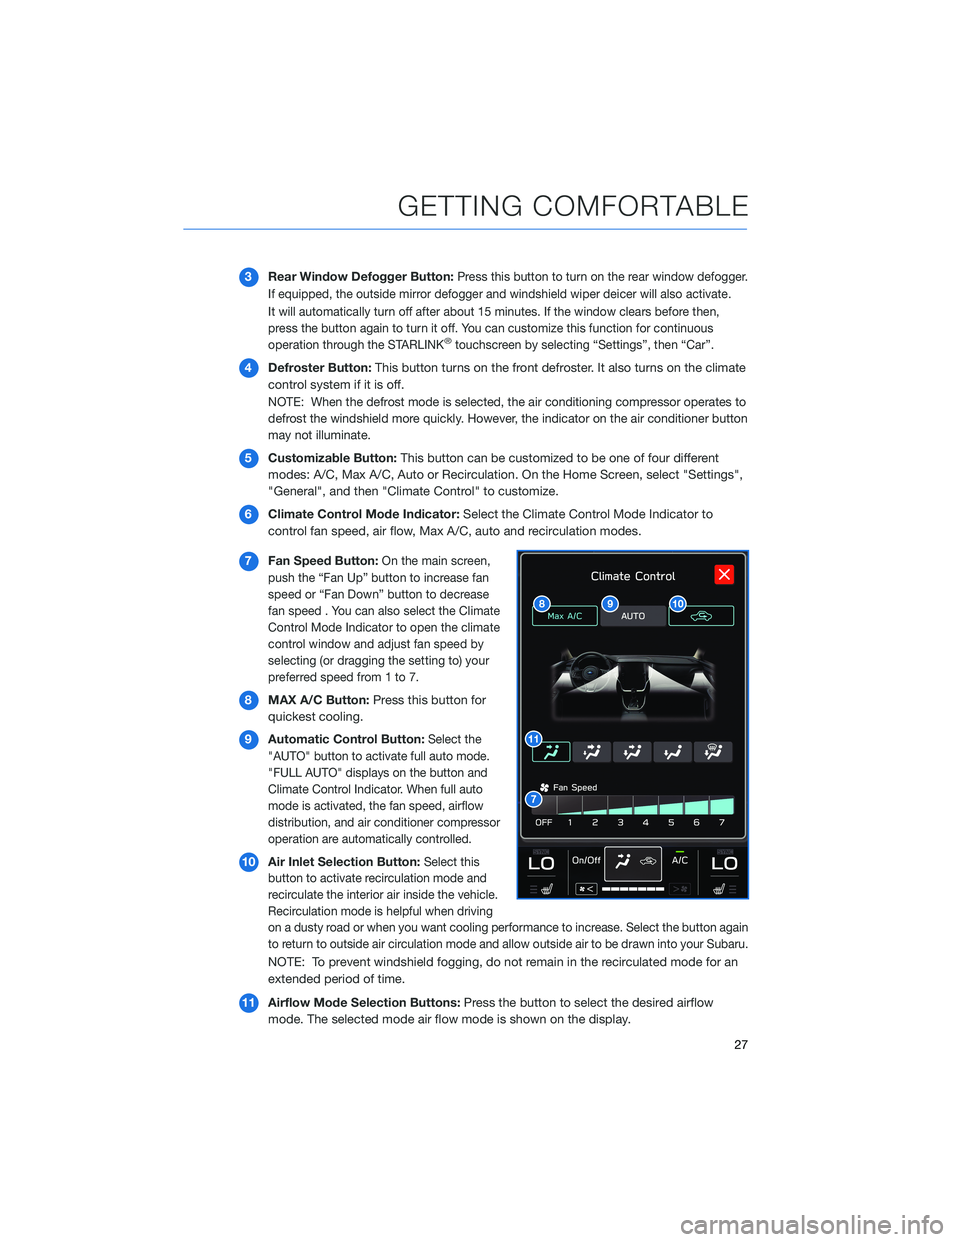
6Climate Control Mode Indicator:Select the Climate Control Mode Indicator to
control fan speed, air flow, Max A/C, auto and recirculation modes.
7Fan Speed Button:
On the main screen,
push the “Fan Up” button to increase fan
speed or “Fan Down” button to decrease
fan speed . You can also select the Climate
Control Mode Indicator to open the climate
control window and adjust fan speed by
selecting (or dragging the setting to) your
preferred speed from 1 to 7.
8MAX A/C Button:Press this button for
quickest cooling.
9Automatic Control Button:
Select the
"AUTO" button to activate full auto mode.
"FULL AUTO" displays on the button and
Climate Control Indicator. When full auto
mode is activated, the fan speed, airflow
distribution, and air conditioner compressor
operation are automatically controlled.
10Air Inlet Selection Button:Select this
button to activate recirculation mode and
recirculate the interior air inside the vehicle.
Recirculation mode is helpful when driving
on a dusty road or when you want cooling performance to increase. Select the button again
to return to outside air circulation mode and allow outside air to be drawn into your Subaru.
NOTE: To prevent windshield fogging, do not remain in the recirculated mode for an
extended period of time.
11Airflow Mode Selection Buttons:Press the button to select the desired airflow
mode. The selected mode air flow mode is shown on the display.
GETTING COMFORTABLE
27
Page 30 of 172
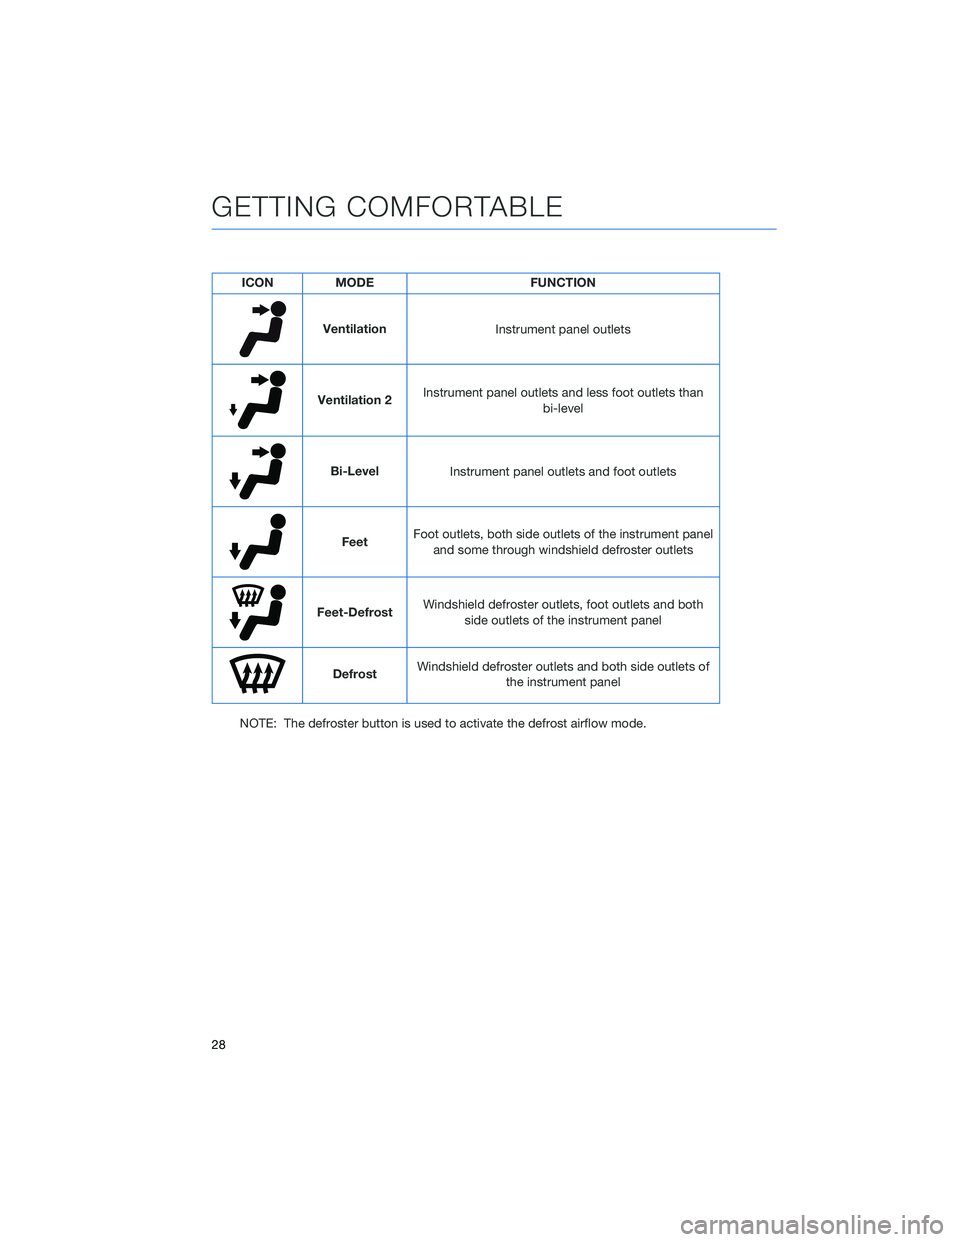
ICON MODE FUNCTION
Ventilation
Instrument panel outlets
Ventilation 2Instrument panel outlets and less foot outlets than
bi-level
Bi-Level
Instrument panel outlets and foot outlets
FeetFoot outlets, both side outlets of the instrument panel
and some through windshield defroster outlets
Feet-DefrostWindshield defroster outlets, foot outlets and both
side outlets of the instrument panel
DefrostWindshield defroster outlets and both side outlets of
the instrument panel
NOTE: The defroster button is used to activate the defrost airflow mode.
GETTING COMFORTABLE
28
Page 31 of 172
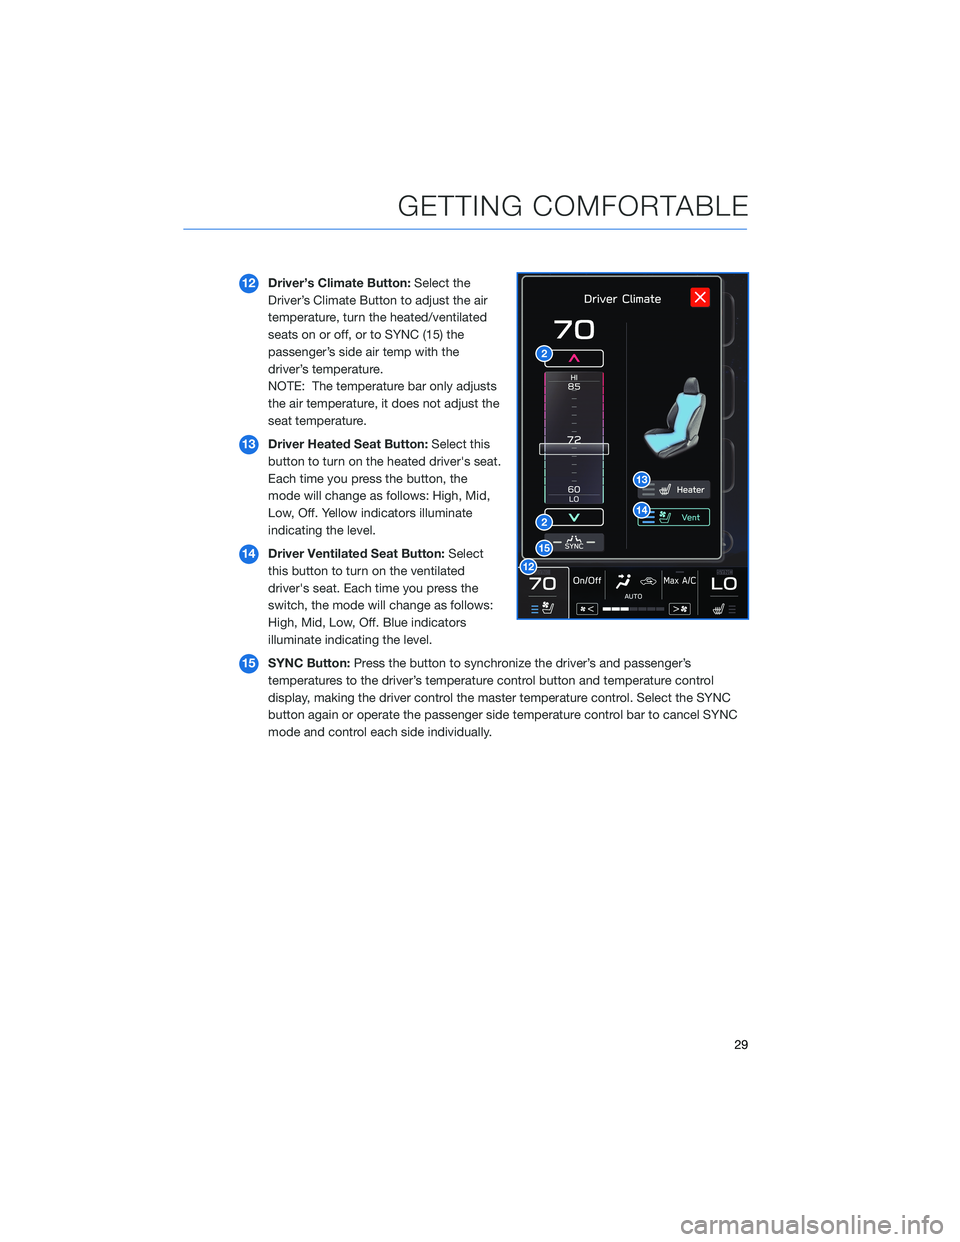
12Driver’s Climate Button:Select the
Driver’s Climate Button to adjust the air
temperature, turn the heated/ventilated
seats on or off, or to SYNC (15) the
passenger’s side air temp with the
driver’s temperature.
NOTE: The temperature bar only adjusts
the air temperature, it does not adjust the
seat temperature.
13Driver Heated Seat Button:Select this
button to turn on the heated driver's seat.
Each time you press the button, the
mode will change as follows: High, Mid,
Low, Off. Yellow indicators illuminate
indicating the level.
14Driver Ventilated Seat Button:Select
this button to turn on the ventilated
driver's seat. Each time you press the
switch, the mode will change as follows:
High, Mid, Low, Off. Blue indicators
illuminate indicating the level.
15SYNC Button:Press the button to synchronize the driver’s and passenger’s
temperatures to the driver’s temperature control button and temperature control
display, making the driver control the master temperature control. Select the SYNC
button again or operate the passenger side temperature control bar to cancel SYNC
mode and control each side individually.
GETTING COMFORTABLE
29
Page 32 of 172
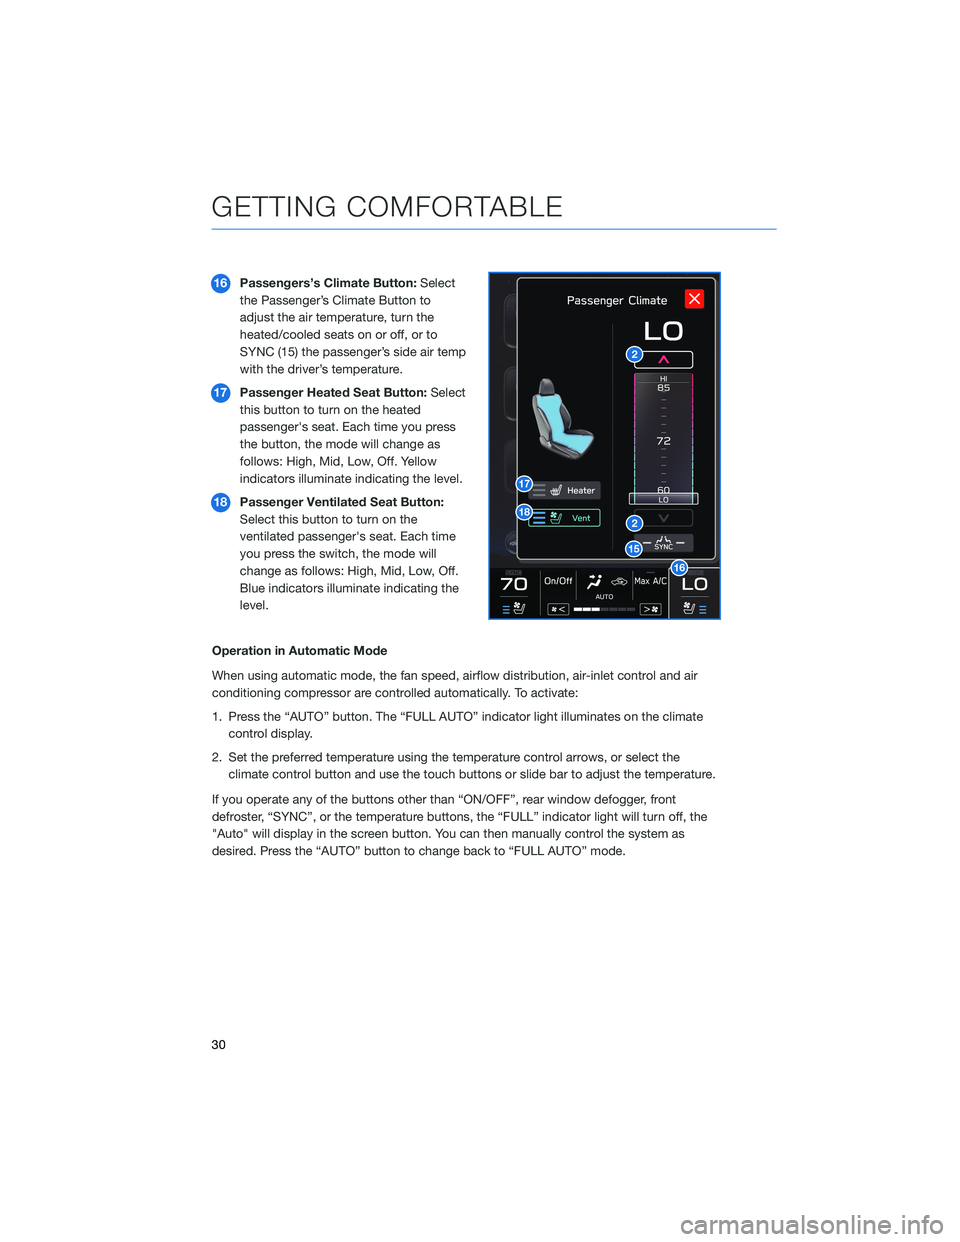
16Passengers’s Climate Button:Select
the Passenger’s Climate Button to
adjust the air temperature, turn the
heated/cooled seats on or off, or to
SYNC (15) the passenger’s side air temp
with the driver’s temperature.
17Passenger Heated Seat Button:Select
this button to turn on the heated
passenger's seat. Each time you press
the button, the mode will change as
follows: High, Mid, Low, Off. Yellow
indicators illuminate indicating the level.
18Passenger Ventilated Seat Button:
Select this button to turn on the
ventilated passenger's seat. Each time
you press the switch, the mode will
change as follows: High, Mid, Low, Off.
Blue indicators illuminate indicating the
level.
Operation in Automatic Mode
When using automatic mode, the fan speed, airflow distribution, air-inlet control and air
conditioning compressor are controlled automatically. To activate:
1. Press the “AUTO” button. The “FULL AUTO” indicator light illuminates on the climate
control display.
2. Set the preferred temperature using the temperature control arrows, or select the
climate control button and use the touch buttons or slide bar to adjust the temperature.
If you operate any of the buttons other than “ON/OFF”, rear window defogger, front
defroster, “SYNC”, or the temperature buttons, the “FULL” indicator light will turn off, the
"Auto" will display in the screen button. You can then manually control the system as
desired. Press the “AUTO” button to change back to “FULL AUTO” mode.
GETTING COMFORTABLE
30
Page 56 of 172
LATCH/ANCHOR
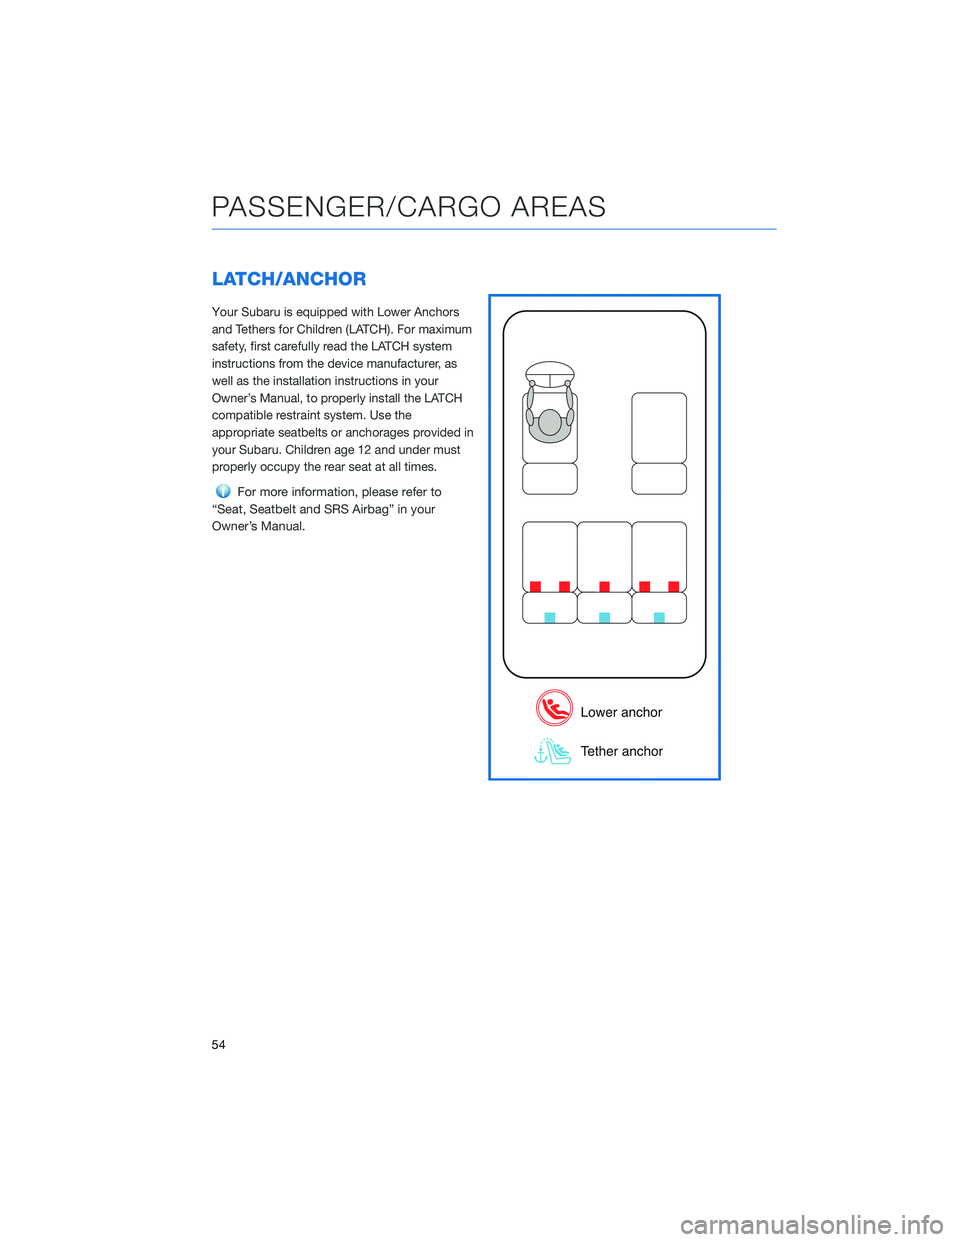
Your Subaru is equipped with Lower Anchors
and Tethers for Children (LATCH). For maximum
safety, first carefully read the LATCH system
instructions from the device manufacturer, as
well as the installation instructions in your
Owner’s Manual, to properly install the LATCH
compatible restraint system. Use the
appropriate seatbelts or anchorages provided in
your Subaru. Children age 12 and under must
properly occupy the rear seat at all times.
For more information, please refer to
“Seat, Seatbelt and SRS Airbag” in your
Owner’s Manual.
PASSENGER/CARGO AREAS
54
Page 61 of 172
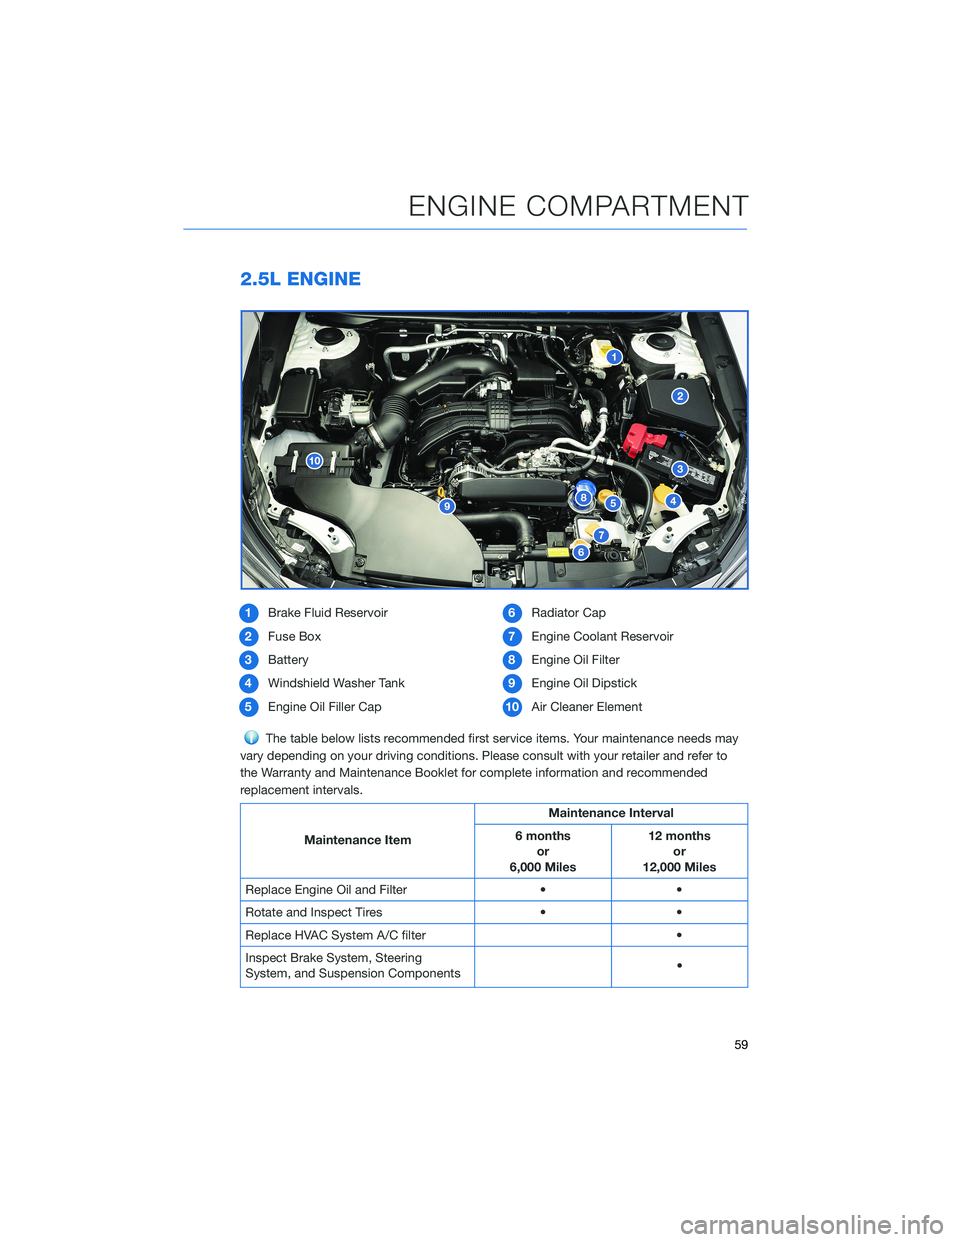
2.5L ENGINE
1Brake Fluid Reservoir
2Fuse Box
3Battery
4Windshield Washer Tank
5Engine Oil Filler Cap6Radiator Cap
7Engine Coolant Reservoir
8Engine Oil Filter
9Engine Oil Dipstick
10Air Cleaner Element
The table below lists recommended first service items. Your maintenance needs may
vary depending on your driving conditions. Please consult with your retailer and refer to
the Warranty and Maintenance Booklet for complete information and recommended
replacement intervals.
Maintenance ItemMaintenance Interval
6 months
or
6,000 Miles12 months
or
12,000 Miles
Replace Engine Oil and Filter • •
Rotate and Inspect Tires • •
Replace HVAC System A/C filter •
Inspect Brake System, Steering
System, and Suspension Components•
ENGINE COMPARTMENT
59
Page 62 of 172
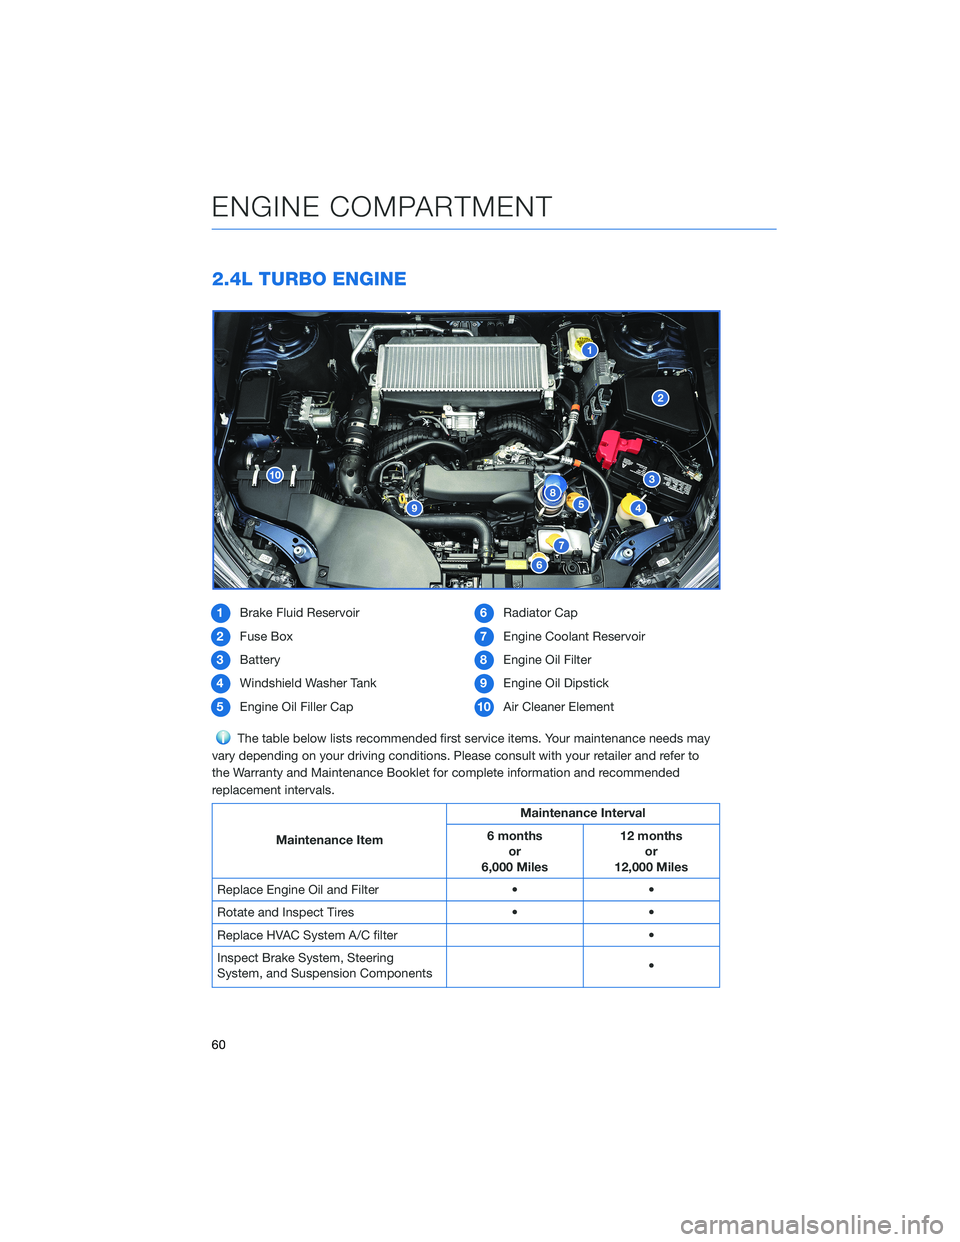
2.4L TURBO ENGINE
1Brake Fluid Reservoir
2Fuse Box
3Battery
4Windshield Washer Tank
5Engine Oil Filler Cap6Radiator Cap
7Engine Coolant Reservoir
8Engine Oil Filter
9Engine Oil Dipstick
10Air Cleaner Element
The table below lists recommended first service items. Your maintenance needs may
vary depending on your driving conditions. Please consult with your retailer and refer to
the Warranty and Maintenance Booklet for complete information and recommended
replacement intervals.
Maintenance ItemMaintenance Interval
6 months
or
6,000 Miles12 months
or
12,000 Miles
Replace Engine Oil and Filter • •
Rotate and Inspect Tires • •
Replace HVAC System A/C filter •
Inspect Brake System, Steering
System, and Suspension Components•
ENGINE COMPARTMENT
60