remote SUBARU SOLTERRA 2023 User Guide
[x] Cancel search | Manufacturer: SUBARU, Model Year: 2023, Model line: SOLTERRA, Model: SUBARU SOLTERRA 2023Pages: 628, PDF Size: 11.91 MB
Page 133 of 628
1332-2. Charging
Owners Manual_USA_M42C01_en
2
Electric Vehicle system
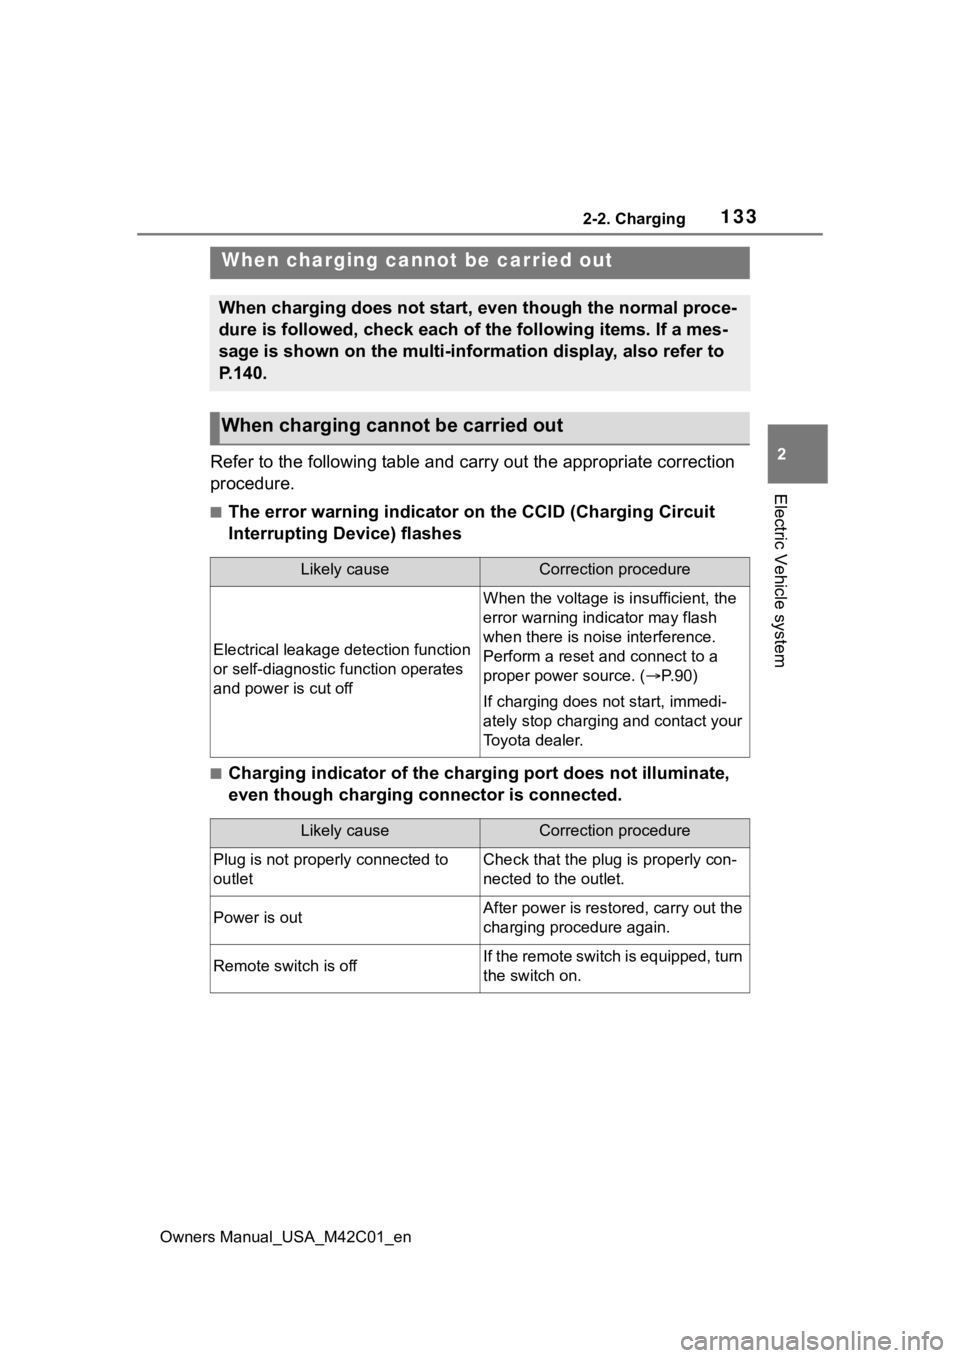
Refer to the following table and carry out the appropriate correction
procedure.
■The error warning indicator on the CCID (Charging Circuit
Interrupting Device) flashes
■Charging indicator of the charging port does not illuminate,
even though charging connector is connected.
When charging canno t be carried out
When charging does not start, even though the normal proce-
dure is followed, check each of the following items. If a mes-
sage is shown on the multi-information display, also refer to
P.140.
When charging cannot be carried out
Likely causeCorrection procedure
Electrical leakage detection function
or self-diagnostic function operates
and power is cut off
When the voltage is insufficient, the
error warning indi cator may flash
when there is noise interference.
Perform a reset and connect to a
proper power source. ( P. 9 0 )
If charging does not start, immedi-
ately stop charging and contact your
Toyota dealer.
Likely causeCorrection procedure
Plug is not properly connected to
outletCheck that the plug is properly con-
nected to the outlet.
Power is outAfter power is restored, carry out the
charging procedure again.
Remote switch is offIf the remote switch is equipped, turn
the switch on.
Page 139 of 628
1392-2. Charging
Owners Manual_USA_M42C01_en
2
Electric Vehicle system
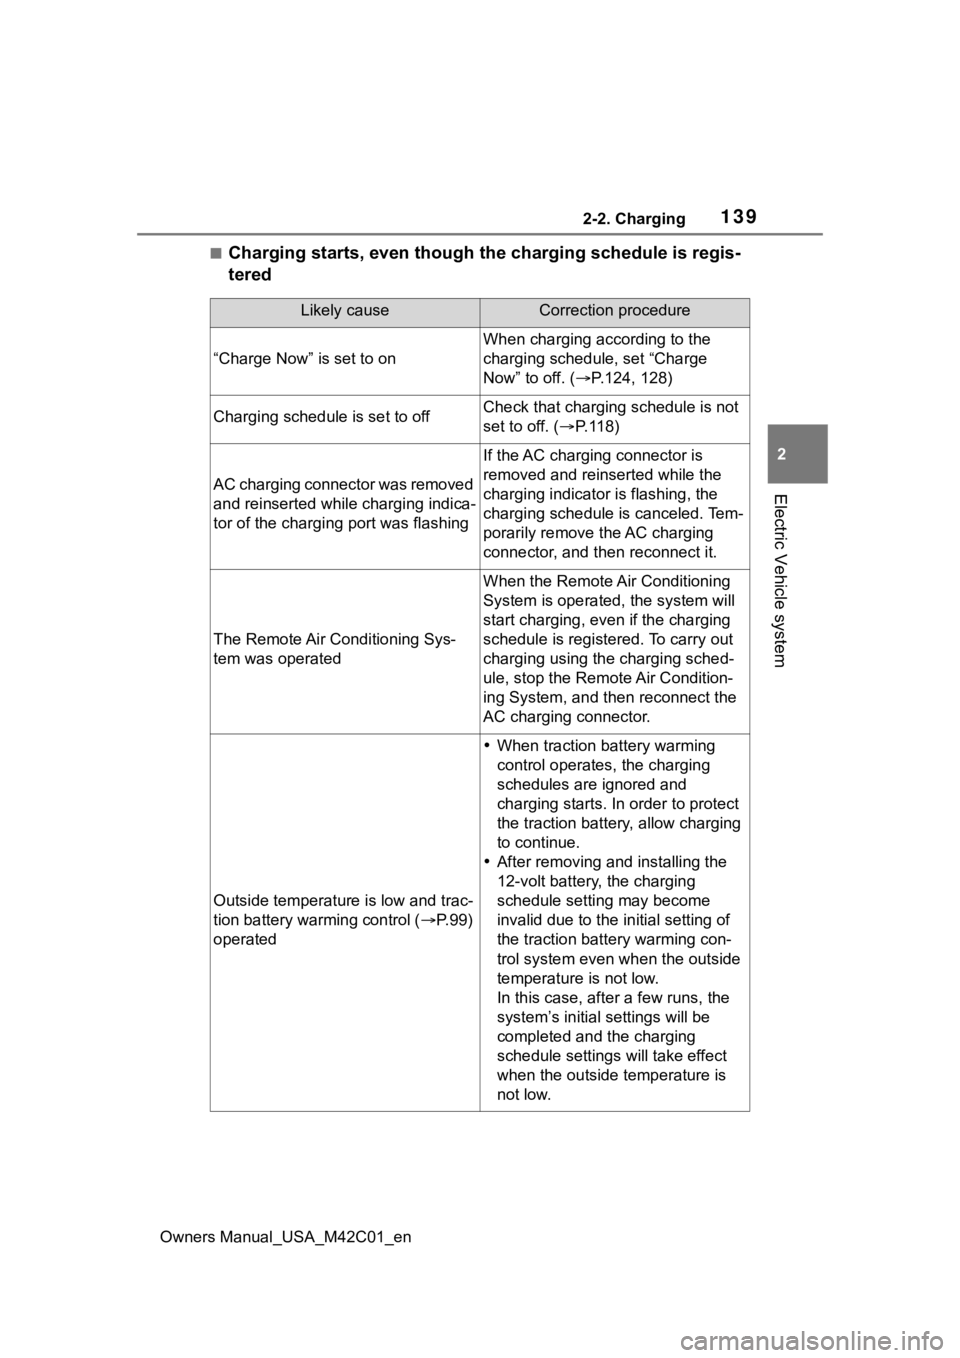
■Charging starts, even though the charging schedule is regis-
tered
Likely causeCorrection procedure
“Charge Now” is set to on
When charging according to the
charging schedule, set “Charge
Now” to off. ( P.124, 128)
Charging schedule is set to offCheck that charging schedule is not
set to off. ( P. 1 1 8 )
AC charging connector was removed
and reinserted while charging indica-
tor of the charging port was flashing
If the AC charging connector is
removed and reinserted while the
charging indicator is flashing, the
charging schedule is canceled. Tem-
porarily remove the AC charging
connector, and then reconnect it.
The Remote Air Conditioning Sys-
tem was operated
When the Remote Air Conditioning
System is operated, the system will
start charging, even if the charging
schedule is registered. To carry out
charging using the charging sched-
ule, stop the Remote Air Condition-
ing System, and then reconnect the
AC charging connector.
Outside temperature is low and trac-
tion battery warming control ( P. 9 9 )
operated
When traction battery warming
control operates, the charging
schedules are ignored and
charging starts. In order to protect
the traction battery , allow charging
to continue.
After removing and installing the
12-volt battery, the charging
schedule setting may become
invalid due to the in itial setting of
the traction battery warming con-
trol system even wh en the outside
temperature is not low.
In this case, after a few runs, the
system’s initial settings will be
completed and the charging
schedule settings will take effect
when the outside temperature is
not low.
Page 141 of 628
1412-2. Charging
Owners Manual_USA_M42C01_en
2
Electric Vehicle system
*: Electricity is consumed wh en operating battery heater ( P.99), the
Remote Air Conditioning System ( P.409).
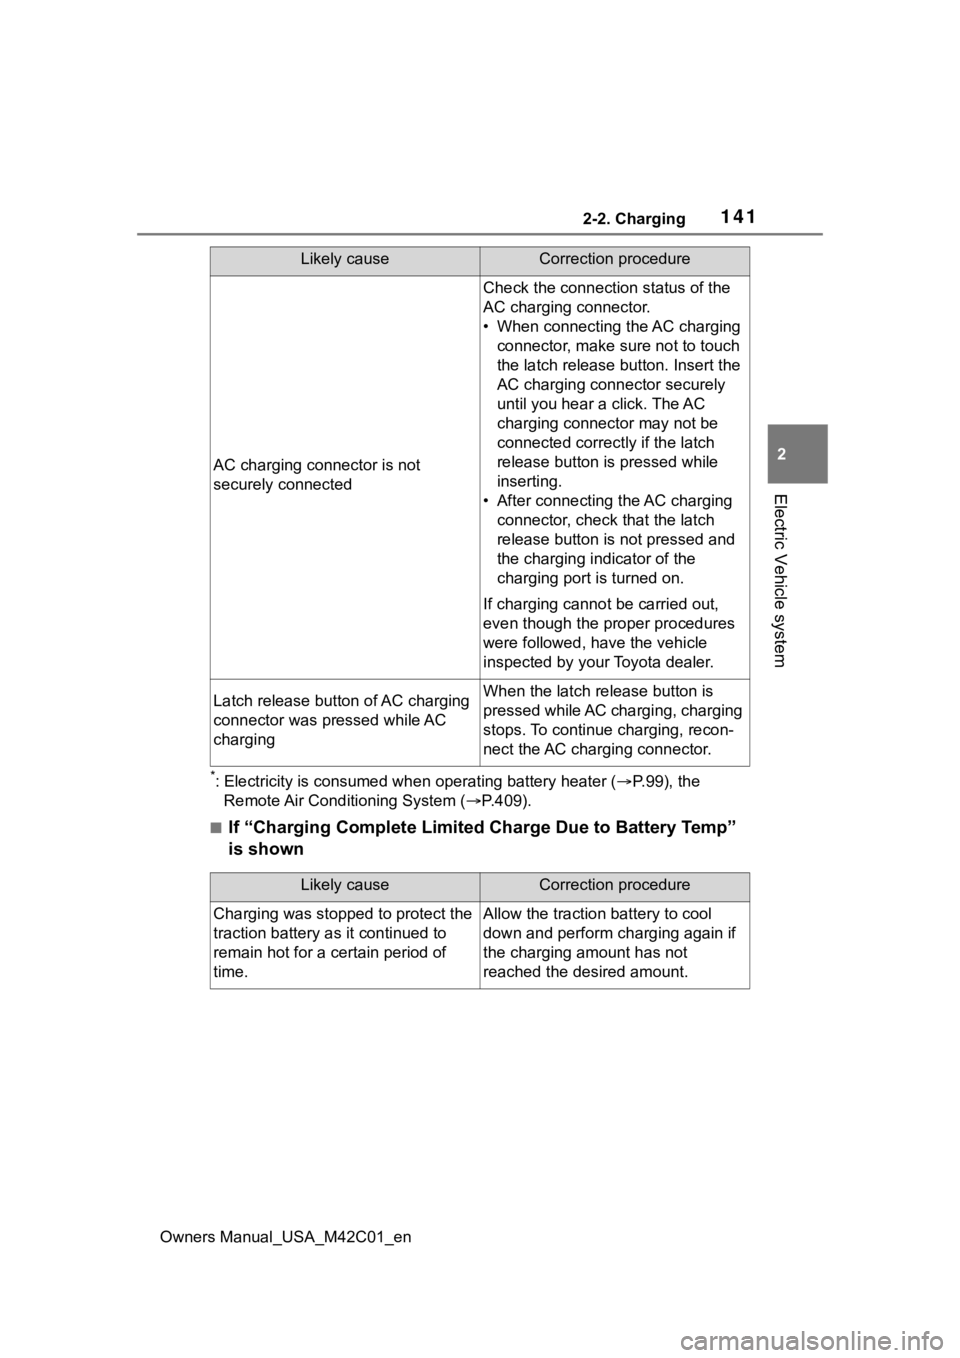
■If “Charging Complete Limited Charge Due to Battery Temp”
is shown
AC charging connector is not
securely connected
Check the connection status of the
AC charging connector.
• When connecting the AC charging
connector, make sure not to touch
the latch release button. Insert the
AC charging connector securely
until you hear a click. The AC
charging connector may not be
connected correctly if the latch
release button is pressed while
inserting.
• After connecting the AC charging connector, check that the latch
release button is not pressed and
the charging indicator of the
charging port is turned on.
If charging cannot be carried out,
even though the proper procedures
were followed, h ave the vehicle
inspected by your Toyota dealer.
Latch release button of AC charging
connector was pressed while AC
chargingWhen the latch release button is
pressed while AC charging, charging
stops. To continue charging, recon-
nect the AC charging connector.
Likely causeCorrection procedure
Likely causeCorrection procedure
Charging was stopped to protect the
traction battery as it continued to
remain hot for a certain period of
time.Allow the traction battery to cool
down and perform ch arging again if
the charging amount has not
reached the desired amount.
Page 142 of 628
1422-2. Charging
Owners Manual_USA_M42C01_en
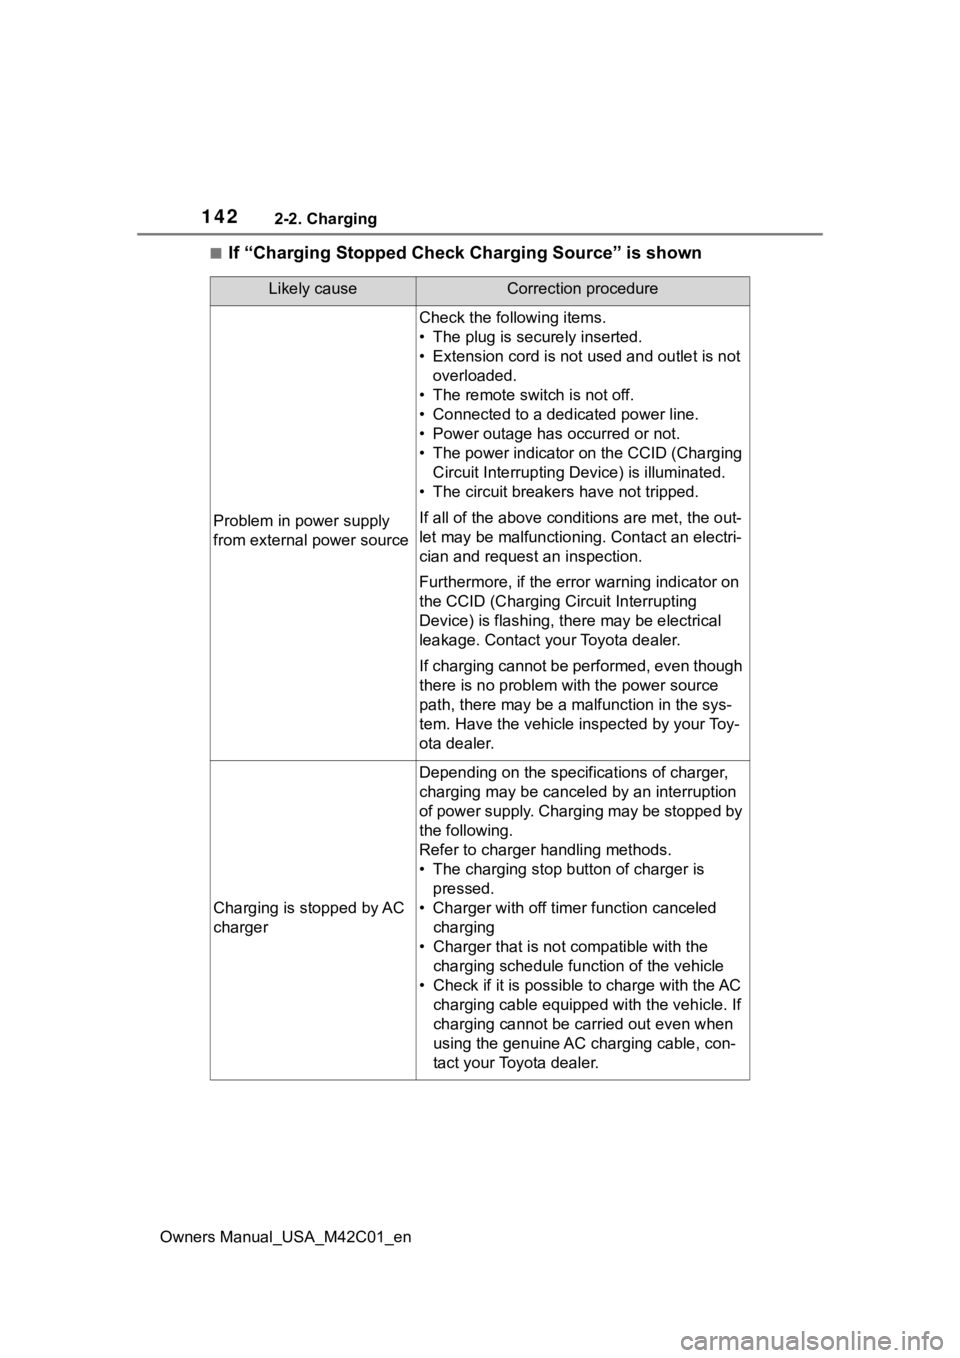
■If “Charging Stopped Check Charging Source” is shown
Likely causeCorrection procedure
Problem in power supply
from external power source
Check the following items.
• The plug is securely inserted.
• Extension cord is not used and outlet is not overloaded.
• The remote switch is not off.
• Connected to a dedicated power line.
• Power outage has occurred or not.
• The power indicator on the CCID (Charging Circuit Interrupting D evice) is illuminated.
• The circuit breakers have not tripped.
If all of the above condit ions are met, the out-
let may be malfunctioni ng. Contact an electri-
cian and request an inspection.
Furthermore, if the error warning indicator on
the CCID (Charging Circuit Interrupting
Device) is flash ing, there may be electrical
leakage. Contact your Toyota dealer.
If charging cannot be performed, even though
there is no problem with the power source
path, there may be a malfunction in the sys-
tem. Have the vehicle inspected by your Toy-
ota dealer.
Charging is stopped by AC
charger
Depending on the specifications of charger,
charging may be canceled by an interruption
of power supply. Charging may be stopped by
the following.
Refer to charger handling methods.
• The charging stop bu tton of charger is
pressed.
• Charger with off timer function canceled charging
• Charger that is not compatible with the charging schedule function of the vehicle
• Check if it is possible to charge with the AC charging cable equipped with the vehicle. If
charging cannot be carried out even when
using the genuine AC charging cable, con-
tact your Toyota dealer.
Page 162 of 628
1624-1. Key information
Owners Manual_USA_M42C01_en
4-1.Key information
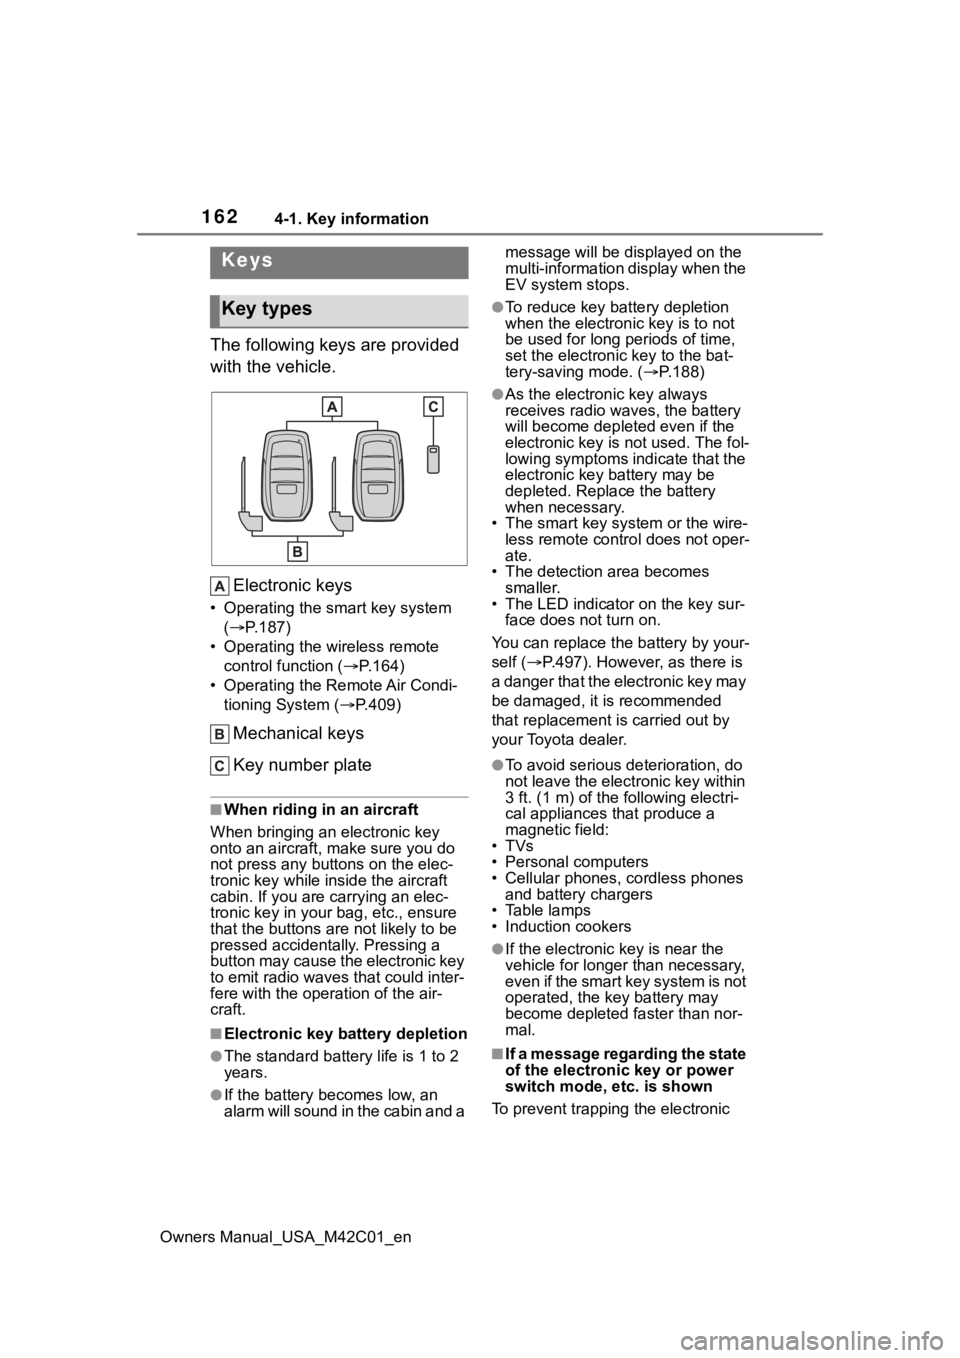
The following keys are provided
with the vehicle.Electronic keys
• Operating the smart key system ( P.187)
• Operating the wireless remote control function ( P.164)
• Operating the Remote Air Condi- tioning System ( P.409)
Mechanical keys
Key number plate
■When riding in an aircraft
When bringing an electronic key
onto an aircraft, make sure you do
not press any buttons on the elec-
tronic key while inside the aircraft
cabin. If you are carrying an elec-
tronic key in your bag, etc., ensure
that the buttons are not likely to be
pressed accidentally. Pressing a
button may cause the electronic key
to emit radio waves that could inter-
fere with the oper ation of the air-
craft.
■Electronic key battery depletion
●The standard battery life is 1 to 2
years.
●If the battery becomes low, an
alarm will sound in the cabin and a message will be disp
layed on the
multi-information display when the
EV system stops.
●To reduce key battery depletion
when the electronic key is to not
be used for long periods of time,
set the electronic key to the bat-
tery-saving mode. ( P.188)
●As the electronic key always
receives radio waves, the battery
will become depleted even if the
electronic key is not used. The fol-
lowing symptoms indicate that the
electronic key battery may be
depleted. Replace the battery
when necessary.
• The smart key system or the wire- less remote contro l does not oper-
ate.
• The detection area becomes smaller.
• The LED indicator on the key sur-
face does not turn on.
You can replace the battery by your-
self ( P.497). However, as there is
a danger that the electronic key may
be damaged, it is recommended
that replacement is carried out by
your Toyota dealer.
●To avoid serious deterioration, do
not leave the electronic key within
3 ft. (1 m) of the following electri-
cal appliances that produce a
magnetic field:
•TVs
• Personal computers
• Cellular phones, cordless phones and battery chargers
• Table lamps
• Induction cookers
●If the electronic key is near the
vehicle for longer than necessary,
even if the smart key system is not
operated, the key battery may
become depleted faster than nor-
mal.
■If a message regarding the state
of the electronic key or power
switch mode, e tc. is shown
To prevent trapping the electronic
Keys
Key types
Page 164 of 628
1644-1. Key information
Owners Manual_USA_M42C01_en
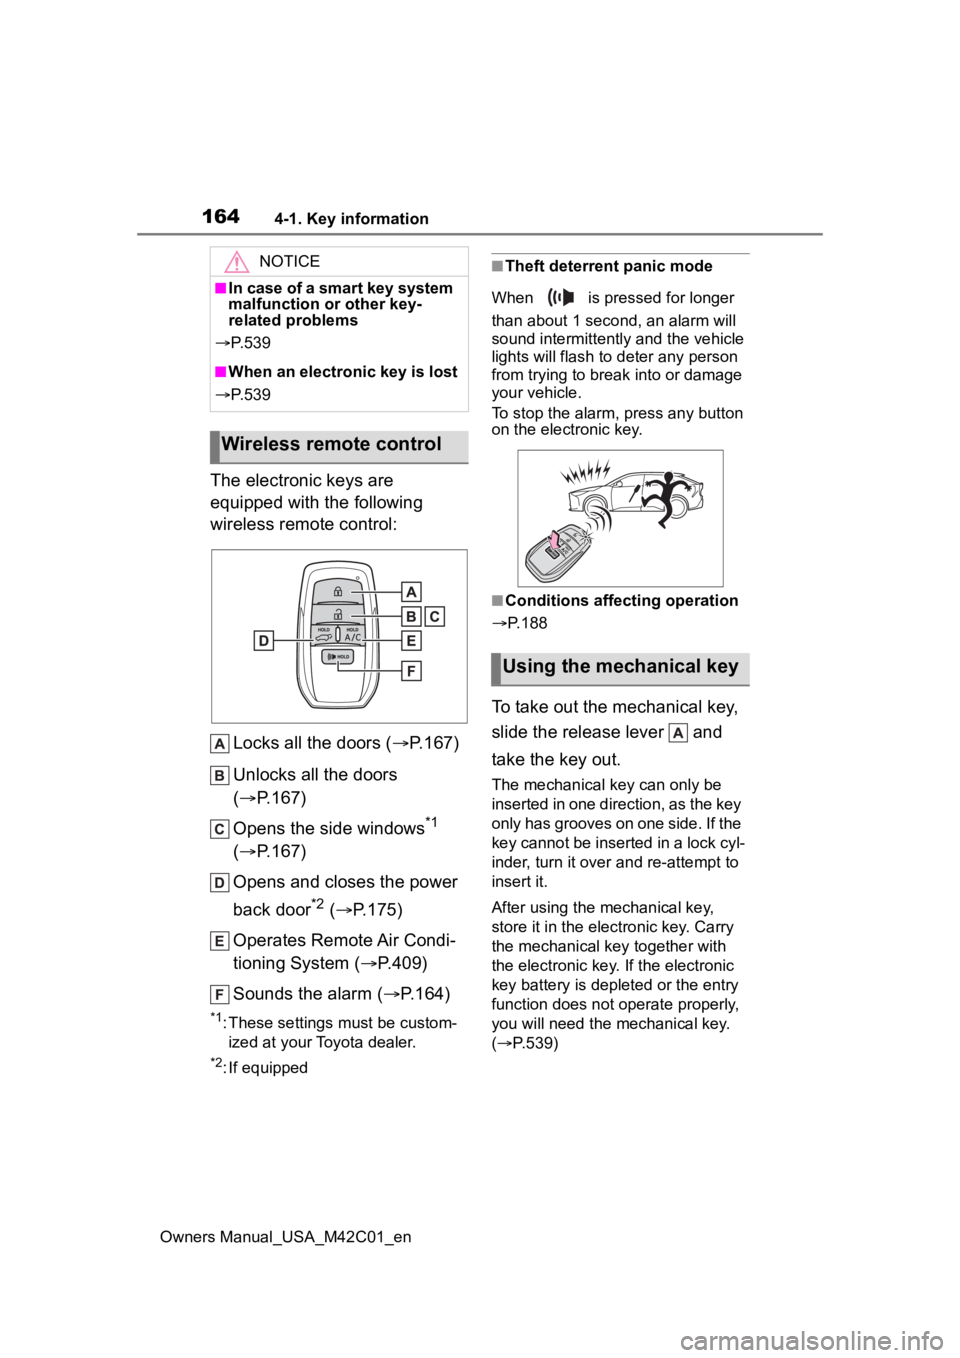
The electronic keys are
equipped with the following
wireless remote control:Locks all the doors ( P.167)
Unlocks all the doors
( P.167)
Opens the side windows
*1
( P.167)
Opens and closes the power
back door
*2 ( P.175)
Operates Remote Air Condi-
tioning System ( P.409)
Sounds the alarm ( P.164)
*1: These settings must be custom-
ized at your Toyota dealer.
*2: If equipped
■Theft deterrent panic mode
When is pressed for longer
than about 1 second, an alarm will
sound intermittently and the vehicle
lights will flash to deter any person
from trying to break into or damage
your vehicle.
To stop the alarm, press any button
on the electronic key.
■Conditions affecting operation
P.188
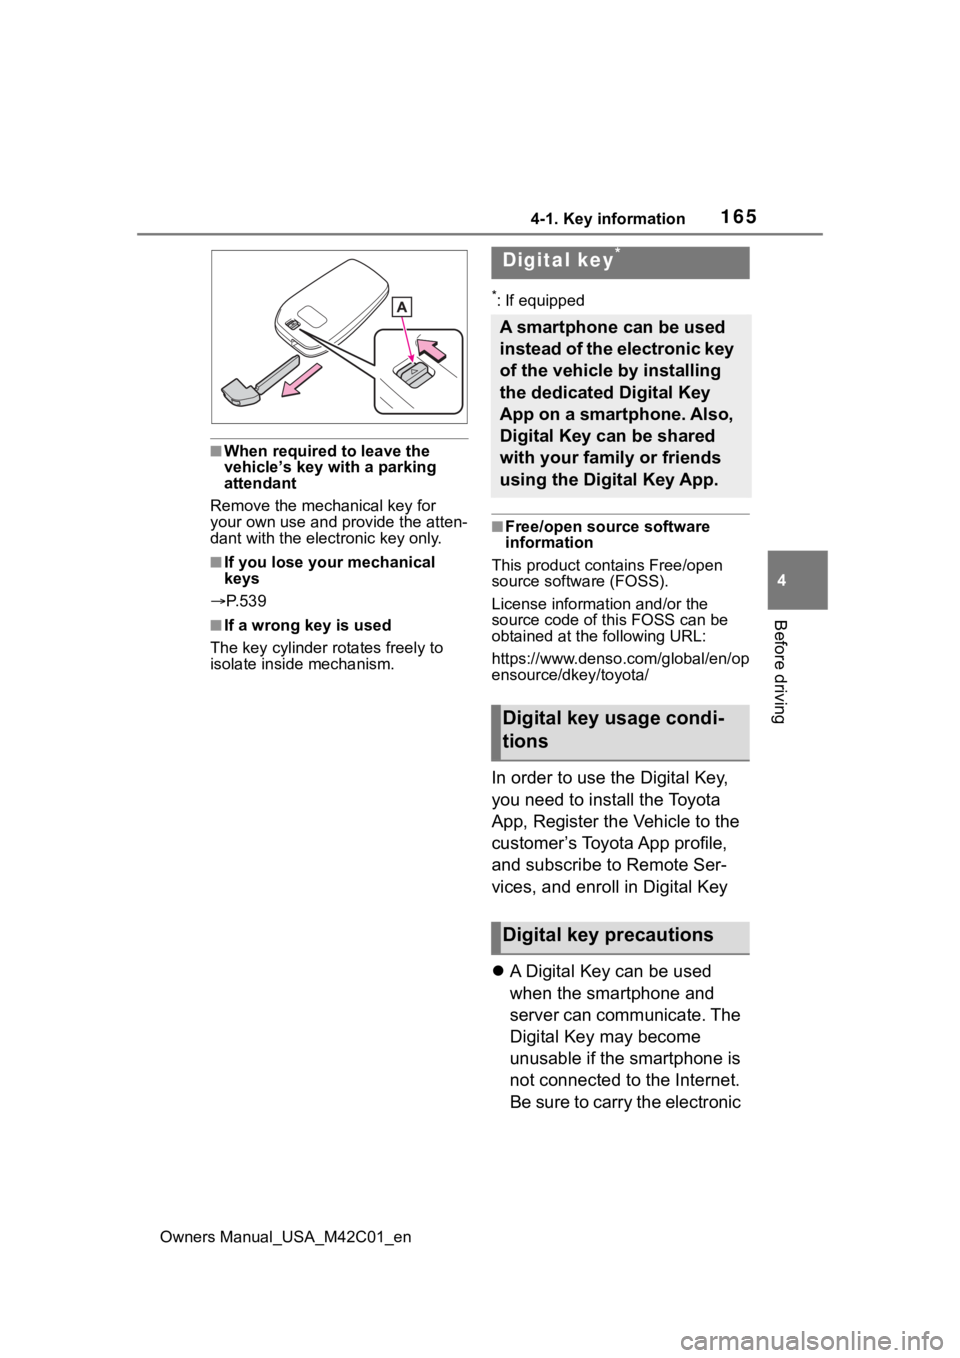
To take out the mechanical key,
slide the release lever and
take the key out.
The mechanical key can only be
inserted in one direction, as the key
only has grooves on one side. If the
key cannot be inserted in a lock cyl-
inder, turn it over a nd re-attempt to
insert it.
After using the mechanical key,
store it in the electronic key. Carry
the mechanical k ey together with
the electronic key. If the electronic
key battery is depleted or the entry
function does not operate properly,
you will need the mechanical key.
( P.539)
NOTICE
■In case of a smart key system
malfunction or other key-
related problems
P. 5 3 9
■When an electronic key is lost
P. 5 3 9
Wireless remote control
Using the mechanical key
Page 165 of 628
1654-1. Key information
Owners Manual_USA_M42C01_en
4
Before driving
■When required to leave the
vehicle’s key with a parking
attendant
Remove the mechanical key for
your own use and provide the atten-
dant with the electronic key only.
■If you lose your mechanical
keys
P. 5 3 9
■If a wrong key is used
The key cylinder rotates freely to
isolate inside mechanism.
*: If equipped
■Free/open source software
information
This product contains Free/open
source software (FOSS).
License information and/or the
source code of this FOSS can be
obtained at th e following URL:
https://www.denso .com/global/en/op
ensource/dkey/toyota/
In order to use the Digital Key,
you need to install the Toyota
App, Register the Vehicle to the
customer’s Toyota App profile,
and subscribe to Remote Ser-
vices, and enroll in Digital Key
A Digital Key can be used
when the smartphone and
server can communicate. The
Digital Key may become
unusable if the smartphone is
not connected to the Internet.
Be sure to carry the electronic
Digital key*
A smartphone can be used
instead of the electronic key
of the vehicle by installing
the dedicated Digital Key
App on a smartphone. Also,
Digital Key can be shared
with your family or friends
using the Digital Key App.
Digital key usage condi-
tions
Digital key precautions
Page 167 of 628
1674-2. Opening, closing and locking the doors
Owners Manual_USA_M42C01_en
4
Before driving
4-2.Opening, closing and locking the doors
■Using the entry function
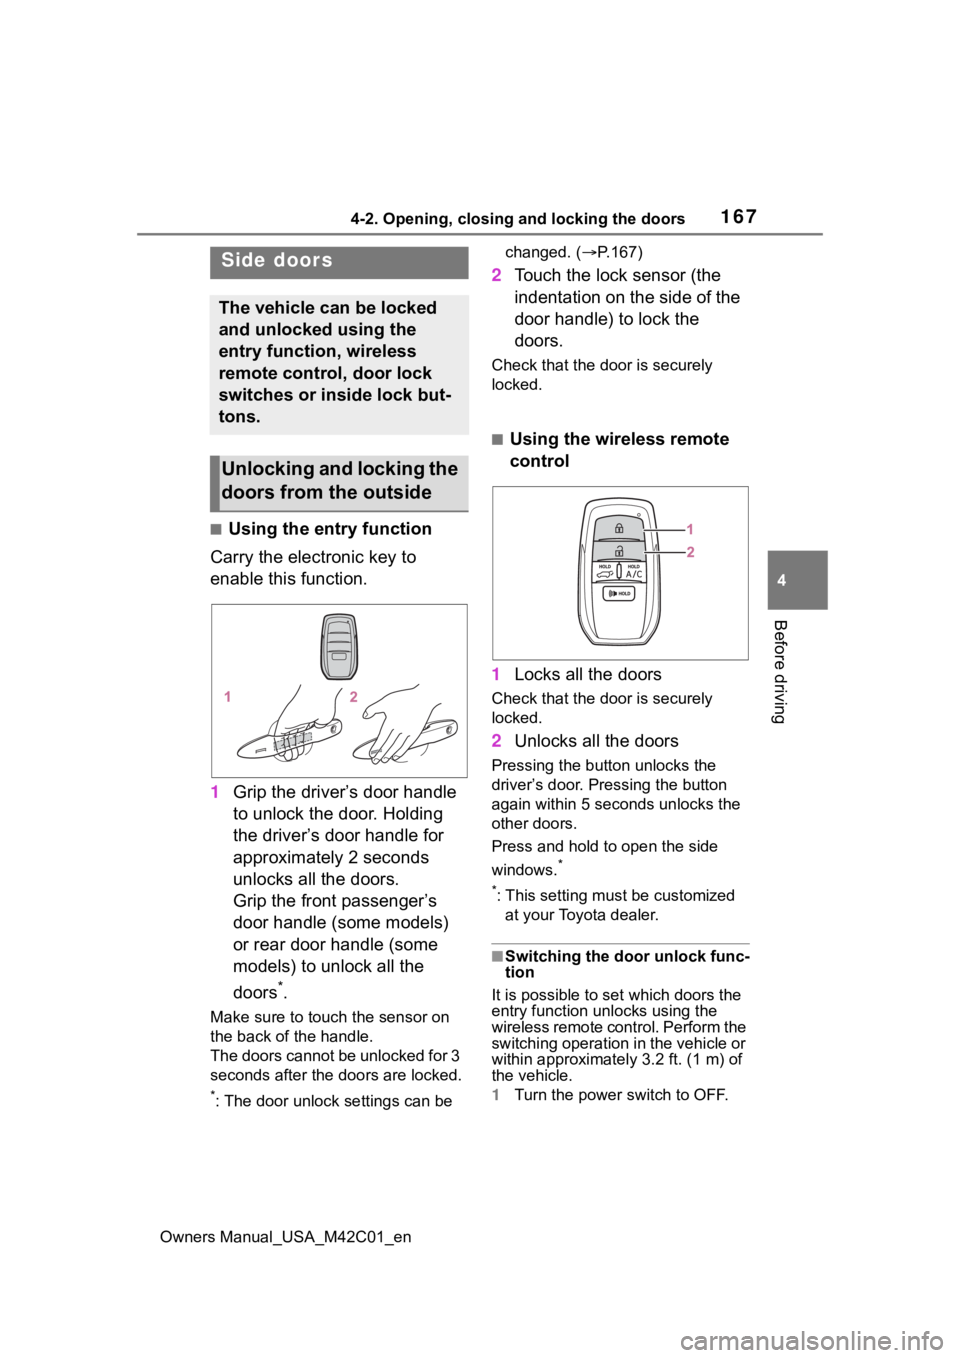
Carry the electronic key to
enable this function.
1 Grip the driver’s door handle
to unlock the door. Holding
the driver’s door handle for
approximately 2 seconds
unlocks all the doors.
Grip the front passenger’s
door handle (some models)
or rear door handle (some
models) to unlock all the
doors
*.
Make sure to touch the sensor on
the back of the handle.
The doors cannot be unlocked for 3
seconds after the doors are locked.
*: The door unlock settings can be changed. (
P.167)
2 Touch the lock sensor (the
indentation on the side of the
door handle) to lock the
doors.
Check that the d oor is securely
locked.
■Using the wireless remote
control
1 Locks all the doors
Check that the d oor is securely
locked.
2 Unlocks all the doors
Pressing the button unlocks the
driver’s door. Pressing the button
again within 5 seconds unlocks the
other doors.
Press and hold to open the side
windows.
*
*
: This setting must be customized at your Toyota dealer.
■Switching the door unlock func-
tion
It is possible to set which doors the
entry function unlocks using the
wireless remote control. Perform the
switching operation in the vehicle or
within approximately 3.2 ft. (1 m) of
the vehicle.
1 Turn the power switch to OFF.
Side doors
The vehicle can be locked
and unlocked using the
entry function, wireless
remote control, door lock
switches or inside lock but-
tons.
Unlocking and locking the
doors from the outside
Page 168 of 628
1684-2. Opening, closing and locking the doors
Owners Manual_USA_M42C01_en2
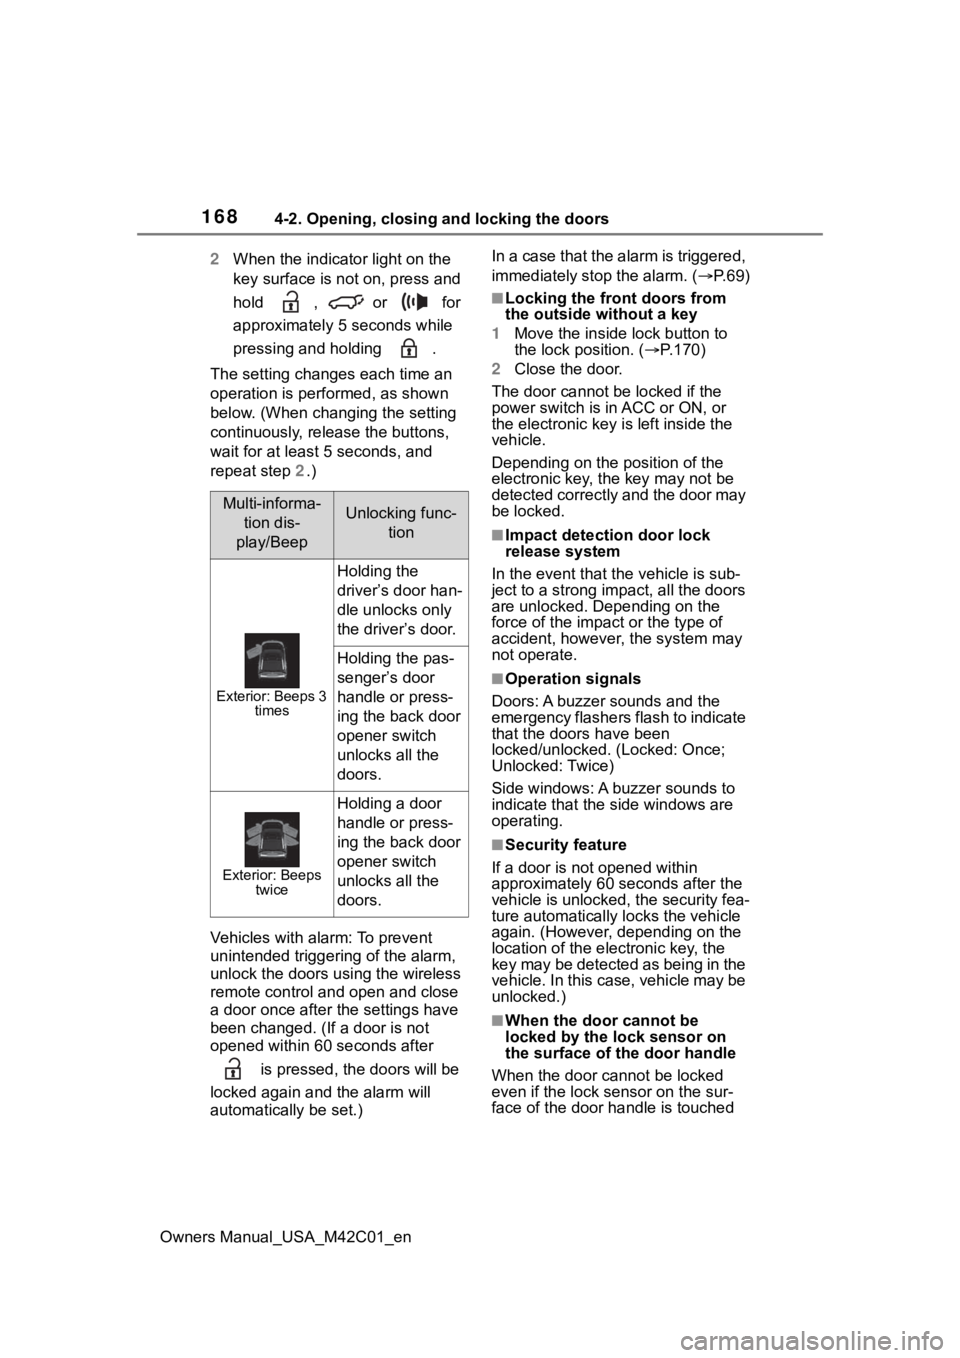
When the indicator light on the
key surface is not on, press and
hold , or for
approximately 5 seconds while
pressing and holding .
The setting changes each time an
operation is performed, as shown
below. (When changing the setting
continuously, release the buttons,
wait for at least 5 seconds, and
repeat step 2.)
Vehicles with alarm: To prevent
unintended triggering of the alarm,
unlock the doors us ing the wireless
remote control and open and close
a door once after t he settings have
been changed. (If a door is not
opened within 60 seconds after
is pressed, the doors will be
locked again a nd the alarm will
automatically be set.) In a case that the alarm is triggered,
immediately stop the alarm. (
P. 6 9 )
■Locking the front doors from
the outside without a key
1 Move the inside l ock button to
the lock position. ( P.170)
2 Close the door.
The door cannot be locked if the
power switch is in ACC or ON, or
the electronic key is left inside the
vehicle.
Depending on the position of the
electronic key, the key may not be
detected correctly and the door may
be locked.
■Impact detection door lock
release system
In the event that t he vehicle is sub-
ject to a strong impact, all the doors
are unlocked. Depending on the
force of the impact or the type of
accident, however, the system may
not operate.
■Operation signals
Doors: A buzzer sounds and the
emergency flashers flash to indicate
that the doors have been
locked/unlocked. (Locked: Once;
Unlocked: Twice)
Side windows: A buzzer sounds to
indicate that the side windows are
operating.
■Security feature
If a door is not opened within
approximately 60 s econds after the
vehicle is unlocked, the security fea-
ture automatically locks the vehicle
again. (However, depending on the
location of the electronic key, the
key may be detected as being in the
vehicle. In this case, vehicle may be
unlocked.)
■When the door cannot be
locked by the lock sensor on
the surface of the door handle
When the door cannot be locked
even if the lock se nsor on the sur-
face of the door handle is touched
Multi-informa-
tion dis-
play/BeepUnlocking func- tion
Exterior: Beeps 3 times
Holding the
driver’s door han-
dle unlocks only
the driver’s door.
Holding the pas-
senger’s door
handle or press-
ing the back door
opener switch
unlocks all the
doors.
Exterior: Beeps twice
Holding a door
handle or press-
ing the back door
opener switch
unlocks all the
doors.
Page 169 of 628
1694-2. Opening, closing and locking the doors
Owners Manual_USA_M42C01_en
4
Before driving
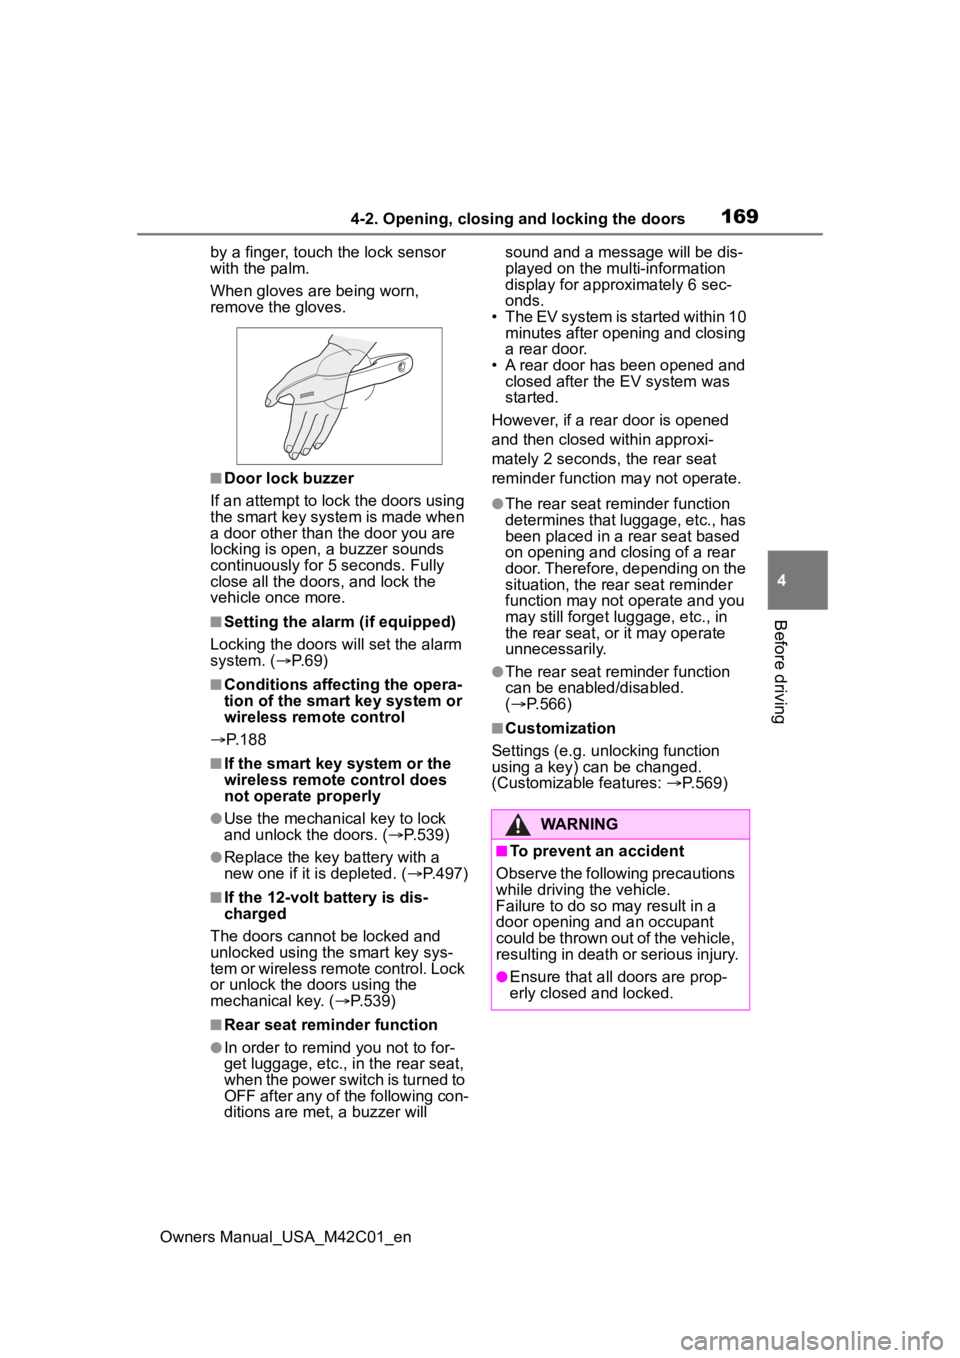
by a finger, touch the lock sensor
with the palm.
When gloves are being worn,
remove the gloves.
■Door lock buzzer
If an attempt to lock the doors using
the smart key system is made when
a door other than t he door you are
locking is open, a buzzer sounds
continuously for 5 seconds. Fully
close all the doors, and lock the
vehicle once more.
■Setting the alarm (if equipped)
Locking the doors will set the alarm
system. ( P.69)
■Conditions affecting the opera-
tion of the smart key system or
wireless remo te control
P. 1 8 8
■If the smart key system or the
wireless remote control does
not operate properly
●Use the mechanical key to lock
and unlock the doors. ( P.539)
●Replace the key battery with a
new one if it is depleted. ( P.497)
■If the 12-volt battery is dis-
charged
The doors cannot be locked and
unlocked using the smart key sys-
tem or wireless remote control. Lock
or unlock the doors using the
mechanical key. ( P.539)
■Rear seat reminder function
●In order to remind you not to for-
get luggage, etc., in the rear seat,
when the power switch is turned to
OFF after any of the following con-
ditions are met, a buzzer will sound and a message will be dis-
played on the multi-information
display for approximately 6 sec-
onds.
• The EV system is started within 10 minutes after opening and closing
a rear door.
• A rear door has been opened and closed after the EV system was
started.
However, if a rear door is opened
and then closed within approxi-
mately 2 seconds, the rear seat
reminder function may not operate.
●The rear seat reminder function
determines that luggage, etc., has
been placed in a rear seat based
on opening and closing of a rear
door. Therefore, depending on the
situation, the rear seat reminder
function may not operate and you
may still forget l uggage, etc., in
the rear seat, or it may operate
unnecessarily.
●The rear seat reminder function
can be enabled/disabled.
( P.566)
■Customization
Settings (e.g. unlocking function
using a key) can be changed.
(Customizable features: P.569)
WARNING
■To prevent an accident
Observe the following precautions
while driving the vehicle.
Failure to do so may result in a
door opening and an occupant
could be thrown out of the vehicle,
resulting in death o r serious injury.
●Ensure that all doors are prop-
erly closed and locked.