transmission oil SUBARU TRIBECA 2009 1.G Service Workshop Manual
[x] Cancel search | Manufacturer: SUBARU, Model Year: 2009, Model line: TRIBECA, Model: SUBARU TRIBECA 2009 1.GPages: 2453, PDF Size: 46.32 MB
Page 2195 of 2453
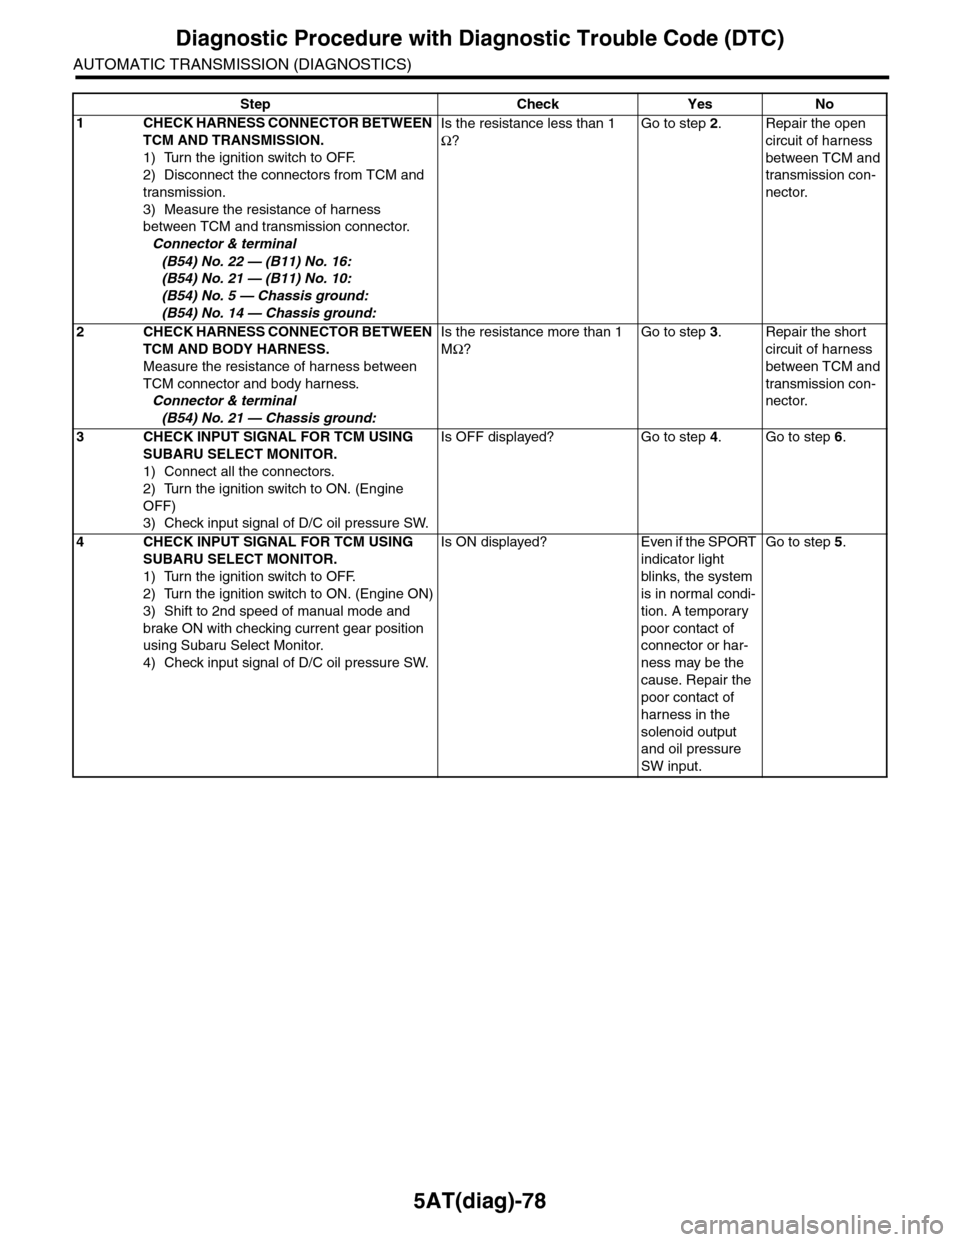
5AT(diag)-78
Diagnostic Procedure with Diagnostic Trouble Code (DTC)
AUTOMATIC TRANSMISSION (DIAGNOSTICS)
Step Check Yes No
1CHECK HARNESS CONNECTOR BETWEEN
TCM AND TRANSMISSION.
1) Turn the ignition switch to OFF.
2) Disconnect the connectors from TCM and
transmission.
3) Measure the resistance of harness
between TCM and transmission connector.
Connector & terminal
(B54) No. 22 — (B11) No. 16:
(B54) No. 21 — (B11) No. 10:
(B54) No. 5 — Chassis ground:
(B54) No. 14 — Chassis ground:
Is the resistance less than 1
Ω?
Go to step 2.Repair the open
circuit of harness
between TCM and
transmission con-
nector.
2CHECK HARNESS CONNECTOR BETWEEN
TCM AND BODY HARNESS.
Measure the resistance of harness between
TCM connector and body harness.
Connector & terminal
(B54) No. 21 — Chassis ground:
Is the resistance more than 1
MΩ?
Go to step 3.Repair the short
circuit of harness
between TCM and
transmission con-
nector.
3CHECK INPUT SIGNAL FOR TCM USING
SUBARU SELECT MONITOR.
1) Connect all the connectors.
2) Turn the ignition switch to ON. (Engine
OFF)
3) Check input signal of D/C oil pressure SW.
Is OFF displayed? Go to step 4.Go to step 6.
4CHECK INPUT SIGNAL FOR TCM USING
SUBARU SELECT MONITOR.
1) Turn the ignition switch to OFF.
2) Turn the ignition switch to ON. (Engine ON)
3) Shift to 2nd speed of manual mode and
brake ON with checking current gear position
using Subaru Select Monitor.
4) Check input signal of D/C oil pressure SW.
Is ON displayed? Even if the SPORT
indicator light
blinks, the system
is in normal condi-
tion. A temporary
poor contact of
connector or har-
ness may be the
cause. Repair the
poor contact of
harness in the
solenoid output
and oil pressure
SW input.
Go to step 5.
Page 2196 of 2453
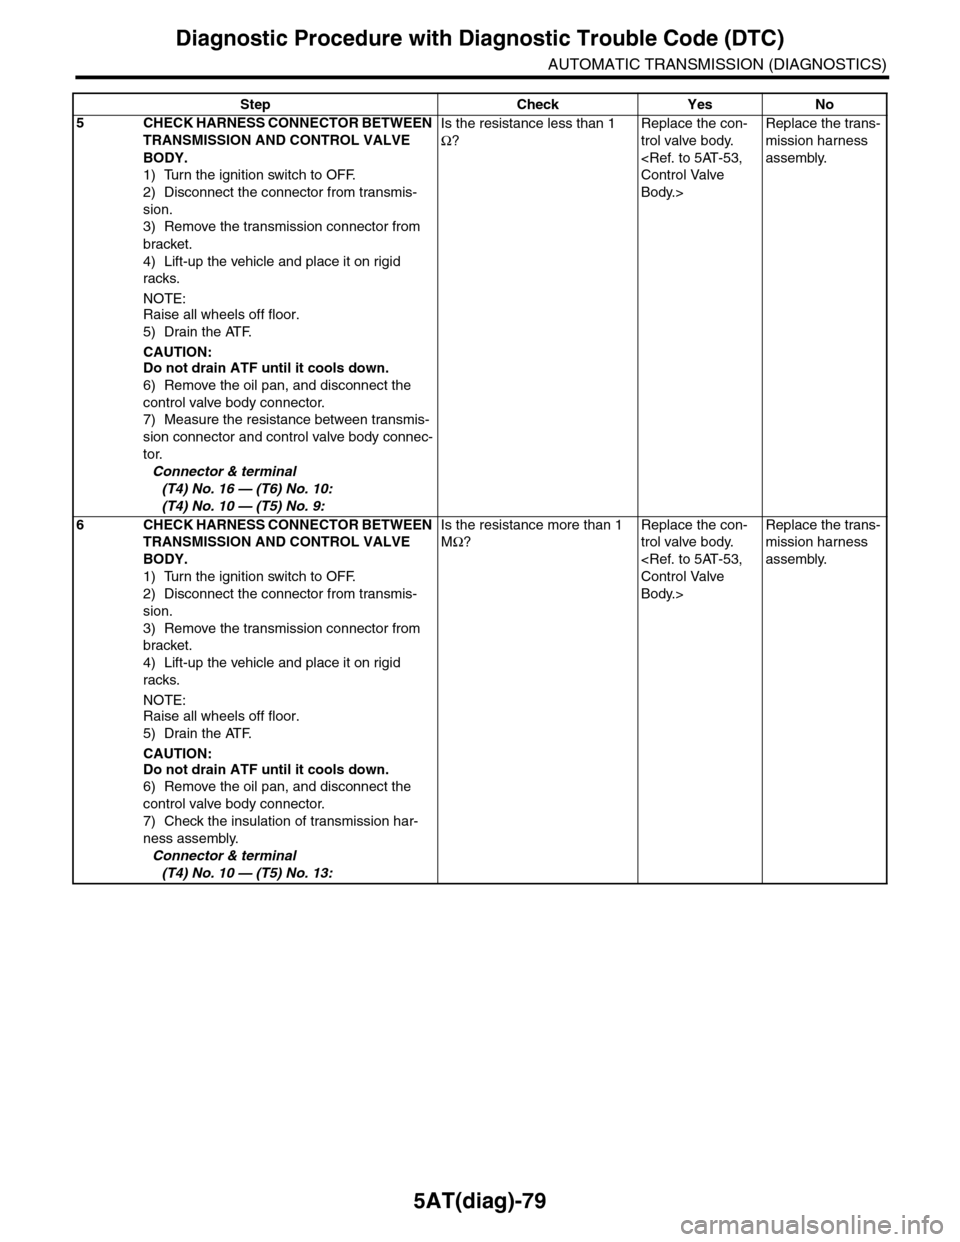
5AT(diag)-79
Diagnostic Procedure with Diagnostic Trouble Code (DTC)
AUTOMATIC TRANSMISSION (DIAGNOSTICS)
5CHECK HARNESS CONNECTOR BETWEEN
TRANSMISSION AND CONTROL VALVE
BODY.
1) Turn the ignition switch to OFF.
2) Disconnect the connector from transmis-
sion.
3) Remove the transmission connector from
bracket.
4) Lift-up the vehicle and place it on rigid
racks.
NOTE:Raise all wheels off floor.
5) Drain the ATF.
CAUTION:Do not drain ATF until it cools down.
6) Remove the oil pan, and disconnect the
control valve body connector.
7) Measure the resistance between transmis-
sion connector and control valve body connec-
tor.
Connector & terminal
(T4) No. 16 — (T6) No. 10:
(T4) No. 10 — (T5) No. 9:
Is the resistance less than 1
Ω?
Replace the con-
trol valve body.
Body.>
Replace the trans-
mission harness
assembly.
6CHECK HARNESS CONNECTOR BETWEEN
TRANSMISSION AND CONTROL VALVE
BODY.
1) Turn the ignition switch to OFF.
2) Disconnect the connector from transmis-
sion.
3) Remove the transmission connector from
bracket.
4) Lift-up the vehicle and place it on rigid
racks.
NOTE:Raise all wheels off floor.
5) Drain the ATF.
CAUTION:
Do not drain ATF until it cools down.
6) Remove the oil pan, and disconnect the
control valve body connector.
7) Check the insulation of transmission har-
ness assembly.
Connector & terminal
(T4) No. 10 — (T5) No. 13:
Is the resistance more than 1
MΩ?
Replace the con-
trol valve body.
Body.>
Replace the trans-
mission harness
assembly.
Step Check Yes No
Page 2198 of 2453
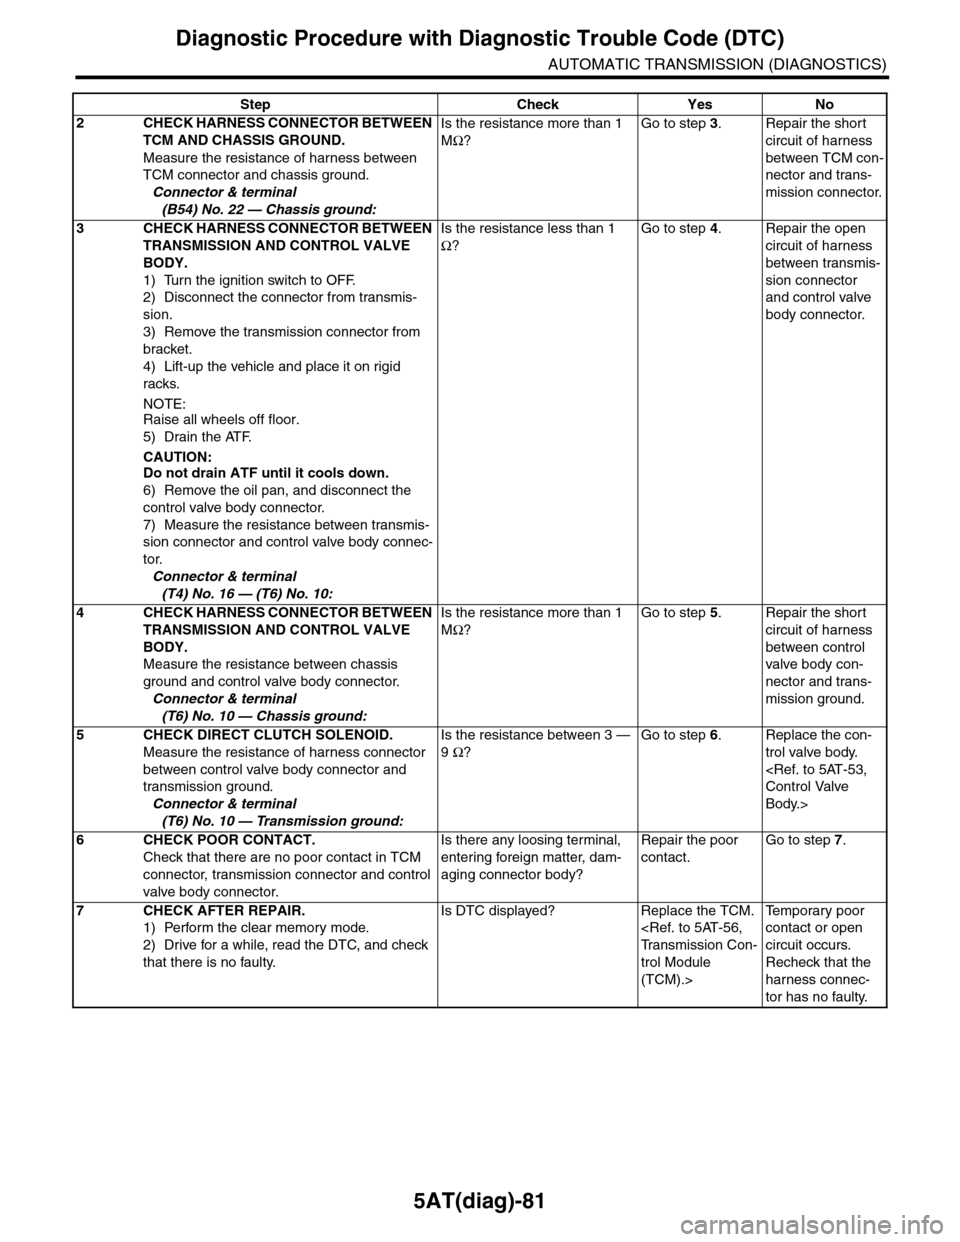
5AT(diag)-81
Diagnostic Procedure with Diagnostic Trouble Code (DTC)
AUTOMATIC TRANSMISSION (DIAGNOSTICS)
2CHECK HARNESS CONNECTOR BETWEEN
TCM AND CHASSIS GROUND.
Measure the resistance of harness between
TCM connector and chassis ground.
Connector & terminal
(B54) No. 22 — Chassis ground:
Is the resistance more than 1
MΩ?
Go to step 3.Repair the short
circuit of harness
between TCM con-
nector and trans-
mission connector.
3CHECK HARNESS CONNECTOR BETWEEN
TRANSMISSION AND CONTROL VALVE
BODY.
1) Turn the ignition switch to OFF.
2) Disconnect the connector from transmis-
sion.
3) Remove the transmission connector from
bracket.
4) Lift-up the vehicle and place it on rigid
racks.
NOTE:Raise all wheels off floor.
5) Drain the ATF.
CAUTION:
Do not drain ATF until it cools down.
6) Remove the oil pan, and disconnect the
control valve body connector.
7) Measure the resistance between transmis-
sion connector and control valve body connec-
tor.
Connector & terminal
(T4) No. 16 — (T6) No. 10:
Is the resistance less than 1
Ω?
Go to step 4.Repair the open
circuit of harness
between transmis-
sion connector
and control valve
body connector.
4CHECK HARNESS CONNECTOR BETWEEN
TRANSMISSION AND CONTROL VALVE
BODY.
Measure the resistance between chassis
ground and control valve body connector.
Connector & terminal
(T6) No. 10 — Chassis ground:
Is the resistance more than 1
MΩ?
Go to step 5.Repair the short
circuit of harness
between control
valve body con-
nector and trans-
mission ground.
5CHECK DIRECT CLUTCH SOLENOID.
Measure the resistance of harness connector
between control valve body connector and
transmission ground.
Connector & terminal
(T6) No. 10 — Transmission ground:
Is the resistance between 3 —
9 Ω?
Go to step 6.Replace the con-
trol valve body.
Body.>
6CHECK POOR CONTACT.
Check that there are no poor contact in TCM
connector, transmission connector and control
valve body connector.
Is there any loosing terminal,
entering foreign matter, dam-
aging connector body?
Repair the poor
contact.
Go to step 7.
7CHECK AFTER REPAIR.
1) Perform the clear memory mode.
2) Drive for a while, read the DTC, and check
that there is no faulty.
Is DTC displayed? Replace the TCM.
trol Module
(TCM).>
Te m p o r a r y p o o r
contact or open
circuit occurs.
Recheck that the
harness connec-
tor has no faulty.
Step Check Yes No
Page 2199 of 2453
5AT(diag)-82
Diagnostic Procedure with Diagnostic Trouble Code (DTC)
AUTOMATIC TRANSMISSION (DIAGNOSTICS)
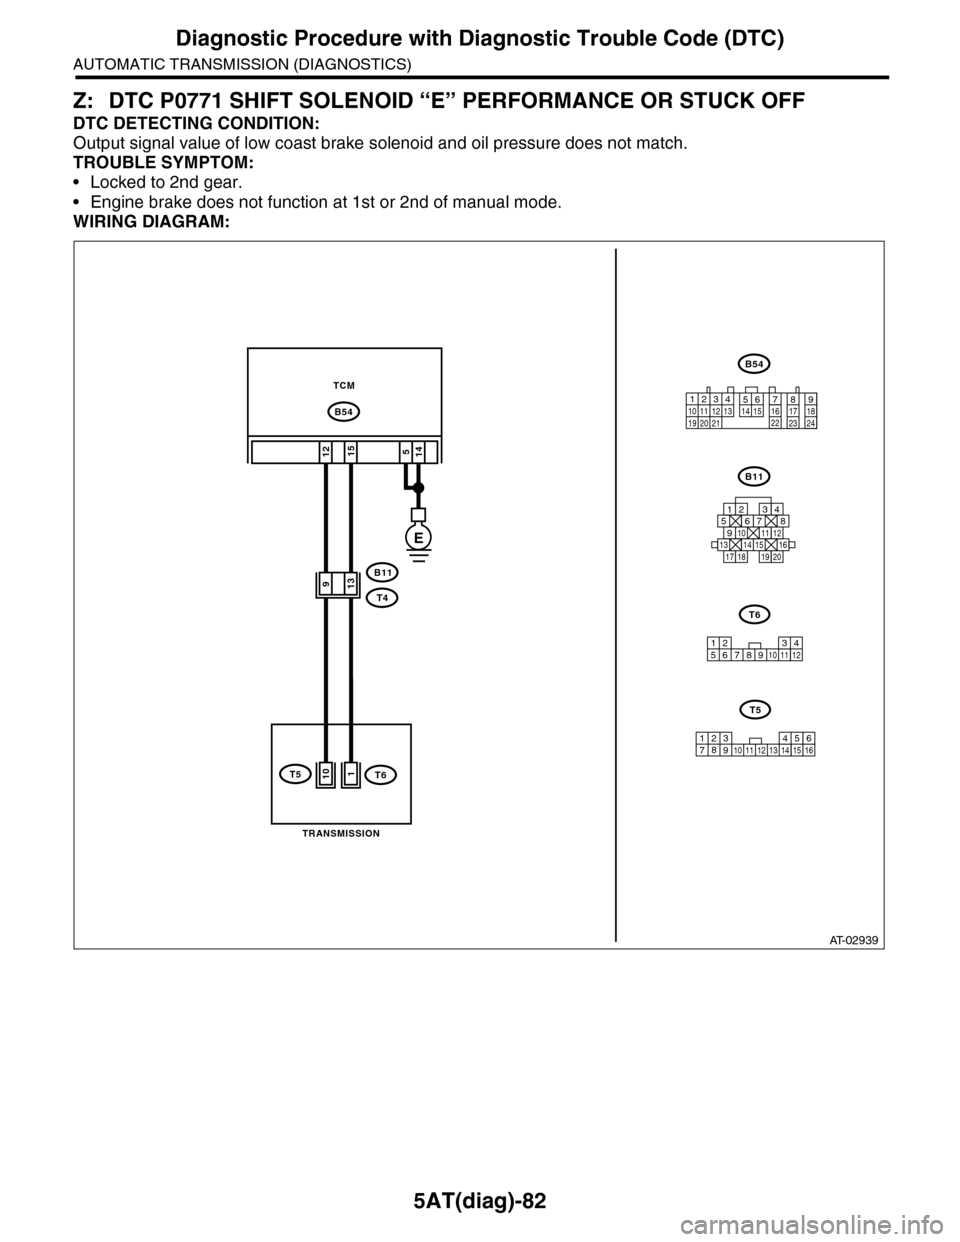
Z: DTC P0771 SHIFT SOLENOID “E” PERFORMANCE OR STUCK OFF
DTC DETECTING CONDITION:
Output signal value of low coast brake solenoid and oil pressure does not match.
TROUBLE SYMPTOM:
•Locked to 2nd gear.
•Engine brake does not function at 1st or 2nd of manual mode.
WIRING DIAGRAM:
AT-02939
B54
B11
TCM
B54
B11
125678
131415169101112
34
17181920
TRANSMISSION
12789563410 11 1219 20 2113 14 15 16 17 18222324
T4
T6
12586910 113412
T6
7
E
514
T5
1512
139
110
123 68910 11 12 13 14451516
T5
7
Page 2200 of 2453
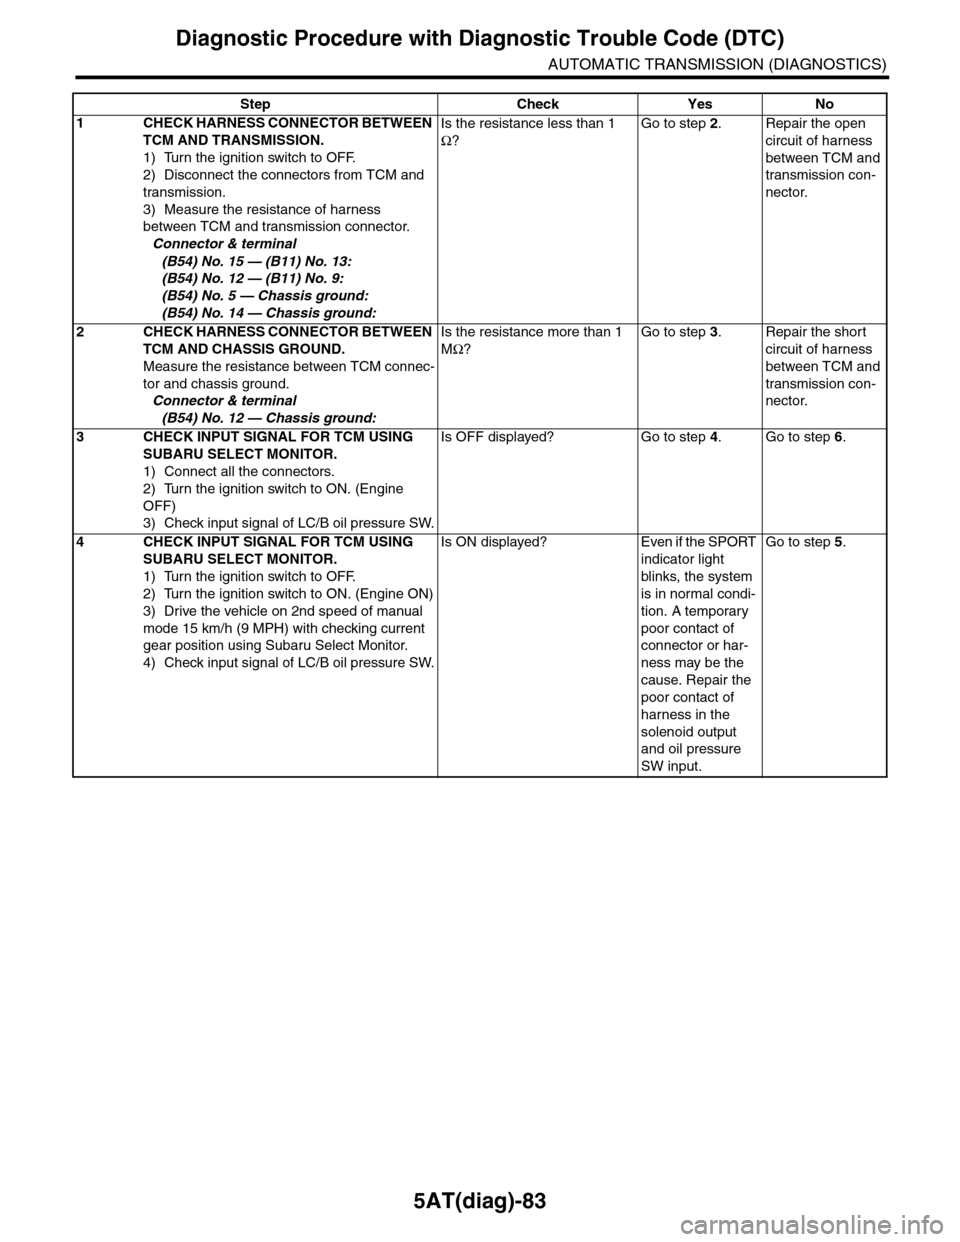
5AT(diag)-83
Diagnostic Procedure with Diagnostic Trouble Code (DTC)
AUTOMATIC TRANSMISSION (DIAGNOSTICS)
Step Check Yes No
1CHECK HARNESS CONNECTOR BETWEEN
TCM AND TRANSMISSION.
1) Turn the ignition switch to OFF.
2) Disconnect the connectors from TCM and
transmission.
3) Measure the resistance of harness
between TCM and transmission connector.
Connector & terminal
(B54) No. 15 — (B11) No. 13:
(B54) No. 12 — (B11) No. 9:
(B54) No. 5 — Chassis ground:
(B54) No. 14 — Chassis ground:
Is the resistance less than 1
Ω?
Go to step 2.Repair the open
circuit of harness
between TCM and
transmission con-
nector.
2CHECK HARNESS CONNECTOR BETWEEN
TCM AND CHASSIS GROUND.
Measure the resistance between TCM connec-
tor and chassis ground.
Connector & terminal
(B54) No. 12 — Chassis ground:
Is the resistance more than 1
MΩ?
Go to step 3.Repair the short
circuit of harness
between TCM and
transmission con-
nector.
3CHECK INPUT SIGNAL FOR TCM USING
SUBARU SELECT MONITOR.
1) Connect all the connectors.
2) Turn the ignition switch to ON. (Engine
OFF)
3) Check input signal of LC/B oil pressure SW.
Is OFF displayed? Go to step 4.Go to step 6.
4CHECK INPUT SIGNAL FOR TCM USING
SUBARU SELECT MONITOR.
1) Turn the ignition switch to OFF.
2) Turn the ignition switch to ON. (Engine ON)
3) Drive the vehicle on 2nd speed of manual
mode 15 km/h (9 MPH) with checking current
gear position using Subaru Select Monitor.
4) Check input signal of LC/B oil pressure SW.
Is ON displayed? Even if the SPORT
indicator light
blinks, the system
is in normal condi-
tion. A temporary
poor contact of
connector or har-
ness may be the
cause. Repair the
poor contact of
harness in the
solenoid output
and oil pressure
SW input.
Go to step 5.
Page 2201 of 2453
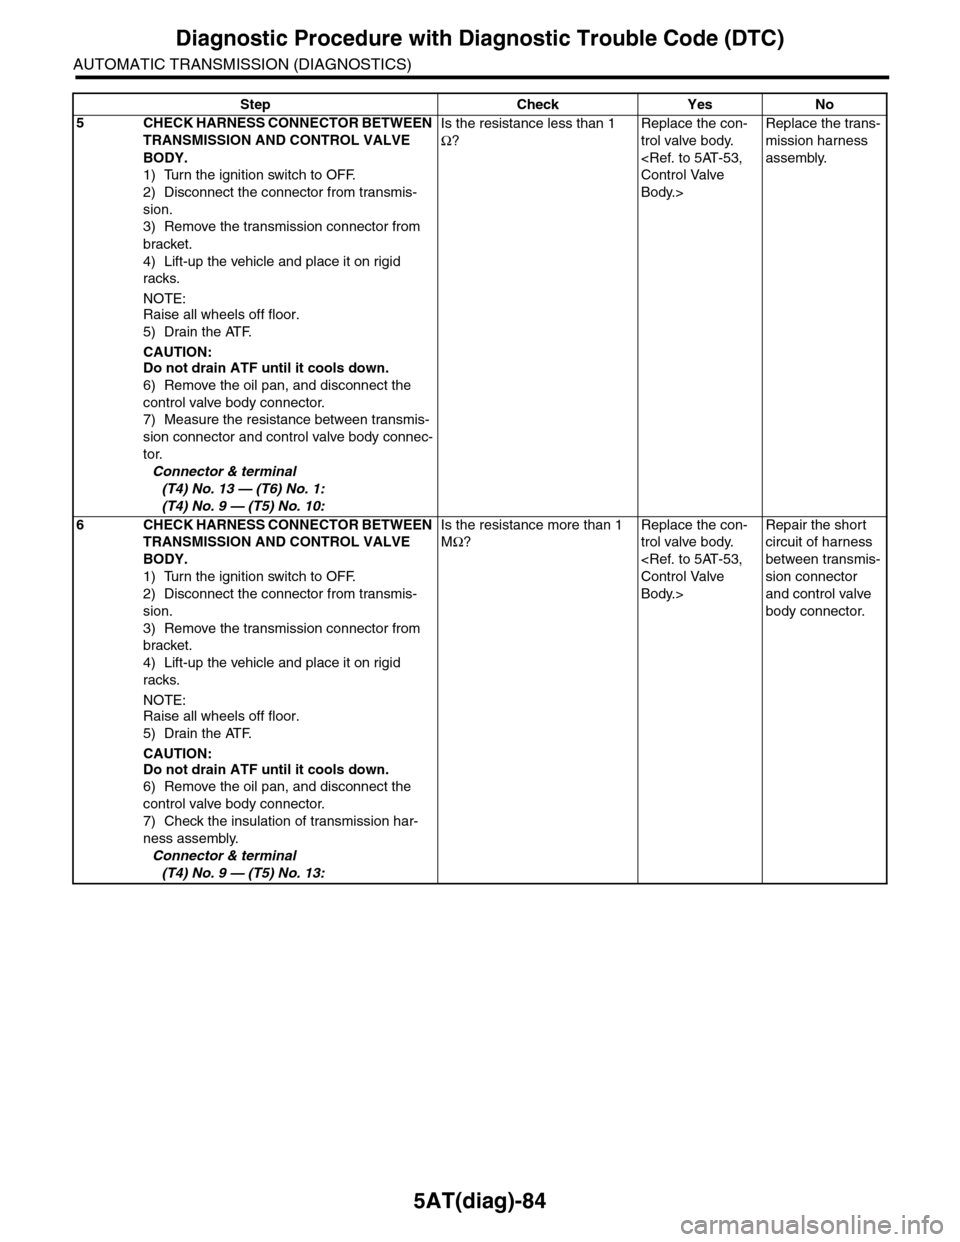
5AT(diag)-84
Diagnostic Procedure with Diagnostic Trouble Code (DTC)
AUTOMATIC TRANSMISSION (DIAGNOSTICS)
5CHECK HARNESS CONNECTOR BETWEEN
TRANSMISSION AND CONTROL VALVE
BODY.
1) Turn the ignition switch to OFF.
2) Disconnect the connector from transmis-
sion.
3) Remove the transmission connector from
bracket.
4) Lift-up the vehicle and place it on rigid
racks.
NOTE:Raise all wheels off floor.
5) Drain the ATF.
CAUTION:Do not drain ATF until it cools down.
6) Remove the oil pan, and disconnect the
control valve body connector.
7) Measure the resistance between transmis-
sion connector and control valve body connec-
tor.
Connector & terminal
(T4) No. 13 — (T6) No. 1:
(T4) No. 9 — (T5) No. 10:
Is the resistance less than 1
Ω?
Replace the con-
trol valve body.
Body.>
Replace the trans-
mission harness
assembly.
6CHECK HARNESS CONNECTOR BETWEEN
TRANSMISSION AND CONTROL VALVE
BODY.
1) Turn the ignition switch to OFF.
2) Disconnect the connector from transmis-
sion.
3) Remove the transmission connector from
bracket.
4) Lift-up the vehicle and place it on rigid
racks.
NOTE:Raise all wheels off floor.
5) Drain the ATF.
CAUTION:
Do not drain ATF until it cools down.
6) Remove the oil pan, and disconnect the
control valve body connector.
7) Check the insulation of transmission har-
ness assembly.
Connector & terminal
(T4) No. 9 — (T5) No. 13:
Is the resistance more than 1
MΩ?
Replace the con-
trol valve body.
Body.>
Repair the short
circuit of harness
between transmis-
sion connector
and control valve
body connector.
Step Check Yes No
Page 2203 of 2453
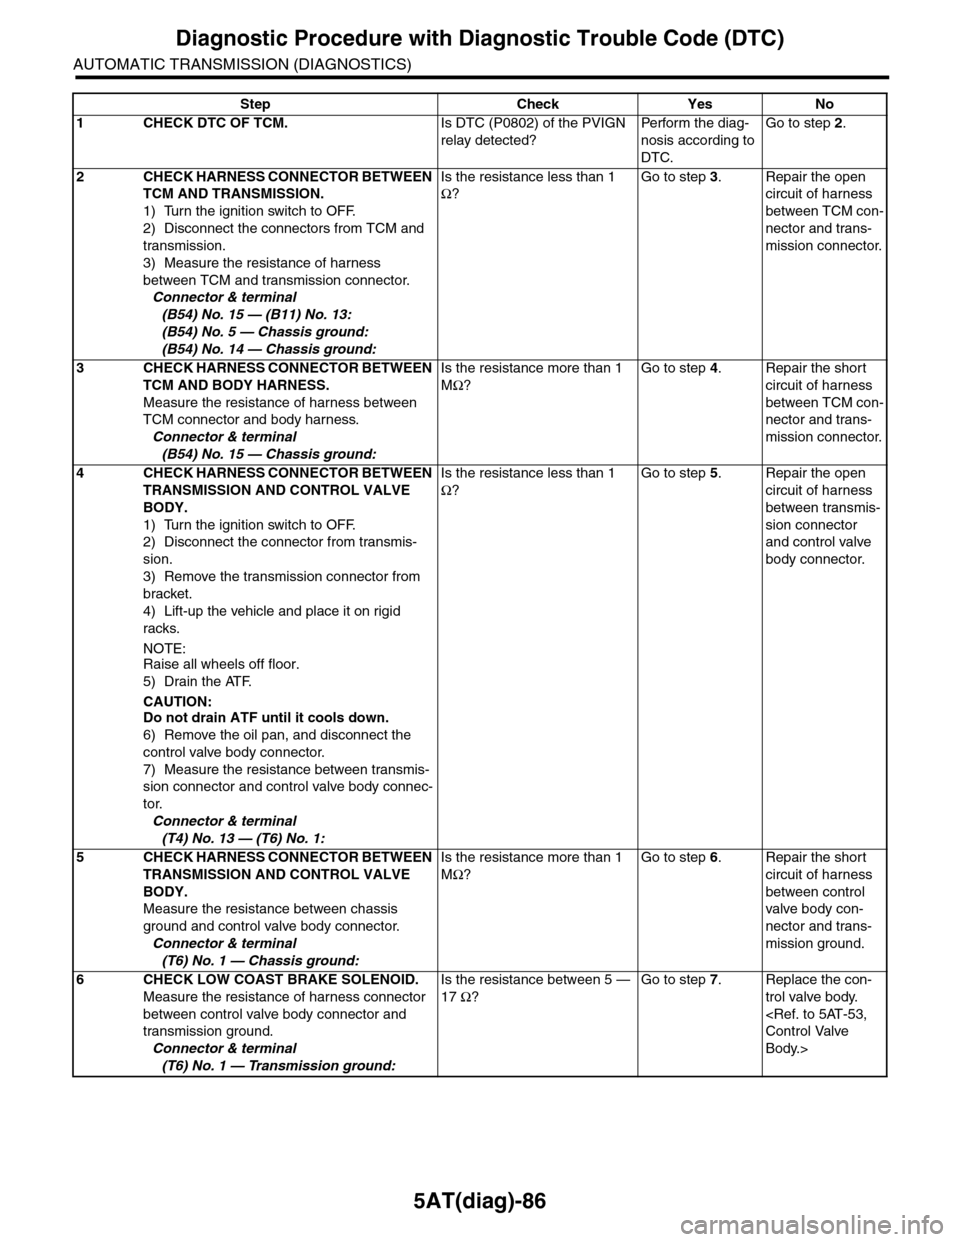
5AT(diag)-86
Diagnostic Procedure with Diagnostic Trouble Code (DTC)
AUTOMATIC TRANSMISSION (DIAGNOSTICS)
Step Check Yes No
1CHECK DTC OF TCM.Is DTC (P0802) of the PVIGN
relay detected?
Pe r for m t h e d ia g -
nosis according to
DTC.
Go to step 2.
2CHECK HARNESS CONNECTOR BETWEEN
TCM AND TRANSMISSION.
1) Turn the ignition switch to OFF.
2) Disconnect the connectors from TCM and
transmission.
3) Measure the resistance of harness
between TCM and transmission connector.
Connector & terminal
(B54) No. 15 — (B11) No. 13:
(B54) No. 5 — Chassis ground:
(B54) No. 14 — Chassis ground:
Is the resistance less than 1
Ω?
Go to step 3.Repair the open
circuit of harness
between TCM con-
nector and trans-
mission connector.
3CHECK HARNESS CONNECTOR BETWEEN
TCM AND BODY HARNESS.
Measure the resistance of harness between
TCM connector and body harness.
Connector & terminal
(B54) No. 15 — Chassis ground:
Is the resistance more than 1
MΩ?
Go to step 4.Repair the short
circuit of harness
between TCM con-
nector and trans-
mission connector.
4CHECK HARNESS CONNECTOR BETWEEN
TRANSMISSION AND CONTROL VALVE
BODY.
1) Turn the ignition switch to OFF.
2) Disconnect the connector from transmis-
sion.
3) Remove the transmission connector from
bracket.
4) Lift-up the vehicle and place it on rigid
racks.
NOTE:Raise all wheels off floor.
5) Drain the ATF.
CAUTION:
Do not drain ATF until it cools down.
6) Remove the oil pan, and disconnect the
control valve body connector.
7) Measure the resistance between transmis-
sion connector and control valve body connec-
tor.
Connector & terminal
(T4) No. 13 — (T6) No. 1:
Is the resistance less than 1
Ω?
Go to step 5.Repair the open
circuit of harness
between transmis-
sion connector
and control valve
body connector.
5CHECK HARNESS CONNECTOR BETWEEN
TRANSMISSION AND CONTROL VALVE
BODY.
Measure the resistance between chassis
ground and control valve body connector.
Connector & terminal
(T6) No. 1 — Chassis ground:
Is the resistance more than 1
MΩ?
Go to step 6.Repair the short
circuit of harness
between control
valve body con-
nector and trans-
mission ground.
6CHECK LOW COAST BRAKE SOLENOID.
Measure the resistance of harness connector
between control valve body connector and
transmission ground.
Connector & terminal
(T6) No. 1 — Transmission ground:
Is the resistance between 5 —
17 Ω?
Go to step 7.Replace the con-
trol valve body.
Body.>
Page 2216 of 2453
5AT(diag)-99
Diagnostic Procedure with Diagnostic Trouble Code (DTC)
AUTOMATIC TRANSMISSION (DIAGNOSTICS)
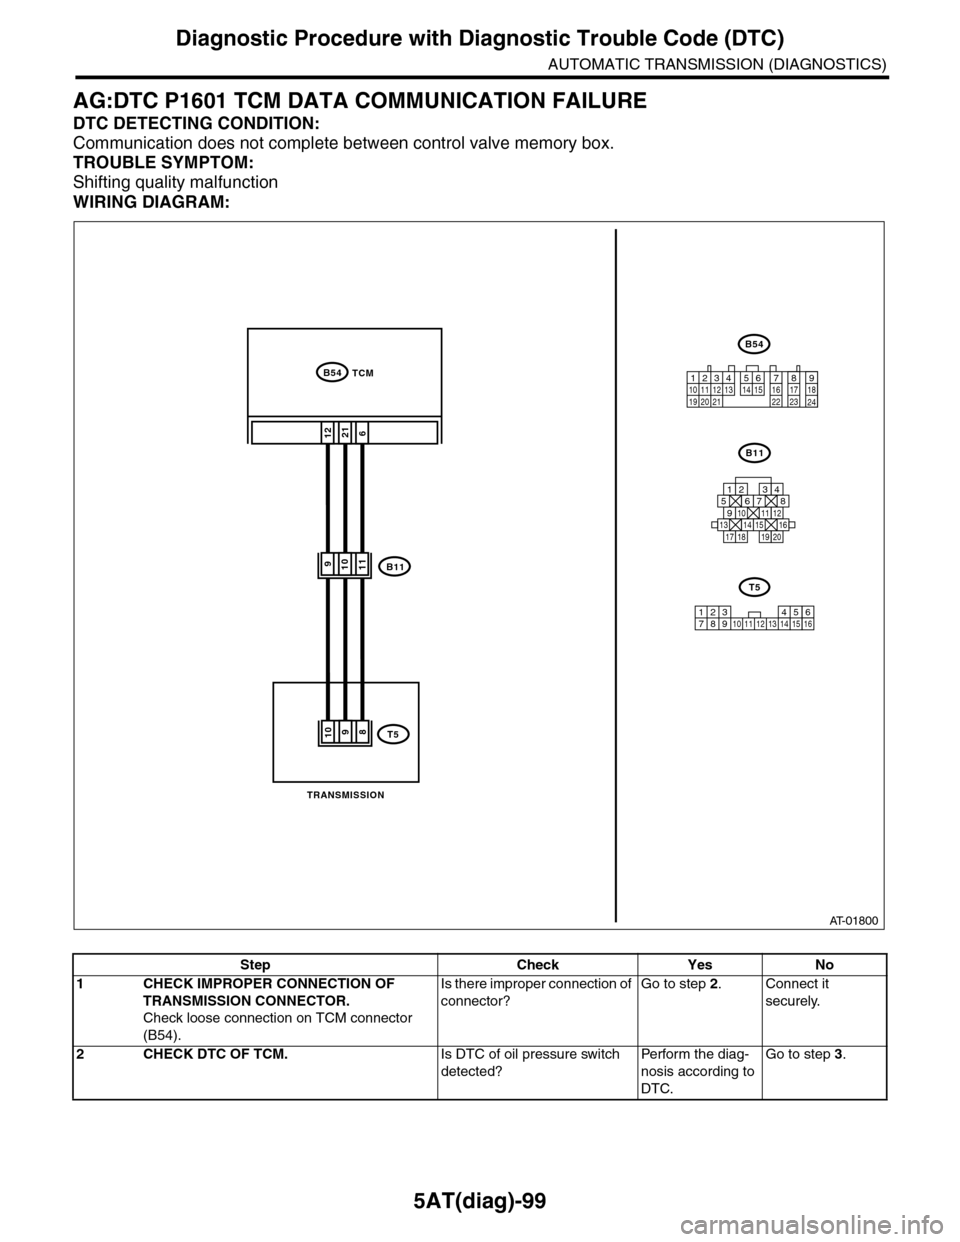
AG:DTC P1601 TCM DATA COMMUNICATION FAILURE
DTC DETECTING CONDITION:
Communication does not complete between control valve memory box.
TROUBLE SYMPTOM:
Shifting quality malfunction
WIRING DIAGRAM:
AT-01800
B54TCM
B54
12789563410 11 1219 20 2113 14 15 16 17 18222324
B11
125678
131415169101112
34
17181920
6
B11
1221
11910
T58109
123 68910 11 12 13 14451516
T5
7
TRANSMISSION
Step Check Yes No
1CHECK IMPROPER CONNECTION OF
TRANSMISSION CONNECTOR.
Check loose connection on TCM connector
(B54).
Is there improper connection of
connector?
Go to step 2.Connect it
securely.
2CHECK DTC OF TCM.Is DTC of oil pressure switch
detected?
Pe r for m t h e d ia g -
nosis according to
DTC.
Go to step 3.
Page 2222 of 2453
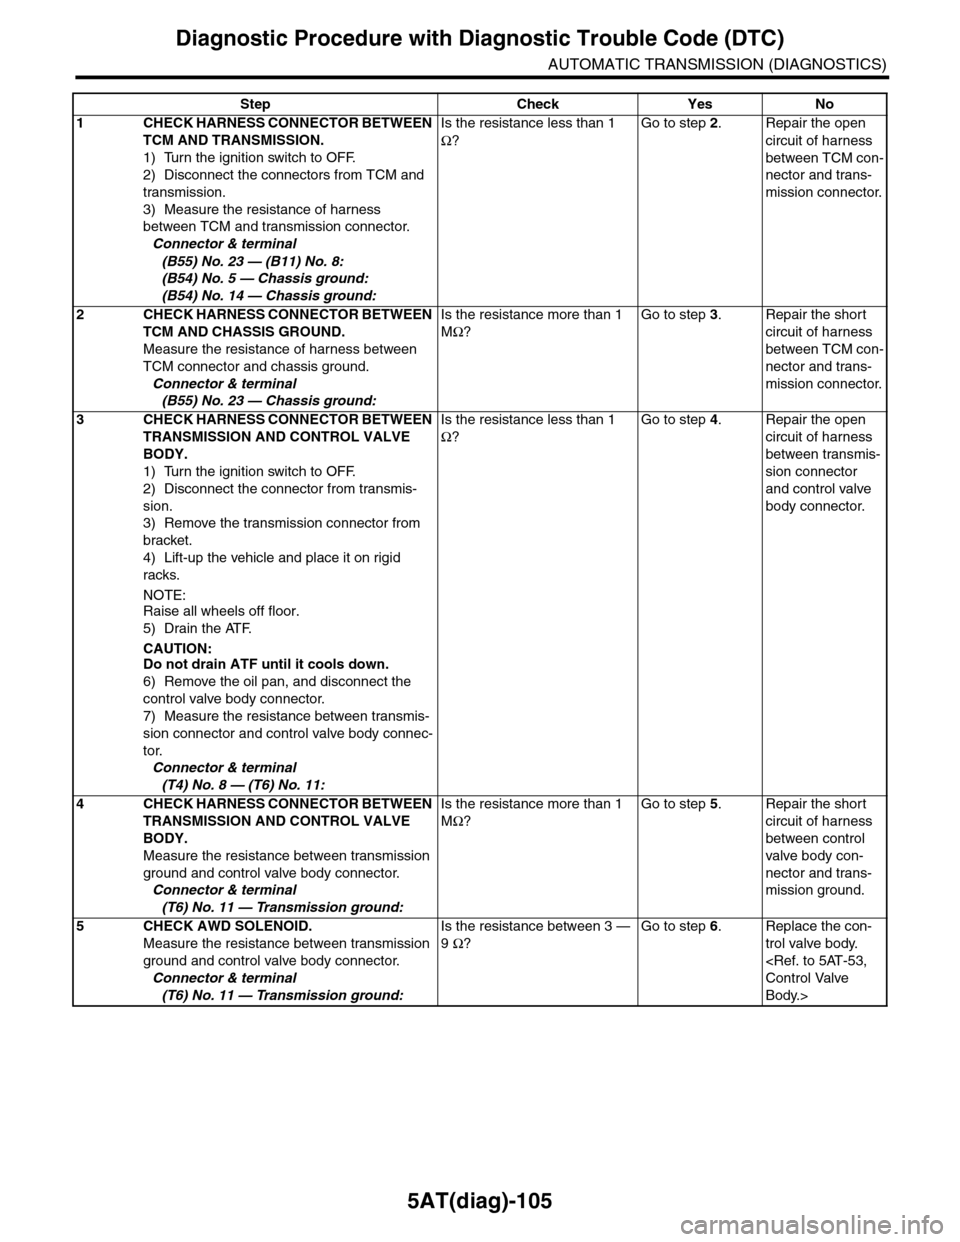
5AT(diag)-105
Diagnostic Procedure with Diagnostic Trouble Code (DTC)
AUTOMATIC TRANSMISSION (DIAGNOSTICS)
Step Check Yes No
1CHECK HARNESS CONNECTOR BETWEEN
TCM AND TRANSMISSION.
1) Turn the ignition switch to OFF.
2) Disconnect the connectors from TCM and
transmission.
3) Measure the resistance of harness
between TCM and transmission connector.
Connector & terminal
(B55) No. 23 — (B11) No. 8:
(B54) No. 5 — Chassis ground:
(B54) No. 14 — Chassis ground:
Is the resistance less than 1
Ω?
Go to step 2.Repair the open
circuit of harness
between TCM con-
nector and trans-
mission connector.
2CHECK HARNESS CONNECTOR BETWEEN
TCM AND CHASSIS GROUND.
Measure the resistance of harness between
TCM connector and chassis ground.
Connector & terminal
(B55) No. 23 — Chassis ground:
Is the resistance more than 1
MΩ?
Go to step 3.Repair the short
circuit of harness
between TCM con-
nector and trans-
mission connector.
3CHECK HARNESS CONNECTOR BETWEEN
TRANSMISSION AND CONTROL VALVE
BODY.
1) Turn the ignition switch to OFF.
2) Disconnect the connector from transmis-
sion.
3) Remove the transmission connector from
bracket.
4) Lift-up the vehicle and place it on rigid
racks.
NOTE:Raise all wheels off floor.
5) Drain the ATF.
CAUTION:Do not drain ATF until it cools down.
6) Remove the oil pan, and disconnect the
control valve body connector.
7) Measure the resistance between transmis-
sion connector and control valve body connec-
tor.
Connector & terminal
(T4) No. 8 — (T6) No. 11:
Is the resistance less than 1
Ω?
Go to step 4.Repair the open
circuit of harness
between transmis-
sion connector
and control valve
body connector.
4CHECK HARNESS CONNECTOR BETWEEN
TRANSMISSION AND CONTROL VALVE
BODY.
Measure the resistance between transmission
ground and control valve body connector.
Connector & terminal
(T6) No. 11 — Transmission ground:
Is the resistance more than 1
MΩ?
Go to step 5.Repair the short
circuit of harness
between control
valve body con-
nector and trans-
mission ground.
5CHECK AWD SOLENOID.
Measure the resistance between transmission
ground and control valve body connector.
Connector & terminal
(T6) No. 11 — Transmission ground:
Is the resistance between 3 —
9 Ω?
Go to step 6.Replace the con-
trol valve body.
Body.>
Page 2226 of 2453
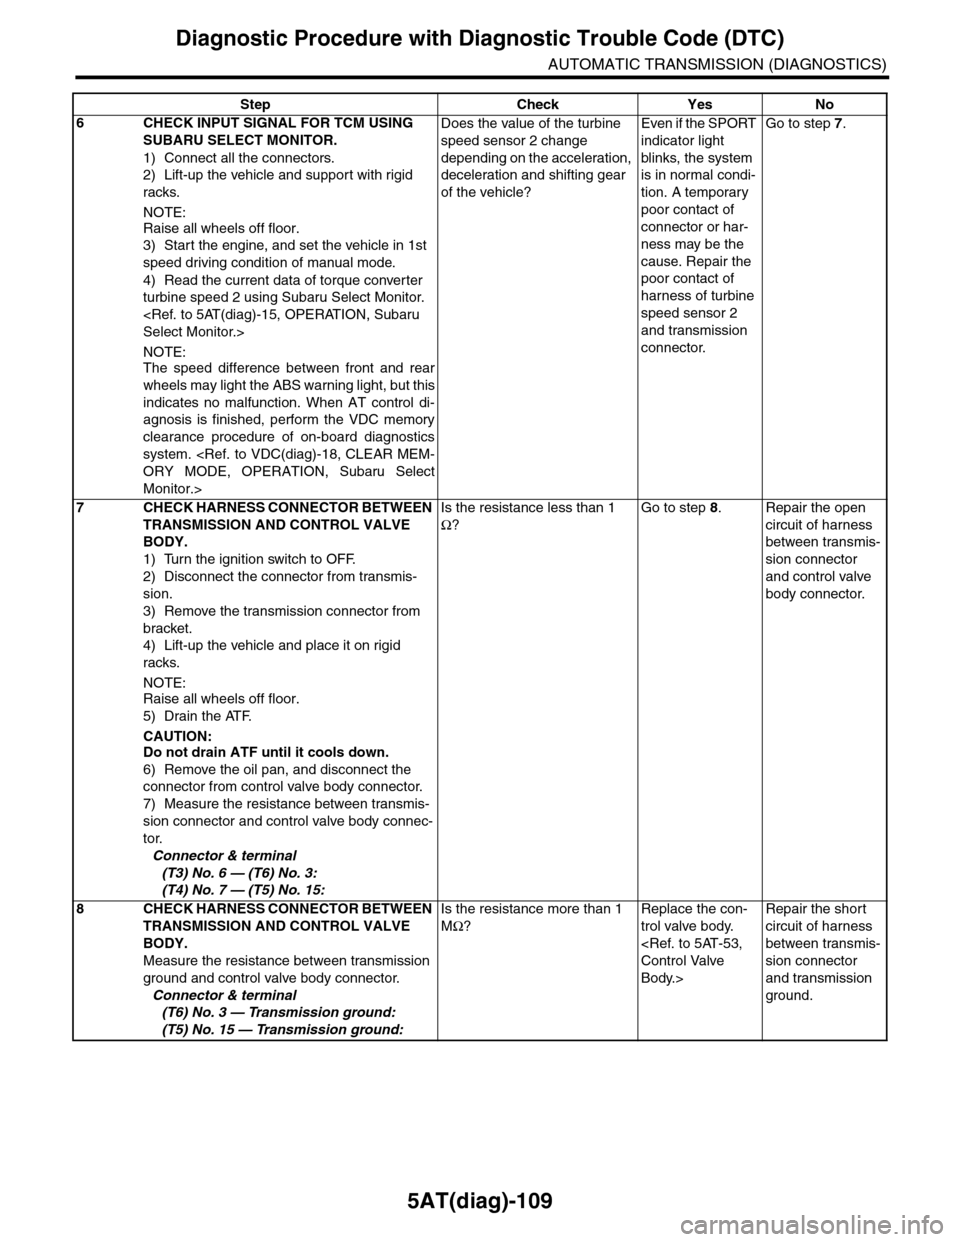
5AT(diag)-109
Diagnostic Procedure with Diagnostic Trouble Code (DTC)
AUTOMATIC TRANSMISSION (DIAGNOSTICS)
6CHECK INPUT SIGNAL FOR TCM USING
SUBARU SELECT MONITOR.
1) Connect all the connectors.
2) Lift-up the vehicle and support with rigid
racks.
NOTE:
Raise all wheels off floor.
3) Start the engine, and set the vehicle in 1st
speed driving condition of manual mode.
4) Read the current data of torque converter
turbine speed 2 using Subaru Select Monitor.
NOTE:The speed difference between front and rear
wheels may light the ABS warning light, but this
indicates no malfunction. When AT control di-
agnosis is finished, perform the VDC memory
clearance procedure of on-board diagnostics
system.
Monitor.>
Does the value of the turbine
speed sensor 2 change
depending on the acceleration,
deceleration and shifting gear
of the vehicle?
Even if the SPORT
indicator light
blinks, the system
is in normal condi-
tion. A temporary
poor contact of
connector or har-
ness may be the
cause. Repair the
poor contact of
harness of turbine
speed sensor 2
and transmission
connector.
Go to step 7.
7CHECK HARNESS CONNECTOR BETWEEN
TRANSMISSION AND CONTROL VALVE
BODY.
1) Turn the ignition switch to OFF.
2) Disconnect the connector from transmis-
sion.
3) Remove the transmission connector from
bracket.
4) Lift-up the vehicle and place it on rigid
racks.
NOTE:
Raise all wheels off floor.
5) Drain the ATF.
CAUTION:Do not drain ATF until it cools down.
6) Remove the oil pan, and disconnect the
connector from control valve body connector.
7) Measure the resistance between transmis-
sion connector and control valve body connec-
tor.
Connector & terminal
(T3) No. 6 — (T6) No. 3:
(T4) No. 7 — (T5) No. 15:
Is the resistance less than 1
Ω?
Go to step 8.Repair the open
circuit of harness
between transmis-
sion connector
and control valve
body connector.
8CHECK HARNESS CONNECTOR BETWEEN
TRANSMISSION AND CONTROL VALVE
BODY.
Measure the resistance between transmission
ground and control valve body connector.
Connector & terminal
(T6) No. 3 — Transmission ground:
(T5) No. 15 — Transmission ground:
Is the resistance more than 1
MΩ?
Replace the con-
trol valve body.
Body.>
Repair the short
circuit of harness
between transmis-
sion connector
and transmission
ground.
Step Check Yes No