Rear diff SUBARU TRIBECA 2009 1.G Service User Guide
[x] Cancel search | Manufacturer: SUBARU, Model Year: 2009, Model line: TRIBECA, Model: SUBARU TRIBECA 2009 1.GPages: 2453, PDF Size: 46.32 MB
Page 734 of 2453
BR-20
Rear Disc Rotor
BRAKE
6. Rear Disc Rotor
A: REMOVAL
1) Lift-up the vehicle, and then remove the rear
wheels.
2) Release the parking brake.
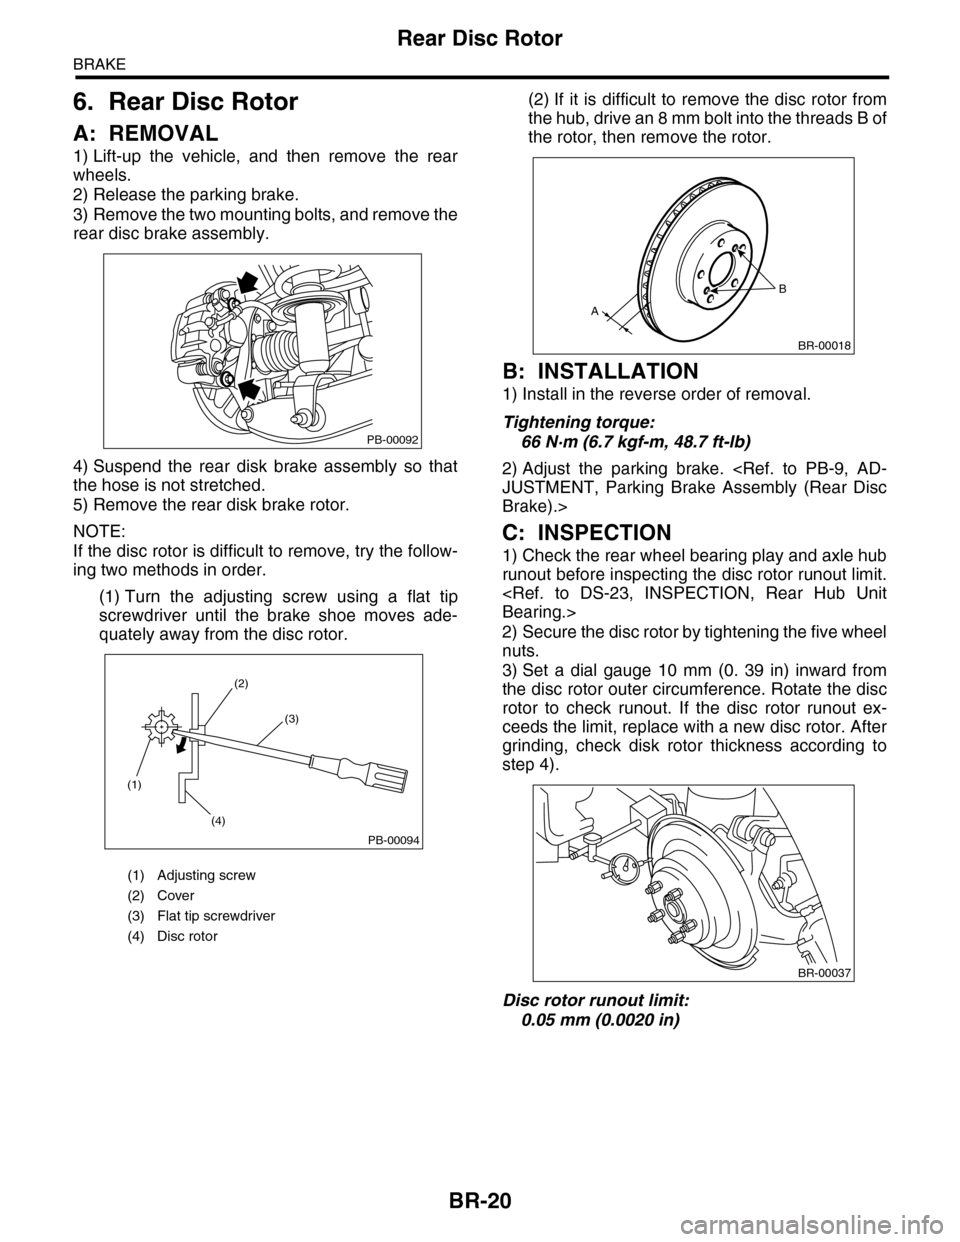
3) Remove the two mounting bolts, and remove the
rear disc brake assembly.
4) Suspend the rear disk brake assembly so that
the hose is not stretched.
5) Remove the rear disk brake rotor.
NOTE:
If the disc rotor is difficult to remove, try the follow-
ing two methods in order.
(1) Turn the adjusting screw using a flat tip
screwdriver until the brake shoe moves ade-
quately away from the disc rotor.
(2) If it is difficult to remove the disc rotor from
the hub, drive an 8 mm bolt into the threads B of
the rotor, then remove the rotor.
B: INSTALLATION
1) Install in the reverse order of removal.
Tightening torque:
66 N·m (6.7 kgf-m, 48.7 ft-lb)
2) Adjust the parking brake.
Brake).>
C: INSPECTION
1) Check the rear wheel bearing play and axle hub
runout before inspecting the disc rotor runout limit.
2) Secure the disc rotor by tightening the five wheel
nuts.
3) Set a dial gauge 10 mm (0. 39 in) inward from
the disc rotor outer circumference. Rotate the disc
rotor to check runout. If the disc rotor runout ex-
ceeds the limit, replace with a new disc rotor. After
grinding, check disk rotor thickness according to
step 4).
Disc rotor runout limit:
0.05 mm (0.0020 in)
(1) Adjusting screw
(2) Cover
(3) Flat tip screwdriver
(4) Disc rotor
PB-00092
(1)
(4)
(2)
(3)
PB-00094
B
A
BR-00018
BR-00037
Page 744 of 2453
BR-30
Brake Fluid
BRAKE
10.Brake Fluid
A: INSPECTION
1) Check that the brake fluid level is between “MIN”
and “MAX”. If out of the specified range, refill or
drain fluid. If the fluid level is close to “MIN”, check
the brake pad for wear and refill the fluid.
2) Check the fluid for discoloration. If the fluid color
has changed excessively, drain the fluid and refill
with new fluid.
B: REPLACEMENT
CAUTION:
•Do not let brake fluid come into contact with
the painted surface of the vehicle body. Wash
away with water immediately and wipe off if it is
spilled by accident.
•Avoid mixing brake fluids of different brands
to prevent fluid performance from degrading.
•Be careful not to allow dirt or dust to enter the
reservoir tank.
NOTE:
•During the operation, keep the reservoir tank
filled with brake fluid to eliminate entry of air.
•Operate the brake pedal slowly.
•For convenience and safety, perform work with 2
people.
•The required amount of brake fluid is approxi-
mately 600 m2 (20 US fl oz, 21 Imp fl oz) for entire
brake system.
1) Lift-up the vehicle and set rigid racks at the spec-
ified locations, or keep the vehicle lifted.
2) Remove both the front and rear wheels.
3) Drain brake fluid from the reservoir tank.
4) Refill the reservoir tank with the recommended
brake fluid.
Recommended brake fluid:
Refer to the specification.
Perform the same procedure as for bleeding the
brake line, until new brake fluid comes out from vi-
nyl tube.
NOTE:
Perform the brake fluid replacement starting in or-
der from the farthest wheel cylinder from the mas-
ter cylinder.
Page 786 of 2453
DI-2
General Description
DIFFERENTIALS
1. General Description
A: SPECIFICATION
1. REAR DIFFERENTIAL
When replacing a rear differential assembly, select the correct one according to the following table.
NOTE:
•Using a different rear differential assembly will cause the drive train and tires to drag or emit abnormal
noise.
•For option code, refer to “ID” section.
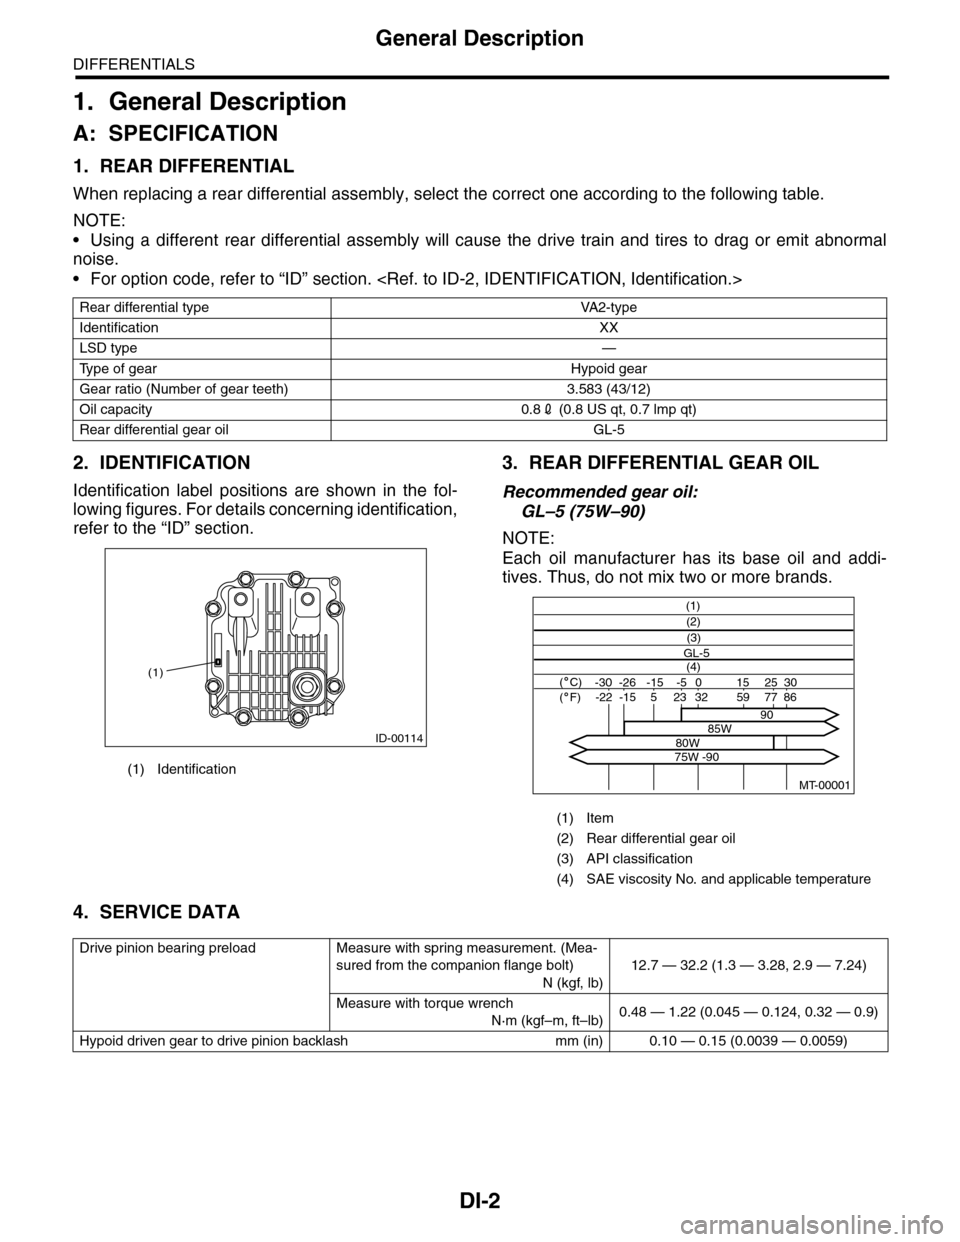
2. IDENTIFICATION
Identification label positions are shown in the fol-
lowing figures. For details concerning identification,
refer to the “ID” section.
3. REAR DIFFERENTIAL GEAR OIL
Recommended gear oil:
GL–5 (75W–90)
NOTE:
Each oil manufacturer has its base oil and addi-
tives. Thus, do not mix two or more brands.
4. SERVICE DATA
Rear differential type VA2-type
Identification XX
LSD type—
Ty p e o f g e a r H y p o i d g e a r
Gear ratio (Number of gear teeth) 3.583 (43/12)
Oil capacity 0.82 (0.8 US qt, 0.7 lmp qt)
Rear differential gear oil GL-5
(1) Identification
ID-00114
(1)
(1) Item
(2) Rear differential gear oil
(3) API classification
(4) SAE viscosity No. and applicable temperature
MT-00001
(1)
(4)GL-5(3)
(2)
( C)( F)-30 -26 -15 15
9085W80W75W -90
25 30 -5 0-22-1523328659775
Drive pinion bearing preload Measure with spring measurement. (Mea-
sured from the companion flange bolt)
N (kgf, lb)
12.7 — 32.2 (1.3 — 3.28, 2.9 — 7.24)
Measure with torque wrench
N·m (kgf–m, ft–lb)0.48 — 1.22 (0.045 — 0.124, 0.32 — 0.9)
Hypoid driven gear to drive pinion backlash mm (in) 0.10 — 0.15 (0.0039 — 0.0059)
Page 788 of 2453
DI-4
General Description
DIFFERENTIALS
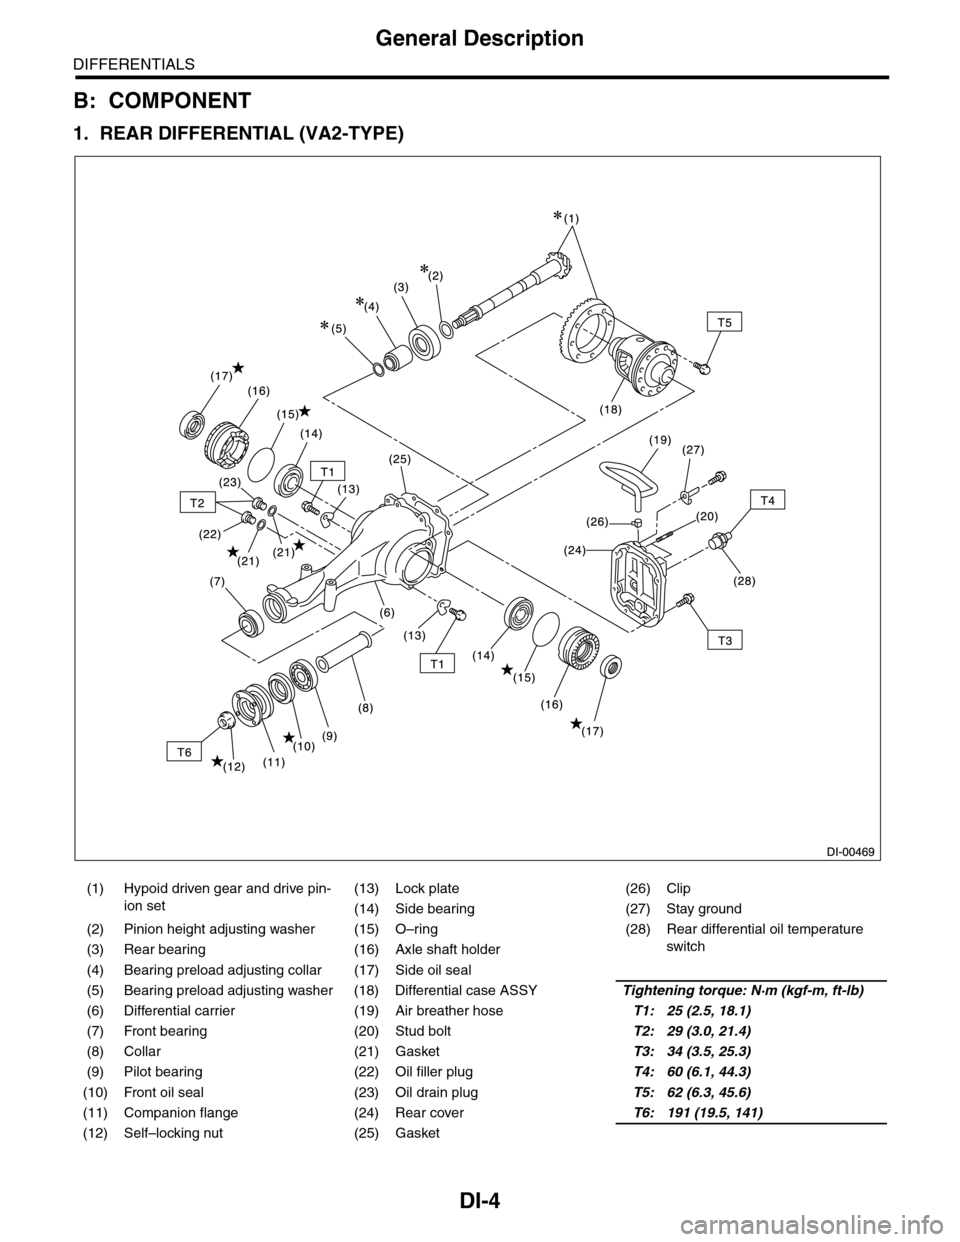
B: COMPONENT
1. REAR DIFFERENTIAL (VA2-TYPE)
(1) Hypoid driven gear and drive pin-
ion set
(13) Lock plate (26) Clip
(14) Side bearing (27) Stay ground
(2) Pinion height adjusting washer (15) O–ring (28)
Rear differential oil temperature
switch(3) Rear bearing (16) Axle shaft holder
(4) Bearing preload adjusting collar (17) Side oil seal
(5) Bearing preload adjusting washer (18) Differential case ASSYTightening torque: N·m (kgf-m, ft-lb)
(6) Differential carrier (19) Air breather hoseT1: 25 (2.5, 18.1)
(7) Front bearing (20) Stud boltT2: 29 (3.0, 21.4)
(8) Collar (21) GasketT3: 34 (3.5, 25.3)
(9) Pilot bearing (22) Oil filler plugT4: 60 (6.1, 44.3)
(10) Front oil seal (23) Oil drain plugT5: 62 (6.3, 45.6)
(11) Companion flange (24) Rear coverT6: 191 (19.5, 141)
(12) Self–locking nut (25) Gasket
Page 789 of 2453
DI-5
General Description
DIFFERENTIALS
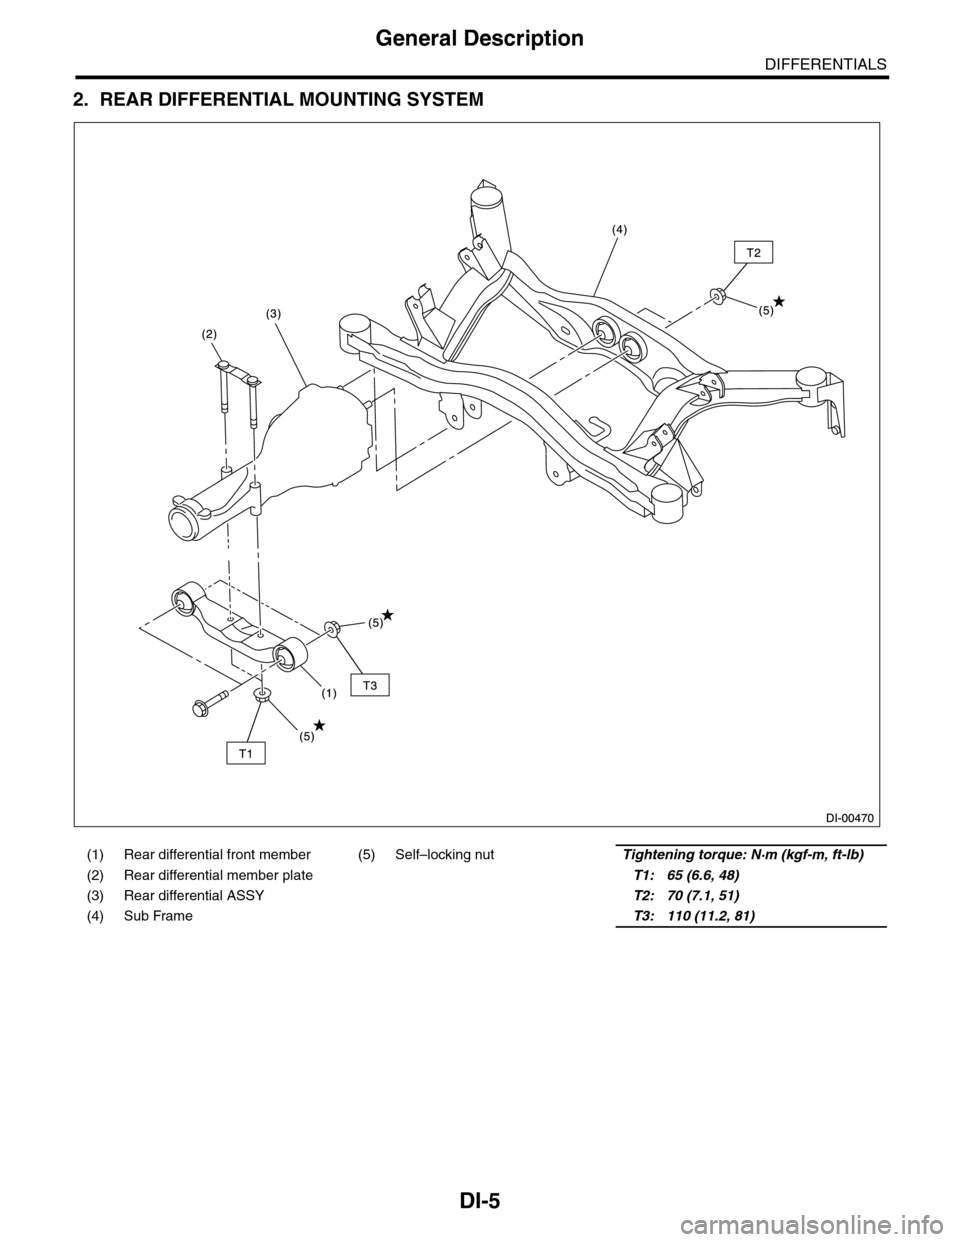
2. REAR DIFFERENTIAL MOUNTING SYSTEM
(1) Rear differential front member (5) Self–locking nutTightening torque: N·m (kgf-m, ft-lb)
(2) Rear differential member plateT1: 65 (6.6, 48)
(3) Rear differential ASSYT2: 70 (7.1, 51)
(4) Sub Frame T3: 110 (11.2, 81)
Page 790 of 2453
DI-6
General Description
DIFFERENTIALS
C: CAUTION
•Wear work clothing, including a cap, protective goggles and protective shoes during operation.
•Remove contamination including dirt and corrosion before removal, installation or disassembly.
•Keep the disassembled parts in order and protect them from dust and dirt.
•Before removal, installation or disassembly, be sure to clarify the failure. Avoid unnecessary removal, in-
stallation, disassembly and replacement.
•Be careful not to burn yourself, because each part on the vehicle is hot after running.
•Use SUBARU genuine grease etc. or equivalent. Do not mix gear oil, grease, etc. with those of different
grades or from other manufacturers.
•Be sure to tighten fasteners including bolts and nuts to the specified torque.
•Place shop jacks or rigid racks at the specified points.
•Apply gear oil onto sliding or revolution surfaces before installation.
•Before installing the O-ring or snap ring, apply a sufficient amount of gear oil to avoid damage and defor-
mation.
•Before securing a part on a vise, place cushioning material such as wood blocks, aluminum plate, or cloth
between the part and the vise.
•Avoid damaging the mating surface of the case.
D: PREPARATION TOOL
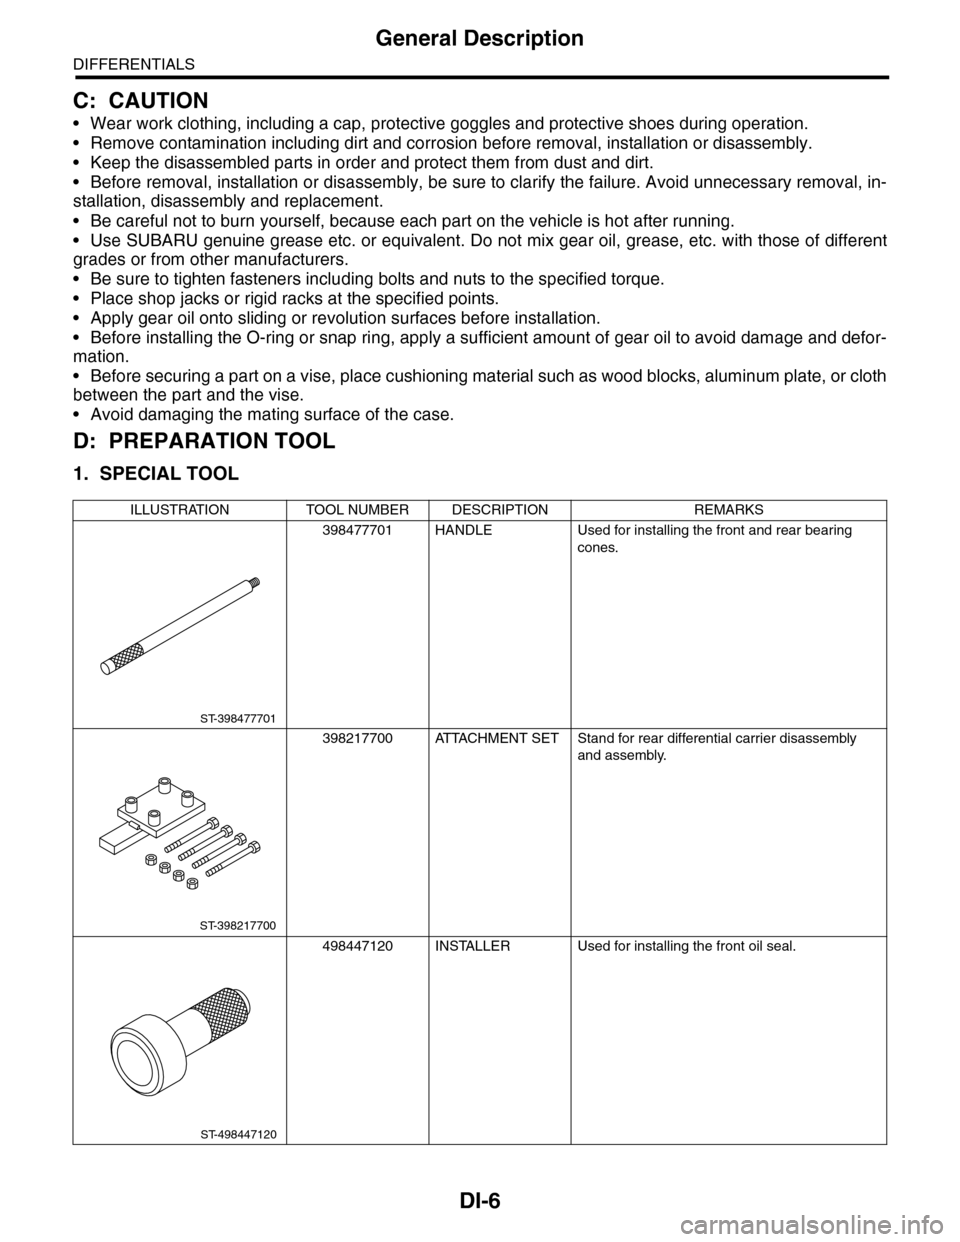
1. SPECIAL TOOL
ILLUSTRATION TOOL NUMBER DESCRIPTION REMARKS
398477701 HANDLE Used for installing the front and rear bearing
cones.
398217700 ATTACHMENT SET Stand for rear differential carrier disassembly
and assembly.
498447120 INSTALLER Used for installing the front oil seal.
ST-398477701
ST-398217700
ST-498447120
Page 791 of 2453
DI-7
General Description
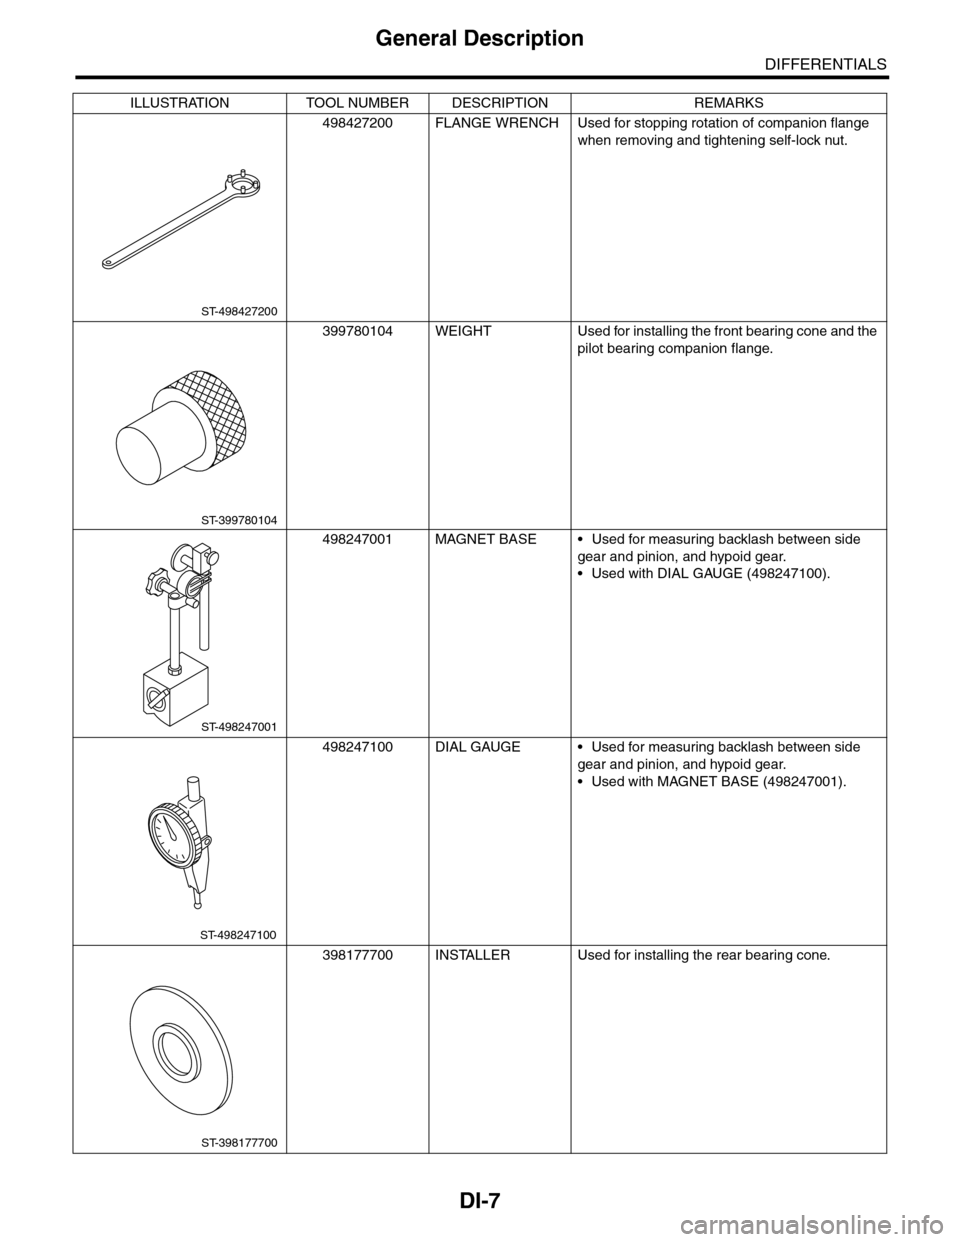
DIFFERENTIALS
498427200 FLANGE WRENCH Used for stopping rotation of companion flange
when removing and tightening self-lock nut.
399780104 WEIGHT Used for installing the front bearing cone and the
pilot bearing companion flange.
498247001 MAGNET BASE • Used for measuring backlash between side
gear and pinion, and hypoid gear.
•Used with DIAL GAUGE (498247100).
498247100 DIAL GAUGE • Used for measuring backlash between side
gear and pinion, and hypoid gear.
•Used with MAGNET BASE (498247001).
398177700 INSTALLER Used for installing the rear bearing cone.
ILLUSTRATION TOOL NUMBER DESCRIPTION REMARKS
ST-498427200
ST-399780104
ST-498247001
ST-498247100
ST-398177700
Page 792 of 2453
DI-8
General Description
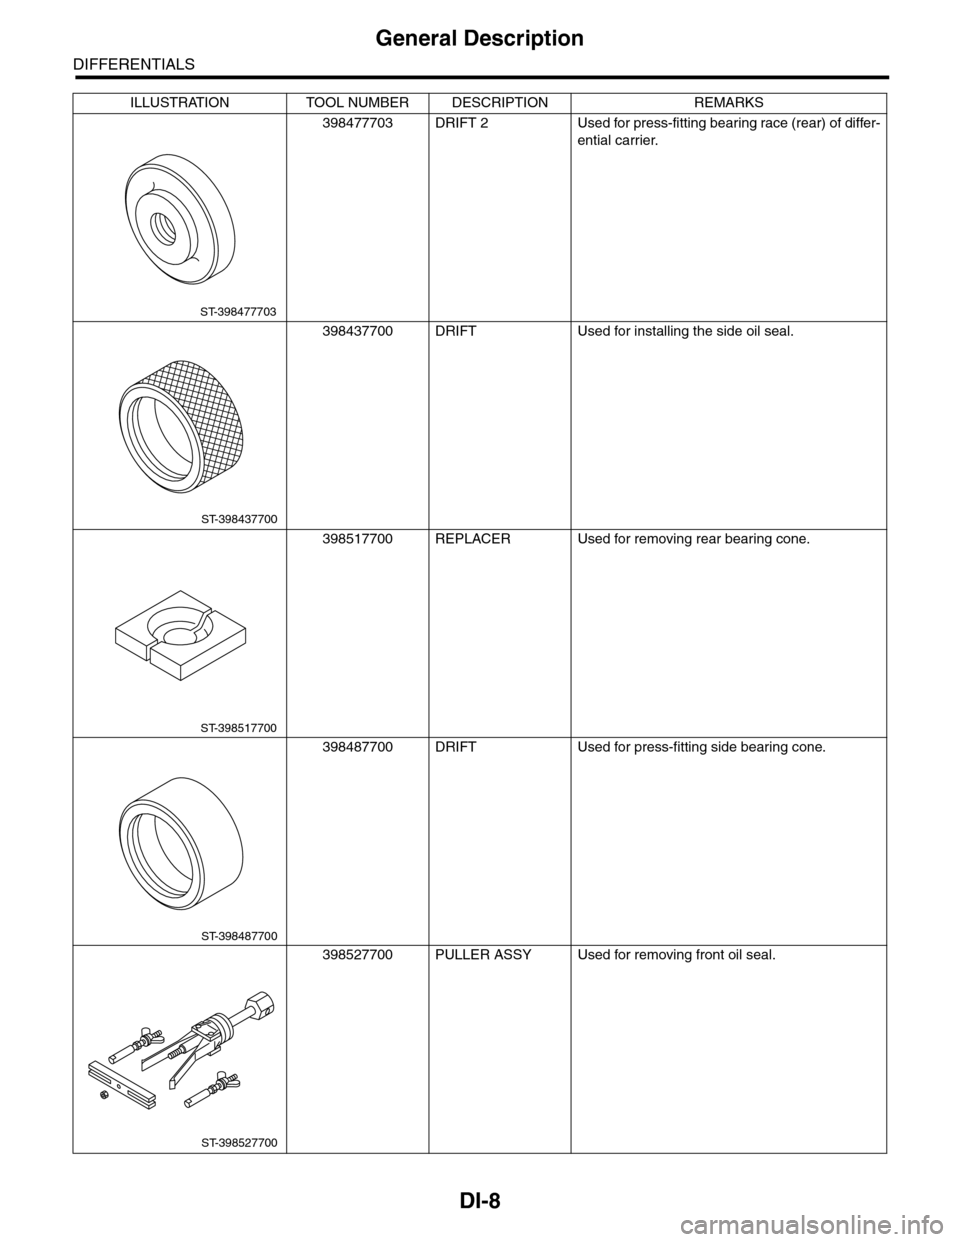
DIFFERENTIALS
398477703 DRIFT 2 Used for press-fitting bearing race (rear) of differ-
ential carrier.
398437700 DRIFT Used for installing the side oil seal.
398517700 REPLACER Used for removing rear bearing cone.
398487700 DRIFT Used for press-fitting side bearing cone.
398527700 PULLER ASSY Used for removing front oil seal.
ILLUSTRATION TOOL NUMBER DESCRIPTION REMARKS
ST-398477703
ST-398437700
ST-398517700
ST-398487700
ST-398527700
Page 793 of 2453
DI-9
General Description
DIFFERENTIALS
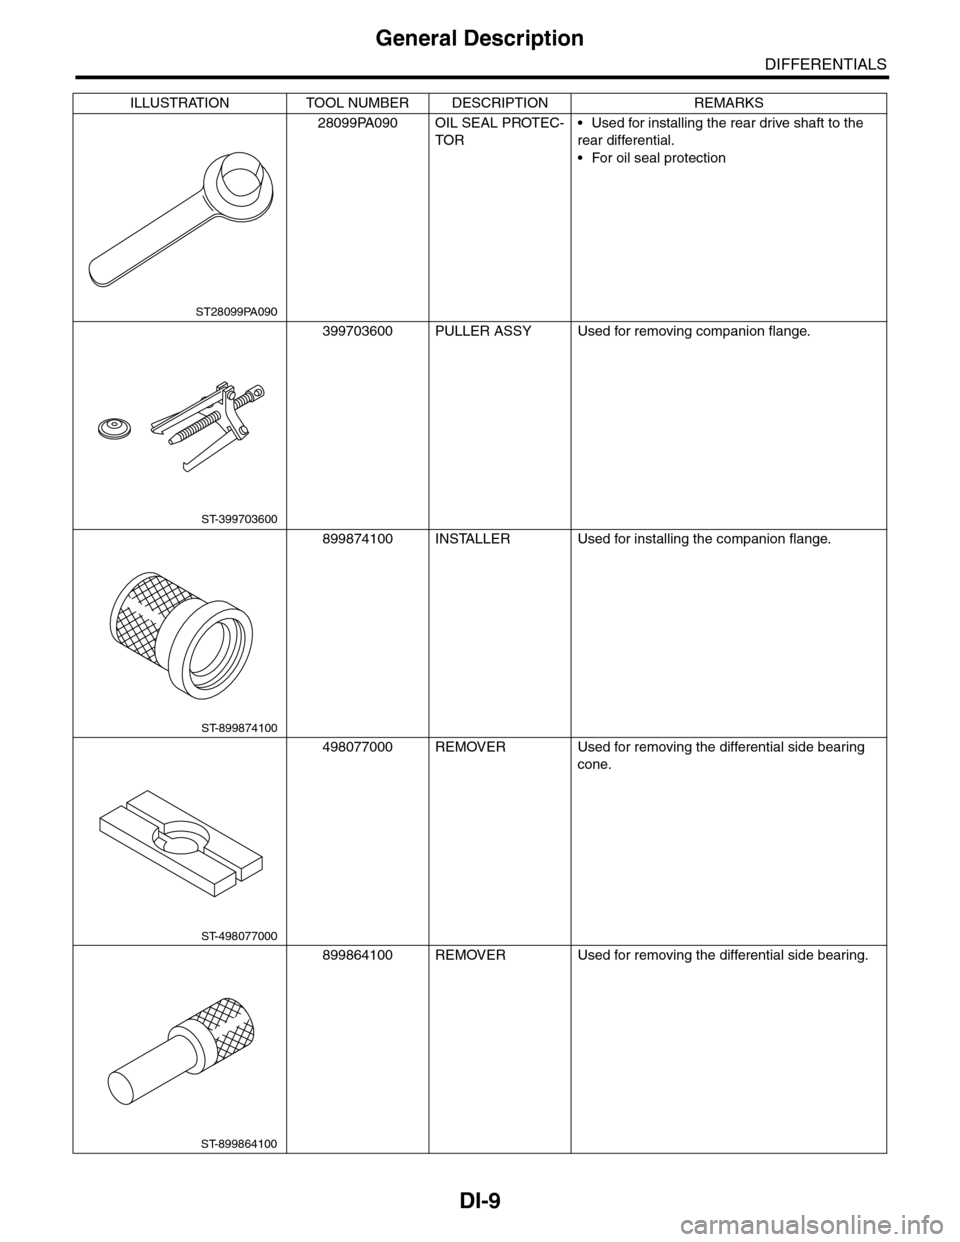
28099PA090 OIL SEAL PROTEC-
TOR
•Used for installing the rear drive shaft to the
rear differential.
•For oil seal protection
399703600 PULLER ASSY Used for removing companion flange.
899874100 INSTALLER Used for installing the companion flange.
498077000 REMOVER Used for removing the differential side bearing
cone.
899864100 REMOVER Used for removing the differential side bearing.
ILLUSTRATION TOOL NUMBER DESCRIPTION REMARKS
ST28099PA090
ST-399703600
ST-899874100
ST-498077000
ST-899864100
Page 798 of 2453
DI-14
Rear Differential (VA–type)
DIFFERENTIALS
4. Rear Differential (VA–type)
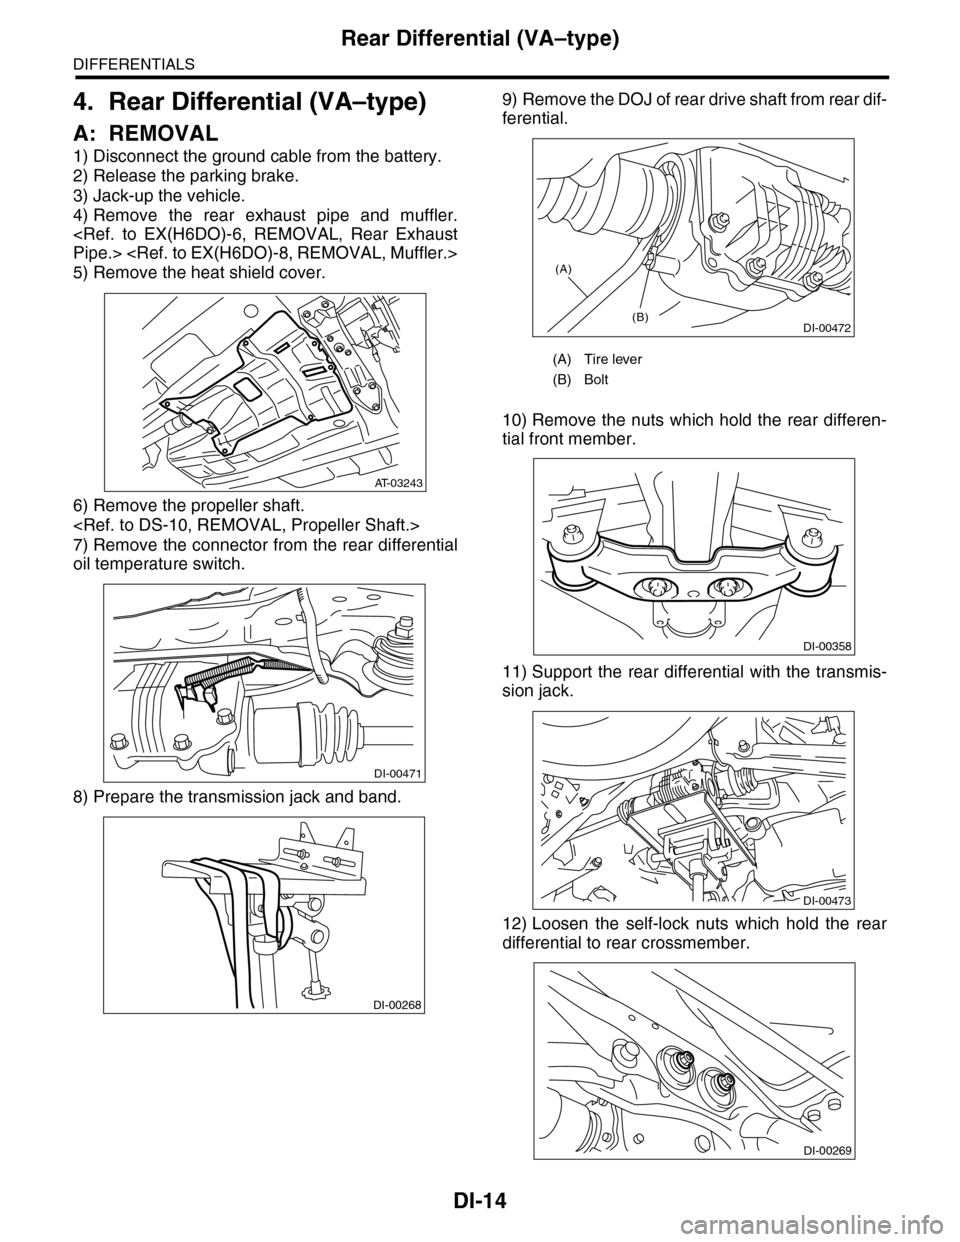
A: REMOVAL
1) Disconnect the ground cable from the battery.
2) Release the parking brake.
3) Jack-up the vehicle.
4) Remove the rear exhaust pipe and muffler.
5) Remove the heat shield cover.
6) Remove the propeller shaft.
7) Remove the connector from the rear differential
oil temperature switch.
8) Prepare the transmission jack and band.
9) Remove the DOJ of rear drive shaft from rear dif-
ferential.
10) Remove the nuts which hold the rear differen-
tial front member.
11) Support the rear differential with the transmis-
sion jack.
12) Loosen the self-lock nuts which hold the rear
differential to rear crossmember.
AT-03243
DI-00471
DI-00268
(A) Tire lever
(B) Bolt
DI-00472
(A)
(B)
DI-00358
DI-00473
DI-00269