Rear diff SUBARU TRIBECA 2009 1.G Service Manual PDF
[x] Cancel search | Manufacturer: SUBARU, Model Year: 2009, Model line: TRIBECA, Model: SUBARU TRIBECA 2009 1.GPages: 2453, PDF Size: 46.32 MB
Page 2087 of 2453
5AT-71
Center Differential Carrier
AUTOMATIC TRANSMISSION
28.Center Differential Carrier
A: REMOVAL
1) Remove the transmission assembly from vehicle
body.
2) Remove the rear wheel speed sensor, and sep-
arate the extension case from transmission case.
3) Extract the rear drive shaft.
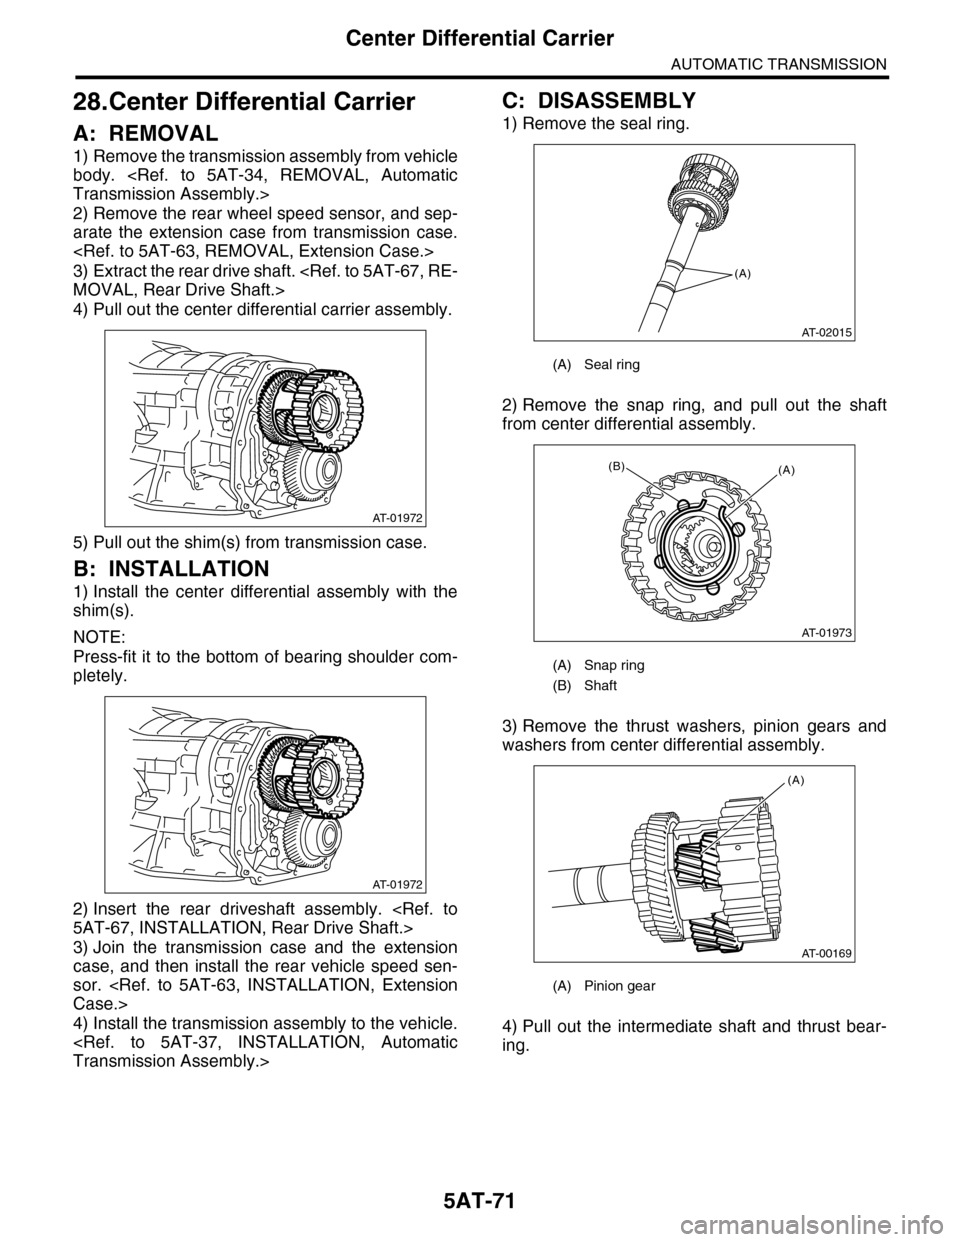
4) Pull out the center differential carrier assembly.
5) Pull out the shim(s) from transmission case.
B: INSTALLATION
1) Install the center differential assembly with the
shim(s).
NOTE:
Press-fit it to the bottom of bearing shoulder com-
pletely.
2) Insert the rear driveshaft assembly.
3) Join the transmission case and the extension
case, and then install the rear vehicle speed sen-
sor.
4) Install the transmission assembly to the vehicle.
C: DISASSEMBLY
1) Remove the seal ring.
2) Remove the snap ring, and pull out the shaft
from center differential assembly.
3) Remove the thrust washers, pinion gears and
washers from center differential assembly.
4) Pull out the intermediate shaft and thrust bear-
ing.
AT-01972
AT-01972
(A) Seal ring
(A) Snap ring
(B) Shaft
(A) Pinion gear
(A)
AT-02015
AT-01973
(A)(B)
AT-00169
(A)
Page 2097 of 2453
5AT-81
Drive Pinion Shaft Assembly
AUTOMATIC TRANSMISSION
32.Drive Pinion Shaft Assembly
A: REMOVAL
1) Remove the transmission assembly from vehicle
body.
2) Pull out the torque converter assembly.
3) Remove the transmission harness connector
from stay.
4) Disconnect the air breather hose.
5) Remove the oil charge pipe.
6) Remove the ATF filter inlet and outlet pipes.
7) Separate the converter case and transmission
case.
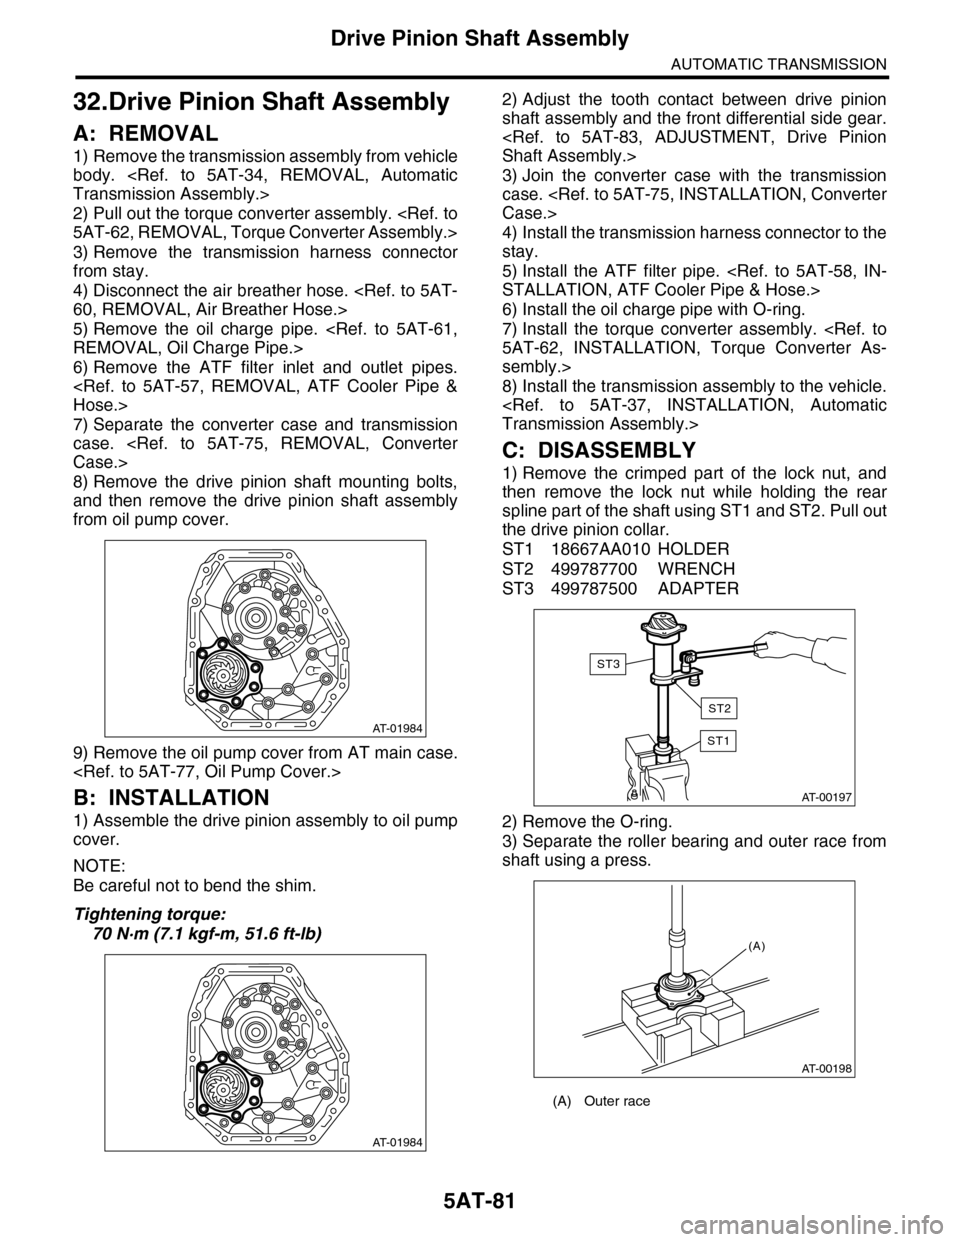
8) Remove the drive pinion shaft mounting bolts,
and then remove the drive pinion shaft assembly
from oil pump cover.
9) Remove the oil pump cover from AT main case.
B: INSTALLATION
1) Assemble the drive pinion assembly to oil pump
cover.
NOTE:
Be careful not to bend the shim.
Tightening torque:
70 N·m (7.1 kgf-m, 51.6 ft-lb)
2) Adjust the tooth contact between drive pinion
shaft assembly and the front differential side gear.
3) Join the converter case with the transmission
case.
4) Install the transmission harness connector to the
stay.
5) Install the ATF filter pipe.
6) Install the oil charge pipe with O-ring.
7) Install the torque converter assembly.
sembly.>
8) Install the transmission assembly to the vehicle.
C: DISASSEMBLY
1) Remove the crimped part of the lock nut, and
then remove the lock nut while holding the rear
spline part of the shaft using ST1 and ST2. Pull out
the drive pinion collar.
ST1 18667AA010 HOLDER
ST2 499787700 WRENCH
ST3 499787500 ADAPTER
2) Remove the O-ring.
3) Separate the roller bearing and outer race from
shaft using a press.
AT-01984
AT-01984
(A) Outer race
AT-00197
ST1
ST3
ST2
AT-00198
(A)
Page 2107 of 2453
5AT-91
AT Main Case
AUTOMATIC TRANSMISSION
34.AT Main Case
A: REMOVAL
1) Remove the transmission assembly from vehicle
body.
2) Pull out the torque converter assembly.
3) Remove the transmission harness connector
from stay.
4) Disconnect the air breather hose.
5) Remove the oil charge pipe.
6) Remove the ATF filter inlet and outlet pipes.
7) Remove the extension case.
8) Remove the center differential carrier.
9) Remove the reduction driven gear.
10) Separate the converter case from the transmis-
sion case.
11) Remove the control valve body.
12) Remove the oil pump cover.
NOTE:
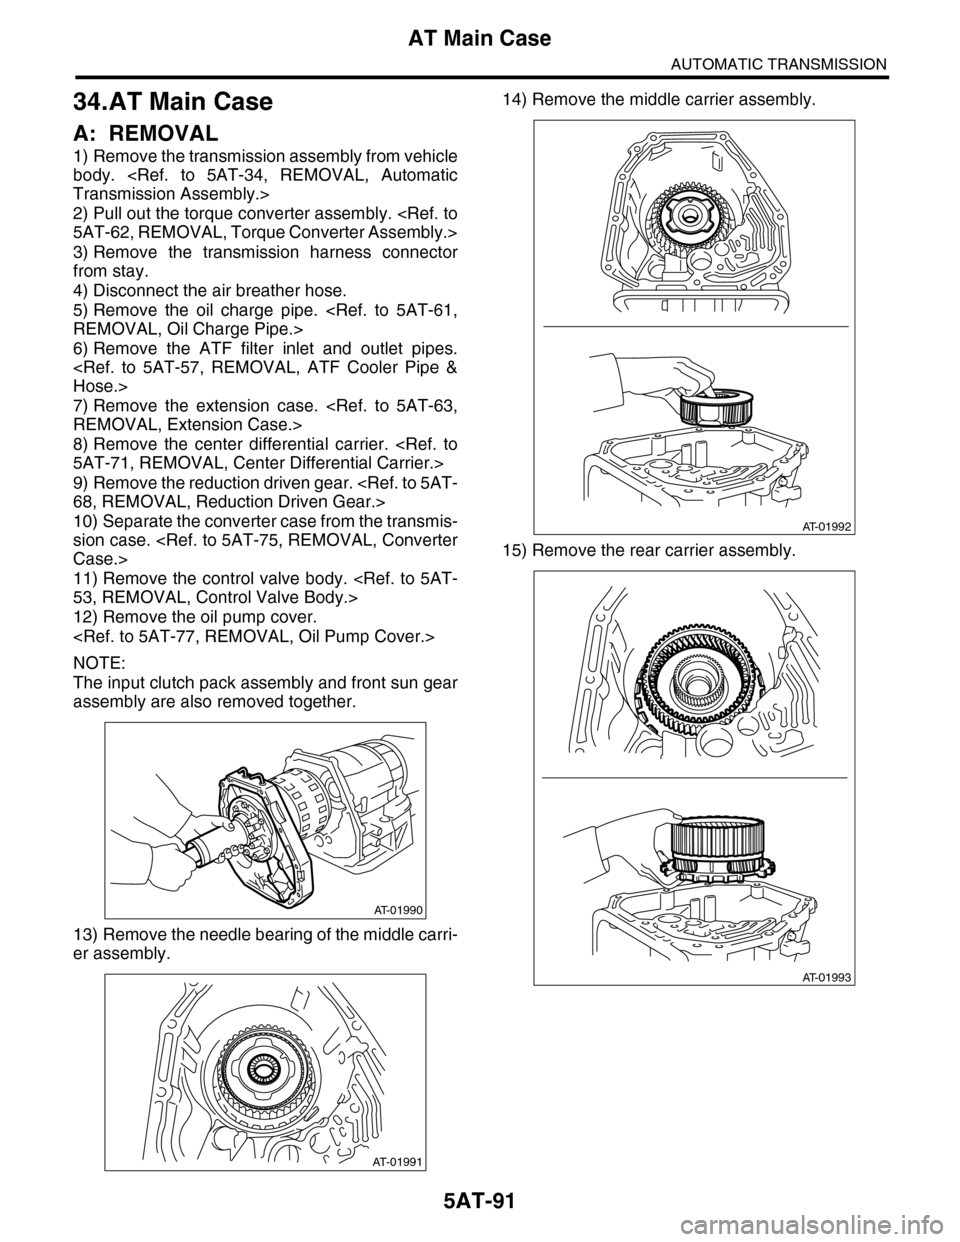
The input clutch pack assembly and front sun gear
assembly are also removed together.
13) Remove the needle bearing of the middle carri-
er assembly.
14) Remove the middle carrier assembly.
15) Remove the rear carrier assembly.
AT-01990
AT-01991
AT-01992
AT-01993
Page 2112 of 2453
5AT-96
AT Main Case
AUTOMATIC TRANSMISSION
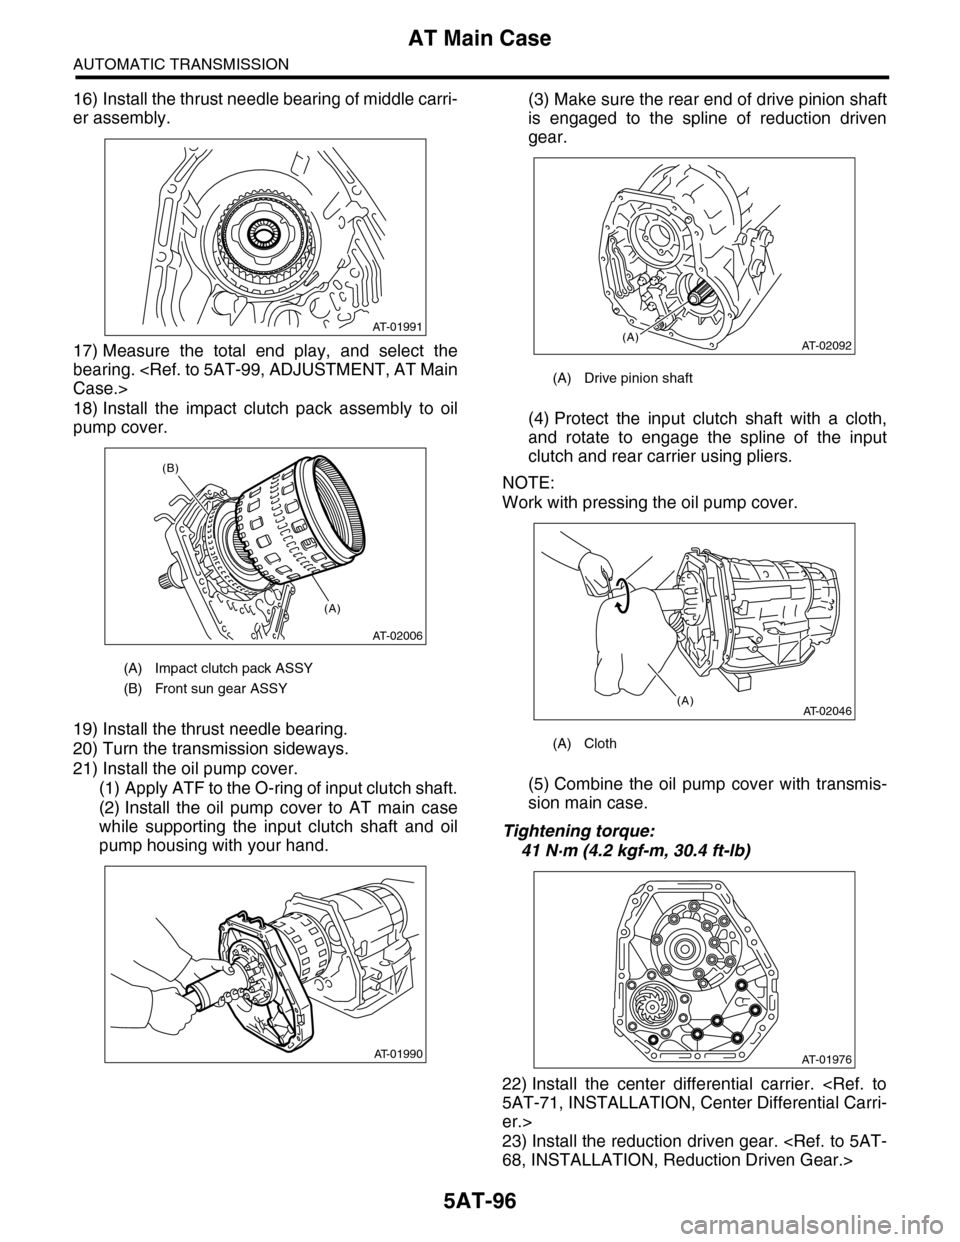
16) Install the thrust needle bearing of middle carri-
er assembly.
17) Measure the total end play, and select the
bearing.
18) Install the impact clutch pack assembly to oil
pump cover.
19) Install the thrust needle bearing.
20) Turn the transmission sideways.
21) Install the oil pump cover.
(1) Apply ATF to the O-ring of input clutch shaft.
(2) Install the oil pump cover to AT main case
while supporting the input clutch shaft and oil
pump housing with your hand.
(3) Make sure the rear end of drive pinion shaft
is engaged to the spline of reduction driven
gear.
(4) Protect the input clutch shaft with a cloth,
and rotate to engage the spline of the input
clutch and rear carrier using pliers.
NOTE:
Work with pressing the oil pump cover.
(5) Combine the oil pump cover with transmis-
sion main case.
Tightening torque:
41 N·m (4.2 kgf-m, 30.4 ft-lb)
22) Install the center differential carrier.
er.>
23) Install the reduction driven gear.
(A) Impact clutch pack ASSY
(B) Front sun gear ASSY
AT-01991
AT-02006
(A)
(B)
AT-01990
(A) Drive pinion shaft
(A) Cloth
AT-02092(A)
AT-02046(A)
AT-01976
Page 2160 of 2453
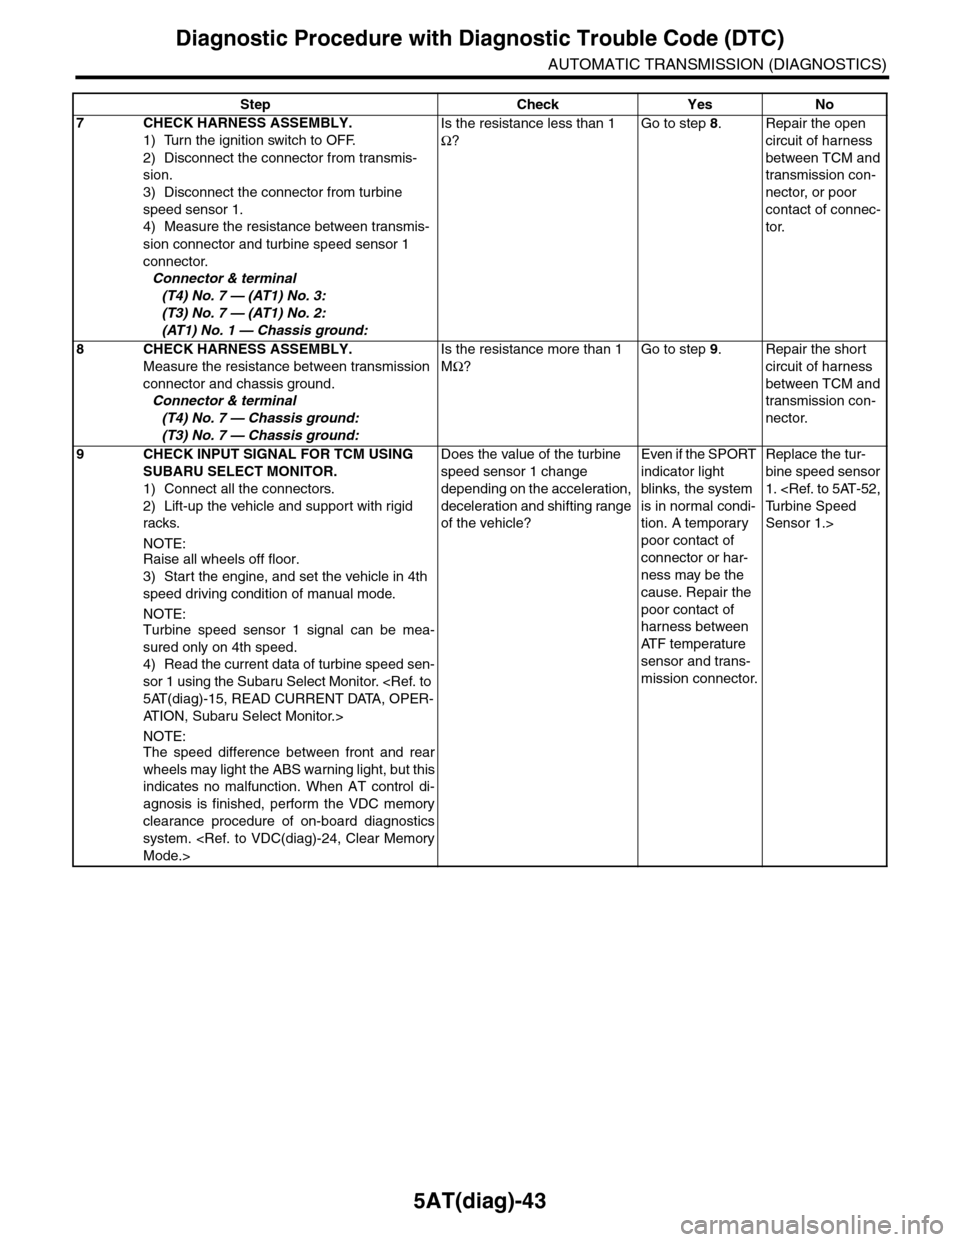
5AT(diag)-43
Diagnostic Procedure with Diagnostic Trouble Code (DTC)
AUTOMATIC TRANSMISSION (DIAGNOSTICS)
7CHECK HARNESS ASSEMBLY.
1) Turn the ignition switch to OFF.
2) Disconnect the connector from transmis-
sion.
3) Disconnect the connector from turbine
speed sensor 1.
4) Measure the resistance between transmis-
sion connector and turbine speed sensor 1
connector.
Connector & terminal
(T4) No. 7 — (AT1) No. 3:
(T3) No. 7 — (AT1) No. 2:
(AT1) No. 1 — Chassis ground:
Is the resistance less than 1
Ω?
Go to step 8.Repair the open
circuit of harness
between TCM and
transmission con-
nector, or poor
contact of connec-
tor.
8CHECK HARNESS ASSEMBLY.
Measure the resistance between transmission
connector and chassis ground.
Connector & terminal
(T4) No. 7 — Chassis ground:
(T3) No. 7 — Chassis ground:
Is the resistance more than 1
MΩ?
Go to step 9.Repair the short
circuit of harness
between TCM and
transmission con-
nector.
9CHECK INPUT SIGNAL FOR TCM USING
SUBARU SELECT MONITOR.
1) Connect all the connectors.
2) Lift-up the vehicle and support with rigid
racks.
NOTE:Raise all wheels off floor.
3) Start the engine, and set the vehicle in 4th
speed driving condition of manual mode.
NOTE:Turbine speed sensor 1 signal can be mea-
sured only on 4th speed.
4) Read the current data of turbine speed sen-
sor 1 using the Subaru Select Monitor.
AT I O N , S u b a r u S e l e c t M o n i t o r . >
NOTE:The speed difference between front and rear
wheels may light the ABS warning light, but this
indicates no malfunction. When AT control di-
agnosis is finished, perform the VDC memory
clearance procedure of on-board diagnostics
system.
Does the value of the turbine
speed sensor 1 change
depending on the acceleration,
deceleration and shifting range
of the vehicle?
Even if the SPORT
indicator light
blinks, the system
is in normal condi-
tion. A temporary
poor contact of
connector or har-
ness may be the
cause. Repair the
poor contact of
harness between
AT F t e m p e r a t u r e
sensor and trans-
mission connector.
Replace the tur-
bine speed sensor
1.
Sensor 1.>
Step Check Yes No
Page 2165 of 2453
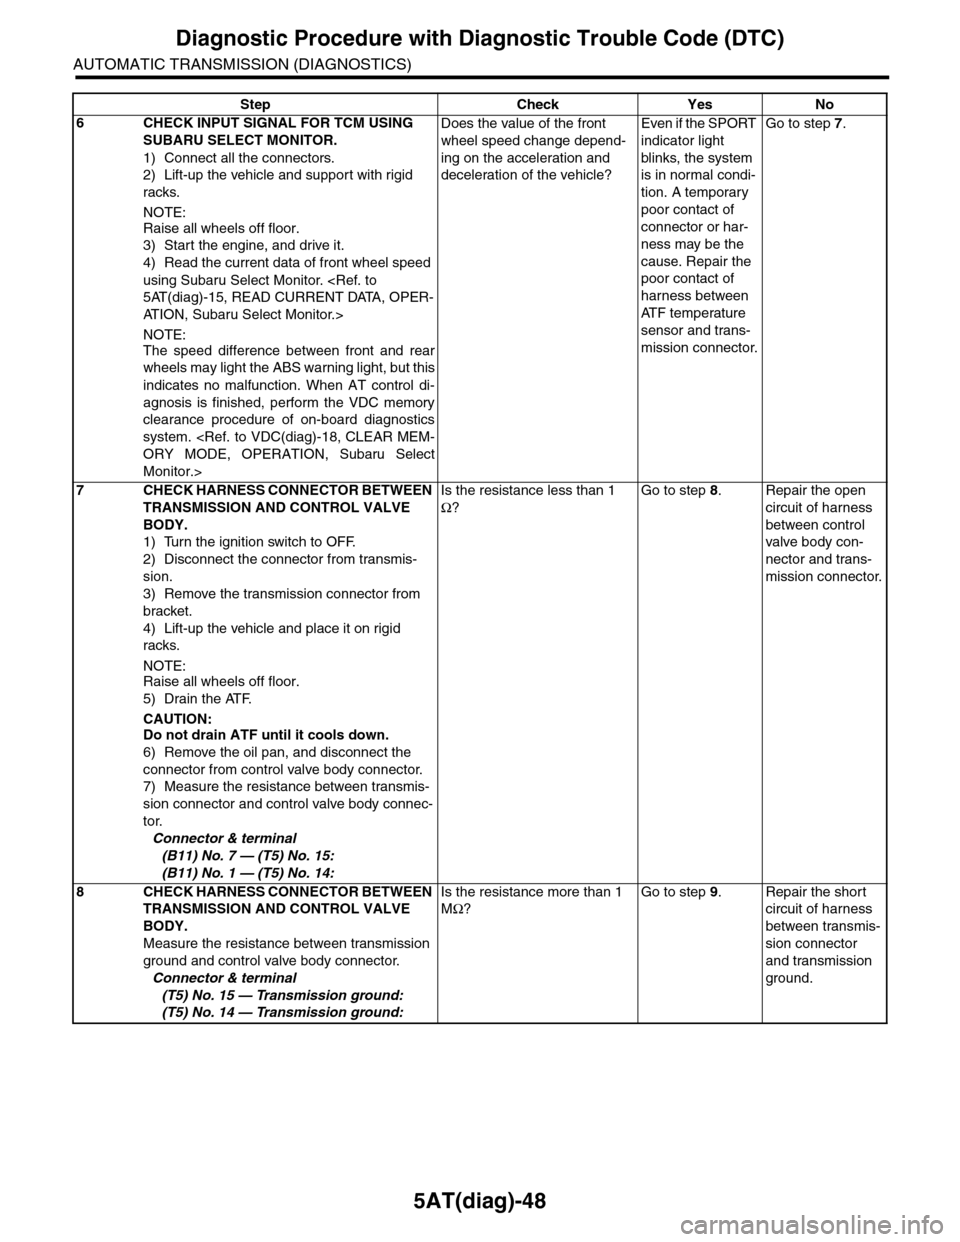
5AT(diag)-48
Diagnostic Procedure with Diagnostic Trouble Code (DTC)
AUTOMATIC TRANSMISSION (DIAGNOSTICS)
6CHECK INPUT SIGNAL FOR TCM USING
SUBARU SELECT MONITOR.
1) Connect all the connectors.
2) Lift-up the vehicle and support with rigid
racks.
NOTE:
Raise all wheels off floor.
3) Start the engine, and drive it.
4) Read the current data of front wheel speed
using Subaru Select Monitor.
AT I O N , S u b a r u S e l e c t M o n i t o r . >
NOTE:
The speed difference between front and rear
wheels may light the ABS warning light, but this
indicates no malfunction. When AT control di-
agnosis is finished, perform the VDC memory
clearance procedure of on-board diagnostics
system.
Monitor.>
Does the value of the front
wheel speed change depend-
ing on the acceleration and
deceleration of the vehicle?
Even if the SPORT
indicator light
blinks, the system
is in normal condi-
tion. A temporary
poor contact of
connector or har-
ness may be the
cause. Repair the
poor contact of
harness between
AT F t e m p e r a t u r e
sensor and trans-
mission connector.
Go to step 7.
7CHECK HARNESS CONNECTOR BETWEEN
TRANSMISSION AND CONTROL VALVE
BODY.
1) Turn the ignition switch to OFF.
2) Disconnect the connector from transmis-
sion.
3) Remove the transmission connector from
bracket.
4) Lift-up the vehicle and place it on rigid
racks.
NOTE:Raise all wheels off floor.
5) Drain the ATF.
CAUTION:Do not drain ATF until it cools down.
6) Remove the oil pan, and disconnect the
connector from control valve body connector.
7) Measure the resistance between transmis-
sion connector and control valve body connec-
tor.
Connector & terminal
(B11) No. 7 — (T5) No. 15:
(B11) No. 1 — (T5) No. 14:
Is the resistance less than 1
Ω?
Go to step 8.Repair the open
circuit of harness
between control
valve body con-
nector and trans-
mission connector.
8CHECK HARNESS CONNECTOR BETWEEN
TRANSMISSION AND CONTROL VALVE
BODY.
Measure the resistance between transmission
ground and control valve body connector.
Connector & terminal
(T5) No. 15 — Transmission ground:
(T5) No. 14 — Transmission ground:
Is the resistance more than 1
MΩ?
Go to step 9.Repair the short
circuit of harness
between transmis-
sion connector
and transmission
ground.
Step Check Yes No
Page 2170 of 2453
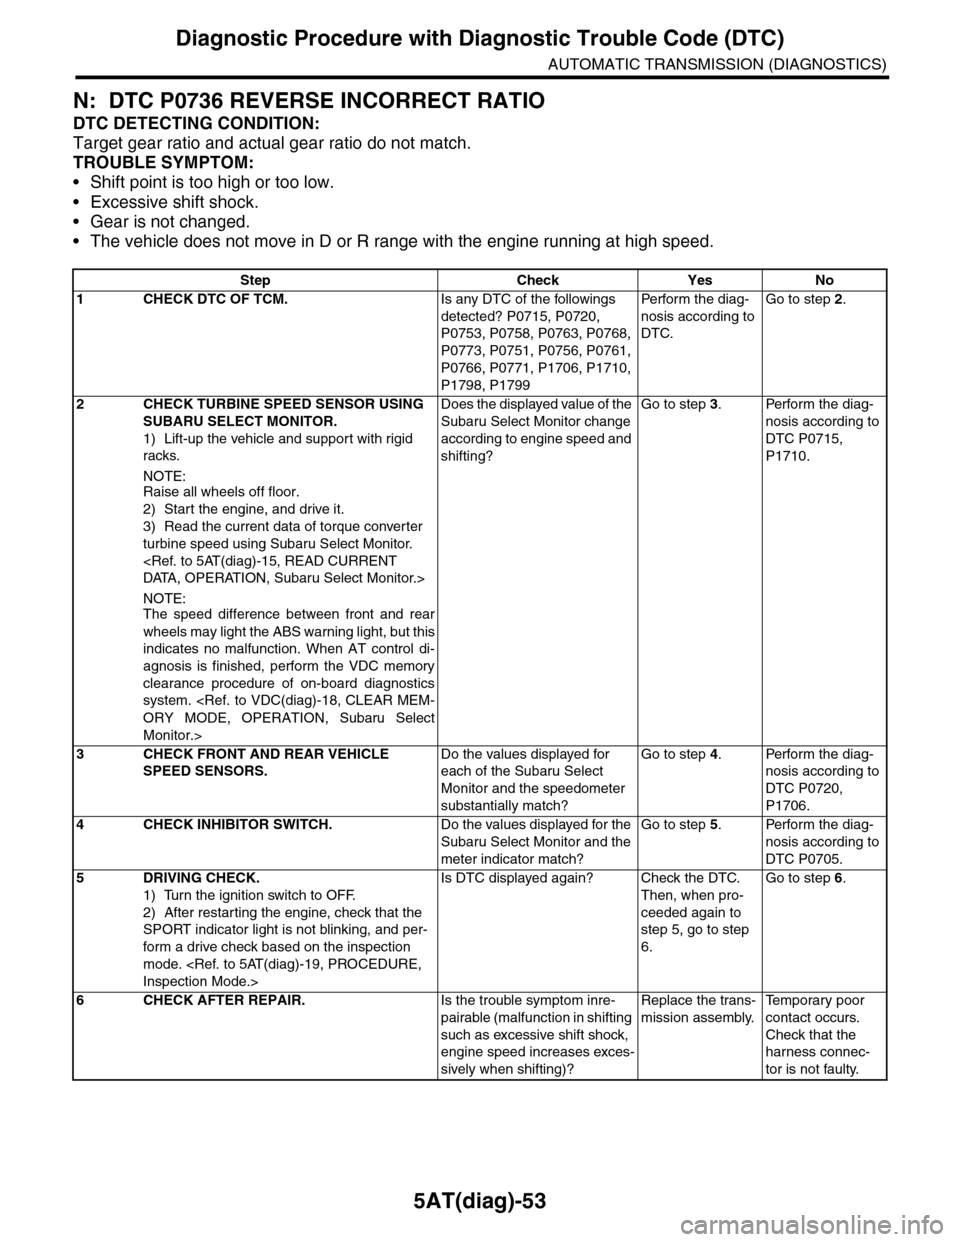
5AT(diag)-53
Diagnostic Procedure with Diagnostic Trouble Code (DTC)
AUTOMATIC TRANSMISSION (DIAGNOSTICS)
N: DTC P0736 REVERSE INCORRECT RATIO
DTC DETECTING CONDITION:
Target gear ratio and actual gear ratio do not match.
TROUBLE SYMPTOM:
•Shift point is too high or too low.
•Excessive shift shock.
•Gear is not changed.
•The vehicle does not move in D or R range with the engine running at high speed.
Step Check Yes No
1CHECK DTC OF TCM.Is any DTC of the followings
detected? P0715, P0720,
P0753, P0758, P0763, P0768,
P0773, P0751, P0756, P0761,
P0766, P0771, P1706, P1710,
P1798, P1799
Pe r for m t h e d ia g -
nosis according to
DTC.
Go to step 2.
2CHECK TURBINE SPEED SENSOR USING
SUBARU SELECT MONITOR.
1) Lift-up the vehicle and support with rigid
racks.
NOTE:Raise all wheels off floor.
2) Start the engine, and drive it.
3) Read the current data of torque converter
turbine speed using Subaru Select Monitor.
NOTE:The speed difference between front and rear
wheels may light the ABS warning light, but this
indicates no malfunction. When AT control di-
agnosis is finished, perform the VDC memory
clearance procedure of on-board diagnostics
system.
Monitor.>
Does the displayed value of the
Subaru Select Monitor change
according to engine speed and
shifting?
Go to step 3.Perform the diag-
nosis according to
DTC P0715,
P1710.
3CHECK FRONT AND REAR VEHICLE
SPEED SENSORS.
Do the values displayed for
each of the Subaru Select
Monitor and the speedometer
substantially match?
Go to step 4.Perform the diag-
nosis according to
DTC P0720,
P1706.
4CHECK INHIBITOR SWITCH.Do the values displayed for the
Subaru Select Monitor and the
meter indicator match?
Go to step 5.Perform the diag-
nosis according to
DTC P0705.
5DRIVING CHECK.
1) Turn the ignition switch to OFF.
2) After restarting the engine, check that the
SPORT indicator light is not blinking, and per-
form a drive check based on the inspection
mode.
Is DTC displayed again? Check the DTC.
Then, when pro-
ceeded again to
step 5, go to step
6.
Go to step 6.
6CHECK AFTER REPAIR.Is the trouble symptom inre-
pairable (malfunction in shifting
such as excessive shift shock,
engine speed increases exces-
sively when shifting)?
Replace the trans-
mission assembly.
Te m p o r a r y p o o r
contact occurs.
Check that the
harness connec-
tor is not faulty.
Page 2207 of 2453
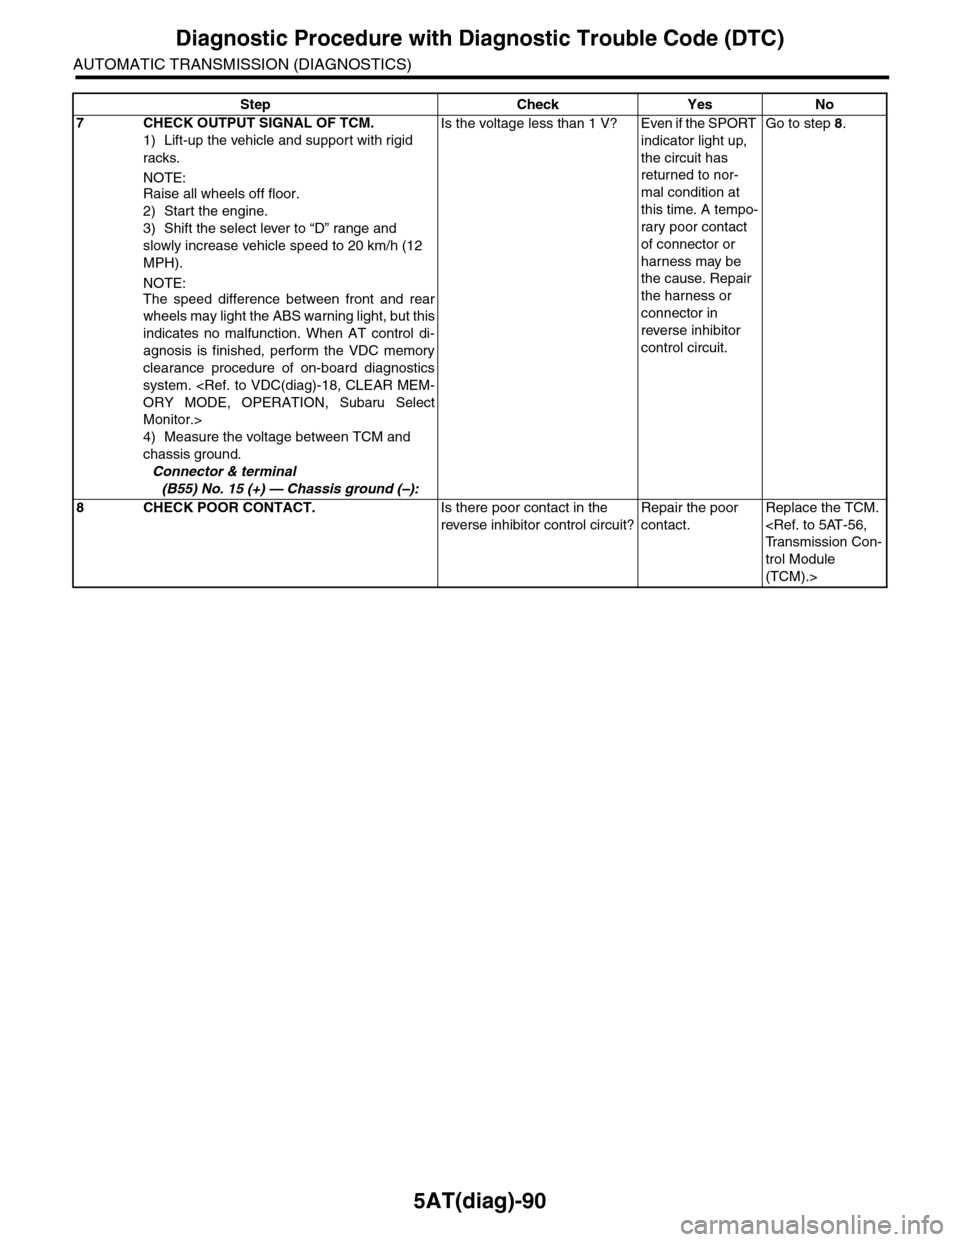
5AT(diag)-90
Diagnostic Procedure with Diagnostic Trouble Code (DTC)
AUTOMATIC TRANSMISSION (DIAGNOSTICS)
7CHECK OUTPUT SIGNAL OF TCM.
1) Lift-up the vehicle and support with rigid
racks.
NOTE:Raise all wheels off floor.
2) Start the engine.
3) Shift the select lever to “D” range and
slowly increase vehicle speed to 20 km/h (12
MPH).
NOTE:
The speed difference between front and rear
wheels may light the ABS warning light, but this
indicates no malfunction. When AT control di-
agnosis is finished, perform the VDC memory
clearance procedure of on-board diagnostics
system.
Monitor.>
4) Measure the voltage between TCM and
chassis ground.
Connector & terminal
(B55) No. 15 (+) — Chassis ground (–):
Is the voltage less than 1 V? Even if the SPORT
indicator light up,
the circuit has
returned to nor-
mal condition at
this time. A tempo-
rary poor contact
of connector or
harness may be
the cause. Repair
the harness or
connector in
reverse inhibitor
control circuit.
Go to step 8.
8CHECK POOR CONTACT.Is there poor contact in the
reverse inhibitor control circuit?
Repair the poor
contact.
Replace the TCM.
trol Module
(TCM).>
Step Check Yes No
Page 2220 of 2453
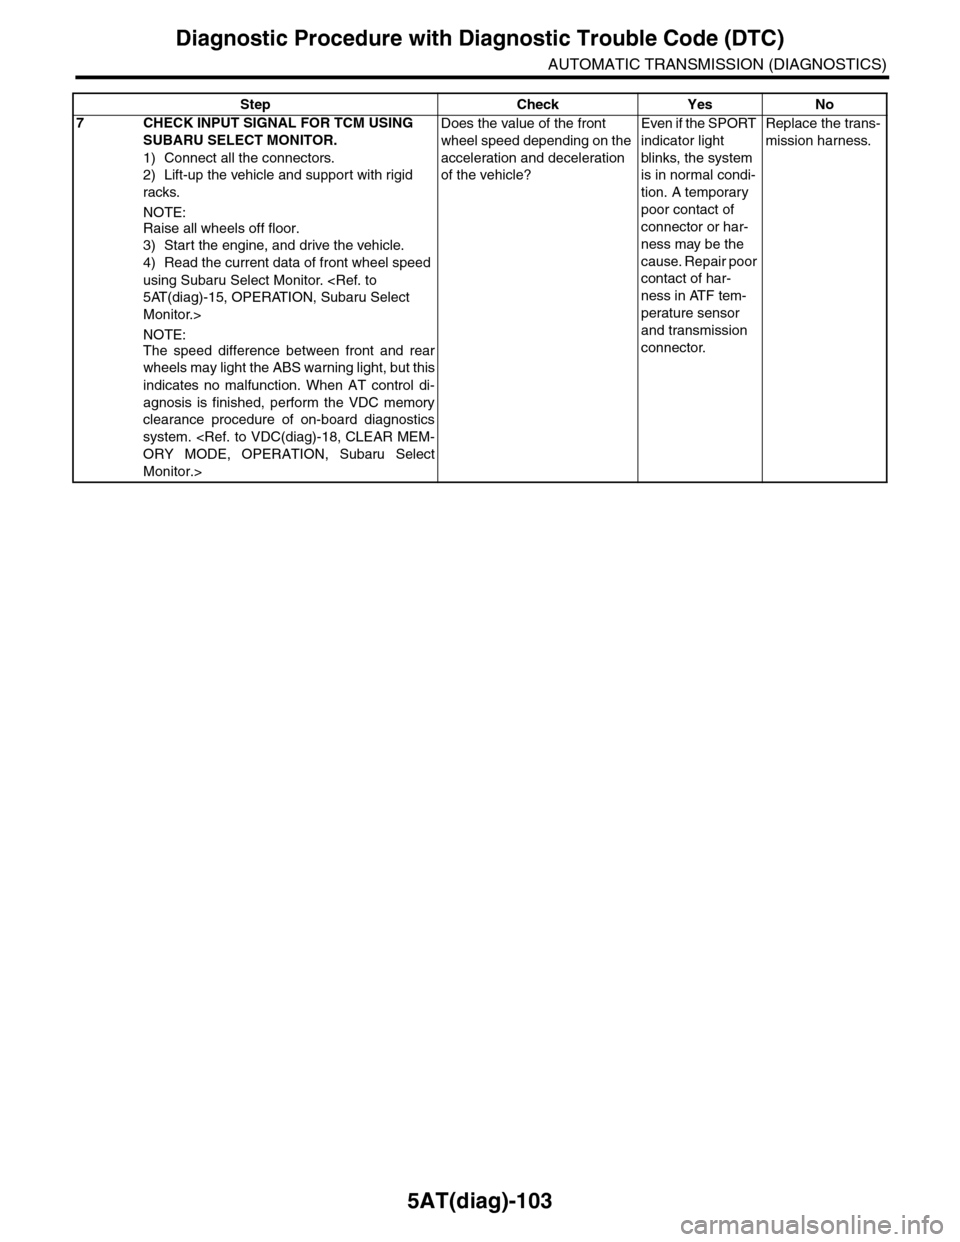
5AT(diag)-103
Diagnostic Procedure with Diagnostic Trouble Code (DTC)
AUTOMATIC TRANSMISSION (DIAGNOSTICS)
7CHECK INPUT SIGNAL FOR TCM USING
SUBARU SELECT MONITOR.
1) Connect all the connectors.
2) Lift-up the vehicle and support with rigid
racks.
NOTE:
Raise all wheels off floor.
3) Start the engine, and drive the vehicle.
4) Read the current data of front wheel speed
using Subaru Select Monitor.
Monitor.>
NOTE:
The speed difference between front and rear
wheels may light the ABS warning light, but this
indicates no malfunction. When AT control di-
agnosis is finished, perform the VDC memory
clearance procedure of on-board diagnostics
system.
Monitor.>
Does the value of the front
wheel speed depending on the
acceleration and deceleration
of the vehicle?
Even if the SPORT
indicator light
blinks, the system
is in normal condi-
tion. A temporary
poor contact of
connector or har-
ness may be the
cause. Repair poor
contact of har-
ness in ATF tem-
perature sensor
and transmission
connector.
Replace the trans-
mission harness.
Step Check Yes No
Page 2226 of 2453
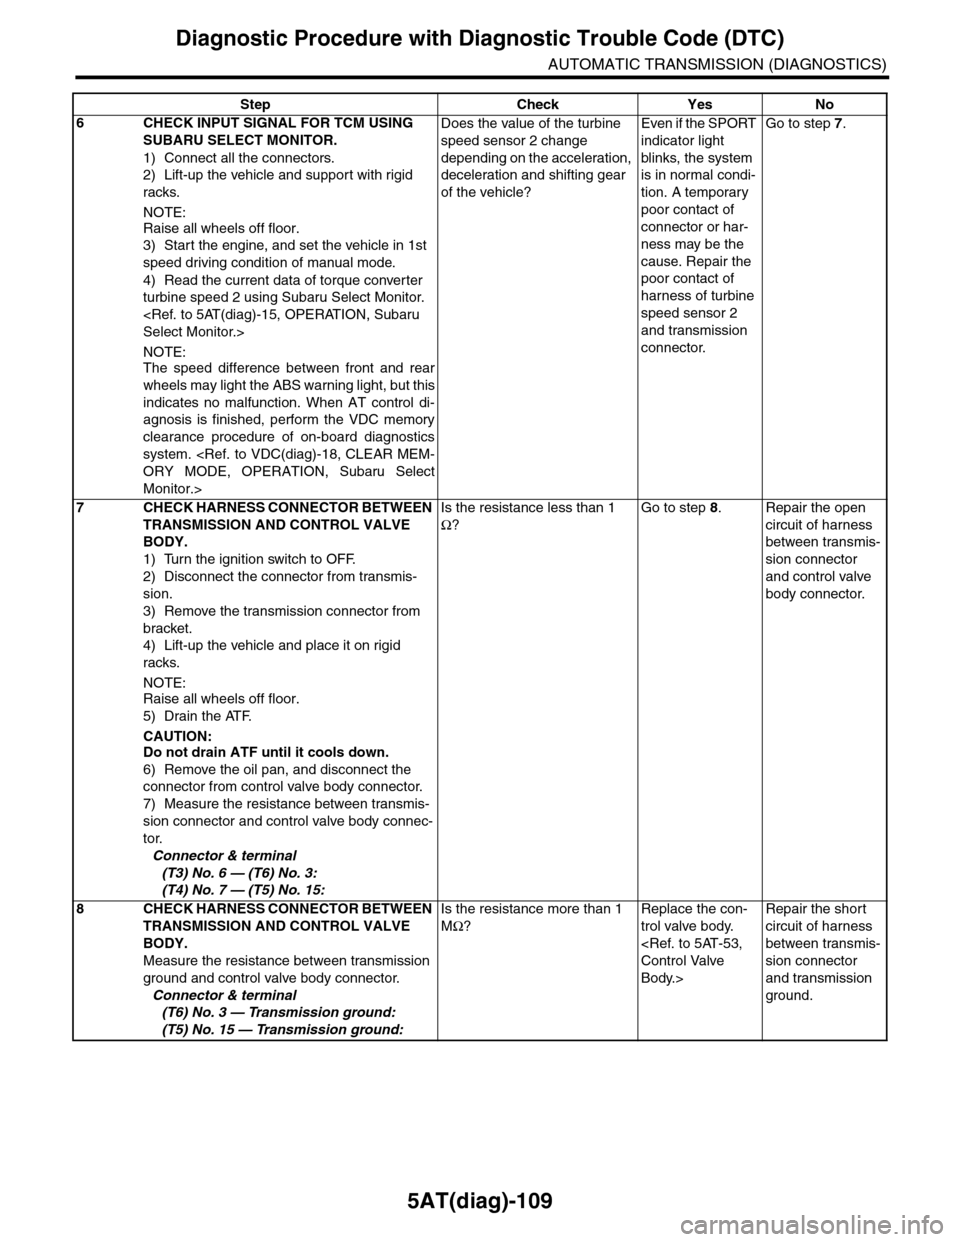
5AT(diag)-109
Diagnostic Procedure with Diagnostic Trouble Code (DTC)
AUTOMATIC TRANSMISSION (DIAGNOSTICS)
6CHECK INPUT SIGNAL FOR TCM USING
SUBARU SELECT MONITOR.
1) Connect all the connectors.
2) Lift-up the vehicle and support with rigid
racks.
NOTE:
Raise all wheels off floor.
3) Start the engine, and set the vehicle in 1st
speed driving condition of manual mode.
4) Read the current data of torque converter
turbine speed 2 using Subaru Select Monitor.
NOTE:The speed difference between front and rear
wheels may light the ABS warning light, but this
indicates no malfunction. When AT control di-
agnosis is finished, perform the VDC memory
clearance procedure of on-board diagnostics
system.
Monitor.>
Does the value of the turbine
speed sensor 2 change
depending on the acceleration,
deceleration and shifting gear
of the vehicle?
Even if the SPORT
indicator light
blinks, the system
is in normal condi-
tion. A temporary
poor contact of
connector or har-
ness may be the
cause. Repair the
poor contact of
harness of turbine
speed sensor 2
and transmission
connector.
Go to step 7.
7CHECK HARNESS CONNECTOR BETWEEN
TRANSMISSION AND CONTROL VALVE
BODY.
1) Turn the ignition switch to OFF.
2) Disconnect the connector from transmis-
sion.
3) Remove the transmission connector from
bracket.
4) Lift-up the vehicle and place it on rigid
racks.
NOTE:
Raise all wheels off floor.
5) Drain the ATF.
CAUTION:Do not drain ATF until it cools down.
6) Remove the oil pan, and disconnect the
connector from control valve body connector.
7) Measure the resistance between transmis-
sion connector and control valve body connec-
tor.
Connector & terminal
(T3) No. 6 — (T6) No. 3:
(T4) No. 7 — (T5) No. 15:
Is the resistance less than 1
Ω?
Go to step 8.Repair the open
circuit of harness
between transmis-
sion connector
and control valve
body connector.
8CHECK HARNESS CONNECTOR BETWEEN
TRANSMISSION AND CONTROL VALVE
BODY.
Measure the resistance between transmission
ground and control valve body connector.
Connector & terminal
(T6) No. 3 — Transmission ground:
(T5) No. 15 — Transmission ground:
Is the resistance more than 1
MΩ?
Replace the con-
trol valve body.
Body.>
Repair the short
circuit of harness
between transmis-
sion connector
and transmission
ground.
Step Check Yes No