brake light SUBARU TRIBECA 2009 1.G Service Workshop Manual
[x] Cancel search | Manufacturer: SUBARU, Model Year: 2009, Model line: TRIBECA, Model: SUBARU TRIBECA 2009 1.GPages: 2453, PDF Size: 46.32 MB
Page 164 of 2453
CC-2
General Description
CRUISE CONTROL SYSTEM
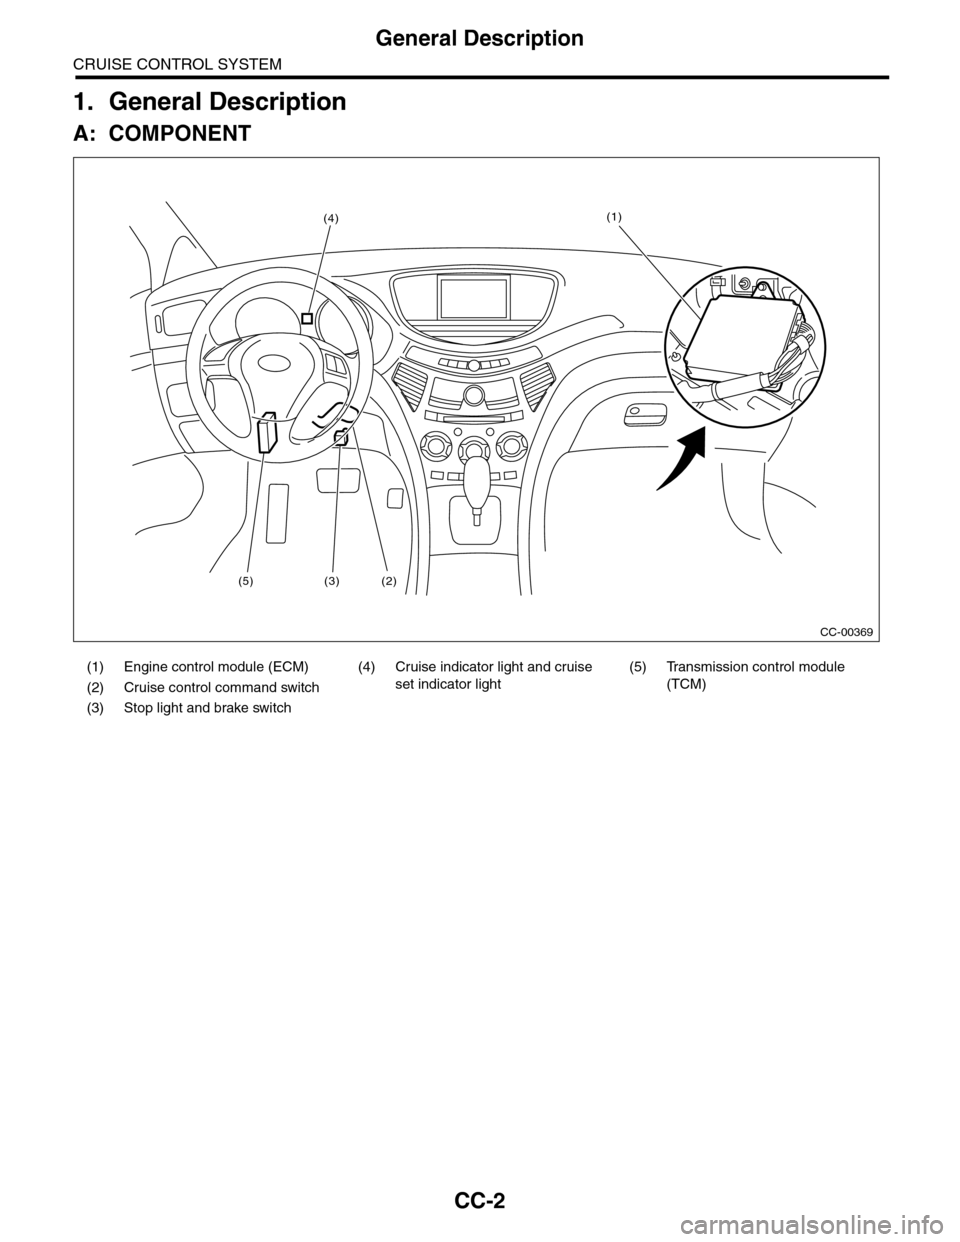
1. General Description
A: COMPONENT
(1) Engine control module (ECM) (4) Cruise indicator light and cruise
set indicator light
(5) Transmission control module
(TCM)(2) Cruise control command switch
(3) Stop light and brake switch
CC-00369
(1)(4)
(2)(3)(5)
Page 168 of 2453
CC-6
Stop Light and Brake Switch
CRUISE CONTROL SYSTEM
4. Stop Light and Brake Switch
A: REMOVAL
1) Disconnect the ground cable from battery.
2) Disconnect the connector from the stop light &
brake switch, and then remove the switch.
B: INSTALLATION
Install in the reverse order of removal.
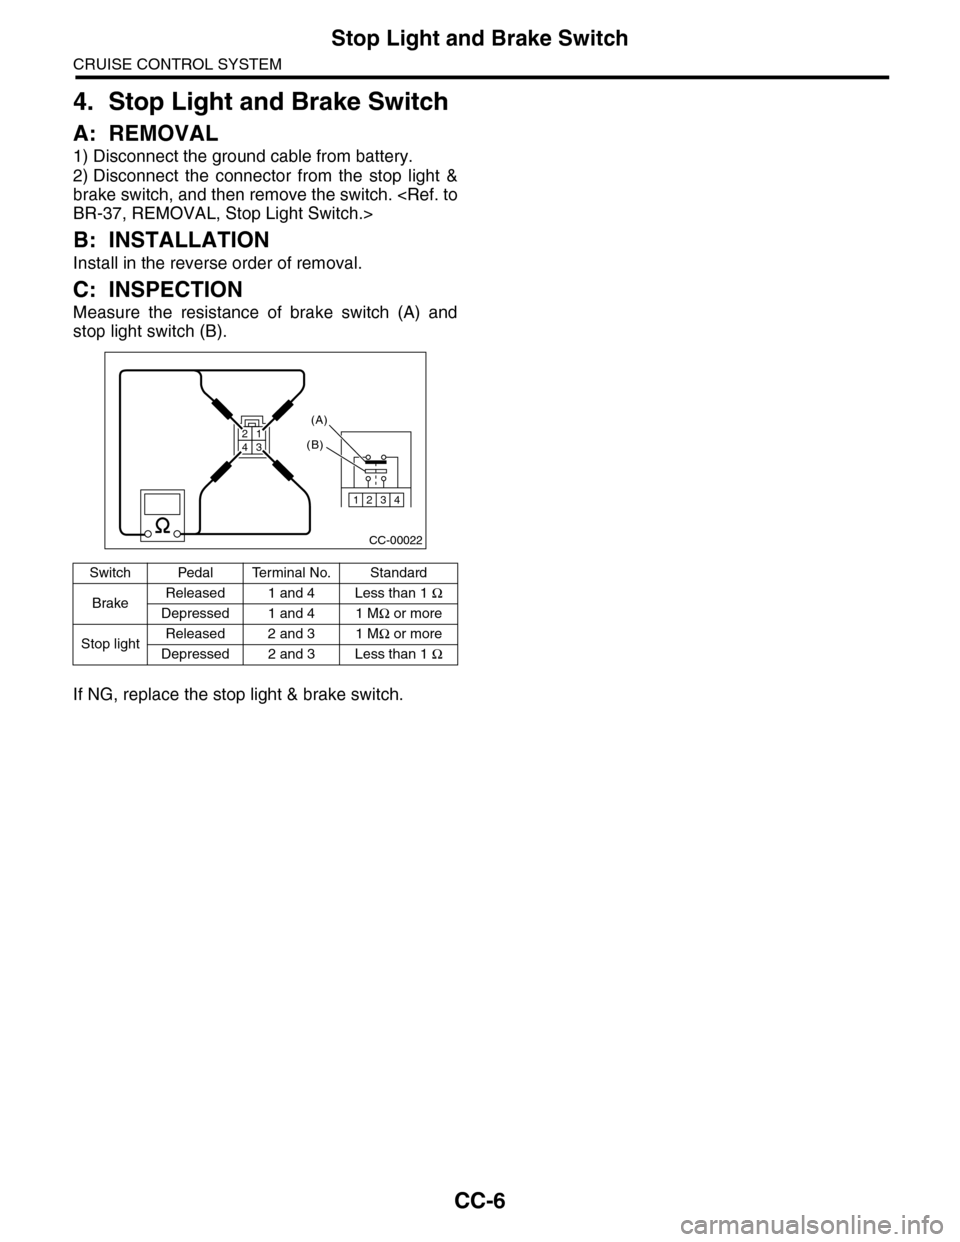
C: INSPECTION
Measure the resistance of brake switch (A) and
stop light switch (B).
If NG, replace the stop light & brake switch.
Switch Pedal Terminal No. Standard
BrakeReleased 1 and 4 Less than 1 Ω
Depressed 1 and 4 1 MΩ or more
Stop lightReleased 2 and 3 1 MΩ or more
Depressed 2 and 3 Less than 1 Ω
CC-00022
1234
(A)
(B)
3214
Page 172 of 2453
CC(ETC)(diag)-5
Electrical Component Location
CRUISE CONTROL SYSTEM (DIAGNOSTICS)
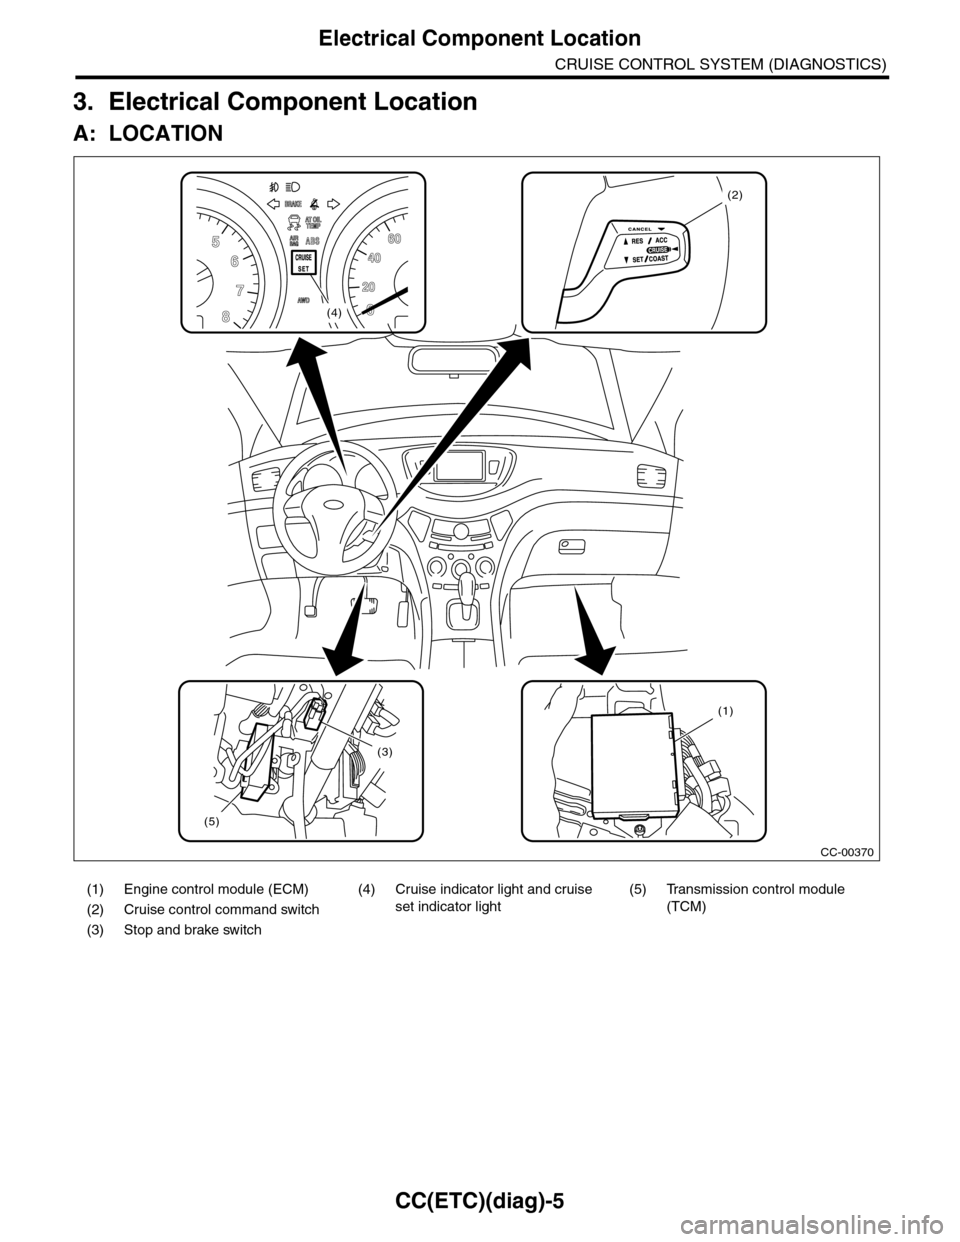
3. Electrical Component Location
A: LOCATION
(1) Engine control module (ECM) (4) Cruise indicator light and cruise
set indicator light
(5) Transmission control module
(TCM)(2) Cruise control command switch
(3) Stop and brake switch
CC-00370
(3)
(1)
(2)
(5)
(4)
Page 173 of 2453
CC(ETC)(diag)-6
Engine Control Module (ECM) I/O Signal
CRUISE CONTROL SYSTEM (DIAGNOSTICS)
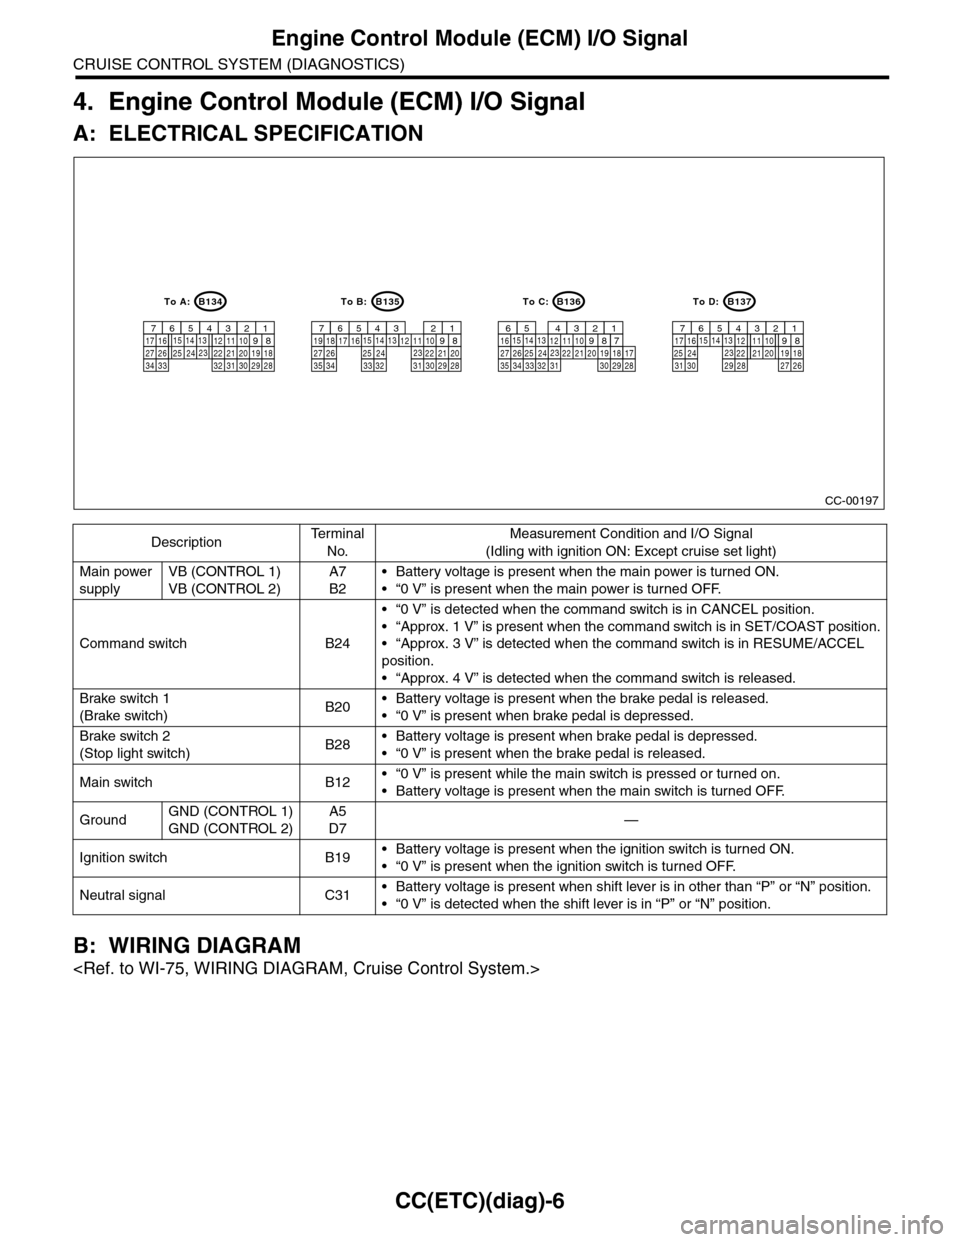
4. Engine Control Module (ECM) I/O Signal
A: ELECTRICAL SPECIFICATION
B: WIRING DIAGRAM
DescriptionTe r m i n a l
No.
Measurement Condition and I/O Signal
(Idling with ignition ON: Except cruise set light)
Main power
supply
VB (CONTROL 1)
VB (CONTROL 2)
A7
B2
•Battery voltage is present when the main power is turned ON.
•“0 V” is present when the main power is turned OFF.
Command switch B24
•“0 V” is detected when the command switch is in CANCEL position.
•“Approx. 1 V” is present when the command switch is in SET/COAST position.
•“Approx. 3 V” is detected when the command switch is in RESUME/ACCEL
position.
•“Approx. 4 V” is detected when the command switch is released.
Brake switch 1
(Brake switch)B20•Battery voltage is present when the brake pedal is released.
•“0 V” is present when brake pedal is depressed.
Brake switch 2
(Stop light switch)B28•Battery voltage is present when brake pedal is depressed.
•“0 V” is present when the brake pedal is released.
Main switch B12•“0 V” is present while the main switch is pressed or turned on.
•Battery voltage is present when the main switch is turned OFF.
GroundGND (CONTROL 1)
GND (CONTROL 2)
A5
D7—
Ignition switch B19•Battery voltage is present when the ignition switch is turned ON.
•“0 V” is present when the ignition switch is turned OFF.
Neutral signal C31•Battery voltage is present when shift lever is in other than “P” or “N” position.
•“0 V” is detected when the shift lever is in “P” or “N” position.
CC-00197
B134
9
30 29 2832 3120 19 1822 211012 11142434 3327 2617 161234567132315258
B135
9
30 29 2832312022 211012 111424353327 2617 161234567132315258
B136
9
30 29 2832 3120 19 1822 211012 11142434 3327 2616123456132315258
B137
9
29 2820 19 182221101211142417 1612345671323152581819
34
71735303127 26
To D:To C:To B:To A:
Page 175 of 2453
CC(ETC)(diag)-8
Subaru Select Monitor
CRUISE CONTROL SYSTEM (DIAGNOSTICS)
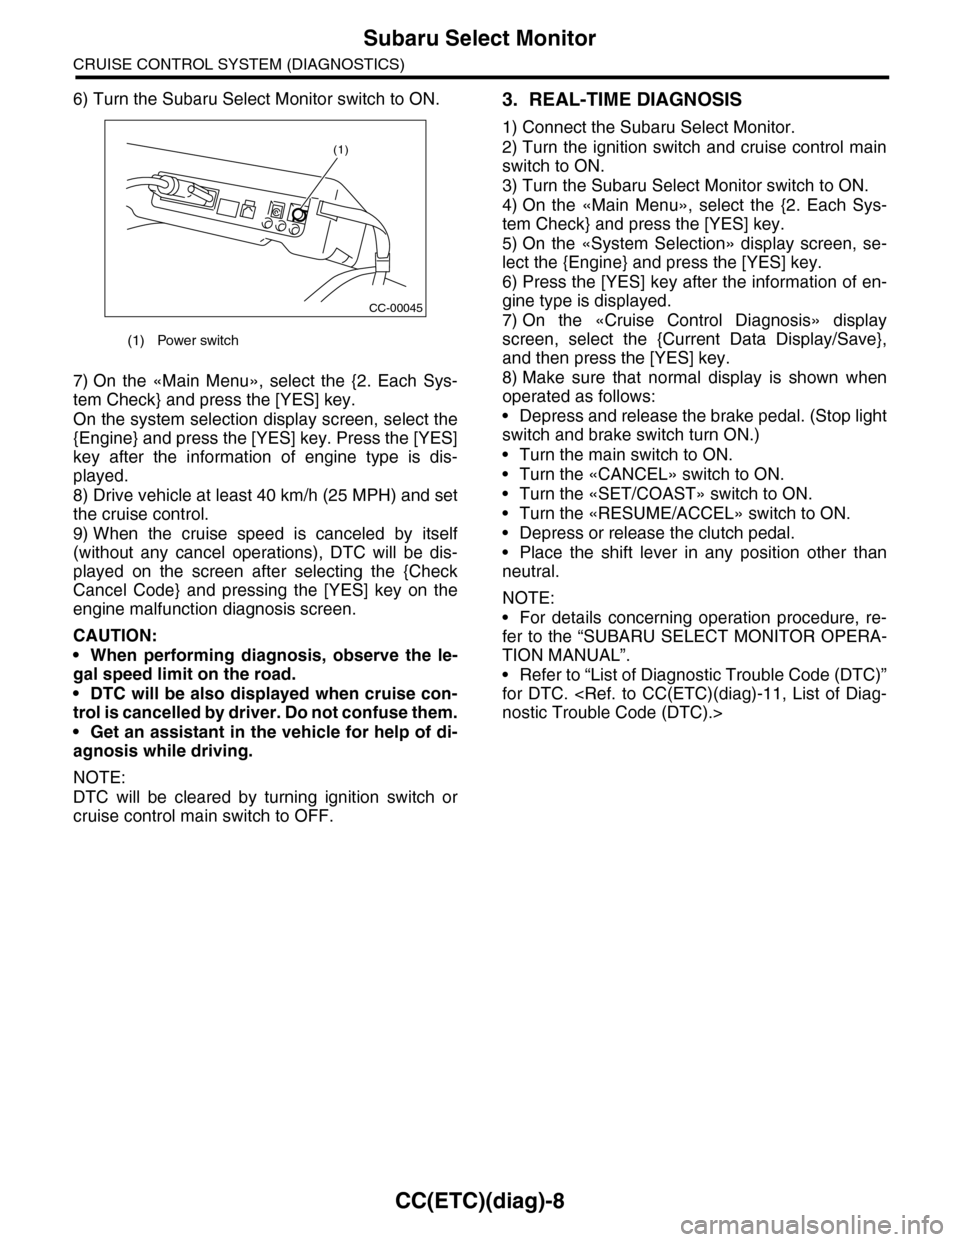
6) Turn the Subaru Select Monitor switch to ON.
7) On the «Main Menu», select the {2. Each Sys-
tem Check} and press the [YES] key.
On the system selection display screen, select the
{Engine} and press the [YES] key. Press the [YES]
key after the information of engine type is dis-
played.
8) Drive vehicle at least 40 km/h (25 MPH) and set
the cruise control.
9) When the cruise speed is canceled by itself
(without any cancel operations), DTC will be dis-
played on the screen after selecting the {Check
Cancel Code} and pressing the [YES] key on the
engine malfunction diagnosis screen.
CAUTION:
•When performing diagnosis, observe the le-
gal speed limit on the road.
•DTC will be also displayed when cruise con-
trol is cancelled by driver. Do not confuse them.
•Get an assistant in the vehicle for help of di-
agnosis while driving.
NOTE:
DTC will be cleared by turning ignition switch or
cruise control main switch to OFF.
3. REAL-TIME DIAGNOSIS
1) Connect the Subaru Select Monitor.
2) Turn the ignition switch and cruise control main
switch to ON.
3) Turn the Subaru Select Monitor switch to ON.
4) On the «Main Menu», select the {2. Each Sys-
tem Check} and press the [YES] key.
5) On the «System Selection» display screen, se-
lect the {Engine} and press the [YES] key.
6) Press the [YES] key after the information of en-
gine type is displayed.
7) On the «Cruise Control Diagnosis» display
screen, select the {Current Data Display/Save},
and then press the [YES] key.
8) Make sure that normal display is shown when
operated as follows:
•Depress and release the brake pedal. (Stop light
switch and brake switch turn ON.)
•Turn the main switch to ON.
•Turn the «CANCEL» switch to ON.
•Turn the «SET/COAST» switch to ON.
•Turn the «RESUME/ACCEL» switch to ON.
•Depress or release the clutch pedal.
•Place the shift lever in any position other than
neutral.
NOTE:
•For details concerning operation procedure, re-
fer to the “SUBARU SELECT MONITOR OPERA-
TION MANUAL”.
•Refer to “List of Diagnostic Trouble Code (DTC)”
for DTC.
(1) Power switch
CC-00045
(1)
Page 176 of 2453
CC(ETC)(diag)-9
Diagnostics with Phenomenon
CRUISE CONTROL SYSTEM (DIAGNOSTICS)
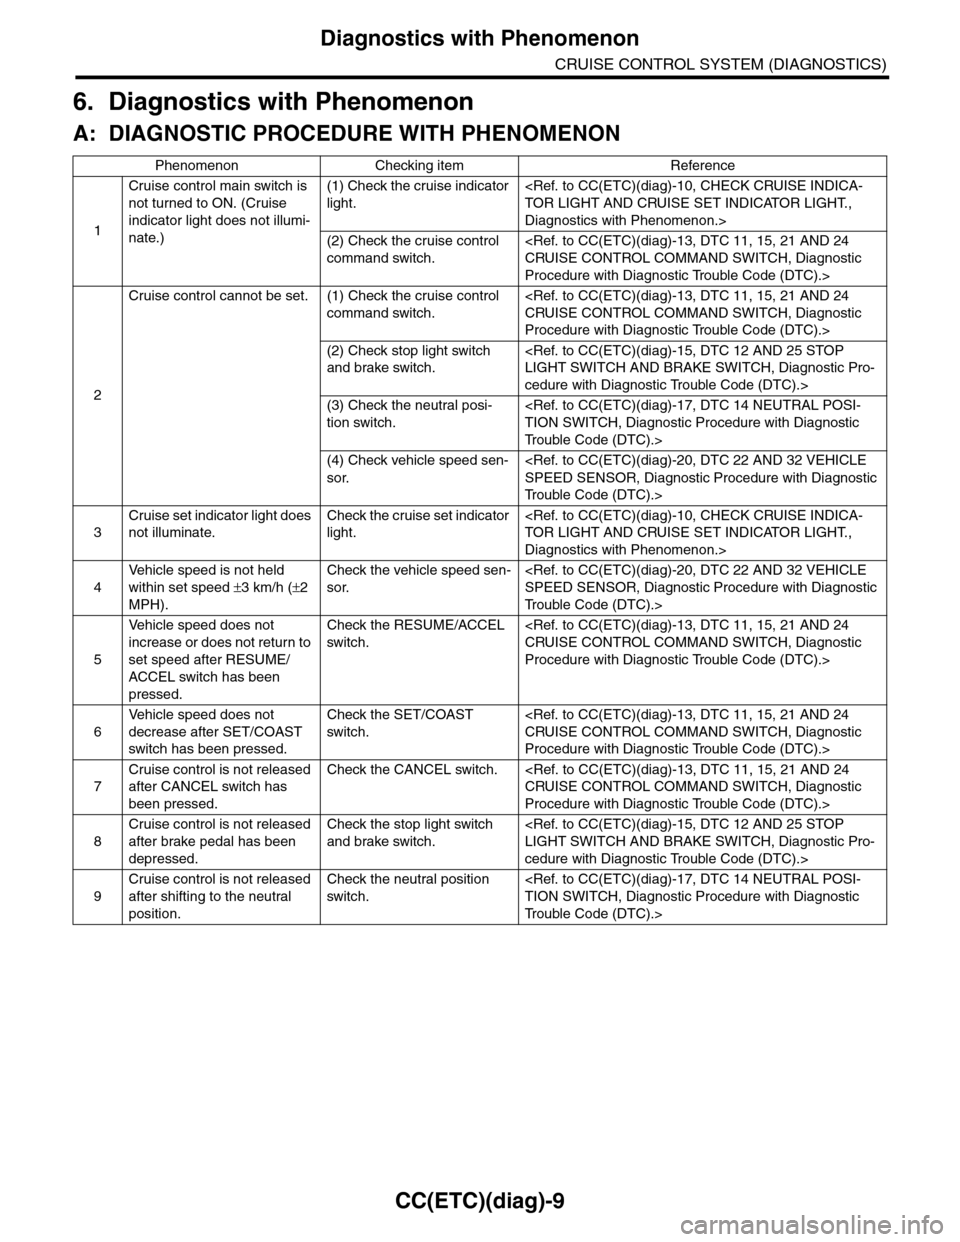
6. Diagnostics with Phenomenon
A: DIAGNOSTIC PROCEDURE WITH PHENOMENON
Phenomenon Checking item Reference
1
Cruise control main switch is
not turned to ON. (Cruise
indicator light does not illumi-
nate.)
(1) Check the cruise indicator
light.
Diagnostics with Phenomenon.>
(2) Check the cruise control
command switch.
Procedure with Diagnostic Trouble Code (DTC).>
2
Cruise control cannot be set. (1) Check the cruise control
command switch.
Procedure with Diagnostic Trouble Code (DTC).>
(2) Check stop light switch
and brake switch.
cedure with Diagnostic Trouble Code (DTC).>
(3) Check the neutral posi-
tion switch.
Tr o u b l e C o d e ( D T C ) . >
(4) Check vehicle speed sen-
sor.
Tr o u b l e C o d e ( D T C ) . >
3
Cruise set indicator light does
not illuminate.
Check the cruise set indicator
light.
Diagnostics with Phenomenon.>
4
Ve h i c l e s p e e d i s n o t h e l d
within set speed ±3 km/h (±2
MPH).
Check the vehicle speed sen-
sor.
Tr o u b l e C o d e ( D T C ) . >
5
Ve h i c l e s p e e d d o e s n o t
increase or does not return to
set speed after RESUME/
ACCEL switch has been
pressed.
Check the RESUME/ACCEL
switch.
Procedure with Diagnostic Trouble Code (DTC).>
6
Ve h i c l e s p e e d d o e s n o t
decrease after SET/COAST
switch has been pressed.
Check the SET/COAST
switch.
Procedure with Diagnostic Trouble Code (DTC).>
7
Cruise control is not released
after CANCEL switch has
been pressed.
Check the CANCEL switch.
Procedure with Diagnostic Trouble Code (DTC).>
8
Cruise control is not released
after brake pedal has been
depressed.
Check the stop light switch
and brake switch.
cedure with Diagnostic Trouble Code (DTC).>
9
Cruise control is not released
after shifting to the neutral
position.
Check the neutral position
switch.
Tr o u b l e C o d e ( D T C ) . >
Page 178 of 2453
CC(ETC)(diag)-11
List of Diagnostic Trouble Code (DTC)
CRUISE CONTROL SYSTEM (DIAGNOSTICS)
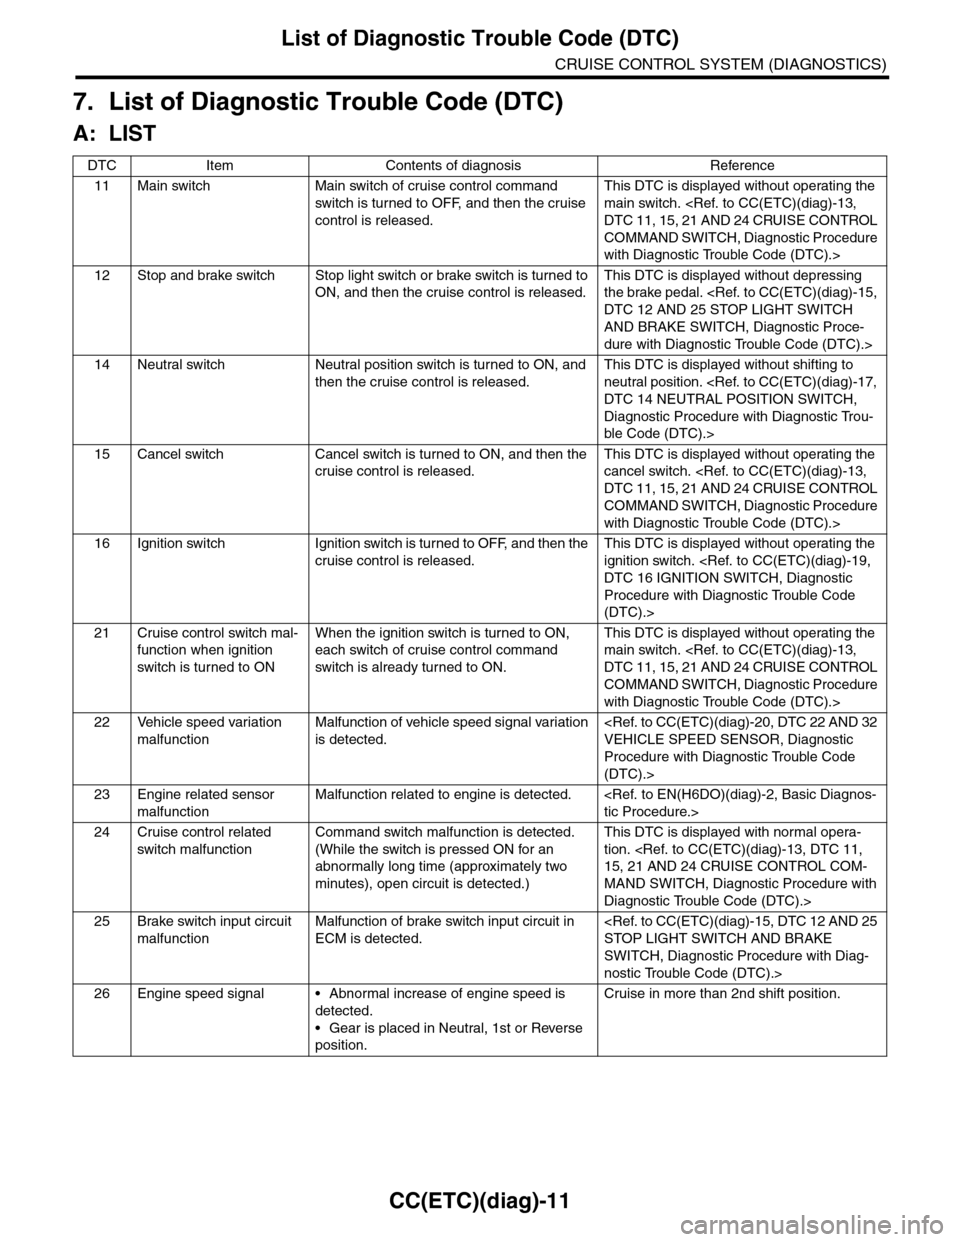
7. List of Diagnostic Trouble Code (DTC)
A: LIST
DTC Item Contents of diagnosis Reference
11 Main switch Main switch of cruise control command
switch is tur ned to OFF, and then the cr uise
control is released.
This DTC is displayed without operating the
main switch.
COMMAND SWITCH, Diagnostic Procedure
with Diagnostic Trouble Code (DTC).>
12 Stop and brake switch Stop light switch or brake switch is turned to
ON, and then the cruise control is released.
This DTC is displayed without depressing
the brake pedal.
AND BRAKE SWITCH, Diagnostic Proce-
dure with Diagnostic Trouble Code (DTC).>
14 Neutral switch Neutral position switch is turned to ON, and
then the cruise control is released.
This DTC is displayed without shifting to
neutral position.
Diagnostic Procedure with Diagnostic Trou-
ble Code (DTC).>
15 Cancel switch Cancel switch is turned to ON, and then the
cruise control is released.
This DTC is displayed without operating the
cancel switch.
COMMAND SWITCH, Diagnostic Procedure
with Diagnostic Trouble Code (DTC).>
16 Ignition switch Ignition switch is turned to OFF, and then the
cruise control is released.
This DTC is displayed without operating the
ignition switch.
Procedure with Diagnostic Trouble Code
(DTC).>
21 Cruise control switch mal-
function when ignition
switch is tur ned to ON
When the ignition switch is turned to ON,
each switch of cruise control command
switch is already tur ned to ON.
This DTC is displayed without operating the
main switch.
COMMAND SWITCH, Diagnostic Procedure
with Diagnostic Trouble Code (DTC).>
22 Vehicle speed variation
malfunction
Malfunction of vehicle speed signal variation
is detected.
Procedure with Diagnostic Trouble Code
(DTC).>
23 Engine related sensor
malfunction
Malfunction related to engine is detected.
24 Cruise control related
switch malfunction
Command switch malfunction is detected.
(While the switch is pressed ON for an
abnormally long time (approximately two
minutes), open circuit is detected.)
This DTC is displayed with normal opera-
tion.
MAND SWITCH, Diagnostic Procedure with
Diagnostic Trouble Code (DTC).>
25 Brake switch input circuit
malfunction
Malfunction of brake switch input circuit in
ECM is detected.
SWITCH, Diagnostic Procedure with Diag-
nostic Trouble Code (DTC).>
26 Engine speed signal • Abnormal increase of engine speed is
detected.
•Gear is placed in Neutral, 1st or Reverse
position.
Cruise in more than 2nd shift position.
Page 182 of 2453
CC(ETC)(diag)-15
Diagnostic Procedure with Diagnostic Trouble Code (DTC)
CRUISE CONTROL SYSTEM (DIAGNOSTICS)
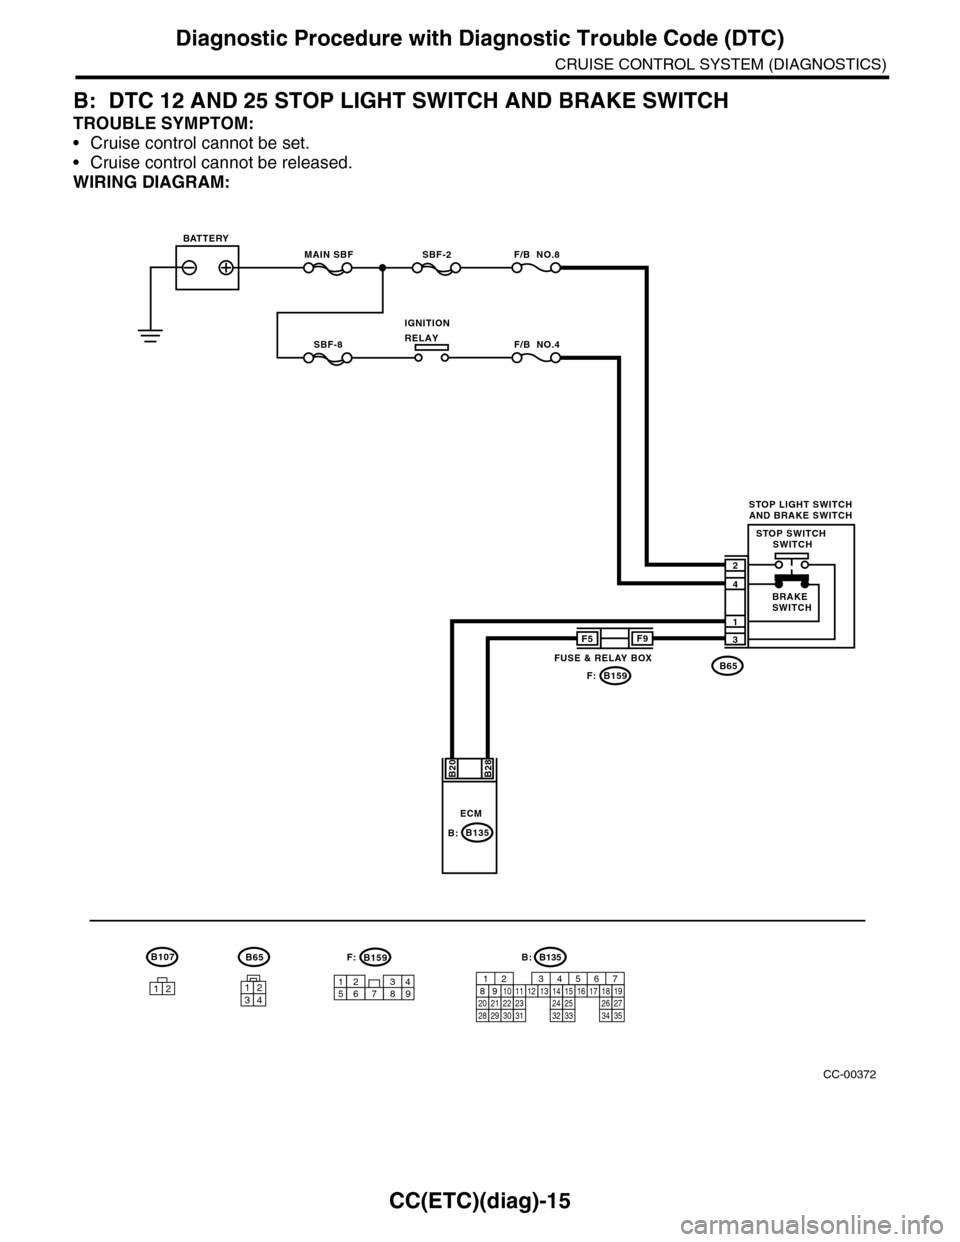
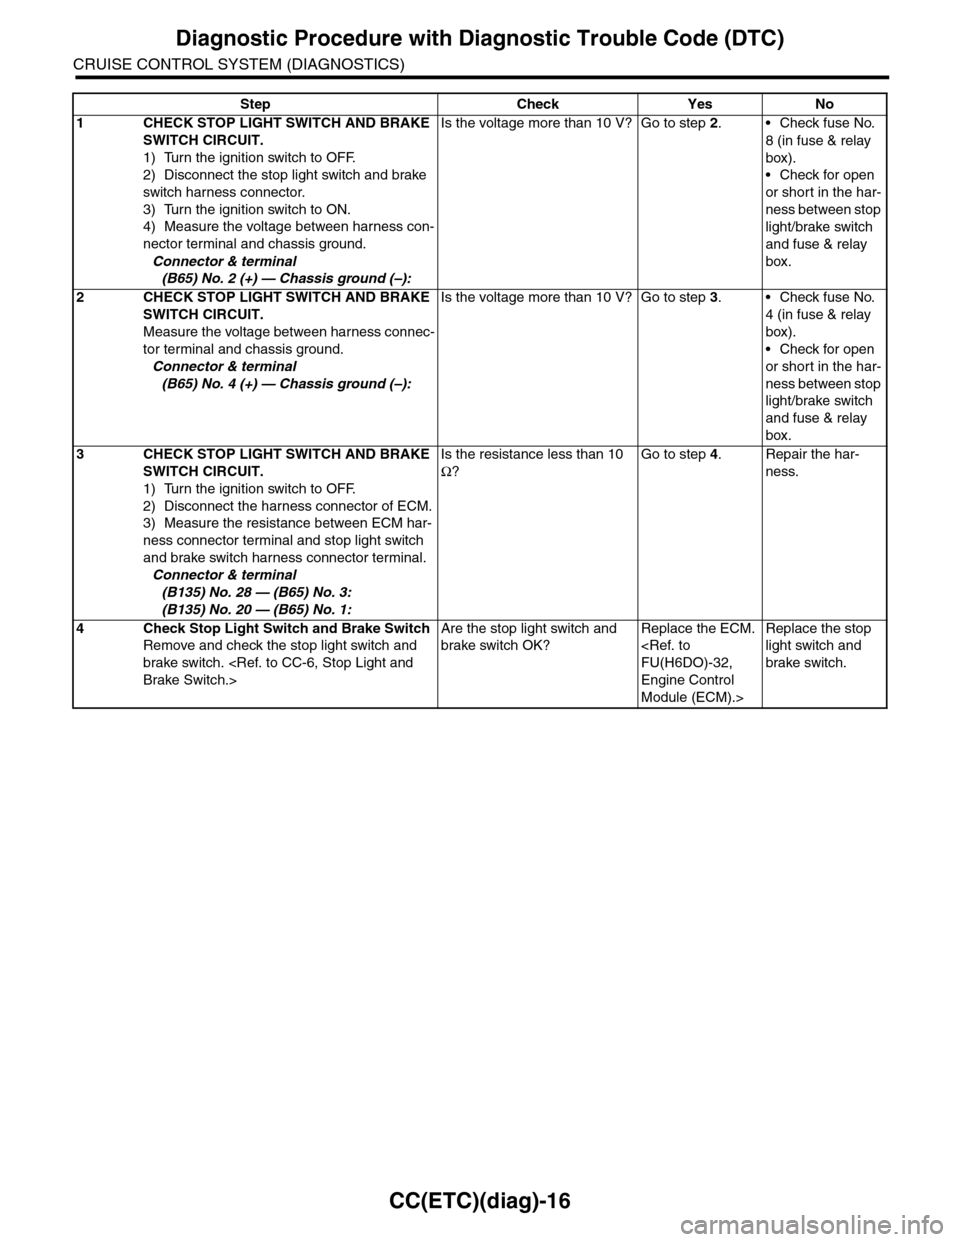
B: DTC 12 AND 25 STOP LIGHT SWITCH AND BRAKE SWITCH
TROUBLE SYMPTOM:
•Cruise control cannot be set.
•Cruise control cannot be released.
WIRING DIAGRAM:
CC-00372
B65
MAIN SBFSBF-2 F/B NO.8
B65
4
3
1
2
B28B20
1234
SBF-8 F/B NO.4
F5
B159
F9
F:
947621538
B159F:
ECM
BATTERY
STOP LIGHT SWITCHAND BRAKE SWITCH
BRAKESWITCH
STOP SWITCH SWITCH
IGNITIONRELAY
FUSE & RELAY BOX
12
B107
B135B:
B135
5672134
29
101112131415252416
30
98171819202821222332312627333435
B:
Page 183 of 2453
CC(ETC)(diag)-16
Diagnostic Procedure with Diagnostic Trouble Code (DTC)
CRUISE CONTROL SYSTEM (DIAGNOSTICS)
Step Check Yes No
1CHECK STOP LIGHT SWITCH AND BRAKE
SWITCH CIRCUIT.
1) Turn the ignition switch to OFF.
2) Disconnect the stop light switch and brake
switch harness connector.
3) Turn the ignition switch to ON.
4) Measure the voltage between harness con-
nector terminal and chassis ground.
Connector & terminal
(B65) No. 2 (+) — Chassis ground (–):
Is the voltage more than 10 V? Go to step 2.•Check fuse No.
8 (in fuse & relay
box).
•Check for open
or short in the har-
ness between stop
light/brake switch
and fuse & relay
box.
2CHECK STOP LIGHT SWITCH AND BRAKE
SWITCH CIRCUIT.
Measure the voltage between harness connec-
tor terminal and chassis ground.
Connector & terminal
(B65) No. 4 (+) — Chassis ground (–):
Is the voltage more than 10 V? Go to step 3.•Check fuse No.
4 (in fuse & relay
box).
•Check for open
or short in the har-
ness between stop
light/brake switch
and fuse & relay
box.
3CHECK STOP LIGHT SWITCH AND BRAKE
SWITCH CIRCUIT.
1) Turn the ignition switch to OFF.
2) Disconnect the harness connector of ECM.
3) Measure the resistance between ECM har-
ness connector terminal and stop light switch
and brake switch harness connector terminal.
Connector & terminal
(B135) No. 28 — (B65) No. 3:
(B135) No. 20 — (B65) No. 1:
Is the resistance less than 10
Ω?
Go to step 4.Repair the har-
ness.
4Check Stop Light Switch and Brake Switch
Remove and check the stop light switch and
brake switch.
Are the stop light switch and
brake switch OK?
Replace the ECM.
Engine Control
Module (ECM).>
Replace the stop
light switch and
brake switch.
Page 192 of 2453
ET-6
Navigation System
ENTERTAINMENT
5. Navigation System
A: WIRING DIAGRAM
B: INSPECTION
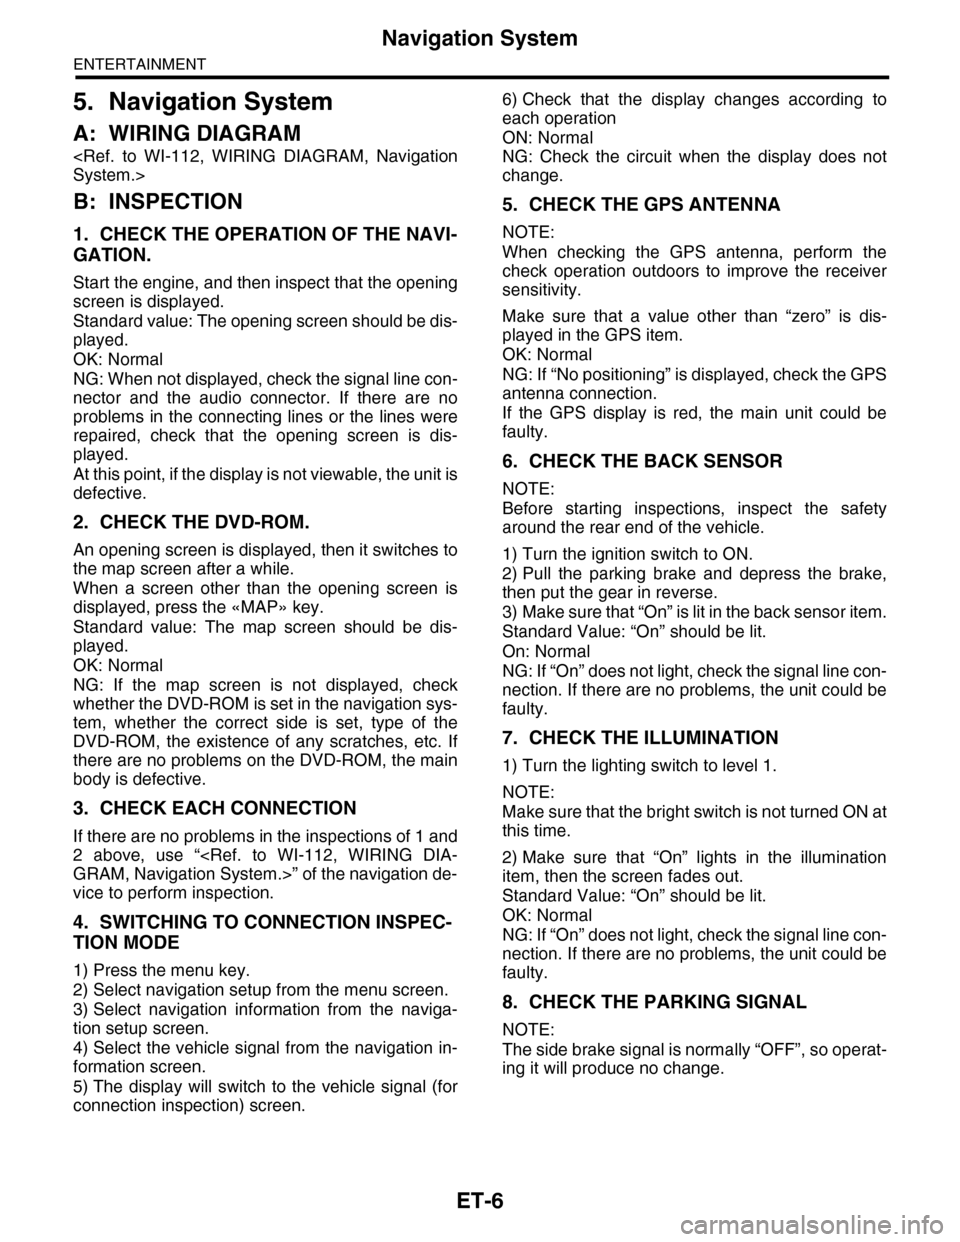
1. CHECK THE OPERATION OF THE NAVI-
GATION.
Start the engine, and then inspect that the opening
screen is displayed.
Standard value: The opening screen should be dis-
played.
OK: Normal
NG: When not displayed, check the signal line con-
nector and the audio connector. If there are no
problems in the connecting lines or the lines were
repaired, check that the opening screen is dis-
played.
At this point, if the display is not viewable, the unit is
defective.
2. CHECK THE DVD-ROM.
An opening screen is displayed, then it switches to
the map screen after a while.
When a screen other than the opening screen is
displayed, press the «MAP» key.
Standard value: The map screen should be dis-
played.
OK: Normal
NG: If the map screen is not displayed, check
whether the DVD-ROM is set in the navigation sys-
tem, whether the correct side is set, type of the
DVD-ROM, the existence of any scratches, etc. If
there are no problems on the DVD-ROM, the main
body is defective.
3. CHECK EACH CONNECTION
If there are no problems in the inspections of 1 and
2 above, use “
vice to perform inspection.
4. SWITCHING TO CONNECTION INSPEC-
TION MODE
1) Press the menu key.
2) Select navigation setup from the menu screen.
3) Select navigation information from the naviga-
tion setup screen.
4) Select the vehicle signal from the navigation in-
formation screen.
5) The display will switch to the vehicle signal (for
connection inspection) screen.
6) Check that the display changes according to
each operation
ON: Normal
NG: Check the circuit when the display does not
change.
5. CHECK THE GPS ANTENNA
NOTE:
When checking the GPS antenna, perform the
check operation outdoors to improve the receiver
sensitivity.
Make sure that a value other than “zero” is dis-
played in the GPS item.
OK: Normal
NG: If “No positioning” is displayed, check the GPS
antenna connection.
If the GPS display is red, the main unit could be
faulty.
6. CHECK THE BACK SENSOR
NOTE:
Before starting inspections, inspect the safety
around the rear end of the vehicle.
1) Turn the ignition switch to ON.
2) Pull the parking brake and depress the brake,
then put the gear in reverse.
3) Make sure that “On” is lit in the back sensor item.
Standard Value: “On” should be lit.
On: Normal
NG: If “On” does not light, check the signal line con-
nection. If there are no problems, the unit could be
faulty.
7. CHECK THE ILLUMINATION
1) Turn the lighting switch to level 1.
NOTE:
Make sure that the bright switch is not turned ON at
this time.
2) Make sure that “On” lights in the illumination
item, then the screen fades out.
Standard Value: “On” should be lit.
OK: Normal
NG: If “On” does not light, check the signal line con-
nection. If there are no problems, the unit could be
faulty.
8. CHECK THE PARKING SIGNAL
NOTE:
The side brake signal is normally “OFF”, so operat-
ing it will produce no change.