automatic SUZUKI AERIO 2007 1.G Owners Manual
[x] Cancel search | Manufacturer: SUZUKI, Model Year: 2007, Model line: AERIO, Model: SUZUKI AERIO 2007 1.GPages: 232, PDF Size: 3.34 MB
Page 1 of 232
Downloaded from www.Manualslib.com manuals search engine Part No. 99011-54G27-03E
June, 2006
OWNER’S MANUAL
99011-54G27-03E AERIO
Printed in Japan
See page 1-1
10.0 mm
Keep With Vehicle At All Times.
Contains Important Information
On Safety, Operation & Maintenance.
SERVICE STATION INFORMATION
Fuel recommendation: Brake and clutch fluid:
Engine oil recommendation: Automatic transaxle fluid:
Tire cold pressure:
For further details, see “Engine Oil and Filter” in the
“INSPECTION AND MAINTENANCE” section.DOT3
An equivalent of DEXRON®
-III.
See the “Tire Information Label” located on the
driver’s door lock pillar.
2007Engine oil with “Starburst” symbol
Made from 100% recycled paper,
except for cover.
ENGLISH
Suzuki Red: Magenta 100%, Yellow 100%
Suzuki Blue: Cyan 100%, Magenta 70%
Page 4 of 232
Downloaded from www.Manualslib.com manuals search engine 54G27-03E
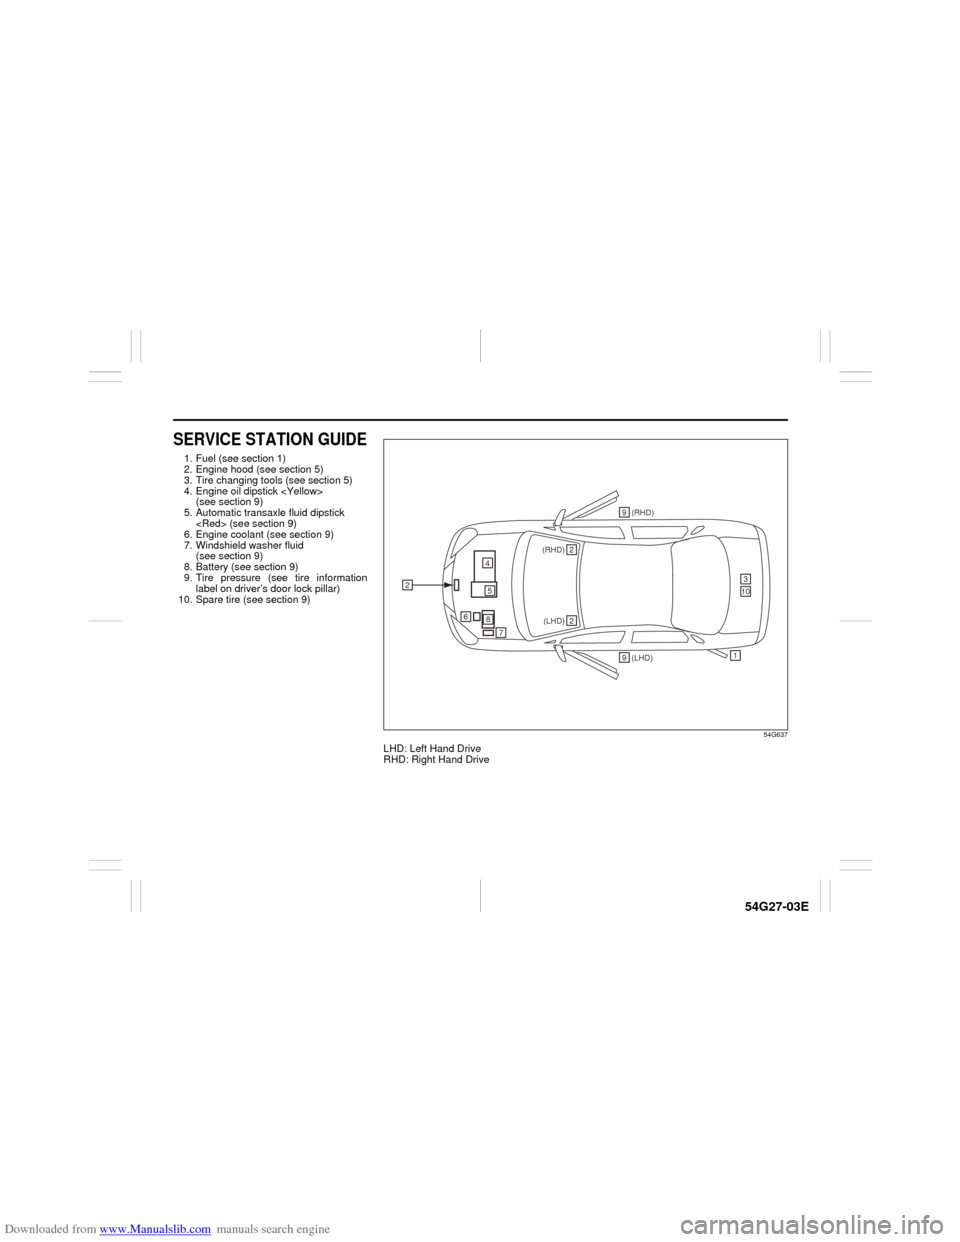
SERVICE STATION GUIDE1. Fuel (see section 1)
2. Engine hood (see section 5)
3. Tire changing tools (see section 5)
4. Engine oil dipstick
(see section 9)
5. Automatic transaxle fluid dipstick
6. Engine coolant (see section 9)
7. Windshield washer fluid
(see section 9)
8. Battery (see section 9)
9. Tire pressure (see tire information
label on driver’s door lock pillar)
10. Spare tire (see section 9)
54G637
LHD: Left Hand Drive
RHD: Right Hand Drive
2
1
(RHD) 2(LHD) 2
310
45
6
7
8
(LHD) 9(RHD) 9
Page 16 of 232
Downloaded from www.Manualslib.com manuals search engine 2-3 BEFORE DRIVING
54G27-03E
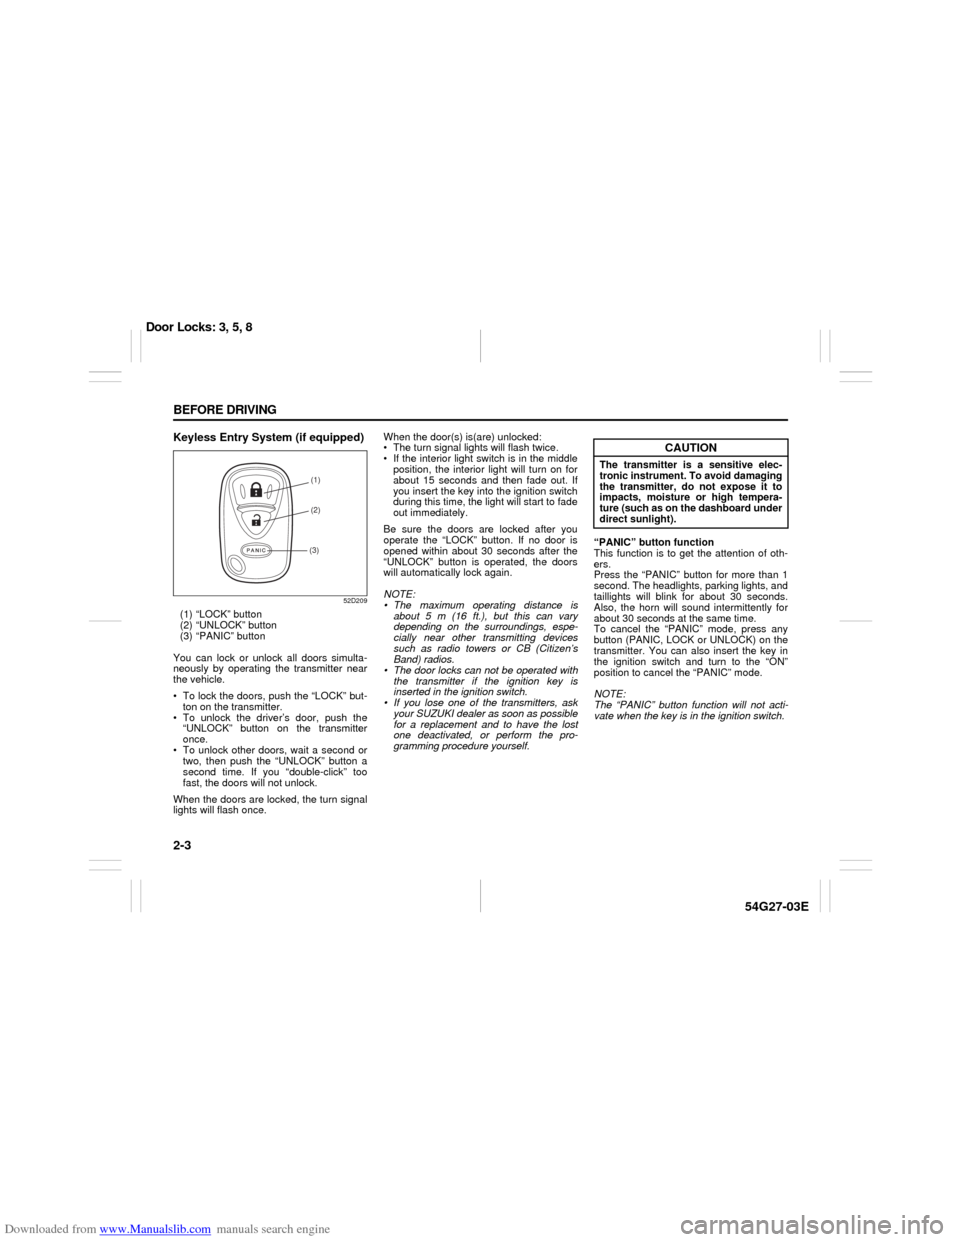
Keyless Entry System (if equipped)
52D209
(1) “LOCK” button
(2) “UNLOCK” button
(3) “PANIC” button
You can lock or unlock all doors simulta-
neously by operating the transmitter near
the vehicle.
To lock the doors, push the “LOCK” but-
ton on the transmitter.
To unlock the driver’s door, push the
“UNLOCK” button on the transmitter
once.
To unlock other doors, wait a second or
two, then push the “UNLOCK” button a
second time. If you “double-click” too
fast, the doors will not unlock.
When the doors are locked, the turn signal
lights will flash once.When the door(s) is(are) unlocked:
The turn signal lights will flash twice.
If the interior light switch is in the middle
position, the interior light will turn on for
about 15 seconds and then fade out. If
you insert the key into the ignition switch
during this time, the light will start to fade
out immediately.
Be sure the doors are locked after you
operate the “LOCK” button. If no door is
opened within about 30 seconds after the
“UNLOCK” button is operated, the doors
will automatically lock again.
NOTE:
The maximum operating distance is
about 5 m (16 ft.), but this can vary
depending on the surroundings, espe-
cially near other transmitting devices
such as radio towers or CB (Citizen’s
Band) radios.
The door locks can not be operated with
the transmitter if the ignition key is
inserted in the ignition switch.
If you lose one of the transmitters, ask
your SUZUKI dealer as soon as possible
for a replacement and to have the lost
one deactivated, or perform the pro-
gramming procedure yourself.“PANIC” button function
This function is to get the attention of oth-
ers.
Press the “PANIC” button for more than 1
second. The headlights, parking lights, and
taillights will blink for about 30 seconds.
Also, the horn will sound intermittently for
about 30 seconds at the same time.
To cancel the “PANIC” mode, press any
button (PANIC, LOCK or UNLOCK) on the
transmitter. You can also insert the key in
the ignition switch and turn to the “ON”
position to cancel the “PANIC” mode.
NOTE:
The “PANIC” button function will not acti-
vate when the key is in the ignition switch.
(1)
(2)
(3)
CAUTION
The transmitter is a sensitive elec-
tronic instrument. To avoid damaging
the transmitter, do not expose it to
impacts, moisture or high tempera-
ture (such as on the dashboard under
direct sunlight).
Door Locks: 3, 5, 8
Page 18 of 232
Downloaded from www.Manualslib.com manuals search engine 2-5 BEFORE DRIVING
54G27-03E
Programming/Removing the transmit-
ter code yourself
Your new vehicle was originally equipped
with two transmitters.
If you have lost one of the transmitters, you
should change the transmitter code in your
vehicle’s memory as soon as possible for
security. If you purchase additional trans-
mitters, the new transmitters need to be
programmed into your vehicle’s memory.
You can perform this yourself by using the
following procedure:
NOTE:
You can program up to four transmitter
codes into your vehicle’s memory. The
four codes may be the same or different.
If you try to program a fifth code, the old-
est code will be cleared automatically.
To purchase new transmitters, see your
SUZUKI dealer.
Before you begin programming, have all
of your transmitters available.To program the new transmitter
1) Confirm that all the doors are closed
and the ignition key is out of the ignition
cylinder.
2) Open the driver’s door.
3) Insert the key, turn the ignition switch to
the “ON” position, turn the ignition
switch to the “OFF” position and
remove the key within 10 seconds.
54G404
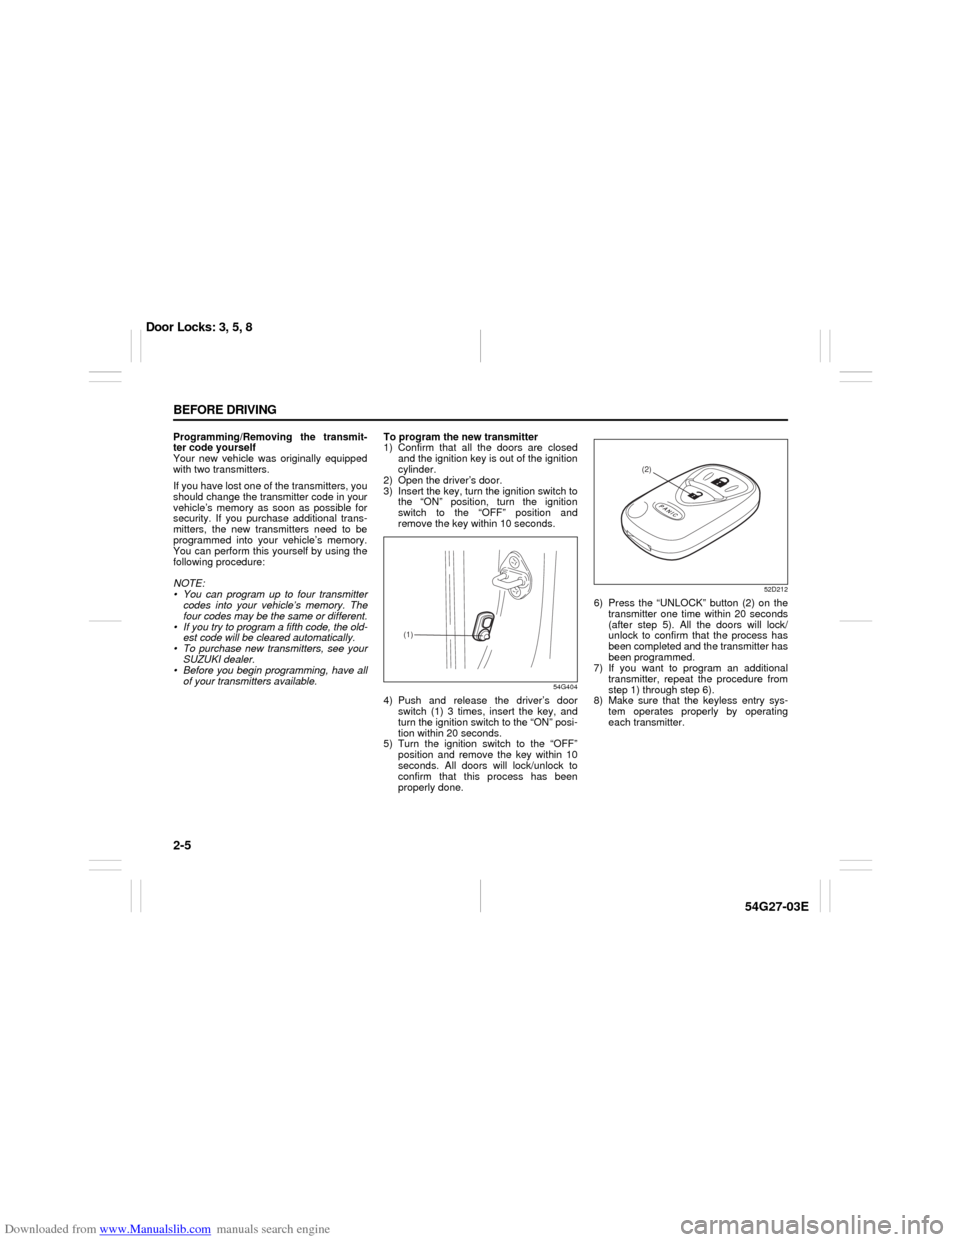
4) Push and release the driver’s door
switch (1) 3 times, insert the key, and
turn the ignition switch to the “ON” posi-
tion within 20 seconds.
5) Turn the ignition switch to the “OFF”
position and remove the key within 10
seconds. All doors will lock/unlock to
confirm that this process has been
properly done.
52D212
6) Press the “UNLOCK” button (2) on the
transmitter one time within 20 seconds
(after step 5). All the doors will lock/
unlock to confirm that the process has
been completed and the transmitter has
been programmed.
7) If you want to program an additional
transmitter, repeat the procedure from
step 1) through step 6).
8) Make sure that the keyless entry sys-
tem operates properly by operating
each transmitter.
(1)
(2)
Door Locks: 3, 5, 8
Page 20 of 232
Downloaded from www.Manualslib.com manuals search engine 2-7 BEFORE DRIVING
54G27-03E
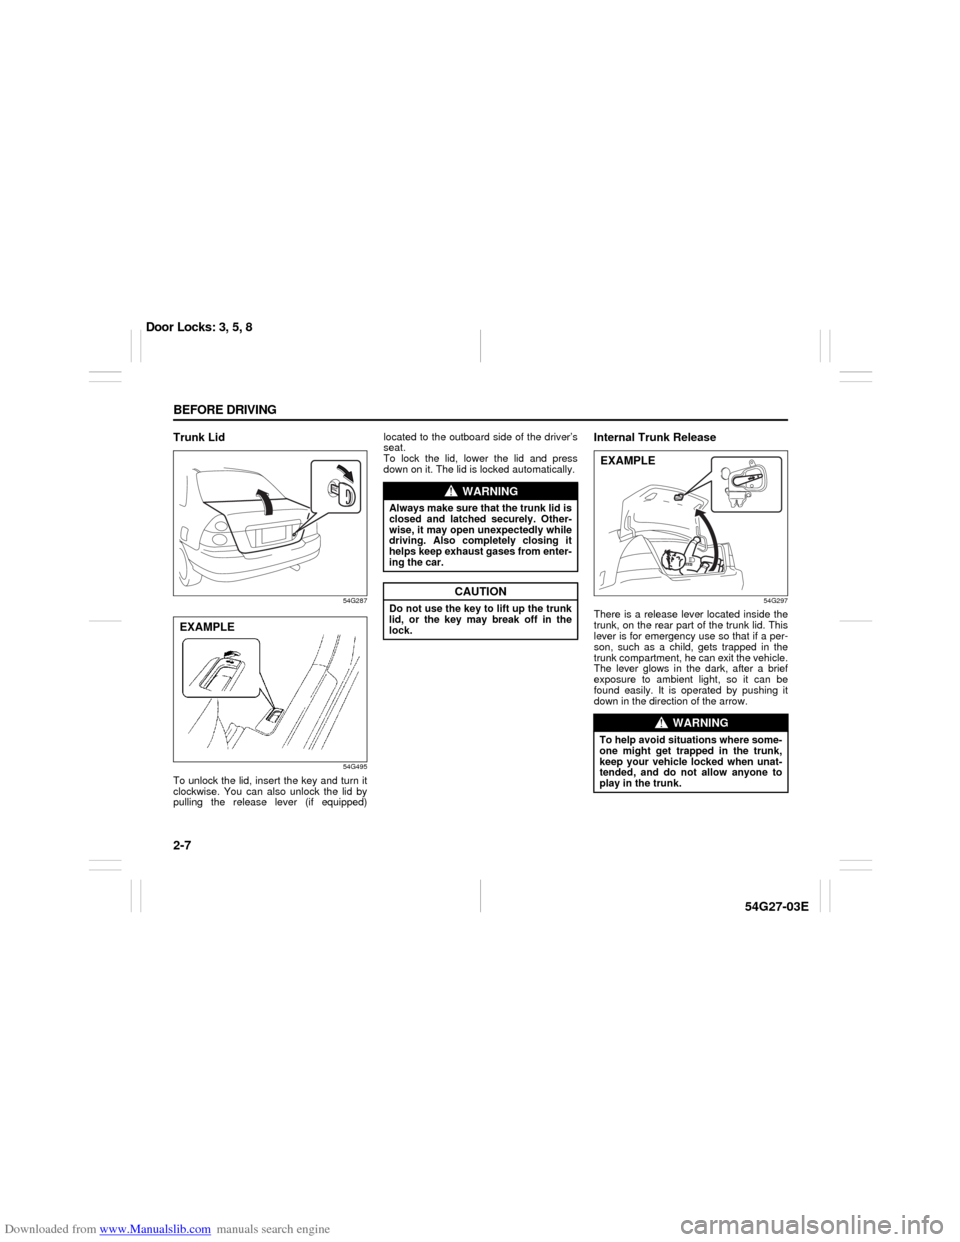
Trunk Lid
54G287
54G495
To unlock the lid, insert the key and turn it
clockwise. You can also unlock the lid by
pulling the release lever (if equipped)located to the outboard side of the driver’s
seat.
To lock the lid, lower the lid and press
down on it. The lid is locked automatically.
Internal Trunk Release
54G297
There is a release lever located inside the
trunk, on the rear part of the trunk lid. This
lever is for emergency use so that if a per-
son, such as a child, gets trapped in the
trunk compartment, he can exit the vehicle.
The lever glows in the dark, after a brief
exposure to ambient light, so it can be
found easily. It is operated by pushing it
down in the direction of the arrow.
EXAMPLE
WARNING
Always make sure that the trunk lid is
closed and latched securely. Other-
wise, it may open unexpectedly while
driving. Also completely closing it
helps keep exhaust gases from enter-
ing the car.
CAUTION
Do not use the key to lift up the trunk
lid, or the key may break off in the
lock.
WARNING
To help avoid situations where some-
one might get trapped in the trunk,
keep your vehicle locked when unat-
tended, and do not allow anyone to
play in the trunk.EXAMPLE
Door Locks: 3, 5, 8
Page 28 of 232
Downloaded from www.Manualslib.com manuals search engine 2-15 BEFORE DRIVING
54G27-03E
Lap-Shoulder BeltEmergency Locking Retractor (ELR)
The seat belt has an emergency locking
retractor (ELR), which is designed to lock
the seat belt only during a sudden stop or
impact. It also may lock if you pull the belt
across your body very quickly. If this hap-
pens, let the belt go back to unlock it, then
pull the belt across your body more slowly.
Automatic Locking Retractor (ALR)
The front passenger’s seat belt and the
rear seat belts have emergency locking
retractors (ELRs) that can be temporarily
converted to function as automatic locking
retractors (ALRs). The ALR mode should
be used if you need to secure a child
restraint system in the seat. Refer to the
“Child Restraint Systems” section for
details.Safety reminder
60A038
60A040
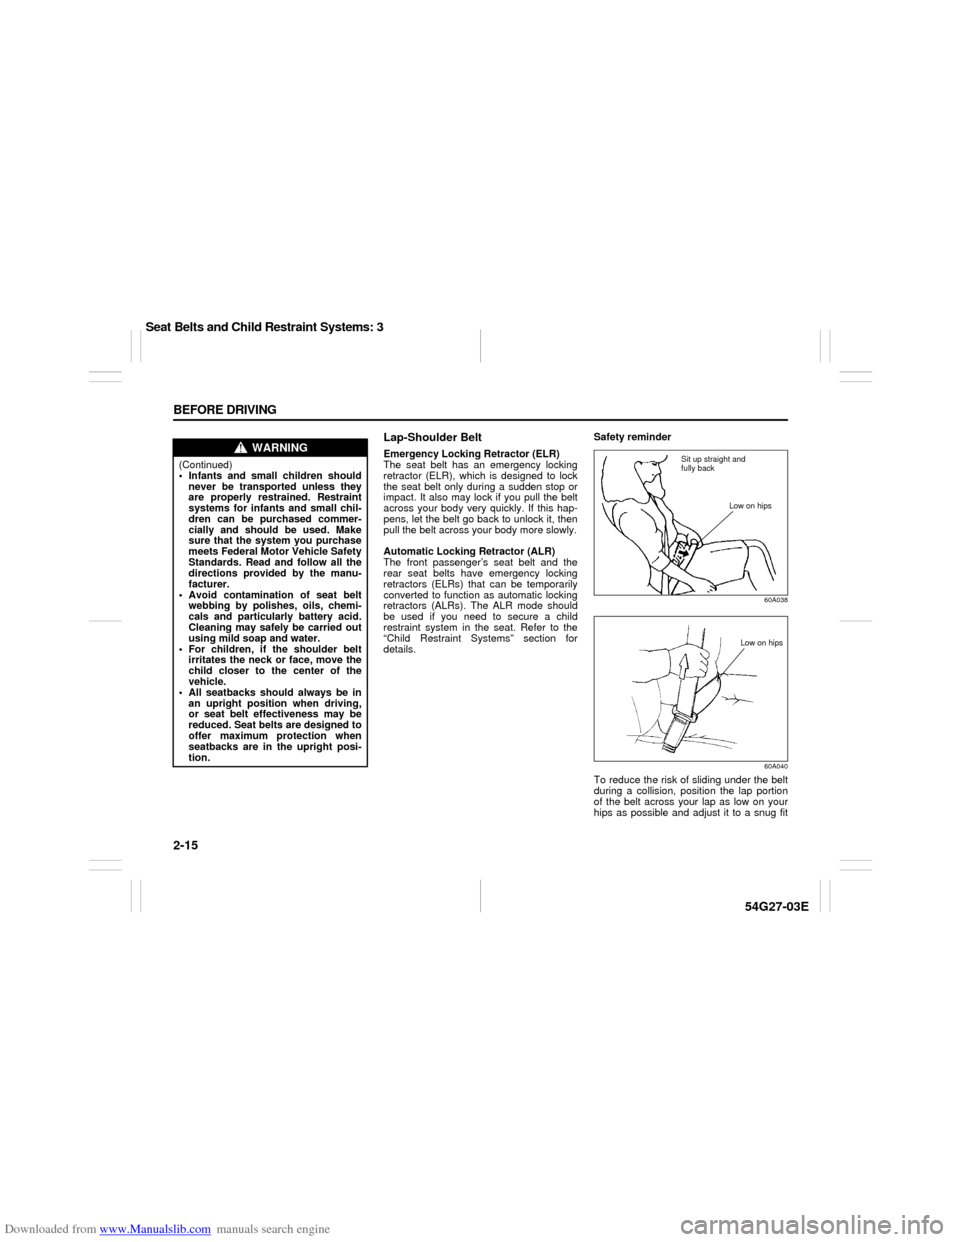
To reduce the risk of sliding under the belt
during a collision, position the lap portion
of the belt across your lap as low on your
hips as possible and adjust it to a snug fit
WARNING
(Continued)
Infants and small children should
never be transported unless they
are properly restrained. Restraint
systems for infants and small chil-
dren can be purchased commer-
cially and should be used. Make
sure that the system you purchase
meets Federal Motor Vehicle Safety
Standards. Read and follow all the
directions provided by the manu-
facturer.
Avoid contamination of seat belt
webbing by polishes, oils, chemi-
cals and particularly battery acid.
Cleaning may safely be carried out
using mild soap and water.
For children, if the shoulder belt
irritates the neck or face, move the
child closer to the center of the
vehicle.
All seatbacks should always be in
an upright position when driving,
or seat belt effectiveness may be
reduced. Seat belts are designed to
offer maximum protection when
seatbacks are in the upright posi-
tion.
Sit up straight and
fully back
Low on hips
Low on hips
Seat Belts and Child Restraint Systems: 3
Page 38 of 232
Downloaded from www.Manualslib.com manuals search engine 2-25 BEFORE DRIVING
54G27-03E
83E035
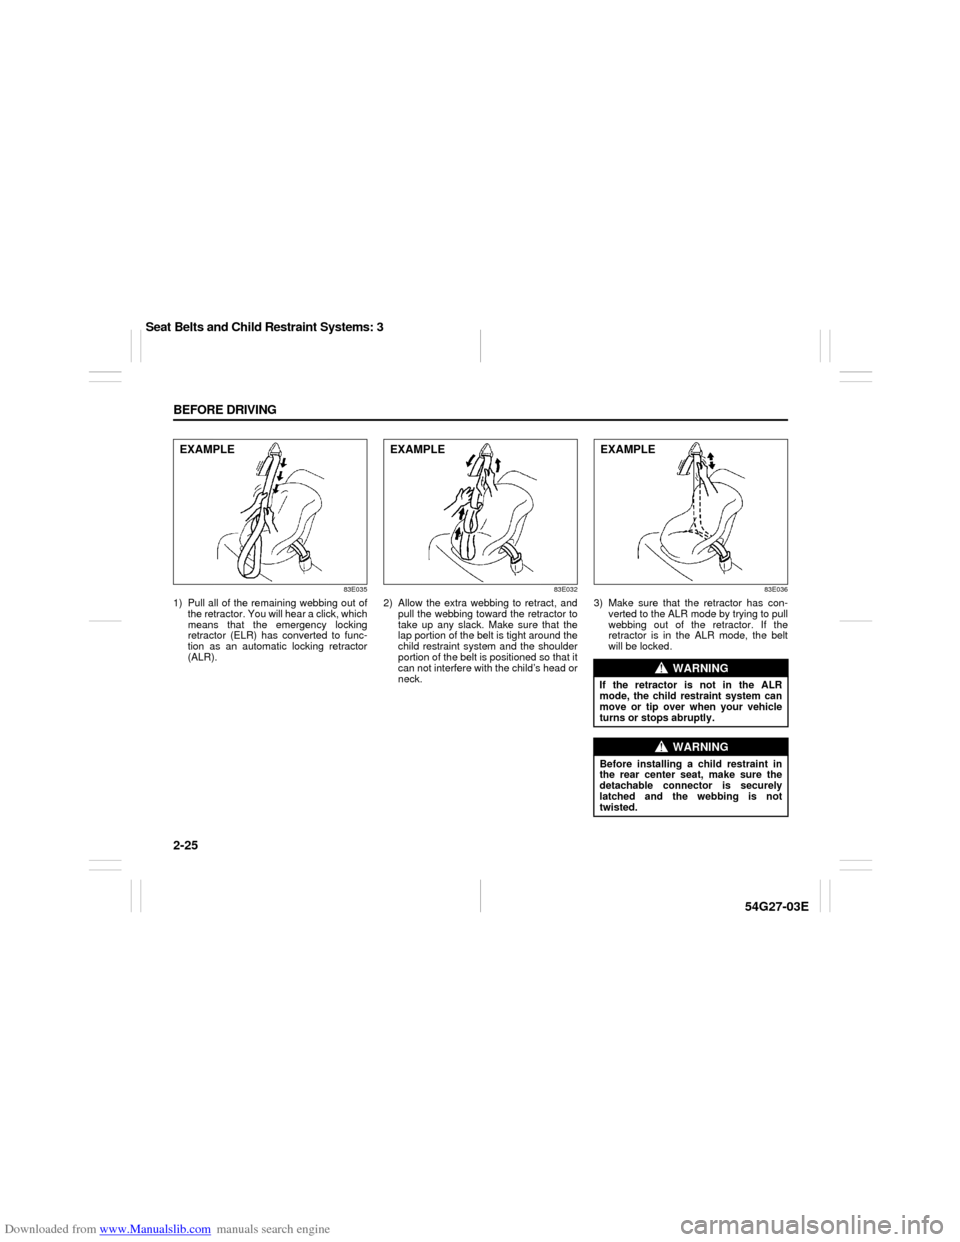
1) Pull all of the remaining webbing out of
the retractor. You will hear a click, which
means that the emergency locking
retractor (ELR) has converted to func-
tion as an automatic locking retractor
(ALR).
83E032
2) Allow the extra webbing to retract, and
pull the webbing toward the retractor to
take up any slack. Make sure that the
lap portion of the belt is tight around the
child restraint system and the shoulder
portion of the belt is positioned so that it
can not interfere with the child’s head or
neck.
83E036
3) Make sure that the retractor has con-
verted to the ALR mode by trying to pull
webbing out of the retractor. If the
retractor is in the ALR mode, the belt
will be locked.
EXAMPLE
EXAMPLE
WARNING
If the retractor is not in the ALR
mode, the child restraint system can
move or tip over when your vehicle
turns or stops abruptly.
WARNING
Before installing a child restraint in
the rear center seat, make sure the
detachable connector is securely
latched and the webbing is not
twisted.EXAMPLE
Seat Belts and Child Restraint Systems: 3
Page 39 of 232
Downloaded from www.Manualslib.com manuals search engine 2-26 BEFORE DRIVING
54G27-03E
65D234
65D235
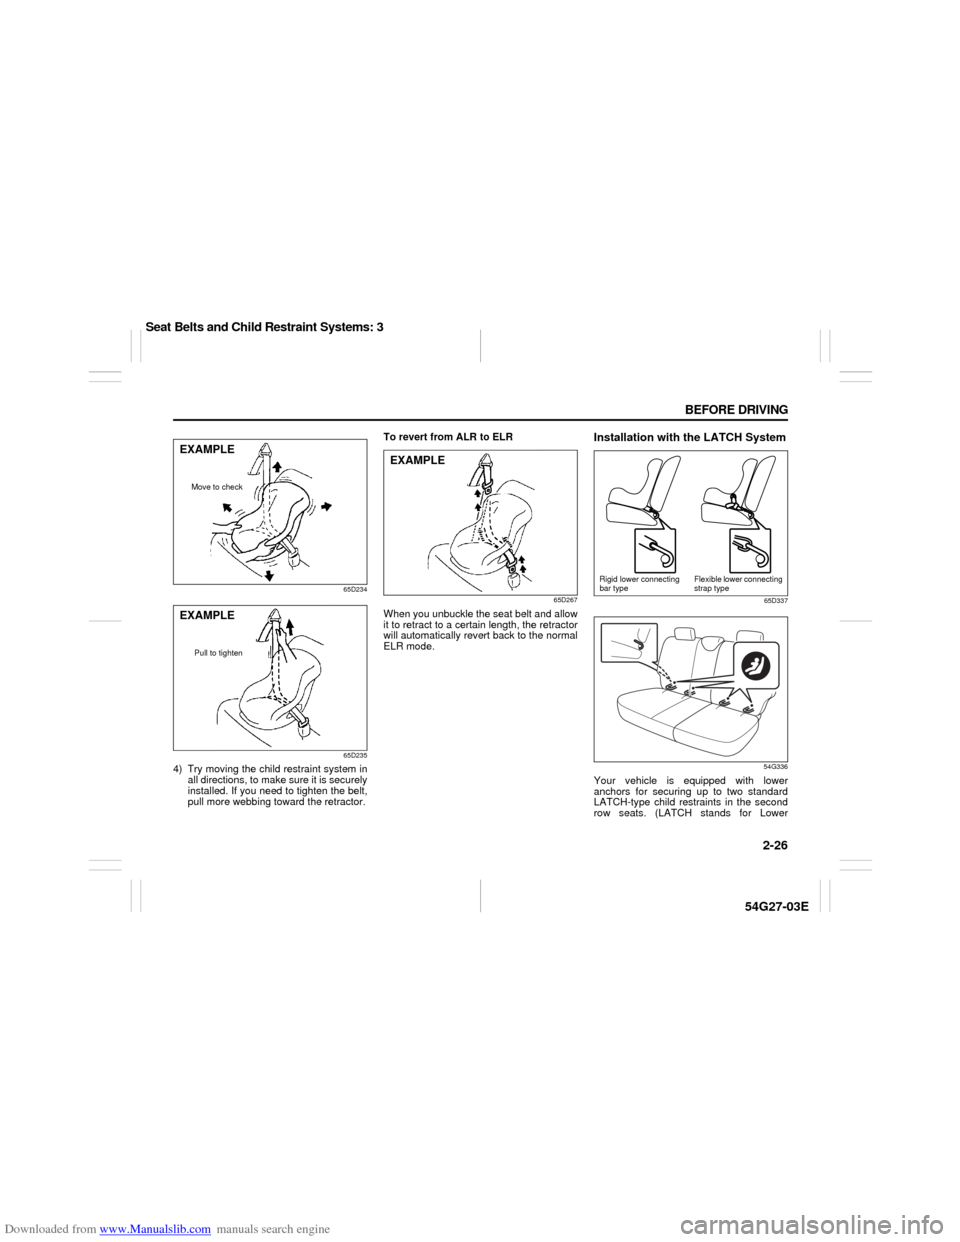
4) Try moving the child restraint system in
all directions, to make sure it is securely
installed. If you need to tighten the belt,
pull more webbing toward the retractor.To revert from ALR to ELR
65D267
When you unbuckle the seat belt and allow
it to retract to a certain length, the retractor
will automatically revert back to the normal
ELR mode.
Installation with the LATCH System
65D337
54G336
Your vehicle is equipped with lower
anchors for securing up to two standard
LATCH-type child restraints in the second
row seats. (LATCH stands for Lower
EXAMPLE
Move to check
EXAMPLE
Pull to tighten
EXAMPLE
Rigid lower connecting
bar typeFlexible lower connecting
strap type
Seat Belts and Child Restraint Systems: 3
Page 56 of 232
Downloaded from www.Manualslib.com manuals search engine 3-1 STEERING COLUMN CONTROLS
54G27-03E
65D611
Ignition Switch
60B041
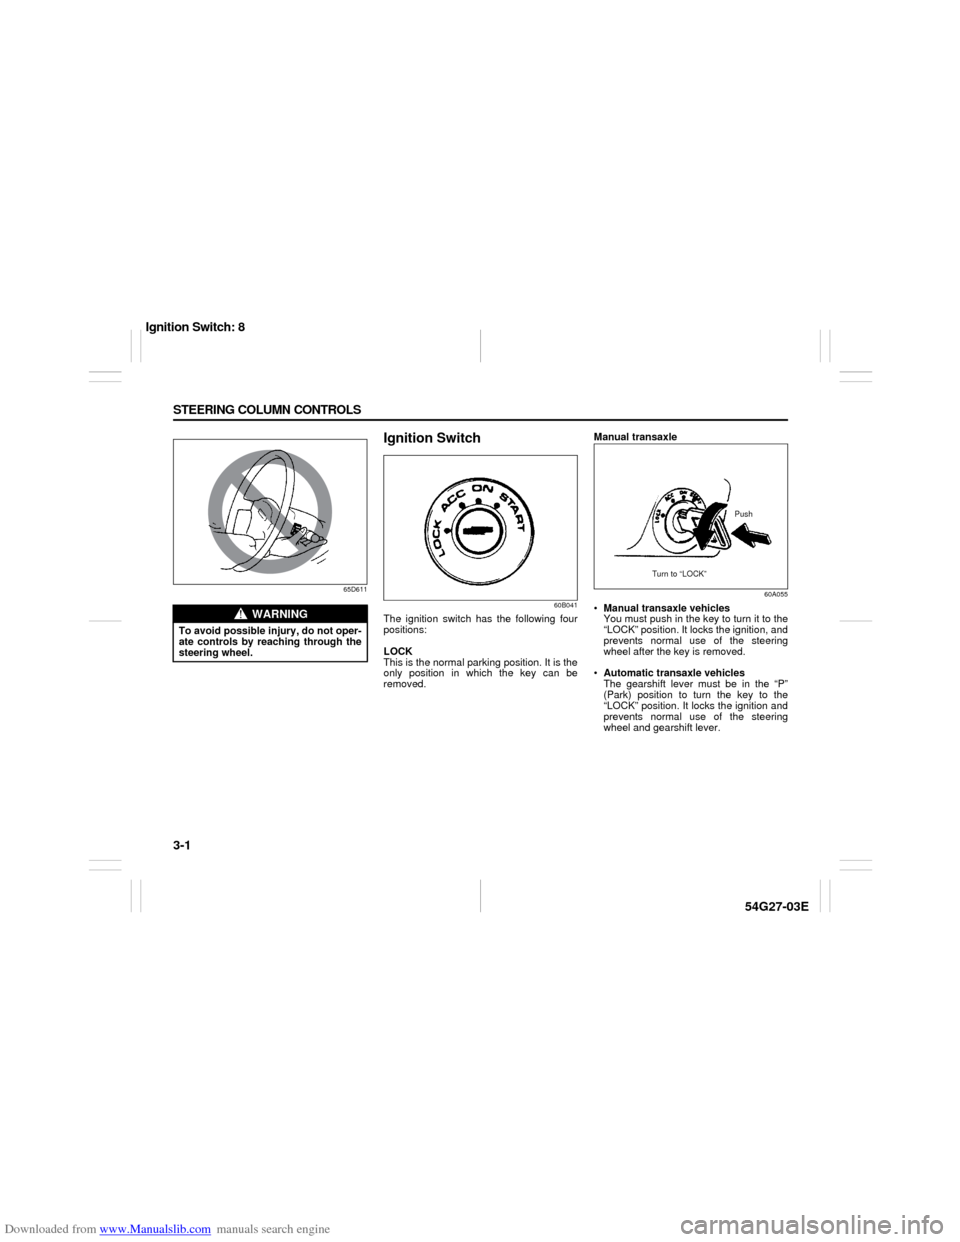
The ignition switch has the following four
positions:
LOCK
This is the normal parking position. It is the
only position in which the key can be
removed.Manual transaxle
60A055
Manual transaxle vehicles
You must push in the key to turn it to the
“LOCK” position. It locks the ignition, and
prevents normal use of the steering
wheel after the key is removed.
Automatic transaxle vehicles
The gearshift lever must be in the “P”
(Park) position to turn the key to the
“LOCK” position. It locks the ignition and
prevents normal use of the steering
wheel and gearshift lever.
WARNING
To avoid possible injury, do not oper-
ate controls by reaching through the
steering wheel.
Push
Turn to “LOCK”
Ignition Switch: 8
Page 57 of 232
Downloaded from www.Manualslib.com manuals search engine 3-2 STEERING COLUMN CONTROLS
54G27-03E
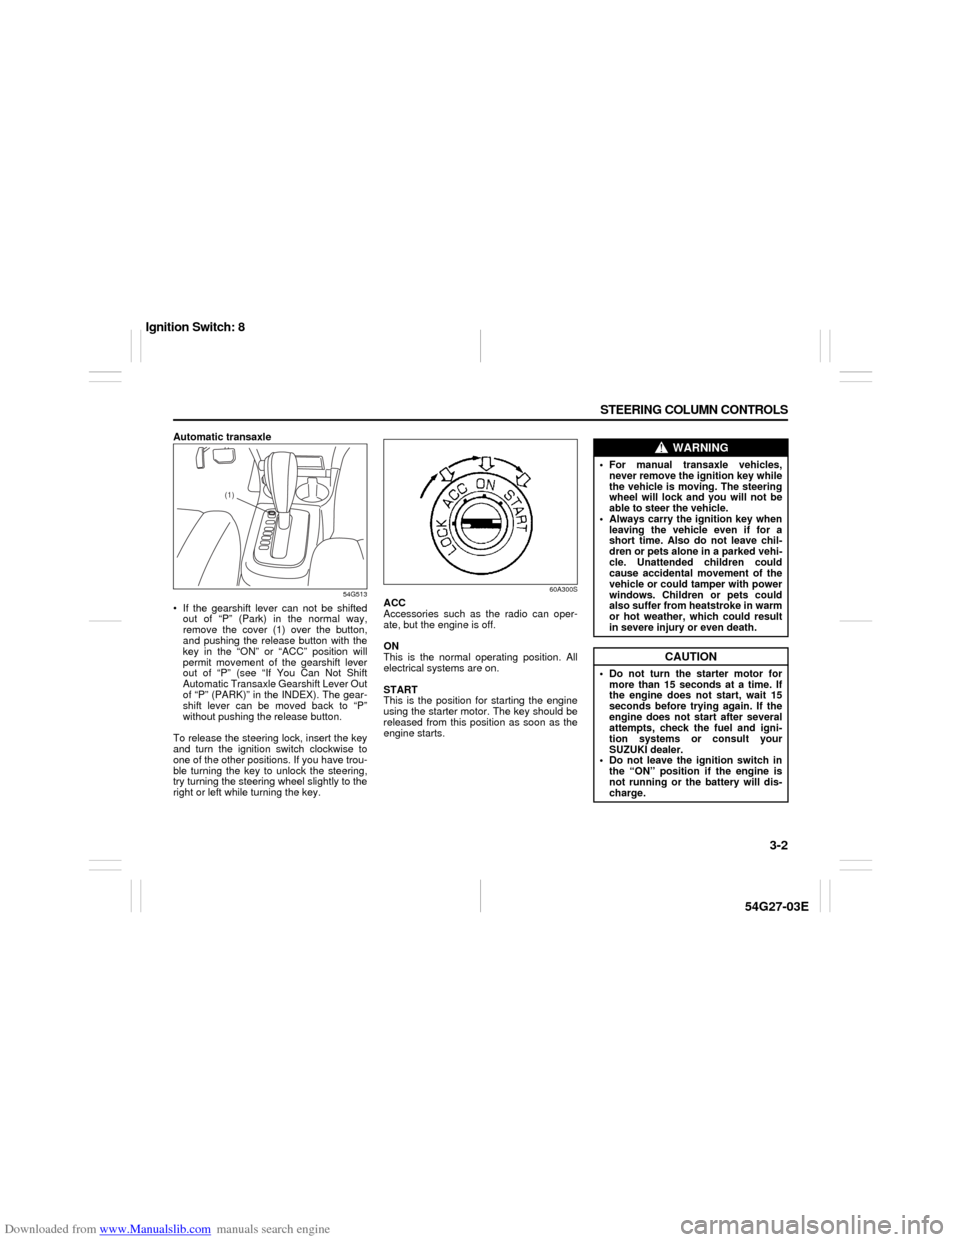
Automatic transaxle
54G513
If the gearshift lever can not be shifted
out of “P” (Park) in the normal way,
remove the cover (1) over the button,
and pushing the release button with the
key in the “ON” or “ACC” position will
permit movement of the gearshift lever
out of “P” (see “If You Can Not Shift
Automatic Transaxle Gearshift Lever Out
of “P” (PARK)” in the INDEX). The gear-
shift lever can be moved back to “P”
without pushing the release button.
To release the steering lock, insert the key
and turn the ignition switch clockwise to
one of the other positions. If you have trou-
ble turning the key to unlock the steering,
try turning the steering wheel slightly to the
right or left while turning the key.
60A300S
ACC
Accessories such as the radio can oper-
ate, but the engine is off.
ON
This is the normal operating position. All
electrical systems are on.
START
This is the position for starting the engine
using the starter motor. The key should be
released from this position as soon as the
engine starts.
(1)
WARNING
For manual transaxle vehicles,
never remove the ignition key while
the vehicle is moving. The steering
wheel will lock and you will not be
able to steer the vehicle.
Always carry the ignition key when
leaving the vehicle even if for a
short time. Also do not leave chil-
dren or pets alone in a parked vehi-
cle. Unattended children could
cause accidental movement of the
vehicle or could tamper with power
windows. Children or pets could
also suffer from heatstroke in warm
or hot weather, which could result
in severe injury or even death.
CAUTION
Do not turn the starter motor for
more than 15 seconds at a time. If
the engine does not start, wait 15
seconds before trying again. If the
engine does not start after several
attempts, check the fuel and igni-
tion systems or consult your
SUZUKI dealer.
Do not leave the ignition switch in
the “ON” position if the engine is
not running or the battery will dis-
charge.
Ignition Switch: 8