display SUZUKI CELERIO 2020 Owners Manual
[x] Cancel search | Manufacturer: SUZUKI, Model Year: 2020, Model line: CELERIO, Model: SUZUKI CELERIO 2020Pages: 201, PDF Size: 5.82 MB
Page 22 of 201
76MH1-74E
BEFORE DRIVINGKeys ...................................................................................... 2-1
Door Locks .......................................................................... 2-2
Keyless Entry System Transmitte r (if equipped) ............. 2-5
Security System (if equipped) ............................................ 2-7
Windows .............................................................................. 2-10
Mirrors .................................................................................. 2-11
Front Seats .......................................................................... 2-13
Rear Seats ............................................................................ 2-13
Seat Belts and Child Restraint Systems ........................... 2-15
Supplemental Restraint System (air bags)
(if equipped) ......................................................................... 2-23
Instrument Cluster .............................................................. 2-28
Speedometer ....................................................................... 2-29
Tachometer (if equipped) ................................................... 2-29
Brightness Control .............................................................. 2-29
Information Display ............................................................. 2-30
Fuel Gauge ........................................................................... 2-31
Warning and Indicator Lights ............................................ 2-37
Lighting Control Lever ........................................................ 2-42
Front Fog Light Switch (if equipped) ................................ 2-43
Headlight Leveling Switch .................................................. 2-43
Turn Signal Control Lever .................................................. 2-44
Hazard Warning Switch ...................................................... 2-45
Windshield Wiper and Washer L ever ................................ 2-45
Tilt Steering Lock Lever (if equipped) ............................... 2-47
Horn ...................................................................................... 2-47
Heated Rear Window Switch (if equipped) ....................... 2-47
11
76MH1-74E
Page 25 of 201
2-3
BEFORE DRIVING
76MH1-74E
76MH1-74E
NOTE: You can switch the function that unlocks alldoors from twice operations to once opera- tion, and vice versa, via the setting modeof the information display. For details onhow to use the information display, refer to“Information Display” in this section.
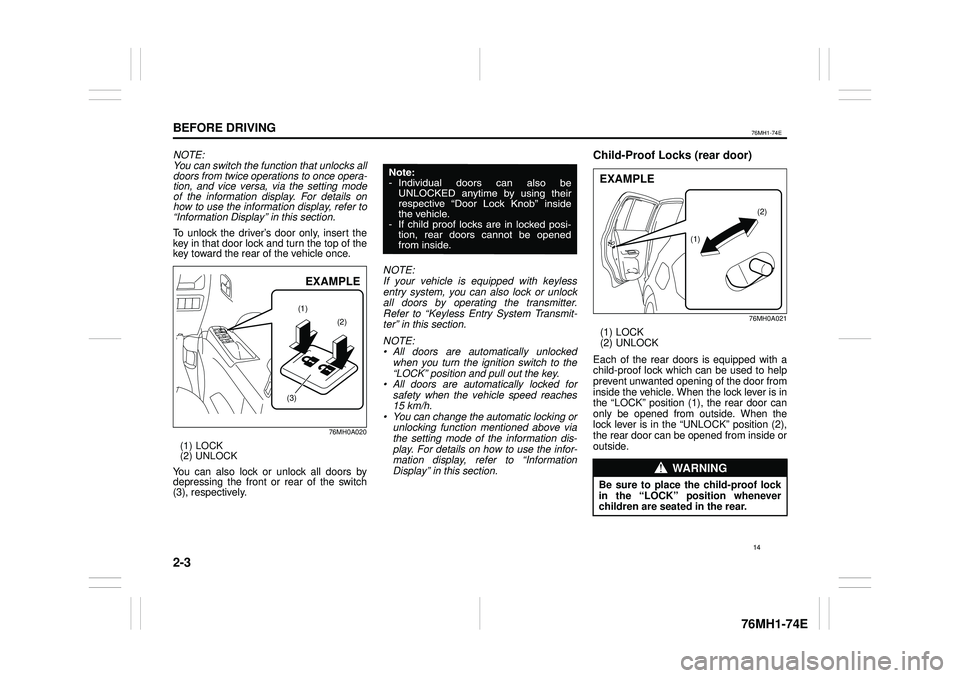
To unlock the driver’s door only, insert the key in that door lock and turn the top of thekey toward the rear of the vehicle once.
76MH0A020
(1) LOCK (2) UNLOCK
You can also lock or unlock all doors by depressing the front or rear of the switch(3), respectively.
NOTE: If your vehicle is equipped with keyless entry system, you can also lock or unlockall doors by operating the transmitter. Refer to “Keyless Entry System Transmit- ter” in this section.
NOTE: • All doors are automatically unlockedwhen you turn the ignition switch to the “LOCK” position and pull out the key.• All doors are automatically locked forsafety when the vehicle speed reaches15 km/h.• You can change the automatic locking orunlocking function mentioned above viathe setting mode of the information dis- play. For details on how to use the infor-mation display, refer to “Information Display” in this section.
Child-Proof Locks (rear door)
76MH0A021
(1) LOCK (2) UNLOCK
Each of the rear doors is equipped with achild-proof lock which can be used to help prevent unwanted opening of the door from inside the vehicle. When the lock lever is inthe “LOCK” position (1), the rear door can only be opened from outside. When the lock lever is in the “UNLOCK” position (2),the rear door can be opened from inside or outside.
(1)
(2)
(3)
EXAMPLE
WA R N I N G
Be sure to place the child-proof lockin the “LOCK” position whenever children are seated in the rear.
(1)
(2)
EXAMPLE
14
Page 27 of 201
2-5
BEFORE DRIVING
76MH1-74E
76MH1-74E
Keyless Entry System
Transmitter (if equipped)
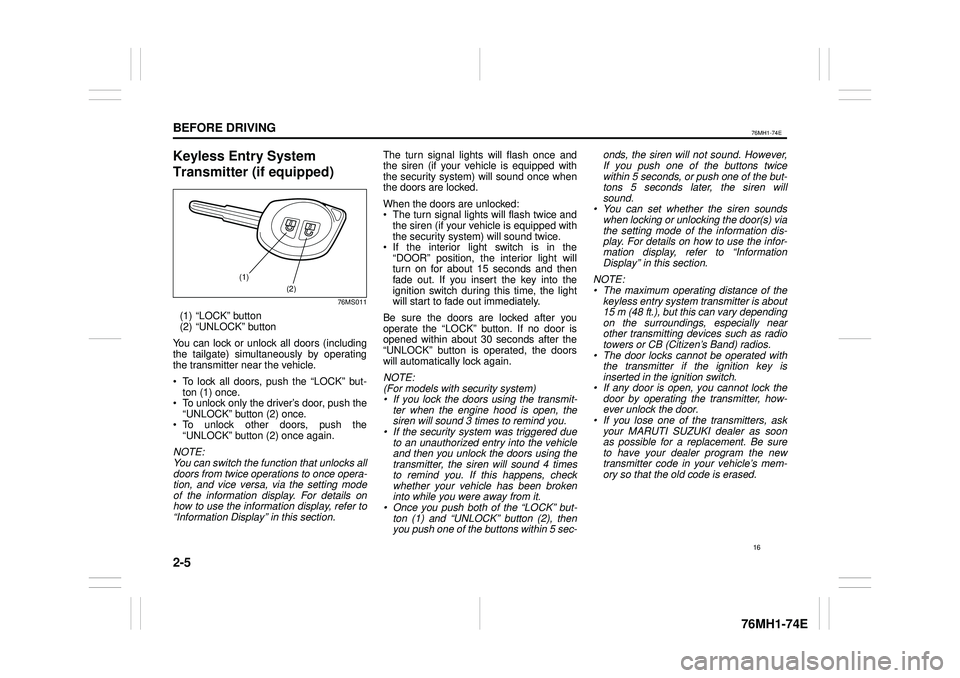
76MS011
(1) “LOCK” button (2) “UNLOCK” button
You can lock or unlock all doors (includingthe tailgate) simultaneously by operating the transmitter near the vehicle.
To lock all doors, push the “LOCK” but-ton (1) once. To unlock only the driver’s door, push the“UNLOCK” button (2) once. To unlock other doors, push the“UNLOCK” button (2) once again.
NOTE: You can switch the function that unlocks alldoors from twice operations to once opera- tion, and vice versa, via the setting modeof the information display. For details onhow to use the information display, refer to“Information Display” in this section.
The turn signal lights will flash once and the siren (if your vehicle is equipped with the security system) will sound once whenthe doors are locked.
When the doors are unlocked: The turn signal lights will flash twice andthe siren (if your vehicle is equipped withthe security system) will sound twice. If the interior light switch is in the“DOOR” position, the interior light willturn on for about 15 seconds and thenfade out. If you insert the key into the ignition switch during this time, the light will start to fade out immediately.
Be sure the doors are locked after youoperate the “LOCK” button. If no door isopened within about 30 seconds after the “UNLOCK” button is operated, the doors will automatically lock again.
NOTE: (For models with security system)• If you lock the doors using the transmit-ter when the engine hood is open, thesiren will sound 3 times to remind you.• If the security system was triggered dueto an unauthorized entry into the vehicleand then you unlock the doors using thetransmitter, the siren will sound 4 times to remind you. If this happens, check whether your vehicle has been brokeninto while you were away from it.• Once you push both of the “LOCK” but-ton (1) and “UNLOCK” button (2), thenyou push one of the buttons within 5 sec-
onds, the siren will not sound. However, If you push one of the buttons twice within 5 seconds, or push one of the but-tons 5 seconds later, the siren willsound.• You can set whether the siren soundswhen locking or unlocking the door(s) via the setting mode of the information dis- play. For details on how to use the infor-mation display, refer to “InformationDisplay” in this section.
NOTE: • The maximum operating distance of thekeyless entry system transmitter is about 15 m (48 ft.), but this can vary depending on the surroundings, especially near other transmitting devices such as radiotowers or CB (Citizen’s Band) radios.• The door locks cannot be operated withthe transmitter if the ignition key isinserted in the ignition switch.• If any door is open, you cannot lock thedoor by operating the transmitter, how-ever unlock the door.• If you lose one of the transmitters, askyour MARUTI SUZUKI dealer as soonas possible for a replacement. Be sure to have your dealer program the new transmitter code in your vehicle’s mem-ory so that the old code is erased.
(1)
(2)
16
Page 29 of 201
2-7
BEFORE DRIVING
76MH1-74E
76MH1-74E
Security System (if equipped)
The security system is armed in about 5 seconds after you lock all doors (includingthe tailgate) by using the keyless entry sys- tem transmitter. Once the system is armed, any attempt toopen a door by using any other means (*) than the keyless entry system transmitter, or open the engine hood, will cause thealarm to be triggered. * These means include the following:–The key – The lock knob on a door – The central door locking switch
Also, in case that you have set the shocksensor to enabled state and set sensitivity of the pre-warning function and full blastwarning function to a level other than 0, the alarm will be triggered if any attempt to tamper with the vehicle. The shock sensorcan be selected enabled or disabled state, and sensitivity of each warning can be adjusted as desired. To set the shock sen-sor, ask your MARUTI SUZUKI dealer or use the setting mode of the information display.
NOTE: • The default setting of the shock sensoris in the disabled state. Set to the enabled state and adjust sensitivity of each warning according to your prefer- ence. For details on how to use the infor-mation display, refer to “Information Display” in this section.• Your dealer may have already set theshock sensor of the vehicle to theenabled state before you purchase it. Consult your dealer for further informa-tion.
NOTE:• The security system generates alarmswhen any of the predetermined condi-tions is met. However, the system doesnot have any function of blocking unau- thorized entry into the vehicle.• Always use the keyless entry systemtransmitter to unlock the doors when thesecurity system has been armed. Using a key instead will trigger the alarm.• If a person who does not know the secu-rity system is going to drive the vehicle,we recommend you explain the systemand its operation to the person, or dis- able the system beforehand. Mistakenly triggering the alarm may cause a nui-sance to others.• Even if the security system is armed,you should still be careful to guardagainst theft. Do not leave money or things of value in the vehicle.
How to arm the security system
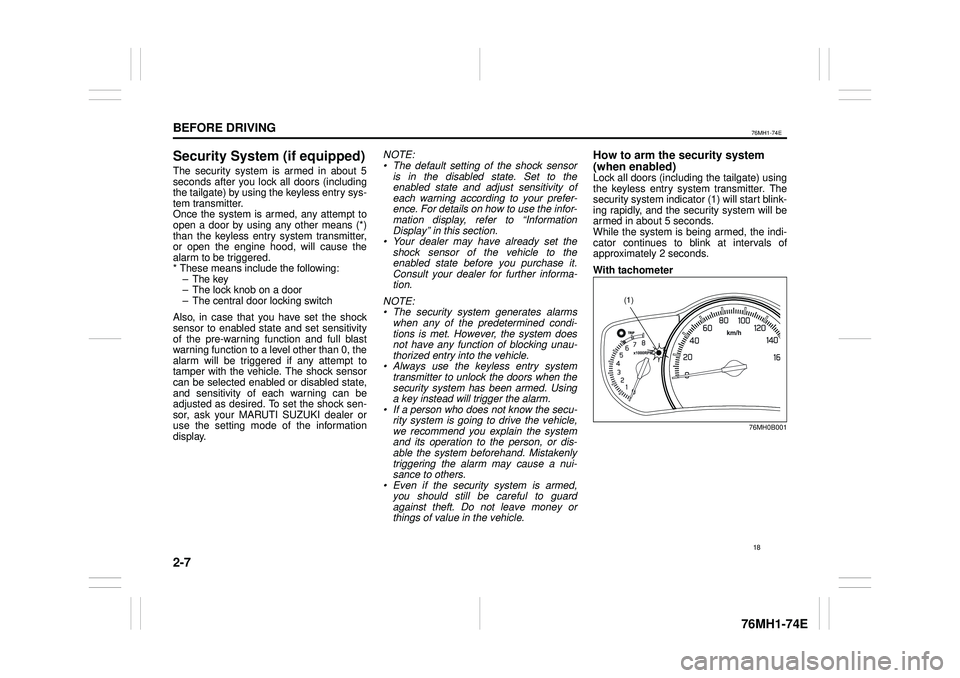
(when enabled)Lock all doors (including the tailgate) using the keyless entry system transmitter. Thesecurity system indicator (1) will start blink- ing rapidly, and the security system will be armed in about 5 seconds.While the system is being armed, the indi- cator continues to blink at intervals of approximately 2 seconds.
With tachometer
76MH0B001
(1)
18
Page 31 of 201
2-9
BEFORE DRIVING
76MH1-74E
76MH1-74E
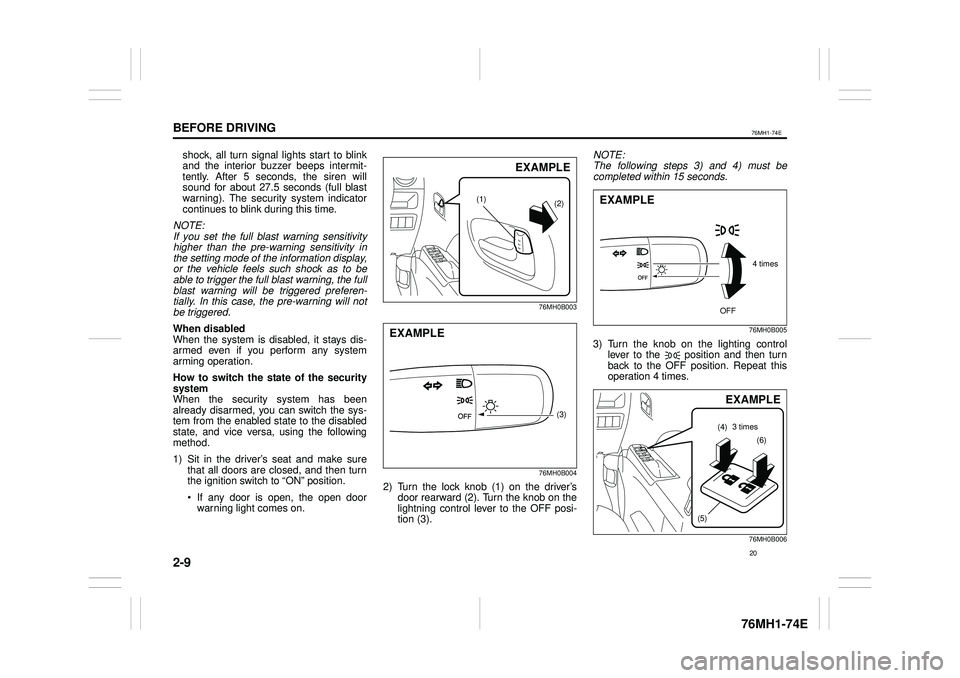
shock, all turn signal lights start to blink and the interior buzzer beeps intermit- tently. After 5 seconds, the siren willsound for about 27.5 seconds (full blast warning). The security system indicator continues to blink during this time.
NOTE:If you set the full blast warning sensitivityhigher than the pre-warning sensitivity inthe setting mode of the information display,or the vehicle feels such shock as to beable to trigger the full blast warning, the full blast warning will be triggered preferen- tially. In this case, the pre-warning will notbe triggered.
When disabled When the system is disabled, it stays dis- armed even if you perform any system arming operation.
How to switch the state of the security systemWhen the security system has beenalready disarmed, you can switch the sys-tem from the enabled state to the disabledstate, and vice versa, using the following method.
1) Sit in the driver
Page 32 of 201
2-10
BEFORE DRIVING
76MH1-74E
76MH1-74E
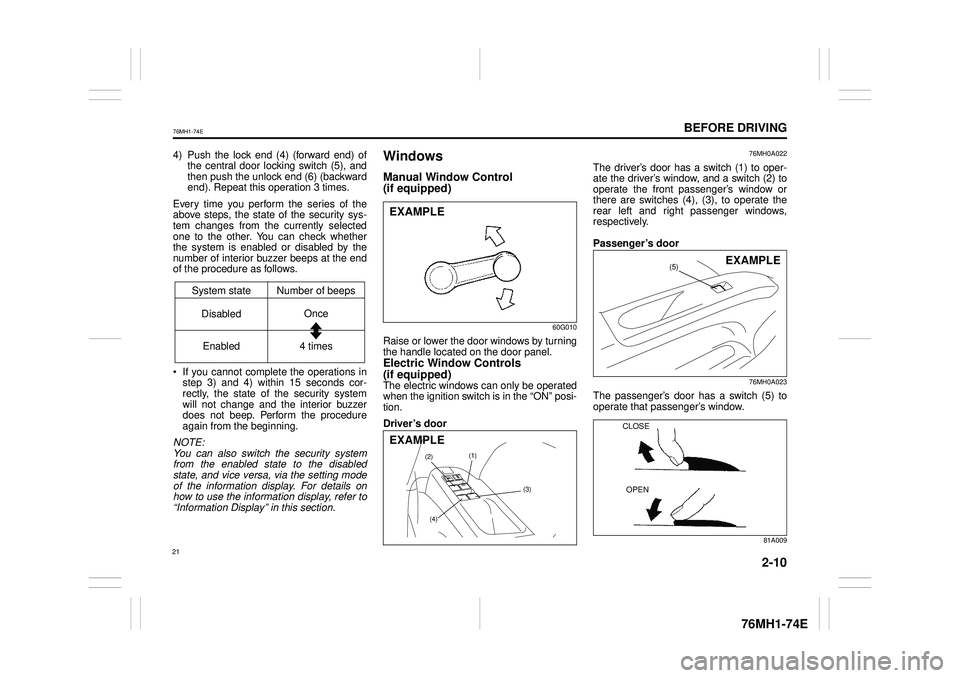
4) Push the lock end (4) (forward end) ofthe central door locking switch (5), and then push the unlock end (6) (backwardend). Repeat this operation 3 times.
Every time you perform the series of theabove steps, the state of the security sys- tem changes from the currently selected one to the other. You can check whetherthe system is enabled or disabled by the number of interior buzzer beeps at the end of the procedure as follows.
If you cannot complete the operations instep 3) and 4) within 15 seconds cor- rectly, the state of the security systemwill not change and the interior buzzer does not beep. Perform the procedure again from the beginning.
NOTE: You can also switch the security systemfrom the enabled state to the disabled state, and vice versa, via the setting mode of the information display. For details onhow to use the information display, refer to“Information Display” in this section.
Windows
Manual Window Control
(if equipped)
60G010
Raise or lower the door windows by turning the handle located on the door panel.
Electric Window Controls
(if equipped)The electric windows can only be operated when the ignition switch is in the “ON” posi- tion.
Driver’s door
76MH0A022
The driver’s door has a switch (1) to oper- ate the driver’s window, and a switch (2) tooperate the front passenger’s window or there are switches (4), (3), to operate the rear left and right passenger windows,respectively.
Passenger’s door
76MH0A023
The passenger’s door has a switch (5) to operate that passenger’s window.
81A009
System state Number of beeps
DisabledOnce
Enabled 4 times
EXAMPLE
(1)(2)
(3)
(4)
EXAMPLE
(5)EXAMPLE
CLOSE
OPEN
21
Page 50 of 201
2-28
BEFORE DRIVING
76MH1-74E
Instrument Cluster
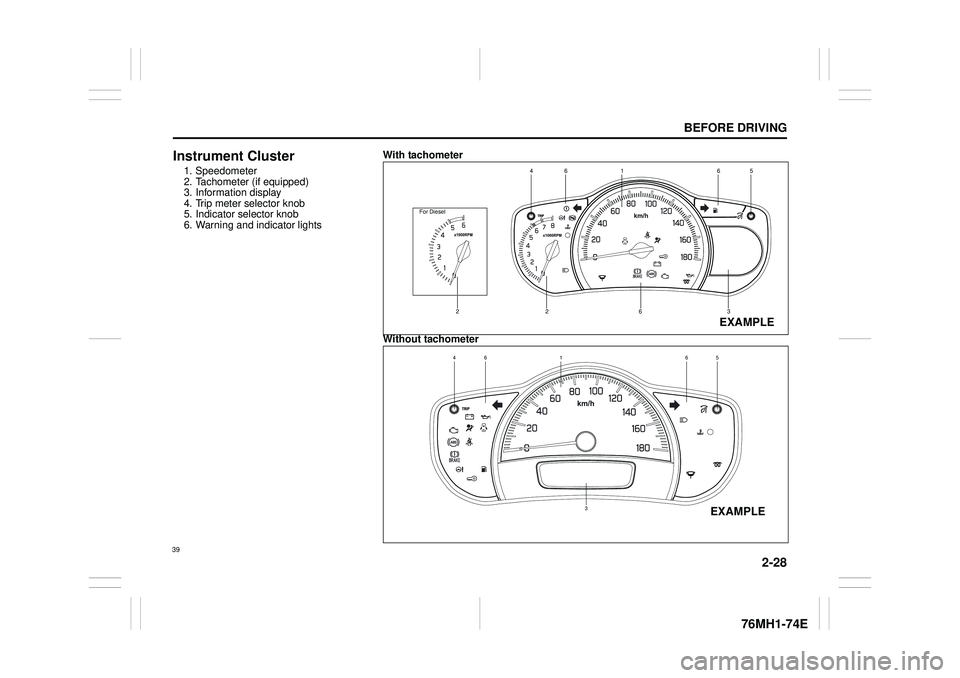
1. Speedometer 2. Tachometer (if equipped)3. Information display 4. Trip meter selector knob 5. Indicator selector knob6. Warning and indicator lights
With tachometer
Without tachometer
EXAMPLE
65641
263
For Diesel
2
65641
3EXAMPLE
39
Page 52 of 201
2-30
BEFORE DRIVING
76MH1-74E
76MH1-74E
To increase the brightness of the instru- ment panel lights, turn the brightness con- trol knob (1) clockwise.To reduce the brightness of the instrument panel lights, turn the brightness control knob (1) counterclockwise.
NOTE: • If you do not turn the brightness controlknob within about 5 seconds of activat-ing the brightness control display, thebrightness control display will be can- celed automatically.• When you reconnect the battery, thebrightness of the instrument panel lightswill be reinitialized. Readjust the bright- ness according to your preference.
Information Display
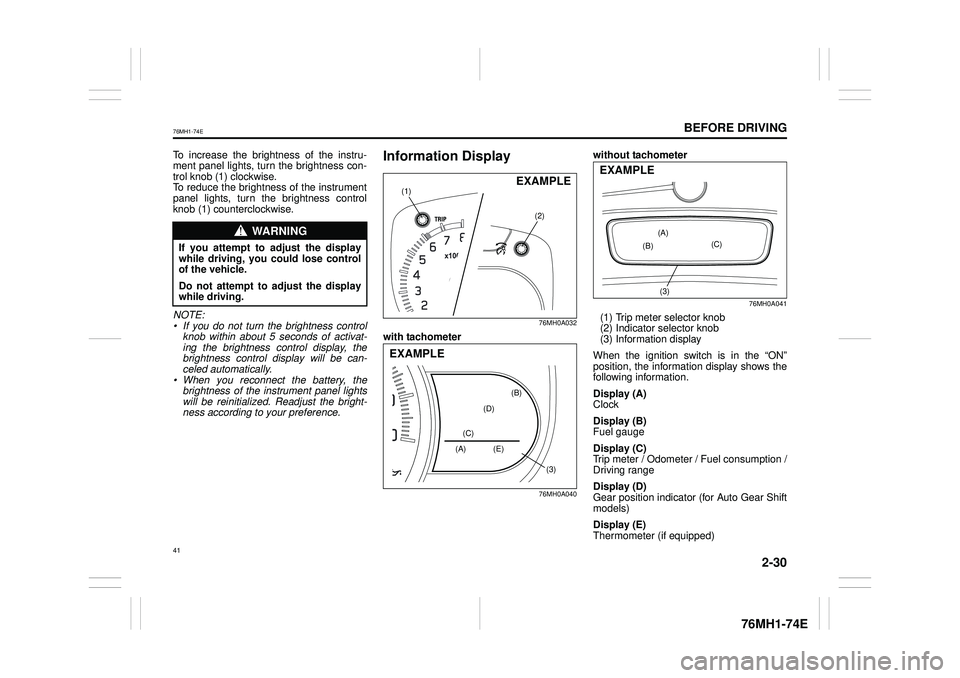
76MH0A032
with tachometer
76MH0A040
without tachometer
76MH0A041
(1) Trip meter selector knob (2) Indicator selector knob (3) Information display
When the ignition switch is in the “ON”position, the information display shows thefollowing information.
Display (A) Clock
Display (B) Fuel gauge
Display (C) Trip meter / Odometer / Fuel consumption / Driving range
Display (D) Gear position indicator (for Auto Gear Shift models)
Display (E) Thermometer (if equipped)
WA R N I N G
If you attempt to adjust the displaywhile driving, you could lose controlof the vehicle.
Do not attempt to adjust the displaywhile driving.
(2)
(1)EXAMPLE
(3)
(A) (E)
(B)
(C)
(D)
EXAMPLE
(3)
(A)
(B)(C)
EXAMPLE
41
Page 53 of 201
2-31
BEFORE DRIVING
76MH1-74E
76MH1-74E
ClockWhen the ignition switch is in the “ON” position, the display (A) shows the time.
To change the time indication: 1) Push the trip meter selector knob (1)and the indicator selector knob (2)together.2) To change the hour indication, turn theindicator selector knob (2) left or rightrepeatedly when the hour indicationblinks. To change the hour indication quickly, turn and hold the indicator selec- tor knob (2). To set the hour indication,push the indicator selector knob (2) and the minute indication will blink.3) To change the minute indication, turn theindicator selector knob (2) left or rightrepeatedly when the minute indication blinks. To change the minute indicationquickly, turn and hold the indicator selec- tor knob (2). To set the minute indication, push the indicator selector knob (2).
NOTE: When you reconnect the negative (–) ter-minal to the battery, the clock indication will be reinitialized. Change the indication again to your preference.
Fuel GaugeWhen the ignition switch is in the “ON”position, the display (B) shows the fuel gauge.
Refer to “Fuel Gauge” in this section.
Trip meter / Odometer / Fuel con-
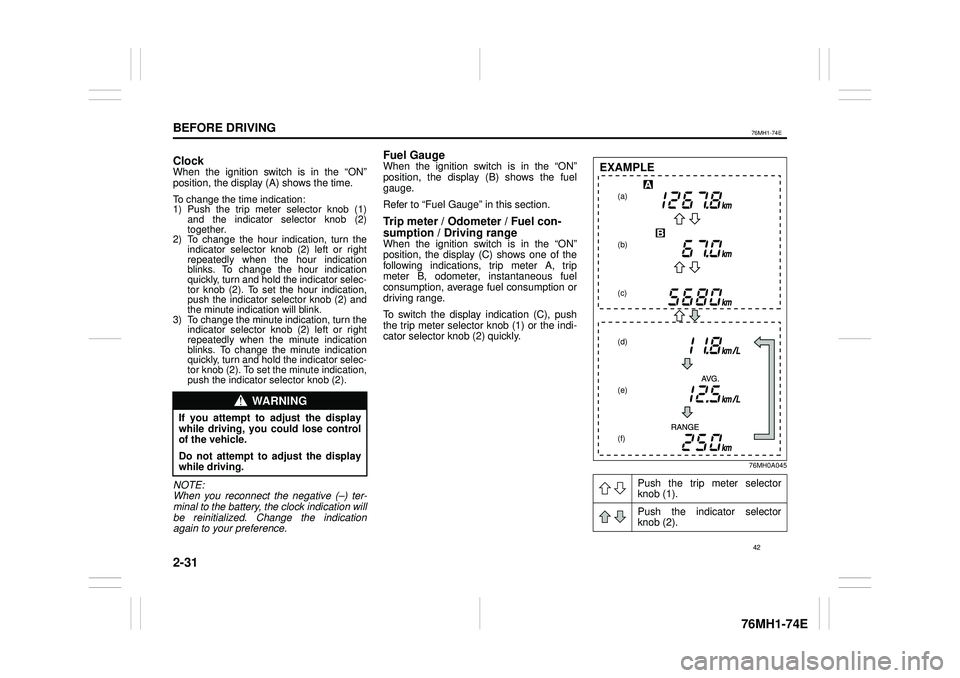
sumption / Driving rangeWhen the ignition switch is in the “ON” position, the display (C) shows one of the following indications, trip meter A, tripmeter B, odometer, instantaneous fuel consumption, average fuel consumption or driving range.
To switch the display indication (C), push the trip meter selector knob (1) or the indi-cator selector knob (2) quickly.
76MH0A045
WA R N I N G
If you attempt to adjust the display while driving, you could lose control of the vehicle.
Do not attempt to adjust the displaywhile driving.
Push the trip meter selector knob (1).
Push the indicator selector knob (2).
(a)
(b)
(c)
(d)
(e)
(f)
EXAMPLE
42
Page 54 of 201
2-32
BEFORE DRIVING
76MH1-74E
76MH1-74E
(a) Trip meter A (b) Trip meter B (c) Odometer(d) Instantaneous fuel consumption (e) Average fuel consumption (f) Driving range
NOTE:• Indications will change when you pushand release a knob.• The display shows estimated values.Indications may not be the same as actual values.Trip meter The trip meter can be used to measure the distance traveled on short trips or between fuel stops.You can use the trip meter A or trip meter B independently.
To reset the trip meter to zero, push and hold the trip meter selector knob (1) for a while when the display shows the tripmeter.
NOTE: The indicated maximum value of the trip meter is 9999.9. When you run past the
maximum value, the indicated value willreturn to 0.0.
Odometer The odometer records the total distance the vehicle has been driven.
Instantaneous Fuel ConsumptionThe display shows the value of instanta- neous fuel consumption only when the vehi- cle is moving.
NOTE:• The display does not show the valueunless the vehicle is moving.• The indicated maximum value of instanta-neous fuel consumption is 30. No more than 30 will be indicated on the displayeven if the actual instantaneous fuel con-sumption is higher.• The indication on the display may bedelayed if fuel consumption is greatly affected by driving conditions.• The display shows estimated values. Indi-cations may not be the same as actual values.• You can change the units that instanta-neous fuel consumption is displayed in.Refer to “Average fuel consumption” in this section.
Average fuel consumptionIf you selected average fuel consumptionthe last time you drove the vehicle, the dis- play shows the last value of average fuelconsumption from previous driving when the ignition switch is turned to the “ON”position. Unless you reset the value of aver- age fuel consumption, the display indicates the value of average fuel consumption which includes average fuel consumptionduring previous driving.
To reset the average fuel consumption to zero, push and hold the indicator selector knob (2) for a while when the display shows the average fuel consumption.
NOTE: When you reset the indication or reconnectthe negative (–) terminal to the battery, the value of average fuel consumption will be shown after driving for a while.
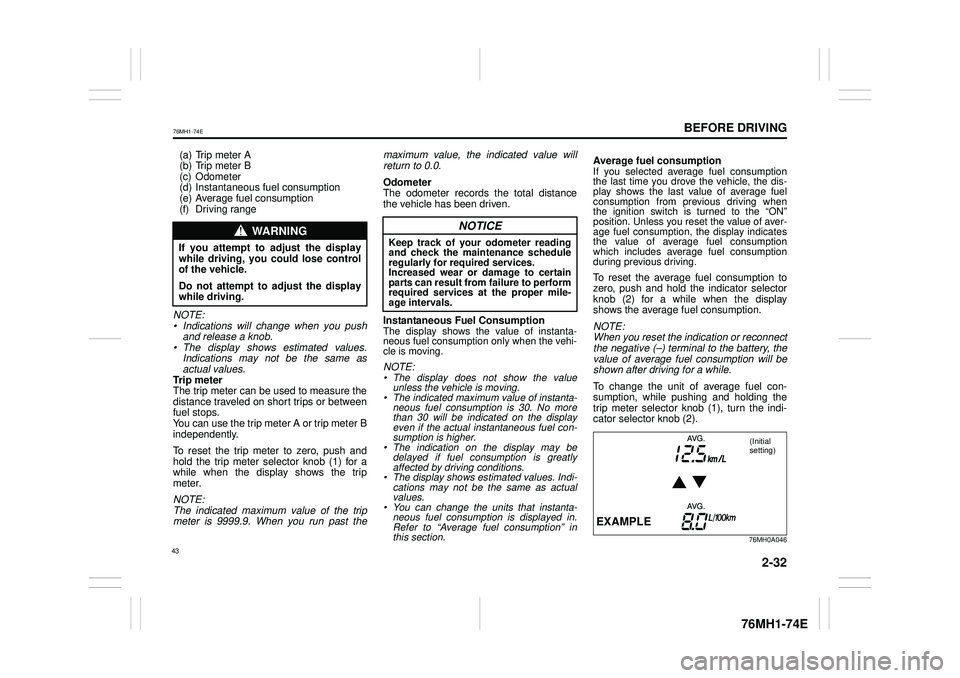
To change the unit of average fuel con- sumption, while pushing and holding thetrip meter selector knob (1), turn the indi- cator selector knob (2).
76MH0A046
WA R N I N G
If you attempt to adjust the display while driving, you could lose controlof the vehicle.
Do not attempt to adjust the displaywhile driving.
NOTICE
Keep track of your odometer reading and check the maintenance scheduleregularly for required services. Increased wear or damage to certain parts can result from failure to performrequired services at the proper mile-age intervals.
EXAMPLE
(Initial setting)
43