display SUZUKI CELERIO 2020 Owner's Manual
[x] Cancel search | Manufacturer: SUZUKI, Model Year: 2020, Model line: CELERIO, Model: SUZUKI CELERIO 2020Pages: 201, PDF Size: 5.82 MB
Page 116 of 201
5-20
OTHER CONTROLS AND EQUIPMENT
76MH1-74E
76MH1-74E
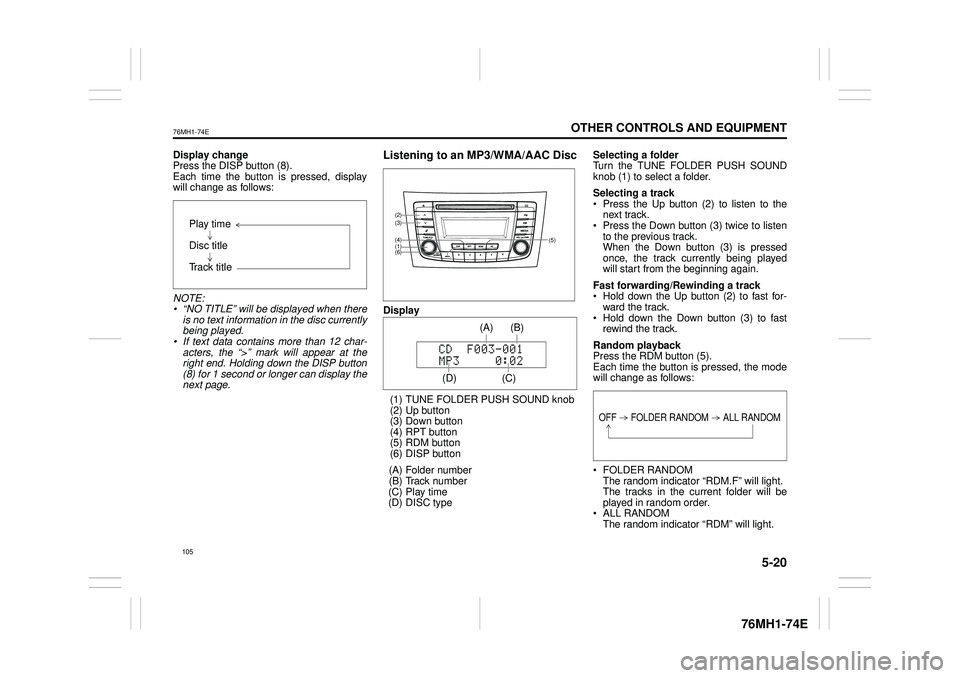
Display change Press the DISP button (8). Each time the button is pressed, displaywill change as follows:
NOTE: • “NO TITLE” will be displayed when there is no text information in the disc currently being played. • If text data contains more than 12 char- acters, the “>” mark will appear at theright end. Holding down the DISP button (8) for 1 second or longer can display the next page.
Listening to an MP3/WMA/AAC Disc
Display
(1) TUNE FOLDER PUSH SOUND knob (2) Up button (3) Down button (4) RPT button(5) RDM button (6) DISP button
(A) Folder number (B) Track number (C) Play time(D) DISC type
Selecting a folder Turn the TUNE FOLDER PUSH SOUND knob (1) to select a folder.
Selecting a track Press the Up button (2) to listen to thenext track. Press the Down button (3) twice to listen to the previous track.When the Down button (3) is pressed once, the track currently being played will start from the beginning again.
Fast forwarding/Rewinding a track Hold down the Up button (2) to fast for-ward the track. Hold down the Down button (3) to fast rewind the track.
Random playback Press the RDM button (5).Each time the button is pressed, the mode will change as follows:
FOLDER RANDOM The random indicator “RDM.F” will light. The tracks in the current folder will beplayed in random order. ALL RANDOM The random indicator “RDM” will light.
Play time
Disc title
Track title
(5)
(6)
(4)
(3)
(1)
(2)
(C)
(B) (A)
(D)
105
Page 117 of 201
5-21
OTHER CONTROLS AND EQUIPMENT
76MH1-74E
76MH1-74E
The tracks in the loaded disc will be played in random order.
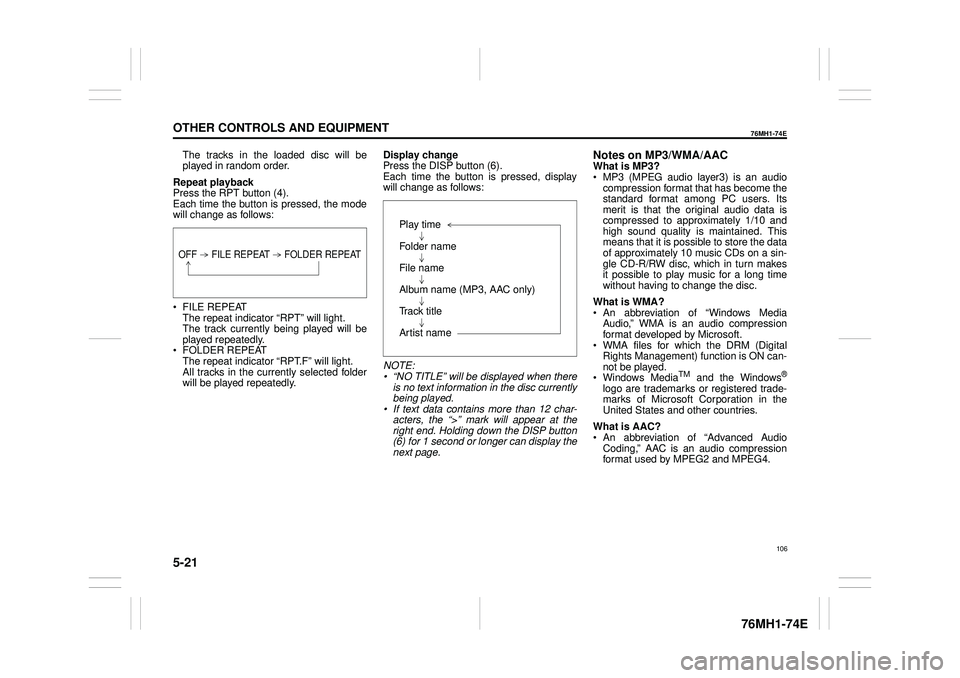
Repeat playback Press the RPT button (4). Each time the button is pressed, the modewill change as follows:
FILE REPEAT The repeat indicator “RPT” will light.The track currently being played will be played repeatedly. FOLDER REPEAT The repeat indicator “RPT.F” will light. All tracks in the currently selected folderwill be played repeatedly.
Display change Press the DISP button (6). Each time the button is pressed, displaywill change as follows:
NOTE: • “NO TITLE” will be displayed when there is no text information in the disc currently being played.• If text data contains more than 12 char- acters, the “>” mark will appear at the right end. Holding down the DISP button(6) for 1 second or longer can display the next page.
Notes on MP3/WMA/AACWhat is MP3? MP3 (MPEG audio layer3) is an audio compression format that has become the standard format among PC users. Itsmerit is that the original audio data is compressed to approximately 1/10 and high sound quality is maintained. Thismeans that it is possible to store the data of approximately 10 music CDs on a sin- gle CD-R/RW disc, which in turn makesit possible to play music for a long time without having to change the disc.
What is WMA? An abbreviation of “Windows Media Audio,” WMA is an audio compressionformat developed by Microsoft. WMA files for which the DRM (Digital Rights Management) function is ON can-not be played. Windows MediaTM and the Windows®
logo are trademarks or registered trade- marks of Microsoft Corporation in the United States and other countries.
What is AAC? An abbreviation of “Advanced Audio Coding,” AAC is an audio compressionformat used by MPEG2 and MPEG4.
OFF FILE REPEAT FOLDER REPEAT
Play time
Folder name
File name
Album name (MP3, AAC only)
Track title
Artist name
106
Page 118 of 201
5-22
OTHER CONTROLS AND EQUIPMENT
76MH1-74E
76MH1-74E
Points to remember when making MP3/ WMA/AAC files Common High bit rate and high sampling fre- quency are recommended for high qual- ity sounds. Selecting VBR (Variable Bit Rate) is not recommended. Selecting VBR may cause display of in correct playing time and jumpiness of playback. Playback sound quality varies depending on the encoding environment. Fordetails, refer to the user manual of the encoding software and the writing soft- ware in use.
Recording MP3/WMA/ AAC files on a CD media It is recommended not to write both CD- DA files and MP3/WMA/AAC files on adisc. If both CD-DA files and MP3/WMA/AAC files are on the same disc, tracks maynot be played in the correct order or some tracks may not be played at all.
When storing both MP3 data and WMA data on the same disc, sort and place them in different folders. Do not write files other than MP3/WMA/ AAC files and unnecessary folders on a disc. MP3/WMA/AAC files should be named to meet the standards and the file sys- tem specifications as shown below. The file extension “.mp3”, “.wma” or “.m4a” should be assigned to files based on their format independently. You may encounter a trouble in playing MP3/WMA/AAC files or displaying infor- mation of MP3/WMA/AAC files depend-ing on the writing software or CD recorder in use. This unit does not have a play list func-tion. It is recommended to write discs in Disc- at-Once mode even though Multi-ses-sion mode is supported.
Compression formats MP3 Bit rate: MPEG1 Audio Layer III: 32 k - 320 kbpsMPEG2 Audio Layer III: 8 k - 160 kbps MPEG2.5 Audio Layer III: 8 k - 160 kbps Sampling frequency: MPEG1 Audio Layer III: 32 k/44.1 k/ 48 kHz MPEG2 Audio Layer III: 16 k/22.05 k/24 kHz MPEG2.5 Audio Layer III: 8 k/11.025 k/ 12 kHz
WMA (Ver. 7, Ver. 8, Ver. 9*) Bit rate: CBR 32 k - 320 kbps Sampling frequency: 32 k/44.1 k/48 kHz* WMA 9 Professional/LossLess/Voice are not supported.
AAC* Bit rate: ABR 16k - 320 kbbs Sampling frequency: 32 k/44.1 k/48 kHz* Apple Lossless is not supported.
Supported file systems ISO 9660 Level 1/Level 2, Joliet, Romeo
Maximum number of files/folders Maximum number of files: 512 Maximum number of files in a folder: 255 Maximum depth of tree structure: 8 Maximum number of folders: 255 (Root folder is included.)
NOTICE
Never assign the “.mp3”, “.wma”, or “.m4a” file name extension to a file ifit is not in th e MP3/WMA/AAC format file. Failure to observe this may result in damage to the speaker due tonoise production.
107
Page 119 of 201
5-23
OTHER CONTROLS AND EQUIPMENT
76MH1-74E
76MH1-74E
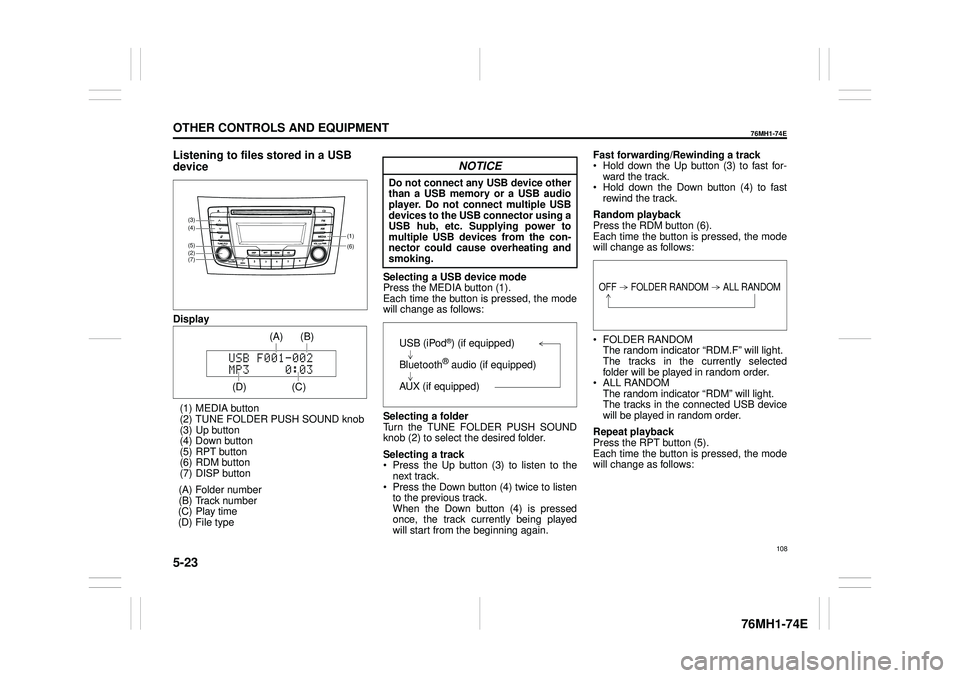
Listening to files stored in a USB
device
Display
(1) MEDIA button (2) TUNE FOLDER PUSH SOUND knob (3) Up button (4) Down button(5) RPT button (6) RDM button (7) DISP button
(A) Folder number (B) Track number(C) Play time (D) File type
Selecting a USB device mode Press the MEDIA button (1).Each time the button is pressed, the mode will change as follows:
Selecting a folder Turn the TUNE FOLDER PUSH SOUNDknob (2) to select the desired folder.
Selecting a track Press the Up button (3) to listen to the next track. Press the Down button (4) twice to listento the previous track. When the Down button (4) is pressed once, the track currently being playedwill start from the beginning again.
Fast forwarding/Rewinding a track Hold down the Up button (3) to fast for- ward the track. Hold down the Down button (4) to fast rewind the track.
Random playback Press the RDM button (6). Each time the button is pressed, the modewill change as follows:
FOLDER RANDOM The random indicator “RDM.F” will light. The tracks in the currently selected folder will be played in random order. ALL RANDOM The random indicator “RDM” will light. The tracks in the connected USB devicewill be played in random order.
Repeat playback Press the RPT button (5). Each time the button is pressed, the mode will change as follows:
(6)
(7)
(5)
(4)
(2)
(3)
(1)
(C)
(B) (A)
(D)
USB (iPod®) (if equipped)
Bluetooth® audio (if equipped)
AUX (if equipped)
OFF FOLDER RANDOM ALL RANDOM
108
Page 120 of 201
5-24
OTHER CONTROLS AND EQUIPMENT
76MH1-74E
76MH1-74E
FILE REPEAT The repeat indicator “RPT” will light. The track currently being played will beplayed repeatedly. FOLDER REPEAT The repeat indicator “RPT.F” will light.All the tracks in the folder currently selected will be played repeatedly.
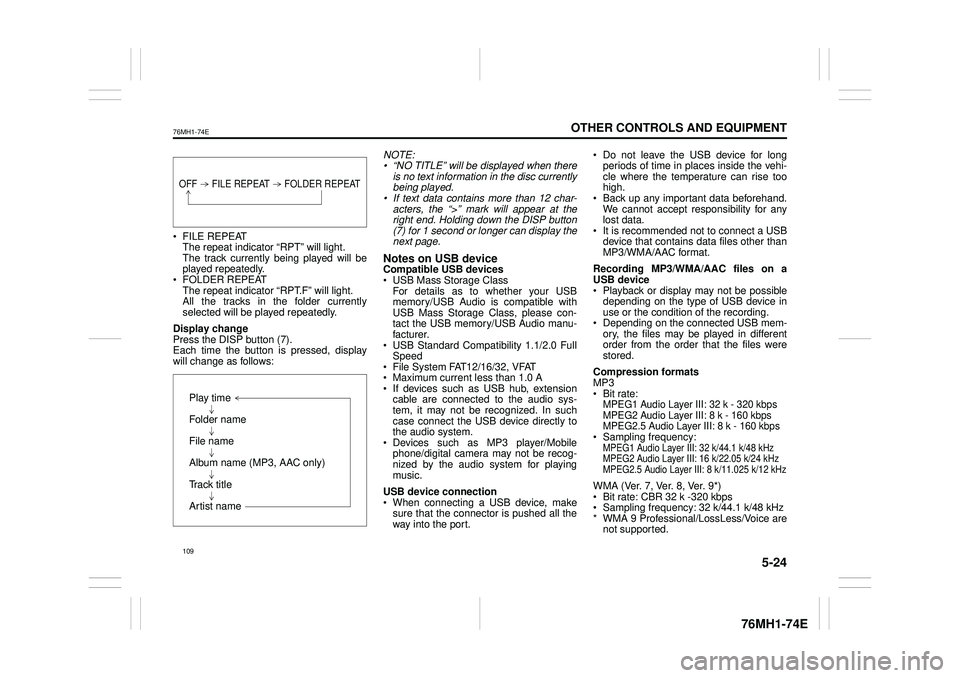
Display change Press the DISP button (7). Each time the button is pressed, display will change as follows:
NOTE: • “NO TITLE” will be displayed when there is no text information in the disc currentlybeing played. • If text data contains more than 12 char- acters, the “>” mark will appear at theright end. Holding down the DISP button (7) for 1 second or longer can display the next page.
Notes on USB deviceCompatible USB devices USB Mass Storage Class For details as to whether your USBmemory/USB Audio is compatible with USB Mass Storage Class, please con- tact the USB memory/USB Audio manu-facturer. USB Standard Compatibility 1.1/2.0 Full Speed File System FAT12/16/32, VFAT Maximum current less than 1.0 A If devices such as USB hub, extensioncable are connected to the audio sys- tem, it may not be recognized. In such case connect the USB device directly tothe audio system. Devices such as MP3 player/Mobile phone/digital camera may not be recog-nized by the audio system for playing music.
USB device connection When connecting a USB device, make sure that the connector is pushed all theway into the port.
Do not leave the USB device for long periods of time in places inside the vehi- cle where the temperature can rise toohigh. Back up any important data beforehand. We cannot accept responsibility for anylost data. It is recommended not to connect a USB device that contains data files other thanMP3/WMA/AAC format.
Recording MP3/WMA/AAC files on a USB device Playback or display may not be possible depending on the type of USB device inuse or the condition of the recording. Depending on the connected USB mem- ory, the files may be played in differentorder from the order that the files were stored.
Compression formats MP3 Bit rate:MPEG1 Audio Layer III: 32 k - 320 kbps MPEG2 Audio Layer III: 8 k - 160 kbps MPEG2.5 Audio Layer III: 8 k - 160 kbps Sampling frequency:MPEG1 Audio Layer III: 32 k/44.1 k/48 kHzMPEG2 Audio Layer III: 16 k/22.05 k/24 kHzMPEG2.5 Audio Layer III: 8 k/11.025 k/12 kHz
WMA (Ver. 7, Ver. 8, Ver. 9*) Bit rate: CBR 32 k -320 kbps Sampling frequency: 32 k/44.1 k/48 kHz * WMA 9 Professional/LossLess/Voice arenot supported.
OFF FILE REPEAT FOLDER REPEAT
Play time
Folder name
File name
Album name (MP3, AAC only)
Track title
Artist name
109
Page 121 of 201
5-25
OTHER CONTROLS AND EQUIPMENT
76MH1-74E
76MH1-74E
AAC* Bit rate: ABR 16k - 320 kbbs Sampling frequency: 32 k/44.1 k/48 kHz* Apple Lossless is not supported.
Maximum number of files/folders Maximum number of files: 2500 Maximum number of files in a folder: 255 Maximum depth of tree structure: 8 Maximum number of folders: 255 (Root folder is included.)
Listening to an iPod®
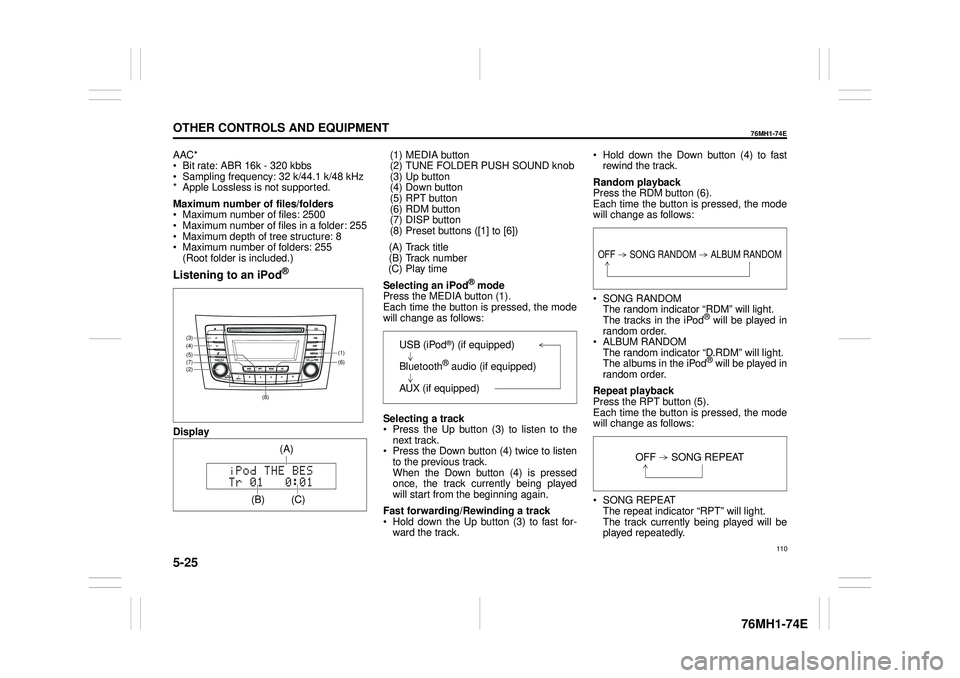
Display
(1) MEDIA button (2) TUNE FOLDER PUSH SOUND knob (3) Up button(4) Down button (5) RPT button (6) RDM button(7) DISP button (8) Preset buttons ([1] to [6])
(A) Track title (B) Track number (C) Play time
Selecting an iPod® mode Press the MEDIA button (1).Each time the button is pressed, the mode will change as follows:
Selecting a track Press the Up button (3) to listen to the next track. Press the Down button (4) twice to listento the previous track. When the Down button (4) is pressed once, the track currently being playedwill start from the beginning again.
Fast forwarding/Rewinding a track Hold down the Up button (3) to fast for- ward the track.
Hold down the Down button (4) to fast rewind the track.
Random playback Press the RDM button (6). Each time the button is pressed, the modewill change as follows:
SONG RANDOM The random indicator “RDM” will light.The tracks in the iPod® will be played in random order. ALBUM RANDOM The random indicator “D.RDM” will light. The albums in the iPod® will be played inrandom order.
Repeat playback Press the RPT button (5). Each time the button is pressed, the mode will change as follows:
SONG REPEAT The repeat indicator “RPT” will light. The track currently being played will beplayed repeatedly.
(6) (7)
(4)
(2)
(3)
(5)(1)
(8)
(C)
(A)
OFF SONG RANDOM ALBUM RANDOM
OFF SONG REPEAT
110
Page 122 of 201
5-26
OTHER CONTROLS AND EQUIPMENT
76MH1-74E
76MH1-74E
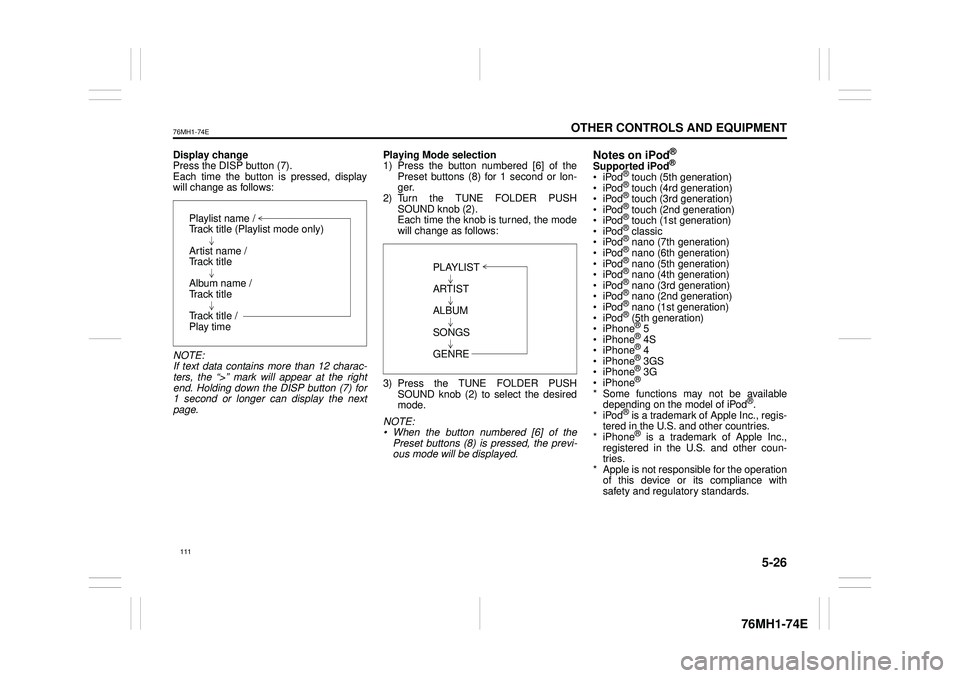
Display change Press the DISP button (7). Each time the button is pressed, displaywill change as follows:
NOTE: If text data contains more than 12 charac- ters, the “>” mark will appear at the right end. Holding down the DISP button (7) for1 second or longer can display the next page.
Playing Mode selection 1) Press the button numbered [6] of the Preset buttons (8) for 1 second or lon-ger. 2) Turn the TUNE FOLDER PUSH SOUND knob (2).Each time the knob is turned, the mode will change as follows:
3) Press the TUNE FOLDER PUSH SOUND knob (2) to select the desired mode.
NOTE: • When the button numbered [6] of thePreset buttons (8) is pressed, the previ- ous mode will be displayed.
Notes on iPod®
Supported iPod®
® touch (5th generation)® touch (4rd generation) ® touch (3rd generation)® touch (2nd generation) ® touch (1st generation) ® classic® nano (7th generation) ® nano (6th generation) ® nano (5th generation)® nano (4th generation) ® nano (3rd generation) ® nano (2nd generation)® nano (1st generation) ® (5th generation) iPhone® 5 iPhone® 4S iPhone® 4 iPhone® 3GS iPhone® 3G iPhone®
* Some functions may not be available depending on the model of iPod®. *iPod® is a trademark of Apple Inc., regis- tered in the U.S. and other countries.* iPhone® is a trademark of Apple Inc., registered in the U.S. and other coun- tries.* Apple is not responsible for the operation of this device or its compliance with safety and regulatory standards.
Playlist name /Track title (Playlist mode only)
Artist name / Track title
Album name / Track title
Track title / Play time
PLAYLIST
ARTIST
ALBUM
SONGS
GENRE
111
Page 125 of 201
5-29
OTHER CONTROLS AND EQUIPMENT
76MH1-74E
76MH1-74E
4) Turn the TUNE FOLDER PUSH SOUND knob (1) to select “Call Vol- ume” or “Ringtone Volume”, and pressthe knob (1) to determine the selection. The current call or ringtone volume will be displayed.5) Turn the TUNE FOLDER PUSH SOUND knob (1) to select desired call or ringtone volume, and press the knob(1) to determine the selection.
NOTE: When selecting “Go Back”, the previous menu will be displayed.
Selecting the Ringtone Follow the instructions below to select a ringtone.1) Press the Bluetooth® setup button (4). The Bluetooth® setup menu will be dis- played.2) Turn the TUNE FOLDER PUSH SOUND knob (1) to select “Setup Tele- phone”, and press the knob (1) to deter-mine the selection. 3) Turn the TUNE FOLDER PUSH SOUND knob (1) to select “Sound Set-ting”, and press the knob (1) to deter- mine the selection. 4) Turn the TUNE FOLDER PUSHSOUND knob (1) to select “Ringtone”, and press the knob (1) to determine the selection.The current ringtone will be sounded. 5) Turn the TUNE FOLDER PUSH SOUND knob (1) to select desired ring-
tone, and press the knob (1) to deter- mine the selection.
NOTE: When selecting “Go Back”, the previous menu will be displayed.
Dialing using Missed/Incoming/ Outgoing CallsFollow the instructions below to dial to the last dialed number again.
NOTE: Up to 10 phone numbers of the latest calls can be stored. (10 each for dialed,received and missed call)
1) Press the Off Hook button (5). The Bluetooth® phonebook menu will be displayed. 2) Turn the TUNE FOLDER PUSHSOUND knob (1) to select “Missed Calls”, “Incoming Calls” or “Outgoing Calls”, and press the knob (1) to deter-mine the selection. To dial from the dialed history or the received history, select “Missed Calls”,“Incoming Calls” or “Outgoing Calls” respectively. 3) Turn the TUNE FOLDER PUSHSOUND knob (1) to select the desired number, and press the knob (1) to determine the selection.4) Turn the TUNE FOLDER PUSH SOUND knob (1) to select “Dial”, and press the knob (1) or the Off Hook but-ton (5) to dial to the selected number.
NOTE: • When selecting “Go Back”, the previous menu will be displayed.• Pressing “Confirm” after selecting “Add Speed Dial” can register the selected number in the speed dial.• Pressing “Confirm” after selecting “Delete” can delete the selected number from the call history.
Deletion of call historyFollow the instructions below to delete a missed/incoming/outgoing call history. 1) Press the Off Hook button (5). The Bluetooth® phonebook menu will be displayed. 2) Turn the TUNE FOLDER PUSH SOUND knob (1) to select
Page 126 of 201
5-30
OTHER CONTROLS AND EQUIPMENT
76MH1-74E
76MH1-74E
7) Turn the TUNE FOLDER PUSH SOUND knob (1) to select “Confirm”, and press the knob (1) to complete thedeletion.
NOTE: When selecting “Go Back”, the previous menu will be displayed.
Registration in Phonebook Registration of numbers in the phonebook. Follow the instructions below to registerphone numbers in the Phonebook of the unit. 1) Press the Bluetooth® setup button (4). The Bluetooth® setup menu will be dis- played. 2) Turn the TUNE FOLDER PUSHSOUND knob (1) to select “Setup Tele- phone”, and press the knob (1) to deter- mine the selection.3) Turn the TUNE FOLDER PUSH SOUND knob (1) to select “Setup Phonebook”, and press the knob (1) todetermine the selection. 4) Turn the TUNE FOLDER PUSH SOUND knob (1) to select “Add Con-tacts”, and press the knob (1) to deter- mine the selection. 5) Turn the TUNE FOLDER PUSHSOUND knob (1) to select “Overwrite All” or “Add One Contact”, and press the knob (1) to deter mine the selection. The “Rest of Memory XXXX: Ok?” will be displayed. 6) Press or turn the TUNE FOLDERPUSH SOUND knob (1) to select “Con-
firm”, and press the knob (1) to deter- mine the selection. 7) Transfer contacts from the phone.When the registration is completed, the “Setup Phonebook” will be displayed.
NOTE: • When selecting “Go Back” the previous menu will be displayed.• Up to 1000 numbers can be registered in Phonebook.
Transfer of call hi story (Call History) Follow the instructions below to transfer call history of the registered phone.1) Press the Bluetooth® setup button (4). The Bluetooth® setup menu will be dis- played.2) Turn the TUNE FOLDER PUSH SOUND knob (1) to select “Setup Tele- phone”, and press the knob (1) to deter-mine the selection. 3) Turn the TUNE FOLDER PUSH SOUND knob (1) to select “Call His-tory”, and press the knob (1) to deter- mine the selection. 4) Turn the TUNE FOLDER PUSHSOUND knob (1) to select “Call His- tory?”, and press the knob (1) to deter- mine the selection.5) Turn the TUNE FOLDER PUSH SOUND knob (1) to select “Confirm”, and press the knob (1) to transfer thecall history from the phone.
NOTE: When selecting “Go Back”, the previous menu will be displayed.
Making a call by Phonebook Follow the instructions below to dial a num-ber registered in Phonebook. 1) Press the Off Hook button (5). The Bluetooth® phonebook menu willbe displayed. 2) Turn the TUNE FOLDER PUSH SOUND knob (1) to select “Phone-book”, and press the knob (1) to deter- mine the selection. 3) Turn the TUNE FOLDER PUSHSOUND knob (1) to select the initial of the name you would like to make a call, and press the knob (1) to determine theselection. The registered numbers will be dis- played in sequence. If names havebeen registered together with num- bers, the names will be displayed. 4) Turn the TUNE FOLDER PUSHSOUND knob (1) to select “Dial”, and press the knob (1) to determine the selection.5) Press the Off Hook button (5). The displayed number or the number registered with the displayed name willbe dialed.
115
Page 127 of 201
5-31
OTHER CONTROLS AND EQUIPMENT
76MH1-74E
76MH1-74E
Deletion of registered data (Delete Entry) Follow the instructions below to delete anumber registered in Phonebook. 1) Press the Bluetooth® setup button (4). The Bluetooth® setup menu will be dis-played. 2) Turn the TUNE FOLDER PUSH SOUND knob (1) to select “Setup Tele-phone”, and press the knob (1) to deter- mine the selection. 3) Turn the TUNE FOLDER PUSHSOUND knob (1) to select “Setup Phonebook”, and press the knob (1) to determine the selection.4) Turn the TUNE FOLDER PUSH SOUND knob (1) to select “Delete Con- tacts”, and press the knob (1) to deter-mine the selection. 5) Turn the TUNE FOLDER PUSH SOUND knob (1) to select a number tobe deleted, and press the knob (1) to determine the selection. 6) Turn the TUNE FOLDER PUSHSOUND knob (1) to select “Delete?”, and press the knob (1) to determine the selection.1) Turn the TUNE FOLDER PUSH SOUND knob (1) to select “Confirm”, and press the knob (1) to complete thedeletion.
NOTE: When selecting “Go Back”, the previous menu will be displayed.
Registration in speed dial Follow the instructions below to assign a number to one of the Preset buttons to useas the speed dial. 1) Press the Bluetooth® setup button (4). The Bluetooth® setup menu will be dis-played. 2) Turn the TUNE FOLDER PUSH SOUND knob (1) to select “Setup Tele-phone”, and press the knob (1) to deter- mine the selection. 3) Turn the TUNE FOLDER PUSHSOUND knob (1) to select “Setup Phonebook”, and press the knob (1) to determine the selection.4) Turn the TUNE FOLDER PUSH SOUND knob (1) to select “Add Speed Dial”, and press the knob (1) to deter-mine the selection. 5) Turn the TUNE FOLDER PUSH SOUND knob (1) to select a number tobe assigned, and press the knob (1) to determine the selection. 6) Turn the TUNE FOLDER PUSHSOUND knob (1) to select “Choose Preset”, and press the knob (1) to determine the selection.7) Press one of the Preset buttons (3) to which the selected number is to be assigned. If a number is alreadyassigned to the selected button, a con- firmation message will be displayed. Turn the TUNE FOLDER PUSHSOUND knob (1) to select “Confirm”, and press the knob (1) to complete the assignment.
When the assignment is completed, the “Setup Phonebook” will be displayed.
NOTE: When selecting “Go Back”, the previous menu will be displayed.
One-touch call (Speed dial) Follow the instructions below to dial thenumber assigned to each of the Preset buttons (3). 1) Press the Off Hook button (5). The Bluetooth® phonebook menu will be displayed. 2) Turn the TUNE FOLDER PUSHSOUND knob (1) to select “Speed Dials”, and press the knob (1) to deter- mine the selection.3) Press one of the Preset buttons (3). When no number is assigned, “No Entry” is displayed.4) Press the Off Hook button (5). The selected number will be dialed.
116