ECO mode SUZUKI CELERIO 2020 User Guide
[x] Cancel search | Manufacturer: SUZUKI, Model Year: 2020, Model line: CELERIO, Model: SUZUKI CELERIO 2020Pages: 201, PDF Size: 5.82 MB
Page 74 of 201
3-4
OPERATING YOUR VEHICLE
76MH1-74E
76MH1-74E
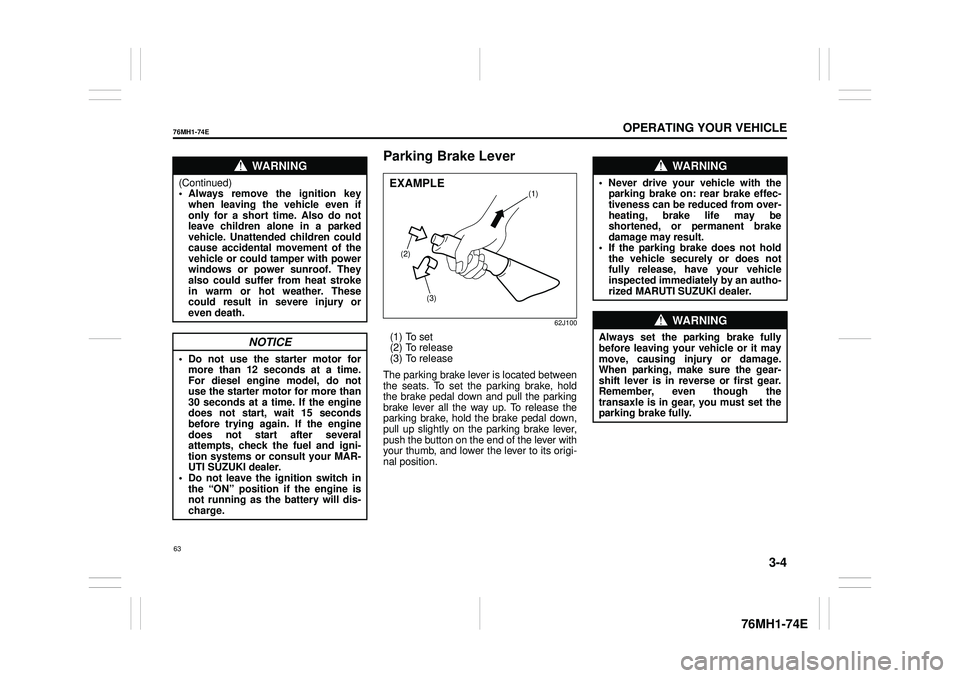
Parking Brake Lever
62J100
(1) To set (2) To release(3) To release
The parking brake lever is located between the seats. To set the parking brake, hold the brake pedal down and pull the parking brake lever all the way up. To release theparking brake, hold the brake pedal down, pull up slightly on the parking brake lever, push the button on the end of the lever withyour thumb, and lower the lever to its origi- nal position.
WA R N I N G
(Continued) • Always remove the ignition keywhen leaving the vehicle even if only for a short time. Also do not leave children alone in a parkedvehicle. Unattended children could cause accidental movement of the vehicle or could tamper with powerwindows or power sunroof. They also could suffer from heat stroke in warm or hot weather. Thesecould result in severe injury or even death.
NOTICE
• Do not use the starter motor for more than 12 seconds at a time.For diesel engine model, do not use the starter motor for more than 30 seconds at a time. If the enginedoes not start, wait 15 seconds before trying again. If the engine does not start after severalattempts, check the fuel and igni- tion systems or consult your MAR- UTI SUZUKI dealer.• Do not leave the ignition switch in the “ON” position if the engine is not running as the battery will dis-charge.
(2)
(3)
(1)EXAMPLE
WA R N I N G
• Never drive your vehicle with theparking brake on: rear brake effec-tiveness can be reduced from over- heating, brake life may be shortened, or permanent brakedamage may result. • If the parking brake does not hold the vehicle securely or does notfully release, have your vehicle inspected immediately by an autho- rized MARUTI SUZUKI dealer.
WA R N I N G
Always set the pa rking brake fully before leaving your vehicle or it may move, causing injury or damage. When parking, make sure the gear-shift lever is in reverse or first gear. Remember, even though the transaxle is in gear, you must set theparking brake fully.
63
Page 78 of 201
3-8
OPERATING YOUR VEHICLE
76MH1-74E
76MH1-74E
Auto Gear ShiftAuto Gear Shift is a 5-speed forward/ reverse transaxle. Auto Gear Shift has the basic features of conventional manual transaxle, but clutchoperation and transaxle gear shifting are controlled electronically.
NOTE: When you open the driver’s door, the Auto Gear Shift systems run automatically and you may hear an operating noise. Thissound does not indicate a malfunction.
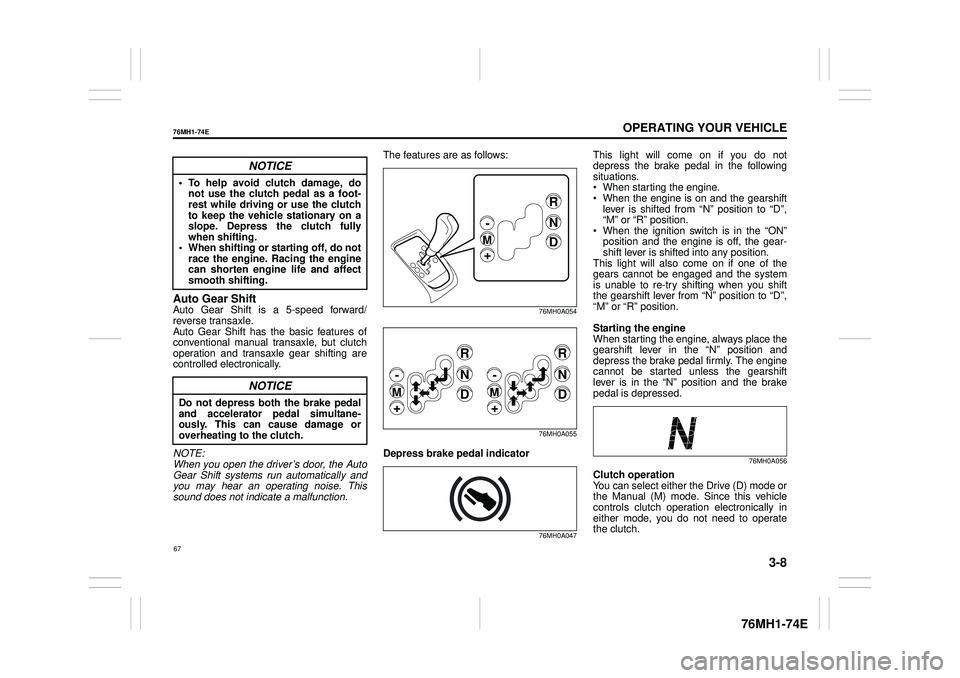
The features are as follows:
76MH0A054
76MH0A055
Depress brake pedal indicator
76MH0A047
This light will come on if you do not depress the brake pedal in the following situations. When starting the engine. When the engine is on and the gearshift lever is shifted from “N” position to “D”,“M” or “R” position. When the ignition switch is in the “ON” position and the engine is off, the gear-shift lever is shifte d into any position. This light will also come on if one of the gears cannot be engaged and the systemis unable to re-try shifting when you shift the gearshift lever from “N” position to “D”, “M” or “R” position.
Starting the engine When starting the engine, always place thegearshift lever in the “N” position and depress the brake pedal firmly. The engine cannot be started unless the gearshiftlever is in the “N” position and the brake pedal is depressed.
76MH0A056
Clutch operationYou can select either the Drive (D) mode or the Manual (M) mode. Since this vehiclecontrols clutch operation electronically in either mode, you do not need to operate the clutch.
NOTICE
• To help avoid clutch damage, donot use the clutch pedal as a foot-rest while driving or use the clutch to keep the vehicle stationary on a slope. Depress the clutch fullywhen shifting. • When shifting or starting off, do not race the engine. Racing the enginecan shorten engine life and affect smooth shifting.
NOTICE
Do not depress both the brake pedaland accelerator pedal simultane- ously. This can cause damage oroverheating to the clutch.
R
N
D
-
M
+
R
N
D
-
M
+
R
N
D
-
M
+
67
Page 80 of 201
3-10
OPERATING YOUR VEHICLE
76MH1-74E
76MH1-74E
Starting off on an uphill/downhill:
Uphill1) Apply the parking brake firmly so that the vehicle does not roll backwards.2) Shift the gearshift lever to the “D” posi-tion while depressing the brake pedal.Make sure that the gear position indica-tor in the instrumental cluster displays1st gear. 3) Release the brake pedal and depress the accelerator pedal gradually, andwhen the vehicle starts to move, releasethe parking brake and depress the accel-erator pedal to start off.
Downhill 1) Depress the brake pedal and shift the gearshift lever to the “D” position. Make sure that the gear is in 1st by checkingthe gear position indicator. 2) Release the brake pedal and depress the accelerator pedal slowly. Even if theaccelerator pedal is not depressed, the clutch will be engaged when the vehicle speed increases.
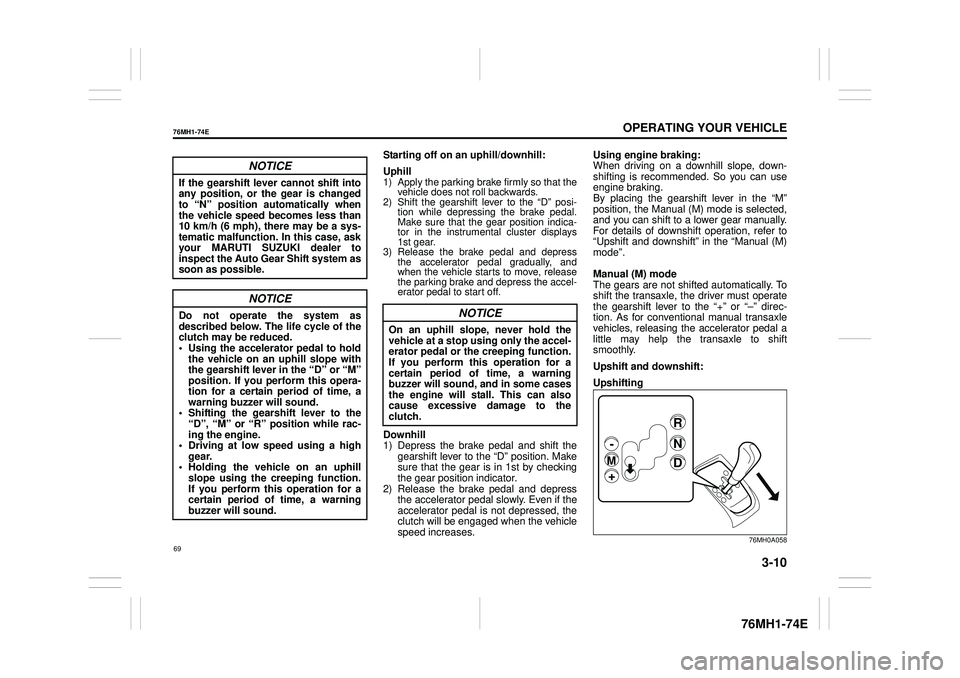
Using engine braking: When driving on a downhill slope, down- shifting is recommended. So you can useengine braking. By placing the gearshift lever in the “M” position, the Manual (M) mode is selected,and you can shift to a lower gear manually. For details of downshift operation, refer to “Upshift and downshift” in the “Manual (M)mode”.
Manual (M) mode The gears are not shifted automatically. To shift the transaxle, the driver must operate the gearshift lever to the “+” or “–” direc-tion. As for conventional manual transaxle vehicles, releasing the accelerator pedal a little may help the transaxle to shift smoothly.
Upshift and downshift:
Upshifting
76MH0A058
NOTICE
If the gearshift lever cannot shift into any position, or the gear is changedto “N” position automatically when the vehicle speed becomes less than 10 km/h (6 mph), there may be a sys-tematic malfunction. In this case, ask your MARUTI SUZUKI dealer to inspect the Auto Gear Shift system assoon as possible.
NOTICE
Do not operate the system as described below. The life cycle of the clutch may be reduced.• Using the accelerator pedal to hold the vehicle on an uphill slope with the gearshift lever in the “D” or “M”position. If you perform this opera- tion for a certain period of time, a warning buzzer will sound.• Shifting the gearsh ift lever to the “D”, “M” or “R” position while rac- ing the engine.• Driving at low speed using a high gear. • Holding the vehicle on an uphillslope using the creeping function. If you perform this operation for a certain period of time, a warningbuzzer will sound.
NOTICE
On an uphill slope, never hold thevehicle at a stop using only the accel-erator pedal or the creeping function. If you perform this operation for a certain period of time, a warningbuzzer will sound, and in some cases the engine will stall. This can also cause excessive damage to theclutch.R
N
D
-
M
+
69
Page 84 of 201

3-14
OPERATING YOUR VEHICLE
76MH1-74E
76MH1-74E
If the gearshift lever is in the “M” posi- tion, the gear will be downshifted to 1st when the vehicle stops.
Parking Unlike an automatic transaxle, Auto GearShift does not have a parking position. The vehicle can be parked with the gearshift lever in any position.1) Apply the parking brake firmly. 2) While depressing the brake pedal, shift the gearshift lever to the “R” position ona downhill slope, and to the 1st position in the drive (D) mode or the “M(1)” posi- tion in the manual (M) mode on anuphill slope and confirm the gear posi- tion by checking the gear position indi- cator.3) Stop the engine.
NOTE: • After the engine is stopped, the gear in the transaxle does not change even ifyou shift the gearshift lever in any posi- tion. Always shift the gearshift lever before stop the engine.• Check the transaxle gear position by looking at the gear position indicator, then turn the ignition switch off to stopthe engine. Release the brake pedal after a few seconds. The gearshift lever will be locked in the position it was inwhen the ignition switch was turned off.
Parking cancel Depress the brake pedal, turn the ignition switch to the “ON” position, and shift thegearshift lever to the “N” position. The gear will be disengaged.
WA R N I N G
• When stopping, for example, at a traffic light, be su re to depress the brake pedal firmly. For your safety, apply the parking brake, too, when stopping on a hill.• When racing the engine, make sure that the gear is in the “N” position by checking the gear position indi- cator. If the accelerator is operated with the gear in any other position, the vehicle may move resulting inan unexpected accident. • Do not leave your vehicle unat- tended while the engine is running.• When leaving the vehicle, stop the engine and park the vehicle with a gear engaged. If you need to leavethe vehicle with the engine running, apply the parking brakes firmly, and shift the gearshift lever to the“N” position. Otherwise, the vehi- cle may move unexpectedly and may cause an accident.
NOTICE
• On a slope, never hold the vehicleat a stop using only the acceleratorpedal or the creeping function. If you perform this operation for a certain period of time, a warningbuzzer will sound, and in some cases the engine will stall. This can also cause excessive damage tothe clutch. • If the gearshift lever is operated more than necessary, the systemmay not allow operation of the gearshift lever for a certain period of time, and the gear may not beshifted appropriately. Therefore, do not operate the gearshift lever if not necessary.
WA R N I N G
• If the gear is not engaged properlyand completely be fore the ignition switch is turned off, the vehicle may not be parked with the gearengaged. Always confirm the gear position by checking the gear posi- tion indicator when parking.• On a downhill slope, the gear should be put in reverse, and in 1st gear on an uphill slope. Otherwise,the vehicle may move, and cause an unexpected accident. If the gear is left in the “N” position, the vehi-cle cannot be parked with a gear engaged.
73
Page 107 of 201

5-11
OTHER CONTROLS AND EQUIPMENT
76MH1-74E
76MH1-74E
Bi-level (b)
76MH0A084
Temperature-controlled air comes out of the floor outlets and cooler air comes out of the center and side outlets. When thetemperature selector (1) is in the fully COLD position or fully HOT position, how- ever, the air from the floor outlets and theair from the center and side outlets will be the same temperature.
Heat (c)
76MH0A085
Temperature-controlled air comes out of the floor outlets and the side outlets, also comes out of the windshield defroster out-lets and also comes slightly out of the side defroster outlets.
Heat & defrost (d)
76MH0A087
Temperature-controlled air comes out of the floor outlets, the windshield defroster outlets, the side defroster outlets and theside outlets.
Defrost (e)
76MH0A088
Temperature-controlled air comes out of the windshield defroster outlets, the side defroster outlets and the side outlets.
Air intake selector (4)
76MH0A089
This selector is used to select the following modes.
Fresh Air (f) When this mode is selected by moving the lever to right, outside air is used.
Recirculated Air (g) When this mode is selected by moving thelever to left, outside air is shut out and inside air is recirculat ed. This mode is suit- able when driving through dusty or pollutedair such as in a tunnel, or when attempting to quickly cool down the interior.
NOTE: If you select “RECIRCULATED AIR” for an extended period of time, the air in the vehi-cle can become contam inated. Therefore, you should occasionally select “FRESH AIR”.
(g) (f)
96
Page 113 of 201
5-17
OTHER CONTROLS AND EQUIPMENT
76MH1-74E
76MH1-74E
2) Turn the TUNE FOLDER PUSH SOUND knob (2) to select the desired AVC adjustment level. (Initial setting:LEVEL 2)
Preset-EQ Preset-EQ calls up various sound types in accordance with the listening music type. 1) Press the TUNE FOLDER PUSHSOUND knob (2) several times until “PRESET-EQ” appears. 2) Turn the TUNE FOLDER PUSHSOUND knob (2). Each time the knob is turned, preset EQ mode will change as follows:
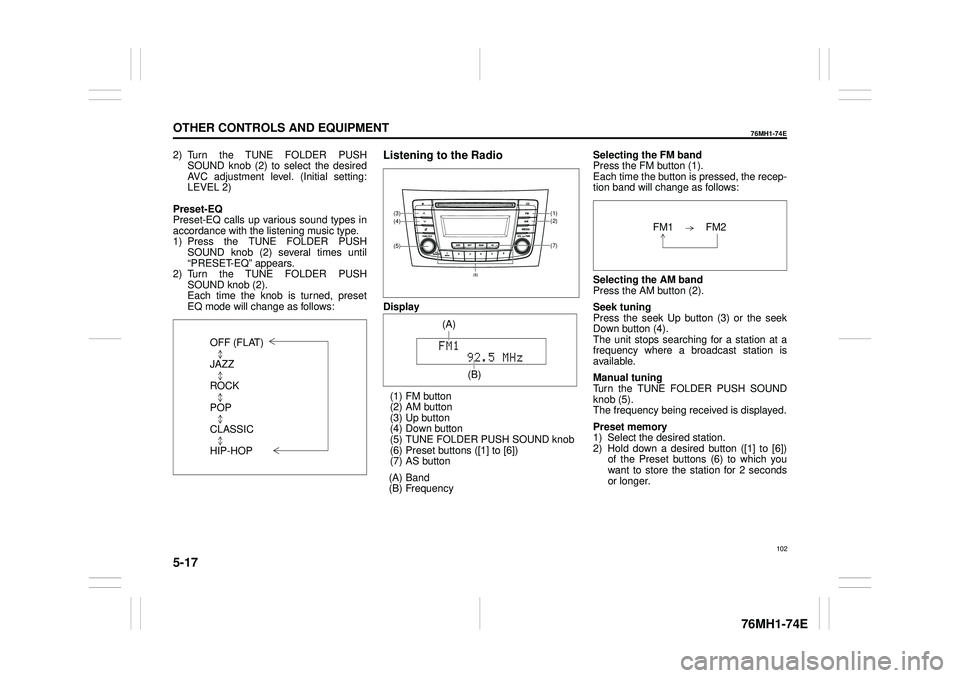
Listening to the Radio
Display
(1) FM button (2) AM button (3) Up button (4) Down button(5) TUNE FOLDER PUSH SOUND knob (6) Preset buttons ([1] to [6]) (7) AS button
(A) Band (B) Frequency
Selecting the FM band Press the FM button (1). Each time the button is pressed, the recep-tion band will change as follows:
Selecting the AM band Press the AM button (2).
Seek tuning Press the seek Up button (3) or the seekDown button (4). The unit stops searching for a station at a frequency where a broadcast station is available.
Manual tuning Turn the TUNE FOLDER PUSH SOUND knob (5).The frequency being received is displayed.
Preset memory 1) Select the desired station. 2) Hold down a desired button ([1] to [6]) of the Preset buttons (6) to which youwant to store the station for 2 seconds or longer.
OFF (FLAT)
JAZZ
ROCK
POP
CLASSIC
HIP-HOP
(7)
(1)(2)
(5)
(4)(3)
(6)
(A)
(B)
102
Page 114 of 201
5-18
OTHER CONTROLS AND EQUIPMENT
76MH1-74E
76MH1-74E
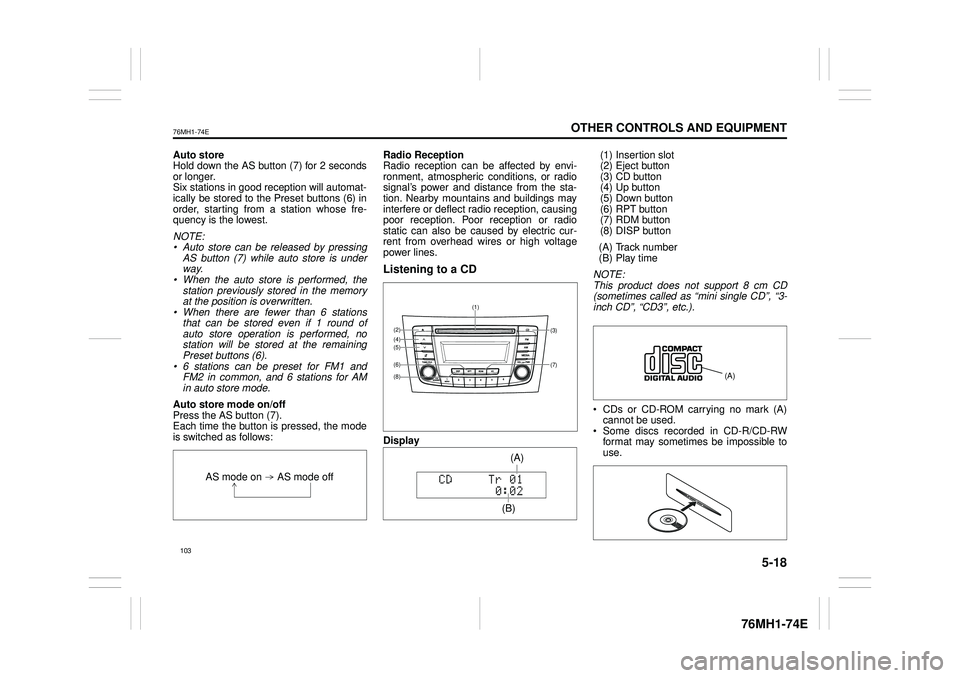
Auto store Hold down the AS button (7) for 2 seconds or longer.Six stations in good reception will automat- ically be stored to the Preset buttons (6) in order, starting from a station whose fre-quency is the lowest.
NOTE: • Auto store can be released by pressing AS button (7) while auto store is under way.• When the auto store is performed, the station previously stored in the memory at the position is overwritten.• When there are fewer than 6 stations that can be stored even if 1 round of auto store operation is performed, nostation will be stored at the remaining Preset buttons (6). • 6 stations can be preset for FM1 andFM2 in common, and 6 stations for AM in auto store mode.
Auto store mode on/off Press the AS button (7). Each time the button is pressed, the modeis switched as follows:
Radio Reception Radio reception can be affected by envi- ronment, atmospheric conditions, or radiosignal’s power and distance from the sta- tion. Nearby mountains and buildings may interfere or deflect radio reception, causingpoor reception. Poor reception or radio static can also be caused by electric cur- rent from overhead wires or high voltagepower lines.
Listening to a CD
Display
(1) Insertion slot (2) Eject button (3) CD button(4) Up button (5) Down button (6) RPT button(7) RDM button (8) DISP button
(A) Track number (B) Play time
NOTE: This product does not support 8 cm CD (sometimes called as “mini single CD”, “3-inch CD”, “CD3”, etc.).
CDs or CD-ROM carrying no mark (A) cannot be used. Some discs recorded in CD-R/CD-RWformat may sometimes be impossible to use.
AS mode on AS mode off
(7)
(3)
(8)
(6)
(5)(4)(2)
(1)
(B)
(A)
Page 115 of 201
5-19
OTHER CONTROLS AND EQUIPMENT
76MH1-74E
76MH1-74E
A CD is to be inserted with its label side up. When there is a CD already in the unit, it is impossible to insert another CD with- out ejecting the CD in the unit. Do notuse force to insert a CD into the CD insertion slot.
Loading a CD Insert a CD in the Insertion slot (1). When a CD is loaded, play starts.
Ejecting a CD Press the Eject button (2).When the ignition switch is in “LOCK” posi- tion, the CD remained ejected for around 15 seconds or longer will automatically bedrawn inside the unit. (Auto reload func- tion) The backup eject function:This function allows you to eject a CD by pressing the Eject button (2) even when the ignition switch is in “LOCK” position.
Listening to a CD When a CD is inserted, playback will auto- matically start. When a CD is already inside the unit,press the CD button (3) to start playback.
Selecting a track Press the Up button (4) to listen to the next track. Press the Down button (5) twice to listento the previous track. When the Down button (5) is pressed once, the track currently being playedwill start from the beginning again.
Fast forwarding/Rewinding a track Hold down the Up button (4) to fast for- ward the track. Hold down the Down button (5) to fastrewind the track.
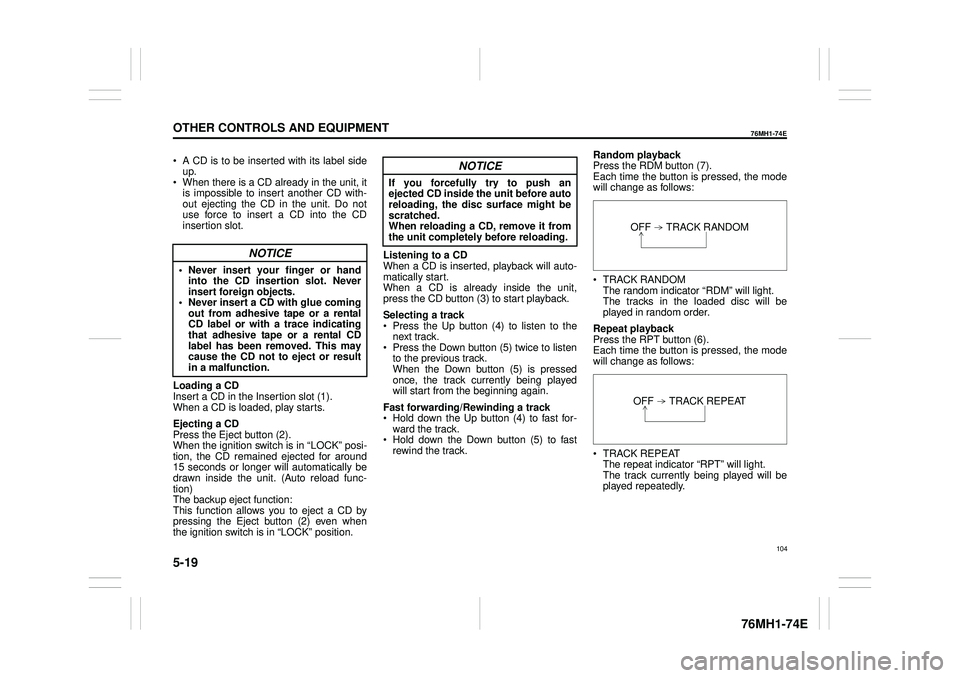
Random playback Press the RDM button (7). Each time the button is pressed, the modewill change as follows:
TRACK RANDOM The random indicator “RDM” will light.The tracks in the loaded disc will be played in random order.
Repeat playback Press the RPT button (6). Each time the button is pressed, the mode will change as follows:
TRACK REPEAT The repeat indicator “RPT” will light. The track currently being played will be played repeatedly.
NOTICE
• Never insert your finger or handinto the CD insertion slot. Neverinsert foreign objects. • Never insert a CD with glue coming out from adhesive tape or a rentalCD label or with a trace indicating that adhesive tape or a rental CD label has been removed. This maycause the CD not to eject or result in a malfunction.
NOTICE
If you forcefully try to push an ejected CD inside the unit before autoreloading, the disc surface might be scratched. When reloading a CD, remove it fromthe unit completely before reloading.OFF TRACK RANDOM
OFF TRACK REPEAT
104
Page 116 of 201
5-20
OTHER CONTROLS AND EQUIPMENT
76MH1-74E
76MH1-74E
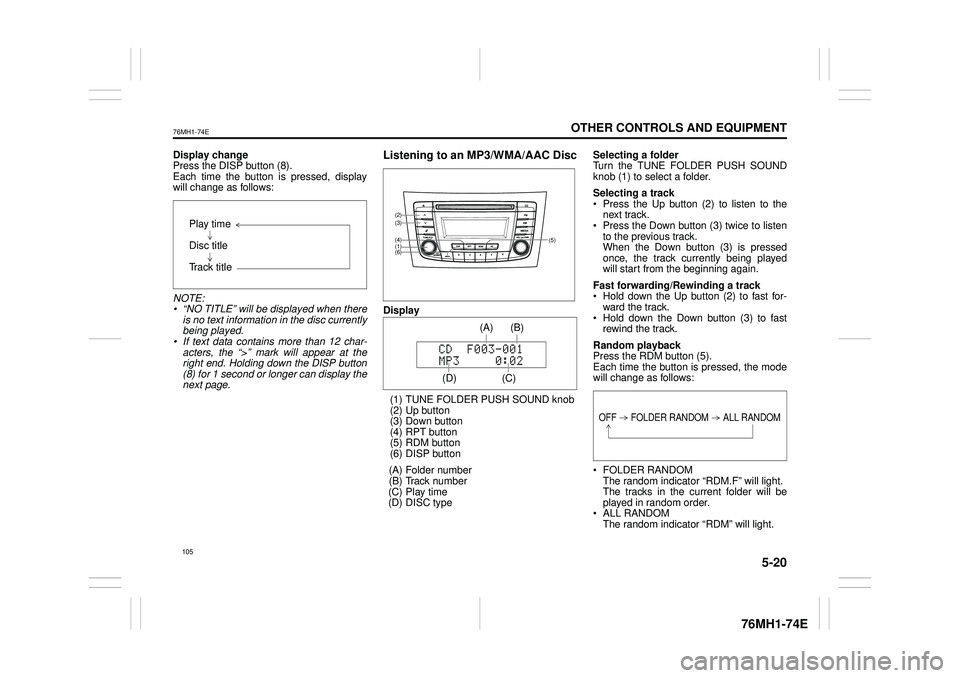
Display change Press the DISP button (8). Each time the button is pressed, displaywill change as follows:
NOTE: • “NO TITLE” will be displayed when there is no text information in the disc currently being played. • If text data contains more than 12 char- acters, the “>” mark will appear at theright end. Holding down the DISP button (8) for 1 second or longer can display the next page.
Listening to an MP3/WMA/AAC Disc
Display
(1) TUNE FOLDER PUSH SOUND knob (2) Up button (3) Down button (4) RPT button(5) RDM button (6) DISP button
(A) Folder number (B) Track number (C) Play time(D) DISC type
Selecting a folder Turn the TUNE FOLDER PUSH SOUND knob (1) to select a folder.
Selecting a track Press the Up button (2) to listen to thenext track. Press the Down button (3) twice to listen to the previous track.When the Down button (3) is pressed once, the track currently being played will start from the beginning again.
Fast forwarding/Rewinding a track Hold down the Up button (2) to fast for-ward the track. Hold down the Down button (3) to fast rewind the track.
Random playback Press the RDM button (5).Each time the button is pressed, the mode will change as follows:
FOLDER RANDOM The random indicator “RDM.F” will light. The tracks in the current folder will beplayed in random order. ALL RANDOM The random indicator “RDM” will light.
Play time
Disc title
Track title
(5)
(6)
(4)
(3)
(1)
(2)
(C)
(B) (A)
(D)
105
Page 117 of 201
5-21
OTHER CONTROLS AND EQUIPMENT
76MH1-74E
76MH1-74E
The tracks in the loaded disc will be played in random order.
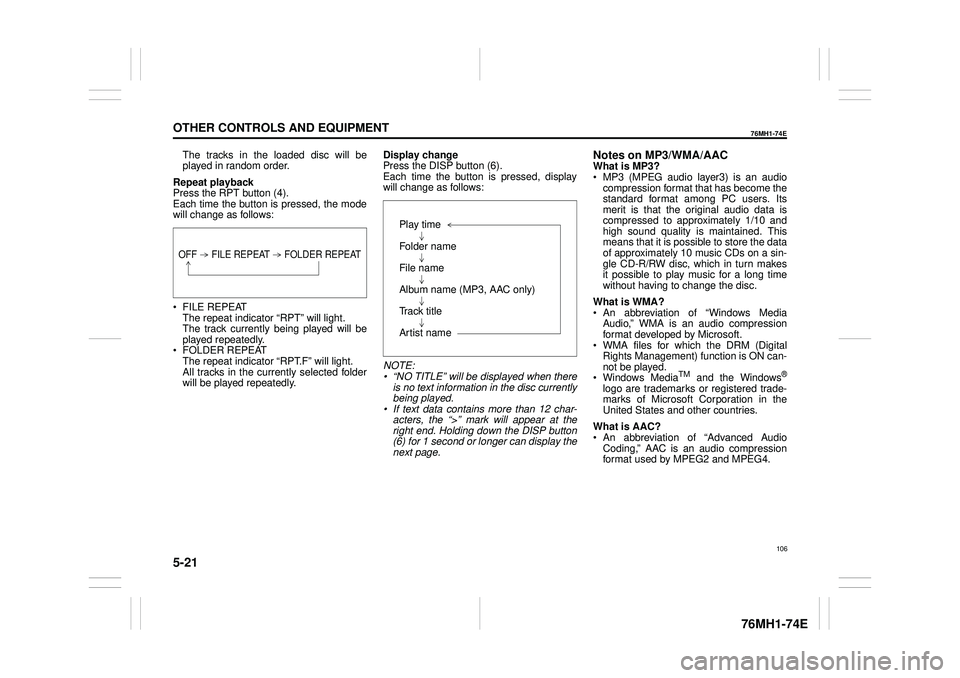
Repeat playback Press the RPT button (4). Each time the button is pressed, the modewill change as follows:
FILE REPEAT The repeat indicator “RPT” will light.The track currently being played will be played repeatedly. FOLDER REPEAT The repeat indicator “RPT.F” will light. All tracks in the currently selected folderwill be played repeatedly.
Display change Press the DISP button (6). Each time the button is pressed, displaywill change as follows:
NOTE: • “NO TITLE” will be displayed when there is no text information in the disc currently being played.• If text data contains more than 12 char- acters, the “>” mark will appear at the right end. Holding down the DISP button(6) for 1 second or longer can display the next page.
Notes on MP3/WMA/AACWhat is MP3? MP3 (MPEG audio layer3) is an audio compression format that has become the standard format among PC users. Itsmerit is that the original audio data is compressed to approximately 1/10 and high sound quality is maintained. Thismeans that it is possible to store the data of approximately 10 music CDs on a sin- gle CD-R/RW disc, which in turn makesit possible to play music for a long time without having to change the disc.
What is WMA? An abbreviation of “Windows Media Audio,” WMA is an audio compressionformat developed by Microsoft. WMA files for which the DRM (Digital Rights Management) function is ON can-not be played. Windows MediaTM and the Windows®
logo are trademarks or registered trade- marks of Microsoft Corporation in the United States and other countries.
What is AAC? An abbreviation of “Advanced Audio Coding,” AAC is an audio compressionformat used by MPEG2 and MPEG4.
OFF FILE REPEAT FOLDER REPEAT
Play time
Folder name
File name
Album name (MP3, AAC only)
Track title
Artist name
106