tow SUZUKI CELERIO 2022 User Guide
[x] Cancel search | Manufacturer: SUZUKI, Model Year: 2022, Model line: CELERIO, Model: SUZUKI CELERIO 2022Pages: 201, PDF Size: 5.82 MB
Page 146 of 201

VEHICLE LOADING AND TOWING
76MH1-74E
76MH1-74E
135
VEHICLE LOADING AND TOWINGVehicle Loading ................................................................... 6-1
Trailer Towing ...................................................................... 6-1
Towing Your Vehicle ........................................................... 6-1
Page 147 of 201
6-1
VEHICLE LOADING AND TOWING
76MH1-74E
76MH1-74E
Vehicle Loading
Your vehicle was designed for specific weight capacities. The weight capacities ofyour vehicle are indicated by the Gross Vehicle Weight Rating (GVWR) and the Permissible maximum Axle Weight (PAW,front and rear). The GVWR and PAW (front and rear) are listed in the “SPECIFICA- TIONS” section.
GVWR – Maximum permissible overall weight of the fully loaded vehicle (includingall the occupants, accessories and cargo plus the trailer nose weight if towing a trailer).PAW – (Front and Rear) Maximum permis- sible weight on an individual axle.
Actual weight of the loaded vehicle and actual loads at the front and rear axles can only be determined by weighing the vehi-cle. Compare these weights to the GVWR and PAW (front and rear). If the gross vehi- cle weight or the load on either axleexceeds these ratings, you must remove enough weight to bring the load down to the rated capacity.
Trailer Towing
Your MARUTI SUZUKI was originallydesigned to carry people and a normal amount of cargo, not to tow a trailer.MAR- UTI SUZUKI does not recommend you useyour vehicle to tow a trailer. Towing a trailer can adversely affect handling, durability, and fuel economy.
Towing Your Vehicle
Your vehicle may be towed behind anothervehicle (such as a motorhome), providedyour vehicle is 2 wheel drive (2WD) and you use the proper towing method speci- fied for your vehicle. The towing methodyou must use depends on the specifica- tions of your vehicle: whether it is a manual transaxle vehicle or an Auto Gear Shiftvehicle.
Use the towing instruction table to select the proper towing method for your vehicle, and carefully follow the corresponding instructions. Be sure to use proper towingequipment designed for recreational tow- ing and make sure that towing speed does not exceed 90 km/h (55 mph).
WA R N I N G
Never overload your vehicle. Thegross vehicle weight (sum of theweights of the vehicle, all the occu- pants, accessories, cargo plus trailer nose weight if towing a trailer) mustnever exceed the Gross Vehicle Weight Rating (GVWR). In addition, never distribute a load so that theweight on either th e front or rear axle exceeds the Permissible maximum Axle Weight (PAW).
WA R N I N G
Always distribute cargo evenly. Toavoid personal injury or damage to your vehicle, always secure cargo to prevent it from shifting if the vehiclemoves suddenly. Place heavier objects on the floor and as far for- ward in the cargo area as possible.Never pile cargo higher than the top of the seat backs.
WA R N I N G
When you tow your vehicle, follow the instructions below to avoid acci-dents and damage to your vehicle. In addition, be sure to observe govern- ment and local requirements regard-ing vehicle lighting and trailer hitches or tow bars.
WA R N I N G
A safety chain should always be used when you tow your vehicle.
136
Page 148 of 201

6-2
VEHICLE LOADING AND TOWING
76MH1-74E
76MH1-74E
TOWING INSTRUCTION TABLE
76MH022
A: 2WD VEHICLES WITH MANUAL TRANSAXLE OR AUTO GEAR SHIFT 1) Secure the front wheels on a towingdolly according to the instructions pro- vided by the dolly manufacturer. 2) Release the parking brake.
76MH023
B: 2WD VEHICLES WITH MANUAL TRANSAXLE OR AUTO GEAR SHIFT 1) Shift the gearshift lever into neutral. 2) Turn the ignition key to the
Page 168 of 201
7-19
INSPECTION AND MAINTENANCE
76MH1-74E
76MH1-74E
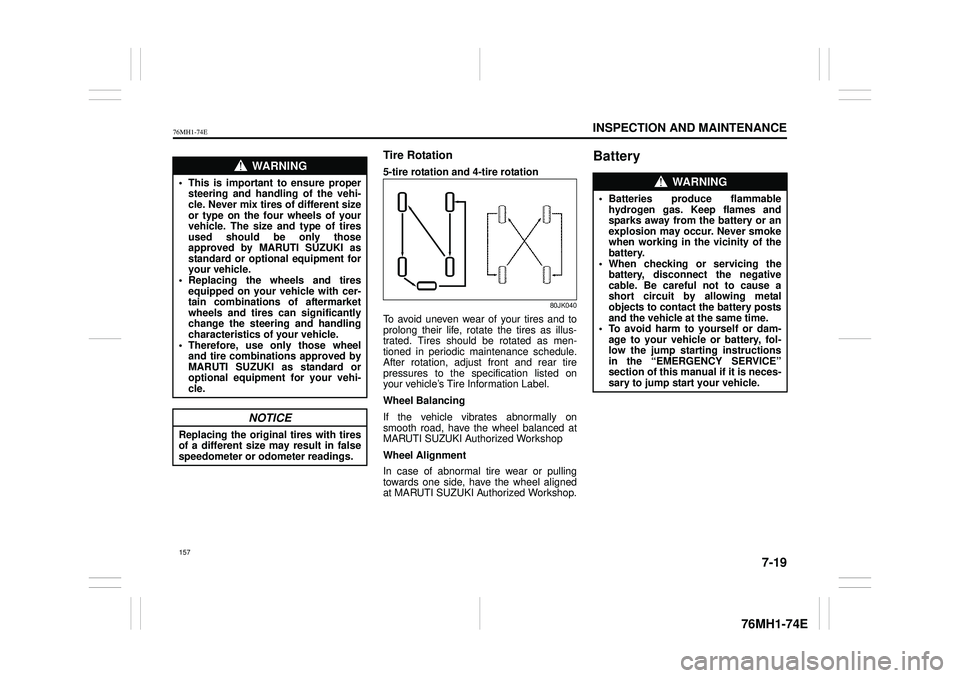
Tire Rotation
5-tire rotation and 4-tire rotation
80JK040
To avoid uneven wear of your tires and to prolong their life, rotate the tires as illus- trated. Tires should be rotated as men-tioned in periodic maintenance schedule. After rotation, adjust front and rear tire pressures to the specification listed onyour vehicle’s Tire Information Label.
Wheel Balancing
If the vehicle vibrates abnormally on smooth road, have the wheel balanced atMARUTI SUZUKI Authorized Workshop
Wheel Alignment
In case of abnormal tire wear or pulling towards one side, have the wheel aligned at MARUTI SUZUKI Authorized Workshop.
BatteryWA R N I N G
• This is important to ensure propersteering and handling of the vehi-cle. Never mix tires of different size or type on the four wheels of your vehicle. The size and type of tiresused should be only those approved by MARUTI SUZUKI as standard or optional equipment foryour vehicle. • Replacing the wheels and tires equipped on your vehicle with cer-tain combinations of aftermarket wheels and tires can significantly change the steering and handlingcharacteristics of your vehicle. • Therefore, use only those wheel and tire combinations approved byMARUTI SUZUKI as standard or optional equipment for your vehi- cle.
NOTICE
Replacing the original tires with tires of a different size may result in false speedometer or odometer readings.
WA R N I N G
• Batteries produce flammable hydrogen gas. Keep flames and sparks away from the battery or an explosion may occur. Never smokewhen working in the vicinity of the battery. • When checking or servicing thebattery, disconnect the negative cable. Be careful not to cause a short circuit by allowing metalobjects to contact the battery posts and the vehicle at the same time. • To avoid harm to yourself or dam-age to your vehicl e or battery, fol- low the jump starting instructions in the “EMERGENCY SERVICE”section of this manual if it is neces- sary to jump start your vehicle.
157
Page 178 of 201

7-29
INSPECTION AND MAINTENANCE
76MH1-74E
76MH1-74E
NOTE: Some wiper blades may be different from the ones described here depending onvehicle specifications. If so, consult your MARUTI SUZUKI dealer for proper replacement method.
For windshield wipers:
70G119
1) Hold the wiper arm away from the win- dow.
54G130
2) Squeeze lock (1) towards wiper arm (2) and remove the wiper frame from the arm as shown.3) Unlock the lock end of the wiper blade and slide the blade out as shown.
Removal
60A260
Installation
54G132
(1) Locked end
EXAMPLE
EXAMPLE
167
Page 179 of 201
7-30
INSPECTION AND MAINTENANCE
76MH1-74E
76MH1-74E
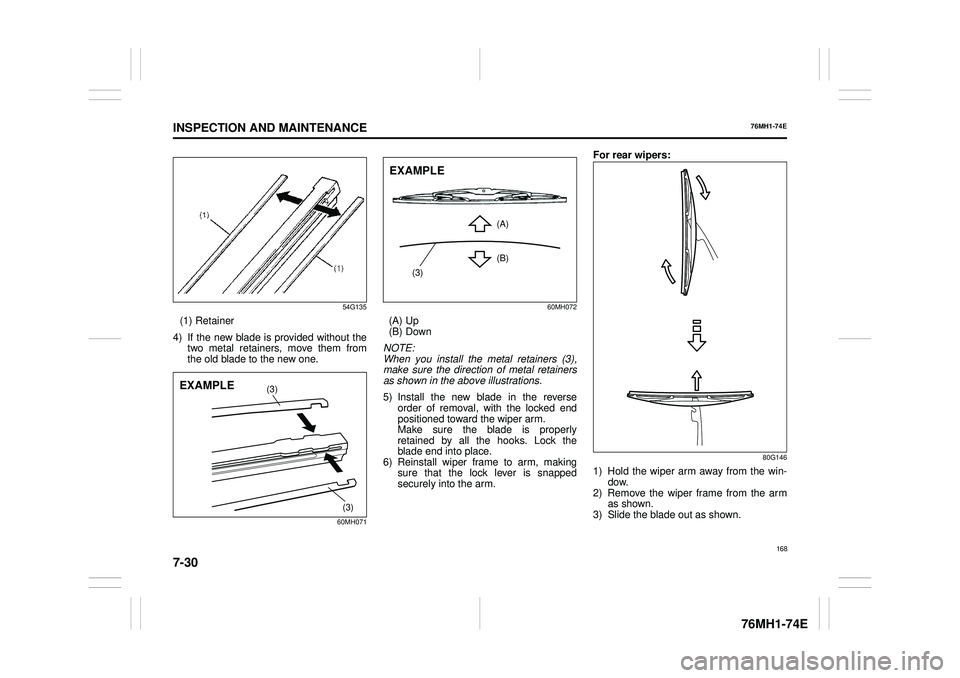
54G135
(1) Retainer
4) If the new blade is provided without the two metal retainers, move them from the old blade to the new one.
60MH071
60MH072
(A) Up (B) Down
NOTE: When you install the metal retainers (3), make sure the direction of metal retainersas shown in the above illustrations.
5) Install the new blade in the reverse order of removal, with the locked end positioned toward the wiper arm. Make sure the blade is properlyretained by all the hooks. Lock the blade end into place. 6) Reinstall wiper frame to arm, makingsure that the lock lever is snapped securely into the arm.
For rear wipers:
80G146
1) Hold the wiper arm away from the win- dow. 2) Remove the wiper frame from the armas shown. 3) Slide the blade out as shown.
(3)
(3)
EXAMPLE
(3)
(A)
(B)
EXAMPLE
168
Page 181 of 201
EMERGENCY SERVICE
76MH1-74E
76MH1-74E
170
EMERGENCY SERVICETire Changing Tool ............................................................. 8-1
Jacking Instructions ........................................................... 8-1
Changing Wheels ................................................................ 8-3
Jump Starting Instructions ................................................ 8-4
Towing .................................................................................. 8-5
If the Starter Does Not Operate .......................................... 8-6
If the Engine is Flooded ...................................................... 8-6
If the Engine Overheats ...................................................... 8-6
Page 182 of 201
8-1
EMERGENCY SERVICE
76MH1-74E
76MH1-74E
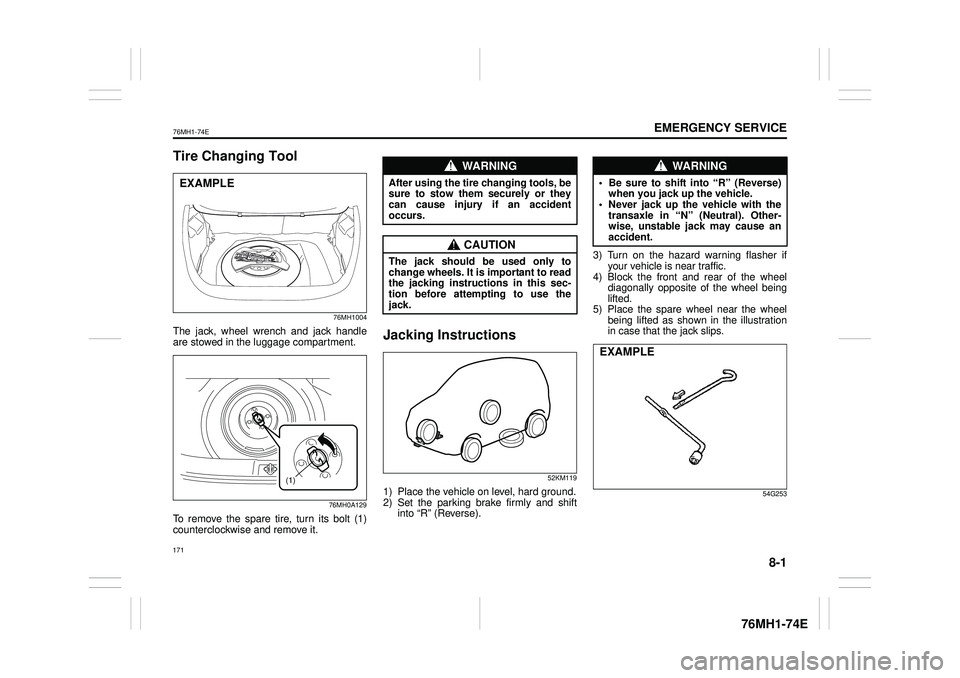
Tire Changing Tool
76MH1004
The jack, wheel wrench and jack handle are stowed in the luggage compartment.
76MH0A129
To remove the spare tire, turn its bolt (1) counterclockwise and remove it.
Jacking Instructions
52KM119
1) Place the vehicle on level, hard ground. 2) Set the parking brake firmly and shift into “R” (Reverse).
3) Turn on the hazard warning flasher if your vehicle is near traffic. 4) Block the front and rear of the wheel diagonally opposite of the wheel beinglifted. 5) Place the spare wheel near the wheel being lifted as shown in the illustrationin case that the jack slips.
54G253
EXAMPLE
(1)
WA R N I N G
After using the tire changing tools, besure to stow them securely or theycan cause injury if an accident occurs.
CAUTION
The jack should be used only to change wheels. It is important to readthe jacking instructions in this sec- tion before attemp ting to use the jack.
WA R N I N G
• Be sure to shift into “R” (Reverse) when you jack up the vehicle.• Never jack up the vehicle with the transaxle in “N” (Neutral). Other- wise, unstable jack may cause anaccident.
EXAMPLE
171
Page 185 of 201

8-4
EMERGENCY SERVICE
76MH1-74E
76MH1-74E
Full Wheel Cover (if equipped)
60G309
Insert a piece of cloth between the spokes of the wheel cover and try to pull the cover outward (as shown in figure). Take out thedetached wheel cover from the wheel rim. For installation first match the slot at the wheel cover with the air filling nozzle of the wheel. Apply equal pressure at the circum- ference of the wheel cover to fix it in thewheel rim.
74LHT0860
When installing the cover, make sure that itis positioned so that it does not cover orfoul the air valve.
Jump Starting Instructions
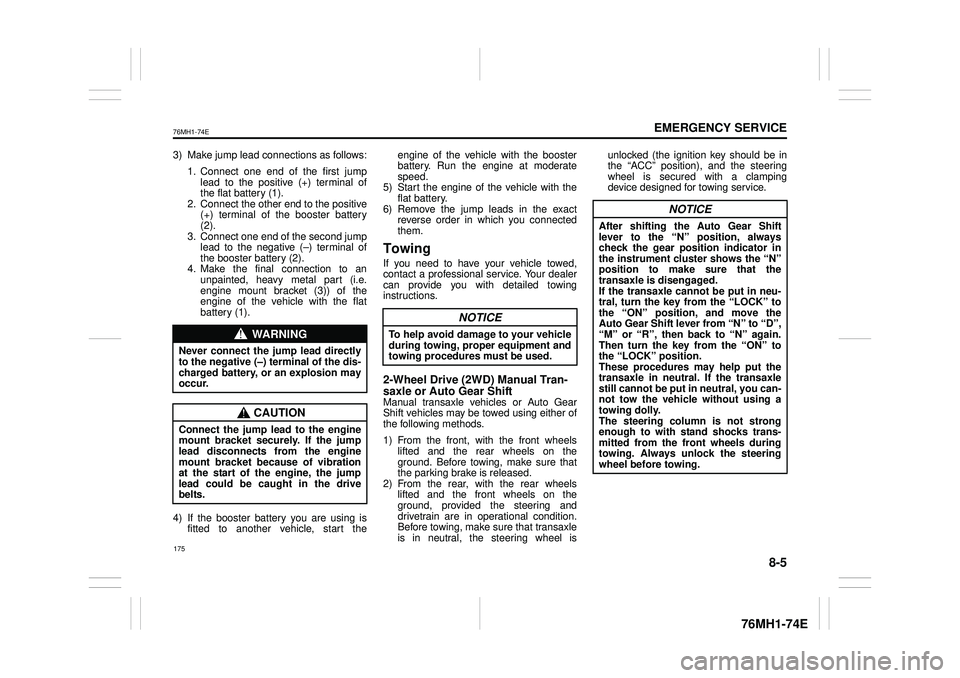
When Jump Starting Your Vehicle,
Use the Following Procedure:1) Use only a 12-volt battery to jump start your vehicle. Position the good 12-volt battery close to your vehicle so that thejump leads will reach both batteries. When using a battery installed on another vehicle, DO NOT LET THEVEHICLES TOUCH. Set the parking brakes fully on both vehicles. 2) Turn off all vehicle accessories, exceptthose necessary for safety reasons (for example, headlights or hazard lights).
54MN259
EXAMPLE
EXAMPLE
WA R N I N G
• Never attempt to jump start your vehicle if the battery appears to be frozen. Batteries in this condition may explode or rupture if jumpstarting is attempted. • When making jump lead connec- tions, be certain that your handsand the jump leads remain clear from pulleys, belts, or fans. • Batteries produce flammablehydrogen gas. Keep flames and sparks away from the battery or an explosion may occur. Never smokewhen working in the vicinity of the battery. • If the booster battery you use forjump starting is installed in another vehicle, make sure the two vehicles are not touching each other.• If your battery discharges repeat- edly, for no apparent reason, have your vehicle inspected by anauthorized MARUTI SUZUKI dealer. • To avoid harm to yourself or dam- age to your vehicl e or battery, fol- low the jump starting instructions below precisely and in order. If you are in doubt, call for qualifiedroad service.
NOTICE
Your vehicle should not be started bypushing or towing. This startingmethod could result in permanent damage to the ca talytic converter. Use jump leads to start a vehicle witha weak or flat battery.
(2)
(1)
(3)2 3
4
1
EXAMPLE
174
Page 186 of 201
8-5
EMERGENCY SERVICE
76MH1-74E
76MH1-74E
3) Make jump lead connections as follows:
1. Connect one end of the first jump lead to the positive (+) terminal of the flat battery (1). 2. Connect the other end to the positive(+) terminal of the booster battery (2). 3. Connect one end of the second jumplead to the negative (–) terminal of the booster battery (2). 4. Make the final connection to anunpainted, heavy metal part (i.e. engine mount bracket (3)) of the engine of the vehicle with the flatbattery (1).
4) If the booster battery you are using is fitted to another vehicle, start the
engine of the vehicle with the booster battery. Run the engine at moderate speed.5) Start the engine of the vehicle with the flat battery. 6) Remove the jump leads in the exactreverse order in which you connected them.
Towing
If you need to have your vehicle towed, contact a professional service. Your dealercan provide you with detailed towing instructions.
2-Wheel Drive (2WD) Manual Tran- saxle or Auto Gear ShiftManual transaxle vehicles or Auto Gear Shift vehicles may be towed using either of the following methods.
1) From the front, with the front wheels lifted and the rear wheels on the ground. Before towing, make sure thatthe parking brake is released. 2) From the rear, with the rear wheels lifted and the front wheels on theground, provided the steering and drivetrain are in operational condition. Before towing, make sure that transaxleis in neutral, the steering wheel is
unlocked (the ignition key should be in the “ACC” position), and the steering wheel is secured with a clampingdevice designed for towing service.
WA R N I N G
Never connect the jump lead directlyto the negative (–) terminal of the dis- charged battery, or an explosion may occur.
CAUTION
Connect the jump le ad to the engine mount bracket securely. If the jump lead disconnects from the engine mount bracket because of vibrationat the start of the engine, the jump lead could be caught in the drive belts.
NOTICE
To help avoid damage to your vehicle during towing, proper equipment and towing procedures must be used.
NOTICE
After shifting the Auto Gear Shiftlever to the “N” position, always check the gear position indicator in the instrument cluster shows the “N”position to make sure that the transaxle is disengaged. If the transaxle cannot be put in neu-tral, turn the key from the “LOCK” to the “ON” position, and move the Auto Gear Shift lever from “N” to “D”,“M” or “R”, then back to “N” again. Then turn the key from the “ON” to the “LOCK” position.These procedures may help put the transaxle in neutral. If the transaxle still cannot be put in neutral, you can-not tow the vehicle without using a towing dolly. The steering column is not strongenough to with stand shocks trans- mitted from the fr ont wheels during towing. Always unlock the steeringwheel before towing.
175