Ps sensor SUZUKI JIMNY 2005 3.G Service Workshop Manual
[x] Cancel search | Manufacturer: SUZUKI, Model Year: 2005, Model line: JIMNY, Model: SUZUKI JIMNY 2005 3.GPages: 687, PDF Size: 13.38 MB
Page 436 of 687

Downloaded from www.Manualslib.com manuals search engine ENGINE GENERAL INFORMATION AND DIAGNOSIS 6-79
DTC P0335 (DTC No.23) Crankshaft Position (CKP) Sensor Circuit Malfunction
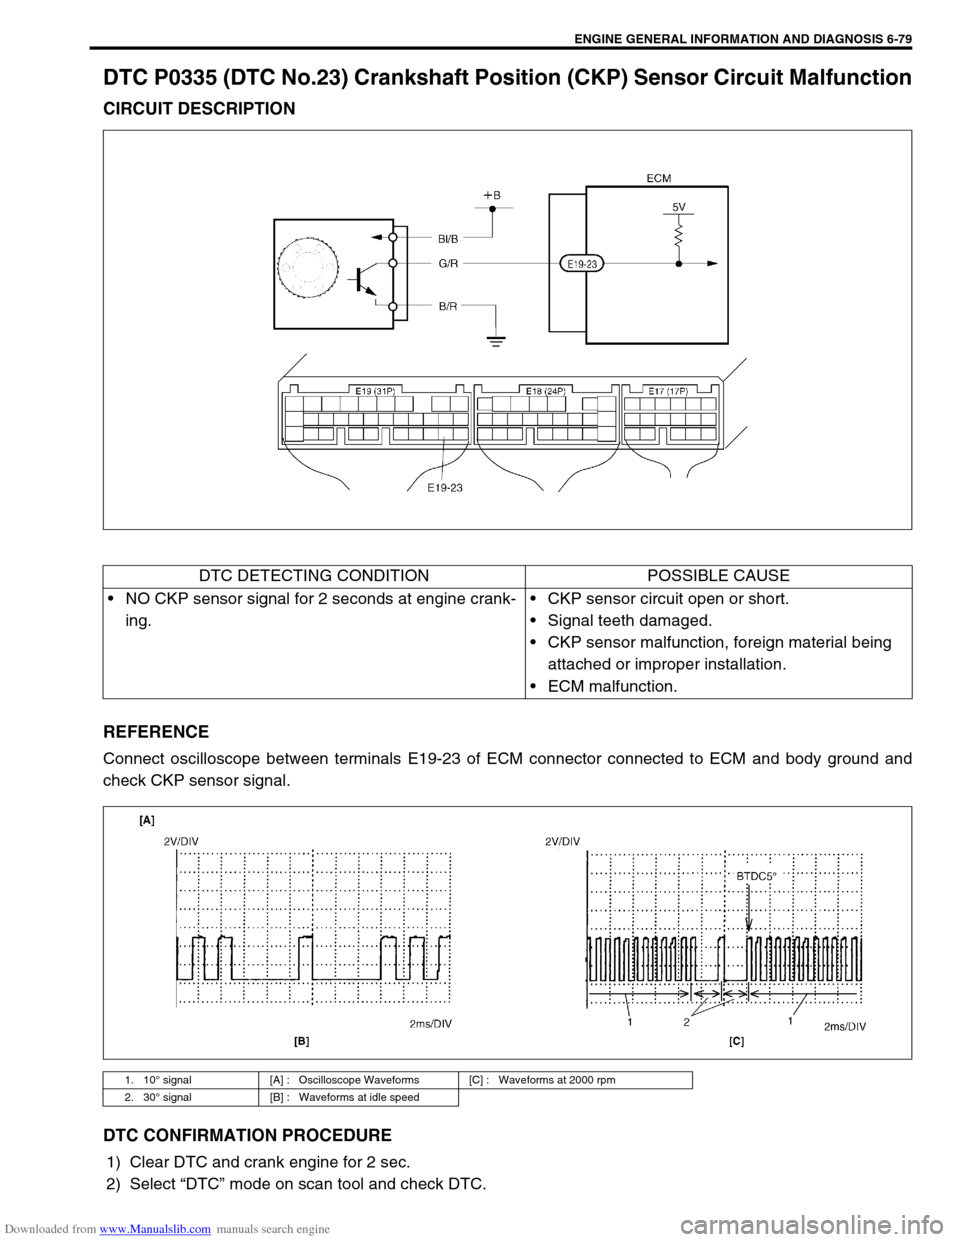
CIRCUIT DESCRIPTION
REFERENCE
Connect oscilloscope between terminals E19-23 of ECM connector connected to ECM and body ground and
check CKP sensor signal.
DTC CONFIRMATION PROCEDURE
1) Clear DTC and crank engine for 2 sec.
2) Select “DTC” mode on scan tool and check DTC.
DTC DETECTING CONDITION POSSIBLE CAUSE
NO CKP sensor signal for 2 seconds at engine crank-
ing.CKP sensor circuit open or short.
Signal teeth damaged.
CKP sensor malfunction, foreign material being
attached or improper installation.
ECM malfunction.
1. 10° signal [A] : Oscilloscope Waveforms [C] : Waveforms at 2000 rpm
2. 30° signal [B] : Waveforms at idle speed
Page 437 of 687

Downloaded from www.Manualslib.com manuals search engine 6-80 ENGINE GENERAL INFORMATION AND DIAGNOSIS
INSPECTION
Step Action Yes No
1Was “Engine Diag. Flow Table” performed? Go to Step 2. Go to “Engine Diag.
Flow Table”.
2 Check CKP Sensor and connector for proper
installation.
Is CKP sensor installed properly and connector
connected securely?Go to Step 3. Correct.
3 Check Wire Harness and Connection.
1) Disconnect connector from CKP sensor.
2) Check for proper connection to CKP sensor at
each terminal.
3) If OK, turn ignition switch ON and check for
voltage at each terminal of sensor connector
disconnected. See Fig. 1.
Terminal “B+” : 10 – 14 V
Terminal “Vout” : 4 – 5 V
Terminal “GND” : 0 V
Is check result satisfactory?Go to Step 5. Go to Step 4.
4 Was terminal “Vout” voltage out of specification in
Step 3 check?“G/R” wire open, short or
poor connection.
If wire and connection are
OK, substitute a known-
good ECM and recheck.“Bl/B” or “B/R” wire
open, short or poor
connection.
5 Check Ground Circuit for Open.
1) Turn ignition switch OFF.
2) Check for continuity between “GND” terminal
of CKP sensor connector and engine ground.
Is continuity indicated?Go to Step 6.“B/R” wire open or
poor ground connec-
tion.
6 Check CKP Sensor for Operation.
1) Remove CKP sensor from sensor case.
2) Remove metal particles on end face of CKP
sensor, if any.
3) Connect each connector to ECM and CKP
sensor.
4) Turn ignition switch ON.
5) Check for voltage at terminal E19-23 of con-
nector connected to ECM by passing magnetic
substance (iron) (1) while keeping approxi-
mately 1 mm (0.03 in.) gap with respect to end
face of CKP sensor. See Fig. 2 and 3.
Does voltage vary from low (0 – 1 V) to high (4 – 5
V) or from high to low?Go to Step 7. Replace CKP sensor.
7 Check signal rotor for the following. See Fig. 4.
Damage
No foreign material attached
Is it in good condition?Intermittent trouble or
faulty ECM.
Check for intermittent
referring to “Intermittent
and Poor Connection” in
Section 0A.Clean rotor teeth or
replace CKP sensor.
Page 439 of 687

Downloaded from www.Manualslib.com manuals search engine 6-82 ENGINE GENERAL INFORMATION AND DIAGNOSIS
DTC P0340 (DTC No.15) Camshaft Position (CMP) Sensor Circuit Malfunction
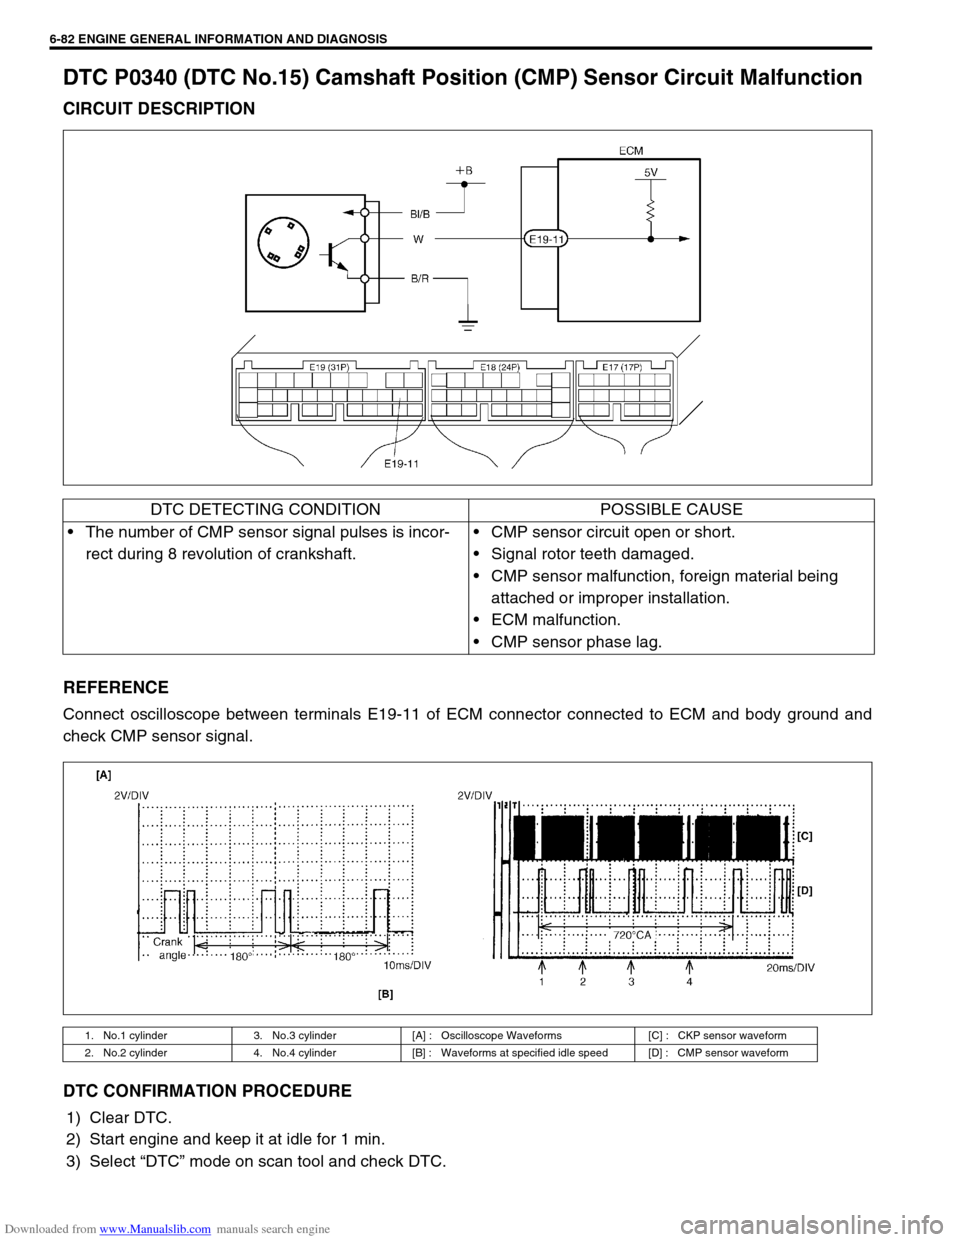
CIRCUIT DESCRIPTION
REFERENCE
Connect oscilloscope between terminals E19-11 of ECM connector connected to ECM and body ground and
check CMP sensor signal.
DTC CONFIRMATION PROCEDURE
1) Clear DTC.
2) Start engine and keep it at idle for 1 min.
3) Select “DTC” mode on scan tool and check DTC.
DTC DETECTING CONDITION POSSIBLE CAUSE
The number of CMP sensor signal pulses is incor-
rect during 8 revolution of crankshaft.CMP sensor circuit open or short.
Signal rotor teeth damaged.
CMP sensor malfunction, foreign material being
attached or improper installation.
ECM malfunction.
CMP sensor phase lag.
1. No.1 cylinder 3. No.3 cylinder [A] : Oscilloscope Waveforms [C] : CKP sensor waveform
2. No.2 cylinder 4. No.4 cylinder [B] : Waveforms at specified idle speed [D] : CMP sensor waveform
Page 440 of 687

Downloaded from www.Manualslib.com manuals search engine ENGINE GENERAL INFORMATION AND DIAGNOSIS 6-83
INSPECTION
Step Action Yes No
1Was “Engine Diag. Flow Table” performed? Go to Step 2. Go to “Engine Diag.
Flow Table”.
2 Check CMP Sensor and connector for proper installa-
tion.
Is CMP sensor installed properly and connector con-
nected securely?Go to Step 3. Correct.
3 Check Wire Harness and Connection.
1) Disconnect connector from CMP sensor.
2) Check for proper connection to CMP sensor at
each terminal.
3) If OK, turn ignition switch ON and check for volt-
age at each terminal of sensor connector discon-
nected. See Fig. 1.
Terminal “B+” : 10 – 14 V
Terminal “Vout” : 4 – 5 V
Terminal “GND” : 0 V
Is check result satisfactory?Go to Step 5. Go to Step 4.
4 Was terminal “Vout” voltage out of specification in
Step 3 check?“W” wire open, short or
poor connection.
If wire and connection
are OK, substitute a
known-good ECM and
recheck.“Bl/B” or “B/R” wire
open, short or poor
connection.
5 Check Ground Circuit for Open.
1) Turn ignition switch OFF.
2) Check for continuity between “GND” terminal of
CMP sensor connector and engine ground.
Is continuity indicated?Go to Step 6.“B/R” wire open or
poor ground connec-
tion.
6 Check CMP Sensor for Operation.
1) Remove CMP sensor from sensor case.
2) Remove metal particles on end face of CMP sen-
sor, if any.
3) Connect each connector to ECM and CMP sensor.
4) Turn ignition switch ON.
5) Check for voltage at terminal E19-11 of connector
connected to ECM by passing magnetic sub-
stance (iron) (1) while keeping approximately 1
mm (0.03 in.) gap with respect to end face of CMP
sensor. See Fig. 2 and 3.
Does voltage vary from low (0 – 1 V) to high (4 – 5 V)
or from high to low?Go to Step 7. Replace CMP sen-
sor.
7 Check signal rotor for the following.
See Fig. 4.
Damage
No foreign material attached
Is it in good condition?Intermittent trouble or
faulty ECM.
Check for intermittent
referring to “Intermittent
and Poor Connection” in
Section 0A.Clean rotor teeth or
replace CMP sensor.
Page 445 of 687

Downloaded from www.Manualslib.com manuals search engine 6-88 ENGINE GENERAL INFORMATION AND DIAGNOSIS
DTC P0420 Catalyst System Efficiency below Threshold
CIRCUIT DESCRIPTION
ECM monitors oxygen concentration in the exhaust gas which has passed the three way catalytic converter by
HO2S-2.
When the catalyst is functioning properly, the variation cycle of HO2S-2 output voltage (oxygen concentration) is
slower than that of HO2S-1 output voltage because of the amount of oxygen in the exhaust gas which has been
stored in the catalyst.
REFERENCE
1. Heated oxygen sensor-1 3. Three way catalytic converter 5. To the sensor [B] : Case of TYPE B is shown
(See NOTE)
2. Warm up three way catalytic
converter4. Heated oxygen sensor-2 [A] : Case of TYPE A is shown
(See NOTE)
NOTE:
For TYPE A and TYPE B, refer to the NOTE in “ECM Terminal Voltage Values Table” for applicable
model.
1. Engine running at closed loop
condition2. Fuel cut 3. Idle after fuel cut [A] : Oscilloscope waveforms
Page 451 of 687

Downloaded from www.Manualslib.com manuals search engine 6-94 ENGINE GENERAL INFORMATION AND DIAGNOSIS
DTC P0500 (DTC No.16) Vehicle Speed Sensor (VSS) Malfunction
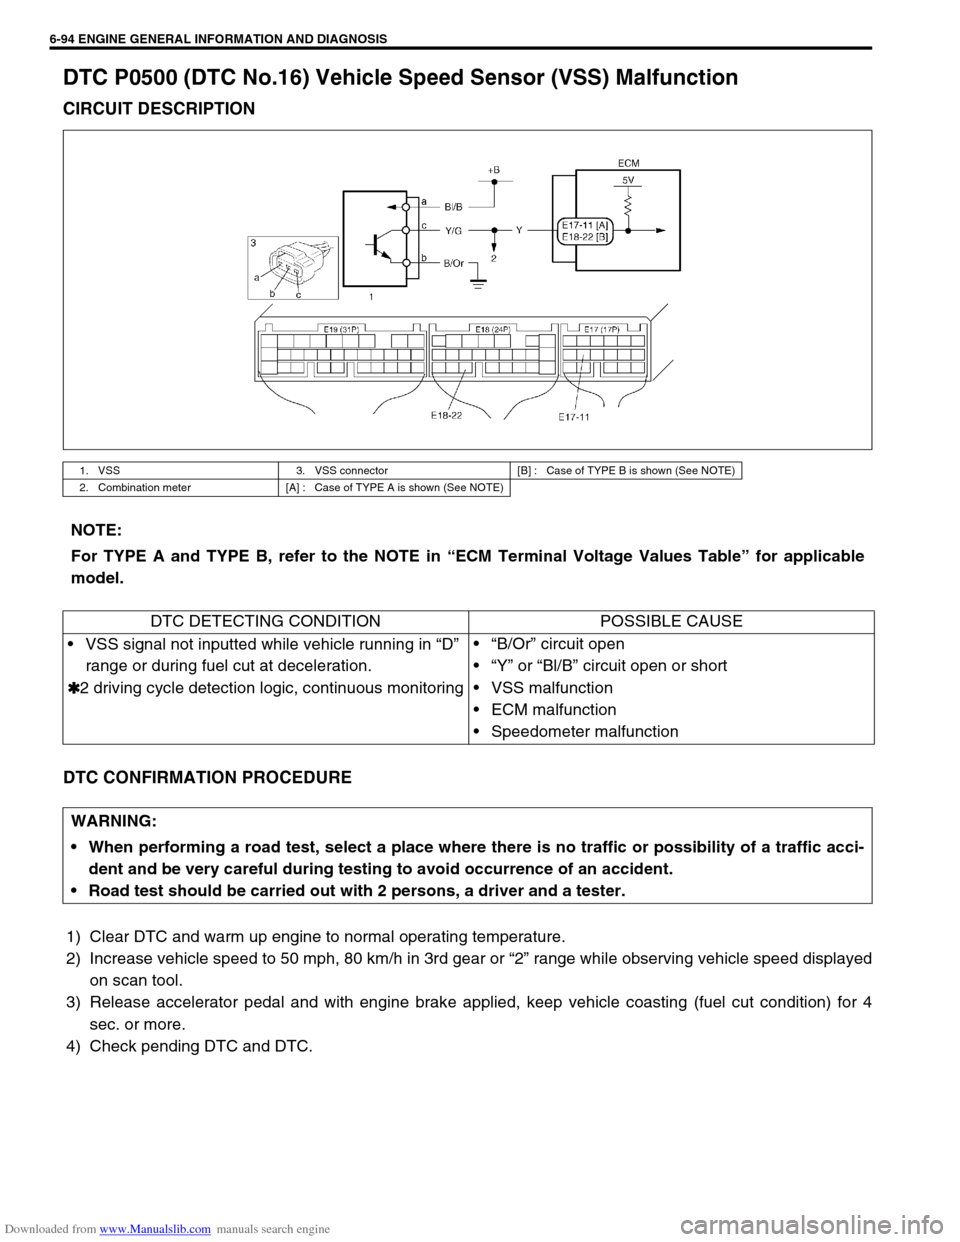
CIRCUIT DESCRIPTION
DTC CONFIRMATION PROCEDURE
1) Clear DTC and warm up engine to normal operating temperature.
2) Increase vehicle speed to 50 mph, 80 km/h in 3rd gear or “2” range while observing vehicle speed displayed
on scan tool.
3) Release accelerator pedal and with engine brake applied, keep vehicle coasting (fuel cut condition) for 4
sec. or more.
4) Check pending DTC and DTC.
1. VSS 3. VSS connector [B] : Case of TYPE B is shown (See NOTE)
2. Combination meter [A] : Case of TYPE A is shown (See NOTE)
NOTE:
For TYPE A and TYPE B, refer to the NOTE in “ECM Terminal Voltage Values Table” for applicable
model.
DTC DETECTING CONDITION POSSIBLE CAUSE
VSS signal not inputted while vehicle running in “D”
range or during fuel cut at deceleration.
✱
✱✱ ✱2 driving cycle detection logic, continuous monitoring“B/Or” circuit open
“Y” or “Bl/B” circuit open or short
VSS malfunction
ECM malfunction
Speedometer malfunction
WARNING:
When performing a road test, select a place where there is no traffic or possibility of a traffic acci-
dent and be very careful during testing to avoid occurrence of an accident.
Road test should be carried out with 2 persons, a driver and a tester.
Page 452 of 687
![SUZUKI JIMNY 2005 3.G Service Workshop Manual Downloaded from www.Manualslib.com manuals search engine ENGINE GENERAL INFORMATION AND DIAGNOSIS 6-95
INSPECTION
[A] Fig. 1 for Step 5 / [B] Fig. 2 for Step 4 and Step 6Step Action Yes No
1Was “Eng SUZUKI JIMNY 2005 3.G Service Workshop Manual Downloaded from www.Manualslib.com manuals search engine ENGINE GENERAL INFORMATION AND DIAGNOSIS 6-95
INSPECTION
[A] Fig. 1 for Step 5 / [B] Fig. 2 for Step 4 and Step 6Step Action Yes No
1Was “Eng](/img/20/7588/w960_7588-451.png)
Downloaded from www.Manualslib.com manuals search engine ENGINE GENERAL INFORMATION AND DIAGNOSIS 6-95
INSPECTION
[A] Fig. 1 for Step 5 / [B] Fig. 2 for Step 4 and Step 6Step Action Yes No
1Was “Engine Diag. Flow Table” performed? Go to Step 2. Go to “Engine Diag. Flow
Table”.
2 Does speedometer indicate vehicle speed? Go to Step 3. Go to Step 5.
3 Check Vehicle Speed Signal.
Is vehicle speed displayed on scan tool in step
2) and 3) of DTC confirmation procedure?Intermittent trouble or
faulty ECM.
Check for intermittent
referring to “Intermittent
and Poor Connection” in
Section 0A.Go to Step 4.
4 1) Turn ignition switch to OFF position.
2) Disconnect combination meter connec-
tors.Refer to Section 8.
3) Turn ignition switch to ON position, without
running engine.
4) Measure voltage from terminal “c” of VSS
connector to ground. See Fig.2.
Is voltage within 4 – 5 V?Faulty speedometer.“Y” or “Y/G” wire open or
short.
Poor connection of ECM
connector terminal.
If OK, substitute a known-
good ECM and recheck.
5 1) With ignition switch at OFF position, discon-
nect VSS connector.
2) Turn ignition switch to ON position, without
running engine.
3) Measure voltage from terminal “a” to “b” of
VSS connector. See Fig.1.
Is voltage within 10 – 14 V?Go to Step 6.“Bl/B” or “B/Or” wire open
or short.
6 1) Measure voltage from terminal “c” of VSS
connector to ground. See Fig.2.
Is voltage more than 4 V?Go to Step 7.“Y” or “Y/G” wire open or
short.
Poor connection of ECM
connector terminal.
If OK, substitute a known-
good ECM and recheck.
7 1) Remove VSS.
2) Visually inspect VSS sensor signal rotor for
damage.
Was any damage found?Faulty VSS signal rotor. Poor connection of VSS
connector terminal.
If OK, substitute a known-
good VSS and recheck.
Page 456 of 687

Downloaded from www.Manualslib.com manuals search engine ENGINE GENERAL INFORMATION AND DIAGNOSIS 6-99
DTC P1450 Barometric Pressure Sensor Low / High Input
DTC P1451 Barometric Pressure Sensor Performance Problem
WIRING DIAGRAM / CIRCUIT DESCRIPTION
Barometric pressure sensor is installed in ECM.
DTC CONFIRMATION PROCEDURE
1) Turn ignition switch OFF.
2) Clear DTC with ignition switch ON.
3) Turn ignition switch ON for 2 sec., crank engine for 2 sec. and run it at idle for 1 min.
4) Check pending DTC in “ON BOARD TEST” or “PENDING DTC” mode and DTC in “DTC” mode.
INSPECTION
DTC P1450 :
Substitute a known-good ECM and recheck.
DTC P1451 :
DTC DETECTING CONDITION POSSIBLE CAUSE
DTC P1450 :
Barometric pressure sensor voltage is 4.7 V or higher, or
1.6 V or lowerECM (barometric pressure sensor) malfunc-
tion
DTC P1451 :
Vehicle stopped
Engine cranking
Difference between barometric pressure and intake mani-
fold absolute pressure is 26 kPa, 200 mmHg or more.
Difference between intake manifold absolute pressure at
engine start and pressure after engine start is less than 1.3
kPa, 10 mmHg.
✱
✱✱ ✱2 driving cycle detection logic, monitoring once / 1 driving.ECM (barometric pressure sensor) malfunc-
tion
NOTE:
Note that atmospheric pressure varies depending on weather conditions as well as altitude.
Take that into consideration when performing these check.
Step Action Yes No
1Was “Engine Diag. Flow Table” performed? Go to Step 2. Go to “Engine Diag. Flow
Table”.
2 1) Connect scan tool to DLC with ignition
switch OFF. See Fig.1.
2) Turn ignition switch ON and select “DATA
LIST” mode on scan tool.
3) Check manifold absolute pressure.
Is it barometric pressure (approx. 100 kPa, 760
mmHg) at sea level?Substitute a known-good
ECM and recheck.Go to Step 3.
Page 457 of 687
![SUZUKI JIMNY 2005 3.G Service Workshop Manual Downloaded from www.Manualslib.com manuals search engine 6-100 ENGINE GENERAL INFORMATION AND DIAGNOSIS
[A] Fig. 1 for Step 2 / [B] Fig. 2 for Step 3
Table 13 Check MAP Sensor
1) Remove MAP sensor fro SUZUKI JIMNY 2005 3.G Service Workshop Manual Downloaded from www.Manualslib.com manuals search engine 6-100 ENGINE GENERAL INFORMATION AND DIAGNOSIS
[A] Fig. 1 for Step 2 / [B] Fig. 2 for Step 3
Table 13 Check MAP Sensor
1) Remove MAP sensor fro](/img/20/7588/w960_7588-456.png)
Downloaded from www.Manualslib.com manuals search engine 6-100 ENGINE GENERAL INFORMATION AND DIAGNOSIS
[A] Fig. 1 for Step 2 / [B] Fig. 2 for Step 3
Table 13 Check MAP Sensor
1) Remove MAP sensor from intake manifold
and connect vacuum pump gauge to MAP
sensor. See Fig. 2.
2) Connect scan tool to DLC and turn ignition
switch ON.
3) Check intake manifold absolute pressure
displayed on scan tool for specified value.
See Table 1.
Is check result satisfactory?Check air intake system
for air being drawn in and
engine compression.
If OK, then substitute a
known-good ECM and
recheck.Replace MAP sensor. Step Action Yes No
Applying Vacuum Displayed Value on Scan Tool
0 Barometric pressure
(Approx. 100 kPa, 760 mmHg)
027 kPa
200 mmHgBarometric pressure – 27 kPa
(Approx. 73 kPa, 560 mmHg)
67 kPa
500 mmHgBarometric pressure – 67 kPa
(Approx. 33 kPa, 260 mmHg)
Page 458 of 687

Downloaded from www.Manualslib.com manuals search engine ENGINE GENERAL INFORMATION AND DIAGNOSIS 6-101
DTC P1500 Engine Starter Signal Circuit Malfunction
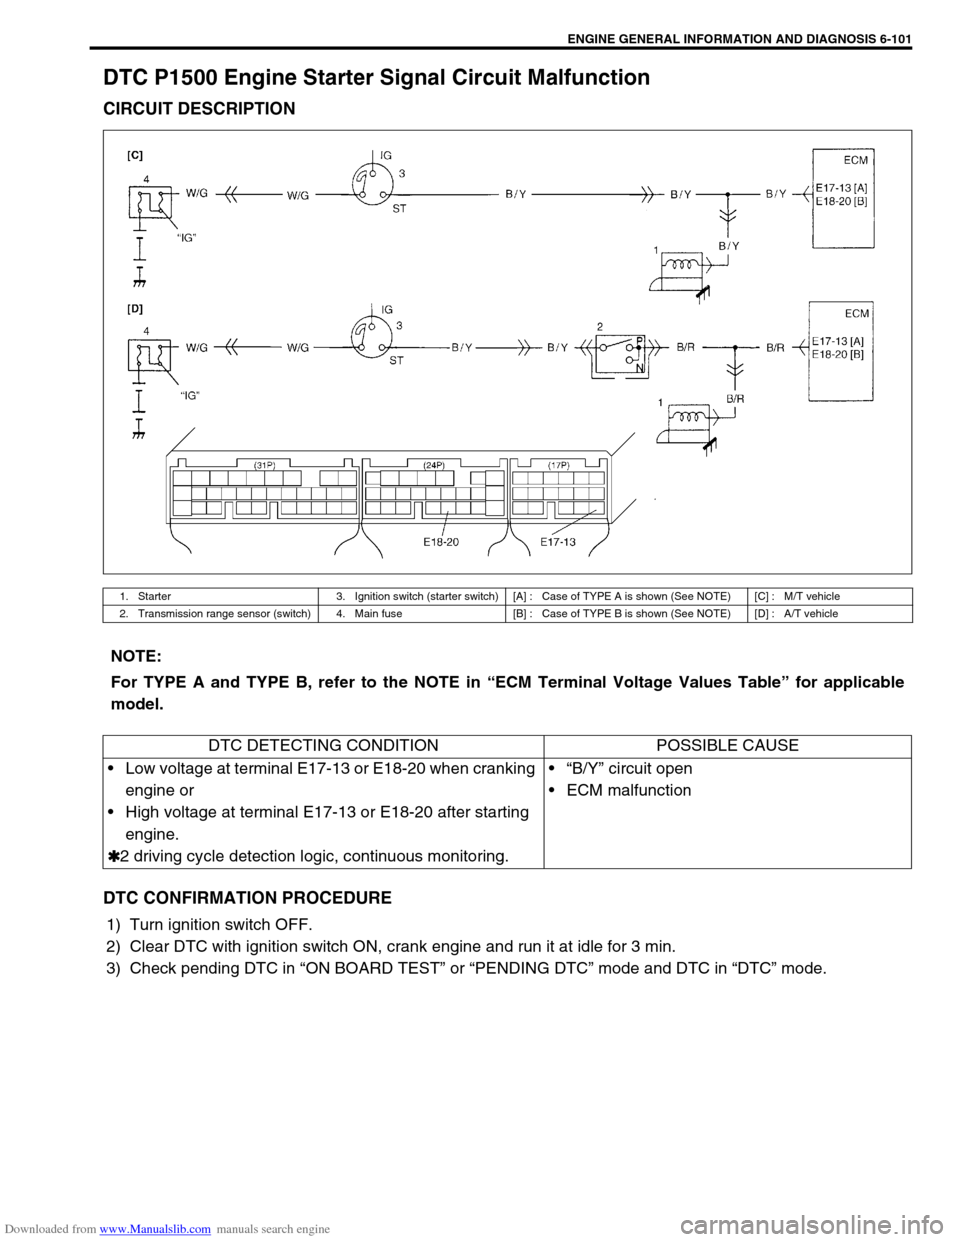
CIRCUIT DESCRIPTION
DTC CONFIRMATION PROCEDURE
1) Turn ignition switch OFF.
2) Clear DTC with ignition switch ON, crank engine and run it at idle for 3 min.
3) Check pending DTC in “ON BOARD TEST” or “PENDING DTC” mode and DTC in “DTC” mode.
1. Starter 3. Ignition switch (starter switch) [A] : Case of TYPE A is shown (See NOTE) [C] : M/T vehicle
2. Transmission range sensor (switch) 4. Main fuse [B] : Case of TYPE B is shown (See NOTE) [D] : A/T vehicle
NOTE:
For TYPE A and TYPE B, refer to the NOTE in “ECM Terminal Voltage Values Table” for applicable
model.
DTC DETECTING CONDITION POSSIBLE CAUSE
Low voltage at terminal E17-13 or E18-20 when cranking
engine or
High voltage at terminal E17-13 or E18-20 after starting
engine.
✱
✱✱ ✱2 driving cycle detection logic, continuous monitoring.“B/Y” circuit open
ECM malfunction