4wd switch SUZUKI JIMNY 2005 3.G Service User Guide
[x] Cancel search | Manufacturer: SUZUKI, Model Year: 2005, Model line: JIMNY, Model: SUZUKI JIMNY 2005 3.GPages: 687, PDF Size: 13.38 MB
Page 179 of 687
Downloaded from www.Manualslib.com manuals search engine 3D-6 FRONT SUSPENSION
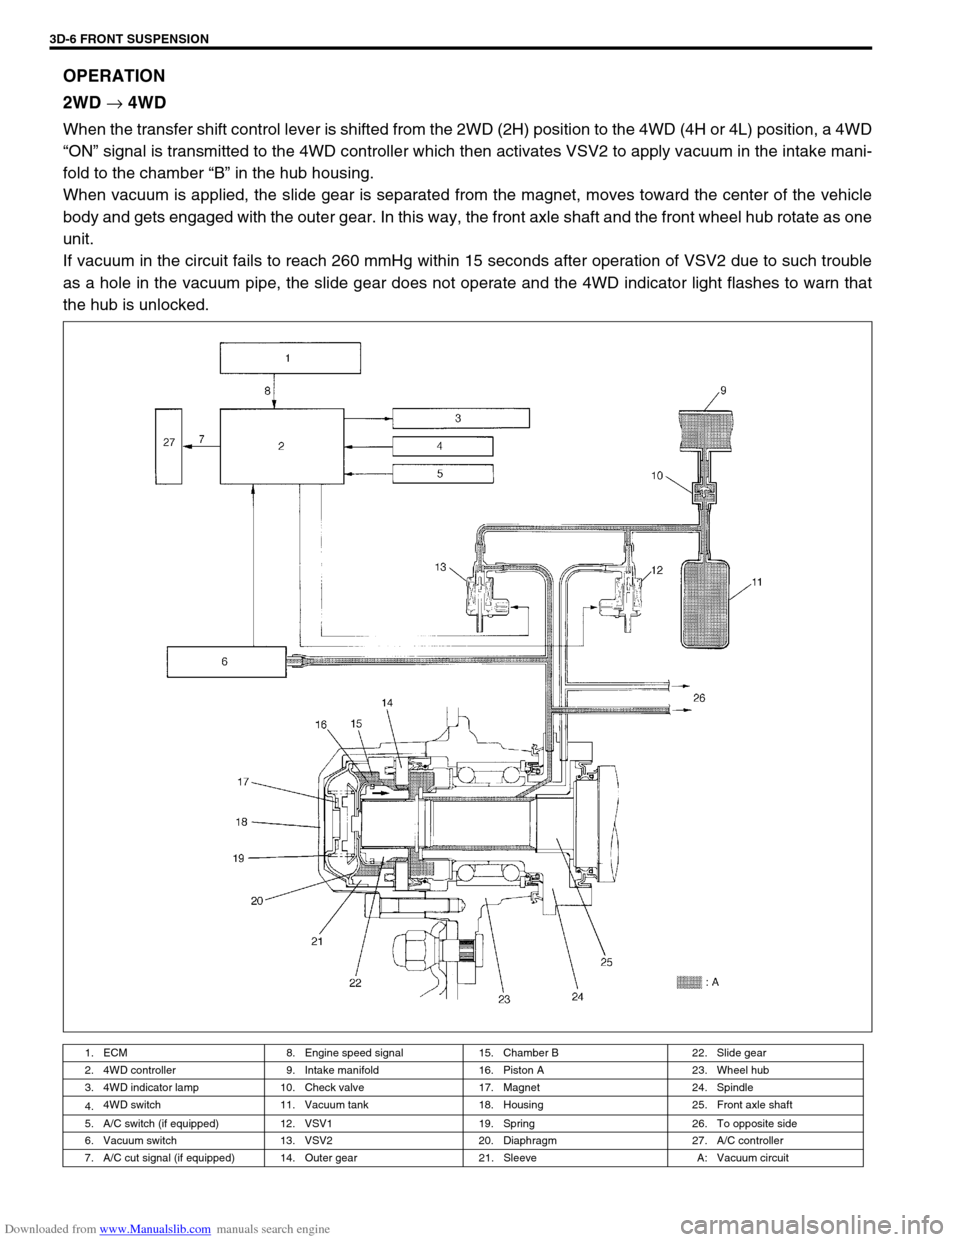
OPERATION
2WD
→ 4WD
When the transfer shift control lever is shifted from the 2WD (2H) position to the 4WD (4H or 4L) position, a 4WD
“ON” signal is transmitted to the 4WD controller which then activates VSV2 to apply vacuum in the intake mani-
fold to the chamber “B” in the hub housing.
When vacuum is applied, the slide gear is separated from the magnet, moves toward the center of the vehicle
body and gets engaged with the outer gear. In this way, the front axle shaft and the front wheel hub rotate as one
unit.
If vacuum in the circuit fails to reach 260 mmHg within 15 seconds after operation of VSV2 due to such trouble
as a hole in the vacuum pipe, the slide gear does not operate and the 4WD indicator light flashes to warn that
the hub is unlocked.
1. ECM 8. Engine speed signal 15. Chamber B 22. Slide gear
2. 4WD controller 9. Intake manifold 16. Piston A 23. Wheel hub
3. 4WD indicator lamp 10. Check valve 17. Magnet 24. Spindle
4.4WD switch 11. Vacuum tank 18. Housing 25. Front axle shaft
5. A/C switch (if equipped) 12. VSV1 19. Spring 26. To opposite side
6. Vacuum switch 13. VSV2 20. Diaphragm 27. A/C controller
7. A/C cut signal (if equipped) 14. Outer gear 21. Sleeve A: Vacuum circuit
Page 180 of 687
Downloaded from www.Manualslib.com manuals search engine FRONT SUSPENSION 3D-7
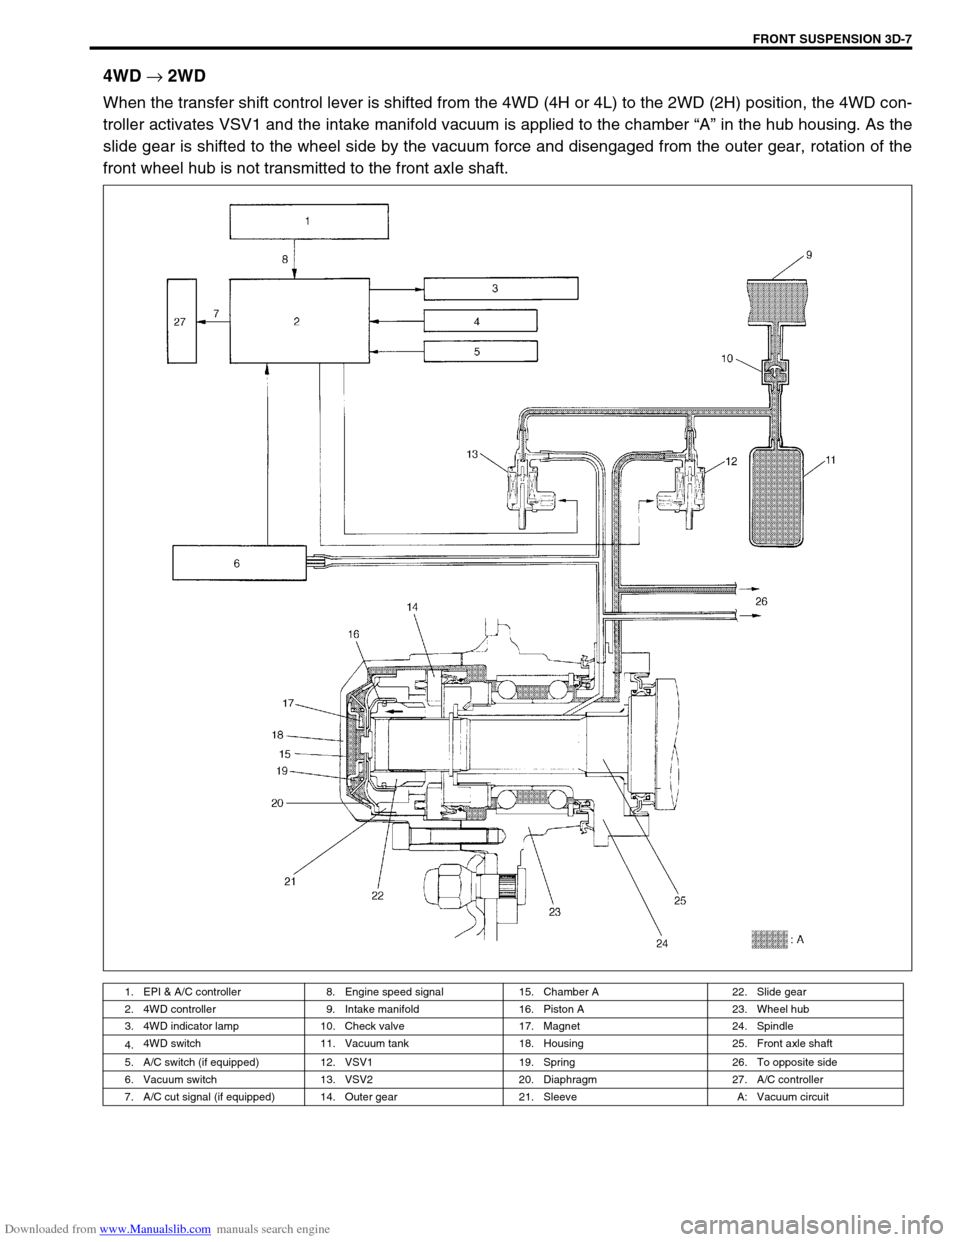
4WD
→ 2WD
When the transfer shift control lever is shifted from the 4WD (4H or 4L) to the 2WD (2H) position, the 4WD con-
troller activates VSV1 and the intake manifold vacuum is applied to the chamber “A” in the hub housing. As the
slide gear is shifted to the wheel side by the vacuum force and disengaged from the outer gear, rotation of the
front wheel hub is not transmitted to the front axle shaft.
1. EPI & A/C controller 8. Engine speed signal 15. Chamber A 22. Slide gear
2. 4WD controller 9. Intake manifold 16. Piston A 23. Wheel hub
3. 4WD indicator lamp 10. Check valve 17. Magnet 24. Spindle
4.4WD switch 11. Vacuum tank 18. Housing 25. Front axle shaft
5. A/C switch (if equipped) 12. VSV1 19. Spring 26. To opposite side
6. Vacuum switch 13. VSV2 20. Diaphragm 27. A/C controller
7. A/C cut signal (if equipped) 14. Outer gear 21. Sleeve A: Vacuum circuit
Page 181 of 687

Downloaded from www.Manualslib.com manuals search engine 3D-8 FRONT SUSPENSION
Diagnosis
Diagnosis Table
For description not found in the table below, refer to “Diagnosis Table” in Section 3.
4WD CONTROL SYSTEM
4WD CONTROL SYSTEM DIAGNOSTIC FLOW TABLE
Before performing the trouble diagnosis, check that the air locking hub assemblies are in good condition and
there is no air leakage from vacuum hoses and vacuum pipe. Refer to “4WD Control System Check” in this sec-
tion for air leakage.
[NOTES ON SYSTEM CIRCUIT INSPECTION]
Be sure to read “Precautions for Electrical Circuit Service” in Section 0A before circuit inspection and
observe what is written there.
For system circuit, refer to the figure of “System Circuit” in this section. Condition Possible Cause Correction
4WD Indicator light
flashingHub locking procedure error
Defective VSV2
Defective vacuum switch
Defective check valve or vacuum tank
Air leak from vacuum circuit
Clogged vacuum hose or pipe
Faulty 4WD controllerShift transfer shift control lever
2WD → 4WD once again
Replace
Replace
Replace
Check and repair
Replace
Check and replace
2WD/4WD switching
errorDefective air locking hub assembly
Abnormality in 4WD control system
Air leakage from vacuum circuit
Clogged vacuum hose or pipe
Defective check valve or vacuum tankReplace
Inspect referring to “4WD Control
System Diagnostic Flow Table”
Check and replace
Replace
Replace
Step Action Yes No
1 Check ground circuit.
1) Disconnect coupler from 4WD controller
with ignition switch OFF.
2) Check for proper connection to 4WD con-
troller at all terminals.
3) If OK, check continuity between A5 terminal
and body ground.
Is there continuity between A5 terminal and
body ground?Go to Step 2.“B” wire is open.
2 Check power circuit.
1) Disconnect coupler from 4WD controller.
2) Turn ignition switch ON.
3) Check voltage between A10 terminal and
ground.
Is it 10 – 14 V?Go to Step 3.“Y/R” circuit is open or
short.
Page 182 of 687

Downloaded from www.Manualslib.com manuals search engine FRONT SUSPENSION 3D-9
3 Check 4WD switch circuit.
1) Connect coupler to 4WD controller.
2) Turn ignition switch ON and check voltage
between A7 terminal and ground.
Transfer lever is in 2H : about 10 – 14 V
Transfer lever is in 4L or 4H : about 0 V
Is check result satisfactory?Go to Step 4. Check 4WD switch (refer
to “4WD Switch” in Sec-
tion 7D), “Bl/B” and “B”
circuits of 4WD switch.
If OK, substitute a known-
good 4WD controller and
recheck.
4 Check VSV1 circuit.
1) Turn ignition switch ON.
2) Check voltage between A1 terminal and
ground.
Is it 10 – 14 V when transfer lever is in 4H or 4L
range and about 0 V for 10 seconds after it is
shifted to 2H range?Go to Step 5. Check VSV1 (refer to
“4WD Control System
Check” in this section),
“Y/R” and “Gr/B” circuits
of VSV1.
If OK, substitute a known-
good 4WD controller and
recheck.
5 Check VSV2 circuit.
1) Turn ignition switch ON.
2) Check voltage between A2 terminal and
ground.
Is it 10 – 14 V when transfer lever is in 2H range
and about 0 V for 5 seconds after it is shifted to
4H or 4L range?Go to Step 6. Check VSV2 (refer to
“4WD Control System
Check” in this section),
“Y/R” and “Gr/R” circuits
of VSV2.
If OK, substitute a known-
good 4WD controller and
recheck.
6 Check vacuum switch circuit.
1) Turn ignition switch ON (stating engine).
2) Check voltage between A6 terminal and
ground.
Is it 10 – 14 V when transfer lever is in 2H range
and about 0 V for 5 seconds after it is shifted to
4H or 4L range?Go to Step 7. Check vacuum switch
(refer to “4WD Control
System Check” in this
section), “Gr” and “B” cir-
cuits of vacuum switch.
If OK, substitute a known-
good 4WD controller and
recheck.
7 Check 4WD indicator light circuit.
1) Turn ignition switch ON.
2) Check voltage between A3 terminal and
ground.
Is it 10 – 14 V when transfer lever is in 2H range
and about 0 V within 15 seconds after it is
shifted to 4H or 4L range?Substitute a known-good
4WD controller and
recheck.Check “Bl” circuit (includ-
ing indicator light and
combination meter refer to
“Combination Meter” in
Section 8).
If OK, substitute a known-
good 4WD controller and
recheck. Step Action Yes No
Page 183 of 687
Downloaded from www.Manualslib.com manuals search engine 3D-10 FRONT SUSPENSION
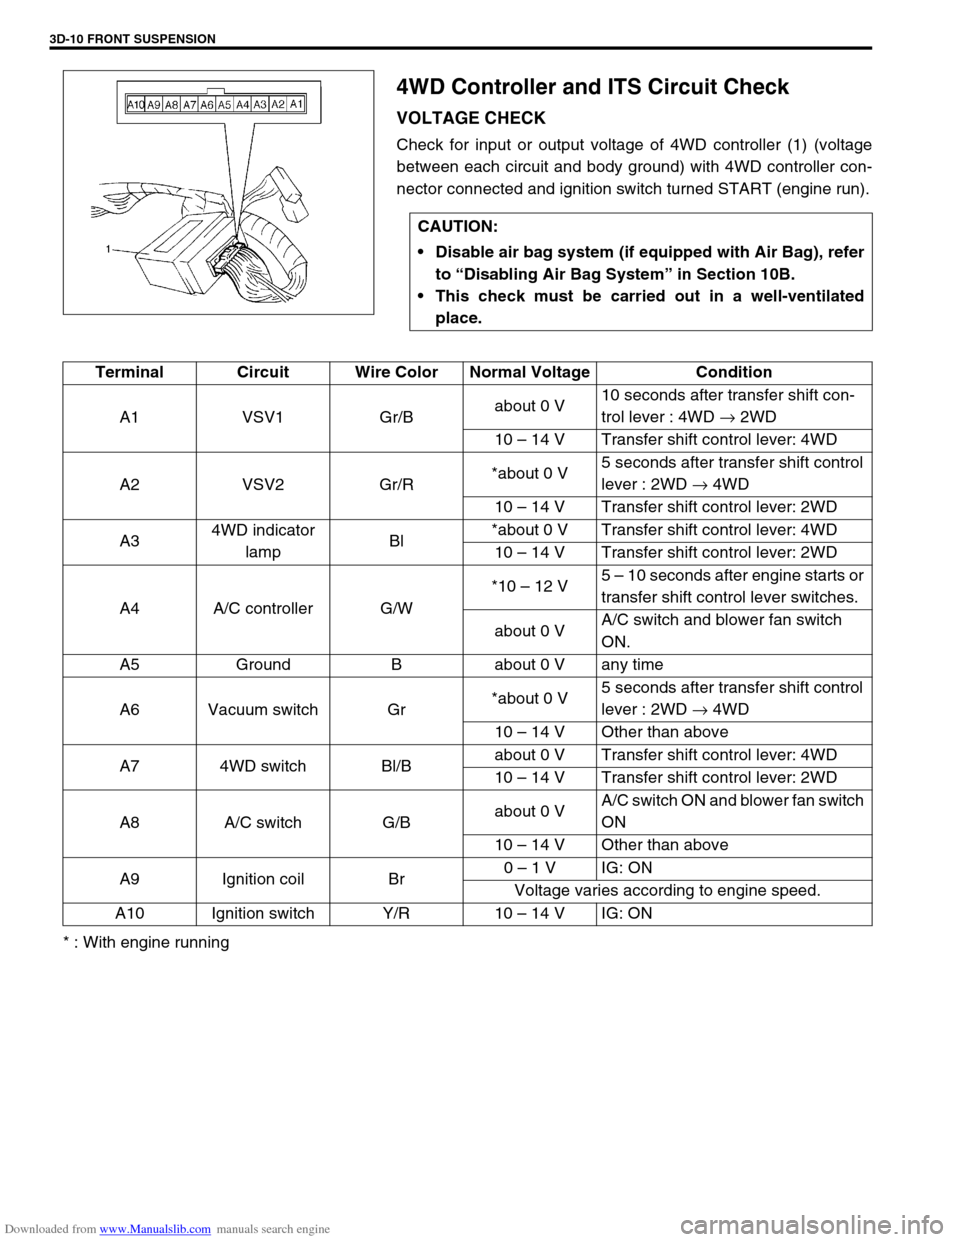
4WD Controller and ITS Circuit Check
VOLTAGE CHECK
Check for input or output voltage of 4WD controller (1) (voltage
between each circuit and body ground) with 4WD controller con-
nector connected and ignition switch turned START (engine run).
* : With engine runningCAUTION:
Disable air bag system (if equipped with Air Bag), refer
to “Disabling Air Bag System” in Section 10B.
This check must be carried out in a well-ventilated
place.
Terminal Circuit Wire Color Normal Voltage Condition
A1 VSV1 Gr/Babout 0 V10 seconds after transfer shift con-
trol lever : 4WD → 2WD
10 – 14 V Transfer shift control lever: 4WD
A2 VSV2 Gr/R*about 0 V5 seconds after transfer shift control
lever : 2WD → 4WD
10 – 14 V Transfer shift control lever: 2WD
A34WD indicator
lampBl*about 0 V Transfer shift control lever: 4WD
10 – 14 V Transfer shift control lever: 2WD
A4 A/C controller G/W*10 – 12 V5 – 10 seconds after engine starts or
transfer shift control lever switches.
about 0 VA/C switch and blower fan switch
ON.
A5 Ground B about 0 V any time
A6 Vacuum switch Gr*about 0 V5 seconds after transfer shift control
lever : 2WD → 4WD
10 – 14 V Other than above
A7 4WD switch Bl/Babout 0 V Transfer shift control lever: 4WD
10 – 14 V Transfer shift control lever: 2WD
A8 A/C switch G/Babout 0 VA/C switch ON and blower fan switch
ON
10 – 14 V Other than above
A9 Ignition coil Br0 – 1 V IG: ON
Voltage varies according to engine speed.
A10 Ignition switch Y/R 10 – 14 V IG: ON
Page 185 of 687

Downloaded from www.Manualslib.com manuals search engine 3D-12 FRONT SUSPENSION
2) Blow air from B and check that air comes out of C.
If found faulty, replace.
3) Connect 12 V-battery to VSV1 (VSV2) terminals and check
continuity between A and B.
Blow air from B and check that air comes out of A.
If found faulty, replace.
VACUUM SWITCH
1) Disconnect coupler from vacuum switch and check resis-
tance between two terminals of vacuum switch.
If resistance is out of specification, replace.
Resistance of vacuum switch
: More than 1 M
Ω
2) Connect vacuum pump gauge and apply vacuum more than
40 kPa (0.40 kg/cm
2, 5.70 Psi), then check resistance
between terminals of vacuum switch.
If resistance is out of specification, replace.
Vacuum switch resistance
: Less than 0.8
Ω
Special tool
(A) : 09917-47910
4WD SWITCH
Refer to “4WD Switch” in Section 7D.
VACUUM HOSE / PIPE
Inspect vacuum hoses for leaks or cracks, vacuum pipes for
cracks, dents or corrosion. If defective, replace.
Page 320 of 687
Downloaded from www.Manualslib.com manuals search engine ANTILOCK BRAKE SYSTEM (ABS) 5E-3
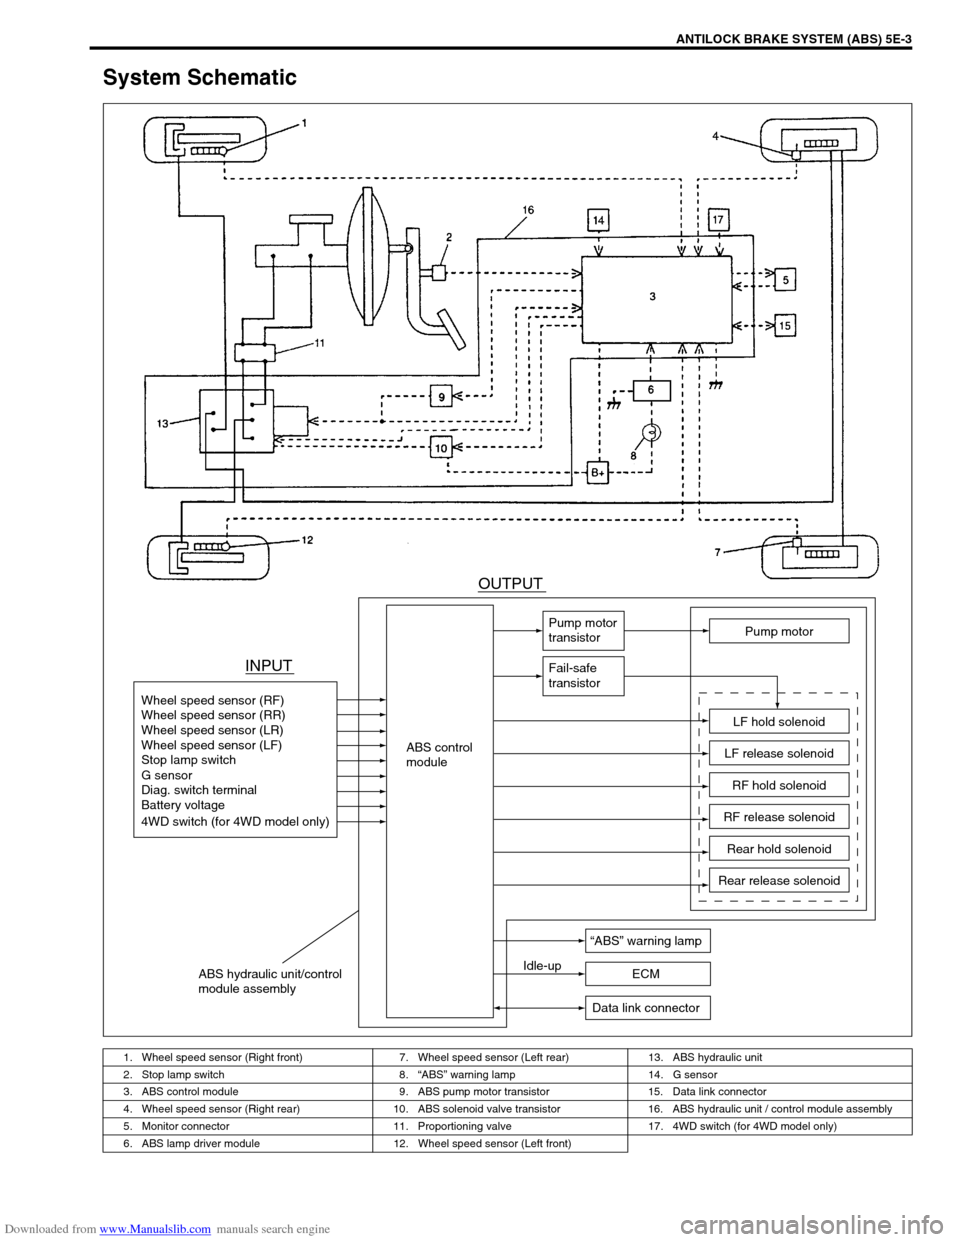
System Schematic
1. Wheel speed sensor (Right front) 7. Wheel speed sensor (Left rear) 13. ABS hydraulic unit
2. Stop lamp switch 8.“ABS” warning lamp 14. G sensor
3. ABS control module 9. ABS pump motor transistor 15. Data link connector
4. Wheel speed sensor (Right rear) 10. ABS solenoid valve transistor 16. ABS hydraulic unit / control module assembly
5. Monitor connector 11. Proportioning valve 17. 4WD switch (for 4WD model only)
6. ABS lamp driver module 12. Wheel speed sensor (Left front)
INPUTOUTPUT
ABS control
module Wheel speed sensor (RF)
Wheel speed sensor (RR)
Wheel speed sensor (LR)
Wheel speed sensor (LF)
Stop lamp switch
Diag. switch terminal
Battery voltage
4WD switch (for 4WD model only) G sensor
Pump motor
transistor
Fail-safe
transistor
Pump motor
LF hold solenoid
LF release solenoid
RF hold solenoid
RF release solenoid
Rear hold solenoid
Rear release solenoid
“ABS” warning lamp
Idle-up
ECM
Data link connector
ABS hydraulic unit/control
module assembly
Page 328 of 687
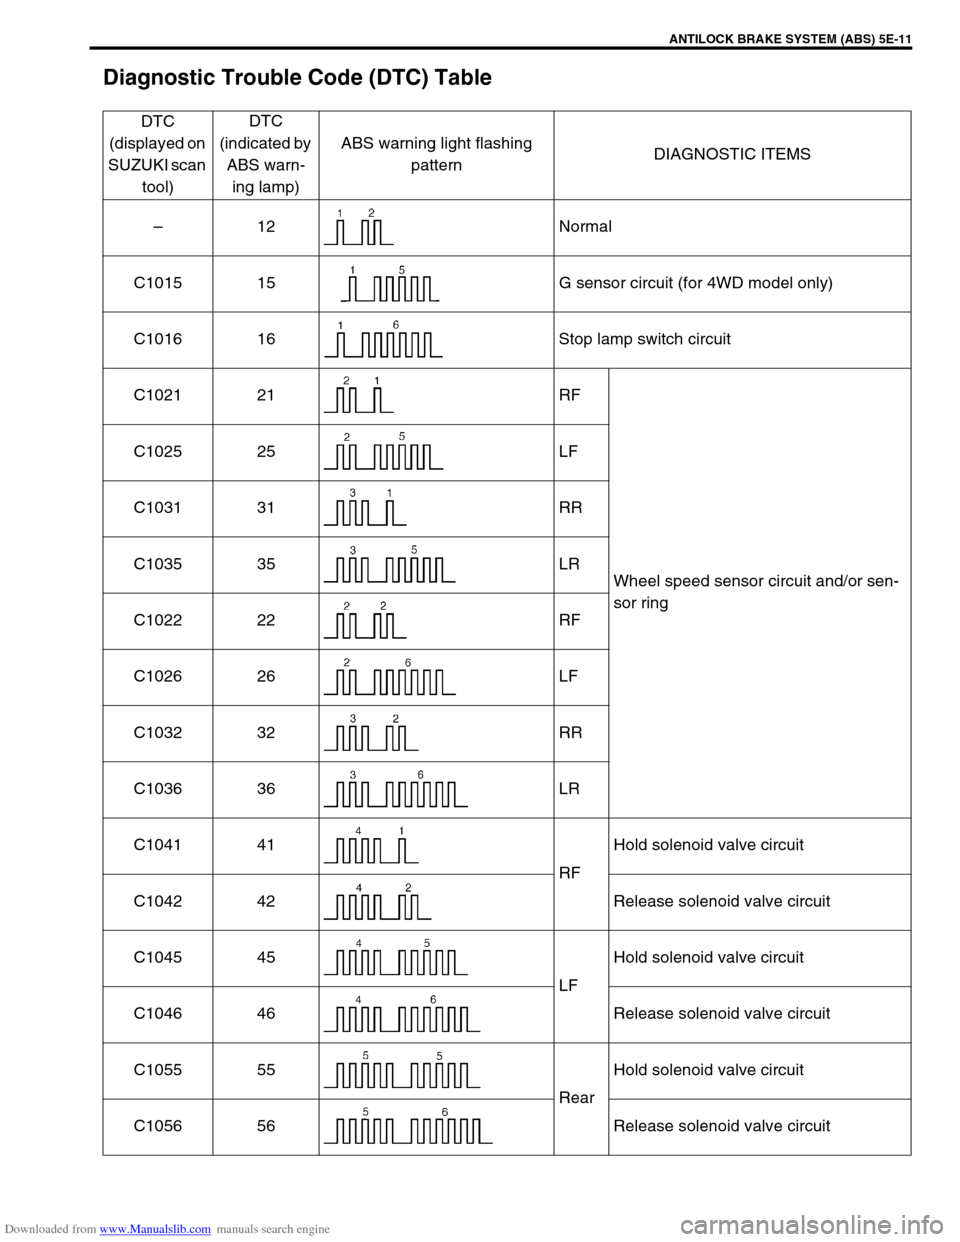
Downloaded from www.Manualslib.com manuals search engine ANTILOCK BRAKE SYSTEM (ABS) 5E-11
Diagnostic Trouble Code (DTC) Table
DTC
(displayed on
SUZUKI scan
tool)DTC
(indicated by
ABS warn-
ing lamp)ABS warning light flashing
patternDIAGNOSTIC ITEMS
–12 Normal
C1015 15 G sensor circuit (for 4WD model only)
C1016 16 Stop lamp switch circuit
C1021 21 RF
Wheel speed sensor circuit and/or sen-
sor ring C1025 25 LF
C1031 31 RR
C1035 35 LR
C1022 22 RF
C1026 26 LF
C1032 32 RR
C1036 36 LR
C1041 41
RFHold solenoid valve circuit
C1042 42 Release solenoid valve circuit
C1045 45
LFHold solenoid valve circuit
C1046 46 Release solenoid valve circuit
C1055 55
RearHold solenoid valve circuit
C1056 56 Release solenoid valve circuit
Page 329 of 687
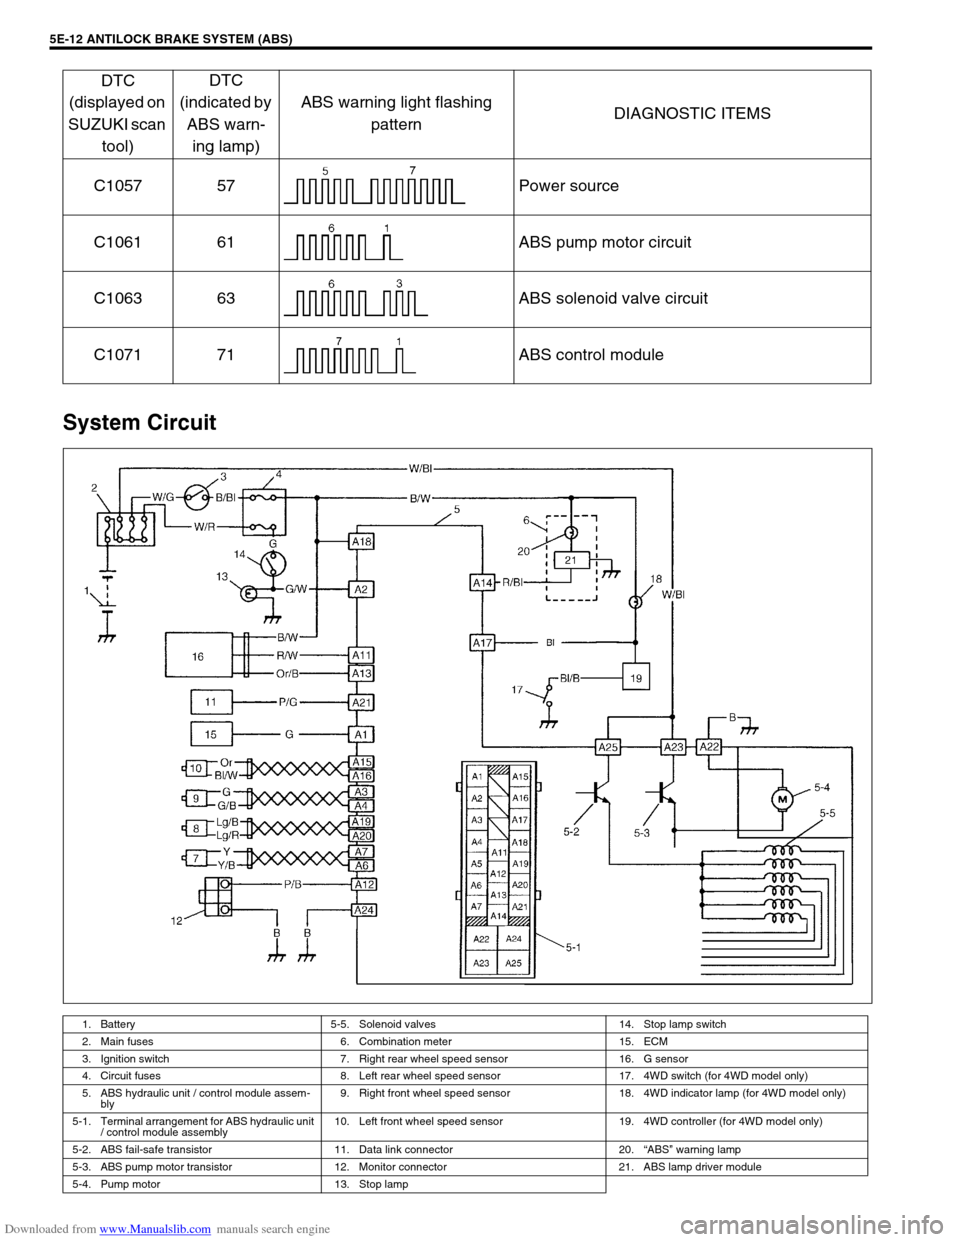
Downloaded from www.Manualslib.com manuals search engine 5E-12 ANTILOCK BRAKE SYSTEM (ABS)
System Circuit
C1057 57 Power source
C1061 61 ABS pump motor circuit
C1063 63 ABS solenoid valve circuit
C1071 71 ABS control module
1. Battery 5-5. Solenoid valves 14. Stop lamp switch
2. Main fuses 6. Combination meter 15. ECM
3. Ignition switch 7. Right rear wheel speed sensor 16. G sensor
4. Circuit fuses 8. Left rear wheel speed sensor 17. 4WD switch (for 4WD model only)
5. ABS hydraulic unit / control module assem-
bly9. Right front wheel speed sensor 18. 4WD indicator lamp (for 4WD model only)
5-1. Terminal arrangement for ABS hydraulic unit
/ control module assembly10. Left front wheel speed sensor 19. 4WD controller (for 4WD model only)
5-2. ABS fail-safe transistor 11. Data link connector 20.“ABS” warning lamp
5-3. ABS pump motor transistor 12. Monitor connector 21. ABS lamp driver module
5-4. Pump motor 13. Stop lamp
DTC
(displayed on
SUZUKI scan
tool)DTC
(indicated by
ABS warn-
ing lamp)ABS warning light flashing
patternDIAGNOSTIC ITEMS
Page 330 of 687

Downloaded from www.Manualslib.com manuals search engine ANTILOCK BRAKE SYSTEM (ABS) 5E-13
TERMINAL CIRCUIT
A1 Idle up signal
A2 Stop lamp switch
A3 Right front wheel speed sensor (+)
A4 Right front wheel speed sensor (–)
A5–
A6 Right rear wheel speed sensor (–)
A7 Right rear wheel speed sensor (+)
A8–
A9–
A10–
A11 G sensor signal
A12 Diagnosis switch terminal
A13 G sensor ground
A14“ABS” warning lamp
A15 Left front wheel speed sensor (+)
A16 Left front wheel speed sensor (–)
A17 4WD switch (for 4WD model only)
A18 Ignition switch
A19 Left rear wheel speed sensor (+)
A20 Left rear wheel speed sensor (–)
A21 Data link connector
A22 Ground (for ABS pump motor)
A23 ABS pump motor power supply
A24 Ground (for ABS control module)
A25 Solenoid valve power supply
Wire color
B : Black G/W : Green / White R/W : Red / White
B/BI : Black / Blue Lg/B : Light green / Black W/Bl : White / Blue
B/W : Black / White Lg/R : Light green / Red W/G : White / Green
B/Or : Black / Orange Or : Orange W/R : White / Red
Bl : Blue Or/B : Orange / Black Y : Yellow
Bl/W : Blue / White P/B : Pink / Black Y/B : Yellow / Black
G : Green P/G : Pink / Green
G/B : Green / Black R/Bl : Red / Blue