change time SUZUKI KIZASHI 2010 1.G Service Manual
[x] Cancel search | Manufacturer: SUZUKI, Model Year: 2010, Model line: KIZASHI, Model: SUZUKI KIZASHI 2010 1.GPages: 388, PDF Size: 4.94 MB
Page 212 of 388

5-33OTHER CONTROLS AND EQUIPMENT
57L20-03E
Selecting a USB device mode
Press the USB button (1).
Selecting a folder
Turn the sound control knob (2) to select a
folder.
Selecting a track
Press the Up button (3) to listen to the
next track.
Press the Down button (4) twice to listen
to the previous track.
When the Down button (4) is pressed
once, the track currently being played
will start again at the beginning.
Fast forwarding/Rewinding a track
Hold in the Up button (3) to advance a
track rapidly.
Hold in the Down button (4) to rewind a
track.Random play
Press the RDM button (6).
Each time the button is pressed, the mode
changes in the following order.
NOTE:
To cancel random play, press the RDM
button (6) several times to change the ran-
dom play mode to OFF.
FOLDER RANDOM
The random indicator “RDM.F” lights.
The tracks in the current folder are
played at random.
ALL RANDOM
The random indicator “RDM” lights.
The tracks in the USB device that is
connected are played at random.Repeat play
Press the RPT button (5).
Each time the button is pressed, repeat
play mode changes as follows:
NOTE:
To cancel repeat play, press the RPT but-
ton (5) several times to change the repeat
play mode to OFF.
FILE REPEAT
The repeat indicator “RPT” lights.
The track currently being played is
played repeatedly.
FOLDER REPEAT
The repeat indicator “RPT.F” lights.
All the tracks in the folder currently
being played are played repeatedly. CAUTION
Do not connect any USB device
other than a USB memory or a
USB audio player. Do not con-
nect multiple USB devices to the
USB connector. Supplying power
to multiple USB devices from the
connector could cause overheat-
ing and smoking.
OFF FOLDER RANDOM ALL RANDOM
OFF FILE REPEAT FOLDER REPEAT
Page 213 of 388

5-34
OTHER CONTROLS AND EQUIPMENT
57L20-03E
Display change
Press the DISP button (7).
Each time it is pressed, display is changed
as follows:
NOTE:
“NO TITLE” is displayed when there is
no information on the disc.
If all the text data cannot be displayed,
the “>” mark appears at the right end.
Holding down the DISP button (7) for
1 sec. or more calls the next page.
Notes on USB deviceCompatible USB devices
USB Mass Storage Class
For details as to whether your USB
memory/USB Audio is compatible with
USB Mass Storage Class, please con-
tact the USB memory/USB Audio manu-
facturer.
USB Standard Compatibility 1.1/2.0 Full
Speed
File System FAT16/32
Maximum current less than 500 mA
Capacity less than 4 GB (1 partition)
USB device connection
When connecting a USB device, make
sure the connector is pushed all the way
into the socket.
Do not leave the USB device for long
periods of time in places inside the car
where the temperature rises too high.
Back up any important data beforehand.
We cannot accept responsibility for any
lost data.
The use of USB devices that contain
data files other than MP3/WMA format
is not recommended.
Recording MP3/WMA files on a USB device Playback or display may not be possible
depending on the type of USB device or
the condition of the recording. Depending on the connected USB
memory, the order in which the files are
played back may differ from the order in
which the files were stored.
Compression formats
MP3
Bit rate: MPEG1 Audio Layer III : 64 k - 320 kbps
MPEG2 Audio Layer III : 64 k - 160 kbps Sampling frequency: MPEG1 Audio Layer III : 32 k/44.1 k/48 kHz
MPEG2 Audio Layer III : 16 k/22.05 k/24 kHzWMA (Ver.7, Ver.8)
Bit rate: CBR 48 k - 192 kbps
Sampling frequency: 32 k/44.1 k/48 kHz
WMA (Ver. 9*)
Bit rate: CBR 48 k - 320 kbps
Sampling frequency: 32 k/44.1 k/48 kHz
* WMA 9 Professional/LossLess/Voice are
not supported.
Maximum number of files/folders
Maximum number of files: 2500 (files +
folders) Maximum number of files in one folder: 255 Maximum depth of trees: 8
Maximum number of folders: 255
(Root folder is included.) Play time display
Folder name display
File name display
Album name display (MP3 only)
Track title display
Artist name display
Page 215 of 388

5-36
OTHER CONTROLS AND EQUIPMENT
57L20-03E
Selecting an iPod
® mode
Press the USB button (1).
Selecting a track
Press the Up button (3) to listen to the
next track.
Press the Down button (4) twice to listen
to the previous track.
When the Down button (4) is pressed
once, the track currently being played
will start again at the beginning.
Fast forwarding/Rewinding a track
Hold in the Up button (3) to advance a
track rapidly.
Hold in the Down button (4) to rewind a
track.Random play
Press the RDM button (6).
Each time the button is pressed, the mode
changes in the following order.
NOTE:
To cancel random play, press the RDM
button (6) several times to change the ran-
dom play mode to OFF.
SONG RANDOM
The random indicator “RDM” lights.
The tracks in the iPod
® are played at
random.
ALBUM RANDOM
The random indicator “D.RDM” lights.
The albums in the iPod® that are played
at random.Repeat play
Press the RPT button (5).
Each time the button is pressed, repeat
play mode changes as follows:
NOTE:
To cancel repeat play, press the RPT but-
ton (5) again.
SONG REPEAT
The repeat indicator “RPT” lights.
The track currently being played is
played repeatedly.
OFF SONG RANDOM ALBUM RANDOM
OFF SONG REPEAT
Page 216 of 388

5-37OTHER CONTROLS AND EQUIPMENT
57L20-03E
Display change
Press the DISP button (7).
Each time it is pressed, display is changed
as follows:
NOTE:
If all the text data cannot be displayed, the
“>” mark appears at the right end. Holding
down the DISP button (7) for 1 sec. or
more calls the next page.Playing Mode selection
1) Press and hold the USB button (1) for
1 second or longer.
2) Turn the TUNE FOLDER PUSH
SOUND knob (2).
Each time it is turned, mode is
changed as follows:
3) Press the TUNE FOLDER PUSH
SOUND knob (2) to select an item.
NOTE:
When the USB button (1) is pressed, the
previous screen appears.
When the DISP button (7) is pressed,
the regular screen appears.
“NO SONGS” will appear if no song
exists.
Notes on iPod
®
Controllable iPod
®/software version
iPod
® touch
iPod® classic
iPod® nano (4th generation)
iPod® nano (3rd generation)
iPod® nano (2nd generation)
iPod® nano (1st generation)
iPod® (5th generation)
* Please update the firmware of your
iPod® before using it.
Some functions may not be available
depending on the model of iPod
® or its
firmware version.
iPod
® is a trademark of Apple Inc., reg-
istered in the U.S. and other countries.
Apple is not responsible for the opera-
tion of this device or its compliance with
safety and regulatory standards.
iPod
® connection
Please make sure to detach the iPod
®
after turning off the car engine (turning
the ACC to OFF). The iPod
® may not
shut down while still connected, which
may result in battery depletion.
Please do not connect iPod® accesso-
ries such as an iPod
® remote control or
headphones while connecting iPod
®
with the unit. The unit may not operate
correctly. Playlist name & Track title display
(Playlist mode only)
Artist name & Track title display
Album name & Track title display
Track title & Play time display
PLAYLIST
ARTIST
ALBUM
SONGS
GENRE
Page 230 of 388

5-51OTHER CONTROLS AND EQUIPMENT
57L20-03E
4) Turn the TUNE FOLDER PUSH
SOUND knob (2) to select “Record
Name”, and press the TUNE FOLDER
PUSH SOUND knob (2) to determine
the selection.
5) Pronounce the name to be used at
voice recognition.
6) Turn the TUNE FOLDER PUSH
SOUND knob (2) to select “Confirm”,
and press the TUNE FOLDER PUSH
SOUND knob (2) to determine the
selection.
7) Select “CAR_M.MEDIA” from the
Bluetooth
® menu of the audio player
and make a connection.
Refer to the manual of your audio
player for further information.
8) Enter the Passkey displayed on the
system into the audio player.
NOTE:
Selection of “Go Back” displays the previ-
ous menu.Selecting the bluetooth audio mode
Press the CD button (1).
Each time the button is pressed, the
source is switched as follows:
Selecting a group (only for supported-
models)
Turn the TUNE FOLDER PUSH SOUND
knob (2) to select a group.
Selecting a track
Press the Up button (3) to listen to the
next track.
Press the Down button (4) twice to listen
to the previous track.
When the Down button (4) is pressed
once, the track currently being played
will start again at the beginning.
Fast forwarding/Rewinding a track
Hold in the Up button (3) to advance a
track rapidly.
Hold in the Down button (4) to rewind a
track.Display change
Press the DISP button (5).
Each time it is pressed, display is changed
as follows:
NOTE:
If all the text data cannot be displayed, the
“>” mark appears at the right end. Holding
down the DISP button (5) for 1 sec. or
more calls the next page. CD Bluetooth
® audio
Play time display
Track name display
Artist name display
Album name display
Page 246 of 388

5-67OTHER CONTROLS AND EQUIPMENT
57L20-03E
The anti-theft feature is intended to dis-
courage theft or the audio system by pre-
venting the system from operating when it
is moved to a different vehicle.
This feature works by allowing you to enter
a Personal Identification Number (PIN).
When the audio system is disconnected
from its power source, such as when the
audio system is removed or the battery is
disconnected, the system will not operate
again unless the PIN is reentered.Setting the Anti-Theft Function
1) Press the VOL PUSH POWER knob
(1) to power off.
2) Press the Preset buttons (2) 1, 6 and
VOL PUSH POWER knob (1) simulta-
neously.
“SECURITY” is displayed.
3) Press the Up button (3) and Preset
button (2) 1 simultaneously.
4) Enter a 4-digit PIN number using the
Preset buttons (2) 1-4.
5) Hold down TUNE FOLDER PUSH
SOUND knob (4) for 1 sec. or more.
NOTE:
Write down your PIN for the future use.
Canceling the anti-theft feature
This operation is to be done when you
want to cancel the anti-theft function or
change your PIN.
1) Press the Preset buttons (2) 1, 6 and
the VOL PUSH POWER knob (1)
simultaneously.
2) Press the Up button (3) and Preset
button (2) 1 simultaneously.
3) Enter a 4-digit PIN number using the
Preset buttons (2) 1-4.
4) Hold down the TUNE FOLDER PUSH
SOUND knob (4) for 1 sec. or more.
NOTE:
To change your PIN, first delete your cur-
rent PIN, then set a new one.Confirming Your Personal Identification
Number (PIN)
When the main power source is discon-
nected such as when you exchange your
battery, etc, you will have to confirm your
PIN to be able to use the audio system.
1) Press the engine switch to change the
ignition mode to “ACC”.
2) Press the Up button (3) and Preset
button (2) 1 simultaneously.
3) Enter a 4-digit PIN number using the
Preset buttons (2) 1-4.
4) Hold down the TUNE FOLDER PUSH
SOUND knob (4) for 1 sec. or more.
If the PIN that you input matches the
registered PIN, the power of the audio-
system will turn off, and you will be
able to operate the audio system.
NOTE:
If you input your PIN incorrectly, “ERROR”
will be displayed. If you enter an incorrect
PIN more than 10 times, “HELP” will be
displayed and you can not perform any
further operation.
Page 248 of 388

5-69OTHER CONTROLS AND EQUIPMENT
57L20-03E
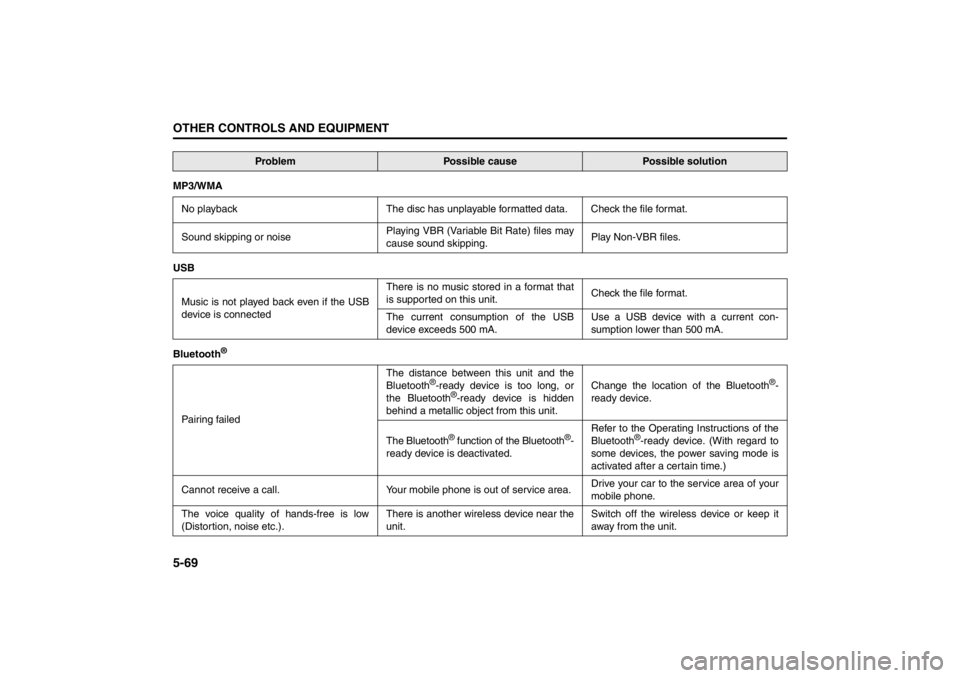
MP3/WMA
No playback The disc has unplayable formatted data. Check the file format.
Sound skipping or noisePlaying VBR (Variable Bit Rate) files may
cause sound skipping.Play Non-VBR files.
USB
Music is not played back even if the USB
device is connectedThere is no music stored in a format that
is supported on this unit.Check the file format.
The current consumption of the USB
device exceeds 500 mA.Use a USB device with a current con-
sumption lower than 500 mA.
Bluetooth
®
Pairing failedThe distance between this unit and the
Bluetooth
®-ready device is too long, or
the Bluetooth
®-ready device is hidden
behind a metallic object from this unit.Change the location of the Bluetooth
®-
ready device.
The Bluetooth
® function of the Bluetooth
®-
ready device is deactivated.Refer to the Operating Instructions of the
Bluetooth
®-ready device. (With regard to
some devices, the power saving mode is
activated after a certain time.)
Cannot receive a call. Your mobile phone is out of service area.Drive your car to the service area of your
mobile phone.
The voice quality of hands-free is low
(Distortion, noise etc.).There is another wireless device near the
unit.Switch off the wireless device or keep it
away from the unit.
Problem
Possible cause
Possible solution
Page 257 of 388

5-78
OTHER CONTROLS AND EQUIPMENT
57L20-03E
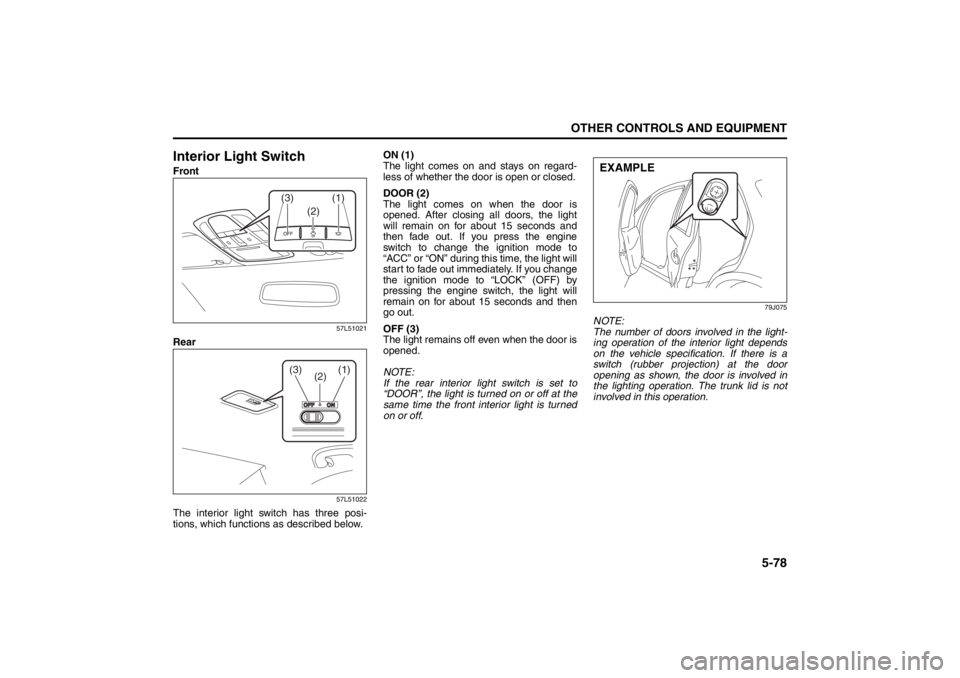
Interior Light SwitchFront
57L51021
Rear
57L51022
The interior light switch has three posi-
tions, which functions as described below.ON (1)
The light comes on and stays on regard-
less of whether the door is open or closed.
DOOR (2)
The light comes on when the door is
opened. After closing all doors, the light
will remain on for about 15 seconds and
then fade out. If you press the engine
switch to change the ignition mode to
“ACC” or “ON” during this time, the light will
start to fade out immediately. If you change
the ignition mode to “LOCK” (OFF) by
pressing the engine switch, the light will
remain on for about 15 seconds and then
go out.
OFF (3)
The light remains off even when the door is
opened.
NOTE:
If the rear interior light switch is set to
“DOOR”, the light is turned on or off at the
same time the front interior light is turned
on or off.
79J075
NOTE:
The number of doors involved in the light-
ing operation of the interior light depends
on the vehicle specification. If there is a
switch (rubber projection) at the door
opening as shown, the door is involved in
the lighting operation. The trunk lid is not
involved in this operation.
(2)(1) (3)
(1) (3)
(2)
EXAMPLE
Page 259 of 388

5-80
OTHER CONTROLS AND EQUIPMENT
57L20-03E
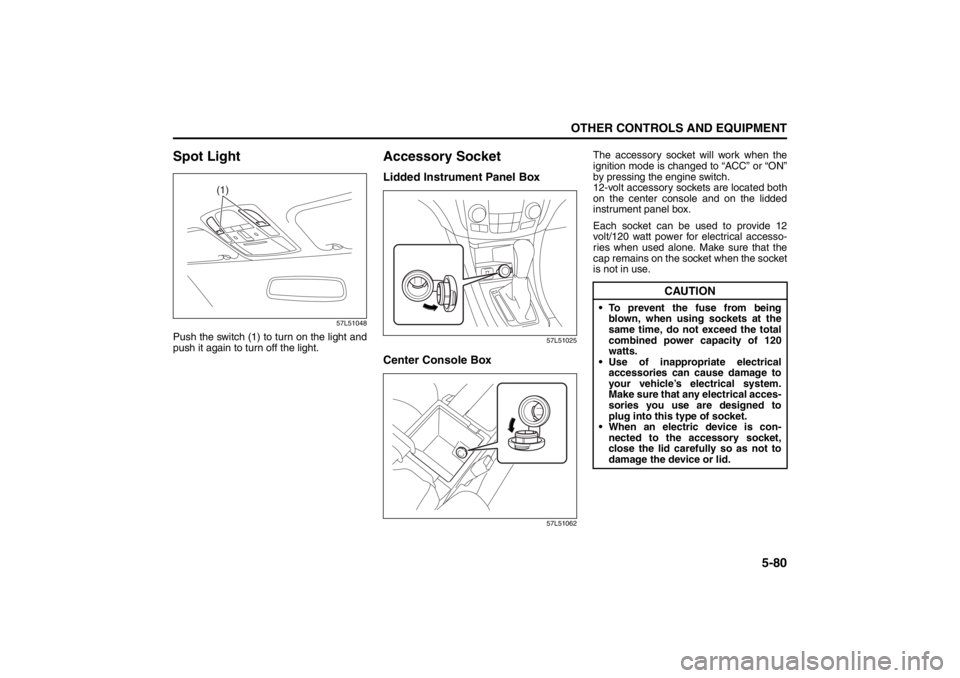
Spot Light
57L51048
Push the switch (1) to turn on the light and
push it again to turn off the light.
Accessory SocketLidded Instrument Panel Box
57L51025
Center Console Box
57L51062
The accessory socket will work when the
ignition mode is changed to “ACC” or “ON”
by pressing the engine switch.
12-volt accessory sockets are located both
on the center console and on the lidded
instrument panel box.
Each socket can be used to provide 12
volt/120 watt power for electrical accesso-
ries when used alone. Make sure that the
cap remains on the socket when the socket
is not in use.
(1)
CAUTION
To prevent the fuse from being
blown, when using sockets at the
same time, do not exceed the total
combined power capacity of 120
watts.
Use of inappropriate electrical
accessories can cause damage to
your vehicle’s electrical system.
Make sure that any electrical acces-
sories you use are designed to
plug into this type of socket.
When an electric device is con-
nected to the accessory socket,
close the lid carefully so as not to
damage the device or lid.
Page 288 of 388

7-3INSPECTION AND MAINTENANCE
57L20-03E
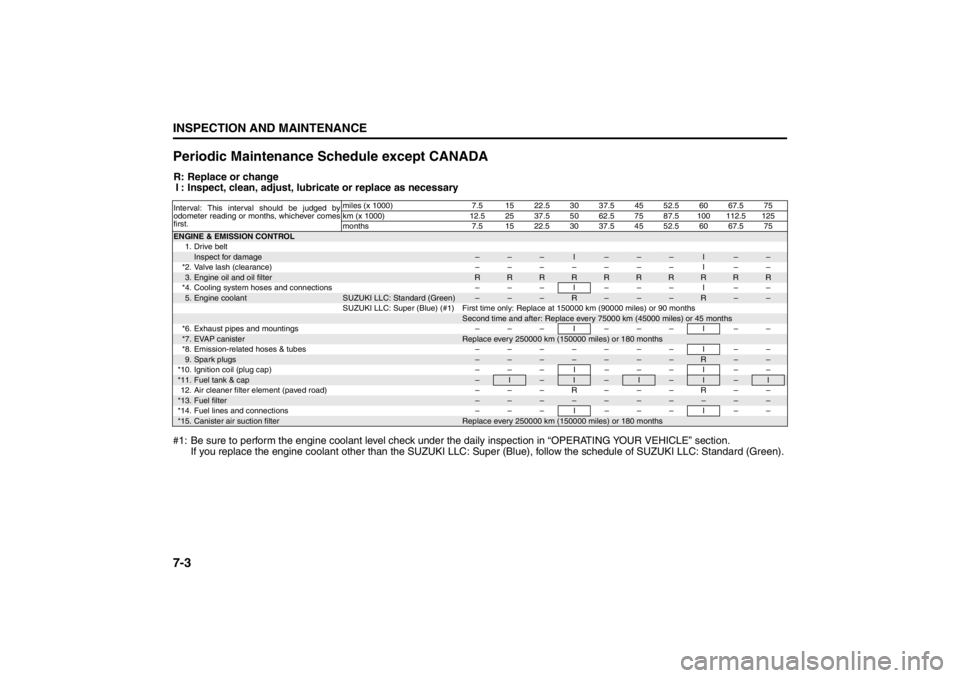
Periodic Maintenance Schedule except CANADAR: Replace or change
I : Inspect, clean, adjust, lubricate or replace as necessary
#1: Be sure to perform the engine coolant level check under the daily inspection in “OPERATING YOUR VEHICLE” section.
If you replace the engine coolant other than the SUZUKI LLC: Super (Blue), follow the schedule of SUZUKI LLC: Standard (Green).Interval: This interval should be judged by
odometer reading or months, whichever comes
first.miles (x 1000) 7.5 15 22.5 30 37.5 45 52.5 60 67.5 75
km (x 1000) 12.5 25 37.5 50 62.5 75 87.5 100 112.5 125
months 7.5 15 22.5 30 37.5 45 52.5 60 67.5 75ENGINE & EMISSION CONTROL
1. Drive belt
Inspect for damage
–
–
–
I
–
–
–
I
–
–
*2.Valve lash (clearance) ––––––– I ––3.Engine oil and oil filter
R
R
R
R
R
R
R
R
R
R
*4. Cooling system hoses and connections – – – I – – – I – –5.Engine coolant
SUZUKI LLC: Standard (Green)
–
–
–
R
–
–
–
R
–
–
SUZUKI LLC: Super (Blue) (#1) First time only: Replace at 150000 km (90000 miles) or 90 months
Second time and after: Replace every 75000 km (45000 miles) or 45 months
*6. Exhaust pipes and mountings – – – I – – – I – –*7.
EVAP canister
Replace every 250000 km (150000 miles) or 180 months
*8.Emission-related hoses & tubes ––––––– I ––9.Spark plugs
–
–
–
–
–
–
–
R
–
–
*10. Ignition coil (plug cap) – – – I – – – I – –*11.
Fuel tank & cap
–
I
–
I
–
I
–
I
–
I
12. Air cleaner filter element (paved road) – – – R – – – R – –*13.
Fuel filter
–
–
–
–
–
–
–
–
–
–
*14. Fuel lines and connections – – – I – – – I – –*15.
Canister air suction filter
Replace every 250000 km (150000 miles) or 180 months
Driving on Slippery Roads: NO