air condition SUZUKI SWIFT 2000 1.G RG413 Service Owners Manual
[x] Cancel search | Manufacturer: SUZUKI, Model Year: 2000, Model line: SWIFT, Model: SUZUKI SWIFT 2000 1.GPages: 698, PDF Size: 16.01 MB
Page 350 of 698
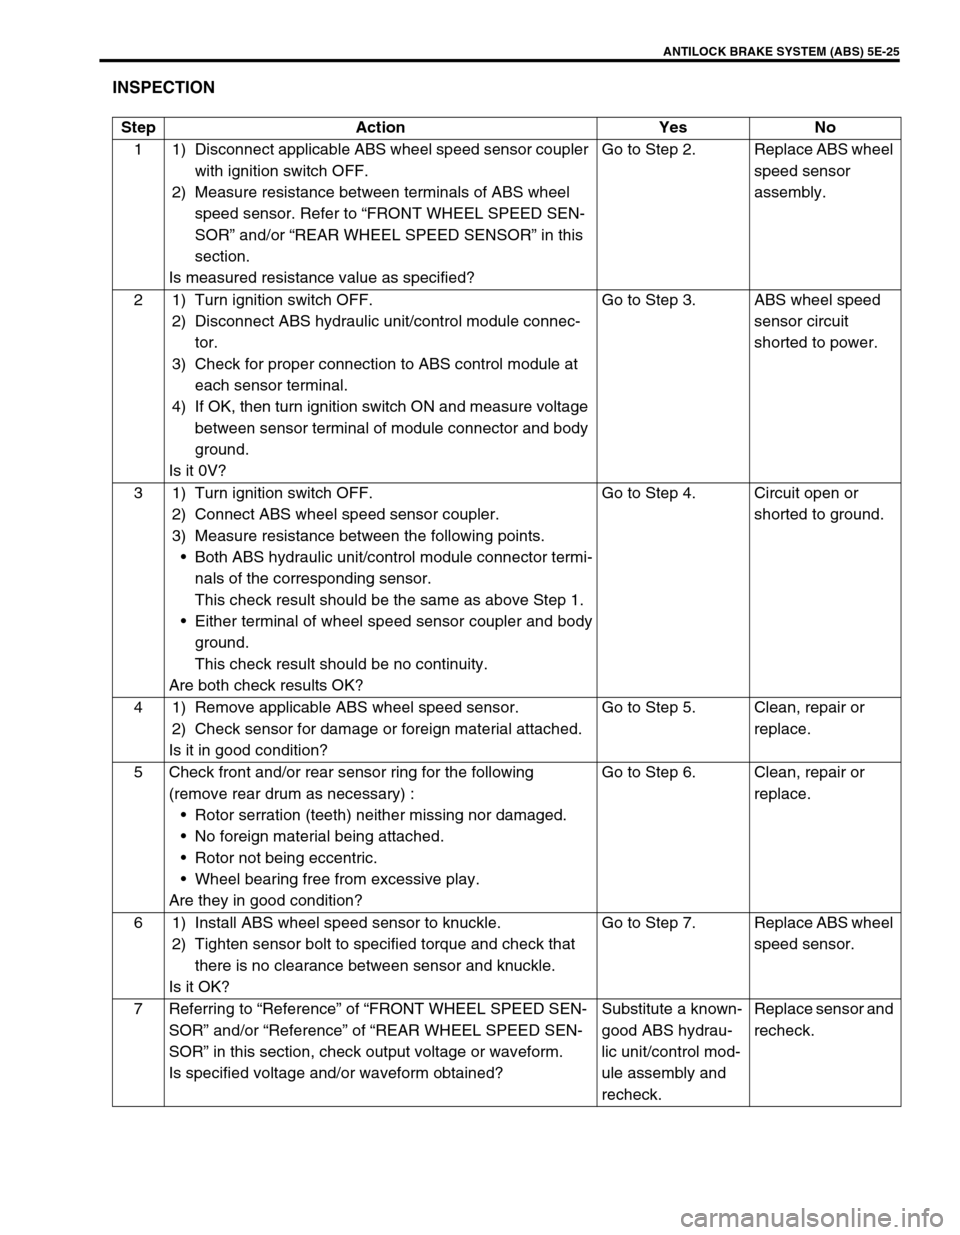
ANTILOCK BRAKE SYSTEM (ABS) 5E-25
INSPECTION
Step Action Yes No
1 1) Disconnect applicable ABS wheel speed sensor coupler
with ignition switch OFF.
2) Measure resistance between terminals of ABS wheel
speed sensor. Refer to “FRONT WHEEL SPEED SEN-
SOR” and/or “REAR WHEEL SPEED SENSOR” in this
section.
Is measured resistance value as specified?Go to Step 2. Replace ABS wheel
speed sensor
assembly.
2 1) Turn ignition switch OFF.
2) Disconnect ABS hydraulic unit/control module connec-
tor.
3) Check for proper connection to ABS control module at
each sensor terminal.
4) If OK, then turn ignition switch ON and measure voltage
between sensor terminal of module connector and body
ground.
Is it 0V?Go to Step 3. ABS wheel speed
sensor circuit
shorted to power.
3 1) Turn ignition switch OFF.
2) Connect ABS wheel speed sensor coupler.
3) Measure resistance between the following points.
Both ABS hydraulic unit/control module connector termi-
nals of the corresponding sensor.
This check result should be the same as above Step 1.
Either terminal of wheel speed sensor coupler and body
ground.
This check result should be no continuity.
Are both check results OK?Go to Step 4. Circuit open or
shorted to ground.
4 1) Remove applicable ABS wheel speed sensor.
2) Check sensor for damage or foreign material attached.
Is it in good condition?Go to Step 5. Clean, repair or
replace.
5 Check front and/or rear sensor ring for the following
(remove rear drum as necessary) :
Rotor serration (teeth) neither missing nor damaged.
No foreign material being attached.
Rotor not being eccentric.
Wheel bearing free from excessive play.
Are they in good condition?Go to Step 6. Clean, repair or
replace.
6 1) Install ABS wheel speed sensor to knuckle.
2) Tighten sensor bolt to specified torque and check that
there is no clearance between sensor and knuckle.
Is it OK?Go to Step 7. Replace ABS wheel
speed sensor.
7 Referring to “Reference” of “FRONT WHEEL SPEED SEN-
SOR” and/or “Reference” of “REAR WHEEL SPEED SEN-
SOR” in this section, check output voltage or waveform.
Is specified voltage and/or waveform obtained?Substitute a known-
good ABS hydrau-
lic unit/control mod-
ule assembly and
recheck.Replace sensor and
recheck.
Page 354 of 698
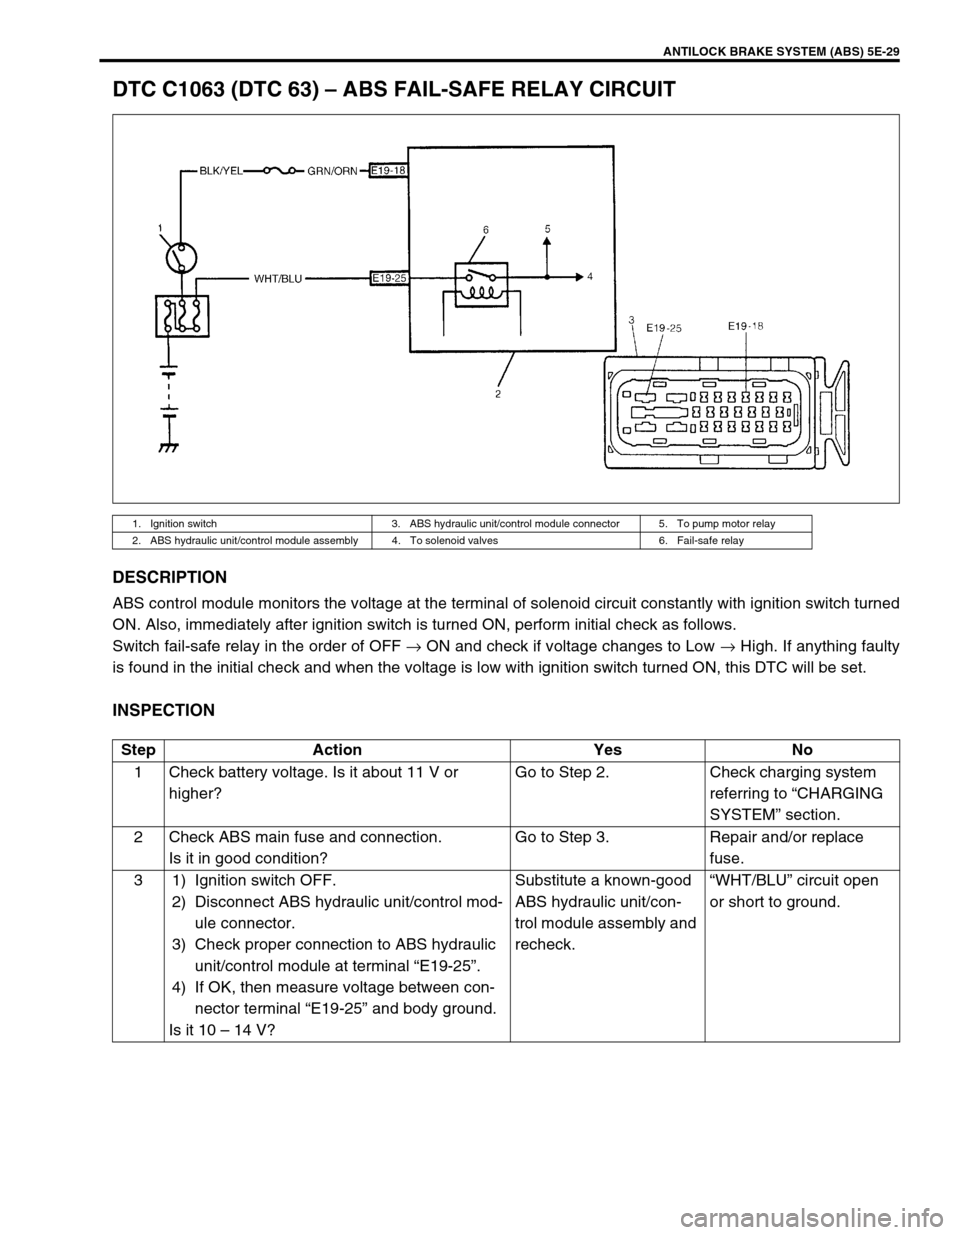
ANTILOCK BRAKE SYSTEM (ABS) 5E-29
DTC C1063 (DTC 63) – ABS FAIL-SAFE RELAY CIRCUIT
DESCRIPTION
ABS control module monitors the voltage at the terminal of solenoid circuit constantly with ignition switch turned
ON. Also, immediately after ignition switch is turned ON, perform initial check as follows.
Switch fail-safe relay in the order of OFF → ON and check if voltage changes to Low → High. If anything faulty
is found in the initial check and when the voltage is low with ignition switch turned ON, this DTC will be set.
INSPECTION
1. Ignition switch 3. ABS hydraulic unit/control module connector 5. To pump motor relay
2. ABS hydraulic unit/control module assembly 4. To solenoid valves 6. Fail-safe relay
Step Action Yes No
1 Check battery voltage. Is it about 11 V or
higher?Go to Step 2. Check charging system
referring to “CHARGING
SYSTEM” section.
2 Check ABS main fuse and connection.
Is it in good condition?Go to Step 3. Repair and/or replace
fuse.
3 1) Ignition switch OFF.
2) Disconnect ABS hydraulic unit/control mod-
ule connector.
3) Check proper connection to ABS hydraulic
unit/control module at terminal “E19-25”.
4) If OK, then measure voltage between con-
nector terminal “E19-25” and body ground.
Is it 10 – 14 V?Substitute a known-good
ABS hydraulic unit/con-
trol module assembly and
recheck.“WHT/BLU” circuit open
or short to ground.
Page 357 of 698
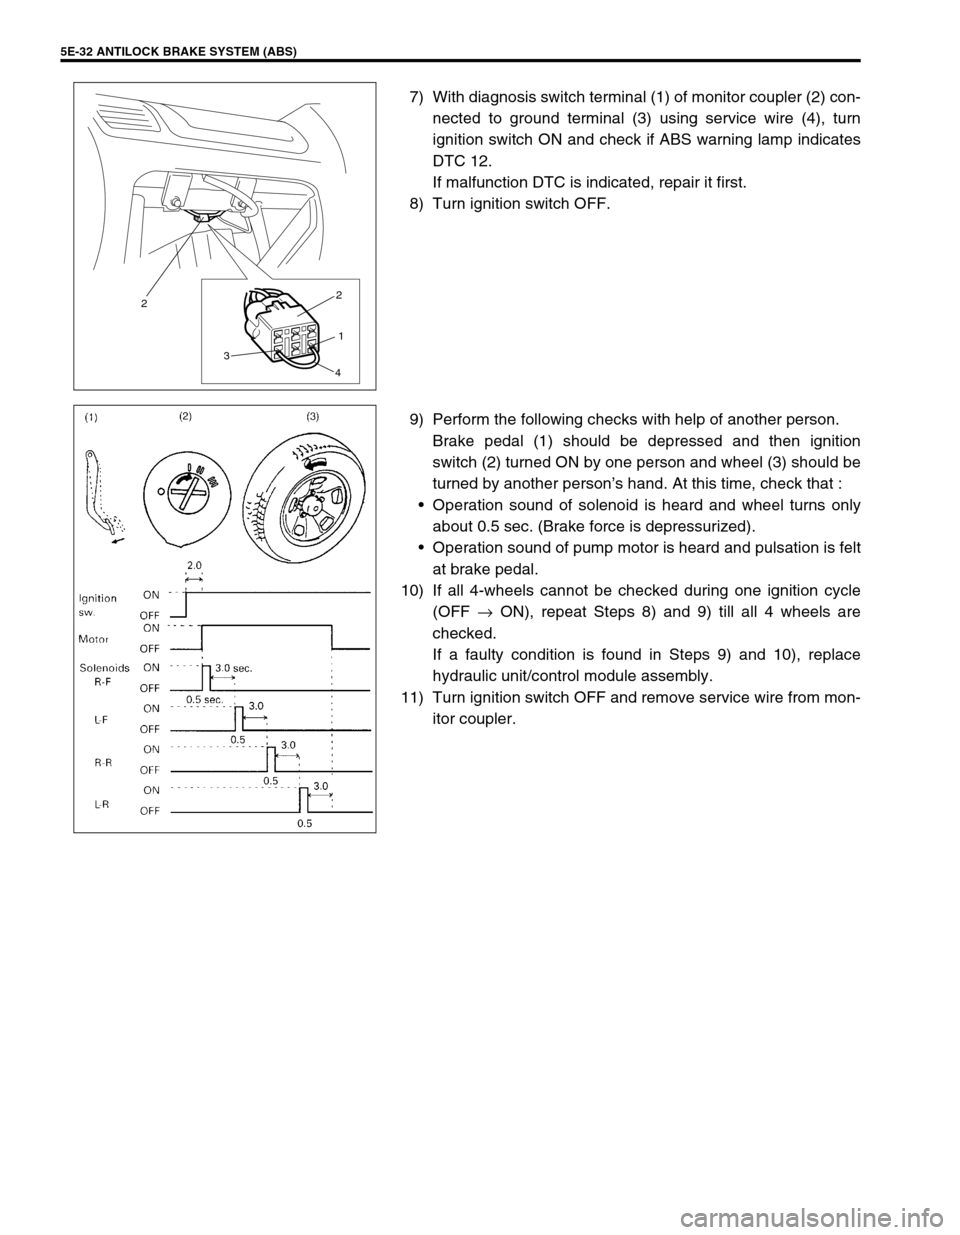
5E-32 ANTILOCK BRAKE SYSTEM (ABS)
7) With diagnosis switch terminal (1) of monitor coupler (2) con-
nected to ground terminal (3) using service wire (4), turn
ignition switch ON and check if ABS warning lamp indicates
DTC 12.
If malfunction DTC is indicated, repair it first.
8) Turn ignition switch OFF.
9) Perform the following checks with help of another person.
Brake pedal (1) should be depressed and then ignition
switch (2) turned ON by one person and wheel (3) should be
turned by another person’s hand. At this time, check that :
Operation sound of solenoid is heard and wheel turns only
about 0.5 sec. (Brake force is depressurized).
Operation sound of pump motor is heard and pulsation is felt
at brake pedal.
10) If all 4-wheels cannot be checked during one ignition cycle
(OFF → ON), repeat Steps 8) and 9) till all 4 wheels are
checked.
If a faulty condition is found in Steps 9) and 10), replace
hydraulic unit/control module assembly.
11) Turn ignition switch OFF and remove service wire from mon-
itor coupler.
3 22
1
4
Page 370 of 698
ENGINE GENERAL INFORMATION AND DIAGNOSIS 6-1
6
6F2
6G
6H
6K
7A
7A1
7B1
7C1
7D
7E
7F
8A
8B
8C
8D
8E
9
10A
10B
SECTION 6
ENGINE GENERAL INFORMATION AND
DIAGNOSIS
ENGINE GENERAL INFORMATION AND ENGINE DIAGNOSIS................................................. Section 6
ENGINE MECHANICAL ................................................................................................................. Section 6A1
ENGINE COOLING......................................................................................................................... Section 6B
ENGINE FUEL ................................................................................................................................ Section 6C
ENGINE AND EMISSION CONTROL SYSTEM ............................................................................ Section 6E1
IGNITION SYSTEM ........................................................................................................................ Section 6F1
CRANKING SYSTEM ..................................................................................................................... Section 6G
CHARGING SYSTEM ..................................................................................................................... Section 6H
EXHAUST SYSTEM ....................................................................................................................... Secton 6K
CONTENTS
GENERAL INFORMATION ................................ 6-4
STATEMENT ON CLEANLINESS AND
CARE .............................................................. 6-4
GENERAL INFORMATION ON ENGINE
SERVICE ........................................................ 6-4PRECAUTION ON FUEL SYSTEM
SERVICE .................................................... 6-5
FUEL PRESSURE RELIEF
PROCEDURE ............................................. 6-6
FUEL LEAKAGE CHECK PROCEDURE.... 6-6 WARNING:
For vehicles equipped with Supplemental Restraint (Air Bag) System :
Service on and around the air bag system components or wiring must be performed only by an
authorized SUZUKI dealer. Refer to “Air Bag System Components and Wiring Location View” under
“General Description” in air bag system section in order to confirm whether you are performing ser-
vice on or near the air bag system components or wiring. Please observe all WARNINGS and “Ser-
vice Precautions” under “On-Vehicle Service” in air bag system section before performing service
on or around the air bag system components or wiring. Failure to follow WARNINGS could result in
unintentional activation of the system or could render the system inoperative. Either of these two
conditions may result in severe injury.
Technical service work must be started at least 90 seconds after the ignition switch is turned to the
“LOCK” position and the negative cable is disconnected from the battery. Otherwise, the system
may be activated by reserve energy in the Sensing and Diagnostic Module (SDM).
NOTE:
Whether the following systems (parts) are used in the particular vehicle or not depends on vehicle
specifications. Be sure to bear this in mind when performing service work.
EGR valve
Heated oxygen sensor(s) or CO adjusting resistor
Three way catalytic converter
Immobilizer indicator lamp (vehicle with immobilizer indicator lamp can be identified also by HO2S-
2)
Knock sensor
Page 377 of 698
6-8 ENGINE GENERAL INFORMATION AND DIAGNOSIS
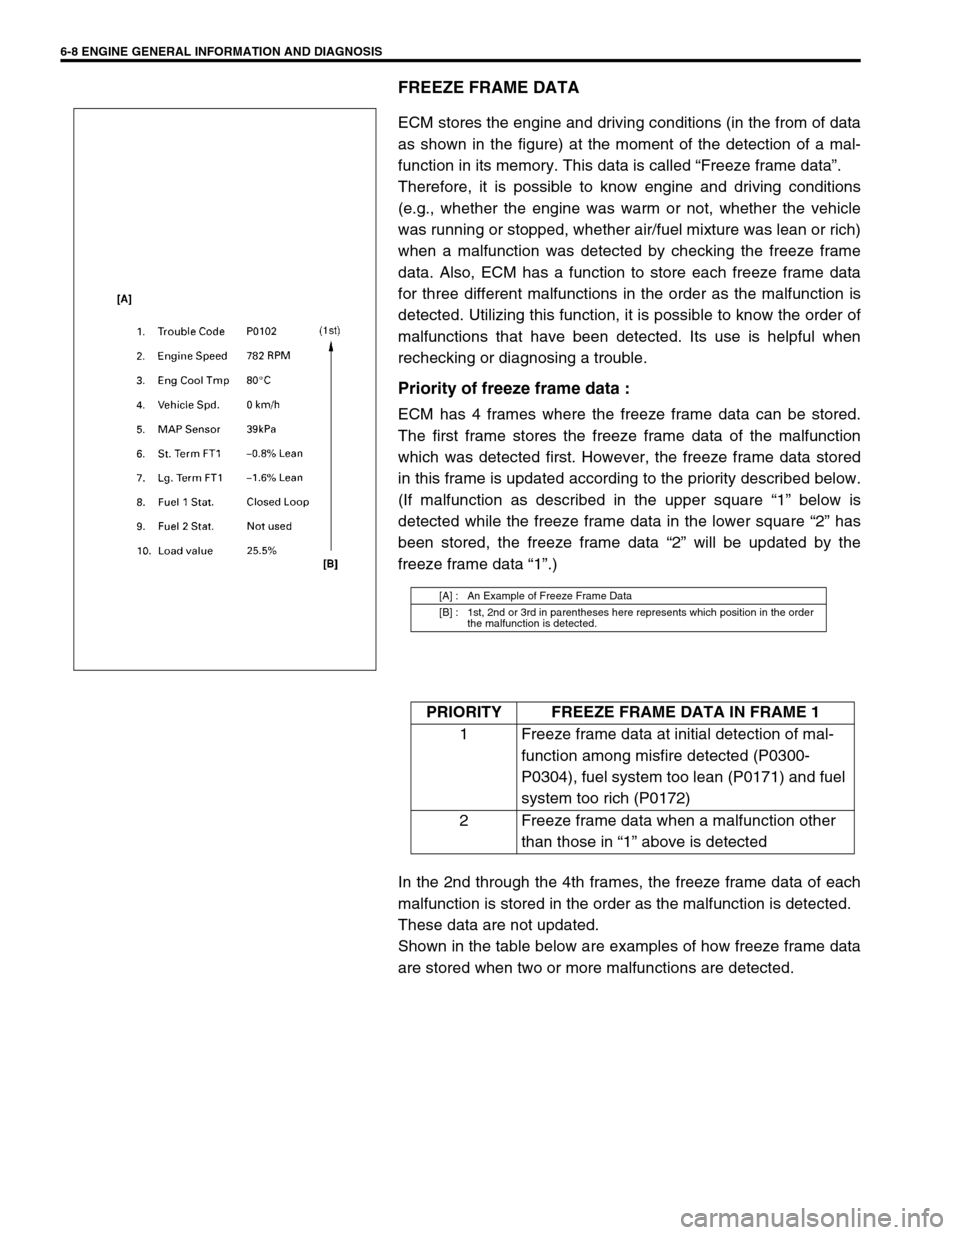
FREEZE FRAME DATA
ECM stores the engine and driving conditions (in the from of data
as shown in the figure) at the moment of the detection of a mal-
function in its memory. This data is called “Freeze frame data”.
Therefore, it is possible to know engine and driving conditions
(e.g., whether the engine was warm or not, whether the vehicle
was running or stopped, whether air/fuel mixture was lean or rich)
when a malfunction was detected by checking the freeze frame
data. Also, ECM has a function to store each freeze frame data
for three different malfunctions in the order as the malfunction is
detected. Utilizing this function, it is possible to know the order of
malfunctions that have been detected. Its use is helpful when
rechecking or diagnosing a trouble.
Priority of freeze frame data :
ECM has 4 frames where the freeze frame data can be stored.
The first frame stores the freeze frame data of the malfunction
which was detected first. However, the freeze frame data stored
in this frame is updated according to the priority described below.
(If malfunction as described in the upper square “1” below is
detected while the freeze frame data in the lower square “2” has
been stored, the freeze frame data “2” will be updated by the
freeze frame data “1”.)
In the 2nd through the 4th frames, the freeze frame data of each
malfunction is stored in the order as the malfunction is detected.
These data are not updated.
Shown in the table below are examples of how freeze frame data
are stored when two or more malfunctions are detected.
[A] : An Example of Freeze Frame Data
[B] : 1st, 2nd or 3rd in parentheses here represents which position in the order
the malfunction is detected.
PRIORITY FREEZE FRAME DATA IN FRAME 1
1 Freeze frame data at initial detection of mal-
function among misfire detected (P0300-
P0304), fuel system too lean (P0171) and fuel
system too rich (P0172)
2 Freeze frame data when a malfunction other
than those in “1” above is detected
Page 380 of 698
ENGINE GENERAL INFORMATION AND DIAGNOSIS 6-11
DATA LINK CONNECTOR (DLC)
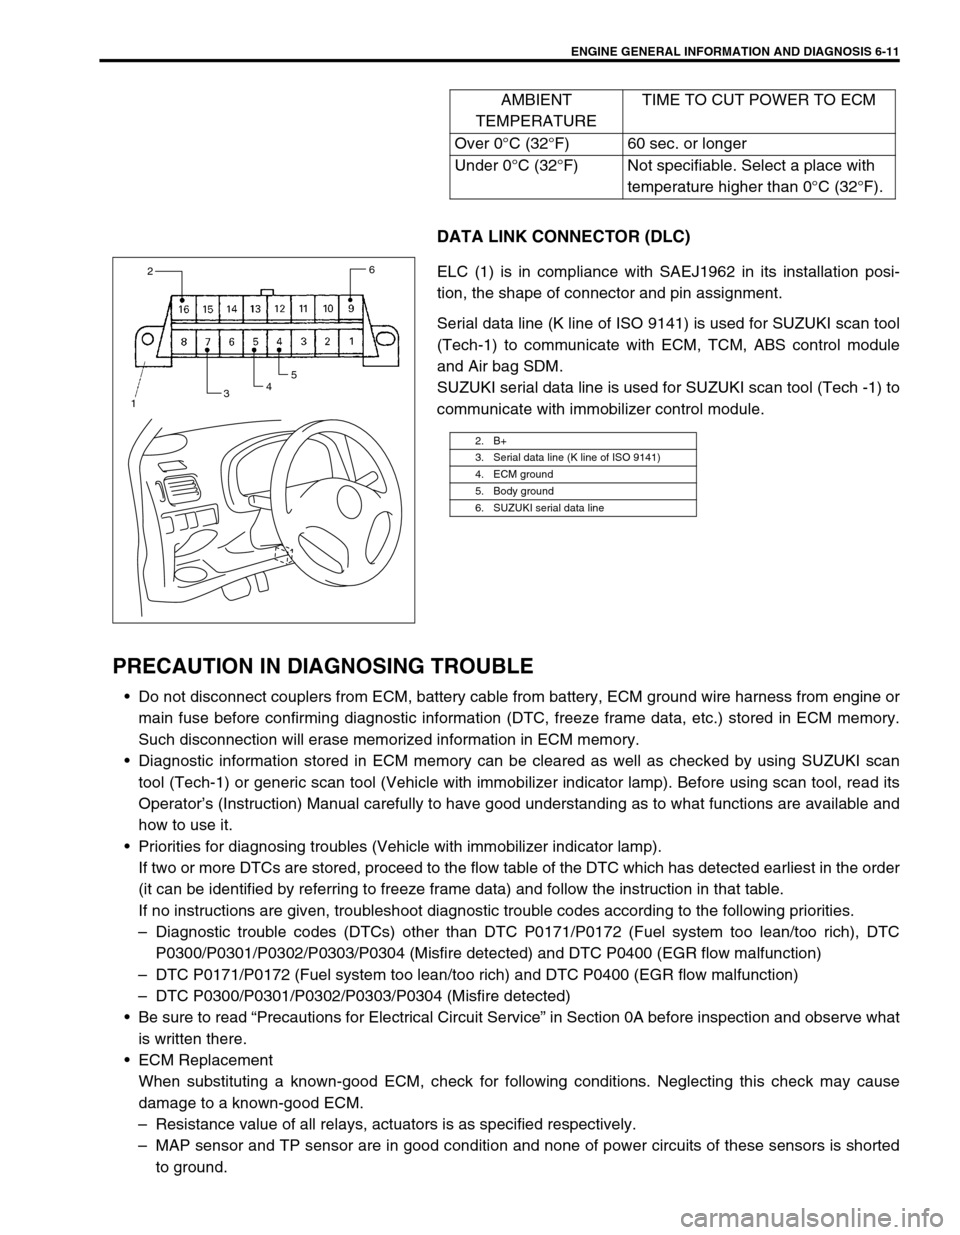
ELC (1) is in compliance with SAEJ1962 in its installation posi-
tion, the shape of connector and pin assignment.
Serial data line (K line of ISO 9141) is used for SUZUKI scan tool
(Tech-1) to communicate with ECM, TCM, ABS control module
and Air bag SDM.
SUZUKI serial data line is used for SUZUKI scan tool (Tech -1) to
communicate with immobilizer control module.
PRECAUTION IN DIAGNOSING TROUBLE
Do not disconnect couplers from ECM, battery cable from battery, ECM ground wire harness from engine or
main fuse before confirming diagnostic information (DTC, freeze frame data, etc.) stored in ECM memory.
Such disconnection will erase memorized information in ECM memory.
Diagnostic information stored in ECM memory can be cleared as well as checked by using SUZUKI scan
tool (Tech-1) or generic scan tool (Vehicle with immobilizer indicator lamp). Before using scan tool, read its
Operator’s (Instruction) Manual carefully to have good understanding as to what functions are available and
how to use it.
Priorities for diagnosing troubles (Vehicle with immobilizer indicator lamp).
If two or more DTCs are stored, proceed to the flow table of the DTC which has detected earliest in the order
(it can be identified by referring to freeze frame data) and follow the instruction in that table.
If no instructions are given, troubleshoot diagnostic trouble codes according to the following priorities.
–Diagnostic trouble codes (DTCs) other than DTC P0171/P0172 (Fuel system too lean/too rich), DTC
P0300/P0301/P0302/P0303/P0304 (Misfire detected) and DTC P0400 (EGR flow malfunction)
–DTC P0171/P0172 (Fuel system too lean/too rich) and DTC P0400 (EGR flow malfunction)
–DTC P0300/P0301/P0302/P0303/P0304 (Misfire detected)
Be sure to read “Precautions for Electrical Circuit Service” in Section 0A before inspection and observe what
is written there.
ECM Replacement
When substituting a known-good ECM, check for following conditions. Neglecting this check may cause
damage to a known-good ECM.
–Resistance value of all relays, actuators is as specified respectively.
–MAP sensor and TP sensor are in good condition and none of power circuits of these sensors is shorted
to ground.AMBIENT
TEMPERATURETIME TO CUT POWER TO ECM
Over 0°C (32°F) 60 sec. or longer
Under 0°C (32°F) Not specifiable. Select a place with
temperature higher than 0°C (32°F).
2. B+
3. Serial data line (K line of ISO 9141)
4. ECM ground
5. Body ground
6. SUZUKI serial data line
2
3456
1
Page 381 of 698
6-12 ENGINE GENERAL INFORMATION AND DIAGNOSIS
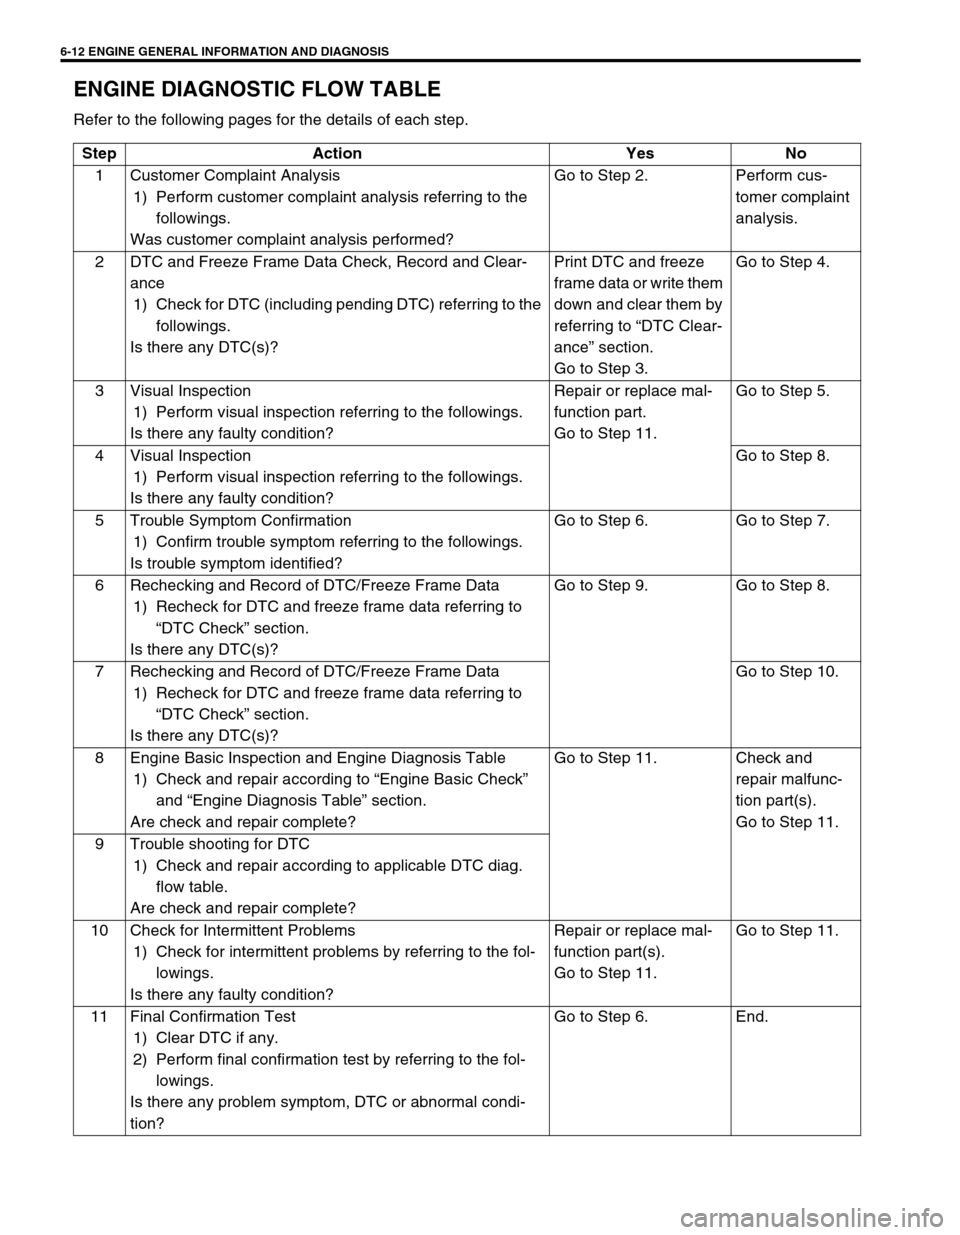
ENGINE DIAGNOSTIC FLOW TABLE
Refer to the following pages for the details of each step.
Step Action Yes No
1 Customer Complaint Analysis
1) Perform customer complaint analysis referring to the
followings.
Was customer complaint analysis performed?Go to Step 2. Perform cus-
tomer complaint
analysis.
2 DTC and Freeze Frame Data Check, Record and Clear-
ance
1) Check for DTC (including pending DTC) referring to the
followings.
Is there any DTC(s)?Print DTC and freeze
frame data or write them
down and clear them by
referring to “DTC Clear-
ance” section.
Go to Step 3.Go to Step 4.
3 Visual Inspection
1) Perform visual inspection referring to the followings.
Is there any faulty condition?Repair or replace mal-
function part.
Go to Step 11.Go to Step 5.
4 Visual Inspection
1) Perform visual inspection referring to the followings.
Is there any faulty condition?Go to Step 8.
5 Trouble Symptom Confirmation
1) Confirm trouble symptom referring to the followings.
Is trouble symptom identified?Go to Step 6. Go to Step 7.
6 Rechecking and Record of DTC/Freeze Frame Data
1) Recheck for DTC and freeze frame data referring to
“DTC Check” section.
Is there any DTC(s)?Go to Step 9. Go to Step 8.
7 Rechecking and Record of DTC/Freeze Frame Data
1) Recheck for DTC and freeze frame data referring to
“DTC Check” section.
Is there any DTC(s)?Go to Step 10.
8 Engine Basic Inspection and Engine Diagnosis Table
1) Check and repair according to “Engine Basic Check”
and “Engine Diagnosis Table” section.
Are check and repair complete?Go to Step 11. Check and
repair malfunc-
tion part(s).
Go to Step 11.
9 Trouble shooting for DTC
1) Check and repair according to applicable DTC diag.
flow table.
Are check and repair complete?
10 Check for Intermittent Problems
1) Check for intermittent problems by referring to the fol-
lowings.
Is there any faulty condition?Repair or replace mal-
function part(s).
Go to Step 11.Go to Step 11.
11 Final Confirmation Test
1) Clear DTC if any.
2) Perform final confirmation test by referring to the fol-
lowings.
Is there any problem symptom, DTC or abnormal condi-
tion?Go to Step 6. End.
Page 382 of 698
ENGINE GENERAL INFORMATION AND DIAGNOSIS 6-13
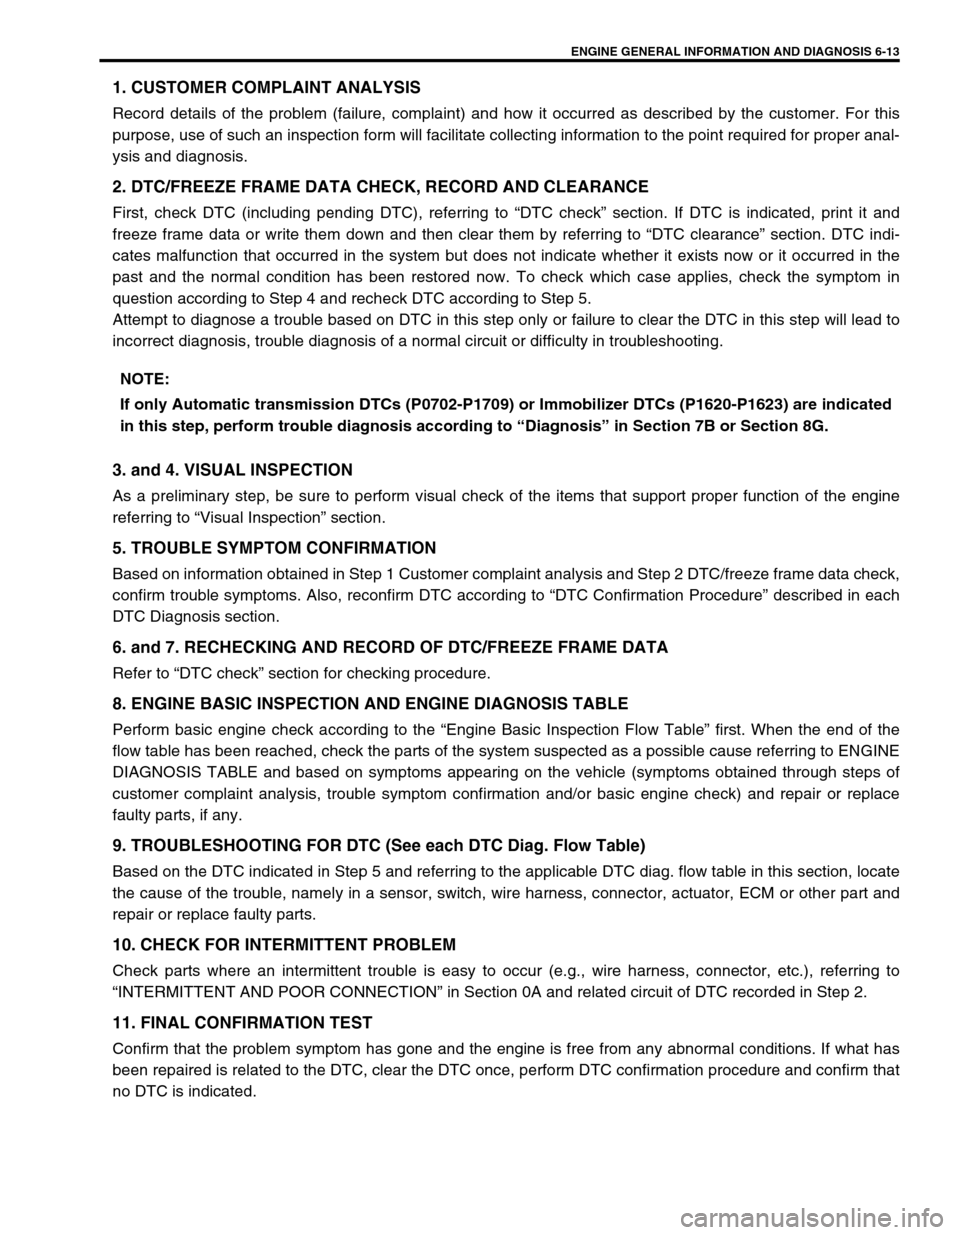
1. CUSTOMER COMPLAINT ANALYSIS
Record details of the problem (failure, complaint) and how it occurred as described by the customer. For this
purpose, use of such an inspection form will facilitate collecting information to the point required for proper anal-
ysis and diagnosis.
2. DTC/FREEZE FRAME DATA CHECK, RECORD AND CLEARANCE
First, check DTC (including pending DTC), referring to “DTC check” section. If DTC is indicated, print it and
freeze frame data or write them down and then clear them by referring to “DTC clearance” section. DTC indi-
cates malfunction that occurred in the system but does not indicate whether it exists now or it occurred in the
past and the normal condition has been restored now. To check which case applies, check the symptom in
question according to Step 4 and recheck DTC according to Step 5.
Attempt to diagnose a trouble based on DTC in this step only or failure to clear the DTC in this step will lead to
incorrect diagnosis, trouble diagnosis of a normal circuit or difficulty in troubleshooting.
3. and 4. VISUAL INSPECTION
As a preliminary step, be sure to perform visual check of the items that support proper function of the engine
referring to “Visual Inspection” section.
5. TROUBLE SYMPTOM CONFIRMATION
Based on information obtained in Step 1 Customer complaint analysis and Step 2 DTC/freeze frame data check,
confirm trouble symptoms. Also, reconfirm DTC according to “DTC Confirmation Procedure” described in each
DTC Diagnosis section.
6. and 7. RECHECKING AND RECORD OF DTC/FREEZE FRAME DATA
Refer to “DTC check” section for checking procedure.
8. ENGINE BASIC INSPECTION AND ENGINE DIAGNOSIS TABLE
Perform basic engine check according to the “Engine Basic Inspection Flow Table” first. When the end of the
flow table has been reached, check the parts of the system suspected as a possible cause referring to ENGINE
DIAGNOSIS TABLE and based on symptoms appearing on the vehicle (symptoms obtained through steps of
customer complaint analysis, trouble symptom confirmation and/or basic engine check) and repair or replace
faulty parts, if any.
9. TROUBLESHOOTING FOR DTC (See each DTC Diag. Flow Table)
Based on the DTC indicated in Step 5 and referring to the applicable DTC diag. flow table in this section, locate
the cause of the trouble, namely in a sensor, switch, wire harness, connector, actuator, ECM or other part and
repair or replace faulty parts.
10. CHECK FOR INTERMITTENT PROBLEM
Check parts where an intermittent trouble is easy to occur (e.g., wire harness, connector, etc.), referring to
“INTERMITTENT AND POOR CONNECTION” in Section 0A and related circuit of DTC recorded in Step 2.
11. FINAL CONFIRMATION TEST
Confirm that the problem symptom has gone and the engine is free from any abnormal conditions. If what has
been repaired is related to the DTC, clear the DTC once, perform DTC confirmation procedure and confirm that
no DTC is indicated.NOTE:
If only Automatic transmission DTCs (P0702-P1709) or Immobilizer DTCs (P1620-P1623) are indicated
in this step, perform trouble diagnosis according to “Diagnosis” in Section 7B or Section 8G.
Page 386 of 698
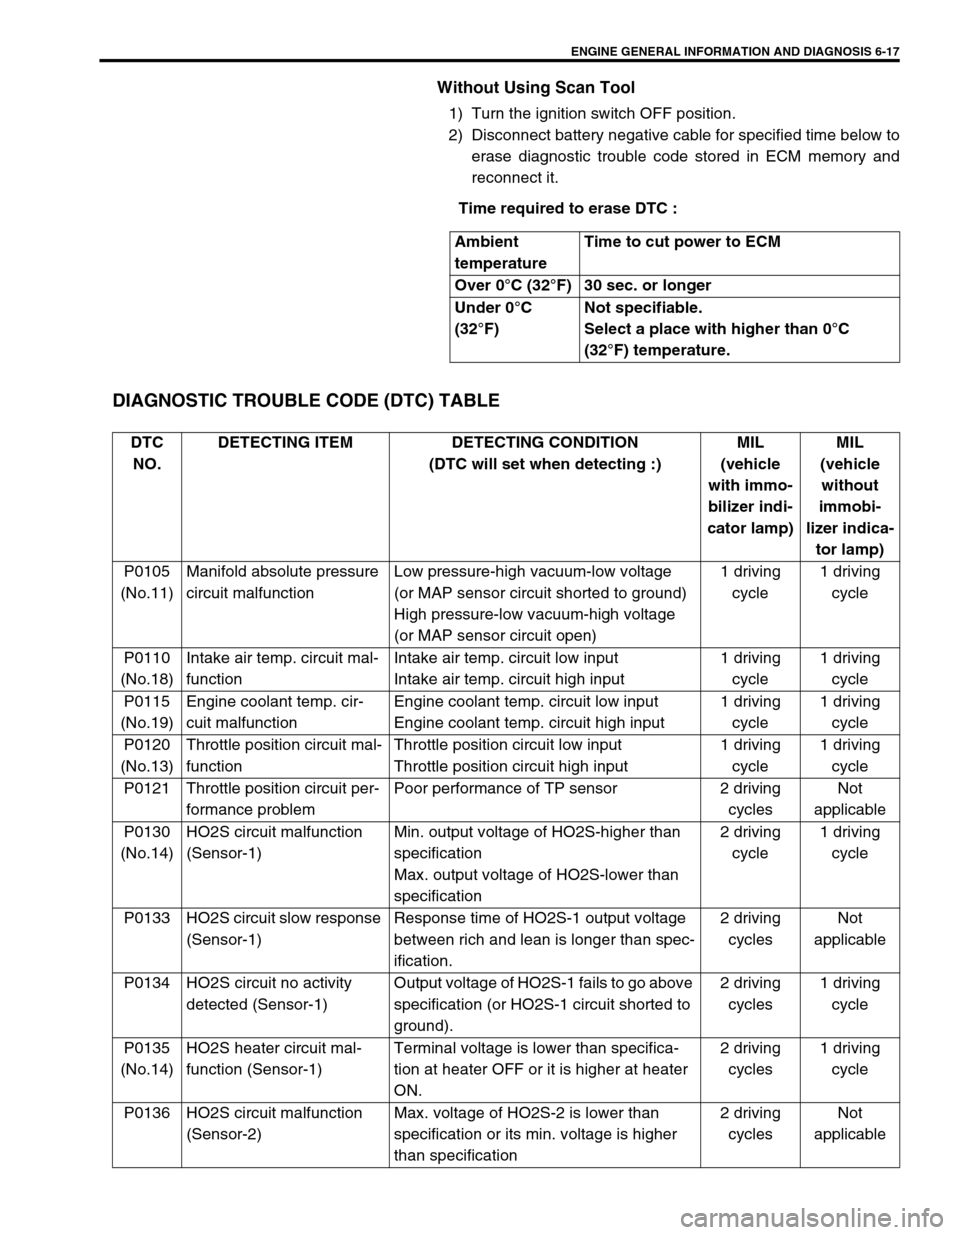
ENGINE GENERAL INFORMATION AND DIAGNOSIS 6-17
Without Using Scan Tool
1) Turn the ignition switch OFF position.
2) Disconnect battery negative cable for specified time below to
erase diagnostic trouble code stored in ECM memory and
reconnect it.
Time required to erase DTC :
DIAGNOSTIC TROUBLE CODE (DTC) TABLE
Ambient
temperatureTime to cut power to ECM
Over 0°C (32°F) 30 sec. or longer
Under 0°C
(32°F)Not specifiable.
Select a place with higher than 0°C
(32°F) temperature.
DTC
NO.DETECTING ITEM DETECTING CONDITION
(DTC will set when detecting :)MIL
(vehicle
with immo-
bilizer indi-
cator lamp)MIL
(vehicle
without
immobi-
lizer indica-
tor lamp)
P0105
(No.11)Manifold absolute pressure
circuit malfunctionLow pressure-high vacuum-low voltage
(or MAP sensor circuit shorted to ground)
High pressure-low vacuum-high voltage
(or MAP sensor circuit open)1 driving
cycle1 driving
cycle
P0110
(No.18)Intake air temp. circuit mal-
functionIntake air temp. circuit low input
Intake air temp. circuit high input1 driving
cycle1 driving
cycle
P0115
(No.19)Engine coolant temp. cir-
cuit malfunctionEngine coolant temp. circuit low input
Engine coolant temp. circuit high input1 driving
cycle1 driving
cycle
P0120
(No.13)Throttle position circuit mal-
functionThrottle position circuit low input
Throttle position circuit high input1 driving
cycle1 driving
cycle
P0121 Throttle position circuit per-
formance problemPoor performance of TP sensor 2 driving
cyclesNot
applicable
P0130
(No.14)HO2S circuit malfunction
(Sensor-1)Min. output voltage of HO2S-higher than
specification
Max. output voltage of HO2S-lower than
specification2 driving
cycle1 driving
cycle
P0133 HO2S circuit slow response
(Sensor-1)Response time of HO2S-1 output voltage
between rich and lean is longer than spec-
ification.2 driving
cyclesNot
applicable
P0134 HO2S circuit no activity
detected (Sensor-1)Output voltage of HO2S-1 fails to go above
specification (or HO2S-1 circuit shorted to
ground).2 driving
cycles1 driving
cycle
P0135
(No.14)HO2S heater circuit mal-
function (Sensor-1)Terminal voltage is lower than specifica-
tion at heater OFF or it is higher at heater
ON.2 driving
cycles1 driving
cycle
P0136 HO2S circuit malfunction
(Sensor-2)Max. voltage of HO2S-2 is lower than
specification or its min. voltage is higher
than specification2 driving
cyclesNot
applicable
Page 389 of 698
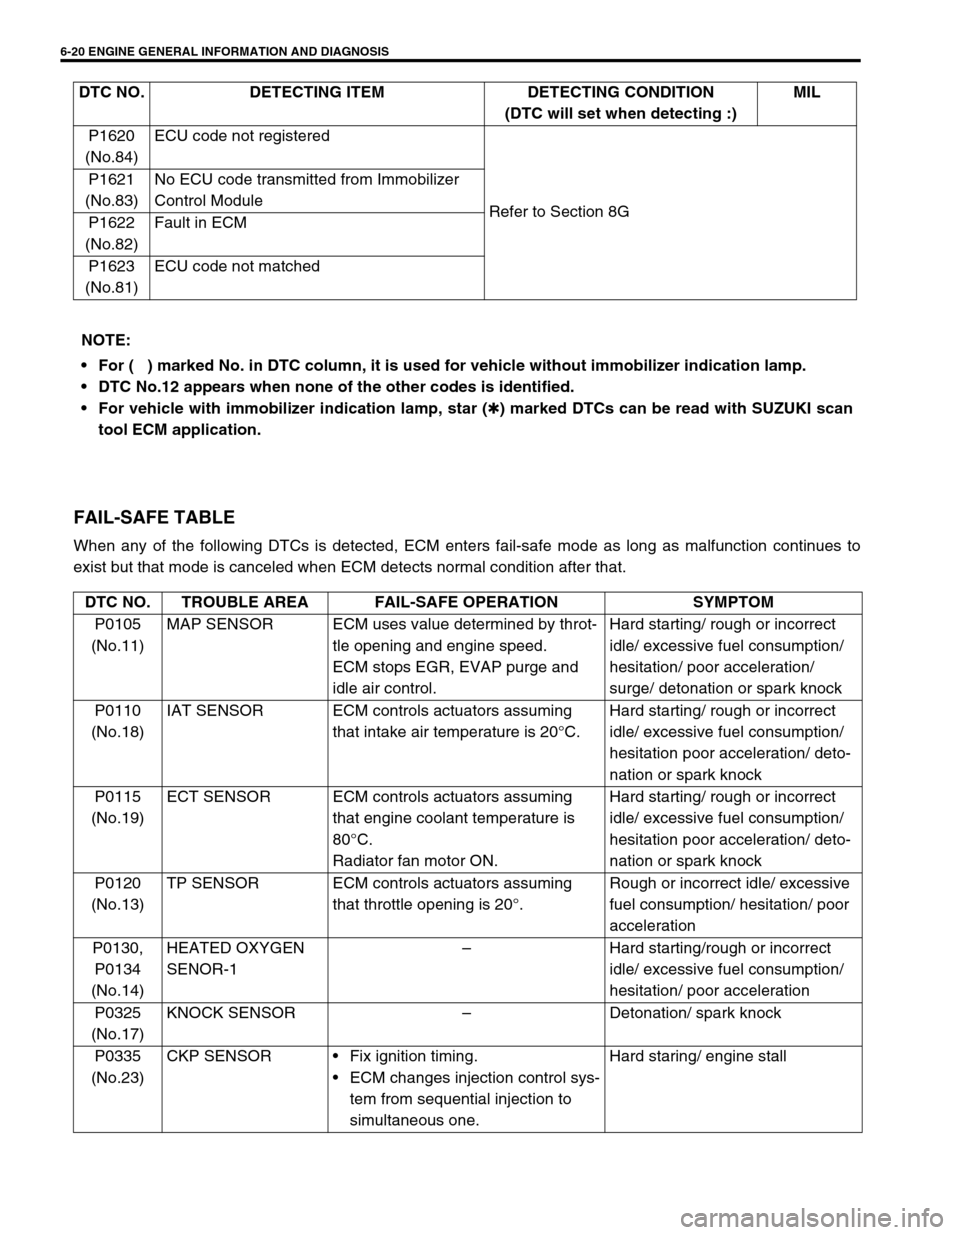
6-20 ENGINE GENERAL INFORMATION AND DIAGNOSIS
FAIL-SAFE TABLE
When any of the following DTCs is detected, ECM enters fail-safe mode as long as malfunction continues to
exist but that mode is canceled when ECM detects normal condition after that.P1620
(No.84)ECU code not registered
Refer to Section 8G P1621
(No.83)No ECU code transmitted from Immobilizer
Control Module
P1622
(No.82)Fault in ECM
P1623
(No.81)ECU code not matched DTC NO. DETECTING ITEM DETECTING CONDITION
(DTC will set when detecting :)MIL
NOTE:
For (
) marked No. in DTC column, it is used for vehicle without immobilizer indication lamp.
DTC No.12 appears when none of the other codes is identified.
For vehicle with immobilizer indication lamp, star (
✱) marked DTCs can be read with SUZUKI scan
tool ECM application.
DTC NO. TROUBLE AREA FAIL-SAFE OPERATION SYMPTOM
P0105
(No.11)MAP SENSOR ECM uses value determined by throt-
tle opening and engine speed.
ECM stops EGR, EVAP purge and
idle air control.Hard starting/ rough or incorrect
idle/ excessive fuel consumption/
hesitation/ poor acceleration/
surge/ detonation or spark knock
P0110
(No.18)IAT SENSOR ECM controls actuators assuming
that intake air temperature is 20°C.Hard starting/ rough or incorrect
idle/ excessive fuel consumption/
hesitation poor acceleration/ deto-
nation or spark knock
P0115
(No.19)ECT SENSOR ECM controls actuators assuming
that engine coolant temperature is
80°C.
Radiator fan motor ON.Hard starting/ rough or incorrect
idle/ excessive fuel consumption/
hesitation poor acceleration/ deto-
nation or spark knock
P0120
(No.13)TP SENSOR ECM controls actuators assuming
that throttle opening is 20°.Rough or incorrect idle/ excessive
fuel consumption/ hesitation/ poor
acceleration
P0130,
P0134
(No.14)HEATED OXYGEN
SENOR-1–Hard starting/rough or incorrect
idle/ excessive fuel consumption/
hesitation/ poor acceleration
P0325
(No.17)KNOCK SENSOR–Detonation/ spark knock
P0335
(No.23)CKP SENSORFix ignition timing.
ECM changes injection control sys-
tem from sequential injection to
simultaneous one.Hard staring/ engine stall