lock SUZUKI SWIFT 2000 1.G RG413 Service Workshop Manual
[x] Cancel search | Manufacturer: SUZUKI, Model Year: 2000, Model line: SWIFT, Model: SUZUKI SWIFT 2000 1.GPages: 698, PDF Size: 16.01 MB
Page 579 of 698

6A1-78 ENGINE MECHANICAL (M13 ENGINE)
Selection of main bearings
STANDARD BEARING :
If bearing is in malcondition, or bearing clearance is out of specifi-
cation, select a new standard bearing according to the following
procedure and install it.
1) First check journal diameter. As shown in figure, crank web
No.2 has stamped numbers.
Three kinds of numbers (“1”, “2” and “3”) represent the fol-
lowing journal diameters.
Stamped numbers on crank web No.2 represent journal
diameters marked with an arrow in figure respectively.
For example, stamped number “1” indicates that correspond-
ing journal diameter is 44.994 – 45.000 mm (1.7714 –
1.7717 in.).
Crankshaft journal diameter
2) Next, check bearing cap bore diameter without bearing. On
mating surface of cylinder block, five alphabets are stamped
as shown in figure.
Three kinds of alphabets (“A”, “B” and “C”) represent the fol-
lowing cap bore diameters.
Stamped alphabets on cylinder block represent bearing cap
bore diameter marked with an arrow in figure respectively.
For example, stamped “A” indicates that corresponding bear-
ing cap bore diameter is 49.000 – 49.006 mm (1.9291 –
1.9294 in.).
Crankshaft bearing cap boreStamped
numbersJournal diameter
1 44.994 – 45.000 mm (1.7714 – 1.7717 in.)
2 44.988 – 44.994 mm (1.7712 – 1.7714 in.)
3 44.982 – 44.988 mm (1.7709 – 1.7712 in.)
Stamped
alphabetBearing cap bore diameter
(without bearing)
A 49.000 - 49.006 mm (1.9291 - 1.9294 in.)
B 49.006 - 49.012 mm (1.9294 - 1.9296 in.)
C 49.012 - 49.018 mm (1.9296 - 1.9298 in.)
Page 580 of 698

ENGINE MECHANICAL (M13 ENGINE) 6A1-79
3) There are five kinds of standard bearings differing in thick-
ness. To distinguish them, they are painted in the following
colors at the position as indicated in figure.
Each color indicated the following thickness at the center of
bearing.
Standard size of crankshaft main bearing thickness
4) From number stamped on crank web No.2 and alphabets
stamped on cylinder block, determine new standard bearing
to be installed to journal, by referring to table shown below.
For example, if number stamped on crank web No.2 is “1”
and alphabet stamped on cylinder block is “B”, install a new
standard bearing painted in “Purple” to its journal.
Specification of new standard crankshaft main bearing
size
5) Using scale (1) on gaging plastic (2), check bearing clear-
ance with newly selected standard bearing.
If clearance still exceeds its limit, use next thicker bearing
and recheck clearance.
6) When replacing crankshaft or cylinder block due to any rea-
son, select new standard bearings to be installed by referring
to number stamped on new crankshaft or alphabets stamped
on new cylinder block. Color painted Bearing thickness
Pink 1.990 – 1.994 mm (0.0783 – 0.0785 in.)
Purple 1.993 – 1.997 mm (0.0785 – 0.0786 in.)
Brown 1.996 – 2.000 mm (0.0786 – 0.0787 in.)
Green 1.999 – 2.003 mm (0.0787 – 0.0789 in.)
Black 2.002 – 2.006 mm (0.0788 – 0.0790 in.)
1. Paint
Number stamped on crank web
No.2 (Journal diameter)
123
Alphabet
stamped on cyl-
inder block
(Cap bore dia.)APink Purple Brown
B Purple Brown Green
C Brown Green Black
New standard bearing to be
installed.
Page 581 of 698
6A1-80 ENGINE MECHANICAL (M13 ENGINE)
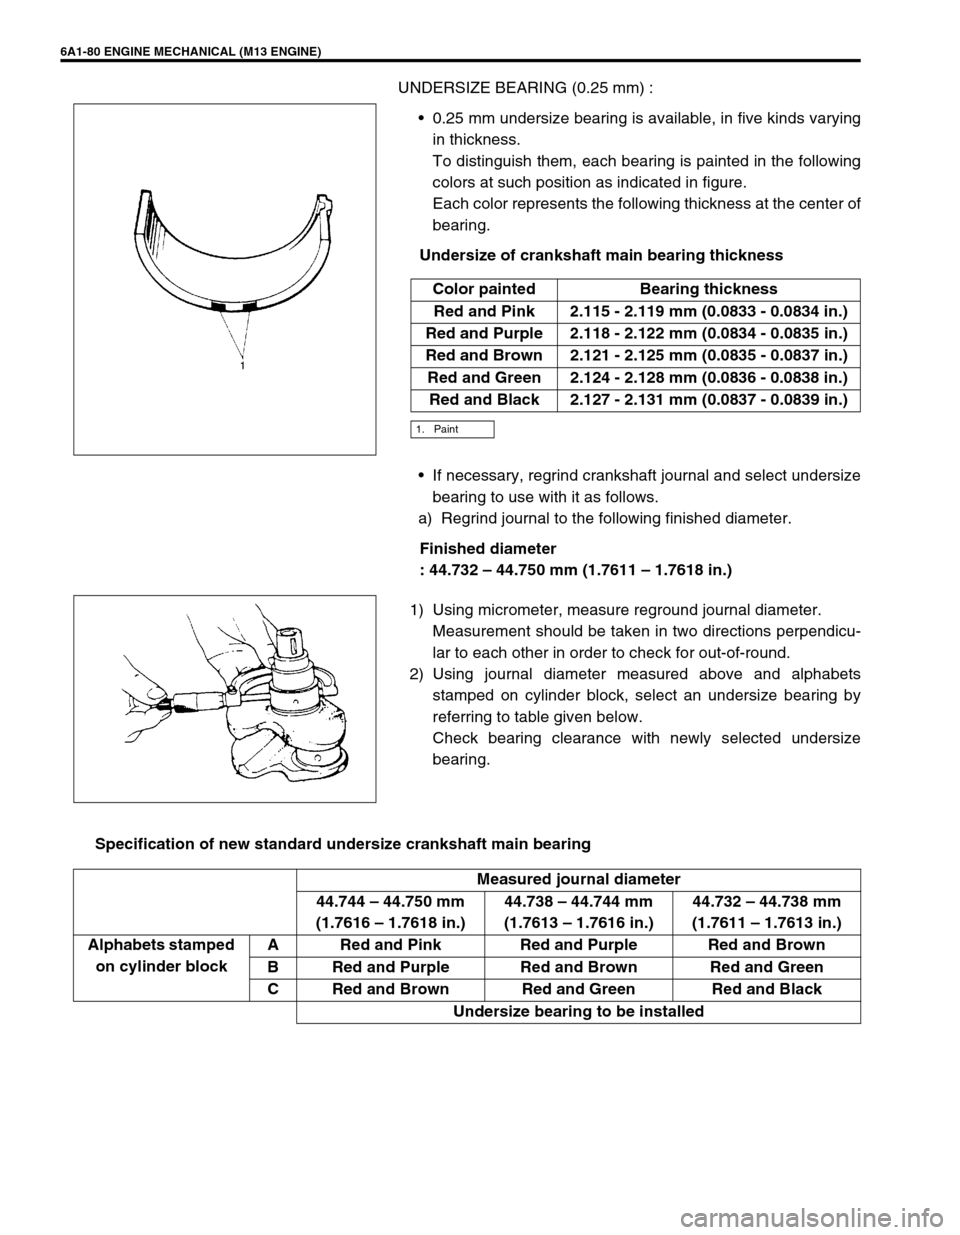
UNDERSIZE BEARING (0.25 mm) :
0.25 mm undersize bearing is available, in five kinds varying
in thickness.
To distinguish them, each bearing is painted in the following
colors at such position as indicated in figure.
Each color represents the following thickness at the center of
bearing.
Undersize of crankshaft main bearing thickness
If necessary, regrind crankshaft journal and select undersize
bearing to use with it as follows.
a) Regrind journal to the following finished diameter.
Finished diameter
: 44.732 – 44.750 mm (1.7611 – 1.7618 in.)
1) Using micrometer, measure reground journal diameter.
Measurement should be taken in two directions perpendicu-
lar to each other in order to check for out-of-round.
2) Using journal diameter measured above and alphabets
stamped on cylinder block, select an undersize bearing by
referring to table given below.
Check bearing clearance with newly selected undersize
bearing.
Specification of new standard undersize crankshaft main bearingColor painted Bearing thickness
Red and Pink 2.115 - 2.119 mm (0.0833 - 0.0834 in.)
Red and Purple 2.118 - 2.122 mm (0.0834 - 0.0835 in.)
Red and Brown 2.121 - 2.125 mm (0.0835 - 0.0837 in.)
Red and Green 2.124 - 2.128 mm (0.0836 - 0.0838 in.)
Red and Black 2.127 - 2.131 mm (0.0837 - 0.0839 in.)
1. Paint
Measured journal diameter
44.744 – 44.750 mm
(1.7616 – 1.7618 in.)44.738 – 44.744 mm
(1.7613 – 1.7616 in.)44.732 – 44.738 mm
(1.7611 – 1.7613 in.)
Alphabets stamped
on cylinder blockA Red and Pink Red and Purple Red and Brown
B Red and Purple Red and Brown Red and Green
C Red and Brown Red and Green Red and Black
Undersize bearing to be installed
Page 583 of 698
6A1-82 ENGINE MECHANICAL (M13 ENGINE)
Cylinder Block
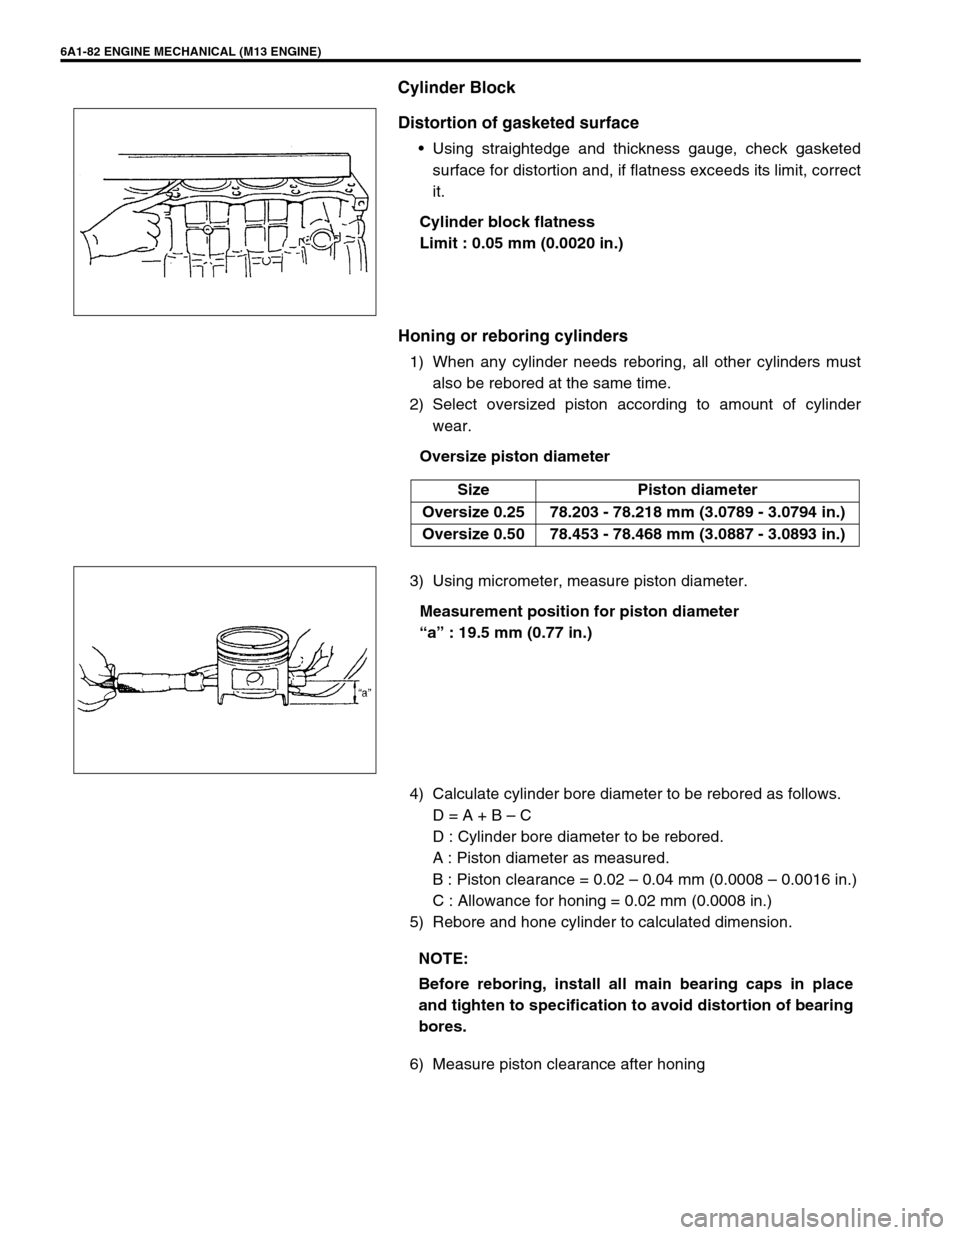
Distortion of gasketed surface
Using straightedge and thickness gauge, check gasketed
surface for distortion and, if flatness exceeds its limit, correct
it.
Cylinder block flatness
Limit : 0.05 mm (0.0020 in.)
Honing or reboring cylinders
1) When any cylinder needs reboring, all other cylinders must
also be rebored at the same time.
2) Select oversized piston according to amount of cylinder
wear.
Oversize piston diameter
3) Using micrometer, measure piston diameter.
Measurement position for piston diameter
“a” : 19.5 mm (0.77 in.)
4) Calculate cylinder bore diameter to be rebored as follows.
D = A + B – C
D : Cylinder bore diameter to be rebored.
A : Piston diameter as measured.
B : Piston clearance = 0.02 – 0.04 mm (0.0008 – 0.0016 in.)
C : Allowance for honing = 0.02 mm (0.0008 in.)
5) Rebore and hone cylinder to calculated dimension.
6) Measure piston clearance after honing
Size Piston diameter
Oversize 0.25 78.203 - 78.218 mm (3.0789 - 3.0794 in.)
Oversize 0.50 78.453 - 78.468 mm (3.0887 - 3.0893 in.)
NOTE:
Before reboring, install all main bearing caps in place
and tighten to specification to avoid distortion of bearing
bores.
Page 584 of 698
ENGINE MECHANICAL (M13 ENGINE) 6A1-83
INSTALLATION
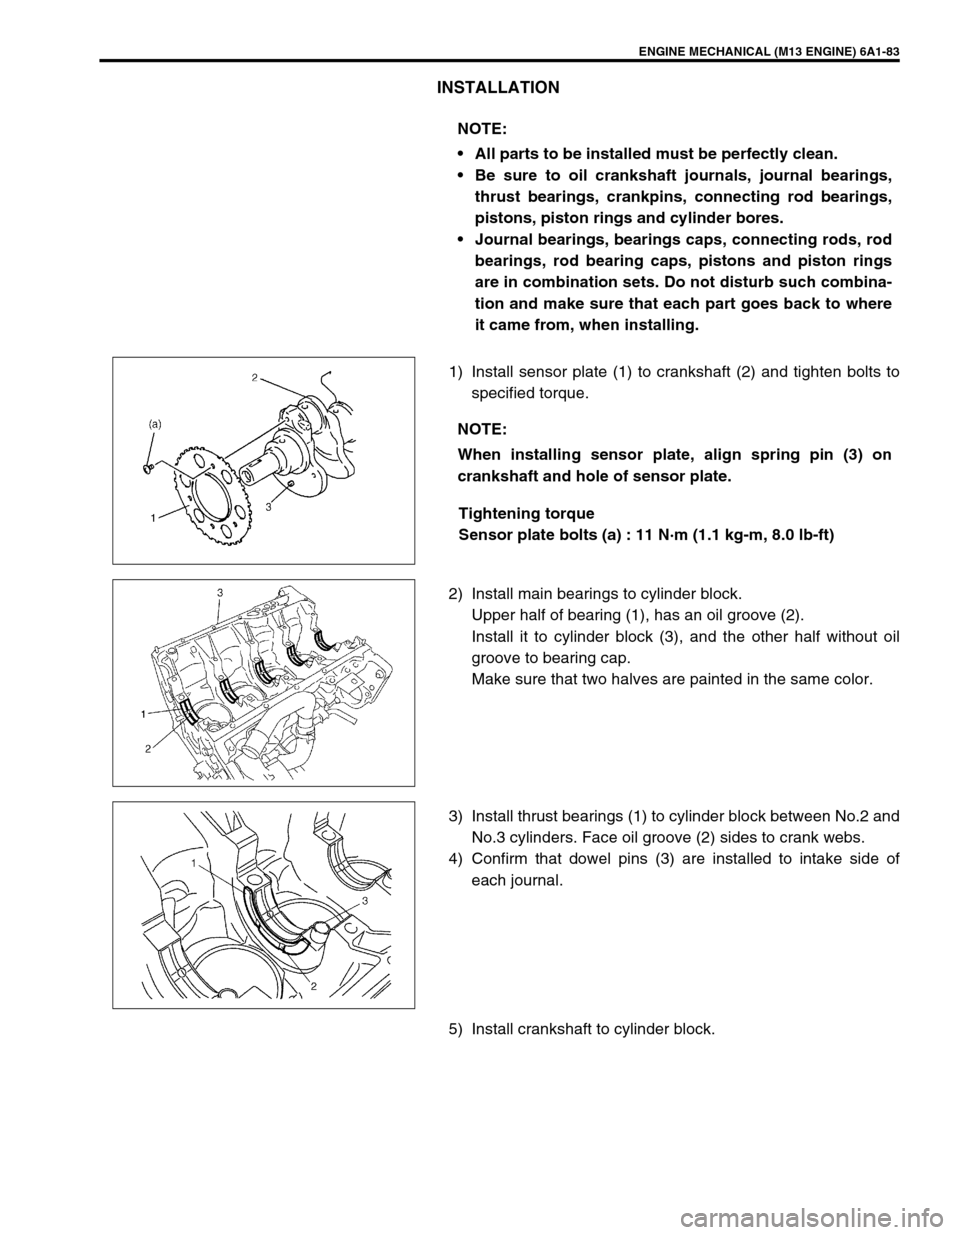
1) Install sensor plate (1) to crankshaft (2) and tighten bolts to
specified torque.
Tightening torque
Sensor plate bolts (a) : 11 N·m (1.1 kg-m, 8.0 lb-ft)
2) Install main bearings to cylinder block.
Upper half of bearing (1), has an oil groove (2).
Install it to cylinder block (3), and the other half without oil
groove to bearing cap.
Make sure that two halves are painted in the same color.
3) Install thrust bearings (1) to cylinder block between No.2 and
No.3 cylinders. Face oil groove (2) sides to crank webs.
4) Confirm that dowel pins (3) are installed to intake side of
each journal.
5) Install crankshaft to cylinder block.NOTE:
All parts to be installed must be perfectly clean.
Be sure to oil crankshaft journals, journal bearings,
thrust bearings, crankpins, connecting rod bearings,
pistons, piston rings and cylinder bores.
Journal bearings, bearings caps, connecting rods, rod
bearings, rod bearing caps, pistons and piston rings
are in combination sets. Do not disturb such combina-
tion and make sure that each part goes back to where
it came from, when installing.
NOTE:
When installing sensor plate, align spring pin (3) on
crankshaft and hole of sensor plate.
Page 585 of 698
6A1-84 ENGINE MECHANICAL (M13 ENGINE)
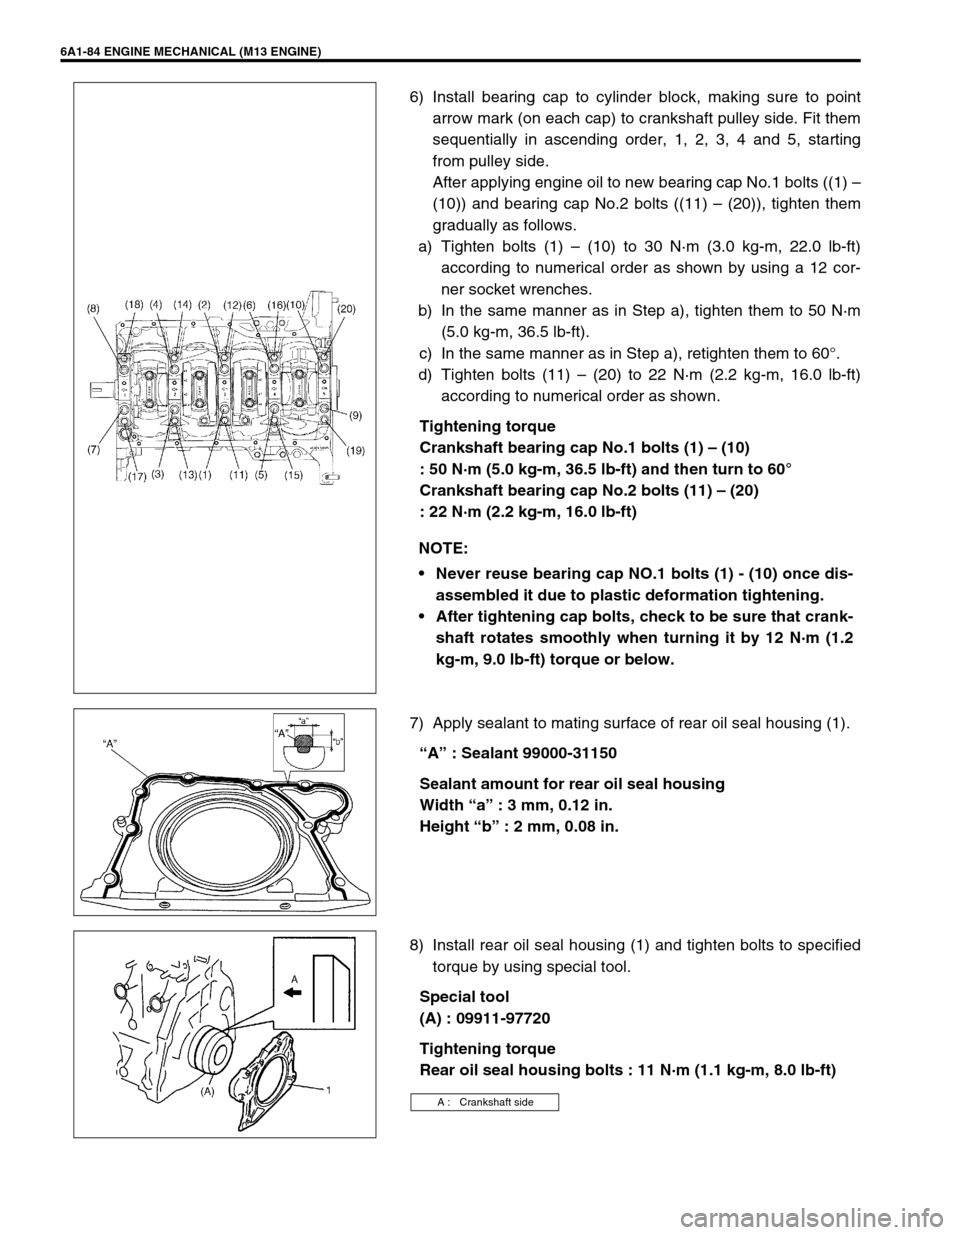
6) Install bearing cap to cylinder block, making sure to point
arrow mark (on each cap) to crankshaft pulley side. Fit them
sequentially in ascending order, 1, 2, 3, 4 and 5, starting
from pulley side.
After applying engine oil to new bearing cap No.1 bolts ((1) –
(10)) and bearing cap No.2 bolts ((11) – (20)), tighten them
gradually as follows.
a) Tighten bolts (1) – (10) to 30 N·m (3.0 kg-m, 22.0 lb-ft)
according to numerical order as shown by using a 12 cor-
ner socket wrenches.
b) In the same manner as in Step a), tighten them to 50 N·m
(5.0 kg-m, 36.5 lb-ft).
c) In the same manner as in Step a), retighten them to 60°.
d) Tighten bolts (11) – (20) to 22 N·m (2.2 kg-m, 16.0 lb-ft)
according to numerical order as shown.
Tightening torque
Crankshaft bearing cap No.1 bolts (1) – (10)
: 50 N·m (5.0 kg-m, 36.5 lb-ft) and then turn to 60°
Crankshaft bearing cap No.2 bolts (11) – (20)
: 22 N·m (2.2 kg-m, 16.0 lb-ft)
7) Apply sealant to mating surface of rear oil seal housing (1).
“A” : Sealant 99000-31150
Sealant amount for rear oil seal housing
Width “a” : 3 mm, 0.12 in.
Height “b” : 2 mm, 0.08 in.
8) Install rear oil seal housing (1) and tighten bolts to specified
torque by using special tool.
Special tool
(A) : 09911-97720
Tightening torque
Rear oil seal housing bolts : 11 N·m (1.1 kg-m, 8.0 lb-ft) NOTE:
Never reuse bearing cap NO.1 bolts (1) - (10) once dis-
assembled it due to plastic deformation tightening.
After tightening cap bolts, check to be sure that crank-
shaft rotates smoothly when turning it by 12 N·m (1.2
kg-m, 9.0 lb-ft) torque or below.
A : Crankshaft side
Page 586 of 698
ENGINE MECHANICAL (M13 ENGINE) 6A1-85
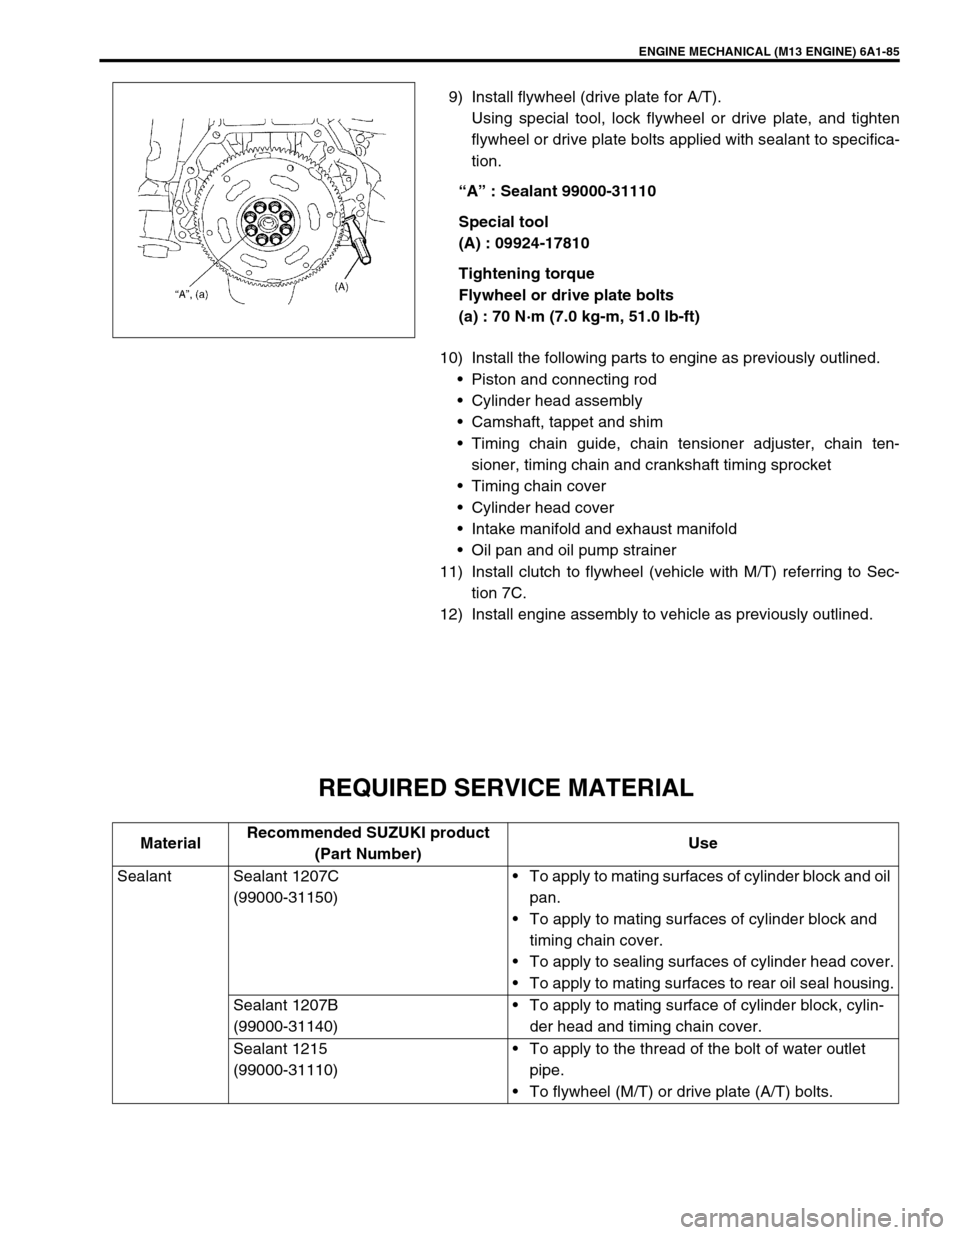
9) Install flywheel (drive plate for A/T).
Using special tool, lock flywheel or drive plate, and tighten
flywheel or drive plate bolts applied with sealant to specifica-
tion.
“A” : Sealant 99000-31110
Special tool
(A) : 09924-17810
Tightening torque
Flywheel or drive plate bolts
(a) : 70 N·m (7.0 kg-m, 51.0 lb-ft)
10) Install the following parts to engine as previously outlined.
Piston and connecting rod
Cylinder head assembly
Camshaft, tappet and shim
Timing chain guide, chain tensioner adjuster, chain ten-
sioner, timing chain and crankshaft timing sprocket
Timing chain cover
Cylinder head cover
Intake manifold and exhaust manifold
Oil pan and oil pump strainer
11) Install clutch to flywheel (vehicle with M/T) referring to Sec-
tion 7C.
12) Install engine assembly to vehicle as previously outlined.
REQUIRED SERVICE MATERIAL
MaterialRecommended SUZUKI product
(Part Number)Use
Sealant Sealant 1207C
(99000-31150)To apply to mating surfaces of cylinder block and oil
pan.
To apply to mating surfaces of cylinder block and
timing chain cover.
To apply to sealing surfaces of cylinder head cover.
To apply to mating surfaces to rear oil seal housing.
Sealant 1207B
(99000-31140)To apply to mating surface of cylinder block, cylin-
der head and timing chain cover.
Sealant 1215
(99000-31110)To apply to the thread of the bolt of water outlet
pipe.
To flywheel (M/T) or drive plate (A/T) bolts.
Page 589 of 698
6A1-88 ENGINE MECHANICAL (M13 ENGINE)
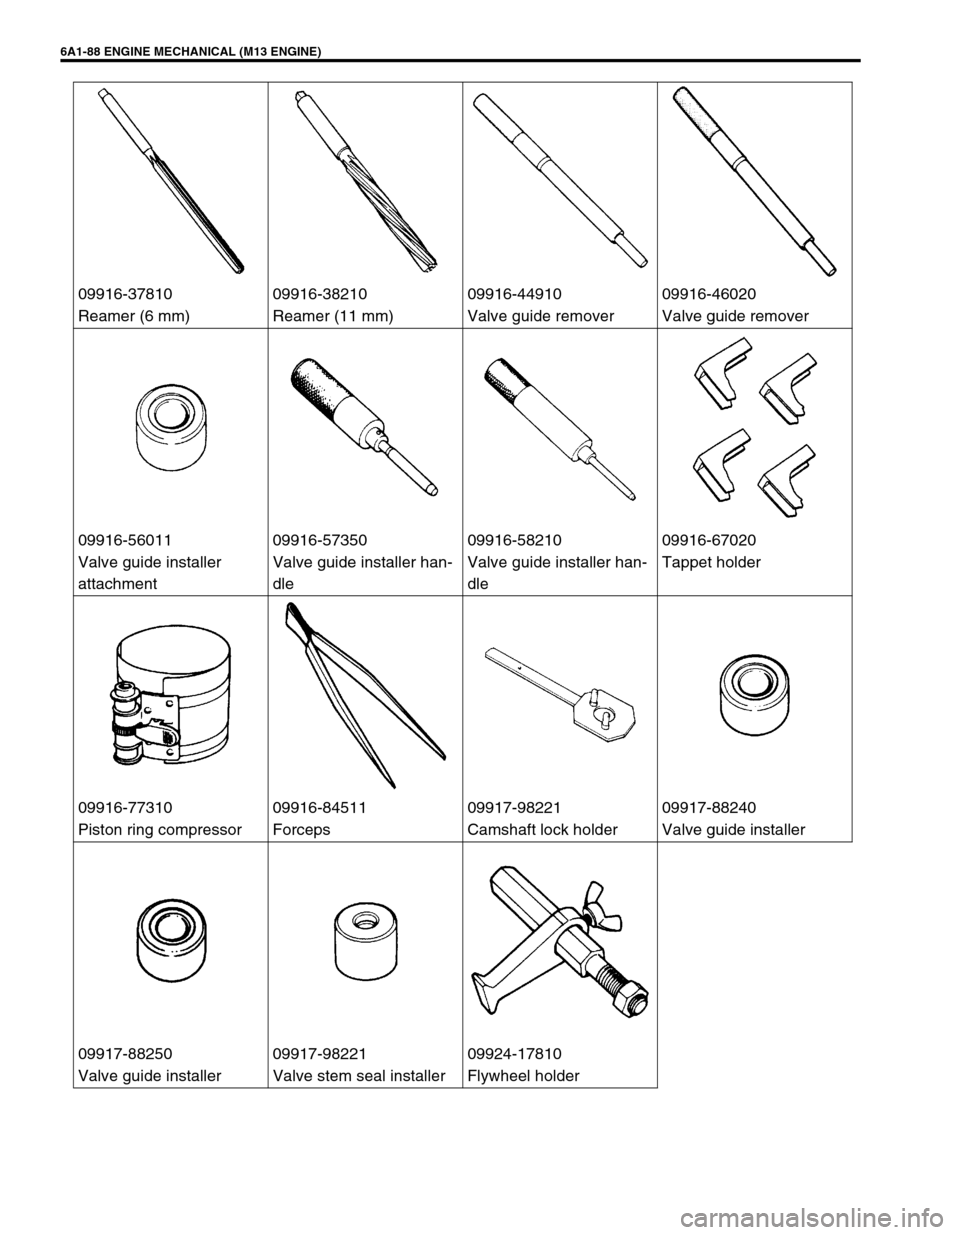
09916-37810 09916-38210 09916-44910 09916-46020
Reamer (6 mm) Reamer (11 mm) Valve guide remover Valve guide remover
09916-56011 09916-57350 09916-58210 09916-67020
Valve guide installer
attachmentValve guide installer han-
dleValve guide installer han-
dleTappet holder
09916-77310 09916-84511 09917-98221 09917-88240
Piston ring compressor Forceps Camshaft lock holder Valve guide installer
09917-88250 09917-98221 09924-17810
Valve guide installer Valve stem seal installer Flywheel holder
Page 591 of 698
6B-2 ENGINE COOLING
GENERAL DESCRIPTION
The cooling system consists of the radiator cap, radiator, coolant reservoir tank, hoses, water pump, cooling fan
and thermostat. The radiator is of tube-and-fin type.
COOLING SYSTEM CIRCULATION
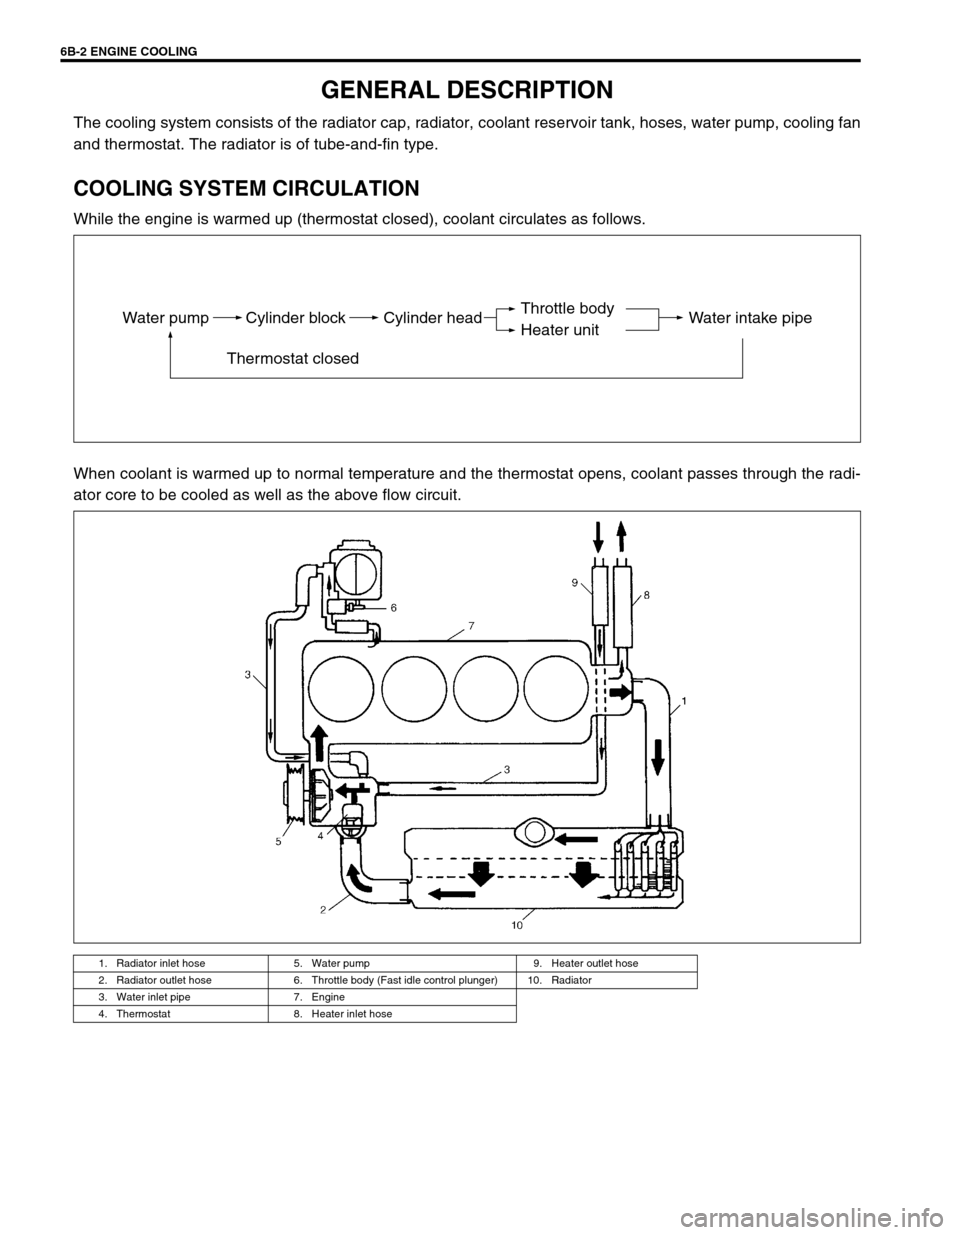
While the engine is warmed up (thermostat closed), coolant circulates as follows.
When coolant is warmed up to normal temperature and the thermostat opens, coolant passes through the radi-
ator core to be cooled as well as the above flow circuit.
1. Radiator inlet hose 5. Water pump 9. Heater outlet hose
2. Radiator outlet hose 6. Throttle body (Fast idle control plunger) 10. Radiator
3. Water inlet pipe 7. Engine
4. Thermostat 8. Heater inlet hose
Water pump Cylinder block
Thermostat closedCylinder head Water intake pipeThrottle body
Heater unit
Page 596 of 698
ENGINE COOLING 6B-7
ENGINE COOLING SYSTEM INSPECTION
AND SERVICE
1) Check cooling system for leakage or damage.
2) Wash radiator cap and filler neck with clean water by remov-
ing radiator cap when engine is cold.
3) Check coolant for proper level and freeze protection.
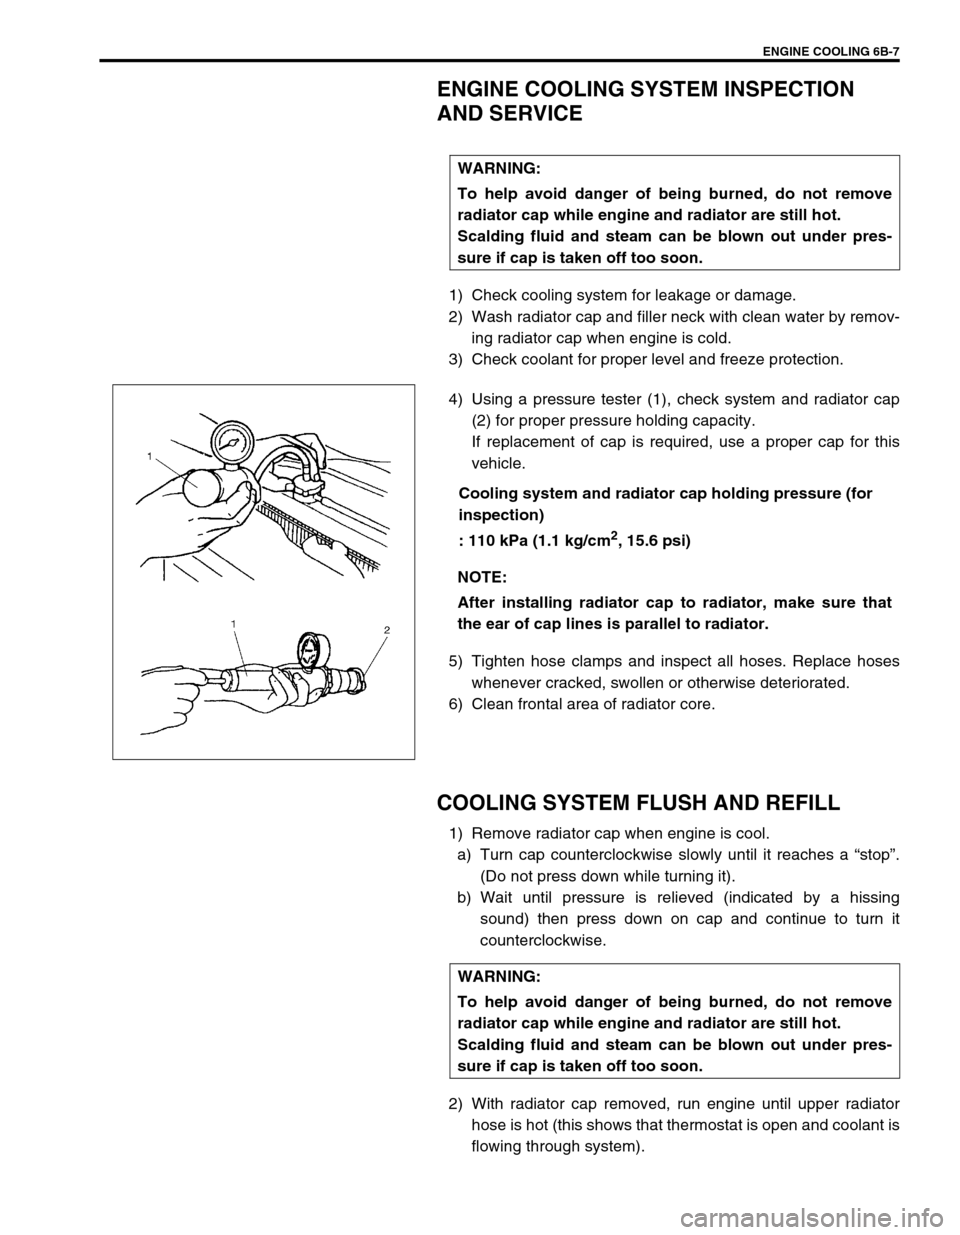
4) Using a pressure tester (1), check system and radiator cap
(2) for proper pressure holding capacity.
If replacement of cap is required, use a proper cap for this
vehicle.
Cooling system and radiator cap holding pressure (for
inspection)
: 110 kPa (1.1 kg/cm
2, 15.6 psi)
5) Tighten hose clamps and inspect all hoses. Replace hoses
whenever cracked, swollen or otherwise deteriorated.
6) Clean frontal area of radiator core.
COOLING SYSTEM FLUSH AND REFILL
1) Remove radiator cap when engine is cool.
a) Turn cap counterclockwise slowly until it reaches a “stop”.
(Do not press down while turning it).
b) Wait until pressure is relieved (indicated by a hissing
sound) then press down on cap and continue to turn it
counterclockwise.
2) With radiator cap removed, run engine until upper radiator
hose is hot (this shows that thermostat is open and coolant is
flowing through system). WARNING:
To help avoid danger of being burned, do not remove
radiator cap while engine and radiator are still hot.
Scalding fluid and steam can be blown out under pres-
sure if cap is taken off too soon.
NOTE:
After installing radiator cap to radiator, make sure that
the ear of cap lines is parallel to radiator.
WARNING:
To help avoid danger of being burned, do not remove
radiator cap while engine and radiator are still hot.
Scalding fluid and steam can be blown out under pres-
sure if cap is taken off too soon.