ECU SUZUKI SWIFT 2000 1.G RG413 Service User Guide
[x] Cancel search | Manufacturer: SUZUKI, Model Year: 2000, Model line: SWIFT, Model: SUZUKI SWIFT 2000 1.GPages: 698, PDF Size: 16.01 MB
Page 147 of 698
3B1-6 ELECTRICAL POWER STEERING (P/S) SYSTEM
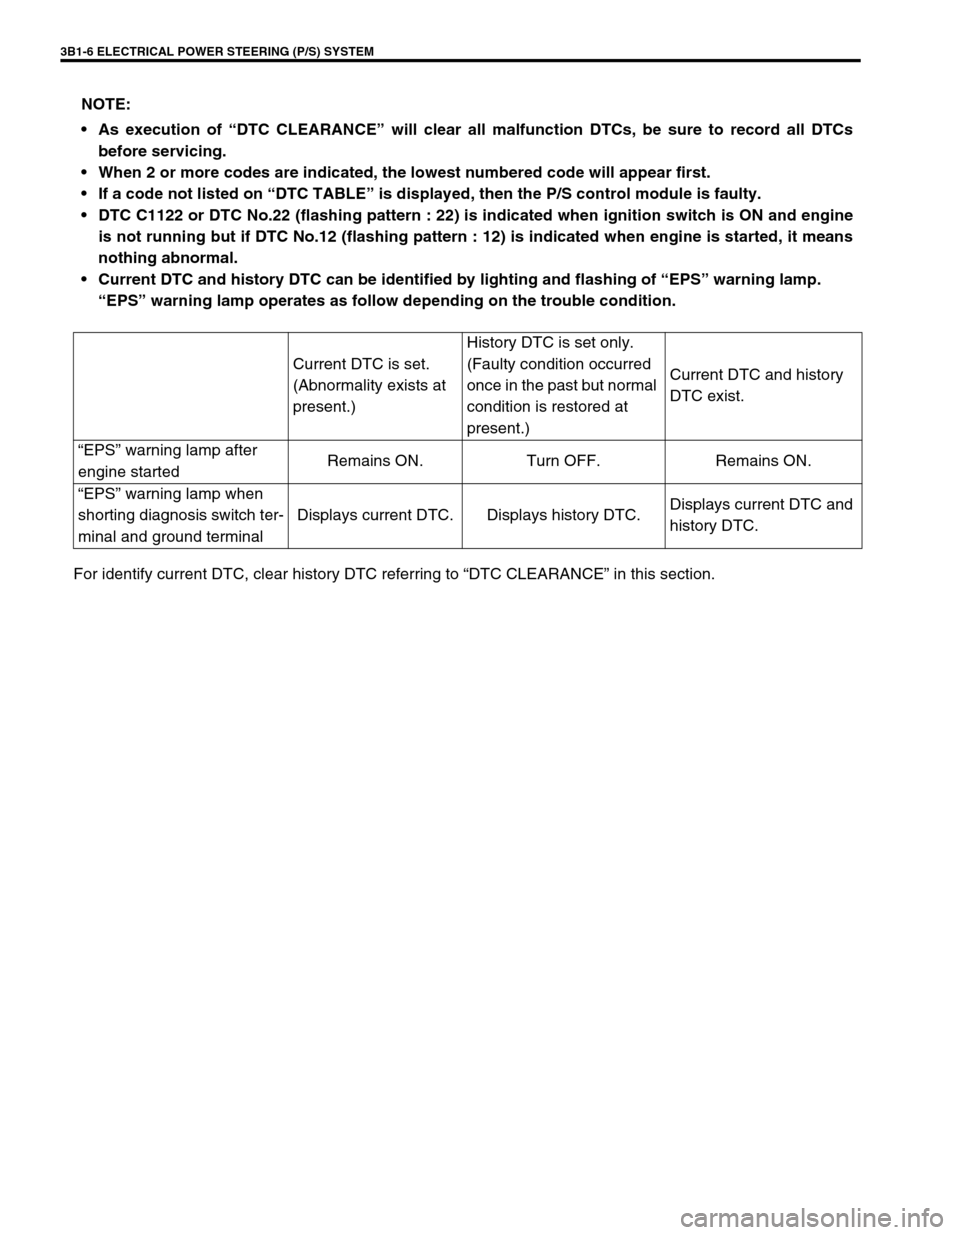
For identify current DTC, clear history DTC referring to “DTC CLEARANCE” in this section. NOTE:
As execution of “DTC CLEARANCE” will clear all malfunction DTCs, be sure to record all DTCs
before servicing.
When 2 or more codes are indicated, the lowest numbered code will appear first.
If a code not listed on “DTC TABLE” is displayed, then the P/S control module is faulty.
DTC C1122 or DTC No.22 (flashing pattern : 22) is indicated when ignition switch is ON and engine
is not running but if DTC No.12 (flashing pattern : 12) is indicated when engine is started, it means
nothing abnormal.
Current DTC and history DTC can be identified by lighting and flashing of “EPS” warning lamp.
“EPS” warning lamp operates as follow depending on the trouble condition.
Current DTC is set.
(Abnormality exists at
present.)History DTC is set only.
(Faulty condition occurred
once in the past but normal
condition is restored at
present.)Current DTC and history
DTC exist.
“EPS” warning lamp after
engine startedRemains ON. Turn OFF. Remains ON.
“EPS” warning lamp when
shorting diagnosis switch ter-
minal and ground terminalDisplays current DTC. Displays history DTC.Displays current DTC and
history DTC.
Page 156 of 698
ELECTRICAL POWER STEERING (P/S) SYSTEM 3B1-15
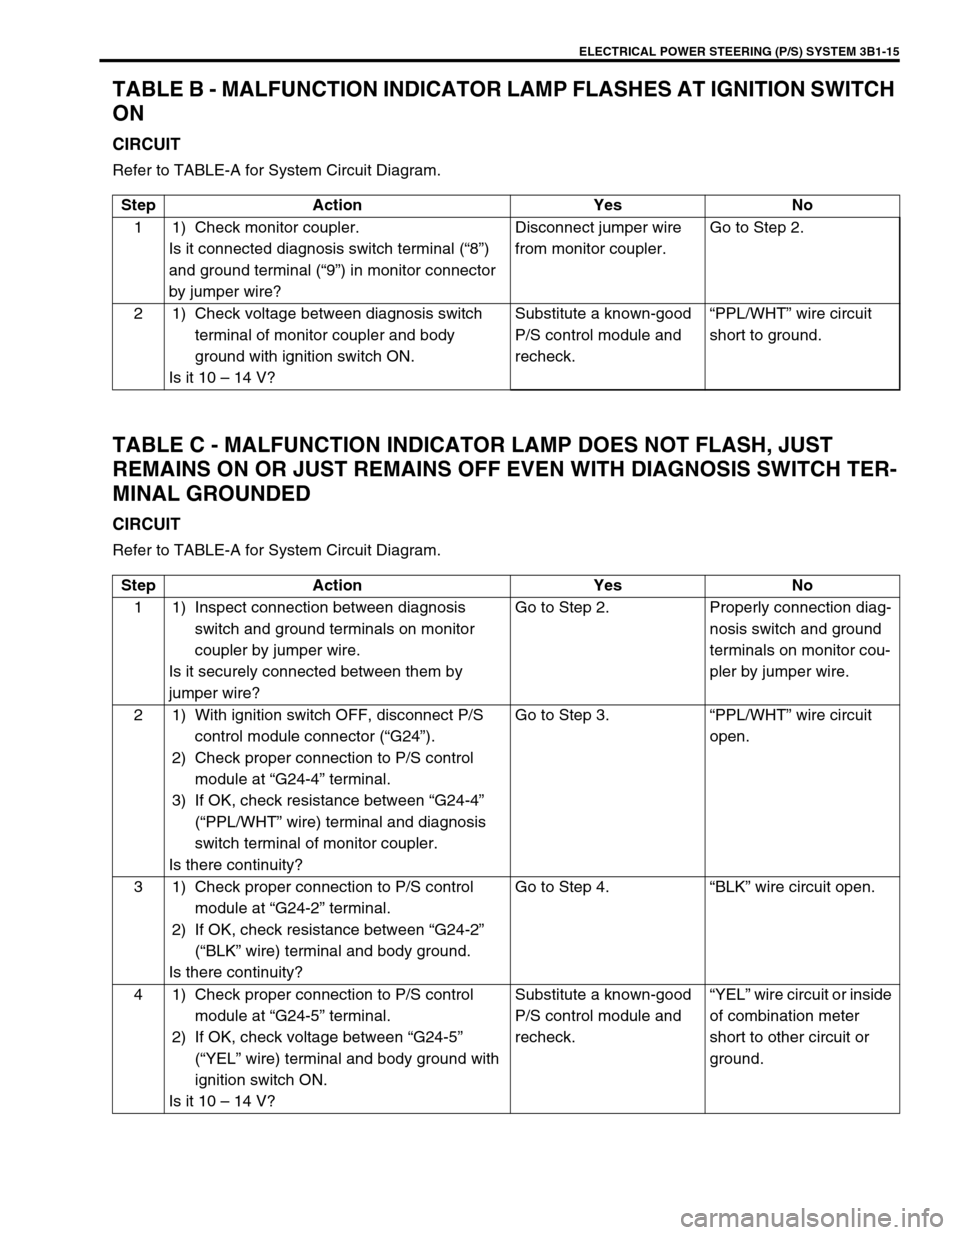
TABLE B - MALFUNCTION INDICATOR LAMP FLASHES AT IGNITION SWITCH
ON
CIRCUIT
Refer to TABLE-A for System Circuit Diagram.
TABLE C - MALFUNCTION INDICATOR LAMP DOES NOT FLASH, JUST
REMAINS ON OR JUST REMAINS OFF EVEN WITH DIAGNOSIS SWITCH TER-
MINAL GROUNDED
CIRCUIT
Refer to TABLE-A for System Circuit Diagram.Step Action Yes No
1 1) Check monitor coupler.
Is it connected diagnosis switch terminal (“8”)
and ground terminal (“9”) in monitor connector
by jumper wire?Disconnect jumper wire
from monitor coupler.Go to Step 2.
2 1) Check voltage between diagnosis switch
terminal of monitor coupler and body
ground with ignition switch ON.
Is it 10 – 14 V?Substitute a known-good
P/S control module and
recheck.“PPL/WHT” wire circuit
short to ground.
Step Action Yes No
1 1) Inspect connection between diagnosis
switch and ground terminals on monitor
coupler by jumper wire.
Is it securely connected between them by
jumper wire?Go to Step 2. Properly connection diag-
nosis switch and ground
terminals on monitor cou-
pler by jumper wire.
2 1) With ignition switch OFF, disconnect P/S
control module connector (“G24”).
2) Check proper connection to P/S control
module at “G24-4” terminal.
3) If OK, check resistance between “G24-4”
(“PPL/WHT” wire) terminal and diagnosis
switch terminal of monitor coupler.
Is there continuity?Go to Step 3.“PPL/WHT” wire circuit
open.
3 1) Check proper connection to P/S control
module at “G24-2” terminal.
2) If OK, check resistance between “G24-2”
(“BLK” wire) terminal and body ground.
Is there continuity?Go to Step 4.“BLK” wire circuit open.
4 1) Check proper connection to P/S control
module at “G24-5” terminal.
2) If OK, check voltage between “G24-5”
(“YEL” wire) terminal and body ground with
ignition switch ON.
Is it 10 – 14 V?Substitute a known-good
P/S control module and
recheck.“YEL” wire circuit or inside
of combination meter
short to other circuit or
ground.
Page 178 of 698
STEERING WHEEL AND COLUMN 3C-5
INSPECTION
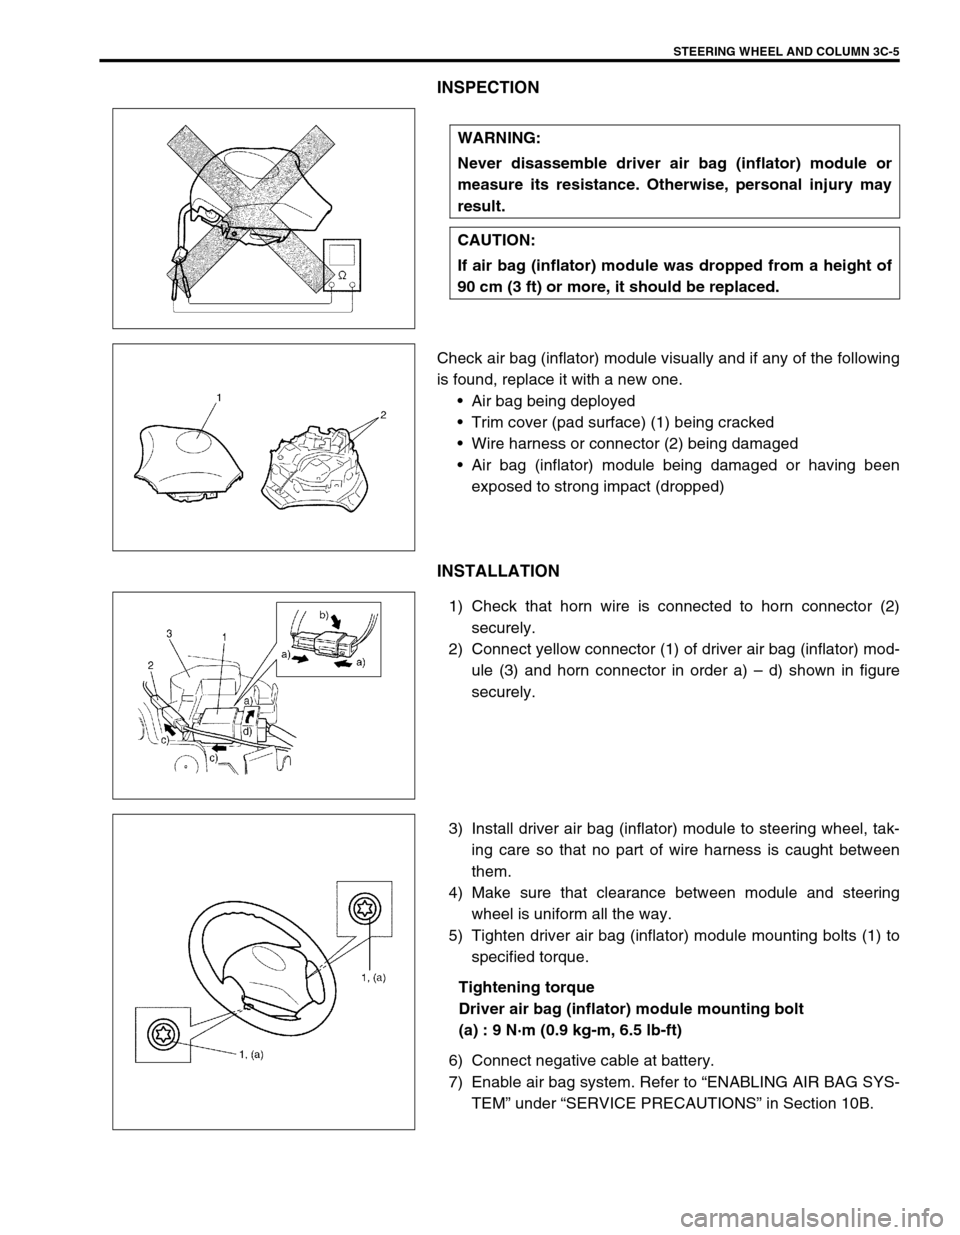
Check air bag (inflator) module visually and if any of the following
is found, replace it with a new one.
Air bag being deployed
Trim cover (pad surface) (1) being cracked
Wire harness or connector (2) being damaged
Air bag (inflator) module being damaged or having been
exposed to strong impact (dropped)
INSTALLATION
1) Check that horn wire is connected to horn connector (2)
securely.
2) Connect yellow connector (1) of driver air bag (inflator) mod-
ule (3) and horn connector in order a) – d) shown in figure
securely.
3) Install driver air bag (inflator) module to steering wheel, tak-
ing care so that no part of wire harness is caught between
them.
4) Make sure that clearance between module and steering
wheel is uniform all the way.
5) Tighten driver air bag (inflator) module mounting bolts (1) to
specified torque.
Tightening torque
Driver air bag (inflator) module mounting bolt
(a) : 9 N·m (0.9 kg-m, 6.5 lb-ft)
6) Connect negative cable at battery.
7) Enable air bag system. Refer to “ENABLING AIR BAG SYS-
TEM” under “SERVICE PRECAUTIONS” in Section 10B. WARNING:
Never disassemble driver air bag (inflator) module or
measure its resistance. Otherwise, personal injury may
result.
CAUTION:
If air bag (inflator) module was dropped from a height of
90 cm (3 ft) or more, it should be replaced.
Page 191 of 698
3C-18 STEERING WHEEL AND COLUMN
INSTALLATION
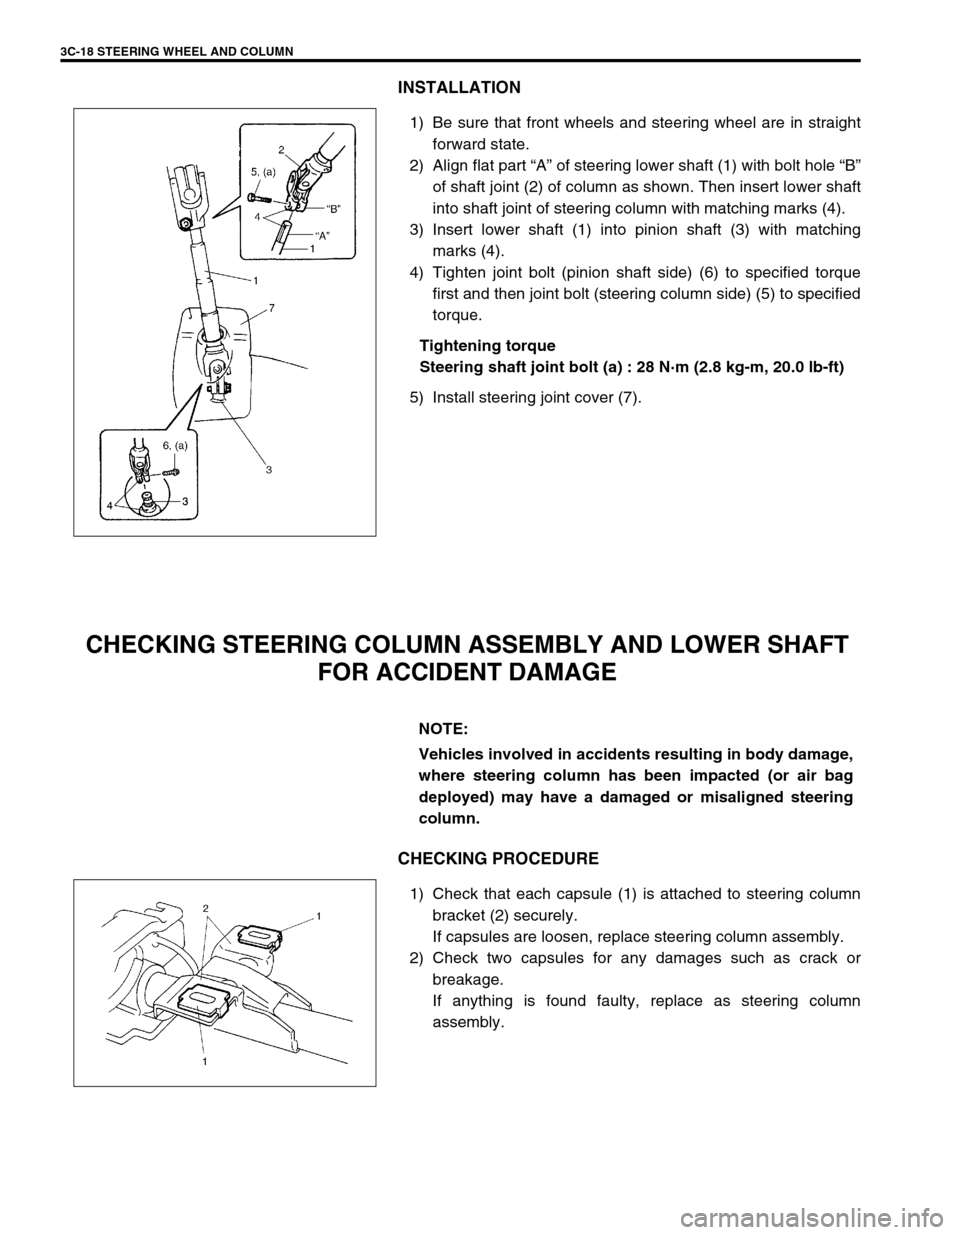
1) Be sure that front wheels and steering wheel are in straight
forward state.
2) Align flat part “A” of steering lower shaft (1) with bolt hole “B”
of shaft joint (2) of column as shown. Then insert lower shaft
into shaft joint of steering column with matching marks (4).
3) Insert lower shaft (1) into pinion shaft (3) with matching
marks (4).
4) Tighten joint bolt (pinion shaft side) (6) to specified torque
first and then joint bolt (steering column side) (5) to specified
torque.
Tightening torque
Steering shaft joint bolt (a) : 28 N·m (2.8 kg-m, 20.0 lb-ft)
5) Install steering joint cover (7).
CHECKING STEERING COLUMN ASSEMBLY AND LOWER SHAFT
FOR ACCIDENT DAMAGE
CHECKING PROCEDURE
1) Check that each capsule (1) is attached to steering column
bracket (2) securely.
If capsules are loosen, replace steering column assembly.
2) Check two capsules for any damages such as crack or
breakage.
If anything is found faulty, replace as steering column
assembly.
NOTE:
Vehicles involved in accidents resulting in body damage,
where steering column has been impacted (or air bag
deployed) may have a damaged or misaligned steering
column.
Page 199 of 698
3D-6 FRONT SUSPENSION
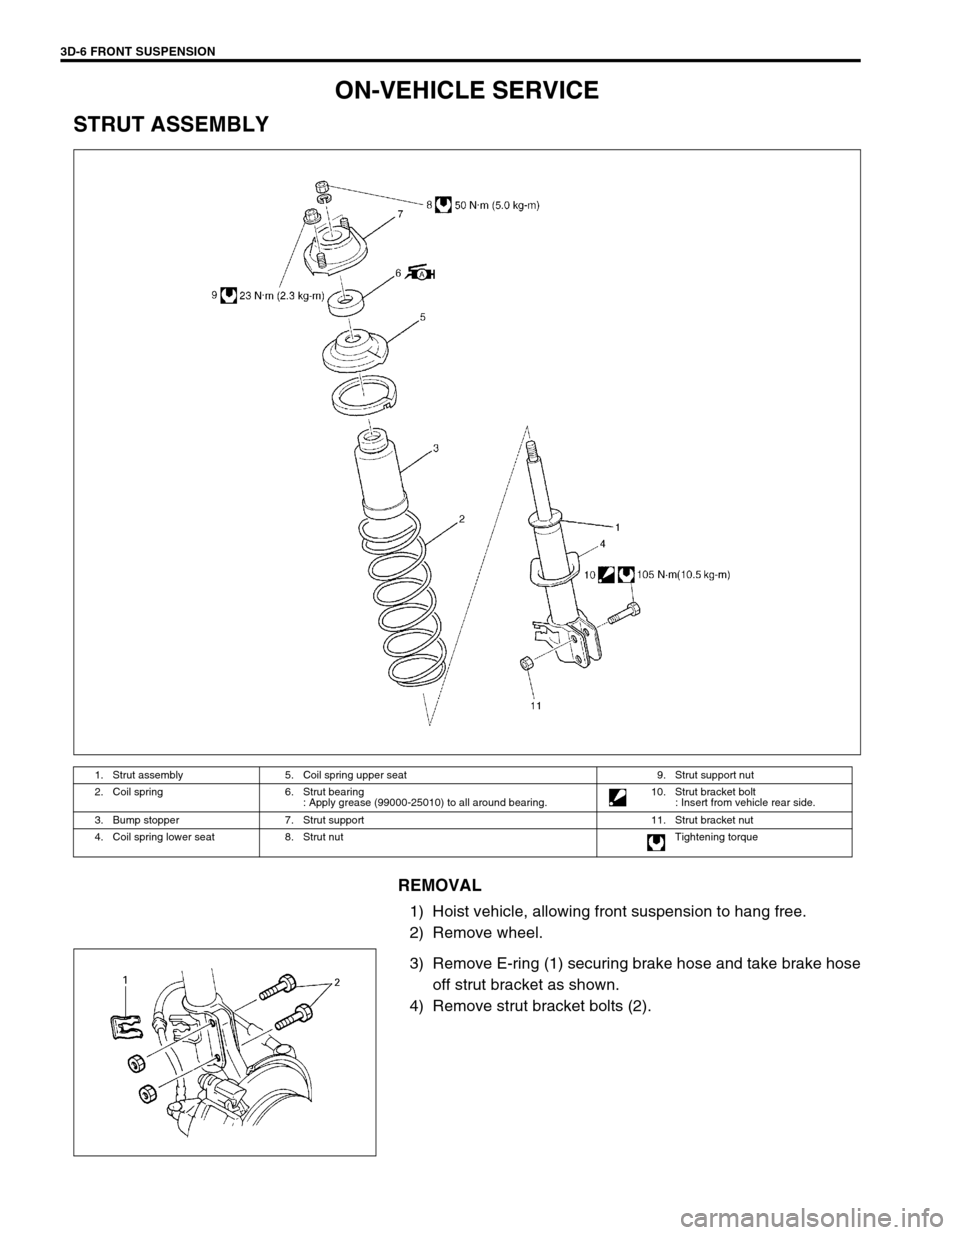
ON-VEHICLE SERVICE
STRUT ASSEMBLY
REMOVAL
1) Hoist vehicle, allowing front suspension to hang free.
2) Remove wheel.
3) Remove E-ring (1) securing brake hose and take brake hose
off strut bracket as shown.
4) Remove strut bracket bolts (2).
1. Strut assembly 5. Coil spring upper seat 9. Strut support nut
2. Coil spring 6. Strut bearing
: Apply grease (99000-25010) to all around bearing.10. Strut bracket bolt
: Insert from vehicle rear side.
3. Bump stopper 7. Strut support 11. Strut bracket nut
4. Coil spring lower seat 8. Strut nut Tightening torque
Page 226 of 698
REAR SUSPENSION 3E-13
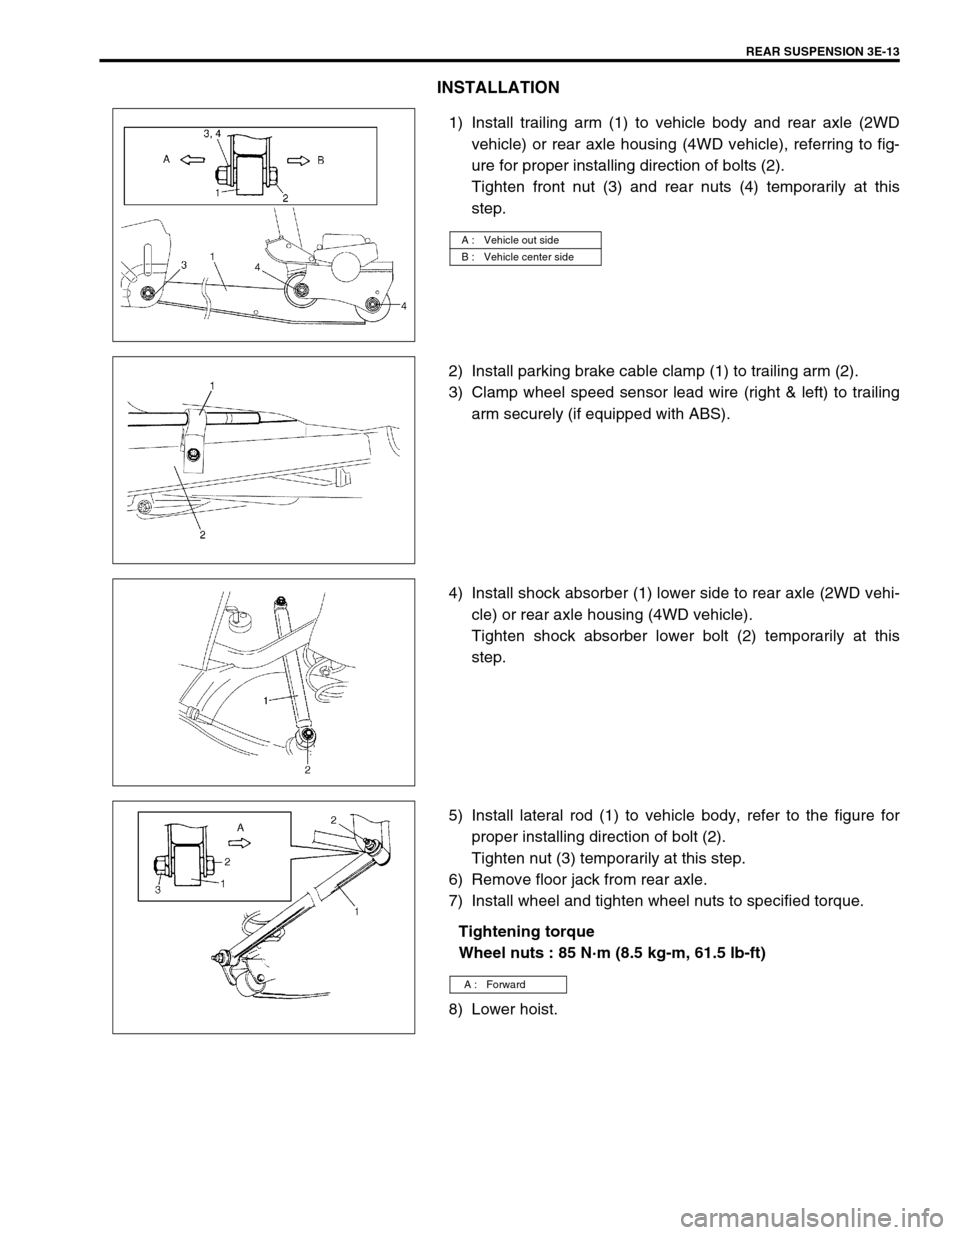
INSTALLATION
1) Install trailing arm (1) to vehicle body and rear axle (2WD
vehicle) or rear axle housing (4WD vehicle), referring to fig-
ure for proper installing direction of bolts (2).
Tighten front nut (3) and rear nuts (4) temporarily at this
step.
2) Install parking brake cable clamp (1) to trailing arm (2).
3) Clamp wheel speed sensor lead wire (right & left) to trailing
arm securely (if equipped with ABS).
4) Install shock absorber (1) lower side to rear axle (2WD vehi-
cle) or rear axle housing (4WD vehicle).
Tighten shock absorber lower bolt (2) temporarily at this
step.
5) Install lateral rod (1) to vehicle body, refer to the figure for
proper installing direction of bolt (2).
Tighten nut (3) temporarily at this step.
6) Remove floor jack from rear axle.
7) Install wheel and tighten wheel nuts to specified torque.
Tightening torque
Wheel nuts : 85 N·m (8.5 kg-m, 61.5 lb-ft)
8) Lower hoist.
A : Vehicle out side
B : Vehicle center side
A : Forward
Page 227 of 698
3E-14 REAR SUSPENSION
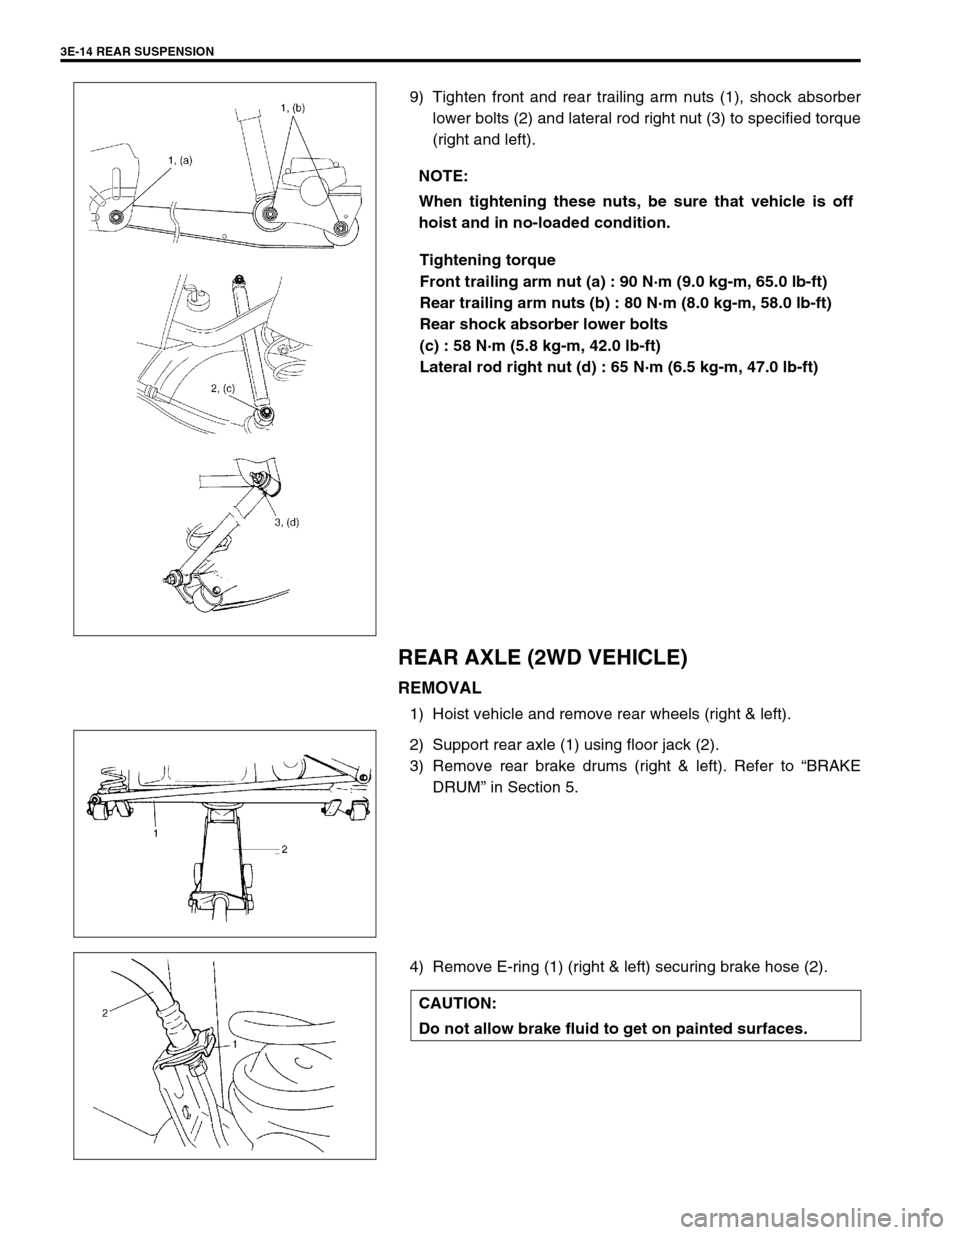
9) Tighten front and rear trailing arm nuts (1), shock absorber
lower bolts (2) and lateral rod right nut (3) to specified torque
(right and left).
Tightening torque
Front trailing arm nut (a) : 90 N·m (9.0 kg-m, 65.0 lb-ft)
Rear trailing arm nuts (b) : 80 N·m (8.0 kg-m, 58.0 lb-ft)
Rear shock absorber lower bolts
(c) : 58 N·m (5.8 kg-m, 42.0 lb-ft)
Lateral rod right nut (d) : 65 N·m (6.5 kg-m, 47.0 lb-ft)
REAR AXLE (2WD VEHICLE)
REMOVAL
1) Hoist vehicle and remove rear wheels (right & left).
2) Support rear axle (1) using floor jack (2).
3) Remove rear brake drums (right & left). Refer to “BRAKE
DRUM” in Section 5.
4) Remove E-ring (1) (right & left) securing brake hose (2).NOTE:
When tightening these nuts, be sure that vehicle is off
hoist and in no-loaded condition.
CAUTION:
Do not allow brake fluid to get on painted surfaces.
Page 231 of 698
3E-18 REAR SUSPENSION
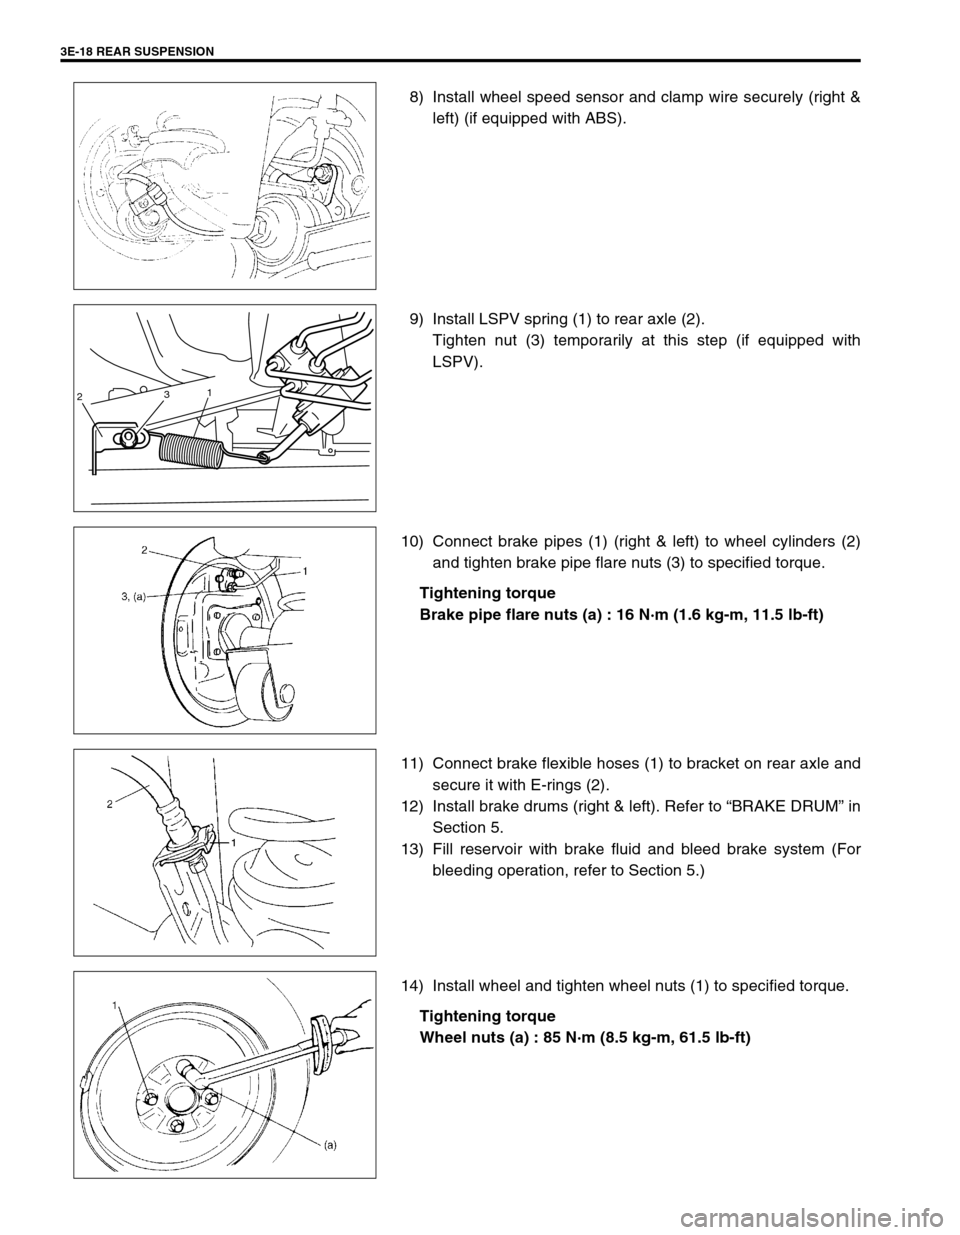
8) Install wheel speed sensor and clamp wire securely (right &
left) (if equipped with ABS).
9) Install LSPV spring (1) to rear axle (2).
Tighten nut (3) temporarily at this step (if equipped with
LSPV).
10) Connect brake pipes (1) (right & left) to wheel cylinders (2)
and tighten brake pipe flare nuts (3) to specified torque.
Tightening torque
Brake pipe flare nuts (a) : 16 N·m (1.6 kg-m, 11.5 lb-ft)
11) Connect brake flexible hoses (1) to bracket on rear axle and
secure it with E-rings (2).
12) Install brake drums (right & left). Refer to “BRAKE DRUM” in
Section 5.
13) Fill reservoir with brake fluid and bleed brake system (For
bleeding operation, refer to Section 5.)
14) Install wheel and tighten wheel nuts (1) to specified torque.
Tightening torque
Wheel nuts (a) : 85 N·m (8.5 kg-m, 61.5 lb-ft)
231
Page 238 of 698
REAR SUSPENSION 3E-25
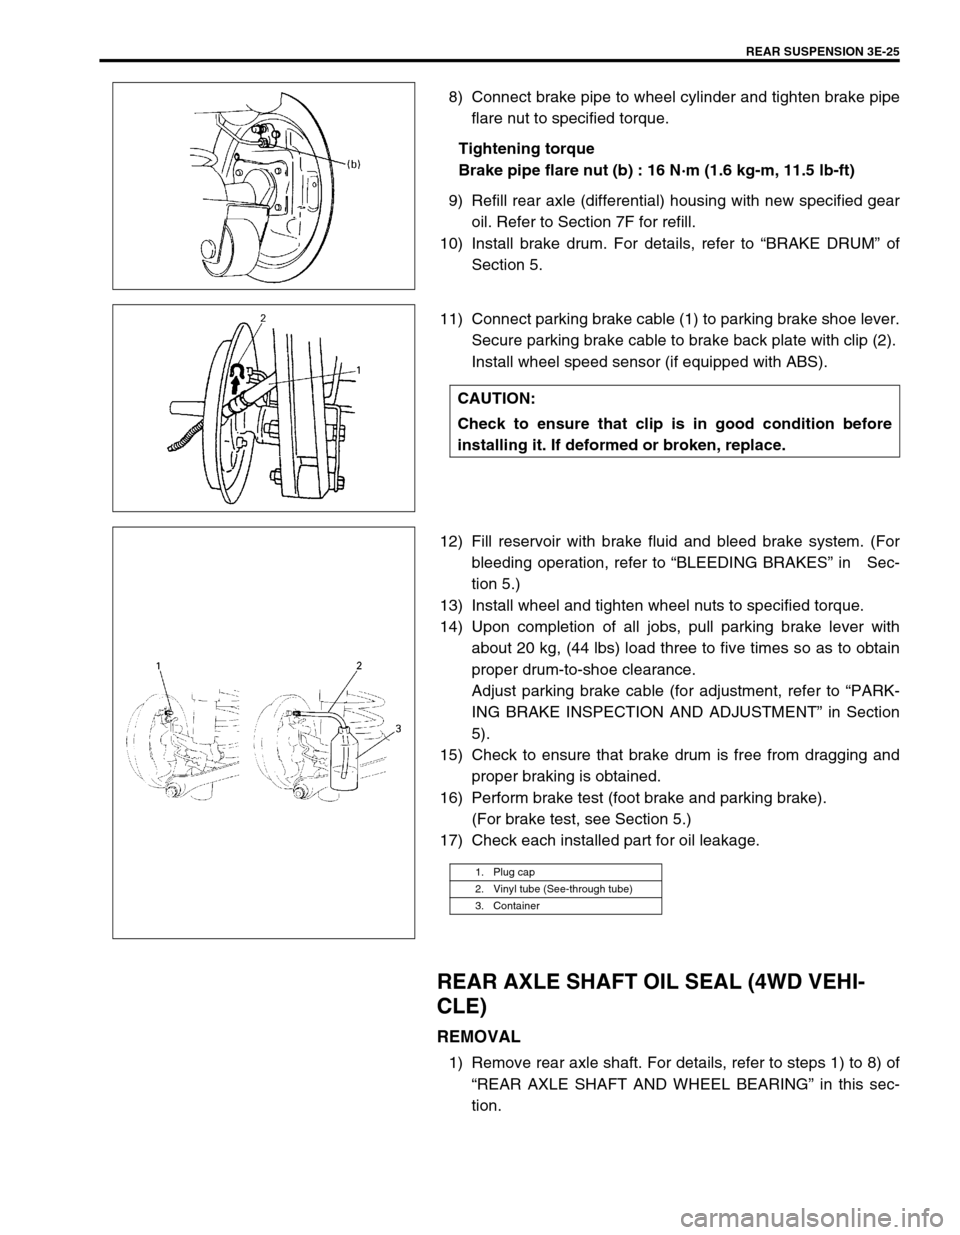
8) Connect brake pipe to wheel cylinder and tighten brake pipe
flare nut to specified torque.
Tightening torque
Brake pipe flare nut (b) : 16 N·m (1.6 kg-m, 11.5 lb-ft)
9) Refill rear axle (differential) housing with new specified gear
oil. Refer to Section 7F for refill.
10) Install brake drum. For details, refer to “BRAKE DRUM” of
Section 5.
11) Connect parking brake cable (1) to parking brake shoe lever.
Secure parking brake cable to brake back plate with clip (2).
Install wheel speed sensor (if equipped with ABS).
12) Fill reservoir with brake fluid and bleed brake system. (For
bleeding operation, refer to “BLEEDING BRAKES” in Sec-
tion 5.)
13) Install wheel and tighten wheel nuts to specified torque.
14) Upon completion of all jobs, pull parking brake lever with
about 20 kg, (44 lbs) load three to five times so as to obtain
proper drum-to-shoe clearance.
Adjust parking brake cable (for adjustment, refer to “PARK-
ING BRAKE INSPECTION AND ADJUSTMENT” in Section
5).
15) Check to ensure that brake drum is free from dragging and
proper braking is obtained.
16) Perform brake test (foot brake and parking brake).
(For brake test, see Section 5.)
17) Check each installed part for oil leakage.
REAR AXLE SHAFT OIL SEAL (4WD VEHI-
CLE)
REMOVAL
1) Remove rear axle shaft. For details, refer to steps 1) to 8) of
“REAR AXLE SHAFT AND WHEEL BEARING” in this sec-
tion.
CAUTION:
Check to ensure that clip is in good condition before
installing it. If deformed or broken, replace.
1. Plug cap
2. Vinyl tube (See-through tube)
3. Container
Page 242 of 698
REAR SUSPENSION 3E-29
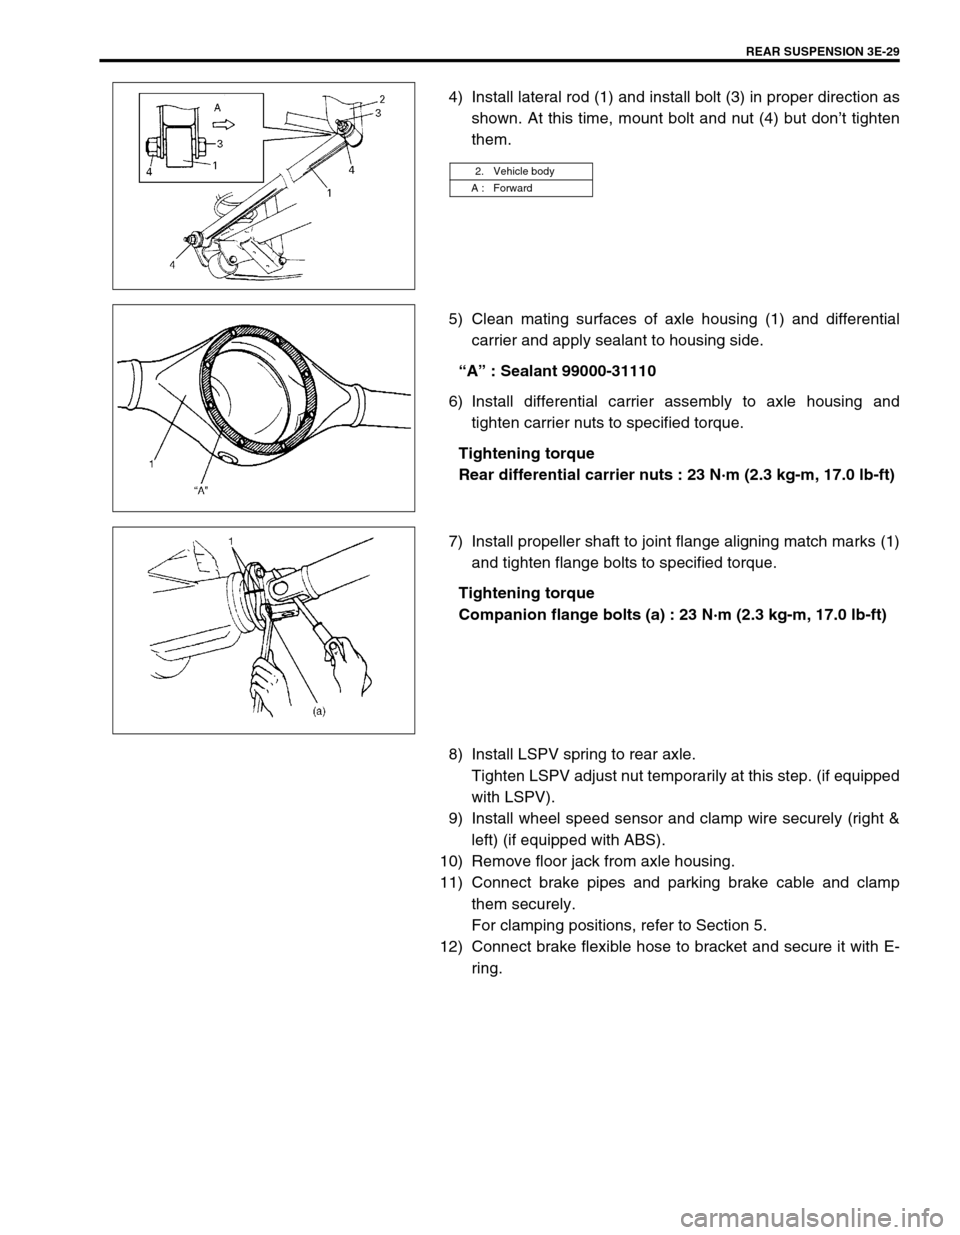
4) Install lateral rod (1) and install bolt (3) in proper direction as
shown. At this time, mount bolt and nut (4) but don’t tighten
them.
5) Clean mating surfaces of axle housing (1) and differential
carrier and apply sealant to housing side.
“A” : Sealant 99000-31110
6) Install differential carrier assembly to axle housing and
tighten carrier nuts to specified torque.
Tightening torque
Rear differential carrier nuts : 23 N·m (2.3 kg-m, 17.0 lb-ft)
7) Install propeller shaft to joint flange aligning match marks (1)
and tighten flange bolts to specified torque.
Tightening torque
Companion flange bolts (a) : 23 N·m (2.3 kg-m, 17.0 lb-ft)
8) Install LSPV spring to rear axle.
Tighten LSPV adjust nut temporarily at this step. (if equipped
with LSPV).
9) Install wheel speed sensor and clamp wire securely (right &
left) (if equipped with ABS).
10) Remove floor jack from axle housing.
11) Connect brake pipes and parking brake cable and clamp
them securely.
For clamping positions, refer to Section 5.
12) Connect brake flexible hose to bracket and secure it with E-
ring.
2. Vehicle body
A : Forward