4WD SUZUKI SWIFT 2000 1.G RG413 Service Service Manual
[x] Cancel search | Manufacturer: SUZUKI, Model Year: 2000, Model line: SWIFT, Model: SUZUKI SWIFT 2000 1.GPages: 698, PDF Size: 16.01 MB
Page 363 of 698
5E-38 ANTILOCK BRAKE SYSTEM (ABS)
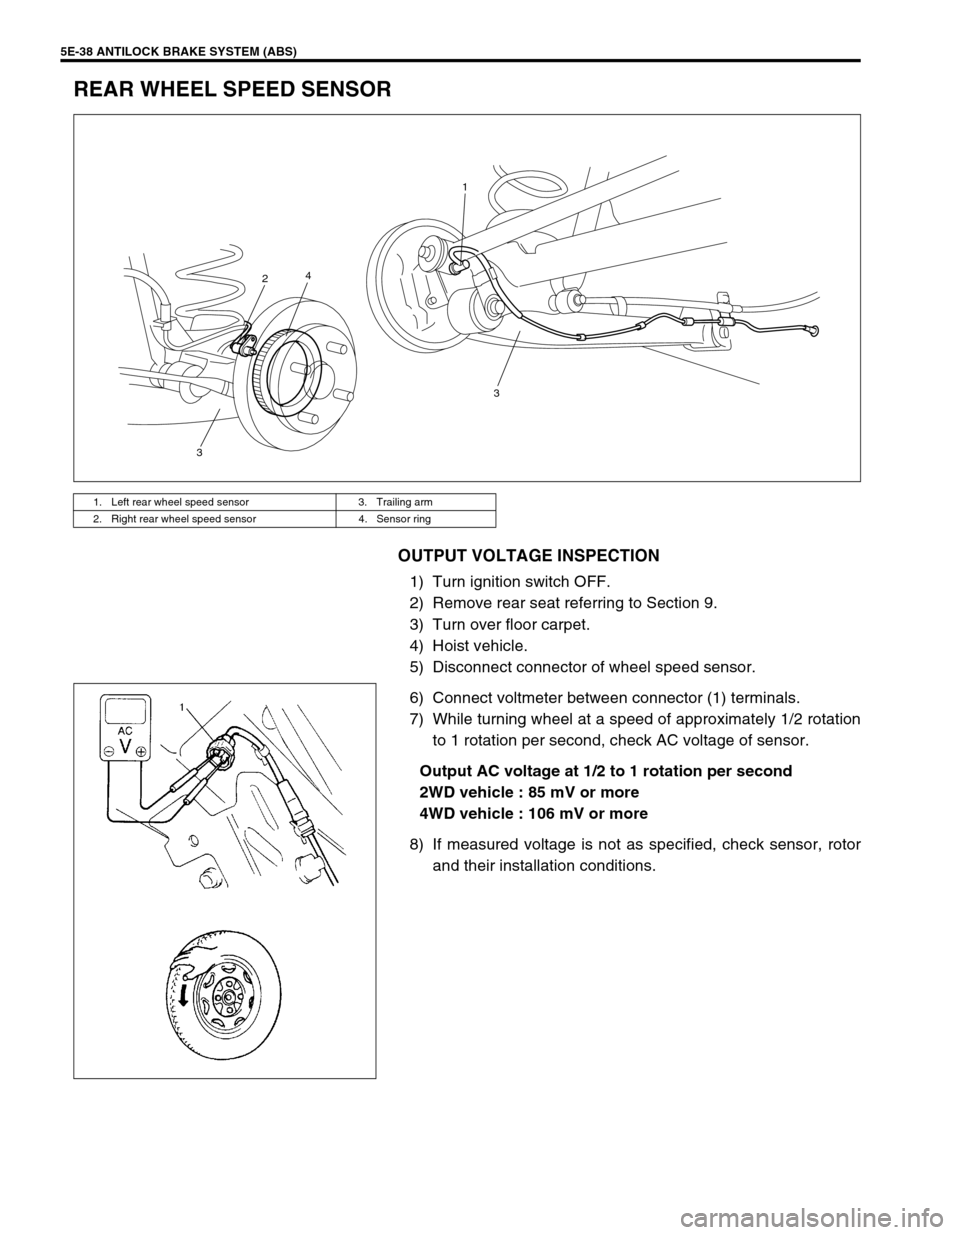
REAR WHEEL SPEED SENSOR
OUTPUT VOLTAGE INSPECTION
1) Turn ignition switch OFF.
2) Remove rear seat referring to Section 9.
3) Turn over floor carpet.
4) Hoist vehicle.
5) Disconnect connector of wheel speed sensor.
6) Connect voltmeter between connector (1) terminals.
7) While turning wheel at a speed of approximately 1/2 rotation
to 1 rotation per second, check AC voltage of sensor.
Output AC voltage at 1/2 to 1 rotation per second
2WD vehicle : 85 mV or more
4WD vehicle : 106 mV or more
8) If measured voltage is not as specified, check sensor, rotor
and their installation conditions.
1. Left rear wheel speed sensor 3. Trailing arm
2. Right rear wheel speed sensor 4. Sensor ring
3 1
4
2
3
Page 364 of 698
ANTILOCK BRAKE SYSTEM (ABS) 5E-39
Reference
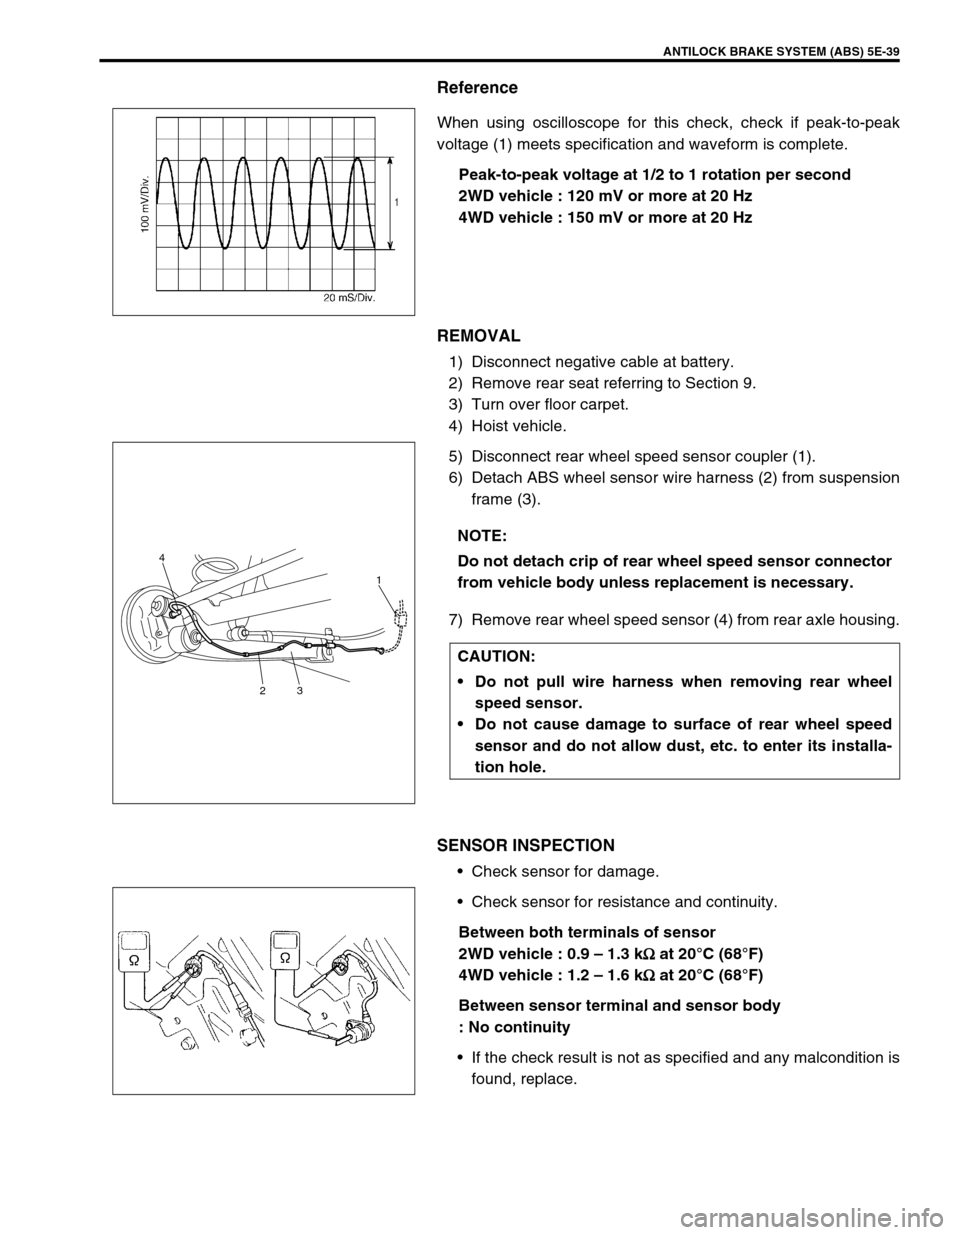
When using oscilloscope for this check, check if peak-to-peak
voltage (1) meets specification and waveform is complete.
Peak-to-peak voltage at 1/2 to 1 rotation per second
2WD vehicle : 120 mV or more at 20 Hz
4WD vehicle : 150 mV or more at 20 Hz
REMOVAL
1) Disconnect negative cable at battery.
2) Remove rear seat referring to Section 9.
3) Turn over floor carpet.
4) Hoist vehicle.
5) Disconnect rear wheel speed sensor coupler (1).
6) Detach ABS wheel sensor wire harness (2) from suspension
frame (3).
7) Remove rear wheel speed sensor (4) from rear axle housing.
SENSOR INSPECTION
Check sensor for damage.
Check sensor for resistance and continuity.
Between both terminals of sensor
2WD vehicle : 0.9 – 1.3 k
Ω
ΩΩ Ω at 20°C (68°F)
4WD vehicle : 1.2 – 1.6 k
Ω
ΩΩ Ω at 20°C (68°F)
Between sensor terminal and sensor body
: No continuity
If the check result is not as specified and any malcondition is
found, replace.
NOTE:
Do not detach crip of rear wheel speed sensor connector
from vehicle body unless replacement is necessary.
CAUTION:
Do not pull wire harness when removing rear wheel
speed sensor.
Do not cause damage to surface of rear wheel speed
sensor and do not allow dust, etc. to enter its installa-
tion hole.
4
231
Page 365 of 698
5E-40 ANTILOCK BRAKE SYSTEM (ABS)
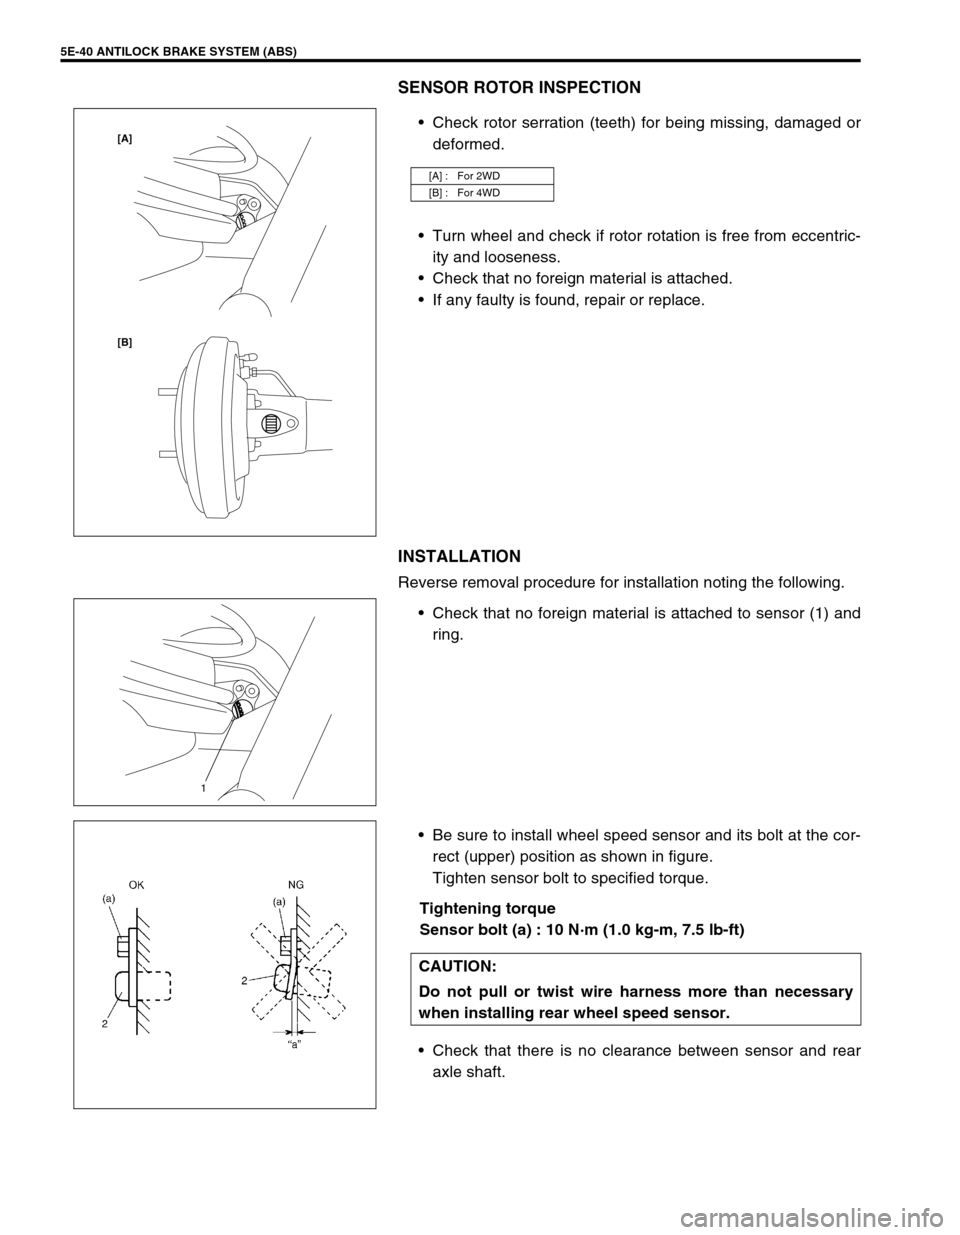
SENSOR ROTOR INSPECTION
Check rotor serration (teeth) for being missing, damaged or
deformed.
Turn wheel and check if rotor rotation is free from eccentric-
ity and looseness.
Check that no foreign material is attached.
If any faulty is found, repair or replace.
INSTALLATION
Reverse removal procedure for installation noting the following.
Check that no foreign material is attached to sensor (1) and
ring.
Be sure to install wheel speed sensor and its bolt at the cor-
rect (upper) position as shown in figure.
Tighten sensor bolt to specified torque.
Tightening torque
Sensor bolt (a) : 10 N·m (1.0 kg-m, 7.5 lb-ft)
Check that there is no clearance between sensor and rear
axle shaft.
[A] : For 2WD
[B] : For 4WD
[B] [A]
1
CAUTION:
Do not pull or twist wire harness more than necessary
when installing rear wheel speed sensor.
Page 367 of 698
5E-42 ANTILOCK BRAKE SYSTEM (ABS)
REAR WHEEL SPEED SENSOR RING (FOR
4WD VEHICLE)
REMOVAL
1) Remove rear axle shaft referring to Section 3E.
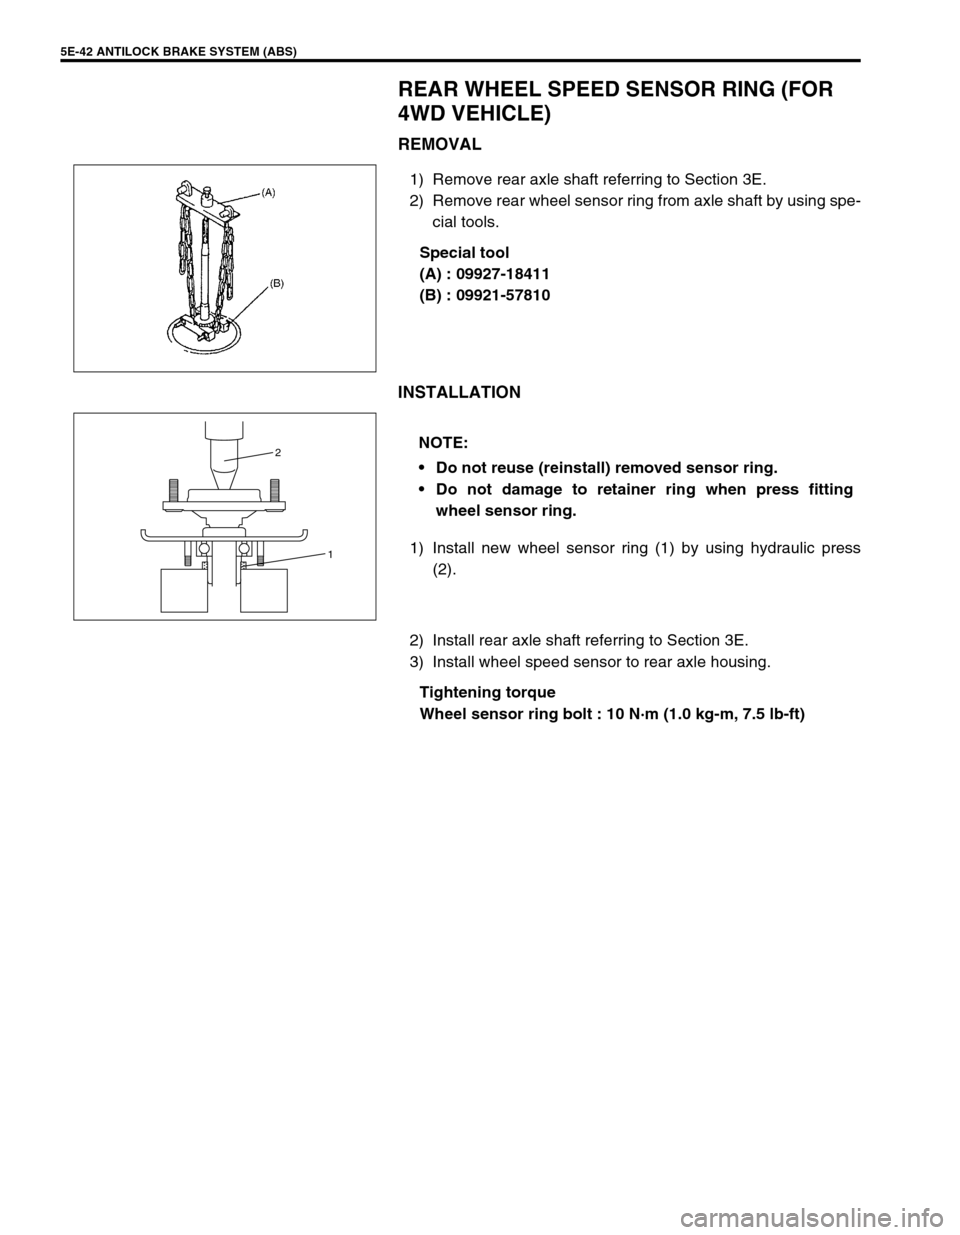
2) Remove rear wheel sensor ring from axle shaft by using spe-
cial tools.
Special tool
(A) : 09927-18411
(B) : 09921-57810
INSTALLATION
1) Install new wheel sensor ring (1) by using hydraulic press
(2).
2) Install rear axle shaft referring to Section 3E.
3) Install wheel speed sensor to rear axle housing.
Tightening torque
Wheel sensor ring bolt : 10 N·m (1.0 kg-m, 7.5 lb-ft)
NOTE:
Do not reuse (reinstall) removed sensor ring.
Do not damage to retainer ring when press fitting
wheel sensor ring.
1 2
Page 368 of 698
ANTILOCK BRAKE SYSTEM (ABS) 5E-43
G SENSOR (FOR 4WD VEHICLE ONLY)
REMOVAL
1) Turn ignition switch OFF and disconnect battery negative
cable.
2) Remove ABS fuse from fuse box.
3) Disconnect ABS hydraulic unit/control module assembly
connector by pulling up lock.
4) Remove center console box.
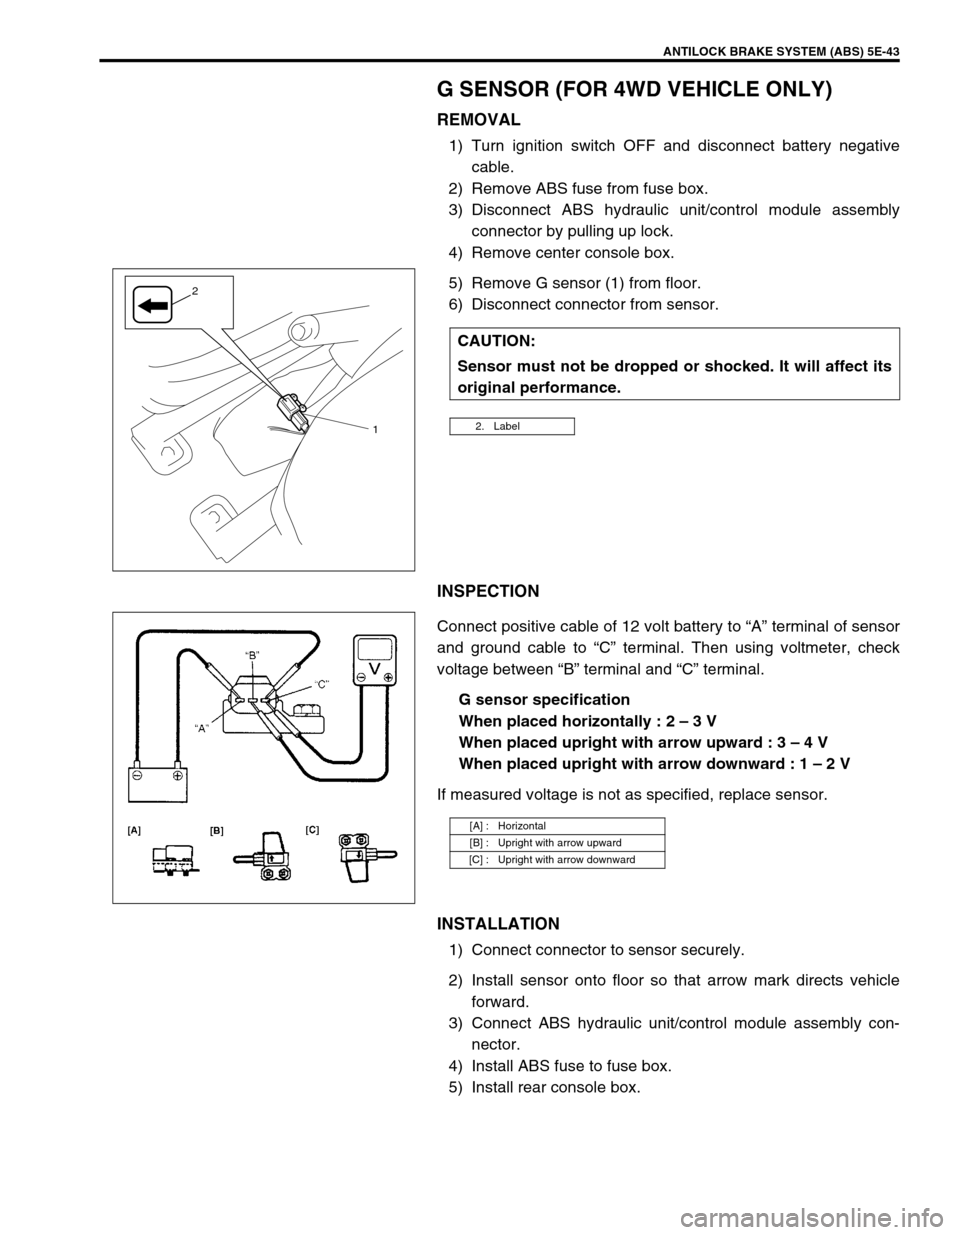
5) Remove G sensor (1) from floor.
6) Disconnect connector from sensor.
INSPECTION
Connect positive cable of 12 volt battery to “A” terminal of sensor
and ground cable to “C” terminal. Then using voltmeter, check
voltage between “B” terminal and “C” terminal.
G sensor specification
When placed horizontally : 2 – 3 V
When placed upright with arrow upward : 3 – 4 V
When placed upright with arrow downward : 1 – 2 V
If measured voltage is not as specified, replace sensor.
INSTALLATION
1) Connect connector to sensor securely.
2) Install sensor onto floor so that arrow mark directs vehicle
forward.
3) Connect ABS hydraulic unit/control module assembly con-
nector.
4) Install ABS fuse to fuse box.
5) Install rear console box.CAUTION:
Sensor must not be dropped or shocked. It will affect its
original performance.
2. Label1
2
[A] : Horizontal
[B] : Upright with arrow upward
[C] : Upright with arrow downward
Page 523 of 698
6A1-22 ENGINE MECHANICAL (M13 ENGINE)
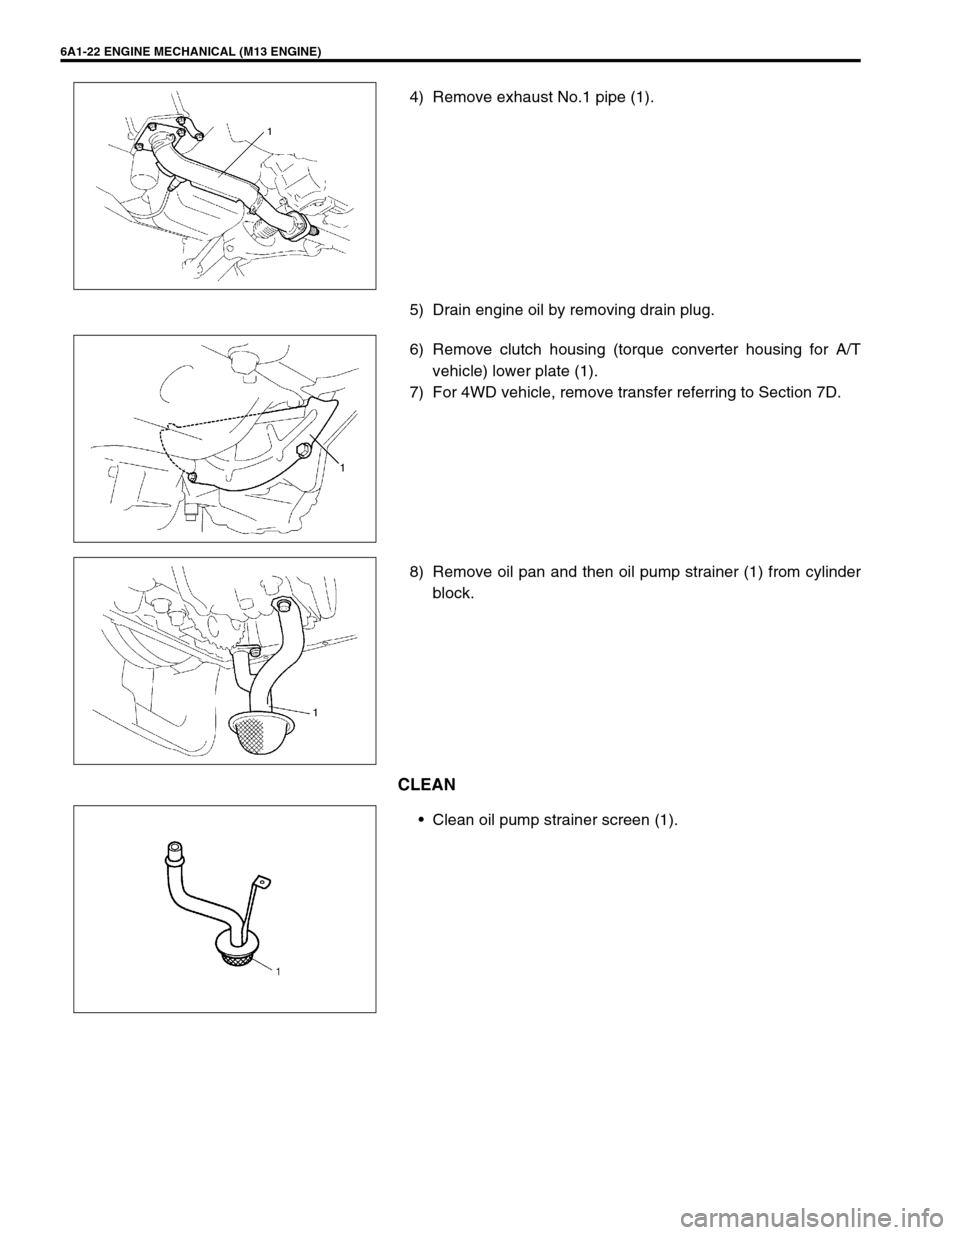
4) Remove exhaust No.1 pipe (1).
5) Drain engine oil by removing drain plug.
6) Remove clutch housing (torque converter housing for A/T
vehicle) lower plate (1).
7) For 4WD vehicle, remove transfer referring to Section 7D.
8) Remove oil pan and then oil pump strainer (1) from cylinder
block.
CLEAN
Clean oil pump strainer screen (1).
Page 525 of 698
6A1-24 ENGINE MECHANICAL (M13 ENGINE)
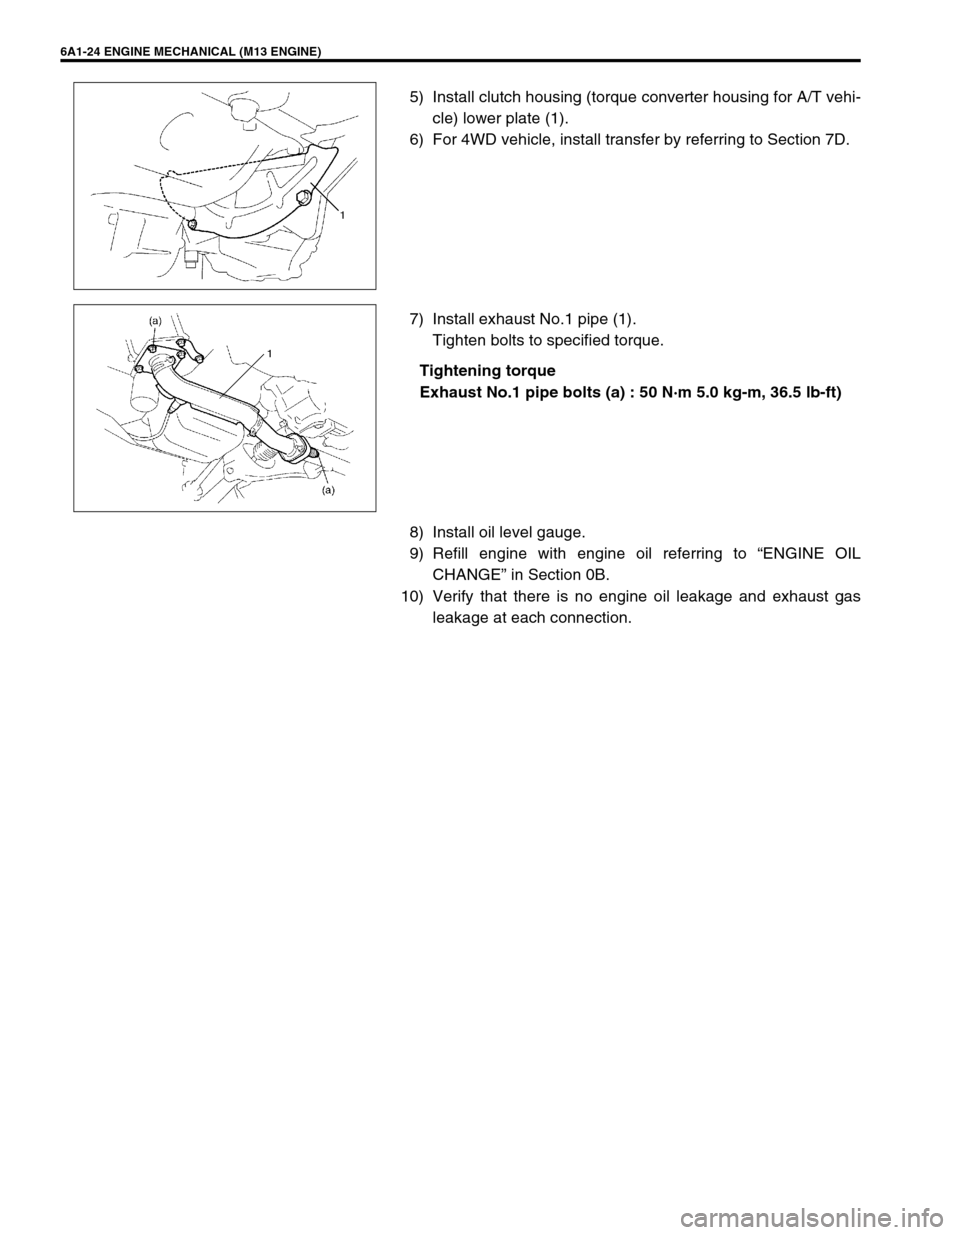
5) Install clutch housing (torque converter housing for A/T vehi-
cle) lower plate (1).
6) For 4WD vehicle, install transfer by referring to Section 7D.
7) Install exhaust No.1 pipe (1).
Tighten bolts to specified torque.
Tightening torque
Exhaust No.1 pipe bolts (a) : 50 N·m 5.0 kg-m, 36.5 lb-ft)
8) Install oil level gauge.
9) Refill engine with engine oil referring to “ENGINE OIL
CHANGE” in Section 0B.
10) Verify that there is no engine oil leakage and exhaust gas
leakage at each connection.
Page 568 of 698
![SUZUKI SWIFT 2000 1.G RG413 Service Service Manual ENGINE MECHANICAL (M13 ENGINE) 6A1-67
ENGINE MOUNTINGS
[A] : 4WD MODEL 3. Engine left mounting 6. Engine rear mounting No.1 bracket
1. Engine right mounting 4. Engine left mounting bracket 7. Engine r SUZUKI SWIFT 2000 1.G RG413 Service Service Manual ENGINE MECHANICAL (M13 ENGINE) 6A1-67
ENGINE MOUNTINGS
[A] : 4WD MODEL 3. Engine left mounting 6. Engine rear mounting No.1 bracket
1. Engine right mounting 4. Engine left mounting bracket 7. Engine r](/img/20/7606/w960_7606-567.png)
ENGINE MECHANICAL (M13 ENGINE) 6A1-67
ENGINE MOUNTINGS
[A] : 4WD MODEL 3. Engine left mounting 6. Engine rear mounting No.1 bracket
1. Engine right mounting 4. Engine left mounting bracket 7. Engine rear mounting No.2 bracket
2. Engine right body side bracket 5. Engine rear mounting Tightening torque
Page 569 of 698
6A1-68 ENGINE MECHANICAL (M13 ENGINE)
UNIT REPAIR OVERHAUL
ENGINE ASSEMBLY
REMOVAL
1) Relieve fuel pressure according to procedure described in
Section 6.
2) Disconnect negative and positive cables at battery.
3) Remove engine hood after disconnecting windshield washer
hose.
4) Remove right and left side engine under covers.
5) Remove A/C compressor belt (if equipped).
6) Remove water pump belt.
7) Drain engine oil, transmission oil or A/T fluid (for A/T vehicle)
and transfer oil (for 4WD vehicle).
8) Drain coolant.
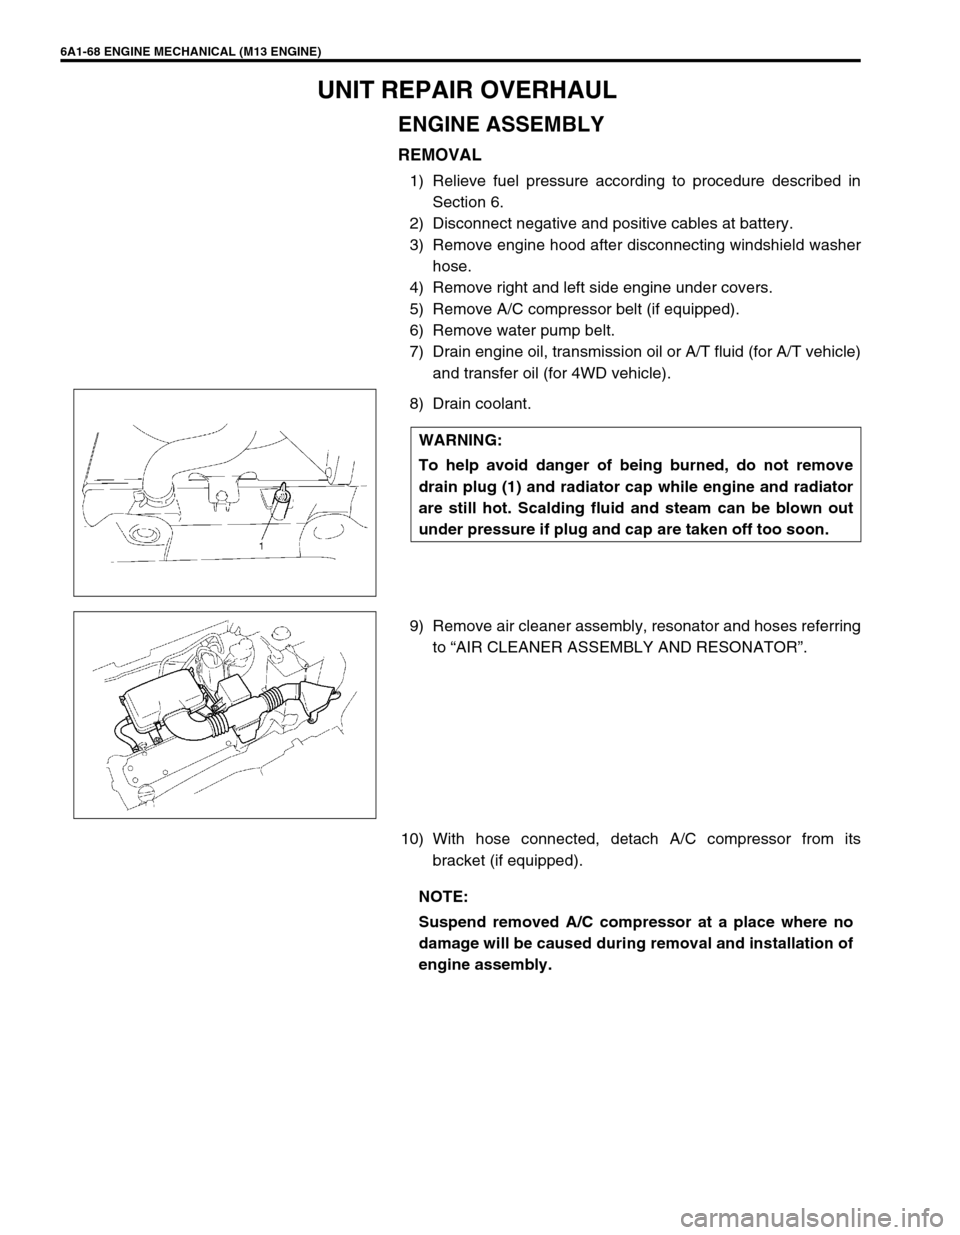
9) Remove air cleaner assembly, resonator and hoses referring
to “AIR CLEANER ASSEMBLY AND RESONATOR”.
10) With hose connected, detach A/C compressor from its
bracket (if equipped). WARNING:
To help avoid danger of being burned, do not remove
drain plug (1) and radiator cap while engine and radiator
are still hot. Scalding fluid and steam can be blown out
under pressure if plug and cap are taken off too soon.
NOTE:
Suspend removed A/C compressor at a place where no
damage will be caused during removal and installation of
engine assembly.
Page 571 of 698

6A1-70 ENGINE MECHANICAL (M13 ENGINE)
15) Remove exhaust No.1 pipe (1).
16) Disconnect right and left drive shaft joints from differential
gear referring to Section 4.
For engine and transmission removal, it is not necessary to
remove drive shafts from steering knuckle.
17) For 4WD vehicle, remove propeller shaft referring to Section
4B.
18) Remove generator referring to Section 6H.
19) Install lifting device.
20) Remove engine rear mounting bolts (1), engine left mounting
bracket nuts (2) and engine right mounting bolts (3).