SUZUKI SWIFT 2000 1.G RG413 Service Workshop Manual
Manufacturer: SUZUKI, Model Year: 2000, Model line: SWIFT, Model: SUZUKI SWIFT 2000 1.GPages: 698, PDF Size: 16.01 MB
Page 501 of 698

6-132 ENGINE GENERAL INFORMATION AND DIAGNOSIS
Page 502 of 698
ENGINE MECHANICAL (M13 ENGINE) 6A1-1
6F1
6A1
6G
6H
6K
7A
7A1
7B1
7C1
7D
7E
7F
8A
8B
8C
8D
8E
9
10B
SECTION 6A1
ENGINE MECHANICAL (M13 ENGINE)
CONTENTS
GENERAL DESCRIPTION .............................6A1-2
ENGINE ...................................................... 6A1-2
ENGINE LUBRICATION ............................. 6A1-3
DIAGNOSIS ....................................................6A1-4
DIAGNOSIS TABLE .................................... 6A1-4
COMPRESSION CHECK ............................ 6A1-4
ENGINE VACUUM CHECK ........................ 6A1-6
OIL PRESSURE CHECK ............................ 6A1-7
VALVE LASH (CLEARANCE) ..................... 6A1-9
ON-VEHICLE SERVICE ...............................6A1-12
AIR CLEANER ELEMENT ........................ 6A1-12
AIR CLEANER ASSEMBLY AND
RESONATOR ........................................... 6A1-13
KNOCK SENSOR ..................................... 6A1-13
CYLINDER HEAD COVER ....................... 6A1-13
THROTTLE BODY AND INTAKE
MANIFOLD ................................................ 6A1-16
EXHAUST MANIFOLD .............................. 6A1-19OIL PAN AND OIL PUMP STRAINER ...... 6A1-21
TIMING CHAIN COVER ........................... 6A1-25
OIL PUMP ................................................. 6A1-30
TIMING CHAIN AND CHAIN
TENSIONER ............................................. 6A1-34
CAMSHAFT, TAPPET AND SHIM............ 6A1-39
VALVES AND CYLINDER HEAD ............. 6A1-44
PISTONS, PISTON RINGS,
CONNECTING RODS AND
CYLINDERS ............................................. 6A1-57
ENGINE MOUNTINGS ............................. 6A1-67
UNIT REPAIR OVERHAUL .......................... 6A1-68
ENGINE ASSEMBLY ................................ 6A1-68
MAIN BEARINGS, CRANKSHAFT AND
CYLINDER BLOCK................................... 6A1-73
REQUIRED SERVICE MATERIAL............... 6A1-85
TIGHTENING TORQUE SPECIFICATION... 6A1-86
SPECIAL TOOL ........................................... 6A1-87
WARNING:
For vehicles equipped with Supplemental Restraint (Air Bag) System :
Service on and around the air bag system components or wiring must be performed only by an
authorized SUZUKI dealer. Refer to “Air Bag System Components and Wiring Location View” under
“General Description” in air bag system section in order to confirm whether you are performing ser-
vice on or near the air bag system components or wiring. Please observe all WARNINGS and “Ser-
vice Precautions” under “On-Vehicle Service” in air bag system section before performing service
on or around the air bag system components or wiring. Failure to follow WARNINGS could result in
unintentional activation of the system or could render the system inoperative. Either of these two
conditions may result in severe injury.
Technical service work must be started at least 90 seconds after the ignition switch is turned to the
“LOCK” position and the negative cable is disconnected from the battery. Otherwise, the system
may be activated by reserve energy in the Sensing and Diagnostic Module (SDM).
Page 503 of 698
6A1-2 ENGINE MECHANICAL (M13 ENGINE)
GENERAL DESCRIPTION
ENGINE
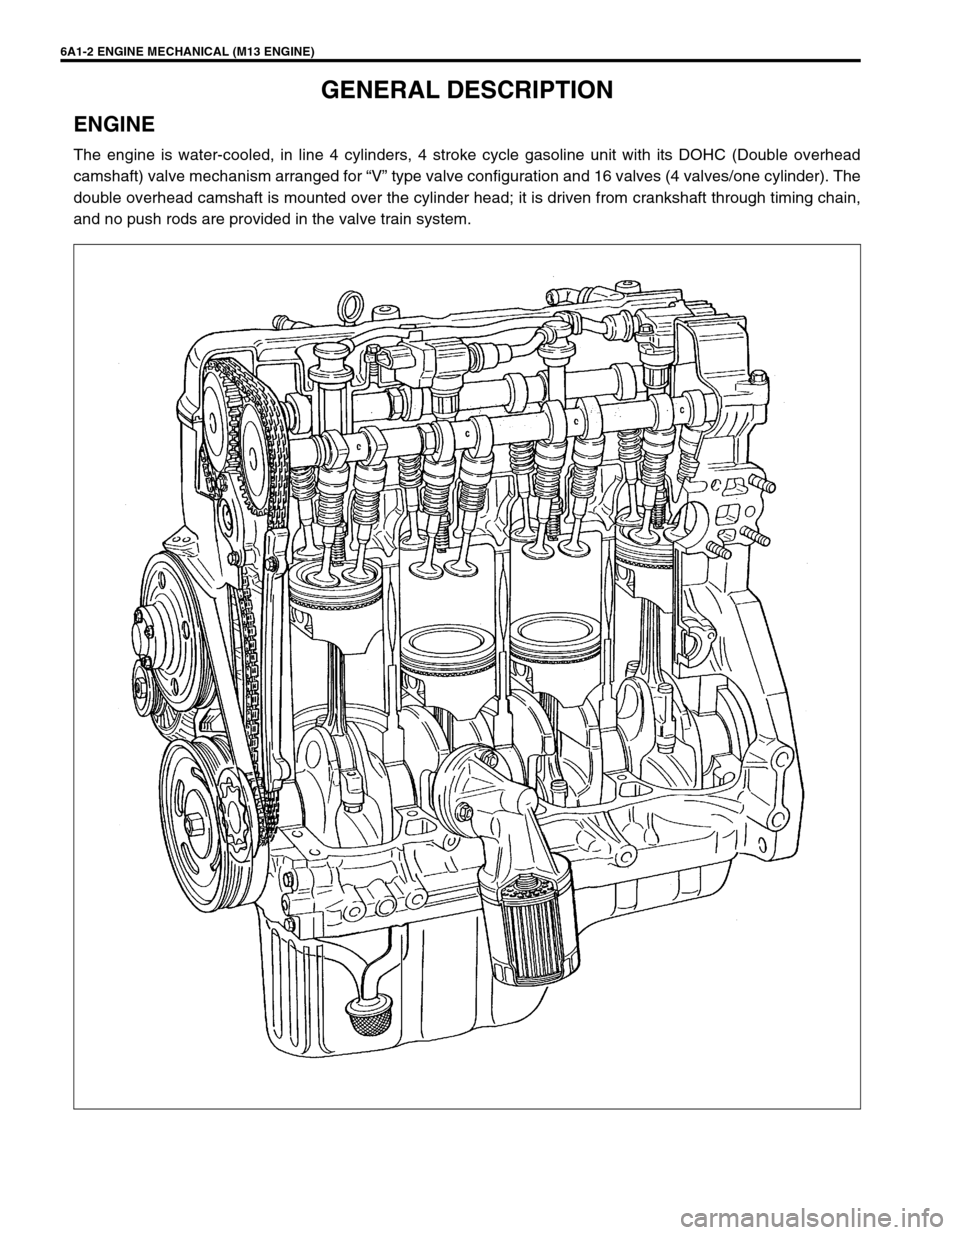
The engine is water-cooled, in line 4 cylinders, 4 stroke cycle gasoline unit with its DOHC (Double overhead
camshaft) valve mechanism arranged for “V” type valve configuration and 16 valves (4 valves/one cylinder). The
double overhead camshaft is mounted over the cylinder head; it is driven from crankshaft through timing chain,
and no push rods are provided in the valve train system.
Page 504 of 698
ENGINE MECHANICAL (M13 ENGINE) 6A1-3
ENGINE LUBRICATION
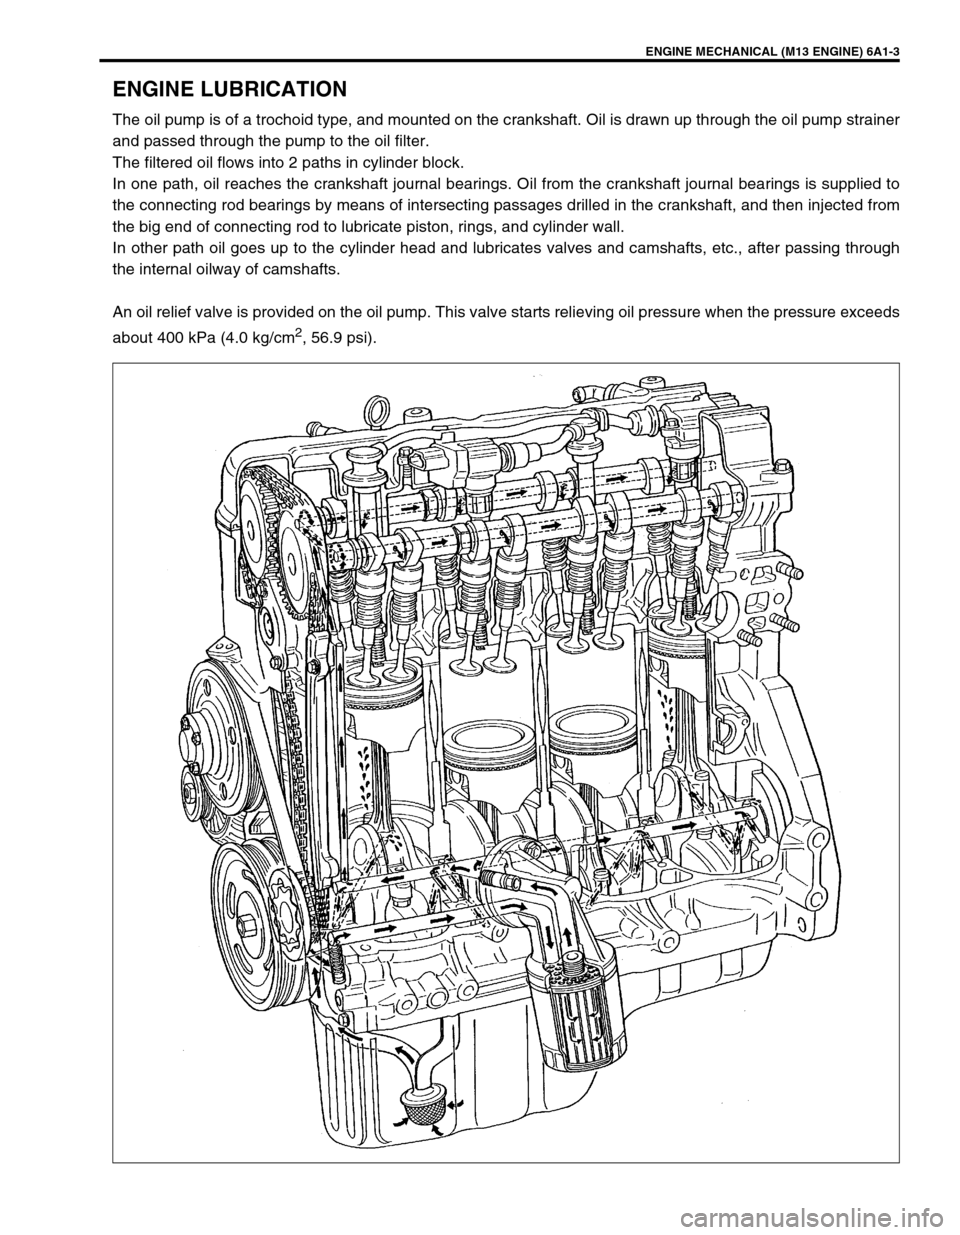
The oil pump is of a trochoid type, and mounted on the crankshaft. Oil is drawn up through the oil pump strainer
and passed through the pump to the oil filter.
The filtered oil flows into 2 paths in cylinder block.
In one path, oil reaches the crankshaft journal bearings. Oil from the crankshaft journal bearings is supplied to
the connecting rod bearings by means of intersecting passages drilled in the crankshaft, and then injected from
the big end of connecting rod to lubricate piston, rings, and cylinder wall.
In other path oil goes up to the cylinder head and lubricates valves and camshafts, etc., after passing through
the internal oilway of camshafts.
An oil relief valve is provided on the oil pump. This valve starts relieving oil pressure when the pressure exceeds
about 400 kPa (4.0 kg/cm
2, 56.9 psi).
Page 505 of 698

6A1-4 ENGINE MECHANICAL (M13 ENGINE)
DIAGNOSIS
DIAGNOSIS TABLE
Refer to “ENGINE MECHANICAL DIAGNOSIS TABLE” in Sec-
tion 6.
COMPRESSION CHECK
Check compression pressure on all 4 cylinders as follows:
1) Warm up engine to normal operating temperature.
2) Stop engine after warming up.
3) Remove air cleaner assembly (1), resonator (2) and hoses.
Refer to “AIR CLEANER ASSEMBLY AND RESONATOR”.
4) Remove cylinder head upper cover (1).
5) Disconnect ignition coil couplers (1).
6) Remove ignition coil assemblies (2) with high-tension cord
(3).
7) Remove all spark plugs.
8) Disconnect fuel injector wires (4) at the coupler.NOTE:
After warming up engine, place transmission gear shift
lever in “Neutral” (shift selector lever to “P” range for A/T
model), and set parking brake and block drive wheels.
Page 506 of 698
ENGINE MECHANICAL (M13 ENGINE) 6A1-5
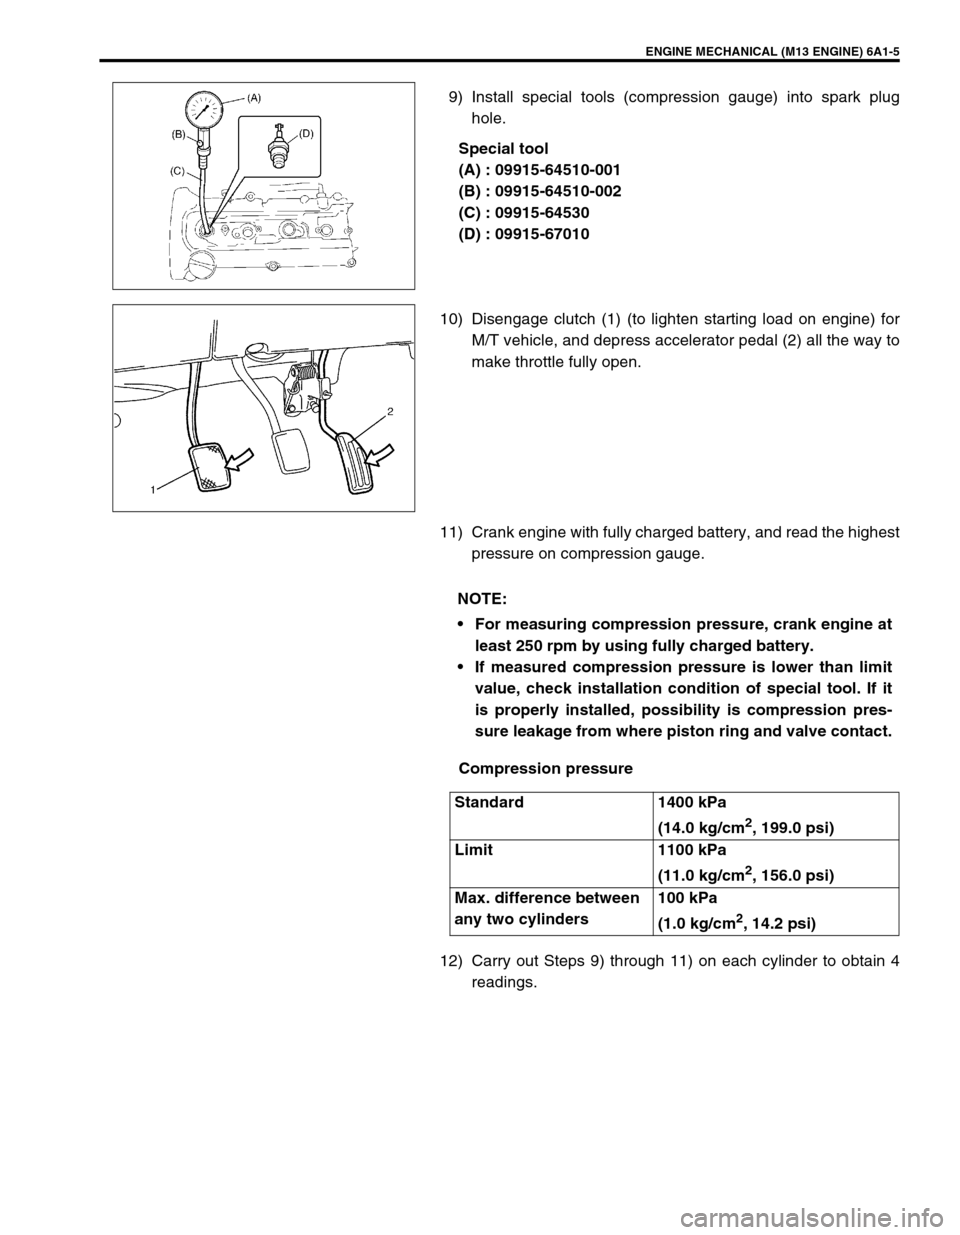
9) Install special tools (compression gauge) into spark plug
hole.
Special tool
(A) : 09915-64510-001
(B) : 09915-64510-002
(C) : 09915-64530
(D) : 09915-67010
10) Disengage clutch (1) (to lighten starting load on engine) for
M/T vehicle, and depress accelerator pedal (2) all the way to
make throttle fully open.
11) Crank engine with fully charged battery, and read the highest
pressure on compression gauge.
Compression pressure
12) Carry out Steps 9) through 11) on each cylinder to obtain 4
readings.
NOTE:
For measuring compression pressure, crank engine at
least 250 rpm by using fully charged battery.
If measured compression pressure is lower than limit
value, check installation condition of special tool. If it
is properly installed, possibility is compression pres-
sure leakage from where piston ring and valve contact.
Standard 1400 kPa
(14.0 kg/cm
2, 199.0 psi)
Limit 1100 kPa
(11.0 kg/cm
2, 156.0 psi)
Max. difference between
any two cylinders100 kPa
(1.0 kg/cm
2, 14.2 psi)
Page 507 of 698
6A1-6 ENGINE MECHANICAL (M13 ENGINE)
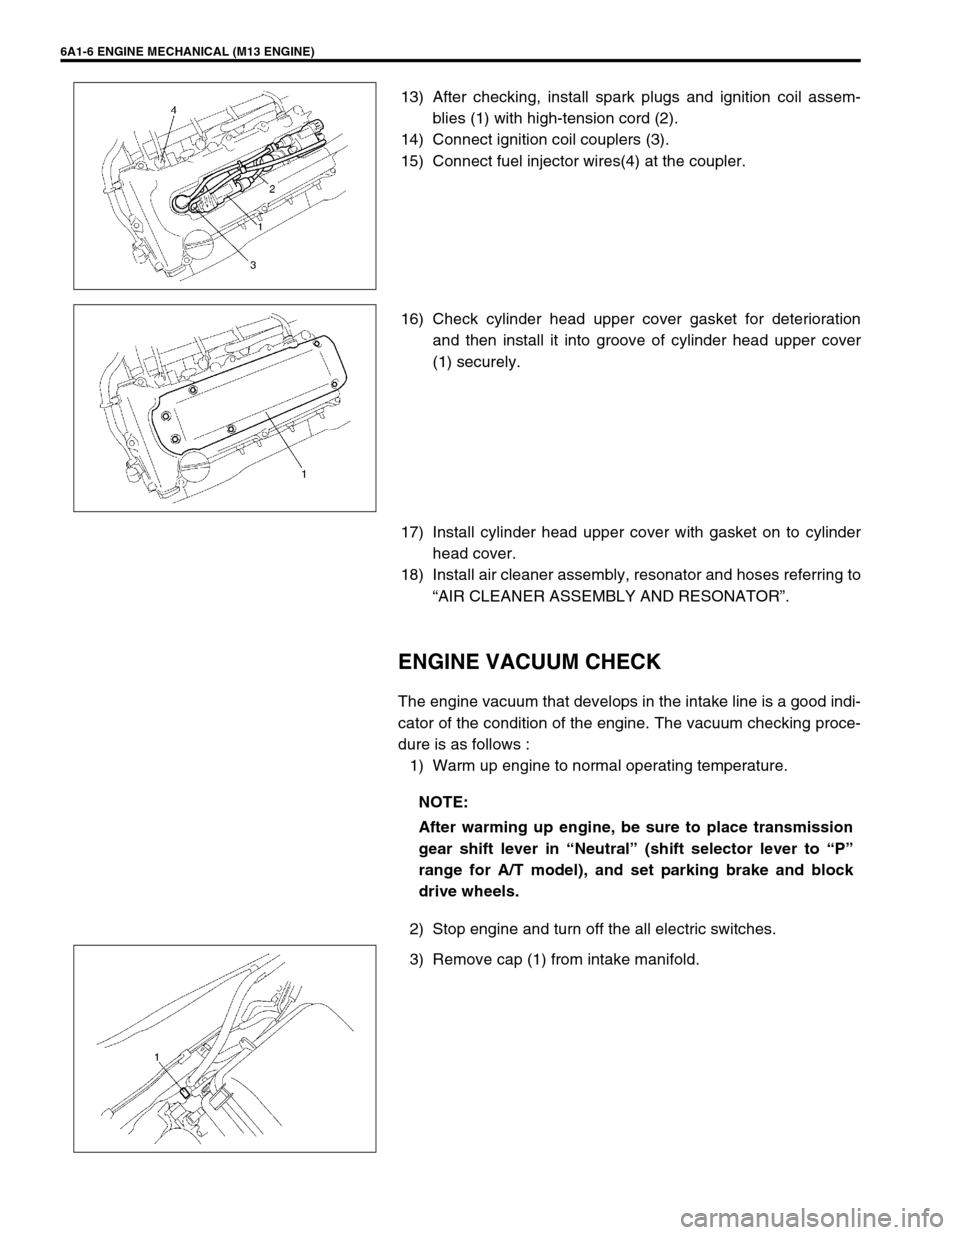
13) After checking, install spark plugs and ignition coil assem-
blies (1) with high-tension cord (2).
14) Connect ignition coil couplers (3).
15) Connect fuel injector wires(4) at the coupler.
16) Check cylinder head upper cover gasket for deterioration
and then install it into groove of cylinder head upper cover
(1) securely.
17) Install cylinder head upper cover with gasket on to cylinder
head cover.
18) Install air cleaner assembly, resonator and hoses referring to
“AIR CLEANER ASSEMBLY AND RESONATOR”.
ENGINE VACUUM CHECK
The engine vacuum that develops in the intake line is a good indi-
cator of the condition of the engine. The vacuum checking proce-
dure is as follows :
1) Warm up engine to normal operating temperature.
2) Stop engine and turn off the all electric switches.
3) Remove cap (1) from intake manifold.
NOTE:
After warming up engine, be sure to place transmission
gear shift lever in “Neutral” (shift selector lever to “P”
range for A/T model), and set parking brake and block
drive wheels.
Page 508 of 698

ENGINE MECHANICAL (M13 ENGINE) 6A1-7
4) Connect special tool (Vacuum gauge) to intake manifold.
Special tool
(A) : 09915-67310
5) Run engine at specified idle speed and read vacuum gauge.
Vacuum should be within specification.
Vacuum specification (at sea level)
: 59 – 73 kPa (45 – 55 cmHg, 17.7 – 21.6 inHg)
at specified idle speed
6) After checking, disconnect special tool (Vacuum gauge) from
intake manifold.
7) Install cap to intake manifold.
OIL PRESSURE CHECK
Oil level in oil pan
If oil level is low, add oil up to Full level mark (hole) on oil
level gauge.
Oil quality
If oil is discolored, or deteriorated, change it.
For particular oil to be used referring to the table in Section
0B.
Oil leaks
If leak is found, repair it.
1) Disconnect oil pressure switch coupler (1) and remove oil
pressure switch (2) from cylinder block.
NOTE:
Prior to checking oil pressure, check the following items.
1. Full level mark (hole)
2. Low level mark (hole)
Page 509 of 698
6A1-8 ENGINE MECHANICAL (M13 ENGINE)
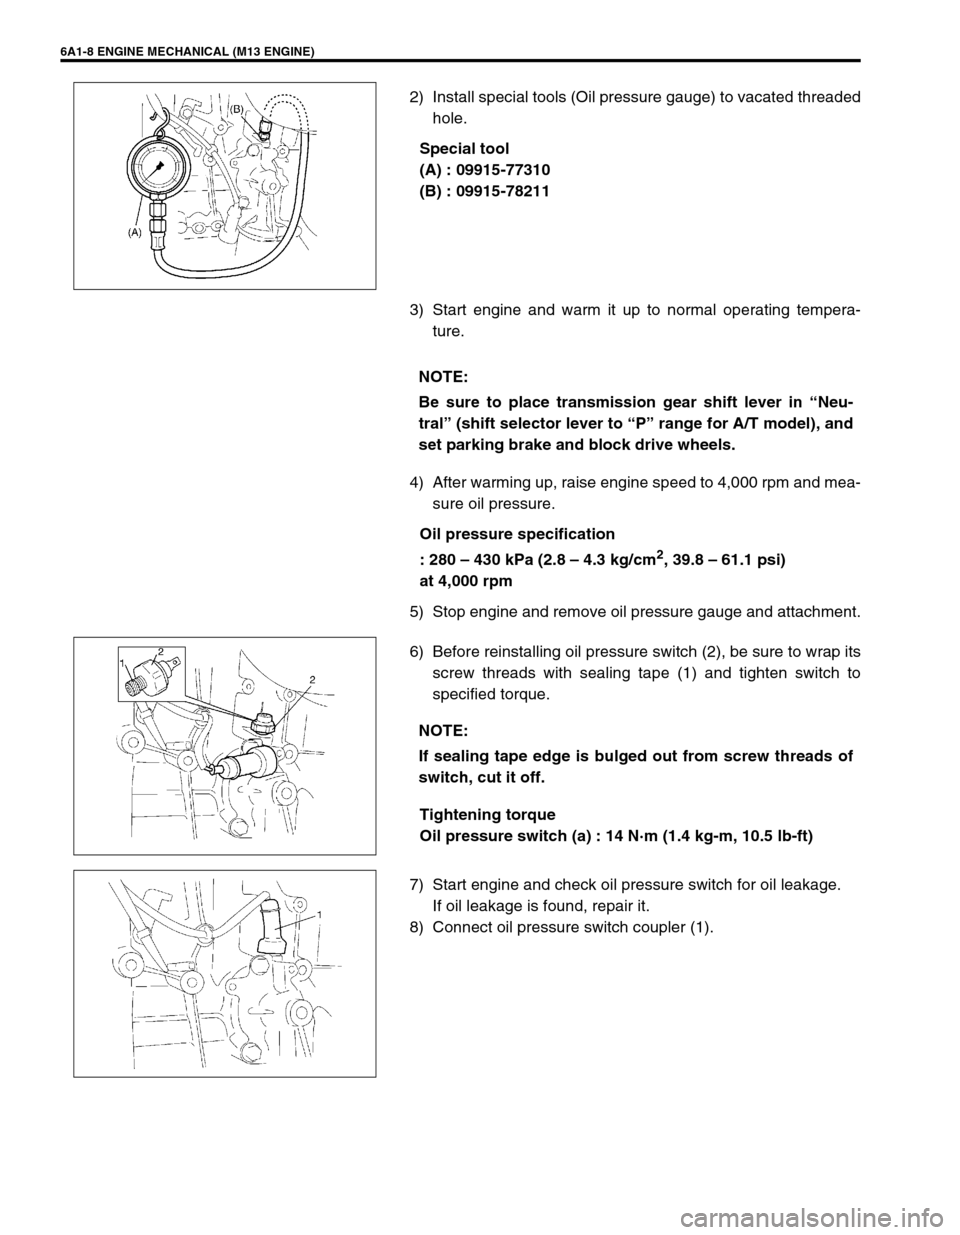
2) Install special tools (Oil pressure gauge) to vacated threaded
hole.
Special tool
(A) : 09915-77310
(B) : 09915-78211
3) Start engine and warm it up to normal operating tempera-
ture.
4) After warming up, raise engine speed to 4,000 rpm and mea-
sure oil pressure.
Oil pressure specification
: 280 – 430 kPa (2.8 – 4.3 kg/cm
2, 39.8 – 61.1 psi)
at 4,000 rpm
5) Stop engine and remove oil pressure gauge and attachment.
6) Before reinstalling oil pressure switch (2), be sure to wrap its
screw threads with sealing tape (1) and tighten switch to
specified torque.
Tightening torque
Oil pressure switch (a) : 14 N·m (1.4 kg-m, 10.5 lb-ft)
7) Start engine and check oil pressure switch for oil leakage.
If oil leakage is found, repair it.
8) Connect oil pressure switch coupler (1).
NOTE:
Be sure to place transmission gear shift lever in “Neu-
tral” (shift selector lever to “P” range for A/T model), and
set parking brake and block drive wheels.
NOTE:
If sealing tape edge is bulged out from screw threads of
switch, cut it off.
Page 510 of 698
ENGINE MECHANICAL (M13 ENGINE) 6A1-9
VALVE LASH (CLEARANCE)
INSPECTION
1) Remove negative cable at battery.
2) Remove cylinder head cover referring to “CYLINDER HEAD
COVER”.
3) Remove right side engine cover if necessary.
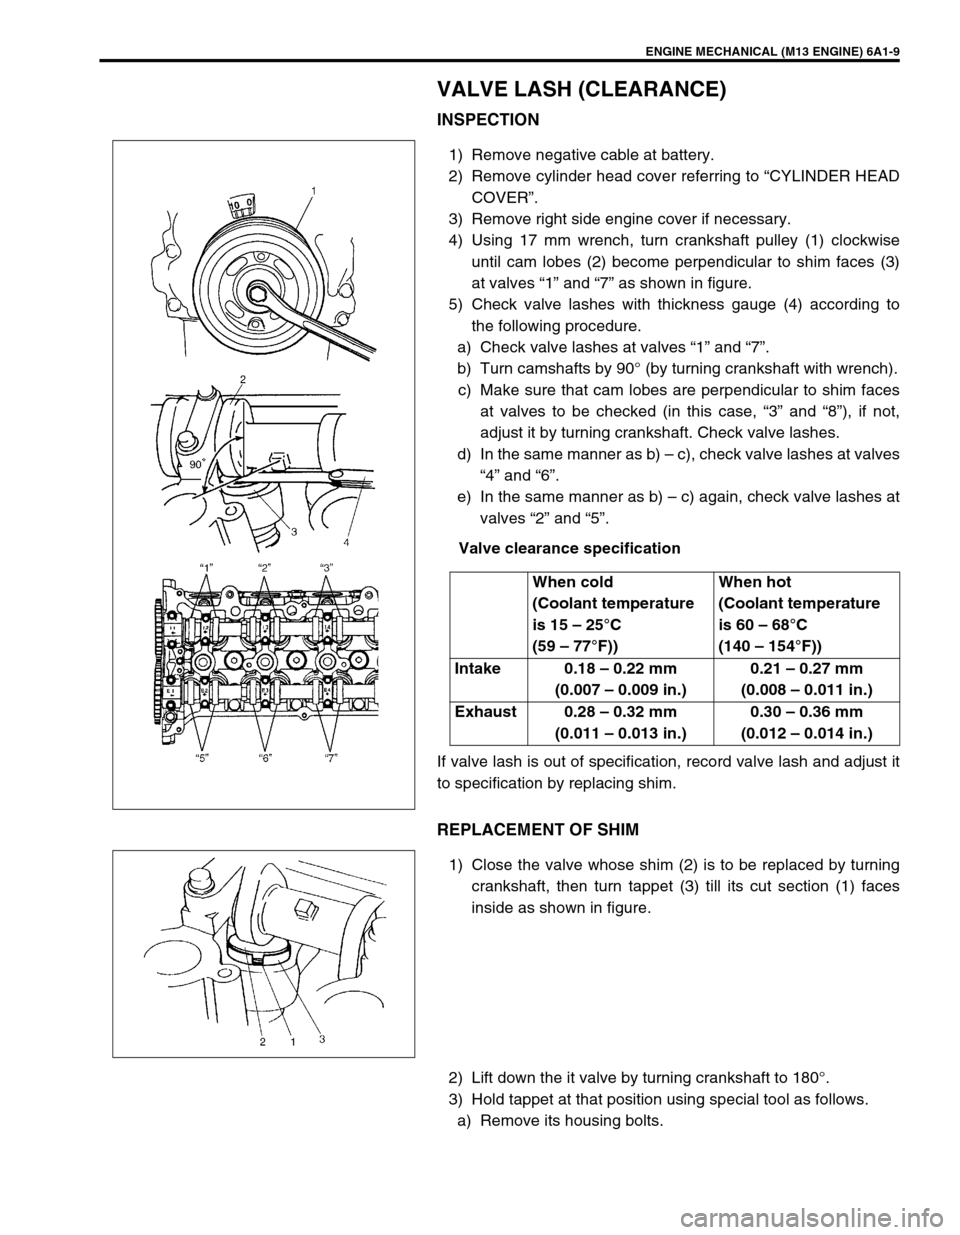
4) Using 17 mm wrench, turn crankshaft pulley (1) clockwise
until cam lobes (2) become perpendicular to shim faces (3)
at valves “1” and “7” as shown in figure.
5) Check valve lashes with thickness gauge (4) according to
the following procedure.
a) Check valve lashes at valves “1” and “7”.
b) Turn camshafts by 90° (by turning crankshaft with wrench).
c) Make sure that cam lobes are perpendicular to shim faces
at valves to be checked (in this case, “3” and “8”), if not,
adjust it by turning crankshaft. Check valve lashes.
d) In the same manner as b) – c), check valve lashes at valves
“4” and “6”.
e) In the same manner as b) – c) again, check valve lashes at
valves “2” and “5”.
Valve clearance specification
If valve lash is out of specification, record valve lash and adjust it
to specification by replacing shim.
REPLACEMENT OF SHIM
1) Close the valve whose shim (2) is to be replaced by turning
crankshaft, then turn tappet (3) till its cut section (1) faces
inside as shown in figure.
2) Lift down the it valve by turning crankshaft to 180°.
3) Hold tappet at that position using special tool as follows.
a) Remove its housing bolts.When cold
(Coolant temperature
is 15 – 25°C
(59 – 77°F))When hot
(Coolant temperature
is 60 – 68°C
(140 – 154°F))
Intake 0.18 – 0.22 mm
(0.007 – 0.009 in.)0.21 – 0.27 mm
(0.008 – 0.011 in.)
Exhaust 0.28 – 0.32 mm
(0.011 – 0.013 in.)0.30 – 0.36 mm
(0.012 – 0.014 in.)