ABS SUZUKI SWIFT 2000 1.G RG413 Service Workshop Manual
[x] Cancel search | Manufacturer: SUZUKI, Model Year: 2000, Model line: SWIFT, Model: SUZUKI SWIFT 2000 1.GPages: 698, PDF Size: 16.01 MB
Page 17 of 698
0A-14 GENERAL INFORMATION
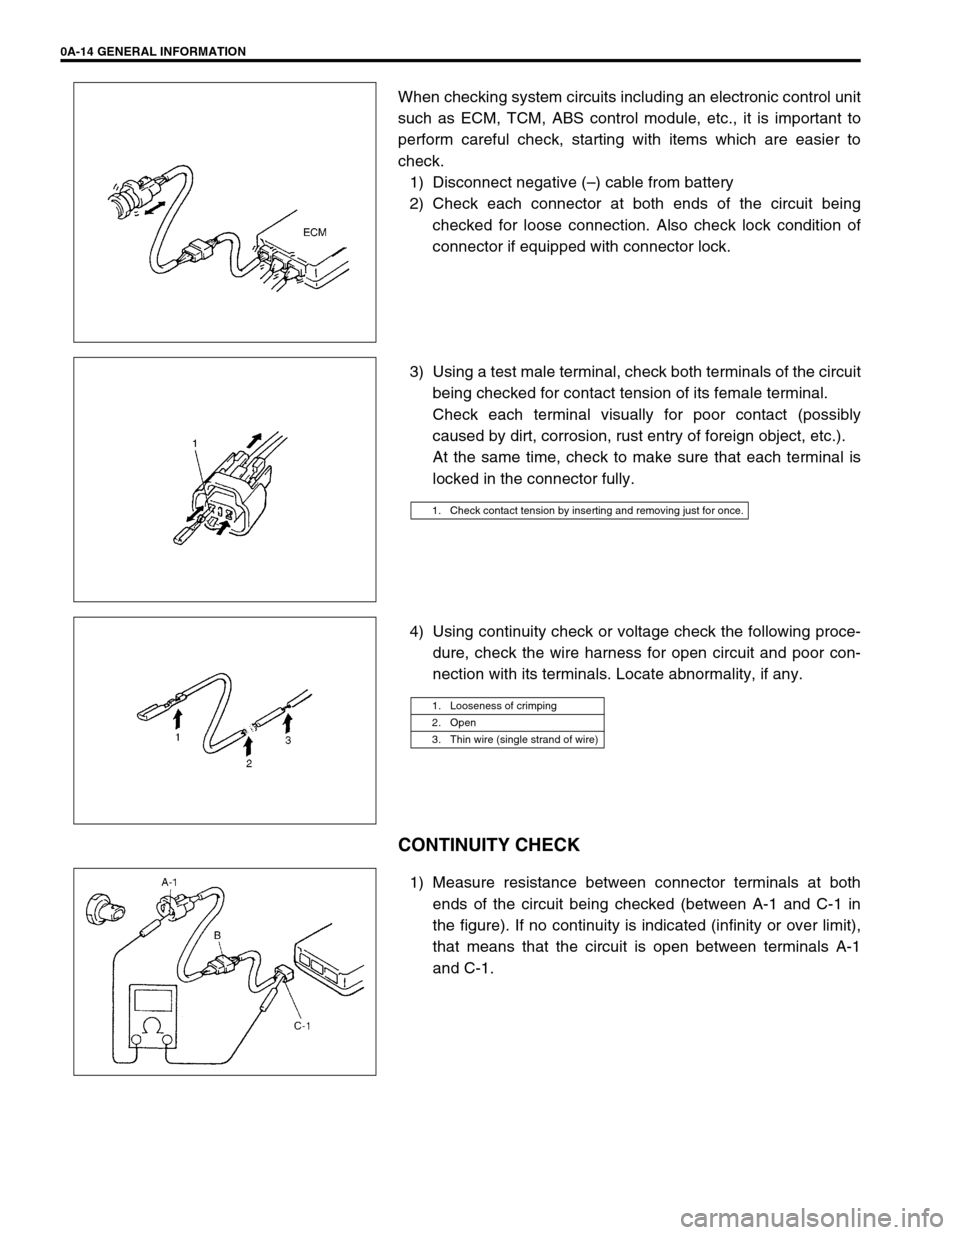
When checking system circuits including an electronic control unit
such as ECM, TCM, ABS control module, etc., it is important to
perform careful check, starting with items which are easier to
check.
1) Disconnect negative (–) cable from battery
2) Check each connector at both ends of the circuit being
checked for loose connection. Also check lock condition of
connector if equipped with connector lock.
3) Using a test male terminal, check both terminals of the circuit
being checked for contact tension of its female terminal.
Check each terminal visually for poor contact (possibly
caused by dirt, corrosion, rust entry of foreign object, etc.).
At the same time, check to make sure that each terminal is
locked in the connector fully.
4) Using continuity check or voltage check the following proce-
dure, check the wire harness for open circuit and poor con-
nection with its terminals. Locate abnormality, if any.
CONTINUITY CHECK
1) Measure resistance between connector terminals at both
ends of the circuit being checked (between A-1 and C-1 in
the figure). If no continuity is indicated (infinity or over limit),
that means that the circuit is open between terminals A-1
and C-1.
1. Check contact tension by inserting and removing just for once.
1. Looseness of crimping
2. Open
3. Thin wire (single strand of wire)
Page 23 of 698
0A-20 GENERAL INFORMATION
VEHICLE LIFTING POINTS
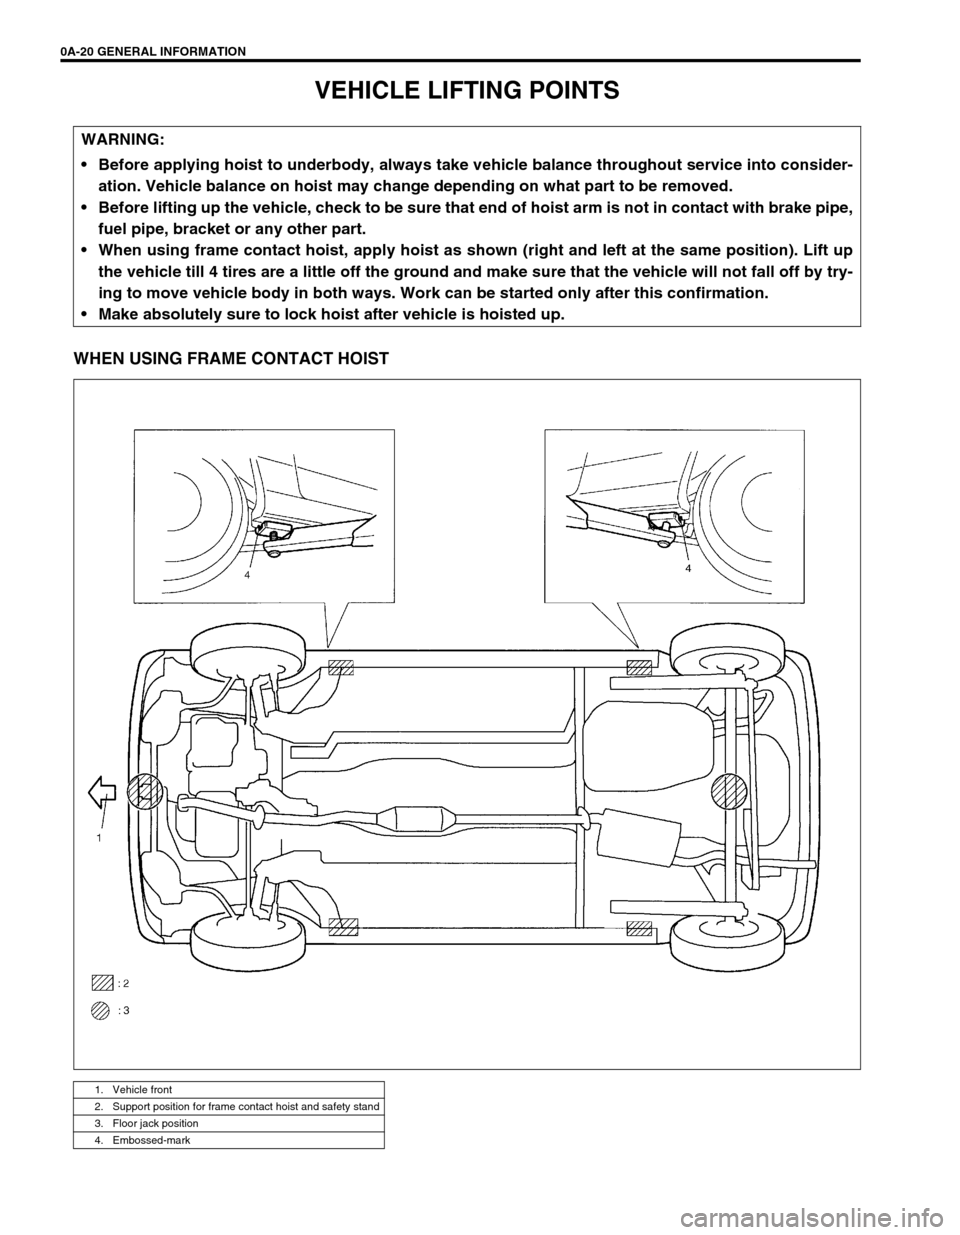
WHEN USING FRAME CONTACT HOIST
WARNING:
Before applying hoist to underbody, always take vehicle balance throughout service into consider-
ation. Vehicle balance on hoist may change depending on what part to be removed.
Before lifting up the vehicle, check to be sure that end of hoist arm is not in contact with brake pipe,
fuel pipe, bracket or any other part.
When using frame contact hoist, apply hoist as shown (right and left at the same position). Lift up
the vehicle till 4 tires are a little off the ground and make sure that the vehicle will not fall off by try-
ing to move vehicle body in both ways. Work can be started only after this confirmation.
Make absolutely sure to lock hoist after vehicle is hoisted up.
1. Vehicle front
2. Support position for frame contact hoist and safety stand
3. Floor jack position
4. Embossed-mark
Page 25 of 698
0A-22 GENERAL INFORMATION
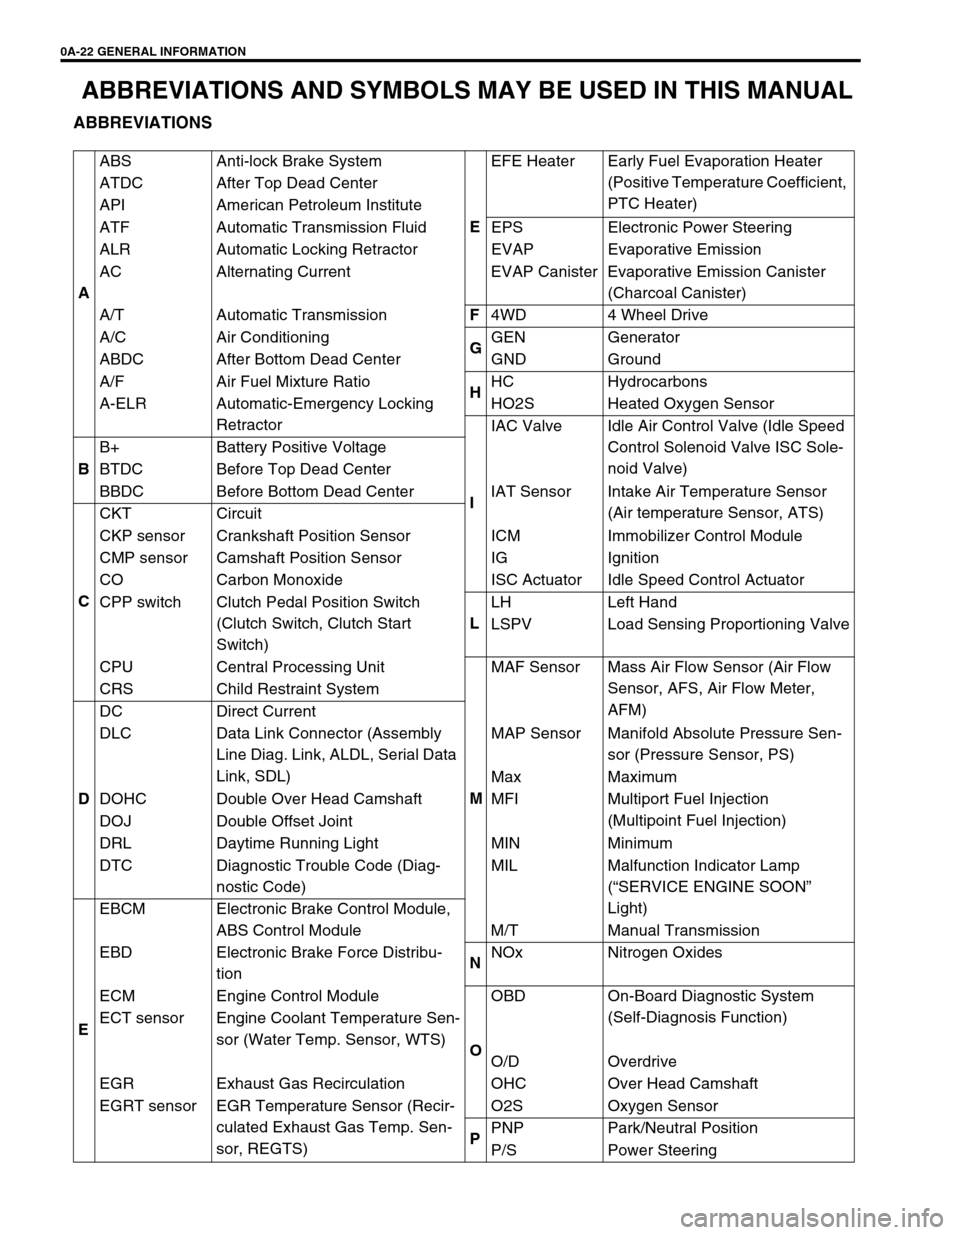
ABBREVIATIONS AND SYMBOLS MAY BE USED IN THIS MANUAL
ABBREVIATIONS
AABS Anti-lock Brake System
EEFE Heater Early Fuel Evaporation Heater
(Positive Temperature Coefficient,
PTC Heater) ATDC After Top Dead Center
API American Petroleum Institute
ATF Automatic Transmission Fluid EPS Electronic Power Steering
ALR Automatic Locking Retractor EVAP Evaporative Emission
AC Alternating Current EVAP Canister Evaporative Emission Canister
(Charcoal Canister)
A/T Automatic TransmissionF
4WD 4 Wheel Drive
A/C Air Conditioning
GGEN Generator
ABDC After Bottom Dead Center GND Ground
A/F Air Fuel Mixture Ratio
HHC Hydrocarbons
A-ELR Automatic-Emergency Locking
RetractorHO2S Heated Oxygen Sensor
IIAC Valve Idle Air Control Valve (Idle Speed
Control Solenoid Valve ISC Sole-
noid Valve)
BB+ Battery Positive Voltage
BTDC Before Top Dead Center
BBDC Before Bottom Dead Center IAT Sensor Intake Air Temperature Sensor
(Air temperature Sensor, ATS)
CCKT Circuit
CKP sensor Crankshaft Position Sensor ICM Immobilizer Control Module
CMP sensor Camshaft Position Sensor IG Ignition
CO Carbon Monoxide ISC Actuator Idle Speed Control Actuator
CPP switch Clutch Pedal Position Switch
(Clutch Switch, Clutch Start
Switch)LLH Left Hand
LSPV Load Sensing Proportioning Valve
CPU Central Processing Unit
MMAF Sensor Mass Air Flow Sensor (Air Flow
Sensor, AFS, Air Flow Meter,
AFM) CRS Child Restraint System
DDC Direct Current
DLC Data Link Connector (Assembly
Line Diag. Link, ALDL, Serial Data
Link, SDL)MAP Sensor Manifold Absolute Pressure Sen-
sor (Pressure Sensor, PS)
Max Maximum
DOHC Double Over Head Camshaft MFI Multiport Fuel Injection
(Multipoint Fuel Injection)
DOJ Double Offset Joint
DRL Daytime Running Light MIN Minimum
DTC Diagnostic Trouble Code (Diag-
nostic Code)MIL Malfunction Indicator Lamp
(“SERVICE ENGINE SOON”
Light)
EEBCM Electronic Brake Control Module,
ABS Control Module M/T Manual Transmission
EBD Electronic Brake Force Distribu-
tionNNOx Nitrogen Oxides
ECM Engine Control Module
OOBD On-Board Diagnostic System
(Self-Diagnosis Function)
ECT sensor Engine Coolant Temperature Sen-
sor (Water Temp. Sensor, WTS)
O/D Overdrive
EGR Exhaust Gas Recirculation OHC Over Head Camshaft
EGRT sensor EGR Temperature Sensor (Recir-
culated Exhaust Gas Temp. Sen-
sor, REGTS)O2S Oxygen Sensor
PPNP Park/Neutral Position
P/S Power Steering
Page 44 of 698
MAINTENANCE AND LUBRICATION 0B-15
WHEEL DISCS INSPECTION
Inspect each wheel disc for dents, distortion and cracks. A disc in
badly damaged condition must be replaced.
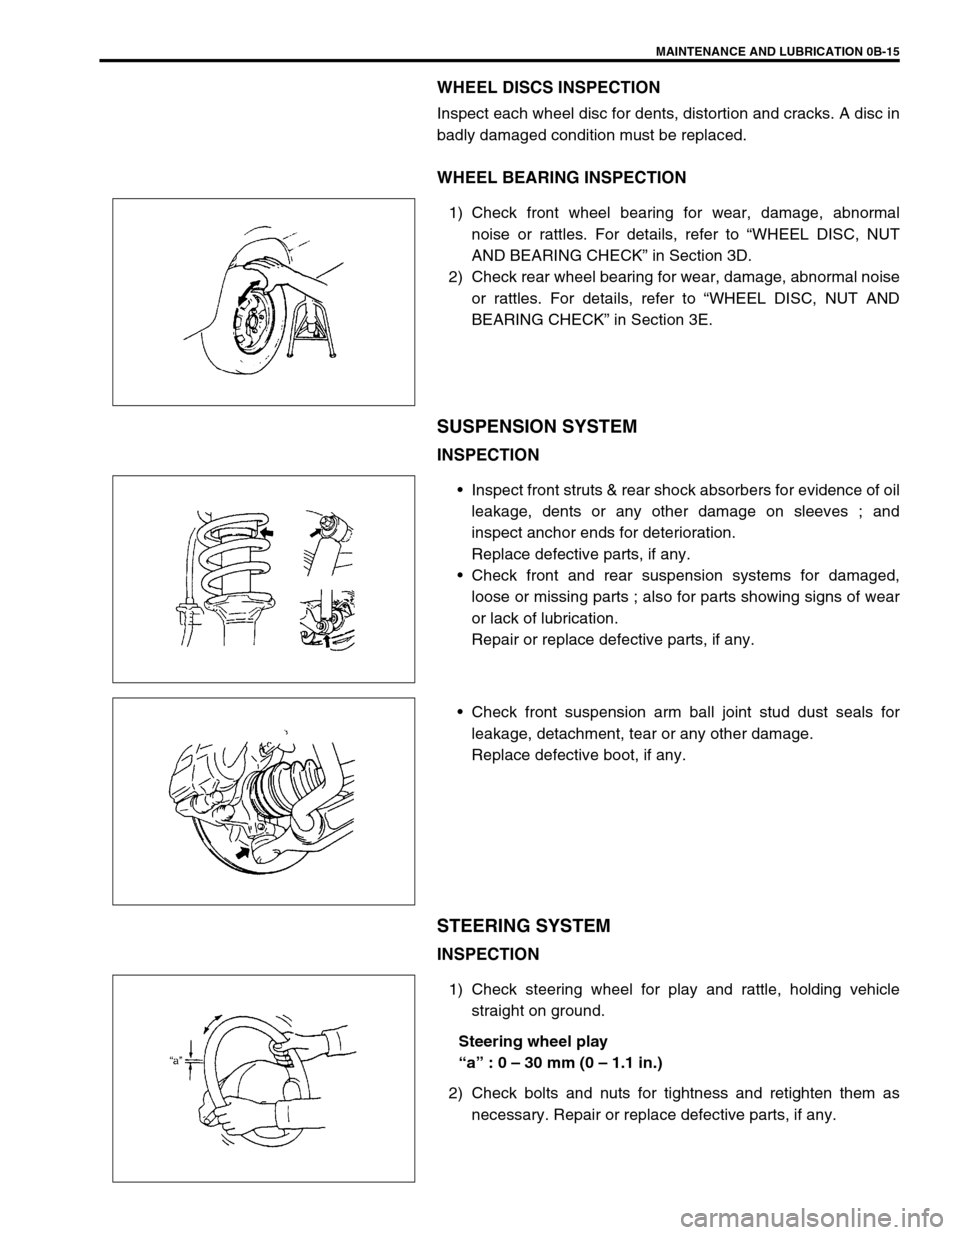
WHEEL BEARING INSPECTION
1) Check front wheel bearing for wear, damage, abnormal
noise or rattles. For details, refer to “WHEEL DISC, NUT
AND BEARING CHECK” in Section 3D.
2) Check rear wheel bearing for wear, damage, abnormal noise
or rattles. For details, refer to “WHEEL DISC, NUT AND
BEARING CHECK” in Section 3E.
SUSPENSION SYSTEM
INSPECTION
Inspect front struts & rear shock absorbers for evidence of oil
leakage, dents or any other damage on sleeves ; and
inspect anchor ends for deterioration.
Replace defective parts, if any.
Check front and rear suspension systems for damaged,
loose or missing parts ; also for parts showing signs of wear
or lack of lubrication.
Repair or replace defective parts, if any.
Check front suspension arm ball joint stud dust seals for
leakage, detachment, tear or any other damage.
Replace defective boot, if any.
STEERING SYSTEM
INSPECTION
1) Check steering wheel for play and rattle, holding vehicle
straight on ground.
Steering wheel play
“a” : 0 – 30 mm (0 – 1.1 in.)
2) Check bolts and nuts for tightness and retighten them as
necessary. Repair or replace defective parts, if any.
Page 111 of 698
3-2 STEERING, SUSPENSION, WHEELS AND TIRES
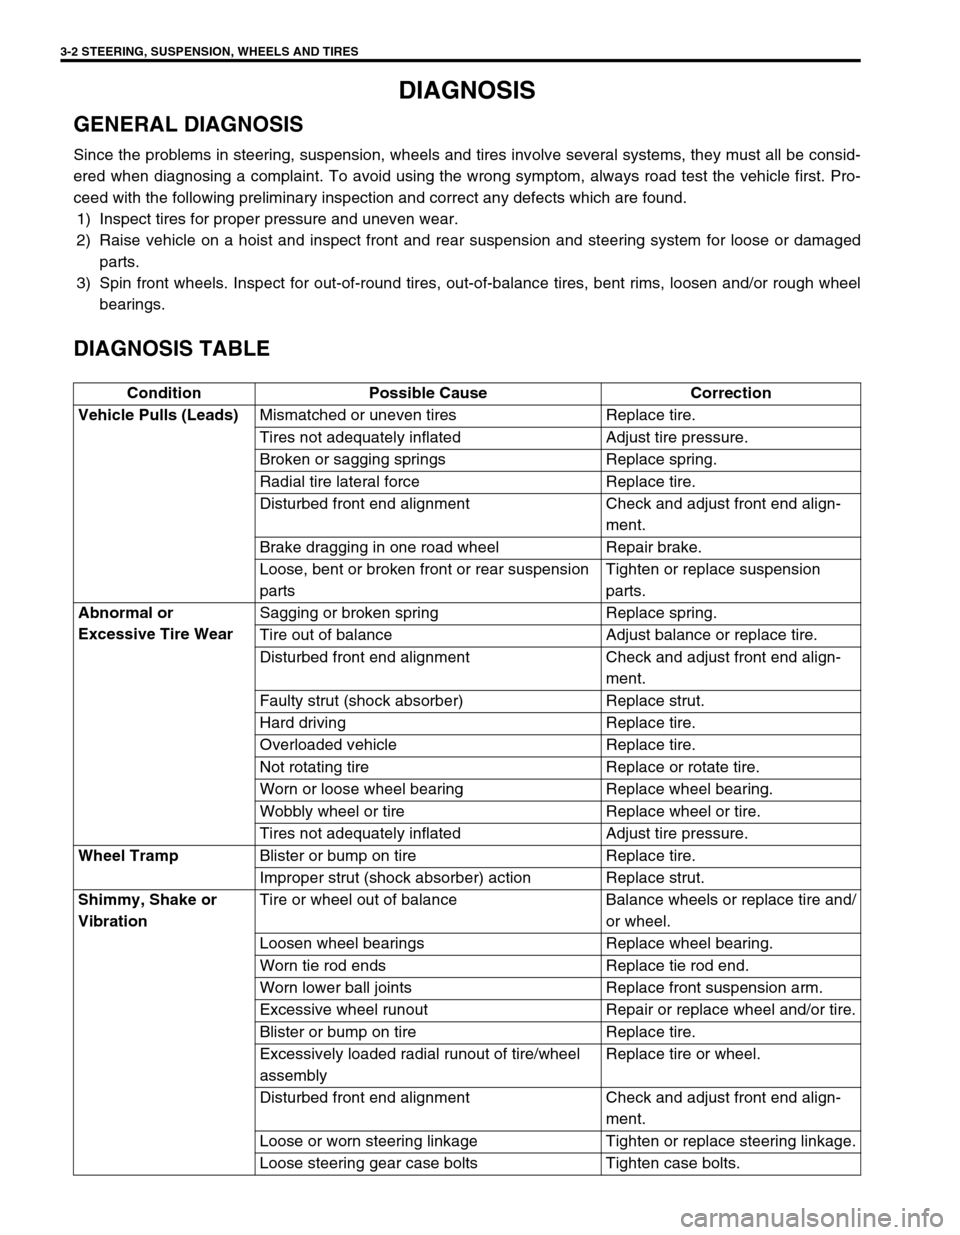
DIAGNOSIS
GENERAL DIAGNOSIS
Since the problems in steering, suspension, wheels and tires involve several systems, they must all be consid-
ered when diagnosing a complaint. To avoid using the wrong symptom, always road test the vehicle first. Pro-
ceed with the following preliminary inspection and correct any defects which are found.
1) Inspect tires for proper pressure and uneven wear.
2) Raise vehicle on a hoist and inspect front and rear suspension and steering system for loose or damaged
parts.
3) Spin front wheels. Inspect for out-of-round tires, out-of-balance tires, bent rims, loosen and/or rough wheel
bearings.
DIAGNOSIS TABLE
Condition Possible Cause Correction
Vehicle Pulls (Leads)
Mismatched or uneven tires Replace tire.
Tires not adequately inflated Adjust tire pressure.
Broken or sagging springs Replace spring.
Radial tire lateral force Replace tire.
Disturbed front end alignment Check and adjust front end align-
ment.
Brake dragging in one road wheel Repair brake.
Loose, bent or broken front or rear suspension
partsTighten or replace suspension
parts.
Abnormal or
Excessive Tire WearSagging or broken spring Replace spring.
Tire out of balance Adjust balance or replace tire.
Disturbed front end alignment Check and adjust front end align-
ment.
Faulty strut (shock absorber) Replace strut.
Hard driving Replace tire.
Overloaded vehicle Replace tire.
Not rotating tire Replace or rotate tire.
Worn or loose wheel bearing Replace wheel bearing.
Wobbly wheel or tire Replace wheel or tire.
Tires not adequately inflated Adjust tire pressure.
Wheel Tramp
Blister or bump on tire Replace tire.
Improper strut (shock absorber) action Replace strut.
Shimmy, Shake or
VibrationTire or wheel out of balance Balance wheels or replace tire and/
or wheel.
Loosen wheel bearings Replace wheel bearing.
Worn tie rod ends Replace tie rod end.
Worn lower ball joints Replace front suspension arm.
Excessive wheel runout Repair or replace wheel and/or tire.
Blister or bump on tire Replace tire.
Excessively loaded radial runout of tire/wheel
assemblyReplace tire or wheel.
Disturbed front end alignment Check and adjust front end align-
ment.
Loose or worn steering linkage Tighten or replace steering linkage.
Loose steering gear case bolts Tighten case bolts.
Page 113 of 698
3-4 STEERING, SUSPENSION, WHEELS AND TIRES
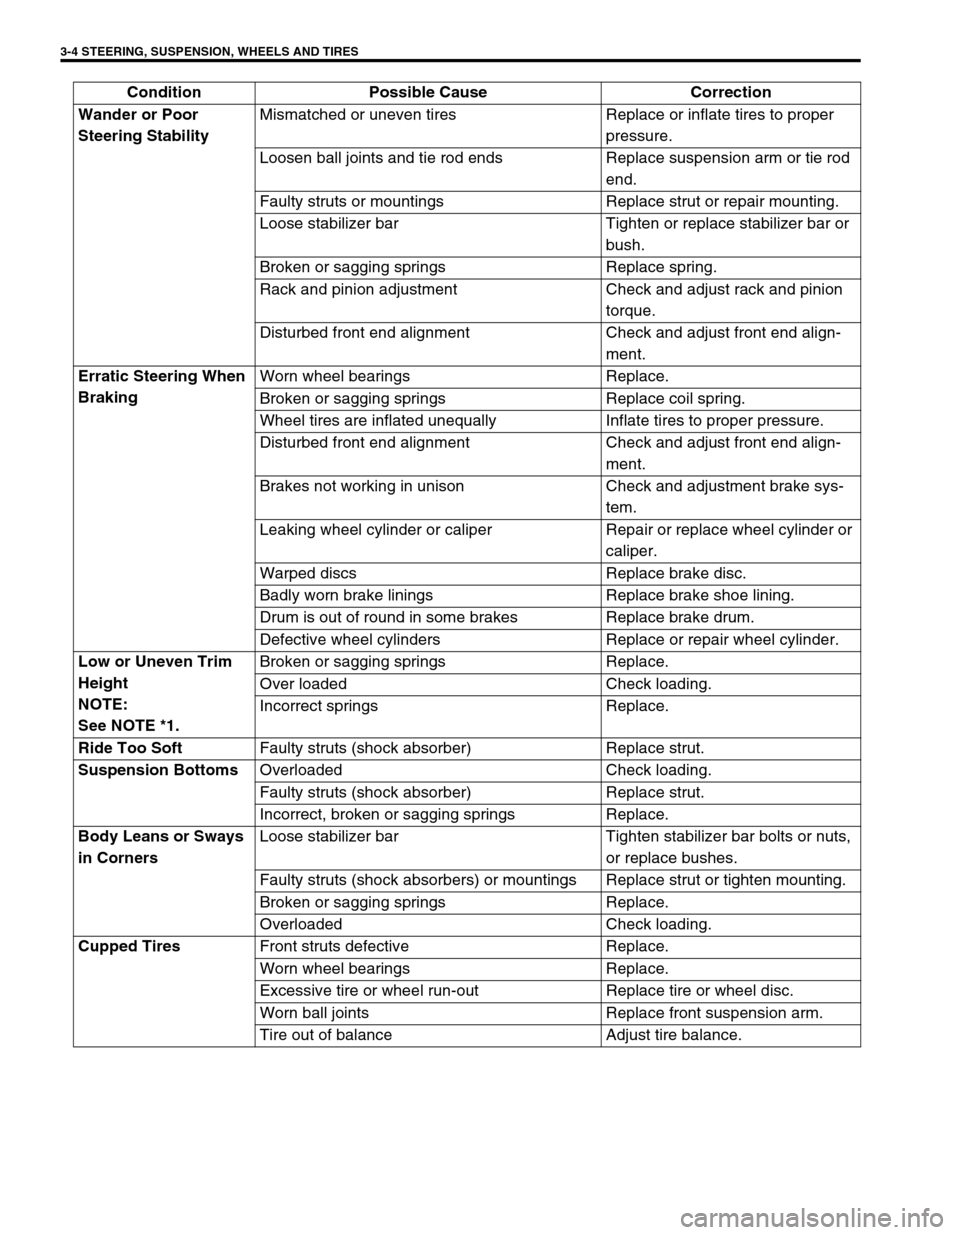
Wander or Poor
Steering StabilityMismatched or uneven tires Replace or inflate tires to proper
pressure.
Loosen ball joints and tie rod ends Replace suspension arm or tie rod
end.
Faulty struts or mountings Replace strut or repair mounting.
Loose stabilizer bar Tighten or replace stabilizer bar or
bush.
Broken or sagging springs Replace spring.
Rack and pinion adjustment Check and adjust rack and pinion
torque.
Disturbed front end alignment Check and adjust front end align-
ment.
Erratic Steering When
BrakingWorn wheel bearings Replace.
Broken or sagging springs Replace coil spring.
Wheel tires are inflated unequally Inflate tires to proper pressure.
Disturbed front end alignment Check and adjust front end align-
ment.
Brakes not working in unison Check and adjustment brake sys-
tem.
Leaking wheel cylinder or caliper Repair or replace wheel cylinder or
caliper.
Warped discs Replace brake disc.
Badly worn brake linings Replace brake shoe lining.
Drum is out of round in some brakes Replace brake drum.
Defective wheel cylinders Replace or repair wheel cylinder.
Low or Uneven Trim
Height
NOTE:
See NOTE *1.Broken or sagging springs Replace.
Over loaded Check loading.
Incorrect springs Replace.
Ride Too Soft
Faulty struts (shock absorber) Replace strut.
Suspension Bottoms
Overloaded Check loading.
Faulty struts (shock absorber) Replace strut.
Incorrect, broken or sagging springs Replace.
Body Leans or Sways
in CornersLoose stabilizer bar Tighten stabilizer bar bolts or nuts,
or replace bushes.
Faulty struts (shock absorbers) or mountings Replace strut or tighten mounting.
Broken or sagging springs Replace.
Overloaded Check loading.
Cupped Tires
Front struts defective Replace.
Worn wheel bearings Replace.
Excessive tire or wheel run-out Replace tire or wheel disc.
Worn ball joints Replace front suspension arm.
Tire out of balance Adjust tire balance. Condition Possible Cause Correction
Page 144 of 698
ELECTRICAL POWER STEERING (P/S) SYSTEM 3B1-3
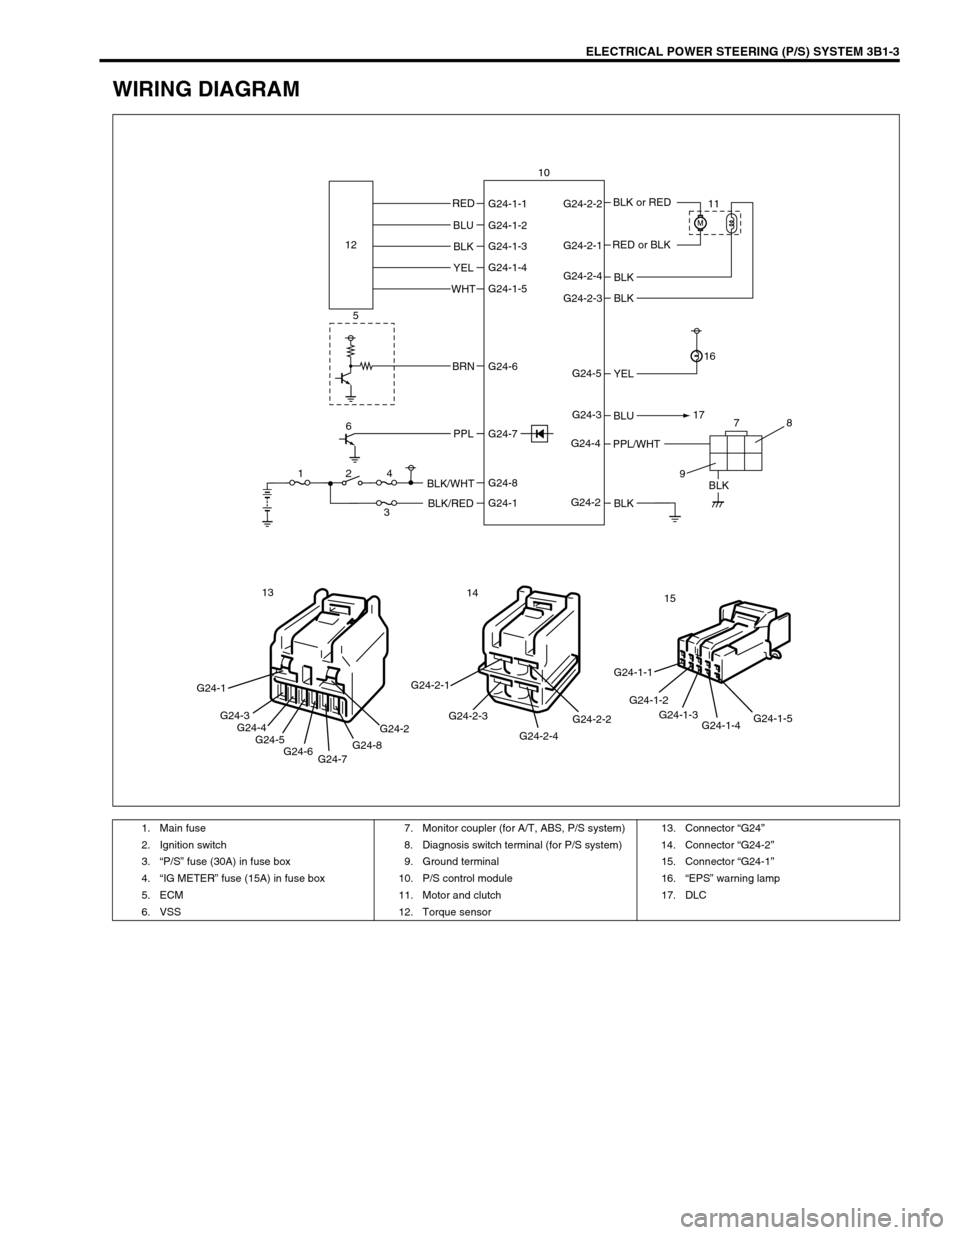
WIRING DIAGRAM
BLK RED
BLK
BLK
BLU
BLK YEL BLU
BLK
YEL
WHT
BRN
PPLBLK/WHT
BLK/RED
PPL/WHTBLK or RED
RED or BLK G24-1-1 G24-2-2
G24-2-1
G24-2-4
G24-2-3
G24-5
G24-3
G24-4
G24-2 G24-1-2
G24-1-3
G24-1-4
G24-1-5
G24-6
G24-8
G24-1 G24-7 12
5
6
124
378
9171611 10
G24-1
G24-3
G24-4
G24-5
G24-6
G24-7G24-8G24-2
13
G24-2-2
G24-2-4 G24-2-3 G24-2-1
14
G24-1-5
G24-1-4 G24-1-3 G24-1-2 G24-1-115
1. Main fuse 7. Monitor coupler (for A/T, ABS, P/S system) 13. Connector “G24”
2. Ignition switch 8. Diagnosis switch terminal (for P/S system) 14. Connector “G24-2”
3.“P/S” fuse (30A) in fuse box 9. Ground terminal 15. Connector “G24-1”
4.“IG METER” fuse (15A) in fuse box 10. P/S control module 16.“EPS” warning lamp
5. ECM 11. Motor and clutch 17. DLC
6. VSS 12. Torque sensor
Page 151 of 698
3B1-10 ELECTRICAL POWER STEERING (P/S) SYSTEM
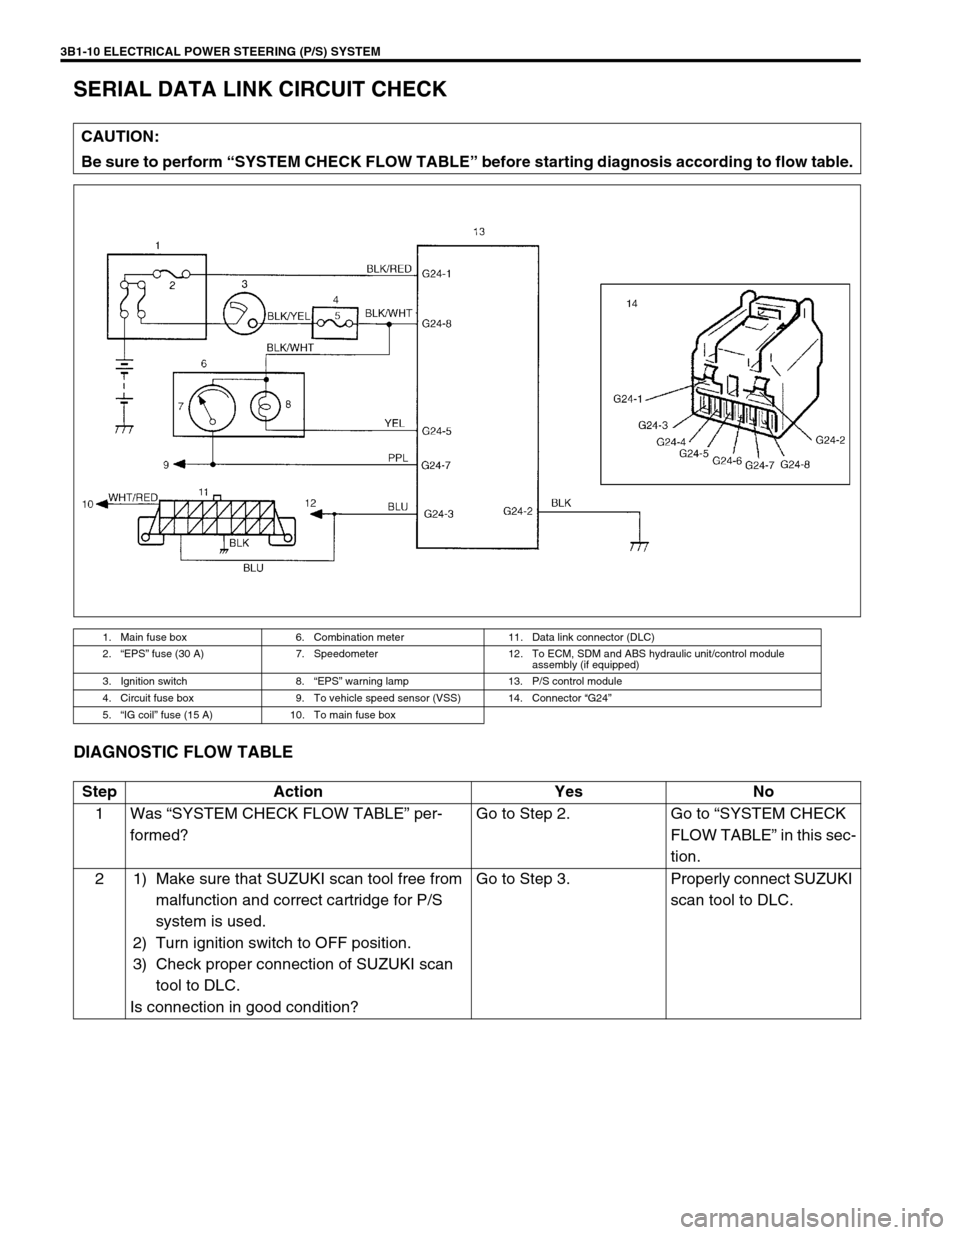
SERIAL DATA LINK CIRCUIT CHECK
DIAGNOSTIC FLOW TABLE
CAUTION:
Be sure to perform “SYSTEM CHECK FLOW TABLE” before starting diagnosis according to flow table.
1. Main fuse box 6. Combination meter 11. Data link connector (DLC)
2.“EPS” fuse (30 A) 7. Speedometer 12. To ECM, SDM and ABS hydraulic unit/control module
assembly (if equipped)
3. Ignition switch 8.“EPS” warning lamp 13. P/S control module
4. Circuit fuse box 9. To vehicle speed sensor (VSS) 14. Connector “G24”
5.“IG coil” fuse (15 A) 10. To main fuse box
Step Action Yes No
1Was “SYSTEM CHECK FLOW TABLE” per-
formed?Go to Step 2. Go to “SYSTEM CHECK
FLOW TABLE” in this sec-
tion.
2 1) Make sure that SUZUKI scan tool free from
malfunction and correct cartridge for P/S
system is used.
2) Turn ignition switch to OFF position.
3) Check proper connection of SUZUKI scan
tool to DLC.
Is connection in good condition?Go to Step 3. Properly connect SUZUKI
scan tool to DLC.
Page 152 of 698
ELECTRICAL POWER STEERING (P/S) SYSTEM 3B1-11
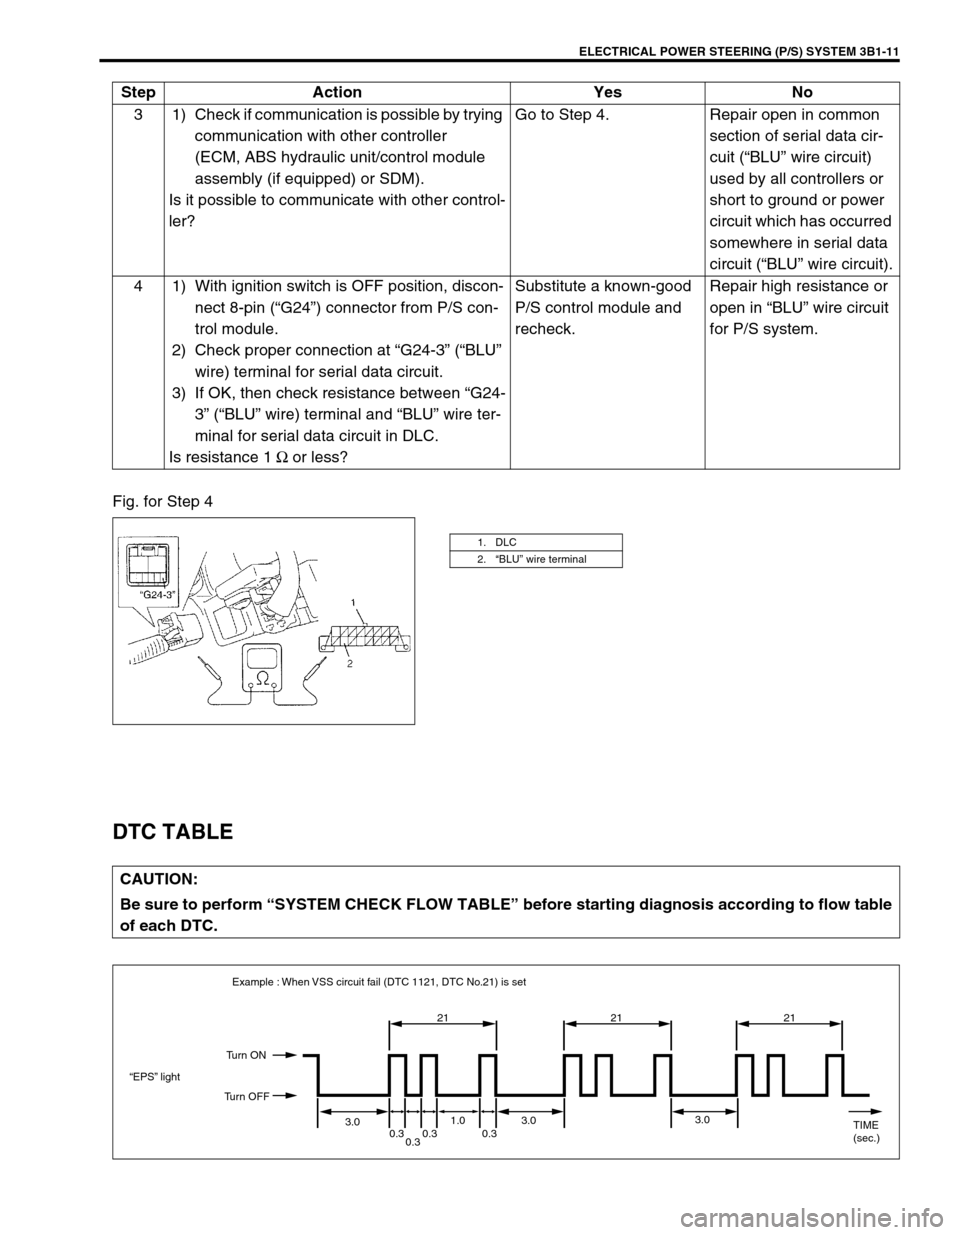
Fig. for Step 4
DTC TABLE
3 1) Check if communication is possible by trying
communication with other controller
(ECM, ABS hydraulic unit/control module
assembly (if equipped) or SDM).
Is it possible to communicate with other control-
ler?Go to Step 4. Repair open in common
section of serial data cir-
cuit (“BLU” wire circuit)
used by all controllers or
short to ground or power
circuit which has occurred
somewhere in serial data
circuit (“BLU” wire circuit).
4 1) With ignition switch is OFF position, discon-
nect 8-pin (“G24”) connector from P/S con-
trol module.
2) Check proper connection at “G24-3” (“BLU”
wire) terminal for serial data circuit.
3) If OK, then check resistance between “G24-
3” (“BLU” wire) terminal and “BLU” wire ter-
minal for serial data circuit in DLC.
Is resistance 1 Ω or less?Substitute a known-good
P/S control module and
recheck.Repair high resistance or
open in “BLU” wire circuit
for P/S system. Step Action Yes No
1. DLC
2.“BLU” wire terminal
CAUTION:
Be sure to perform “SYSTEM CHECK FLOW TABLE” before starting diagnosis according to flow table
of each DTC.
21
3.0
0.3
0.30.3 0.31.0 3.03.0 21 21
Example : When VSS circuit fail (DTC 1121, DTC No.21) is set
“EPS” lightTurn ON
Turn OFF
TIME
(sec.)
Page 175 of 698
3C-2 STEERING WHEEL AND COLUMN
GENERAL DESCRIPTION
STEERING COLUMN
This double tube type steering column has following three important features in addition to the steering function
:
The column is energy absorbing, designed to compress in a front-end collision.
The ignition switch and lock are mounted conveniently on this column.
With the column mounted lock, the ignition and steering operations can be locked to inhibit theft of the vehi-
cle.
To insure the energy absorbing action, it is important that only the specified screws, bolts, and nuts be used as
designated and that they are tightened to the specified torque.
When the column assembly is removed from the vehicle, special care must be taken in handling it. Use of a
steering wheel puller other than the one recommended in this manual or a sharp blow on the end of the steering
shaft, leaning on the assembly, or dropping the assembly could shear the plastic shear pins which maintain col-
umn length and position.
STEERING WHEEL AND DRIVER AIR BAG (INFLATOR) MODULE
The driver air bag (inflator) module is one of the supplemental restraint (air bag) system components and is
mounted to the center of the steering wheel. During certain frontal crashes, the air bag system supplements the
restraint of the driver’s and passenger’s seat belts by deploying the air bags.
The air bag (inflator) module should be handled with care to prevent accidental deployment. When servicing, be
sure to observe all WARNINGS and CAUTIONS and “SERVICE PRECAUTIONS” under “ON-VEHICLE SER-
VICE” in Section 10B.
DIAGNOSIS
For maintenance service of the steering wheel and column, refer to Section 0B.
For diagnosis of the steering wheel and column, refer to Section 3.
For diagnosis of the air bag system, refer to Section 10B.
INSPECTION AND REPAIR REQUIRED AFTER ACCIDENT
After an accident, whether the air bag has been deployed or not, be sure to perform checks, inspections and
repairs described under “CHECKING STEERING COLUMN ASSEMBLY AND LOWER SHAFT FOR ACCI-
DENT DAMAGE” as well as “REPAIRS AND INSPECTIONS REQUIRED AFTER ACCIDENT” under “DIAGNO-
SIS” in Section 10B.