belt SUZUKI SWIFT 2000 1.G Transmission Service Workshop Manual
[x] Cancel search | Manufacturer: SUZUKI, Model Year: 2000, Model line: SWIFT, Model: SUZUKI SWIFT 2000 1.GPages: 447, PDF Size: 10.54 MB
Page 245 of 447

BODY ELECTRICAL SYSTEM 8-1
6F1
6F2
6G
6H
6K
7A
7A1
7B1
7C1
7D
7E
7F
8A
8
8D
8E
9
10
10A
10B
SECTION 8
BODY ELECTRICAL SYSTEM
CONTENTS
DIAGNOSIS ........................................................ 8-3
HEADLIGHT .................................................... 8-3
HEADLIGHTS WITH LEVELING SYSTEM
(IF EQUIPPED) ............................................... 8-3
TURN SIGNAL AND HAZARD WARNING
LIGHT .............................................................. 8-3
CLEARANCE, TAIL AND LICENSE
PLATE LIGHT ................................................. 8-4
BACK-UP LIGHT ............................................. 8-4
BRAKE LIGHT ................................................ 8-4
FRONT FOG LIGHT (IF EQUIPPED) ............. 8-4
REAR FOG LIGHT (IF EQUIPPED) ................ 8-4
SPEEDOMETER AND VSS ............................ 8-5
FUEL METER AND FUEL LEVEL SENSOR
(GAUGE UNIT) ............................................... 8-5
ENGINE COOLANT TEMPERATURE (ECT)
METER AND ECT SENSOR ........................... 8-5
OIL PRESSURE WARNING LIGHT ................ 8-5
BRAKE AND PARKING BRAKE WARNING
LIGHT .............................................................. 8-6
REAR WINDOW DEFOGGER ........................ 8-6
WIPERS AND WASHERS .............................. 8-6
FRONT WIPER AND WASHER .................. 8-6
REAR WIPER AND WASHER (IF
EQUIPPED)................................................. 8-6
POWER WINDOW CONTROL SYSTEM
(IF EQUIPPED) ............................................... 8-7
CIGARETTE LIGHTER ................................... 8-7
POWER DOOR LOCK CONTROL SYSTEM
(IF EQUIPPED) ............................................... 8-7
KEYLESS ENTRY SYSTEM (IF
EQUIPPED) .................................................... 8-7POWER DOOR MIRROR CONTROL
SYSTEM (IF EQUIPPED) ............................... 8-8
INTERIOR LIGHT ........................................... 8-8
HORN ............................................................. 8-8
IGNITION KEY REMAINDER (IF EQUIPPED)
AND LIGHT REMAINDER WARNING
BUZZER.......................................................... 8-8
SEAT BELT WARNING LIGHT (IF
EQUIPPED) .................................................... 8-8
FRONT SEAT HEATER (IF EQUIPPED) ....... 8-9
ON-VEHICLE SERVICE ..................................... 8-9
CAUTIONS IN SERVICING ............................ 8-9
HEADLIGHT ................................................... 8-9
HEADLIGHT SWITCH ................................ 8-9
HEADLIGHT ASSEMBLY ......................... 8-10
HEADLIGHT BULB ................................... 8-10
HEADLIGHT AIMING ADJUSTMENT
WITH SCREEN ......................................... 8-11
HEADLIGHT LEVELING SWITCH (IF
EQUIPPED) .............................................. 8-12
TURN SIGNAL AND HAZARD WARNING
LIGHTS ......................................................... 8-12
TURN SIGNAL LIGHT SWITCH ............... 8-12
REMOVAL AND INSTALLATION ............. 8-12
TURN SIGNAL AND HAZARD RELAY ..... 8-13
HAZARD SWITCH .................................... 8-13
FRONT FOG LIGHTS (IF EQUIPPED)......... 8-13
FRONT FOG LIGHT SWITCH .................. 8-13
REAR FOG LIGHT (IF EQUIPPED) ............. 8-14
REAR FOG LIGHT SWITCH..................... 8-14
IGNITION SWITCH ....................................... 8-14
COMBINATION METER ............................... 8-15 WARNING:
For vehicles equipped with Supplemental Restraint (Air Bag) System :
Service on and around the air bag system components or wiring must be performed only by an
authorized SUZUKI dealer. Refer to “Air Bag System Components and Wiring Location View” under
“General Description” in air bag system section in order to confirm whether you are performing ser-
vice on or near the air bag system components or wiring. Please observe all WARNINGS and “Ser-
vice Precautions” under “On-Vehicle Service” in air bag system section before performing service
on or around the air bag system components or wiring. Failure to follow WARNINGS could result in
unintentional activation of the system or could render the system inoperative. Either of these two
conditions may result in severe injury.
Technical service work must be started at least 90 seconds after the ignition switch is turned to the
“LOCK” position and the negative cable is disconnected from the battery. Otherwise, the system
may be activated by reserve energy in the Sensing and Diagnostic Module (SDM).
Page 252 of 447

8-8 BODY ELECTRICAL SYSTEM
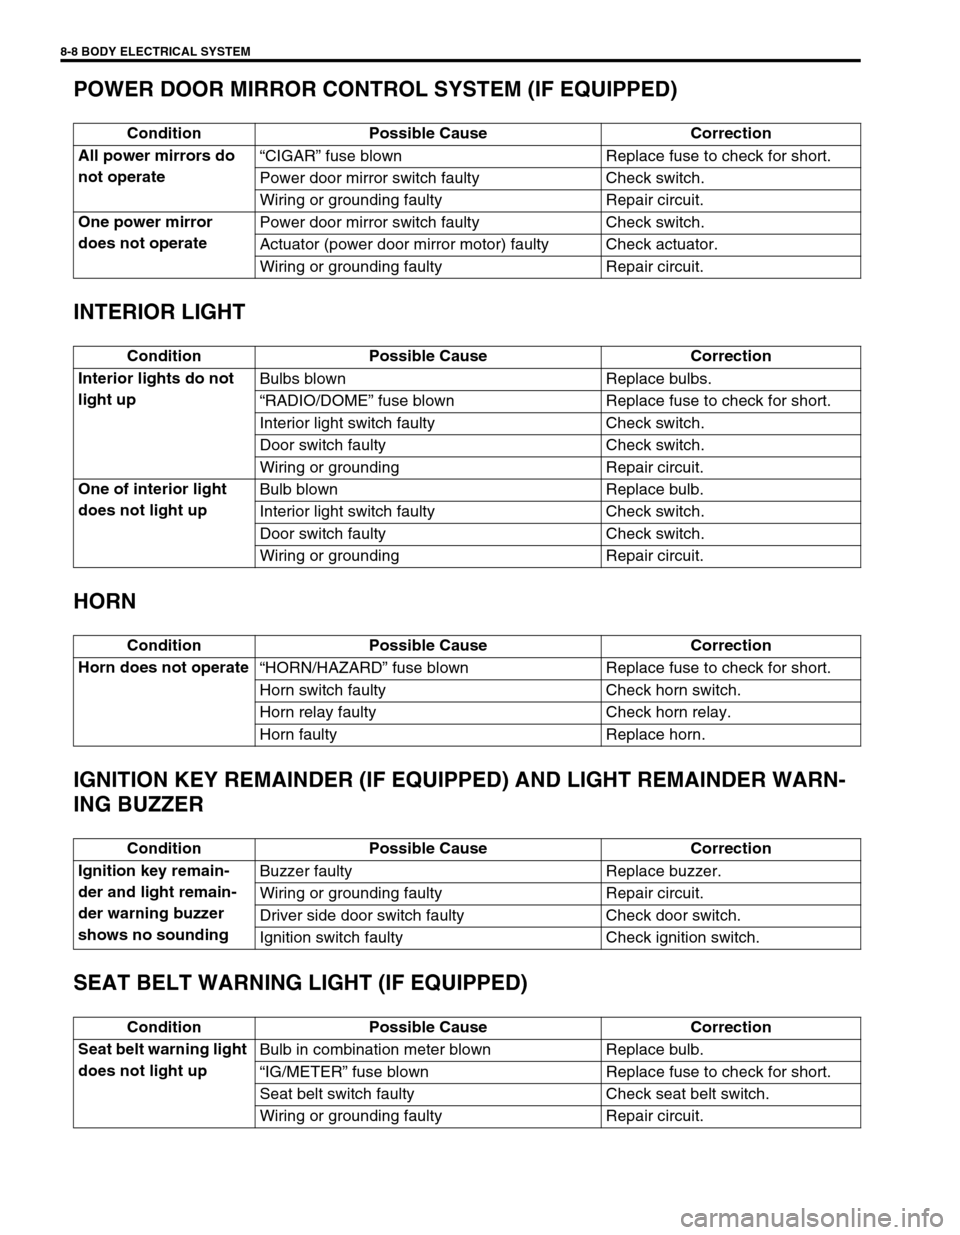
POWER DOOR MIRROR CONTROL SYSTEM (IF EQUIPPED)
INTERIOR LIGHT
HORN
IGNITION KEY REMAINDER (IF EQUIPPED) AND LIGHT REMAINDER WARN-
ING BUZZER
SEAT BELT WARNING LIGHT (IF EQUIPPED)
Condition Possible Cause Correction
All power mirrors do
not operate“CIGAR” fuse blown Replace fuse to check for short.
Power door mirror switch faulty Check switch.
Wiring or grounding faulty Repair circuit.
One power mirror
does not operatePower door mirror switch faulty Check switch.
Actuator (power door mirror motor) faulty Check actuator.
Wiring or grounding faulty Repair circuit.
Condition Possible Cause Correction
Interior lights do not
light upBulbs blown Replace bulbs.
“RADIO/DOME” fuse blown Replace fuse to check for short.
Interior light switch faulty Check switch.
Door switch faulty Check switch.
Wiring or grounding Repair circuit.
One of interior light
does not light upBulb blown Replace bulb.
Interior light switch faulty Check switch.
Door switch faulty Check switch.
Wiring or grounding Repair circuit.
Condition Possible Cause Correction
Horn does not operate
“HORN/HAZARD” fuse blown Replace fuse to check for short.
Horn switch faulty Check horn switch.
Horn relay faulty Check horn relay.
Horn faulty Replace horn.
Condition Possible Cause Correction
Ignition key remain-
der and light remain-
der warning buzzer
shows no soundingBuzzer faulty Replace buzzer.
Wiring or grounding faulty Repair circuit.
Driver side door switch faulty Check door switch.
Ignition switch faulty Check ignition switch.
Condition Possible Cause Correction
Seat belt warning light
does not light upBulb in combination meter blown Replace bulb.
“IG/METER” fuse blown Replace fuse to check for short.
Seat belt switch faulty Check seat belt switch.
Wiring or grounding faulty Repair circuit.
Page 259 of 447

BODY ELECTRICAL SYSTEM 8-15
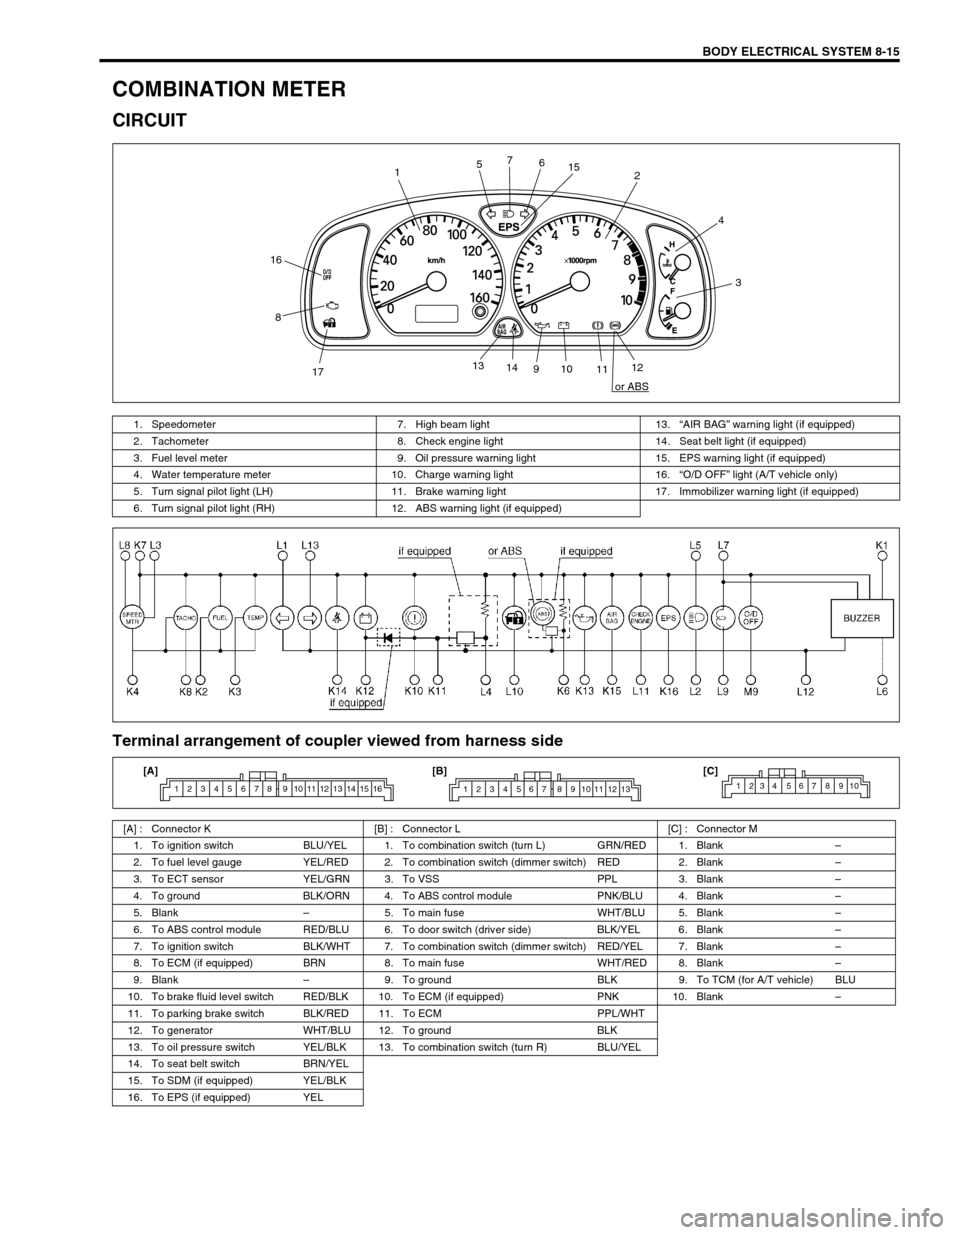
COMBINATION METER
CIRCUIT
Terminal arrangement of coupler viewed from harness side
12
3 4
56 7
8
910
1112 13
14
1715
16
or ABS
1. Speedometer 7. High beam light 13.“AIR BAG” warning light (if equipped)
2. Tachometer 8. Check engine light 14. Seat belt light (if equipped)
3. Fuel level meter 9. Oil pressure warning light 15. EPS warning light (if equipped)
4. Water temperature meter 10. Charge warning light 16.“O/D OFF” light (A/T vehicle only)
5. Turn signal pilot light (LH) 11. Brake warning light 17. Immobilizer warning light (if equipped)
6. Turn signal pilot light (RH) 12. ABS warning light (if equipped)
[A] : Connector K [B] : Connector L [C] : Connector M
1. To ignition switch BLU/YEL 1. To combination switch (turn L) GRN/RED 1. Blank–
2. To fuel level gauge YEL/RED 2. To combination switch (dimmer switch) RED 2. Blank–
3. To ECT sensor YEL/GRN 3. To VSS PPL 3. Blank–
4. To ground BLK/ORN 4. To ABS control module PNK/BLU 4. Blank–
5. Blank–5. To main fuse WHT/BLU 5. Blank–
6. To ABS control module RED/BLU 6. To door switch (driver side) BLK/YEL 6. Blank–
7. To ignition switch BLK/WHT 7. To combination switch (dimmer switch) RED/YEL 7. Blank–
8. To ECM (if equipped) BRN 8. To main fuse WHT/RED 8. Blank–
9. Blank–9. To ground BLK 9. To TCM (for A/T vehicle) BLU
10. To brake fluid level switch RED/BLK 10. To ECM (if equipped) PNK 10. Blank–
11. To parking brake switch BLK/RED 11. To ECM PPL/WHT
12. To generator WHT/BLU 12. To ground BLK
13. To oil pressure switch YEL/BLK 13. To combination switch (turn R) BLU/YEL
14. To seat belt switch BRN/YEL
15. To SDM (if equipped) YEL/BLK
16. To EPS (if equipped) YEL
1 2 3 4 5 6 7 8 9 10 11 12 13 14 15 161 2 3 4 5 6 7 8 9 10 11 12 131234 567 8910[A] [B] [C]
Page 351 of 447

BODY SERVICE 9-47
IGNITION SWITCH LOCK CYLINDER
REMOVAL AND INSTALLATION
Refer to “STEERING LOCK ASSEMBLY (IGNITION SWITCH)” in
Section 3C.
ELECTRICAL DIAGNOSIS
For ignition switch electrical troubleshooting, refer to “IGNITION
SWITCH” in Section 8.
EXTERIOR AND INTERIOR TRIM
FLOOR CARPET
REMOVAL
1) Remove front seats and rear seat cushion.
2) Remove seat belt lower anchor bolt.
3) Remove dash side trims, front side sill scuffs, center pillar inner lower trims, quarter inner trims and rear side
sill scuffs.
4) Remove parking brake lever cover and console box.
5) Remove floor carpet.
INSTALLATION
Reverse removal sequence to install front floor carpet, noting the following instruction.
For tightening torque of seat belt anchor bolt, refer to “FRONT SEAT BELT” in Section 10.
1. Floor carpet
2. Dash panel silencer
3. Silencer seat
Page 367 of 447

RESTRAINT SYSTEM 10-1
6F1
6F2
6G
6H
6K
7A
7A1
7B1
7C1
7D
7E
7F
8A
8B
8C
8D
8E
9
10
10A
10B
SECTION 10
RESTRAINT SYSTEM
CONTENTS
GENERAL DESCRIPTION .............................. 10-2
SYSTEM SPECIFICATION .......................... 10-3
SEAT BELT PRETENSIONER
(IF EQUIPPED) ............................................ 10-3
DIAGNOSIS ..................................................... 10-3
INSPECTION AND REPAIR REQUIRED
AFTER ACCIDENT ...................................... 10-3
ON-VEHICLE SERVICE .................................. 10-4SERVICE PRECAUTIONS .......................... 10-4
SERVICE AND DIAGNOSIS .................... 10-4
DISABLING AIR BAG SYSTEM............... 10-4
ENABLING AIR BAG SYSTEM................ 10-4
HANDLING AND STORAGE ................... 10-4
DISPOSAL ............................................... 10-4
FRONT SEAT BELT .................................... 10-5
REAR SEAT BELT....................................... 10-8
WARNING:
For vehicles equipped with Supplemental Restraint (Air Bag) System with seat belt pretensioner:
Service on or around the air bag system components or wiring must be performed only by an
authorized SUZUKI dealer. Please observe all WARNINGS and “Service Precautions” under “On-
Vehicle Service” in air bag system section before performing service on or around the air bag sys-
tem components or wiring. Failure to follow WARNINGS could result in unintentional activation of
the system or could render the system inoperative. Either of these two conditions may result in
severe injury.
The procedures in this section must be followed in the order listed to disable the air bag system
temporarily and prevent false diagnostic trouble codes from setting. Failure to follow procedures
could result in possible activation of the air bag system, personal injury or otherwise unneeded air
bag system repairs.
CAUTION:
When fasteners are removed, always reinstall them at the same location from which they were
removed. If a fastener needs to be replaced, use the correct part number fastener for that application.
If the correct part number fastener is not available, a fastener of equal size and strength (or stronger)
may be used. Fasteners that are not reused, and those requiring thread-locking compound, will be
called out. The correct torque value must be used when installing fasteners that require it. If the above
procedures are not followed, parts or system damage could result.
Page 368 of 447

10-2 RESTRAINT SYSTEM
GENERAL DESCRIPTION
Seat Belt with ELR
The seat belt with emergency locking retractor (ELR) is designed so that it locks immediately (to prevent the
webbing from being pulled out of the retractor any further) when any of the following items is detected as
exceeding each set value;
speed at which the webbing is pulled out of the retractor,
acceleration or deceleration of the vehicle speed, and
inclination.
Seat Belt with A-ELR
The automatic and emergency locking retractor (A-ELR) works as an Emergency Locking Retractor (ELR) till its
webbing is pulled all the way out and then on as an Automatic Locking Retractor (ALR) till it is retracted fully.
ALR: Automatically locks when the webbing is pulled out from the retractor and allowed to retract even a little.
Then the webbing can not be pulled out any further, unless it is wound all the way back into the retractor, which
releases the lock and allows the webbing to be pulled out.
Seat Belt with ELR and Pretensioner
The seat belt with ELR and a pretensioner has a pretensioner mechanism which operates in linkage with the air
bag in addition to the above described ELR. The pretensioner takes up the sag of the seat belt in occurrence of
a front collision with an impact larger than a certain set value, thereby enhancing restraint performance.
1. Front seat belt 4. Passenger air bag (if equipped)
2. Rear seat belt 5. Label (for seat belt with pretensioner)
3. Driver air bag (if equipped) 6. Rear center seat belt
Page 369 of 447

RESTRAINT SYSTEM 10-3
Driver and Front Passenger Air Bags and Seat Belt Pretensioners
With the air bag system which includes air bags for both the driver’s and passenger’s sides as well as the seat
belt pretensioners, the pretensioner takes up the sag of the seat belt, the driver air bag (inflator) module is
deployed from the center of the steering column and the passenger air bag (inflator) module from the top of the
instrument panel in front of the front passenger seat in occurrence of a front collision with an impact larger than
a certain set value to supplement protection offered by the driver and front passenger seat belts.
SYSTEM SPECIFICATION
SEAT BELT PRETENSIONER (IF EQUIPPED)
Some seat belts of the driver and front passenger seats are provided with a pretensioner as an optional function
unit. The pretensioner is incorporated in retractor assembly and controlled by SDM as one of air bag system
components. It will be activated at the same time as the air bag when an impact at the front of vehicle exceeds
the specified value.
When servicing seat belt (retractor assembly) with pretensioner, be sure to observe all WARNINGS and CAU-
TIONS in this section and “SERVICE PRECAUTIONS” of “ON-VEHICLE SERVICE” in Section 10B
DIAGNOSIS
For diagnosis of air bag system (including in seat belt pretensioner), refer to Section 10B.
INSPECTION AND REPAIR REQUIRED AFTER ACCIDENT
After an accident, whether the seat belt pretensioner has been activated or not, be sure to perform checks and
repairs described on “REPAIRS AND INSPECTIONS REQUIRED AFTER ACCIDENT” under “DIAGNOSIS” in
Section 10B.Type 1 Type 2 Type 3
Front
seatSeat belt with ELRDriver air bag
Seat belt with ELR and
pretensionerDriver and front passenger air bags
Seat belt wit ELR and pretensioner
Rear
seatSeat belt with A-ELR
(right and left)
Seat belt (center)Seat belt with A-ELR
(right and left)
Seat belt (center)Seat belt with A-ELR (right and left)
Seat belt (center)
CAUTION:
Do not reuse the seat belt pretensioner (retractor assembly) that has operated but replace it with a
new one as an assembly. For checking procedure of its operation, refer to “SERVICE PRECAUTIONS”
of “ON-VEHICLE SERVICE” in Section 10B.
Page 370 of 447

10-4 RESTRAINT SYSTEM
ON-VEHICLE SERVICE
SERVICE PRECAUTIONS
SERVICE AND DIAGNOSIS
Before servicing or replacing seat belts, refer to following precautionary items.
Seat belts should be normal relative to strap retractor and buckle portions.
Keep sharp edges and damaging objects away from belts.
Avoid bending or damaging any portion of belt buckle or latch plate.
Do not bleach or dye belt webbing. (Use only mild soap and lukewarm water to clean it.)
When installing a seat belt anchor bolt, it should be tightened by hand at first to prevent cross-threading and
then to specified torque.
Do not attempt any repairs on retractor mechanisms or retractor covers. Replace defective assemblies with
new replacement parts.
Keep belts dry and clean at all times.
If there exist any parts in question, replace such parts.
Replace belts whose webbing is cut or otherwise damaged.
Do not put anything into trim panel opening which seat belt webbing passes through.
For Seat Belt with Pretensioner
Refer to “SERVICE AND DIAGNOSIS” of “SERVICE PRECAUTIONS” under “ON-VEHICLE SERVICE” in Sec-
tion 10B.
DISABLING AIR BAG SYSTEM
Refer to “DISABLING AIR BAG SYSTEM” of “SERVICE PRECAUTIONS” under “ON-VEHICLE SERVICE” in
Section 10B.
ENABLING AIR BAG SYSTEM
Refer to “ENABLING AIR BAG SYSTEM” of “SERVICE PRECAUTIONS” under “ON-VEHICLE SERVICE” in
Section 10B.
HANDLING AND STORAGE
Refer to “HANDLING AND STORAGE” of “SERVICE PRECAUTIONS” under “ON-VEHICLE SERVICE” in Sec-
tion 10B.
DISPOSAL
Refer to “DISPOSAL” of “SERVICE PRECAUTIONS” under “ON-VEHICLE SERVICE” in Section 10B. WARNING:
If replacing seat belt is necessary, replace buckle and ELR (or webbing) together as a set. This is for
the reason of ensuring locking of tongue plate with buckle.
If these parts are replaced individually, such a locking condition may become unreliable. For this rea-
son, SUZUKI will supply only the spare buckle and ELR (or webbing) in a set part.
WARNING:
When performing service on or around air bag system components or air bag system wiring, disable
the air bag system. Refer to “DISABLING AIR BAG SYSTEM” of “SERVICE PRECAUTIONS” under
“ON-VEHICLE SERVICE” in Section 10B.
Failure to follow procedures could result in possible air bag activation, personal injury or unneeded
air bag system repairs.
Page 371 of 447

RESTRAINT SYSTEM 10-5
FRONT SEAT BELT
WARNING:
Never attempt to disassemble or repair the seat belt pretensioner (retractor assembly). If any abnor-
mality is found, be sure to replace it with new one as an assembly.
Be sure to read “SERVICE PRECAUTIONS”, before starting to work and observe every precaution
during work. Neglecting them may result in personal injury or unactivation of the seat belt preten-
sioner when necessary.
1. Upper anchor 4. BuckleTightening torque
2. Lower anchor 5. Yellow connector (for seat belt pretensioner) (if equipped)
3. Retractor assembly 6. Retractor assembly upper mounting bolt
: After tightening lower bolt, tightening upper bolt
Page 372 of 447

10-6 RESTRAINT SYSTEM
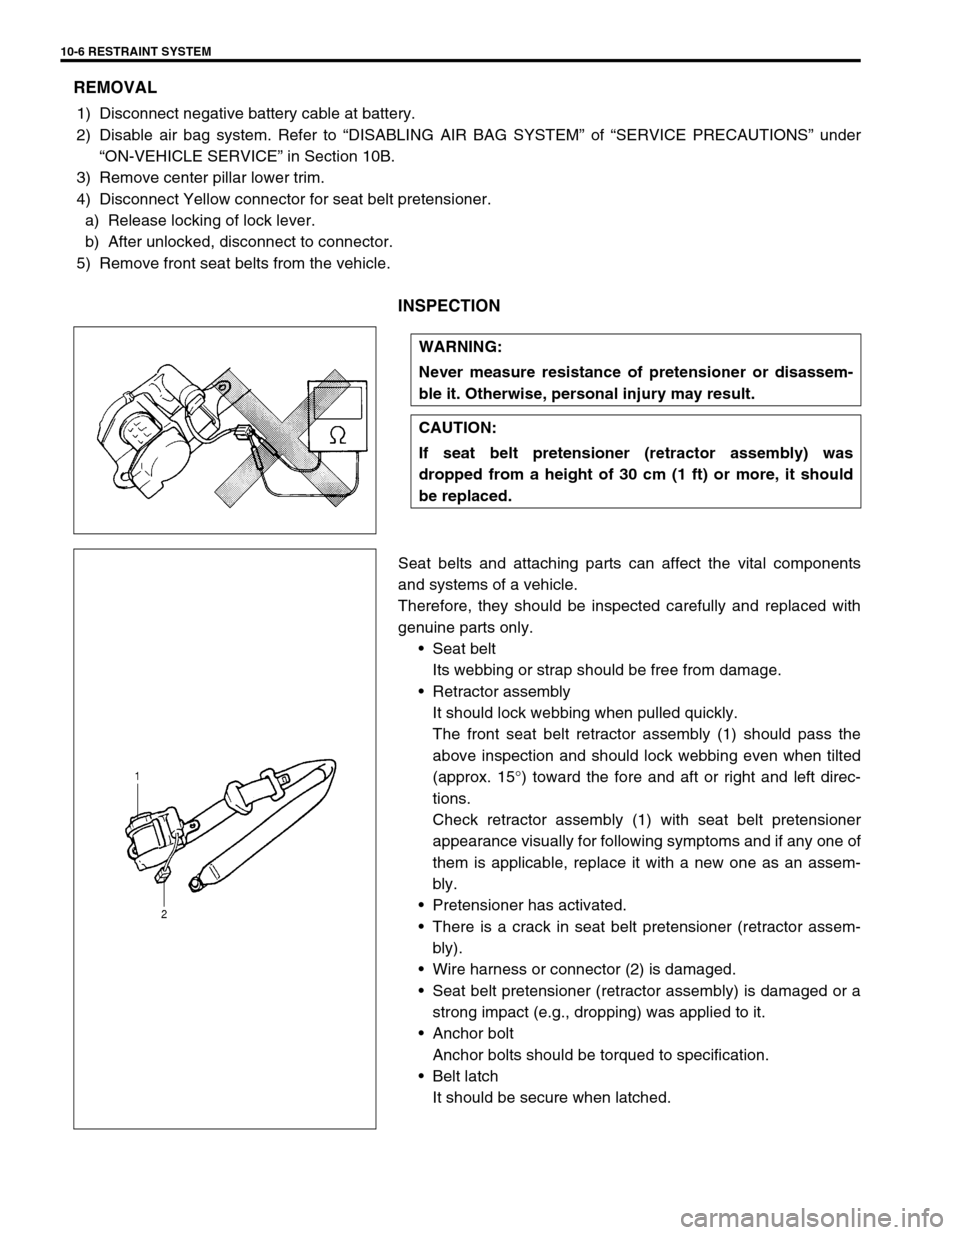
REMOVAL
1) Disconnect negative battery cable at battery.
2) Disable air bag system. Refer to “DISABLING AIR BAG SYSTEM” of “SERVICE PRECAUTIONS” under
“ON-VEHICLE SERVICE” in Section 10B.
3) Remove center pillar lower trim.
4) Disconnect Yellow connector for seat belt pretensioner.
a) Release locking of lock lever.
b) After unlocked, disconnect to connector.
5) Remove front seat belts from the vehicle.
INSPECTION
Seat belts and attaching parts can affect the vital components
and systems of a vehicle.
Therefore, they should be inspected carefully and replaced with
genuine parts only.
Seat belt
Its webbing or strap should be free from damage.
Retractor assembly
It should lock webbing when pulled quickly.
The front seat belt retractor assembly (1) should pass the
above inspection and should lock webbing even when tilted
(approx. 15°) toward the fore and aft or right and left direc-
tions.
Check retractor assembly (1) with seat belt pretensioner
appearance visually for following symptoms and if any one of
them is applicable, replace it with a new one as an assem-
bly.
Pretensioner has activated.
There is a crack in seat belt pretensioner (retractor assem-
bly).
Wire harness or connector (2) is damaged.
Seat belt pretensioner (retractor assembly) is damaged or a
strong impact (e.g., dropping) was applied to it.
Anchor bolt
Anchor bolts should be torqued to specification.
Belt latch
It should be secure when latched. WARNING:
Never measure resistance of pretensioner or disassem-
ble it. Otherwise, personal injury may result.
CAUTION:
If seat belt pretensioner (retractor assembly) was
dropped from a height of 30 cm (1 ft) or more, it should
be replaced.