123 SUZUKI SWIFT 2008 2.G Service Repair Manual
[x] Cancel search | Manufacturer: SUZUKI, Model Year: 2008, Model line: SWIFT, Model: SUZUKI SWIFT 2008 2.GPages: 1496, PDF Size: 34.44 MB
Page 1279 of 1496
Downloaded from www.Manualslib.com manuals search engine Wiring Systems: 9A-108
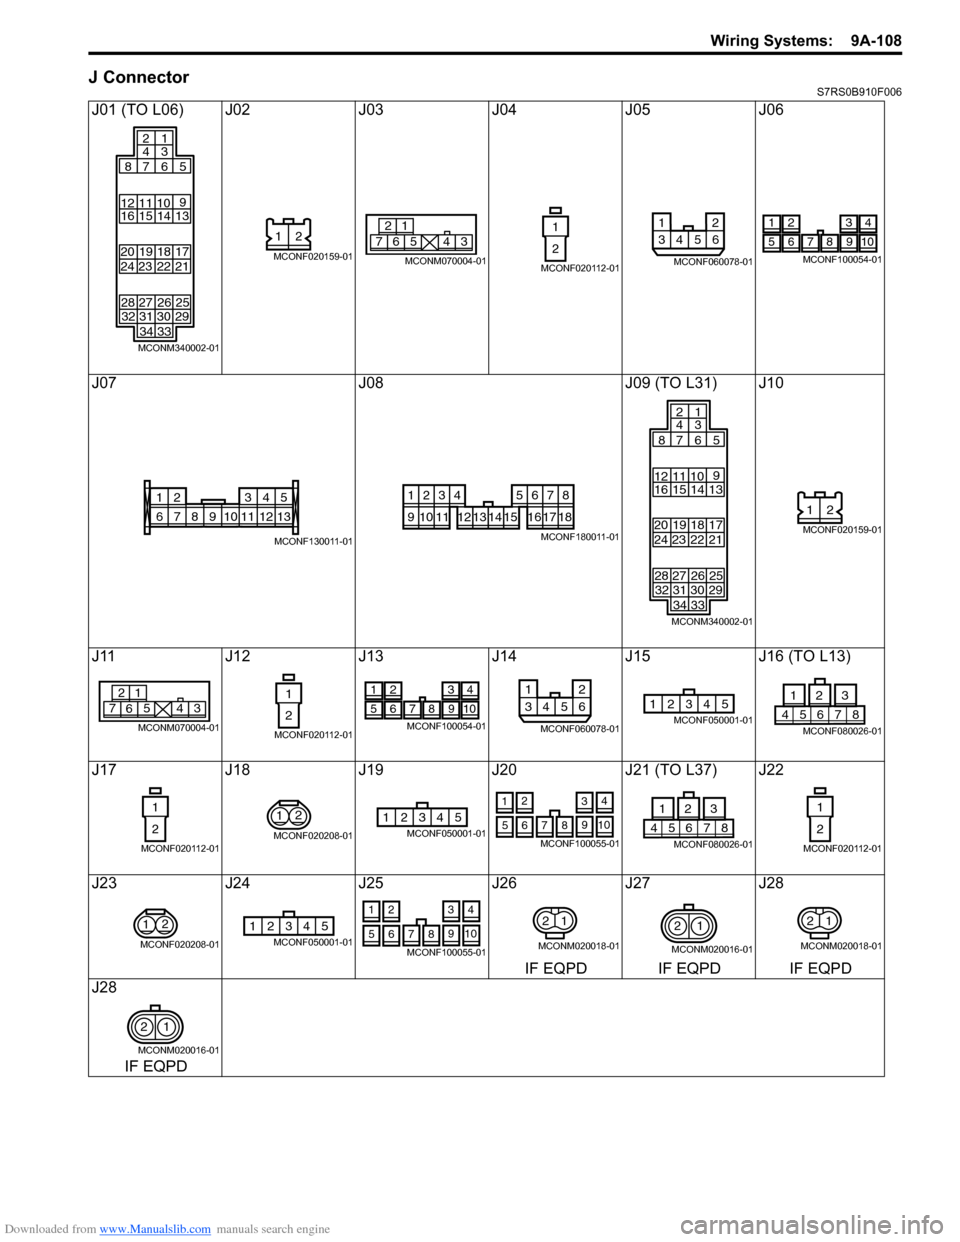
J ConnectorS7RS0B910F006
J01 (TO L06) J02J03J04J05J06
J07 J08J09 (TO L31) J10
J11 J12J13J14 J15 J16 (TO L13)
J17 J18J19 J20 J21 (TO L37) J22
J23 J24J25 J26 J27 J28
IF EQPD IF EQPD IF EQPD
J28
IF EQPD
313234 33 30 29
24
28 23
27 22
26 21
25
16
20 19 15
12 11 10
14
1813
17
87 6
2
4
1
3
5
9
MCONM340002-01
21
MCONF020159-016
21
7543
MCONM070004-01
1
2
MCONF020112-01
12
3456
MCONF060078-01
1234
5678910
MCONF100054-01
135
68910111324
712
MCONF130011-01
1234
91011
5678
12131415161718
MCONF180011-01
3132 34 33 30 29
24
28 23
27 22
26 21
25
16
20 19 15
12 11 10
14
1813
17
87 6
2
4
1
3
5
9
MCONM340002-01
21
MCONF020159-01
6
21
7543
MCONM070004-01
1
2
MCONF020112-01
1234
5678910
MCONF100054-01
12
3456
MCONF060078-01
12345MCONF050001-0187654
231
MCONF080026-01
1
2
MCONF020112-01
2
1
MCONF020208-01
12345MCONF050001-01
2
1 4
3
7 9
65 108
MCONF100055-0187654
231
MCONF080026-01
1
2
MCONF020112-01
2
1
MCONF020208-01
12345MCONF050001-01
2
1 4
3
7 9
65 108
MCONF100055-01
12
MCONM020018-01
2
1
MCONM020016-01
12
MCONM020018-01
21
MCONM020016-01
Page 1280 of 1496
Downloaded from www.Manualslib.com manuals search engine 9A-109 Wiring Systems:
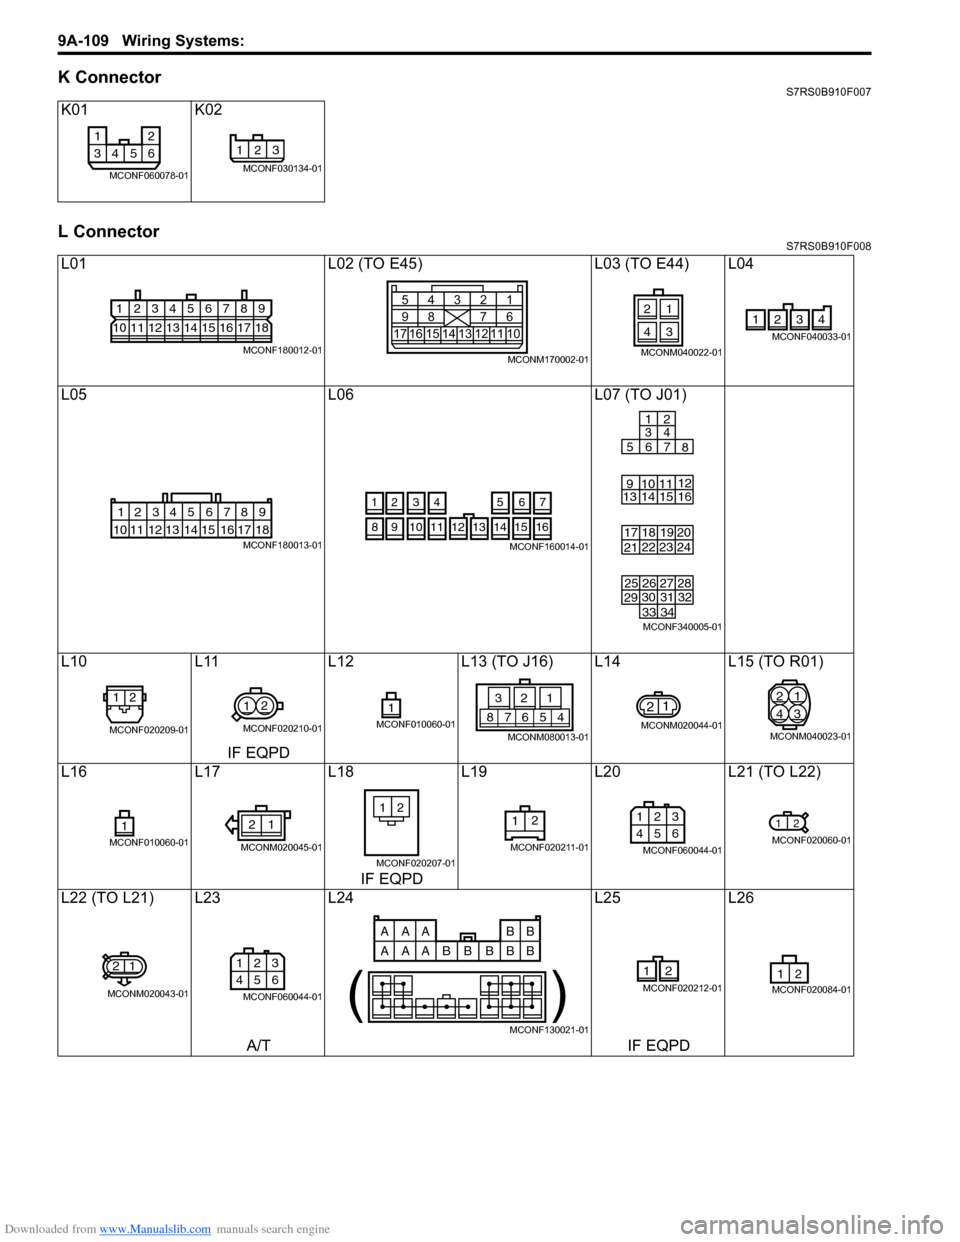
K ConnectorS7RS0B910F007
L ConnectorS7RS0B910F008
K01K02
L01 L02 (TO E45)L03 (TO E44) L04
L05 L06L07 (TO J01)
L10 L11L12L13 (TO J16) L14 L15 (TO R01)
IF EQPD
L16 L17L18L19L20 L21 (TO L22)
IF EQPD
L22 (TO L21) L23 L24L25L26
A/T IF EQPD
12
3456
MCONF060078-01
123
MCONF030134-01
123456789
101112131415161718
MCONF180012-01175
9161312 11 101514
4
832
71
6
MCONM170002-01
21
43
MCONM040022-01
2341
MCONF040033-01
123456789
15 16 17 18
1110 12 13 14
MCONF180013-01
4
3
56
1214
11
10 15
721
13
16
98
MCONF160014-01
31 32
3433
30
29
24
28
23
27
22
26
21
25
13 2019
14
91011
15
18 16
17 7
1
3
2
4
56 8
12
MCONF340005-01
12
MCONF020209-01
1 2
MCONF020210-01
1MCONF010060-0145678
213
MCONM080013-01
21
MCONM020044-01
2
4 1
3
MCONM040023-01
1MCONF010060-01
12
MCONM020045-01
21
MCONF020207-01
12
MCONF020211-01
1 23
456
MCONF060044-01
12
MCONF020060-01
21
MCONM020043-01
1 23
456
MCONF060044-01
AAA BB
AAA B
BB
BB
( )
MCONF130021-01
12
MCONF020212-0121MCONF020084-01
Page 1281 of 1496

Downloaded from www.Manualslib.com manuals search engine Wiring Systems: 9A-110
L27L28 (TO L44) L29
L30 L31 (TO J09) L32 (TO G04) L33 (TO G03) L34
IF EQPD
L35 L36L37 (TO J21) L38 L39L40
IF EQPD
L41 L42 (TO O01) L43 L44 (TO L28) L46 L47
IF EQPD
L48 L51 (TO G43) L53L59 L60
LHD LHD
L61 L62L63L64L65 L66
LHD LHDLHDLHDIF EQPD IF EQPD
L69 L70 (TO M01) L74
IF EQPD
1MCONF010021-01
1 23
456
MCONF060044-0127 28 29 30 31 32 33 34 3536 37 38 39 40 41 42 43 4445 46 47 48 49 50 51
234567 891011 12 13 14 15 16 17 18 1920 21 22 23 24 25 26
1
MCONF510002-01
12
MCONF020212-01
31 32 3433
30
29
24
28
23
27
22
26
21
25
13 2019
14
91011
15
18 16
17 7
1
3
2
4
56 8
12
MCONF340005-01
4321
MCONF040099-01
234
1 5678 910
20191817161514131211
MCONF200003-01
1MCONF010060-01
12
MCONF020210-01
12
MCONF020209-0145678
213
MCONM080013-01
21
MCONM020044-01
1
MCONM010004-011MCONF010060-01
21
MCONF020207-01
45678
213
MCONM080013-01
1
23
456
MCONF060044-01
123
4
65
MCONM060012-01
1
2
MCONF020116-01
1
2
MCONF020013-01
1
2
MCONF020013-01
12567
8
9 1011121314
34
MCONF140012-01
21MCONF020084-01
12
MCONF020266-01
12
MCONF020060-01
12
34
MCONF040143-01
12
34
MCONF040143-01
12
3456
MCONF060025-01
12
3456
MCONF060025-01
21
MCONF020228-01
21
MCONF020228-01
12
3456
MCONF060025-01
2
4 1
3
MCONM040027-01
123 45
678 12 1110
91 3
( )
MCONF130026-01
Page 1282 of 1496
Downloaded from www.Manualslib.com manuals search engine 9A-111 Wiring Systems:
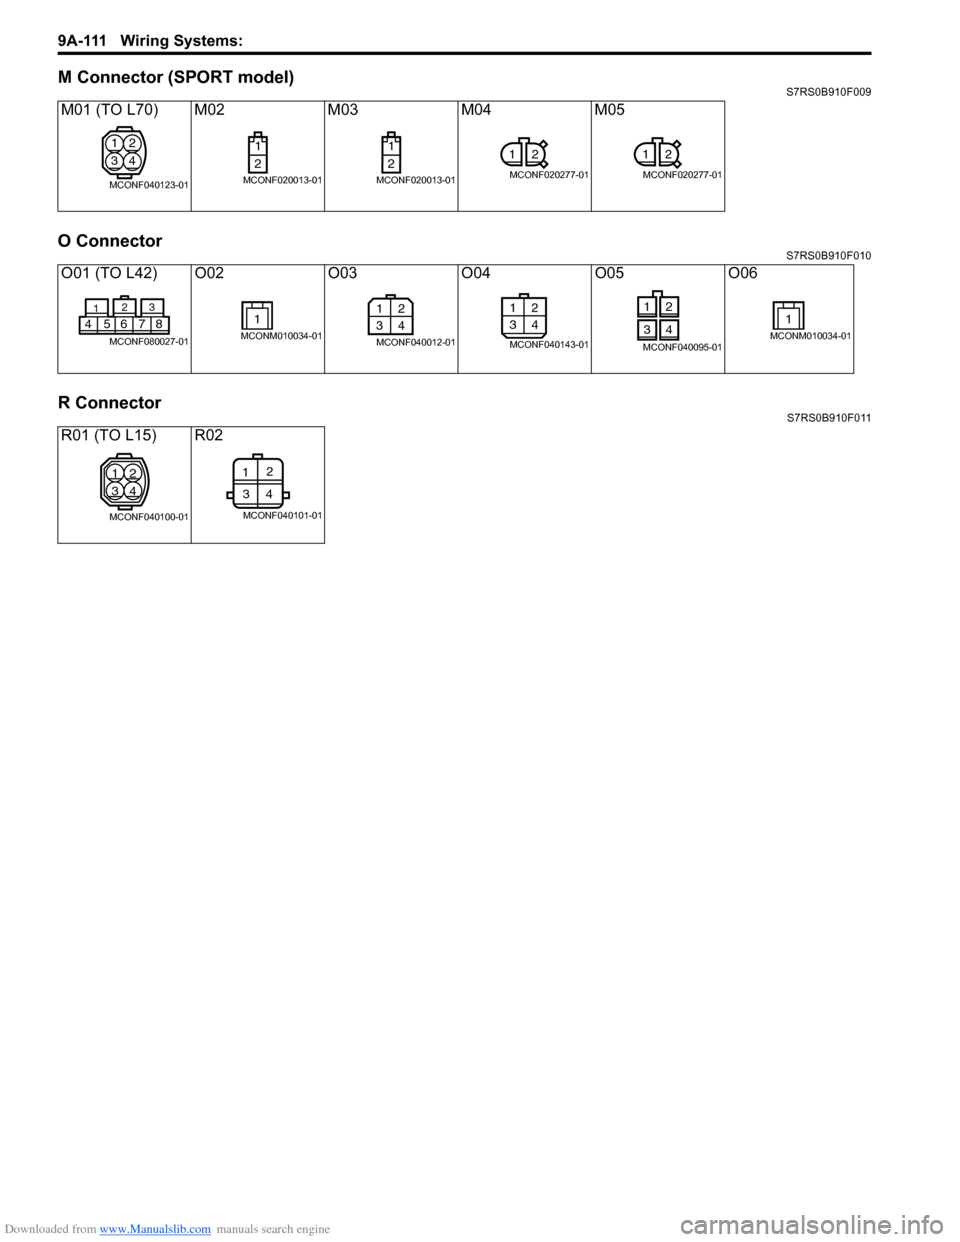
M Connector (SPORT model)S7RS0B910F009
O ConnectorS7RS0B910F010
R ConnectorS7RS0B910F011
M01 (TO L70) M02M03M04M05
O01 (TO L42) O02 O03O04 O05 O06
R01 (TO L15) R02
1
3 2
4
MCONF040123-01
1
2
MCONF020013-01
1
2
MCONF020013-01
1 2
MCONF020277-01
12
MCONF020277-01
3
2
1
45678
MCONF080027-01
1
MCONM010034-01
12
34
MCONF040012-01
12
34
MCONF040143-01
12
34
MCONF040095-01
1
MCONM010034-01
1
3 2
4
MCONF040100-01
1 2
34
MCONF040101-01
Page 1291 of 1496
Downloaded from www.Manualslib.com manuals search engine Lighting Systems: 9B-9
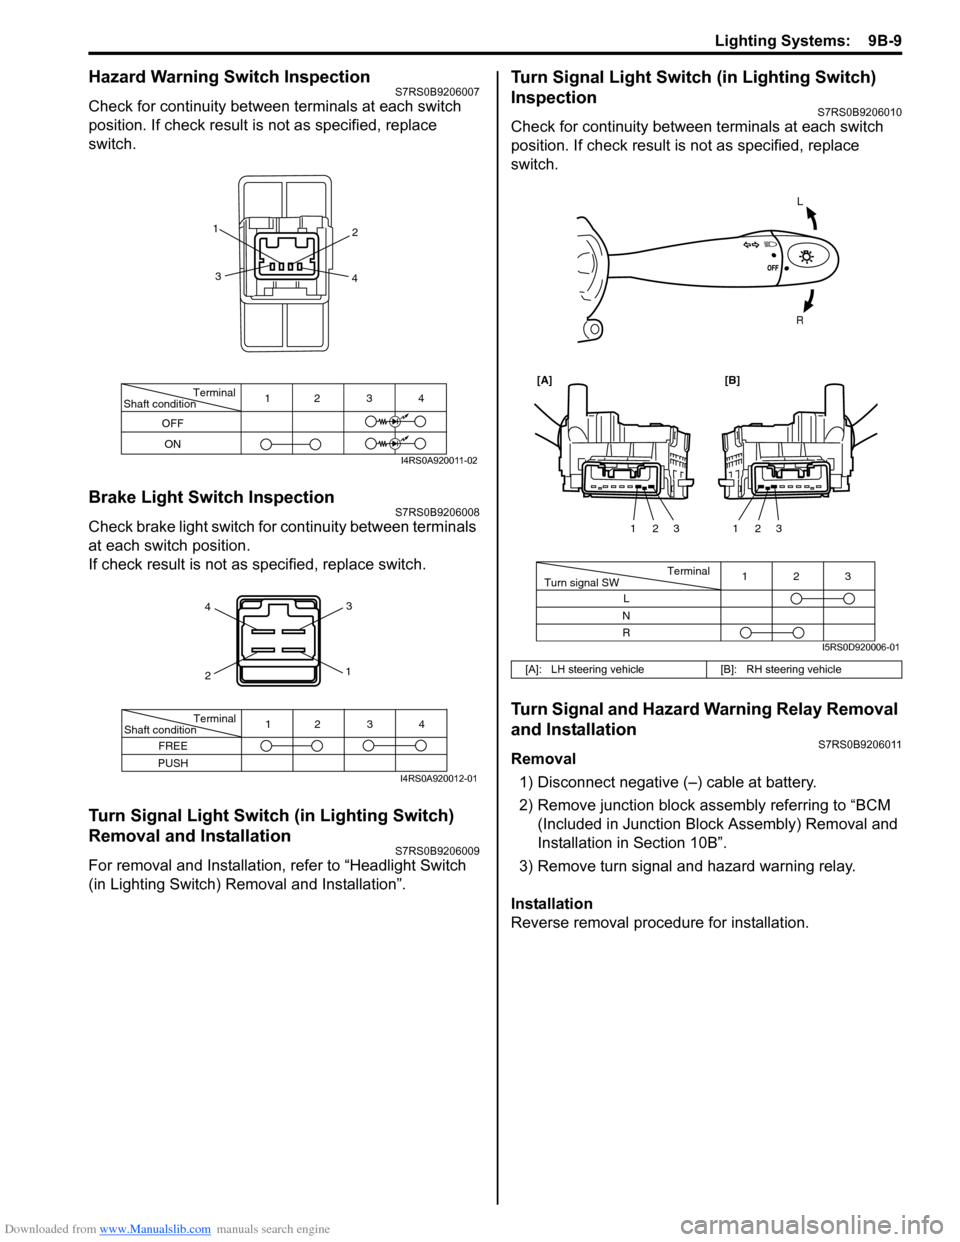
Hazard Warning Switch InspectionS7RS0B9206007
Check for continuity between terminals at each switch
position. If check result is not as specified, replace
switch.
Brake Light Switch InspectionS7RS0B9206008
Check brake light switch for continuity between terminals
at each switch position.
If check result is not as specified, replace switch.
Turn Signal Light Switch (in Lighting Switch)
Removal and Installation
S7RS0B9206009
For removal and Installation, refer to “Headlight Switch
(in Lighting Switch) Removal and Installation”.
Turn Signal Light Switch (in Lighting Switch)
Inspection
S7RS0B9206010
Check for continuity between terminals at each switch
position. If check result is not as specified, replace
switch.
Turn Signal and Hazard Warning Relay Removal
and Installation
S7RS0B9206011
Removal
1) Disconnect negative (–) cable at battery.
2) Remove junction block assembly referring to “BCM (Included in Junction Bl ock Assembly) Removal and
Installation in Section 10B”.
3) Remove turn signal and hazard warning relay.
Installation
Reverse removal procedure for installation.
Terminal
Shaft condition
OFF
ON 12 3 4
1
2
3 4
I4RS0A920011-02
4
2 3
1
Terminal
Shaft condition
FREE
PUSH 12 3 4
I4RS0A920012-01
[A]: LH steering vehicle
[B]: RH steering vehicle
L
R
Terminal
Turn signal SW 3
12
L
N
R 123
123
[A][B]
I5RS0D920006-01
Page 1326 of 1496
Downloaded from www.Manualslib.com manuals search engine 9D-9 Wipers / Washers:
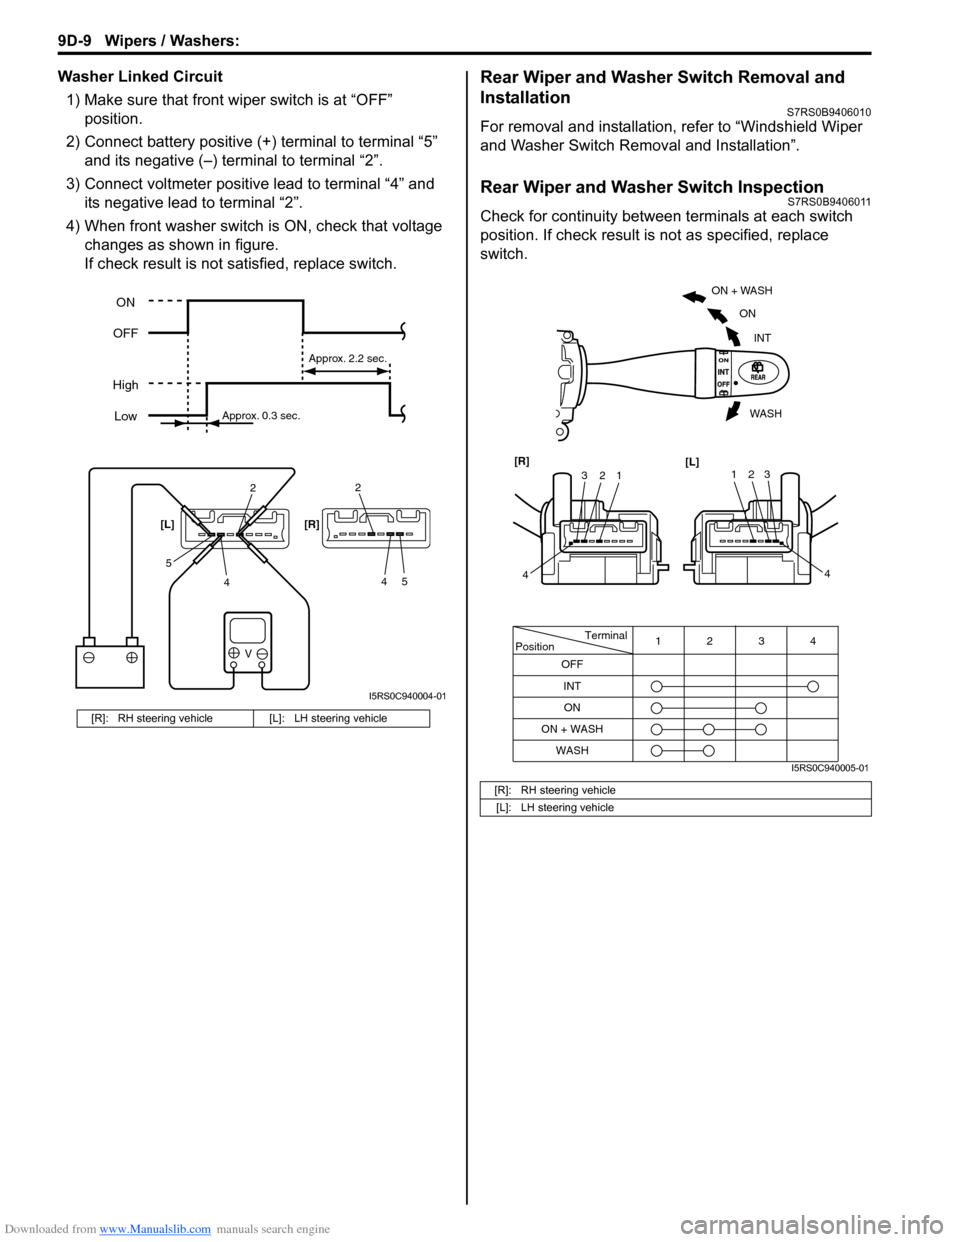
Washer Linked Circuit1) Make sure that front wiper switch is at “OFF” position.
2) Connect battery positive (+ ) terminal to terminal “5”
and its negative (–) terminal to terminal “2”.
3) Connect voltmeter positive lead to terminal “4” and its negative lead to terminal “2”.
4) When front washer switch is ON, check that voltage
changes as shown in figure.
If check result is not satisfied, replace switch.Rear Wiper and Washer Switch Removal and
Installation
S7RS0B9406010
For removal and installation, refer to “Windshield Wiper
and Washer Switch Removal and Installation”.
Rear Wiper and Washer Switch InspectionS7RS0B9406011
Check for continuity between terminals at each switch
position. If check result is not as specified, replace
switch.
[R]: RH steering vehicle [L]: LH steering vehicle
V
2
4
52
45
[L] [R]
ON
OFF
High Low
Approx. 0.3 sec. Approx. 2.2 sec.
I5RS0C940004-01
[R]: RH steering vehicle
[L]: LH steering vehicle
Terminal
Position
OFF
INT 4
3
12
WASH ON
ON + WASH
ON + WASH
INT
ON
WASH
123
4
[R]
[L]123
4
I5RS0C940005-01
Page 1361 of 1496
Downloaded from www.Manualslib.com manuals search engine Security and Locks: 9F-15
Keyless Entry Receiver and Its Circuit InspectionS7RS0B9606018
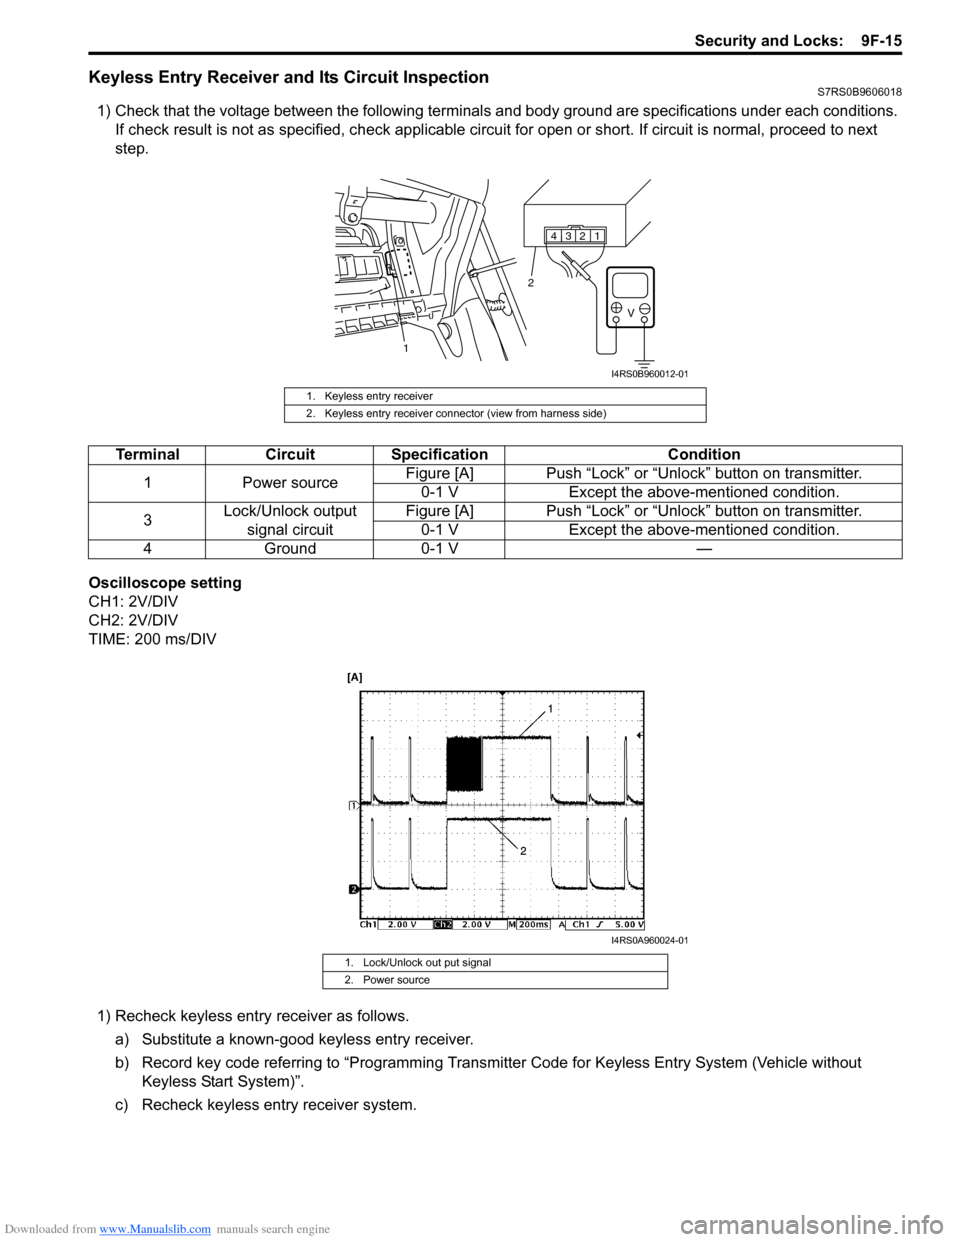
1) Check that the voltage between the following terminals and body ground are specifications under each conditions.
If check result is not as specified, ch eck applicable circuit for open or short. If circuit is normal, proceed to next
step.
Oscilloscope setting
CH1: 2V/DIV
CH2: 2V/DIV
TIME: 200 ms/DIV 1) Recheck keyless entry receiver as follows.
a) Substitute a known-good keyless entry receiver.
b) Record key code referring to “Programming Transmit ter Code for Keyless Entry System (Vehicle without
Keyless Start System)”.
c) Recheck keyless entry receiver system.
1. Keyless entry receiver
2. Keyless entry receiver connector (view from harness side)
1234
V
1 2
I4RS0B960012-01
Terminal
Circuit Specification Condition
1 Power source Figure [A] Push “Lock” or “Unlock” button on transmitter.
0-1 V Except the above-mentioned condition.
3 Lock/Unlock output
signal circuit Figure [A] Push “Lock” or “Unlock” button on transmitter.
0-1 V Except the above-mentioned condition.
4G ro un d0 -1 V —
1. Lock/Unlock out put signal
2. Power source
I4RS0A960024-01
Page 1382 of 1496

Downloaded from www.Manualslib.com manuals search engine 9K-5 Body Structure:
Side Body
Hole to hole distance
Hole to hole distance
I4RS0A9B0005-02
a (a’). Jig hole (φ 8 mm) e (e’). Rear door lower hinge installation rear hole i (i’). Jig hole ( φ 10 mm)
b (b’). Front door upper hinge installation upper hole f (f’). Rear door upper hinge installation upper hole j (j’). Rear door switc h installation hole (large hole)
c (c’). Front door lower hinge installation lower hole g (g’). Jig hole ( φ 10 mm) k (k’). Rear side sill scuff installation hole
d (d’). Bleeding hole h (h’). Curtain air bag clip installation hole
a-d: 1055 mm (41.54 in.) c-e: 1021 mm (40.20 in.) f-j: 835 mm (32.87 in.) a-f: 747 mm (29.41 in.) c-f: 1123 mm (44.21 in.) h-i: 601 mm (23.66 in.)
a-g: 378 mm (14.88 in.) d-g: 1129 mm (44.45 in.) h-j: 817 mm (32.17 in.)
b-c: 383 mm (15.08 in.) e-f: 354 mm (13.94 in.) h-k: 1097 mm (43.19 in.)
b-e: 1085 mm (42.72 in.) e-j: 946 mm (37.24 in.) i-k: 1153 mm (45.39 in.) b-f: 1061 mm (41.77 in.) f-i: 926 mm (36.46 in.)
a-a’: 1039 mm (40.91 in.) e-e’: 1474 mm (58.03 in.) i-i’: 1009 mm (39.72 in.)
b-b’: 1461 mm (57.52 in.) f-f’: 1468 mm (57.80 in.) j-j’: 1327 mm (52.24 in.) c-c’: 1489 mm (58.62 in.) g-g’: 1018 mm (40.08 in.) k-k’: 1472 mm (57.95 in.)
d-d’: 1472 mm (57.95 in.) h-h’: 1022 mm (40.24 in.)
Page 1424 of 1496
Downloaded from www.Manualslib.com manuals search engine 10B-21 Body Electrical Control System:
DTC B1170 (No. 1170): EEPROM Access ErrorS7RS0BA204012
DTC Detecting Condition and Possible Cause
DTC Troubleshooting
NOTE
Before performing steps below, be sure to perform “Body Electrical Control System Check”.
1) Ignition switch OFF.
2) Replace BCM.
3) Repeat BCM Check Flow Table.
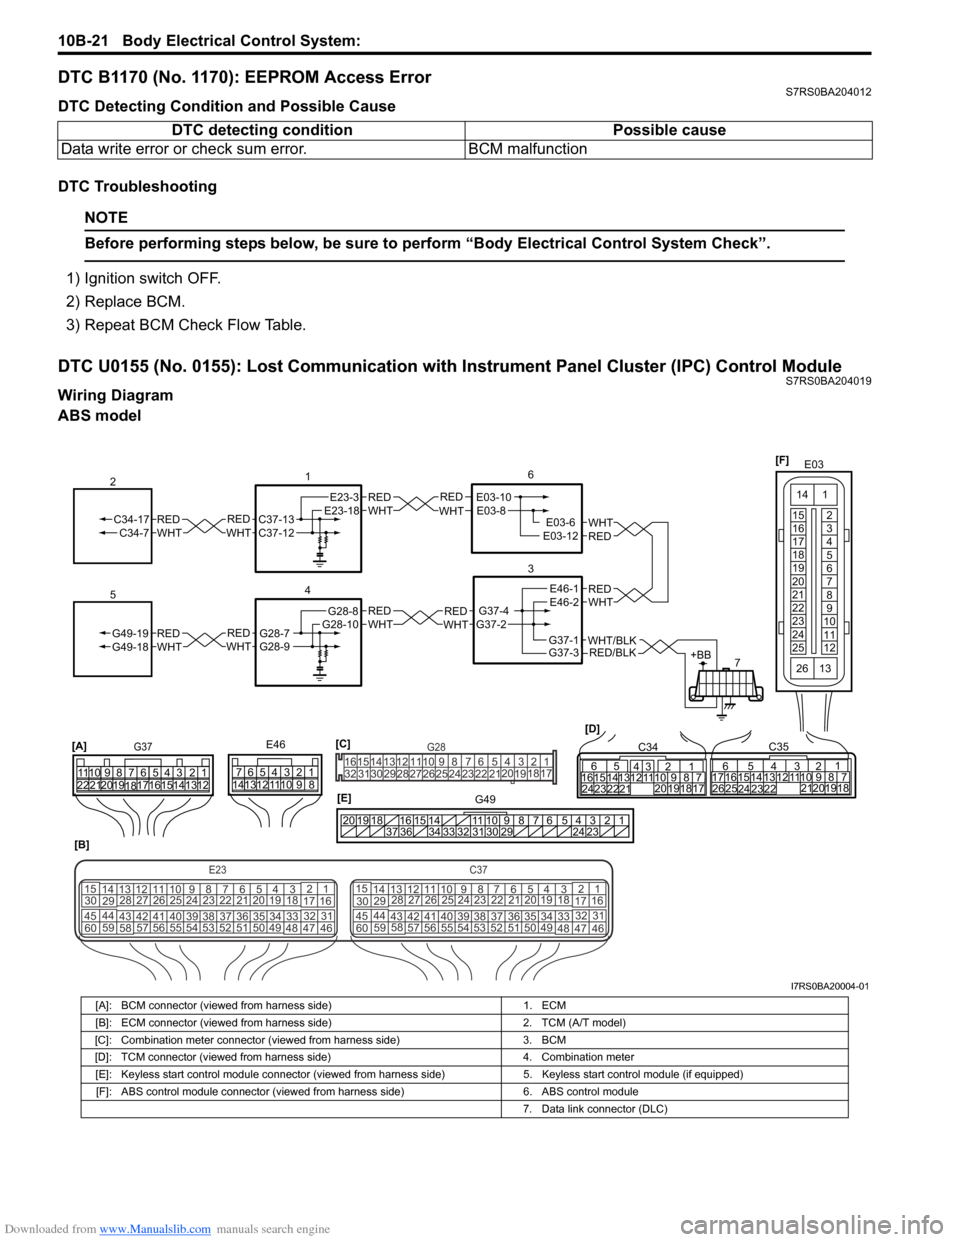
DTC U0155 (No. 0155): Lost Communication with Instrument Panel Cluster (IPC) Control ModuleS7RS0BA204019
Wiring Diagram
ABS model DTC detecting condition Possible cause
Data write error or check sum error. BCM malfunction
REDWHTE03-6E03-12
6
3
7
REDWHT
1
[B]
[A]
G37E46
1234567
1234567
8910
11
8910
11
121314 121314
151617
18
19202122 [D]65
1615 141312 11 43
2423 2122 10 9 8 7
21
1920 1817
C3417 16
26 2515 14
65 3
42
13 12
23 2224 1110 9
212019 87
18
1
C35
[E]
REDWHTC37-13C37-12REDWHTC34-17C34-7
2
12345678910
11
141516
36 34 33 32 31 30 29 24 23
37
181920
[C] [F]
G49
E23-3E23-18
4
REDWHTG28-7G28-9REDWHTG49-19G49-18
5
REDWHTE03-10E03-8
G37-4G37-2
REDWHTE46-1E46-2REDWHTREDWHTG28-8G28-10
E03
15
16
17
18
19
20
21
22
23
24
25 2
3
4
5
6
7
8
9
10
11
12
1
13
14
26
E23C37
34
1819
567
1011
17
20
47 46
495051
2122
52 16
25 9
24
14
29
5557 54 53
59
60 58 2
262728
15
30
56 4832 31
34353637
4042 39 38
44
45 43 41 33 1
1213
238
34
1819
567
1011
17
20
47 46
495051
2122
52 16
25 9
24
14
29
5557 54 53
59
60 58 2
262728
15
30
56 4832 31
34353637
4042 39 38
44
45 43 41 331
1213
238
G281234567
8
910111213141516
1718
19
20
212223242526272829303132
RED/BLKWHT/BLKG37-3G37-1+BB
I7RS0BA20004-01
[A]: BCM connector (viewed from harness side) 1. ECM
[B]: ECM connector (viewed from harness side) 2. TCM (A/T model)
[C]: Combination meter connector (viewed from harness side) 3. BCM
[D]: TCM connector (viewed from harness side) 4. Combination meter
[E]: Keyless start control module connector (viewed from harness side) 5. Keyless start control module (if equipped)
[F]: ABS control module connector (viewed from harness side) 6. ABS control module
7. Data link connector (DLC)
Page 1425 of 1496
Downloaded from www.Manualslib.com manuals search engine Body Electrical Control System: 10B-22
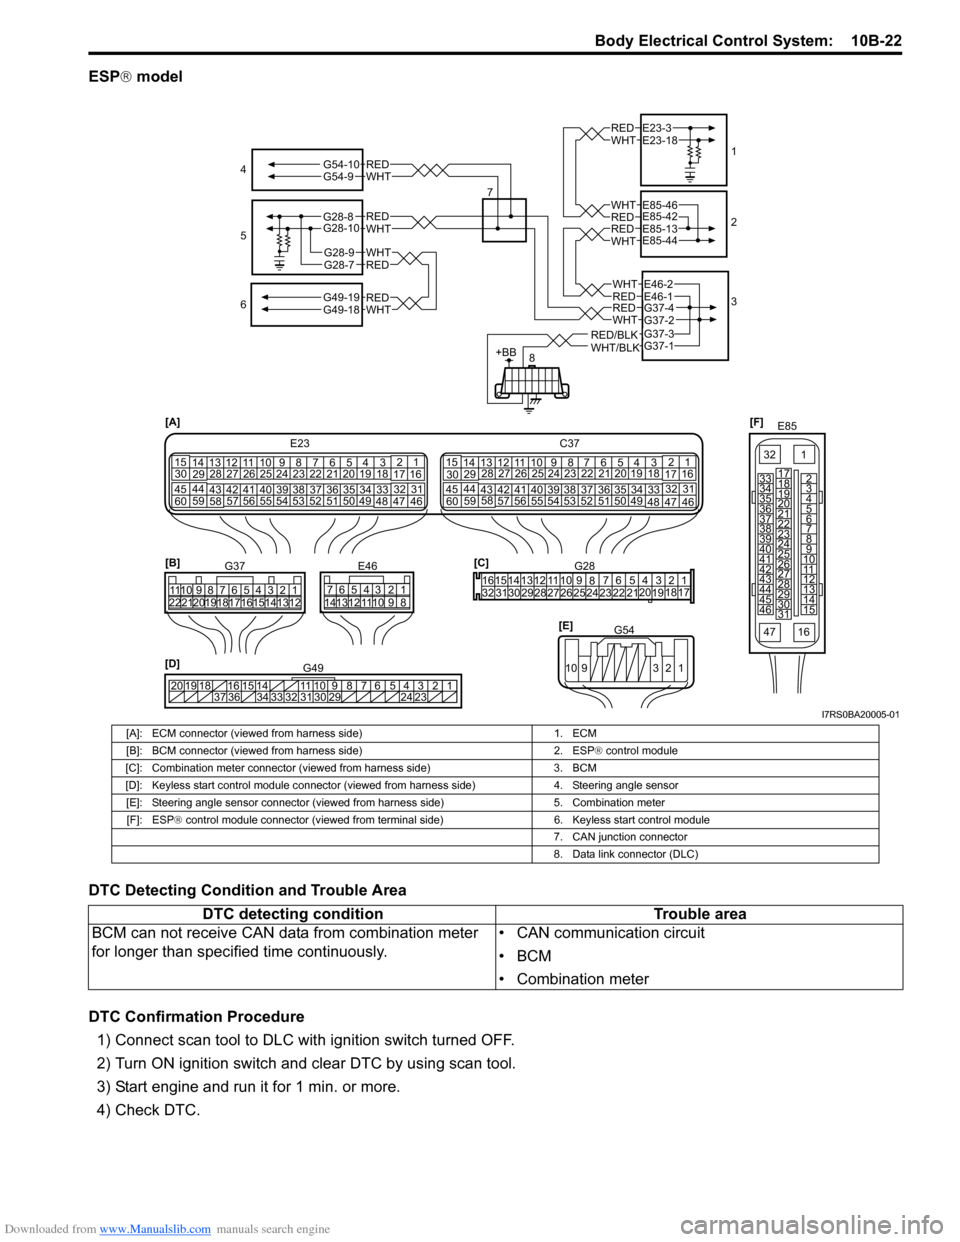
ESP® model
DTC Detecting Condition and Trouble Area
DTC Confirmation Procedure 1) Connect scan tool to DLC with ignition switch turned OFF.
2) Turn ON ignition switch and clear DTC by using scan tool.
3) Start engine and run it for 1 min. or more.
4) Check DTC.
[F] E85
161
15
2
3
4
5
6
7
8
9
10
11
12
13
14
17
18
19
20
21
22
23
24
25
26
27
28
29
30
31
3233
34
35
36
37
38
39
40
41
42
43
44
45
46
47
[D] 12345678910
11
141516
36 34 33 32 31 30 29 24 23
37
181920
G49
[A]
E23
C37
34
1819
567
10
11
17
20
47 46
495051
2122
52 16
25 9
24
14
29
5557 54 53
59
60 58 2
262728
15
30
56 4832 31
34353637
4042 39 38
44
45 43 41 331
1213
238
34
1819
567
10
11
17
20
47 46
495051
2122
52 16
25 9
24
14
29
5557 54 53
59
60 58 2
262728
15
30
56 4832 31
34353637
4042 39 38
44
45 43 41 331
12
13
238
[C]G28
1234567
8
910
11
1213141516
1718
19
20
212223242526272829303132
[E] G54
109 321
[B]
G37E46
1234567 1234567
8910
11
8910
11
121314 121314
1516171819202122
4
6 1
2
3
REDWHT
REDWHT
REDWHT
REDWHT
E23-3E23-18
E85-42E85-46
E85-13E85-44
G37-4G37-2
REDWHT
REDWHTG49-19G49-18
5
7
WHTG54-9REDG54-10
G28-8G28-10
G28-7REDG28-9WHT
RED/BLKWHT/BLK
REDWHTE46-1E46-2
G37-1G37-3
+BB8
I7RS0BA20005-01
[A]: ECM connector (viewed from harness side)
1. ECM
[B]: BCM connector (viewed from harness side) 2. ESP® control module
[C]: Combination meter connector (viewed from harness side) 3. BCM
[D]: Keyless start control module connector (viewed from harness side) 4. Steering angle sensor
[E]: Steering angle sensor connector (viewed from harness side) 5. Combination meter
[F]: ESP ® control module connector (viewed from terminal side) 6. Keyless start control module
7. CAN junction connector
8. Data link connector (DLC)
DTC detecting condition Trouble area
BCM can not receive CAN data from combination meter
for longer than specif ied time continuously. • CAN communication circuit
•BCM
• Combination meter